The theoretical capability of a 1,000-GPU cluster is staggering, but in practice, the hardware often spends more time "talking" than "thinking." In distributed training, the gradient synchronization phase is the bottleneck. If one node finishes its backward pass 10 minutes late, the entire cluster must wait, which causes prolonged idle compute time.
To turn a collection of isolated GPUs into a single cohesive learner, we rely on Message Passing Interface (MPI)-style collective operations. Specifically, All-Reduce—which sums gradients across all nodes and redistributes the result—must be executed with precision to prevent the network from becoming a graveyard for throughput.
In this article, we move from theory to implementation. We will look deeper into gradient synchronization, explore the core MPI primitives that power it, and walk through a production-ready Pytorch implementation using the torch.distributed backend to bridge the gap between code and massive-scale hardware.
The mechanics of gradient synchronization
When training large models across multiple GPUs or systems, we need to synchronize the gradients to ensure every worker is updated with the same information before the next training step. Large language models (LLMs) typically rely on four primary parallelization methods, implemented individually or in combination.
Data parallelism
This approach functions like a network of identical factories. Every GPU or system maintains a complete copy of the model, but each handles a unique set of training data. For example, if you process 1,000 sentences across a two-GPU setup, GPU 0 runs sentences 1 through 500, while GPU 1 processes sentences 501 through 1,000. After calculating gradients locally on the system, the cards use MPI_Allreduce to average their findings across the entire cluster. Engineers typically use this method when models can fit entirely on a single graphics card.
Tensor parallelism
Often described as split mathematics, tensor parallelism divides an individual layer's workload across multiple GPUs. Instead of one GPU doing a massive math calculation, two cards can handle half of the computation each. For example, if a single layer requires a matrix multiplication of 10,000 by 10,000, GPU 0 can process the left 5,000 columns while GPU 1 processes the right 5,000 columns. To resolve the final output for that specific layer, the processors must communicate immediately using MPI_Allgather before moving to the next layer.
Pipeline parallelism
Pipeline parallelism splits a model vertically by layers, operating much like a standard assembly line. For instance, GPU 0 handles the first half of the model's layers and GPU 1 handles the second half. Data enters GPU 0, undergoes initial processing, and passes the results to GPU 1 using MPI_Send. While GPU 1 finishes processing, GPU 0 starts on the next sequence.
Sharded data parallelism
Instead of requiring every processor to maintain a full copy of the model, sharded data parallelism assigns only a specific fraction of the model to each GPU. For example, if a model contains four blocks, GPU 0 might store block 1, while GPU 1 stores block 2. When GPU 0 needs to run a calculation that requires block 2, it temporarily copies the block from GPU 1 via a high-speed MPI broadcast, executes the workload, and then discards the data to free up memory. This technique delivers the throughput benefits of traditional data parallelism without the massive memory overhead.
Now that you have a clear understanding of how MPI structures distributed training, you might wonder how present-day GPUs communicate through it. Does this communication introduce extra overhead, and how do modern-day GPUs minimize it?
Minimize PCIe overhead with GPU-aware MPI
In a standard MPI setup, you cannot pass GPU pointers directly to an MPI function because the CPU does not know how to read that memory directly. You must manually copy data from the GPU to the host first:
// Sender
cudaMemcpy(host_buffer, device_buffer, size, cudaMemcpyDeviceToHost);

MPI_Send( host_buffer, size, MPI_FLOAT, 1, 0, MPI_COMM_WORLD);

//Receiver
MPI_Recv( host_buffer, size, MPI_FLOAT, 0, 0, MPI_COMM_WORLD, MPI_STATUS_IGNORE);

cudaMemcpy(device_buffer, host_buffer, size, cudaMemcpyHostToDevice);
This process is slow because it moves data across the PCIe bus twice just to reach the network card.
With a GPU-aware MPI implementation, you pass the device pointer directly. The MPI library detects that the pointer belongs to the GPU and uses technologies like GPUDirectRDMA to move it.
MPI_Send(device_ptr, size, MPI_FLOAT, 1, 0, MPI_COMM_WORLD);

MPI_Recv( device_ptr, size, MPI_FLOAT, 0, 0, MPI_COMM_WORLD, MPI_STATUS_IGNORE
Remote Direct Memory Access (RDMA) is the underlying technology that makes GPU-aware MPI fast. It allows hardware to talk directly to hardware. Because data bypasses the CPU and the operating system (OS), it stays in user space rather than entering the OS kernel. Furthermore, data isn't copied to multiple temporary buffers; it moves directly from the source memory to the destination.
The following step-by-step process outlines what happens behind the scenes:
- Memory pinning: The MPI library pins a section of the GPU memory. This basically means that the OS will not move the data to another location, allowing the network card to identify exactly where the data resides.
- Registration: The MPI library provides the physical address of that GPU memory to the network interface card (NIC).
- Direct jump: When you call
MPI_send, the NIC reaches across the PCIe bus, retrieves the data directly from the GPU VRAM, and pushes it across the network. - Receiving: On the receiving side, the NIC takes the incoming data and writes it directly into the destination GPU VRAM.
Libraries like NCCL and XCCL use similar concepts to communicate with vendor-specific GPUs.
Map out the PyTorch distributed workflow
The torch.distributed package includes an extension to use MPI. As illustrated in Figure 1, the distributed training initialization program maps out a clear path across hardware nodes to partition data and synchronize model states. Before exploring how to set up GPU-aware MPI and running an example, let us look at the workflow for MPI-based distributed training in PyTorch:
- Launching the training script: Specify the number of processes to launch. The system handles GPU allotment as each process is assigned to a graphics card.
Rank assignment: The initalization process connects all processes within the MPI environment and assigns each a unique rank. This step establishes a communication channel for exchanging information. To attach individual processes to the group, configure the local rank and target device:
local_rank = rank % torch.cuda.device_count() device = torch.device(f”cuda:{local_rank}”) torch.cuda.set_device(device)- Data loading: Load the data into each rank. The exact method for distributing this data is left to the developer's discretion.
- Wrapping the model in DDP: Wrap the model in Distributed Data Parallel (DDP) to synchronize gradients. DDP connects to the allocated GPUs and directs MPI to orchestrate the sending and receiving of gradients across devices.
- Training loop*:* During the forward pass, calculations execute locally on each GPU without network communication. During the backward pass, the system shares and reduces gradients across the network using an all_reduce operation. Optimization then occurs on the local GPU using the specified learning rate, keeping the weights identical across nodes.
- Metrics calculation: Post-training validation metrics, such as accuracy, also utilize MPI all-reduce operations to consolidate results.
Checkpointing: Use
dist.barrier()to make sure all ranks finish processing before saving the model from a single designated rank and safely destroying the MPI process groups.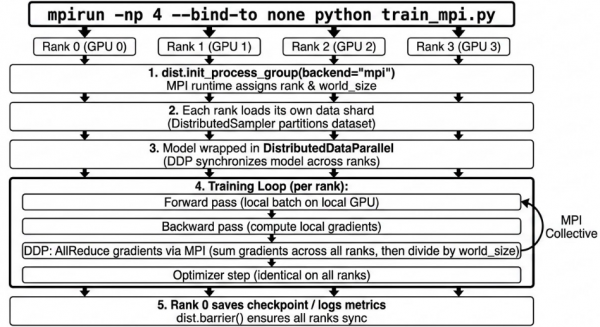
Figure 1: Workflow steps for distributed model training using the torch.distributed package with an MPI backend.

Build PyTorch from source with MPI support
To make PyTorch aware of MPI, we need to build PyTorch from source with MPI support.
The following shell commands build Open MPI with CUDA support:
wget https://download.open-mpi.org/release/open-mpi/v5.0/openmpi-5.0.10.tar.gz
tar xzf openmpi-5.0.10.tar.gz
cd openmpi-5.0.10
./configure --with-cuda=/usr/local/cuda --prefix=/opt/openmpi-cuda
make -j$(nproc)
make install
ldconfig
Next, verify that MPI supports CUDA.
/ $ /opt/openmpi-cuda/bin/ompi_info --parsable --all | grep mpi_built_with_cuda_support:value
mca:mpi:base:param:mpi_built_with_cuda_support:value:true
/ $
If an older version of MPI is already installed without CUDA support, remove it. Then, create a symbolic link to the new MPI installation directory to prevent path conflicts when building PyTorch.
Configure the required environment variables for MPI:
export PATH=/opt/openmpi-cuda/bin:$PATH
export LD_LIBRARY_PATH=/opt/openmpi-cuda/lib:/usr/local/cuda/lib64
export MPI_HOME=/opt/openmpi-cuda
export MPI_INCLUDE=/opt/openmpi-cuda/include
export MPI_LIB=/opt/openmpi-cuda/lib
Build PyTorch from source:
cd pytorch
USE_MPI=1 USE_CUDA=1 MAX_JOBS=8 pip install -e . -v --no-build-isolation
Verify PyTorch is MPI-aware:
/pytorch $ python -c "import torch; print('MPI available:', torch.distributed.is_mpi_available())"
MPI available: True
/pytorch $
Run a distributed training workload on MNIST
I trained a small model on the MNIST dataset using distributed MPI training across five epochs. You can run the training script on your system to see the performance results.
/pytorch $ mpirun -np 2 --allow-run-as-root --bind-to none python ../train_mpi_distributed.py
--------------------------------------------------------------------------
PMIx was unable to find a usable compression library
on the system. We will therefore be unable to compress
large data streams. This may result in longer-than-normal
startup times and larger memory footprints. We will
continue, but strongly recommend installing zlib or
a comparable compression library for better user experience.

You can suppress this warning by adding "pcompress_base_silence_warning=1"
to your PMIx MCA default parameter file, or by adding
"PMIX_MCA_pcompress_base_silence_warning=1" to your environment.
--------------------------------------------------------------------------
World size: 2, Device: cuda:0
GPUs per node: 1
Train: 60000 samples, ~30000 per rank
Test:  10000 samples, ~5000 per rank
Epoch [1/5]  Train Loss: 0.2621  Train Acc: 92.0%  Test Acc: 98.3%  Time: 5.34s
Epoch [2/5]  Train Loss: 0.0720  Train Acc: 97.8%  Test Acc: 98.7%  Time: 5.12s
Epoch [3/5]  Train Loss: 0.0531  Train Acc: 98.4%  Test Acc: 99.1%  Time: 5.12s
Epoch [4/5]  Train Loss: 0.0430  Train Acc: 98.7%  Test Acc: 99.0%  Time: 5.14s
Epoch [5/5]  Train Loss: 0.0345  Train Acc: 98.9%  Test Acc: 99.1%  Time: 5.12s
Model saved to ./data/mnist_mpi_model.pt
/pytorch $
MPI is one of the backends in torch.distributed, alongside options like gloo and nccl. You can explore other supported backends to see how they compare with MPI.
Address cross-vendor GPU communication limits
In PyTorch, multi-vendor communication isn't automatic across different GPU stacks. Each device type maps to its own backend (such as NCCL for CUDA GPUs, XCCL for XPU GPUs, and Gloo for CPU) and processes the backend appropriate to the tensor's device.
There is experimental multi-backend support that lets a single process group use different backends per device type (for example, cpu:gloo or cuda:nccl), but that configuration still assumes each tensor remains on a device type that supports the backend.
So for cross-vendor GPU communication (for example, from CUDA to XPU), the built-in path is generally to move tensors to the CPU and use a CPU backend (such as Gloo or MPI) or use a custom or third-party backend that supports a mixed-vendor architecture.
This presents an opportunity for researchers to build cross-vendor GPU communication models and establish standards so that new vendors do not duplicate core engineering efforts in PyTorch.
Key takeaways for low-latency training
Distributed training is a battle of latency. This article demonstrates how MPI provides the essential framework to address these performance bottlenecks. The shift toward GPU-aware MPI forms the basis of modern GPU communication libraries such as NCCL, XCCL, and Gloo, which minimizes overhead by moving data directly between VRAM across nodes. Whether handled manually or through frameworks like PyTorch, MPI remains the industry standard for transforming a cluster of machines into a single, synchronized engine for AI.