To improve the performance of AI and agentic applications on domain-specific enterprise tasks, organizations are increasingly adopting distributed fine-tuning of foundation models. The primary challenge for this lies in efficiently coordinating computation and communication across GPUs and nodes. Gradients must be synchronized, data must be partitioned effectively, and the overhead of communication can create significant bottlenecks that slow down training. Additionally, practitioners must navigate complex trade-offs between different parallelism strategies while ensuring throughput efficiency, cost, and fault tolerance. In this blog, we highlight how you can leverage fms-hf-tuning for expert parallelism training of Mixture of Experts (MoE) models on Red Hat OpenShift AI.
Open source tuning with fms-hf-tuning
Built as a wrapper on top of PyTorch FSDP and Hugging Face libraries, fms-hf-tuning is an open source tuning library. It supports full fine-tuning, LoRA, and QLoRA of language and vision-language models. It offers some unique features:
- Preprocessing data based on a config specification: You can preprocess data using a simple YAML config file with support for multiple datasets, multiple file formats including parquet, jsonl, CSV (all formats supported by HF Datasets), sampling, applying chat templates, renaming columns, and so on.
- Throughput and memory efficiency features: Padding-free tuning, fused operations, triton kernels, and MoE kernels.
- Distributed training: Uses protocols such as FSDPv2 and expert parallel.
- Declarative training control: Takes specific actions (such as checkpointing, stop training) based on rules (for example, loss not reducing) enforced at specified intervals (such as the end of an epoch or step).
Mixture of experts kernels, and expert parallelism
Training of MoE models with fms-hf-tuning is improved using two key optimizations:
- Kernels for MoE module
- Expert parallelism
Both of these optimizations are maintained in the fms-acceleration project, a subproject of fms-hf-tuning that hosts several tuning optimizations.
MoE kernels
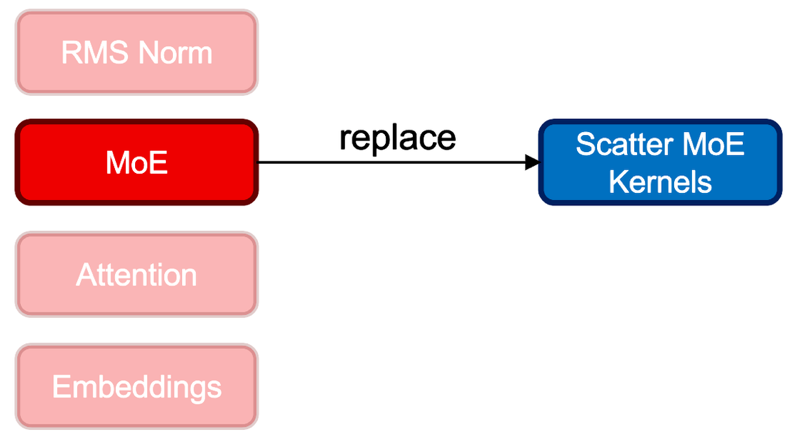
When you use fms-hf-tuning, it performs a drop-in replacement of an existing MoE module with scatter mode kernels, while keeping the parameter composition intact. This optimization aims to provide training GPU memory savings and throughput enhancement. Specifically, for the Granite 4.0 MoE class of models, the GraniteMoeHybridMoE module is replaced with kernels and corresponding experts (input_linear and output_linear), and router weights are mapped. Upon training, learned weights are mapped back to GraniteMoeHybridMoE, and the original architecture is maintained. This feature can be activated by setting the fast_moe argument to True.
Expert parallelism

Also, fms-hf-tuning provides throughput enhancements through expert parallelism which is a distributed training technique where each GPU device hosts a subset of experts. All experts execute in parallel across GPUs and receive a respective set of tokens from all the data batches through all2all communication. Expert parallelism can be enabled along with MoE kernels allowing to realize benefits from both the optimizations. This feature can be activated by setting the fast_moe argument to the expert parallel degree.
Tuning Granite 4 tiny and small MoE hybrid models
Training is performed on Red Hat OpenShift AI using Kubeflow Trainer. You can copy the training script examples into a Jupyter notebook provisioned by OpenShift AI and run them.
Models
- Granite 4.0 tiny hybrid MoE model (model id: https://huggingface.co/ibm-granite/granite-4.0-h-tiny)
- Granite 4.0 small hybrid MoE model (model id: https://huggingface.co/ibm-granite/granite-4.0-h-small)
Prerequisites
To replicate our examples, you must have:
- A Red Hat OpenShift instance with eight A100 80 GB GPUs (ideally on one node, to reduce multi-node communication overhead)
- GPU nodes should have at least 16 CPUs and 512 GB of memory.
- OpenShift AI 3.2.0 or later with KServe, workbenches, dashboard, and trainer components enabled.
- A project in the OpenShift AI dashboard.
- 2 cluster storages in the OpenShift AI dashboard with the names
trained-model(used for storing trained model) andscratch-volume(used for storing cached and temporary files during training). Both volumes must be 500 GB in size. - PyTorch workbench from the OpenShift AI dashboard with default values (hardware profile doesn't need to provide GPU).
Prepare the dataset
For training, we used dataset epfl-dlab/gsm8k, a variant of the popular openai/gsm8k.
This dataset provides a question/answer list of mathematical word problems. The expected answer is provided with specific syntax for computation parts and the result highlighted.
Running a training job
Choose one of the following approaches:
- Full fine-tuning: For adjusting the whole model
- LoRA: For creation of an adapter to be applied on the base model.
This training is performed on a tiny model. To use a small model, replace the specified model in model_name_or_path parameter.
To perform the training, open a workbench in your browser by clicking the new page icon in the Workbenches section of the Red Hat OpenShift AI dashboard for your project. Run the code samples below in a Python notebook file.
Running a training job: Full fine-tuning
First, you must install the Kubeflow SDK (for Trainer v2 API support) if it's not already available in your workbench:
!pip install -U kubeflowSpecify all configurations for training jobs using fms-hf-tuning. This configuration is passed as an environment variable into the training job.
sft_trainer_config = '''{
    "accelerate_launch_args": {
        "use_fsdp": true,
        "fsdp_version": 2,
        "fsdp_auto_wrap_policy": "TRANSFORMER_BASED_WRAP",
        "fsdp_sharding_strategy": "FULL_SHARD",
        "fsdp_state_dict_type": "SHARDED_STATE_DICT",
        "fsdp_cpu_ram_efficient_loading": true
      },
    "model_name_or_path": "ibm-granite/granite-4.0-h-tiny",
    "training_data_path": "epfl-dlab/gsm8k",
    "validation_data_path": "epfl-dlab/gsm8k",
    "output_dir": "/mnt/output/model",
    "save_model_dir": "/mnt/output/model",
    "num_train_epochs": 3.0,
    "per_device_train_batch_size": 32,
    "per_device_eval_batch_size": 32,
    "gradient_accumulation_steps": 1,
    "gradient_checkpointing": true,
    "save_strategy": "epoch",
    "learning_rate": 2e-5,
    "weight_decay": 0.0,
    "lr_scheduler_type": "cosine",
    "include_tokens_per_second": true,
    "data_formatter_template": "### Question:{{question}} \\n\\n### Answer: {{answer}}",
    "response_template": "\\n### Answer:",
    "fast_moe": 4,
    "torch_dtype": "bfloat16",
    "max_seq_length": 4096
}'''
Alternatively, it's possible to refer to your fms-hf-tuning configuration from the filesystem by mounting it, for example, as a ConfigMap.
To use the configuration in a training job, it must be encoded to base64:
import base64
def encode_config(config):
    base64_bytes = base64.b64encode(config.encode("ascii"))
    txt = base64_bytes.decode("ascii")
    return txt
encoded_config = encode_config(sft_trainer_config)
Now create a training job. In this case, use TrainJob provided by the Trainer v2 operator. TrainJob is created using the Kubeflow SDK (replace the token using your OpenShift token with appropriate access):
from kubernetes import client
from kubeflow.trainer import TrainerClient
from kubeflow.common.types import KubernetesBackendConfig
api_server = "https://kubernetes.default.svc"
token = "<replace by OpenShift token with rights to create TrainJob>"
configuration = client.Configuration()
configuration.host = api_server
configuration.api_key = {"authorization": f"Bearer {token}"}
# Un-comment if your cluster API server uses a self-signed certificate or an un-trusted CA
# configuration.verify_ssl = False
backend_config = KubernetesBackendConfig(client_configuration=configuration)
tc = TrainerClient(backend_config=backend_config)
To mounting the defined persistent volumes to store scratch data and trained models:
from kubeflow.trainer.types import types
from kubeflow.trainer.options.kubernetes import (
    PodTemplateOverrides,
    PodTemplateOverride,
    PodSpecOverride,
    ContainerOverride,
)
# Create a CustomTrainerContainer for the training job
trainer = types.CustomTrainerContainer(
    image="quay.io/foundation-model-stack/fms-hf-tuning:v3.1-rc",
    env={
        "HF_HOME": "/mnt/scratch/hf_home",
        "SFT_TRAINER_CONFIG_JSON_ENV_VAR": encoded_config,
    },
    num_nodes=1,
    resources_per_node={
        "memory": "160Gi",
        "cpu": "8",
        "nvidia.com/gpu": "4"
    },
)
# Define pod template overrides for volumes and volume mounts
pod_override = PodTemplateOverride(
    target_jobs=["node"],  # Apply to training node pods
    spec=PodSpecOverride(
        volumes=[
            {
                "name": "trained-model",
                "persistentVolumeClaim": {"claimName": "trained-model"}
            },
            {
                "name": "scratch-volume",
                "persistentVolumeClaim": {"claimName": "scratch-volume"}
            },
        ],
        containers=[
            ContainerOverride(
                name="node",
                volume_mounts=[
                    {"name": "trained-model", "mountPath": "/mnt/output"},
                    {"name": "scratch-volume", "mountPath": "/mnt/scratch"},
                ],
            )
        ],
    )
)
# Use the train() method with pod template overrides
job_id = tc.train(
    trainer=trainer,
    options=[PodTemplateOverrides(pod_override)]
)
Wait until the training job finishes:
# Wait for the training job to complete
train_job = tc.wait_for_job_status(name=job_id)
# Check the job status
if train_job.status == "Complete":
    print("Job is successful \n")
elif train_job.status == "Failed":
    print("Job failed, please check Pod logs \n")
else:
    print(f"Job ended with status: {train_job.status}\n")
The trained model is stored in the trained-model PersistentVolume.
Running a training job: LoRA
LoRA uses the same approach as full fine-tuning, passing the configuration using environment variables. If you ran full fine-tuning first and then run LoRA, you must provide dedicated cluster storage (the PersistentVolume) for the trained model to avoid overriding your full fine-tuned model.
First, install the Kubeflow SDK (for Trainer v2 API support) if it's not already available in your workbench:
!pip install -U kubeflowConfiguration is largely the same as for full fine-tuning, although it contains additional LoRA specific parameters.
sft_trainer_config = '''{
    "accelerate_launch_args": {
        "use_fsdp": true,
        "fsdp_version": 2,
        "fsdp_auto_wrap_policy": "TRANSFORMER_BASED_WRAP",
        "fsdp_sharding_strategy": "FULL_SHARD",
        "fsdp_state_dict_type": "SHARDED_STATE_DICT",
        "fsdp_cpu_ram_efficient_loading": true
      },
    "model_name_or_path": "ibm-granite/granite-4.0-h-tiny",
    "training_data_path": "epfl-dlab/gsm8k",
    "validation_data_path": "epfl-dlab/gsm8k",
    "output_dir": "/mnt/output/model",
    "save_model_dir": "/mnt/output/model",
    "num_train_epochs": 3.0,
    "per_device_train_batch_size": 32,
    "per_device_eval_batch_size": 32,
    "gradient_accumulation_steps": 1,
    "gradient_checkpointing": true,
    "save_strategy": "epoch",
    "learning_rate": 2e-4,
    "weight_decay": 0.0,
    "lr_scheduler_type": "cosine",
    "include_tokens_per_second": true,
    "data_formatter_template": "### Question:{{question}} \\n\\n### Answer: {{answer}}",
    "response_template": "\\n### Answer:",
    "fast_moe": 4,
    "torch_dtype": "bfloat16",
    "max_seq_length": 4096,
    "peft_method": "lora",
    "r": 8,
    "lora_dropout": 0.05,
    "lora_alpha": 32,
    "target_modules": ["q_proj", "v_proj", "k_proj", "o_proj"],
    "lora_post_process_for_vllm": true
}'''
Encode into base64:
# Convert training configuration to base64 representation to pass it using environment variable
import base64
def encode_config(config):
    base64_bytes = base64.b64encode(config.encode("ascii"))
    txt = base64_bytes.decode("ascii")
    return txt
encoded_config = encode_config(sft_trainer_config)
Create the training job using the Kubeflow SDK, as with full fine-tuning:
from kubernetes import client
from kubeflow.trainer import TrainerClient
from kubeflow.common.types import KubernetesBackendConfig
api_server = "https://kubernetes.default.svc"
token = "<replace by OpenShift token with rights to create TrainJob>"
configuration = client.Configuration()
configuration.host = api_server
configuration.api_key = {"authorization": f"Bearer {token}"}
# Un-comment if your cluster API server uses a self-signed cert or un-trusted CA
# configuration.verify_ssl = False
backend_config = KubernetesBackendConfig(client_configuration=configuration)
tc = TrainerClient(backend_config=backend_config)
from kubeflow.trainer.types import types
from kubeflow.trainer.options.kubernetes import (
PodTemplateOverrides,
PodTemplateOverride,
PodSpecOverride,
ContainerOverride,
)
# Create a CustomTrainerContainer for the training job to use fms-hf-tuning image
trainer = types.CustomTrainerContainer(
image="quay.io/foundation-model-stack/fms-hf-tuning:v3.1-rc",
env={
"HF_HOME": "/mnt/scratch/hf_home",
"SFT_TRAINER_CONFIG_JSON_ENV_VAR": encoded_config,
},
num_nodes=1,
resources_per_node={
"memory": "160Gi",
"cpu": "8",
"nvidia.com/gpu": "4"
},
)
# Define pod template overrides for volumes and volume mounts
pod_override = PodTemplateOverride(
target_jobs=["node"],
spec=PodSpecOverride(
volumes=[
{
"name": "trained-model",
"persistentVolumeClaim": {"claimName": "trained-model"}
},
{
"name": "scratch-volume",
"persistentVolumeClaim": {"claimName": "scratch-volume"}
},
],
containers=[
ContainerOverride(
name="node",
volume_mounts=[
{"name": "trained-model", "mountPath": "/mnt/output"},
{"name": "scratch-volume", "mountPath": "/mnt/scratch"},
],
)
],
)
)
job_id = tc.train(
trainer=trainer,
options=[PodTemplateOverrides(pod_override)]
)Wait until the training job finishes:
# Wait for the training job to complete
train_job = tc.wait_for_job_status(name=job_id)
# Check the job status
if train_job.status == "Complete":
    print("Job is successful \n")
elif train_job.status == "Failed":
    print("Job failed, please check Pod logs \n")
else:
    print(f"Job ended with status: {train_job.status}\n")
The resulting LoRA adapter is stored in the trained-model PersistentVolume.
Adapter merging
Due to a known bug, you must reformat the trained adapter using the code below. Make sure that the referenced path is available in your workbench:
!pip install -U safetensorsfrom safetensors.torch import load_file, save_file
save_file({f"base_model.model.{k}": v for k, v in load_file("model/model/hf_converted_checkpoint/adapter_model.safetensors").items()},
"model/model/hf_converted_checkpoint/adapter_model.safetensors")vLLM currently does not support fused MoE LoRA inference. To serve trained LoRA adapters, you must merge trained adapters with base models. Adapter merging takes quite a lot of memory, so you can run it as a dedicated TrainJob.
The merging script:
def train_func():
    import torch
    from peft import AutoPeftModelForCausalLM
    from transformers.models.auto.tokenization_auto import AutoTokenizer
    # Load and merge model on CPU
    peft_model = AutoPeftModelForCausalLM.from_pretrained(
        "/mnt/output/model/hf_converted_checkpoint",
        torch_dtype="bfloat16"
    )
    # Merge and unload on CPU
    model = peft_model.merge_and_unload()
    # Save the merged model
    model.save_pretrained("/mnt/output/model/merged_model")
    # Load and save tokenizer (tokenizer operations are not GPU-dependent)
    tokenizer = AutoTokenizer.from_pretrained("/mnt/output/model/hf_converted_checkpoint")
    tokenizer.save_pretrained("/mnt/output/model/merged_model")
This script runs on training runtime, provided by OpenShift AI, which contains all the necessary dependencies to run the script:
from kubeflow.trainer.types import types
from kubeflow.trainer.options.kubernetes import (
    PodTemplateOverrides,
    PodTemplateOverride,
    PodSpecOverride,
    ContainerOverride,
)
# Create a CustomTrainer for the LoRA merge job (uses train_func)
merge_trainer = types.CustomTrainer(
    func=train_func,
    num_nodes=1,
    resources_per_node={
        "memory": "160Gi",
        "cpu": "4"
    },
    env={
        "HF_HOME": "/mnt/scratch/hf_home",
    },
)
# Define pod template overrides for volumes and volume mounts
merge_pod_override = PodTemplateOverride(
    target_jobs=["node"],
    spec=PodSpecOverride(
        volumes=[
            {
                "name": "trained-model",
                "persistentVolumeClaim": {"claimName": "trained-model"}
            },
            {
                "name": "scratch-volume",
                "persistentVolumeClaim": {"claimName": "scratch-volume"}
            },
        ],
        containers=[
            ContainerOverride(
                name="node",
                volume_mounts=[
                    {"name": "trained-model", "mountPath": "/mnt/output"},
                    {"name": "scratch-volume", "mountPath": "/mnt/scratch"},
                ],
            )
        ],
    )
)
merge_job_id = tc.train(
    runtime="torch-distributed",
    trainer=merge_trainer,
    options=[PodTemplateOverrides(merge_pod_override)]
)
Wait until the merging job finishes:
# Wait for the merge job to complete
merge_job = tc.wait_for_job_status(name=merge_job_id)
# Check the job status
if merge_job.status == "Complete":
    print("LoRA merge job is successful \n")
elif merge_job.status == "Failed":
    print("LoRA merge job failed, please check Pod logs \n")
else:
    print(f"LoRA merge job ended with status: {merge_job.status}\n")
Throughput
For the provided configuration, with training running on one pod with 4x A100 GPU nodes, fms-hf-tuning is able to process 590 tokens per GPU, per second.
Serve the fine-tuned Granite 4.0 models
For common model serving use cases, you can use the OpenShift AI dashboard to create model-serving resources. You must:
- Create a hardware profile in the OpenShift AI dashboard, in Settings > Environment setup > Hardware profiles
- This hardware profile must provide at least 16 GB of memory and at least 1 GPU (for example, A100)
Serving trained model
In the OpenShift AI dashboard, open the Deployments section, and start model deployment by clicking the Deploy model button, as shown in Figure 3.

In the Model location drop-down menu, select Cluster storage and choose trained-model. For the Model path, provide the path to where the model is stored, as shown in Figure 4. In this article, the paths are:
- Full fine-tuning:
model/hf_converted_checkpoint - LoRA:
model/merged_model

On the next page, fill in the Model deployment name (such as granite4), and the Hardware profile with the GPU, as shown in Figure 5.

In the Advanced settings (shown in Figure 6) page, you can specify additional configuration, such as external access to the deployed model.

On the next page, confirm model configuration and deploy it, as shown in Figure 7.

Once the predictor pod is up and running, you can go back to the OpenShift AI Deployments page, to find the external endpoint URL and token secret value. These values can be used to connect to the model to send requests. You can use Jupyter notebook to communicate with the model.
First, install the openai module:
%pip install -qqU openaiThen use OpenAI to send a prompt to the model, and to print the response:
from openai import OpenAI
# Put here token secret and endpoint URL
api_key = "<replace with token secret>"
base_url = "<replace with endpoint URL>/v1"
client = OpenAI(
    api_key=api_key,
    base_url=base_url,
)
completion = client.chat.completions.create(
  model="granite4",
  messages=[
    {"role": "user", "content": "Janet's ducks lay 16 eggs per day. She eats three for breakfast every morning and bakes muffins for her friends every day with four. She sells the remainder at the farmers' market daily for $2 per fresh duck egg. How much in dollars does she make every day at the farmers' market?"}
  ]
)
print(completion.choices[0].message.content)
The model response is aligned to provide response style and formatting as defined in the training dataset.
Try fms-hf-tuning
In this article, you've learned how to use fms-hf-tuning, the open source tuning library for PyTorch FSDP and Hugging Face libraries, for expert parallelism training of Mixture of Experts (MoE) models on Red Hat OpenShift AI. Run some experiments of your own, and then start using it to improve how your organization is preprocessing data, utilizing memory, and performing distributed training and expert parallelism.