Over the past year, I have been implementing an automated infrastructure to test the SystemTap project and to collect and analyze the test results. SystemTap is a scripting language for creating instrumentation to observe a live running Linux kernel and user-space applications. The SystemTap language translator produces Linux kernel modules. These modules depend on internal details of the Linux kernel that vary significantly between different versions of Linux.
The process of developing the SystemTap project and maintaining it for a wide range of Linux kernel versions requires a strategy to detect and fix unexpected bugs. Bugs can arise not only from changes in the SystemTap project, but also from changes in newer versions of the Linux kernel.
In order to verify the safety and correct behavior of SystemTap, the SystemTap project includes a test suite based on the DejaGnu framework. However, up to now there was no system for running this test suite each time someone made a commit to the SystemTap Git repository. An infrastructure that automatically runs the test suite and reports new test failures would be very helpful for detecting and fixing bugs as early as possible during the SystemTap development process.
This article is the first of two articles summarizing the tools that I developed and used to automate the process of testing SystemTap and detecting test failures. For the purpose of these articles, I consider the testing process to consist of seven steps. I describe the implementation for each of these steps and finish by summarizing my key design ideas and outlining potential future improvements.
The ideas presented in these articles could be useful for other open source projects with complex testing requirements.
Seven steps for successful testing
When developing an infrastructure for testing and test-result analysis, I found that commonly used continuous integration (CI) systems are insufficient for testing SystemTap. Most CI systems assume a problem formulation in which a commit to a project should be accepted or rejected depending on whether testing the resulting version produces a "pass" or "fail" result on a specified set of test cases. This formulation is not sufficient for testing SystemTap.
An infrastructure for testing SystemTap must take several difficult concerns into account. The SystemTap test suite contains a large number of test cases that are nondeterministic or environment-sensitive. Some of these test cases are important, whereas others are included to monitor the availability of optional SystemTap functionality across different systems. It would be difficult to decide on a single "pass" or "fail" verdict for the entire set of test results.
A set of test results could contain a number of important test failures that indicate new bugs that should be fixed, intermixed with unimportant test failures that occur on a regular basis. Test failures could also arise because of changes in the test environment, particularly changes to kernel internals after a kernel update. Because these test failures are not caused by changes in SystemTap code, they cannot be prevented by rejecting or reverting a SystemTap commit. The only solution is to detect the test failure and to fix or extend SystemTap to support the changed environment.
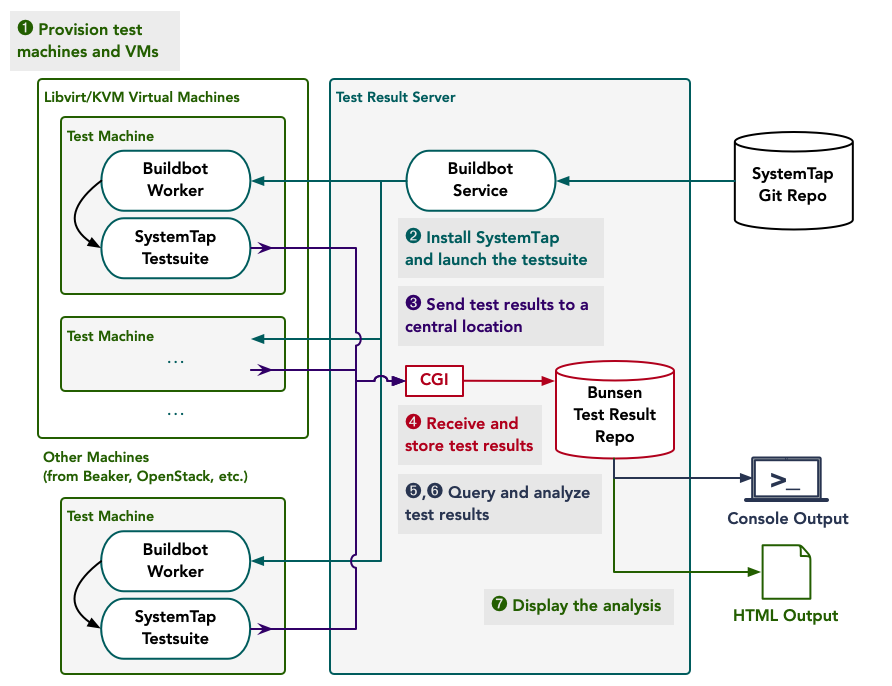
To design an infrastructure for testing SystemTap, I analyzed the testing process from the top level and defined a testing scheme consisting of seven steps. Some of these steps could be automated with basic shell scripts and existing tools. Other steps required me to develop entirely new software for test result analysis.
The first three steps relate to testing the project and collecting test results. I determined that these steps could be handled with shell scripts and existing software—namely the libvirt virtual machine (VM) provisioning system and the Buildbot test-automation toolkit. These steps are:
- Step 1: Provisioning test machines and VMs.
- Step 2: Installing the SystemTap project and running the test suite.
- Step 3: Sending test results to a central location.
The remaining four steps, described in Part 2, pertain to storing the collected test results and to analyzing them to discover and report new test failures. To handle these steps, I developed a test result storage and analysis toolkit called Bunsen. These steps are:
- Step 4: Receiving and storing test results in a compact format.
- Step 5: Querying the test results. When we obtain a new set of test results, we want to view those results and compare them with test results for earlier versions.
- Step 6: Analyzing the test results. To filter out newly occurring test failures from previously occurring failures, we need to use information from the entire history of test results.
- Step 7: Reporting the analysis in a readable format.
In terms of equipment, my testing infrastructure consists of a set of test machines and a server that acts as a virtual machine host and test result storage server. Currently, this infrastructure operates internally at Red Hat. Figure 1 summarizes the components of the testing infrastructure and how they interact.
This article explains in detail the first three steps of the testing process and how these steps are implemented by my testing infrastructure. I'll cover the remaining four steps in the next article.
Step 1: Provisioning test machines and VMs
The purpose of this step is to maintain a set of test machines with a range of hardware architectures and kernel versions. SystemTap must be tested on a wide variety of system configurations because of its complex dependencies on the Linux kernel’s internals and on the hardware architecture.
I found that maintaining the required set of test machines manually would entail a significant and recurring maintenance burden. My primary source of test machines was a virtual-machine server running the KVM hypervisor with the libvirt virtual-machine management tools. I was also able to provision test machines on a temporary basis from pools of hardware resources managed by systems such as OpenStack or Beaker.
I needed to initialize each test machine with a Linux distribution and configure it to run the SystemTap test suite. Doing so manually would entail frequent repetitive work.
As I developed my testing infrastructure, it became clear that the best way to avoid repetitive manual maintenance would be to make it as simple as possible to provision new test machines.
Therefore, I developed buildbot-create-vm.sh, a shell script that invokes the virt-install and virt-customize commands to create and configure a virtual machine for testing SystemTap. virt-install and virt-customize are command-line tools, included in both the libvirt and libguestfs projects, that can automatically create a virtual machine and modify the contents of its filesystem. The example commands in this section are based on buildbot-create-vm.sh and illustrate how the virt-install and virt-customize commands can be used.
The following command invokes virt-install to create a new virtual machine:
NAME=buildbot_example \
LOCATION=http://download.fedoraproject.org/pub/fedora/linux/development/33/Server/x86_64/os/ \
virt-install --name=$NAME --os-variant=fedora32 \
    --vcpus 2 --memory 4096 \
    --disk pool=default,size=25 \
    --autostart --watchdog default \
    --location=$LOCATION \
    --network bridge=br0 \
    --graphics=none --extra-args console=ttyS0 \
    --unattended admin-password-file=$PASSWORD \
    --noreboot
This command assumes that a libvirt storage pool named default is available for creating a new virtual disk. The LOCATION variable specifies the URL of a mirror for network installation of Fedora Linux.
And the following command invokes virt-customize to initialize the newly created VM with additional configuration:
NAME=buildbot_example \
REPO_FILE=example_custom.repo \
BUILDBOT_INSTALL_SH=/path/to/buildbot-install.sh \
SSH_PUBLIC_KEY=$(cat id_rsa_casual.pub) \
virt-customize -d $NAME \
    --hostname "$NAME.local" \
    --copy-in $REPO_FILE:/etc/yum.repos.d \
    --copy-in $BUILDBOT_INSTALL_SH:/root \
    --append-line $'/etc/crontab:@reboot\troot\tbash -c "chmod +x /root/buildbot-install.sh; /root/buildbot-install.sh 2>&1 >/root/crontab-firstboot.log"' \
    --edit $'/etc/ssh/sshd_config:s/^# ?PermitRootLogin .*/PermitRootLogin yes/' \
    --mkdir /root/.ssh \
    --append-line "/root/.ssh/authorized_keys:$SSH_PUBLIC_KEY" \
    --chmod $'0600:/root/.ssh/authorized_keys'
This command creates a crontab file that will run the script buildbot-install-stap.sh when the VM starts running. As described in the next section, this script installs a SystemTap development environment and configures it for automated testing.
The REPO_FILE variable contains the name of a custom DNF package repository, while BUILDBOT_INSTALL_SH specifies the location of the buildbot-install-stap.sh script described in the next section. In addition, the SSH_PUBLIC_KEY variable is initialized with an SSH public key that will be used for logging into the test machine remotely.
Step 2: Installing the SystemTap project and running the test suite
The purpose of this step is to set up the newly provisioned test machines with a SystemTap development environment and to configure the machines to launch the SystemTap test suite automatically whenever a commit is made to the main SystemTap Git repository on sourceware.org.
For setting up a SystemTap development environment, I developed several shell scripts: buildbot-install-stap.sh and stap-install.sh to install the developer tools required to build SystemTap, and stap-test.sh to download, compile, and test the SystemTap project from source. These scripts assume that the test machine will be dedicated exclusively for testing SystemTap.
For long-term testing of SystemTap, it is safest to use a dedicated test machine, since the full SystemTap test suite includes a number of "stress tests" that deliberately weaken or disable some of SystemTap’s safety mechanisms. On rare occasions, a failure result for one of these test cases can produce a kernel panic or hard lockup.
Before launching the SystemTap test suite, stap-test.sh performs a number of helpful configuration steps not handled by the SystemTap project’s make installcheck test suite command, including the following:
stap-test.shensures that akernel-develpackage is installed with a version exactly matching the currently running kernel. Akernel-develpackage is required to allow SystemTap to compile kernel modules that can carry out system-wide observations. Because some distributions' package repositories provide only the latest version of each package, thekernel-develpackage for the currently running kernel might no longer be available. In that case,stap-test.shupdates the kernel to match the available version of thekernel-develpackage and reboots the test machine.stap-test.shchecks whether the debuginfod.elfutils.org server provides debuginfo for the Linux distribution and currently running kernel on the test machine, and accordingly enables or disables SystemTap's support for retrieving kernel debuginfo viadebuginfod. Whendebuginfodsupport is disabled,stap-test.shruns thestap-prepscript provided by SystemTap to attempt to install a debuginfo package for the current kernel. More information about SystemTap's support fordebuginfodcan be found in the article Introducing debuginfod, the elfutils debuginfo server by Aaron Merey.stap-test.shruns the dmesg command to capture the Linux kernel ring buffer output into an additional file included with the final test results. In my experience, this output is important to capture because it may contain additional information about kernel warnings or crashes triggered by SystemTap test cases.
I’ve published the stap-install.sh and stap-test.sh scripts for anyone who is interested in quickly setting up a SystemTap environment and running the test suite.
To launch the SystemTap test suite automatically across the full set of test machines, I use an instance of the Buildbot system. The Buildbot system runs on the test result server and accepts connections from Buildbot workers running on the test machines.
Whenever a new test machine is provisioned, a Buildbot worker is automatically installed and configured on the machine by buildbot-install-stap.sh. After connecting to the Buildbot system, the Buildbot worker waits for testing requests.
The Buildbot service regularly checks the SystemTap Git repository on sourceware.org for new commits. When a commit is made to the SystemTap Git repository, the Buildbot service sends a request to the Buildbot worker on each of the test machines. The Buildbot workers then invoke the stap-test.sh script.
The buildbot-install-stap.sh script can also be invoked manually on a test machine that was provisioned either by hand or from a pool of test machines managed by a system such as OpenStack or Beaker. This manual invocation option has proven useful for quickly setting up test machines on a variety of architectures besides x86.
The Buildbot system includes some functionality for collecting and displaying test results, but I decided not to rely on it. Buildbot assumes a testing process that is modeled as a series of stages, and each of these stages is expected to have a simple "pass" or "fail" outcome. As mentioned earlier, this model is appropriate for a continuous integration system, but is too simple for a project such as SystemTap whose test suite includes many nondeterministic or environment-dependent test cases.
Step 3: Sending test results to a central location
The purpose of this step is to collect in one location the SystemTap test results produced by the various test machines.
After running the SystemTap test suite, the stap-test.sh script packages the test results in a tar archive and sends them to the test result server. The test results produced by SystemTap’s DejaGnu test suite consist of a systemtap.log and a systemtap.sum file.
The systemtap.log file contains the detailed output of every test case in the test suite, while the systemtap.sum file contains a condensed summary of the results for each test case.
In addition to the DejaGnu output, the stap-test.sh script also sends a file of system diagnostics collected by the stap-report command, as well as a file named systemtap.dmesg containing kernel ring buffer data captured during the test suite execution.
The following command from stap-test.sh packages and sends the test result log files to the test result server:
tar cvzf - $LOGPATH/systemtap.log* $LOGPATH/systemtap.sum* $LOGPATH/systemtap.dmesg* $LOGPATH/stap-report.* | curl -X POST -F 'project=systemtap' -F 'tar=@-' $BUNSEN_URL/bunsen-upload.py
Here, the variable LOGPATH specifies the location of the test result log files and the variable BUNSEN_URL specifies the location of the test result server.
On the test result server, test results are accepted by a CGI script that adds the log files to a test-result repository managed by the Bunsen toolkit, as described in the next article in the series.
To be continued ...
This article described the automated testing infrastructure I developed for the SystemTap project. The next article will describe Bunsen, the toolkit I developed for test result storage and analysis.
Last updated: March 18, 2024