"This repository has no secrets" — who doesn't want this screenshot (figure 1) to provide to a security auditor, right?
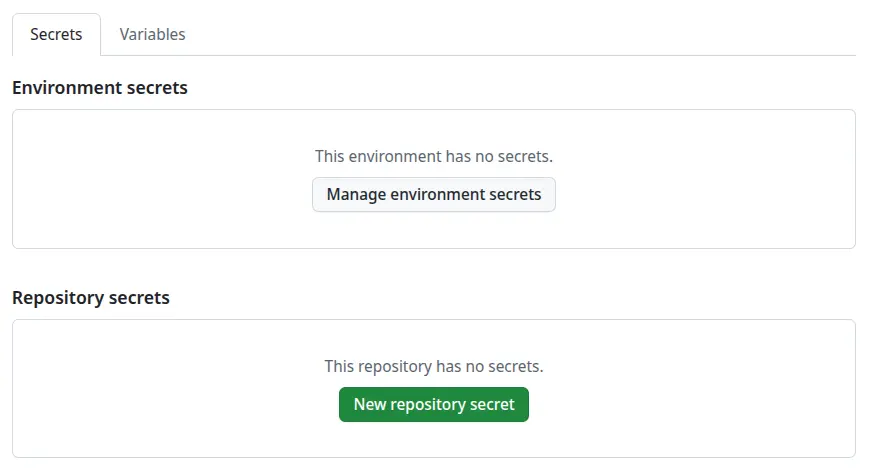
If you're pushing container images from GitHub Actions, you probably have a registry token stored as a GitHub secret. That token lives forever until you rotate it, or until it leaks.
There's a better way!
GitHub (or GitLab, and other Git hosts) can prove your workflow's identity to the registry using OpenID Connect (OIDC). Your workflow gets an ephemeral quay.io token every time it runs. Red Hat Quay calls this keyless robot-account federation.
This makes it easier to ship your software because you can add new repositories to your build pipeline without touching GitHub secrets at all. There's no secret API key to create, nothing to rotate, and nothing to revoke if a secret leaks or someone leaves the team.
In three easy steps:
- Create a robot account in Quay.
- Configure robot federation pointing to GitHub's OIDC issuer, and set the subject to match your repository.
- In GitHub Action workflow, request an OIDC token from Github, exchange it for a short-lived Quay robot token, and use that token to log in to Quay and push or pull images.
I've based this guide on Quay's product docs: Keyless authentication with robot accounts.
Step 1: Create a repository and robot account in Quay
First, you need somewhere for your container images to land. This takes about 30 seconds.
To create a new repository in the Quay UI, go to Organizations > (your-quay-org) > Create New Repository. In my example, my Quay organization is thoughtful-code, so I created thoughtful-code/quay-oidc-demo.
Next, create a Robot Account that can push images to this repository:
- In the Quay UI, go to Organizations > (your-quay-org) > Robot Accounts.
- Click Create Robot Account and give it a name. I called mine
githubactions. - The bot's full Quay user name is
<your-quay-org>+<robot-name>. You'll need that later in your GitHub Action YAML. In my example, my Quay org isthoughtful-code, so my bot's name isthoughtful-code+githubactions. (As of Quay 3.16, robot federation only works for robot accounts in Quay orgs, not robot accounts for individual Quay users.)
Now grant the robot write permission on the target repository:
- Go to the repository in Quay (for example,
your-quay-org/quay-oidc-demo) - Click Settings > User and Robot Permissions
- Add the robot account and set its role to Write
Step 2: Set up robot-account federation (linking Quay to GitHub's OIDC provider)
Now you must configure Quay.io to trust the OIDC tokens that your GitHub Action creates.
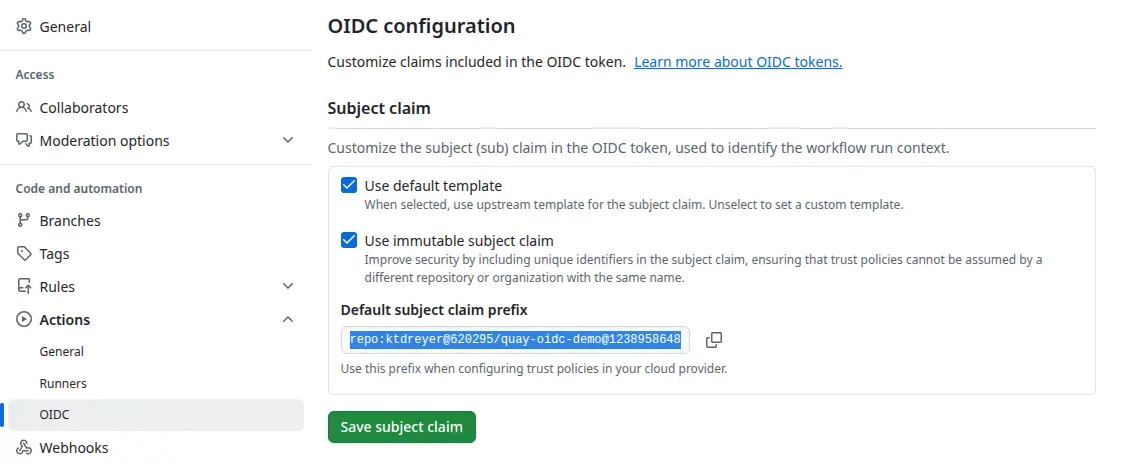
First, determine your GitHub repo's subject claim string. To find this, go to your GitHub repository's Settings > Actions > OIDC. Check the Use immutable subject claim box (this is the default for new repos), and copy the Default subject claim prefix (figure 2). You'll append :ref:refs/heads/main to this when you configure your robot account federation in Quay.
Back to Quay:
- In Quay, go to Organizations > (your-quay-org) > Robot Accounts
Click the kebab menu icon (⋮) and choose Set robot federation (as in figure 3).
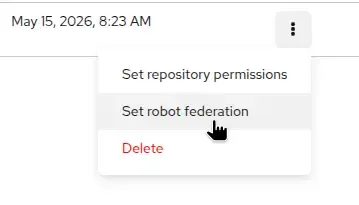
Figure 3: The Quay kebab menu expanded to "Set Robot Federation." - Click the plus (+) link and fill in these values (see figure 4):
- Issuer URL:
https://token.actions.githubusercontent.com - Subject:
repo:ktdreyer@620295/quay-oidc-demo@1238958648:ref:refs/heads/main(Use your own repository's immutable subject prefix. See above.)
- Issuer URL:
- Click Save.
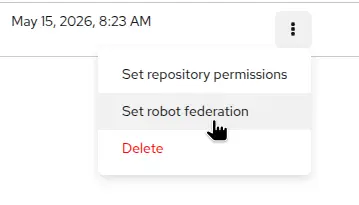
The Subject field (figure 4) is important for security. It limits who and what can authenticate to Quay. In this example, I only allow actions in my ktdreyer/quay-oidc-demo Git repository, and only Actions that run directly on the main branch. Quay rejects any token from actions on a work-in-progress branch or a fork.
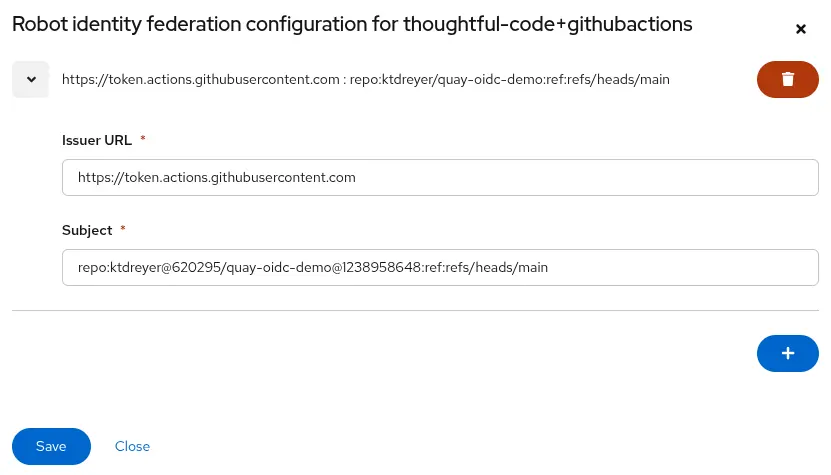
Note that the GitHub owner (ktdreyer) or org name string does not necessarily need to match the Quay org (thoughtful-code). The subject controls who can mint the token, while the Quay org controls where the image lands.
Step 3: Use the OIDC token in a GitHub Actions workflow
Here's the fun part: No secrets required.
# .github/workflows/build-push.yml
name: Build & push to Quay
on:
  push:
    branches: [ main ]
permissions:
  # Required for OIDC token exchange
  id-token: write
  contents: read
jobs:
  build:
    runs-on: ubuntu-latest
    env:
      QUAY_ROBOT_USER: thoughtful-code+githubactions   # <org>+<robot-name>
    steps:
      - name: Checkout code
        uses: actions/checkout@v6
      - name: Build image
        run: |
          podman build -t quay.io/thoughtful-code/quay-oidc-demo:latest .
      - name: Obtain OIDC token for Quay
        run: |
          set -o pipefail
          # Ask GitHub to prove who we are (signed OIDC token)
          OIDC_TOKEN=$(curl -sSf -H "Authorization: bearer $ACTIONS_ID_TOKEN_REQUEST_TOKEN" \
            "$ACTIONS_ID_TOKEN_REQUEST_URL" | jq -r .value)
          echo "::add-mask::$OIDC_TOKEN"
          # Trade that proof (OIDC_TOKEN) for short-lived Quay robot token
          QUAY_TOKEN=$(curl -sSf \
            "https://quay.io/oauth2/federation/robot/token" \
            -u "$QUAY_ROBOT_USER:$OIDC_TOKEN" | jq -r .token)
          echo "::add-mask::$QUAY_TOKEN"
          # Export the token for later steps
          echo "QUAY_TOKEN=$QUAY_TOKEN" >> $GITHUB_ENV
      - name: Log in to Quay
        uses: redhat-actions/podman-login@v1
        with:
          registry: quay.io
          username: ${{ env.QUAY_ROBOT_USER }}
          password: ${{ env.QUAY_TOKEN }}
      - name: Push image
        run: |
          podman push quay.io/thoughtful-code/quay-oidc-demo:latest
The podman-login step uses the temporary QUAY_TOKEN as the password. This token expires after one hour. I recommend running login after you've done your build. The build step doesn't need the token, and with this pattern you can limit the short-lived QUAY_TOKEN to the exact steps that need it.
Push a commit to main and watch the action run! If you've set everything correctly, a fresh image lands in your Quay.io repo, no long-lived API keys in sight.
Where to go from here
- Beyond GitHub: OIDC works with Git forges like GitLab or Forgejo.
- Lock down who can push: You could scope the Subject to a GitHub Actions environment with, for example,
repo:ktdreyer@620295/quay-oidc-demo@1238958648:environment:production. This further limits which CI jobs can push images. - Pulling a private base image: In this example, we built an image from a public base and pushed it at the end. If you wanted to pull a private base image in your build process, you would authenticate to Quay with OIDC first, before building. If your build process takes longer than an hour, you'd authenticate to Quay a second time in the job for the push operation.
- Fork the demo repo to try this with your own Quay org. Edit the workflow and
Containerfileto fit your needs. - Read the full keyless authentication docs for the complete reference on robot-account federation in Red Hat Quay 3.16.
- Access Quay on Red Hat OpenShift with short-lived credentials to set up the same pattern on OpenShift.

