Hark, my fellow R programmers, the time is upon us to move out of the workbench, package our glorious models in containers, and send them out into the world!
Using containers, Kubernetes, and KServe, we can make our data science models available for workloads, data science pipelines, and applications as microservices. At first, it can feel overwhelming, but Red Hat OpenShift and Red Hat OpenShift AI provide built-in functionality to host models and serve inference requests.
This guide shows you how to build a custom R serving runtime using KServe, import the custom runtime into your cluster, package the model in a ModelCar, and deploy the model on OpenShift AI.
If you prefer to use the prebuilt images rather than building them yourself, start at step 3.
This workflow came from a request from a customer I worked with, and I wanted to share it with the community in the spirit of open source collaboration.
R you ready? Let's get started.
Prerequisites
Ready your tools:
- Podman on your workstation (for building the image)
ocCLI (for applying manifests on Red Hat OpenShift)- Git (for cloning the repo and building the image)
- An image registry to store your built images, such as Quay.io
Step 1: Build the image
You will not have to start from scratch, nay. The serving runtime supports classical model files, such as:
- Any
.rdswhose object has apredict()method:lm,glm,randomForest,ranger,glmnet,rpart,nnet,e1071,MASS,carettrain, ortidymodels workflow/model_fit .qs2.rdaand.RData
First, clone the repository to your local machine.
git clone https://github.com/rh-aiservices-bu/kserveR.gitNavigate to the root directory of the repository:
cd kserveR/
ls
Here, you will find:
- Containerfile examples
./images./manifestsREADME.md./runtime
Next, examine the runtime folder and Containerfile. Within the runtime directory, you will find several R scripts. Here is a short summary of what each of them does, for your pleasure.
- install-packages.R runs at build time. It holds the list of baked-in R packages, installs them, then checks each one loads properly, failing the build with a reason if any doesn't.
- server.R is the entrypoint. It locates the runtime directory, sources the seven files below in dependency order, loads the model, and starts the HTTP server on port 8080.
- config.R reads environment variables and determines which file in
/mnt/modelsis the model, throwing an error rather than guessing when more than one candidate is present. - schema.R digs the training schema back out of the fitted object—predictor names, their types, and the factor levels used during fitting, merged with anything declared in
schema.json. - formats.R loads the model off disk across the formats R people use, and makes sure the package defining that object's
predict()method is loaded, since deserialising an object doesn't bring its methods with it. - tensors.R is the core file. It converts V2 tensors into data frames and predictions back into tensors, handles both request shapes, rebuilds factor columns against training levels, and keeps single-row responses serialising as arrays.
- metrics.R keeps request counts and timings, formatting them in Prometheus text format for
/metrics. - model.R loads the model once at startup, exits with an error if loading fails, checks for an optional
predict.Rhook, and runs the inference path from tensors through to predictions. - api_v2.R defines the Plumber router: the V2 routes, an error handler that distinguishes client errors from server errors, and metrics timing hooks.
Good to know. Next, examine the Containerfile that provides the instructions to build the runtime image.
The Containerfile starts with Red Hat Universal Base Image 9 (UBI 9), updates package repositories, and installs R 4.4.2. It configures the CRAN repository, installs the required R packages, and copies the application files into the container. It sets the server configuration, exposes port 8080, switches to a non-root user for security, and runs entrypoint.sh to start the application.
Let's build it:
podman build -t quay.io/your-username/kserver-runtime:v1 -f Containerfile .This process takes a few minutes. When the build completes, push the image to your registry (remember to log in before pushing).
podman push quay.io/your-username/kserver-runtime:v1Step 2: Build the ModelCar
In this step, you will build the ModelCar container image. A ModelCar is an OCI-compliant container image that packages a model. It lets platforms like KServe deploy and run models without having to configure the environment from scratch each time.
The repository includes an examples directory. Inside, you will find a model.rds file created from the famous Iris dataset donated by Sir Ronald Aylmer Fisher in 1936. The model is a random forest model created with Breiman and Cutler's original implementation package randomForest. If you don't have your own model file to package, use this sample file.
cd examples/iris-rfHere, you will also find the training script for the model, along with a Containerfile with build instructions.
FROM registry.access.redhat.com/ubi9/ubi-minimal:latest
COPY model.rds /models/model.rds
USER 1001
This configuration copies the model file into the container image under the required /models directory path. Go ahead and build the container:
podman build -t quay.io/your-organisation/iris-modelcar:v1 -f Containerfile .This build completes quickly. When the build finishes, push it to your registry.
podman push quay.io/your-organisation/iris-modelcar:v1We are ready for the next step.
Step 3: Import the custom model serving runtime into OpenShift AI
If you skipped steps 1 and 2 to use the prebuilt images, start by cloning the repository and navigating to the root directory:
git clone https://github.com/rh-aiservices-bu/kserveR.git
cd kserveR
Now that we have both a runtime and a ModelCar, we need to import the custom runtime into OpenShift AI.
Attention
To complete step 3 in the OpenShift AI web console, you need OpenShift AI administrator permissions in your cluster. If you don't have it, it's time to contact your admin friends for assistance.
Option 1: Import the runtime using the CLI
cd manifests
ls manifests
inferenceservice.yaml servingruntime-template.yaml servingruntime.yaml
The directory contains 3 YAML files. For this step, we are most interested in servingruntime-template.yaml.
This file contains instructions for OpenShift AI on how to present the runtime in the dashboard—its display name, that it serves predictive models over REST, and that it handles 1 model per deployment—together with the full ServingRuntime it creates when someone selects it: the image to run, the R model format it claims, the port, probes, and resource limits.
The servingruntime-template.yaml file defines the container specification:
containers:
   - name: kserve-container
     image: quay.io/your-username/kserver:v1 <- #update to your own image url
     imagePullPolicy: Always
Log in to your Red Hat OpenShift cluster (or ask your OpenShift AI admin) and apply servingruntime-template.yaml:
oc apply -n redhat-ods-applications -f servingruntime-template.yamlOption 2: Import the runtime using the OpenShift AI web console
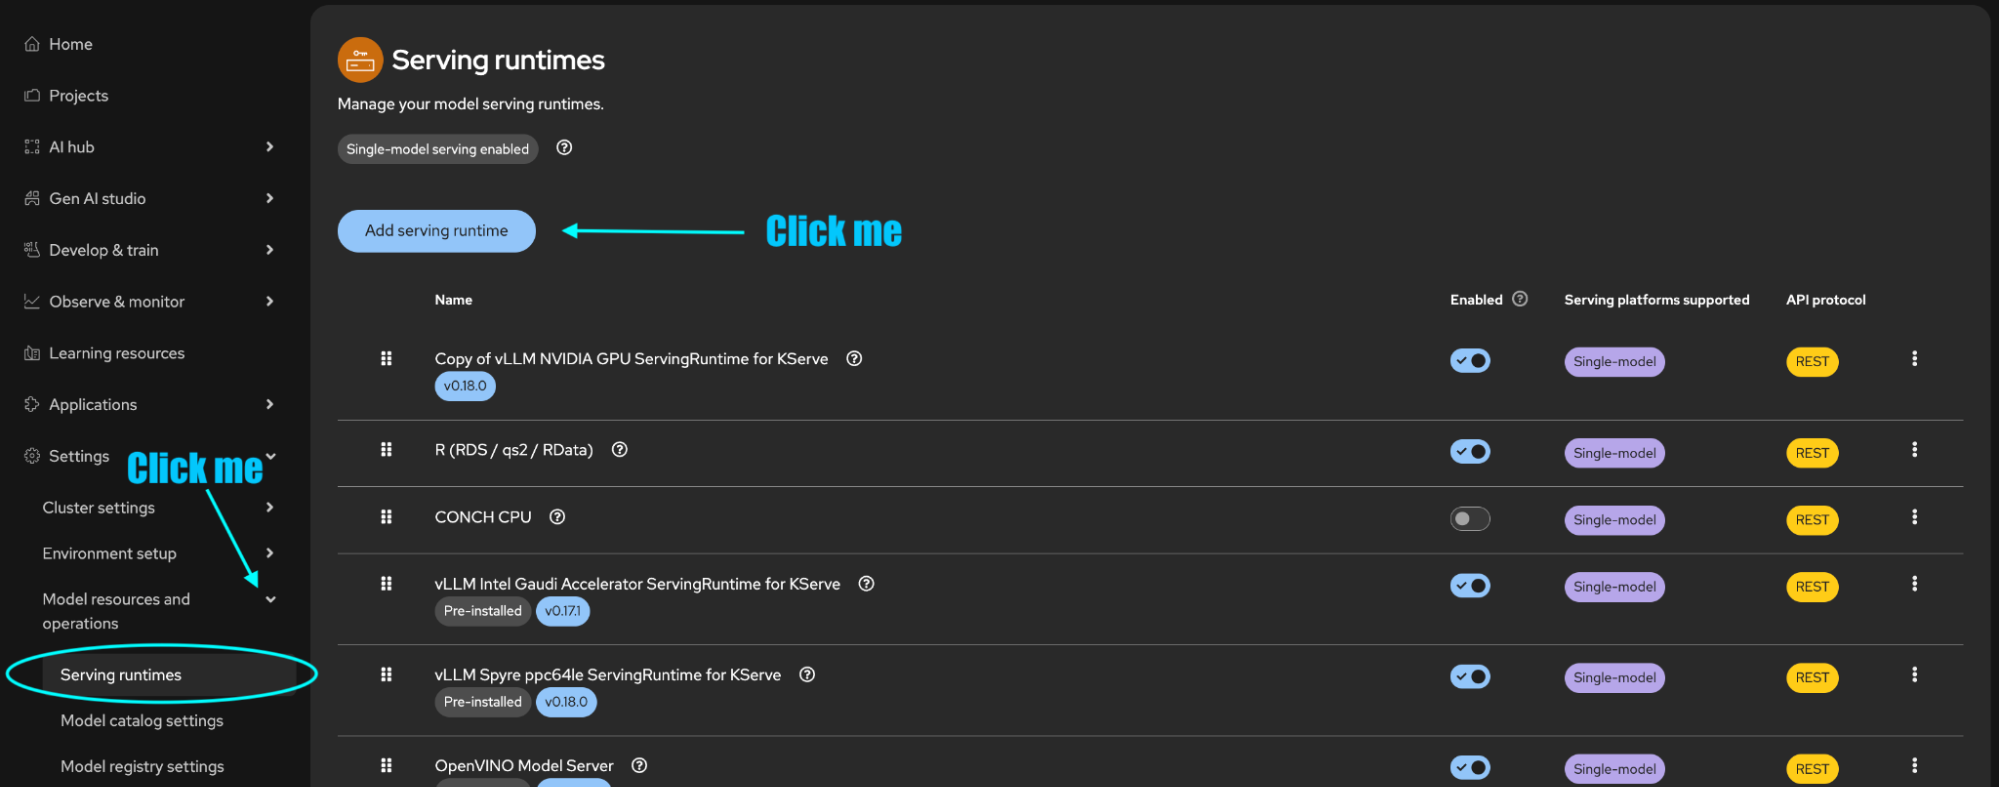
Log in to OpenShift AI with your credentials and navigate in the left-hand menu to Settings → Serving runtimes → Add serving runtime, as shown in Figure 1.
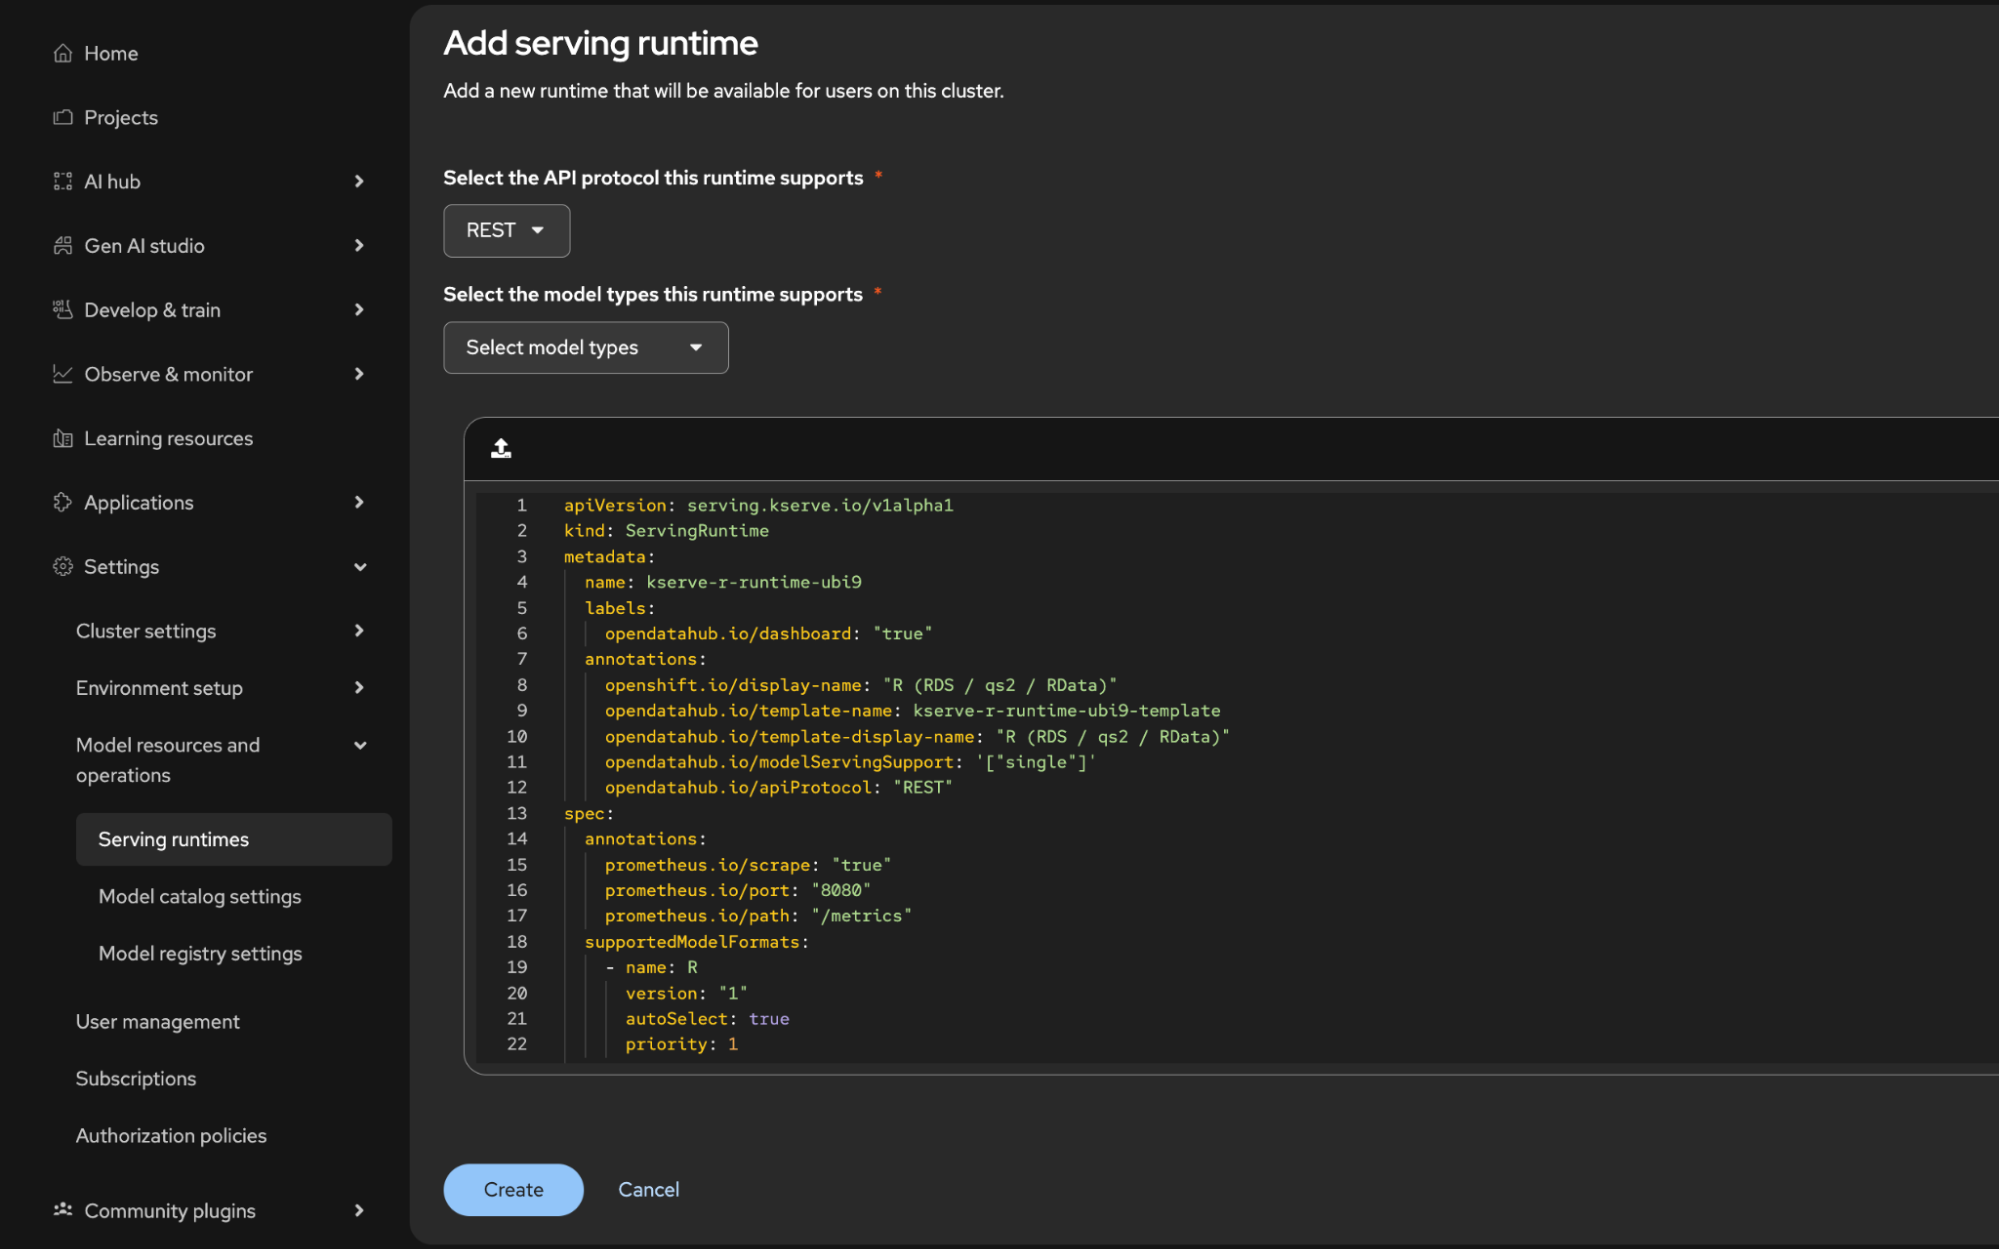
The configuration screen appears, as shown in Figure 2. Select REST as the API protocol, and in the drop-down menu for model types, choose Predictive model. You can then upload a file, drag and drop a file, or paste YAML content directly. Whichever option you choose, use the contents of servingruntime.yaml located in the manifests directory. Then select Create.
Now, for the crescendo. If you prefer using the CLI, proceed to step 4a. If you prefer using the web console, proceed to step 4b.
Step 4a: Deploy the model with kserveR using the CLI
Create a new project for this deployment. For deploying from the UI, go to step 4b. Create and label the project by running:
oc new-project kserverBefore applying the manifests, update the YAML files with your specific image URLs.
Note
If you didn't build your own images, don't run these sed commands; your deployment will use the default image URLs. Proceed directly to the oc apply commands.
sed -i "s|image: quay.io/sara_banderby/kserver-runtime:v1|image: quay.io/your-username/kserver-runtime:v1|" \ manifests/servingruntime.yaml manifests/servingruntime-template.yaml
sed -i "s|storageUri: oci://quay.io/sara_banderby/iris-modelcar:v1|storageUri: oci://quay.io/your-username/iris-modelcar:v1|" \ manifests/inferenceservice.yaml
Configure authentication using manifests/iris-rf-ubi9-auth.yaml. This manifest creates the iris-rf-ubi9-sa service account, a Role granting access to the iris-rf-ubi9 InferenceService, a RoleBinding, and a token Secret.
Set the namespace in the authentication manifest to your project name. The following command updates namespace fields, including the RoleBinding's service account subject. The subject namespace must match the project containing the service account;
sed -i "s|namespace:.*|namespace: kserver|" \
manifests/iris-rf-ubi9-auth.yaml
Run these commands to deploy the model with its serving runtime:
oc apply -n kserver -f manifests/iris-rf-ubi9-auth.yaml
oc apply -n kserver -f manifests/servingruntime.yaml
oc apply -n kserver -f manifests/inferenceservice.yaml
Run the following command and verify that the pod status indicates it is ready:
oc get -n kserver isvc iris-rf-ubi9 -wLet's send an inference request to confirm the model responds. First, we need to get our route and our token. Because authentication is enabled for the model deployment, each inference request must include a bearer token with permission to access the model.
HOST=$(oc get route iris-rf-ubi9 -n kserver -o jsonpath='{.spec.host}')
TOKEN=$(oc get secret default-token-iris-rf-ubi9-sa -n kserver -o jsonpath='{.data.token}' | base64 -d)
Send the curl request:
curl -k -X POST https://$HOST/v2/models/iris-rf-ubi9/infer -H "Authorization: Bearer $TOKEN" -H 'Content-Type: application/json' -d @examples/iris-rf/request.jsonThe command returns the following response:
{"model_name":"iris-rf-ubi9","model_version":"1","outputs":[{"name":"predictions","datatype":"BYTES","shape":[2],"data":["setosa","virginica"]}]}The model runtime successfully processed the request and returned the predicted classes.
Step 4b: Deploy the model using the OpenShift AI web console
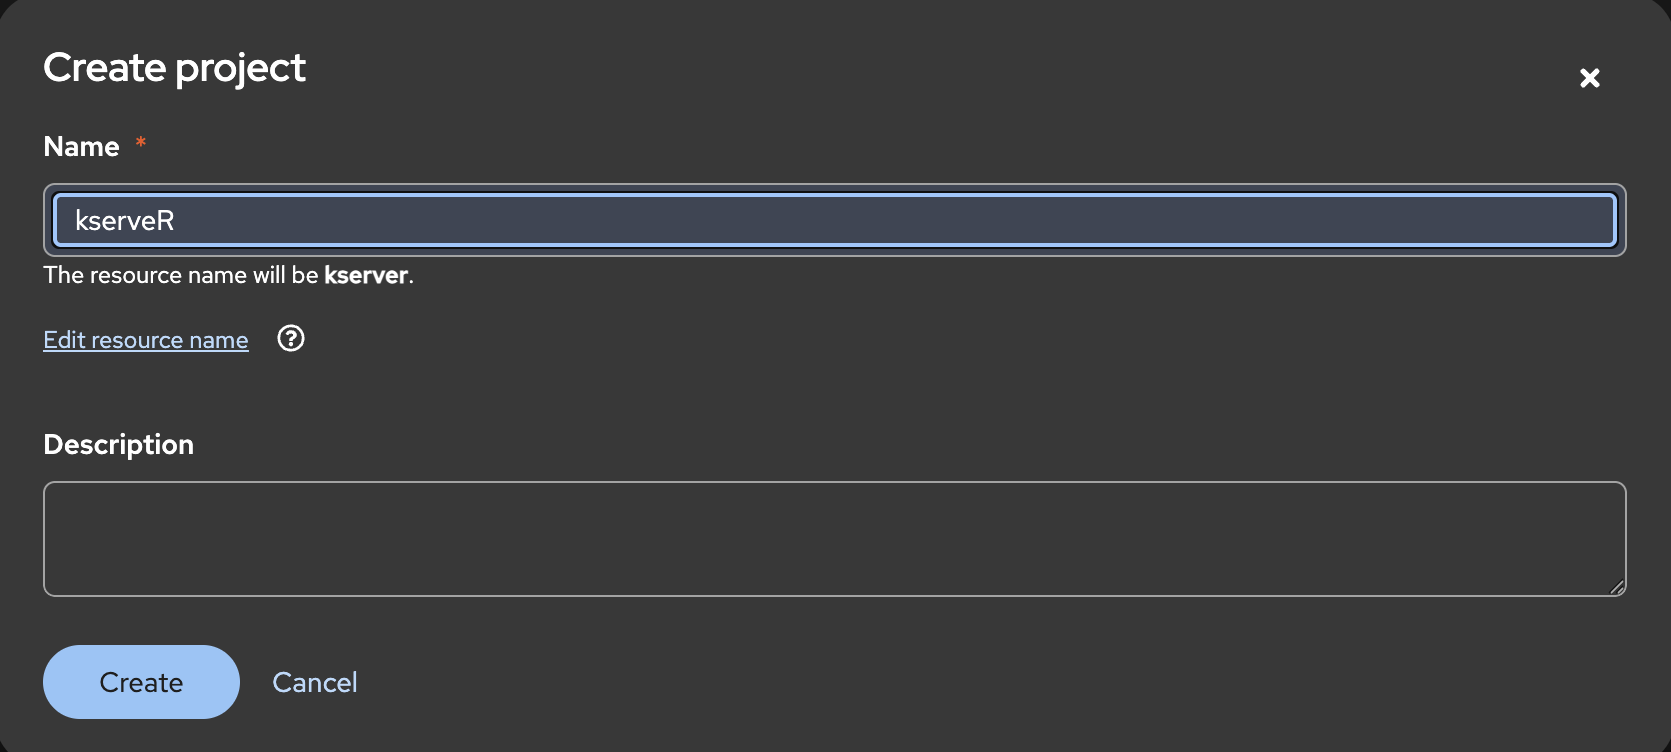
Log in to the OpenShift AI web console, select Create project, enter kserveR as the project name, and select Create (Figure 3).
Navigate to your project view and select Deployments (Figure 4).
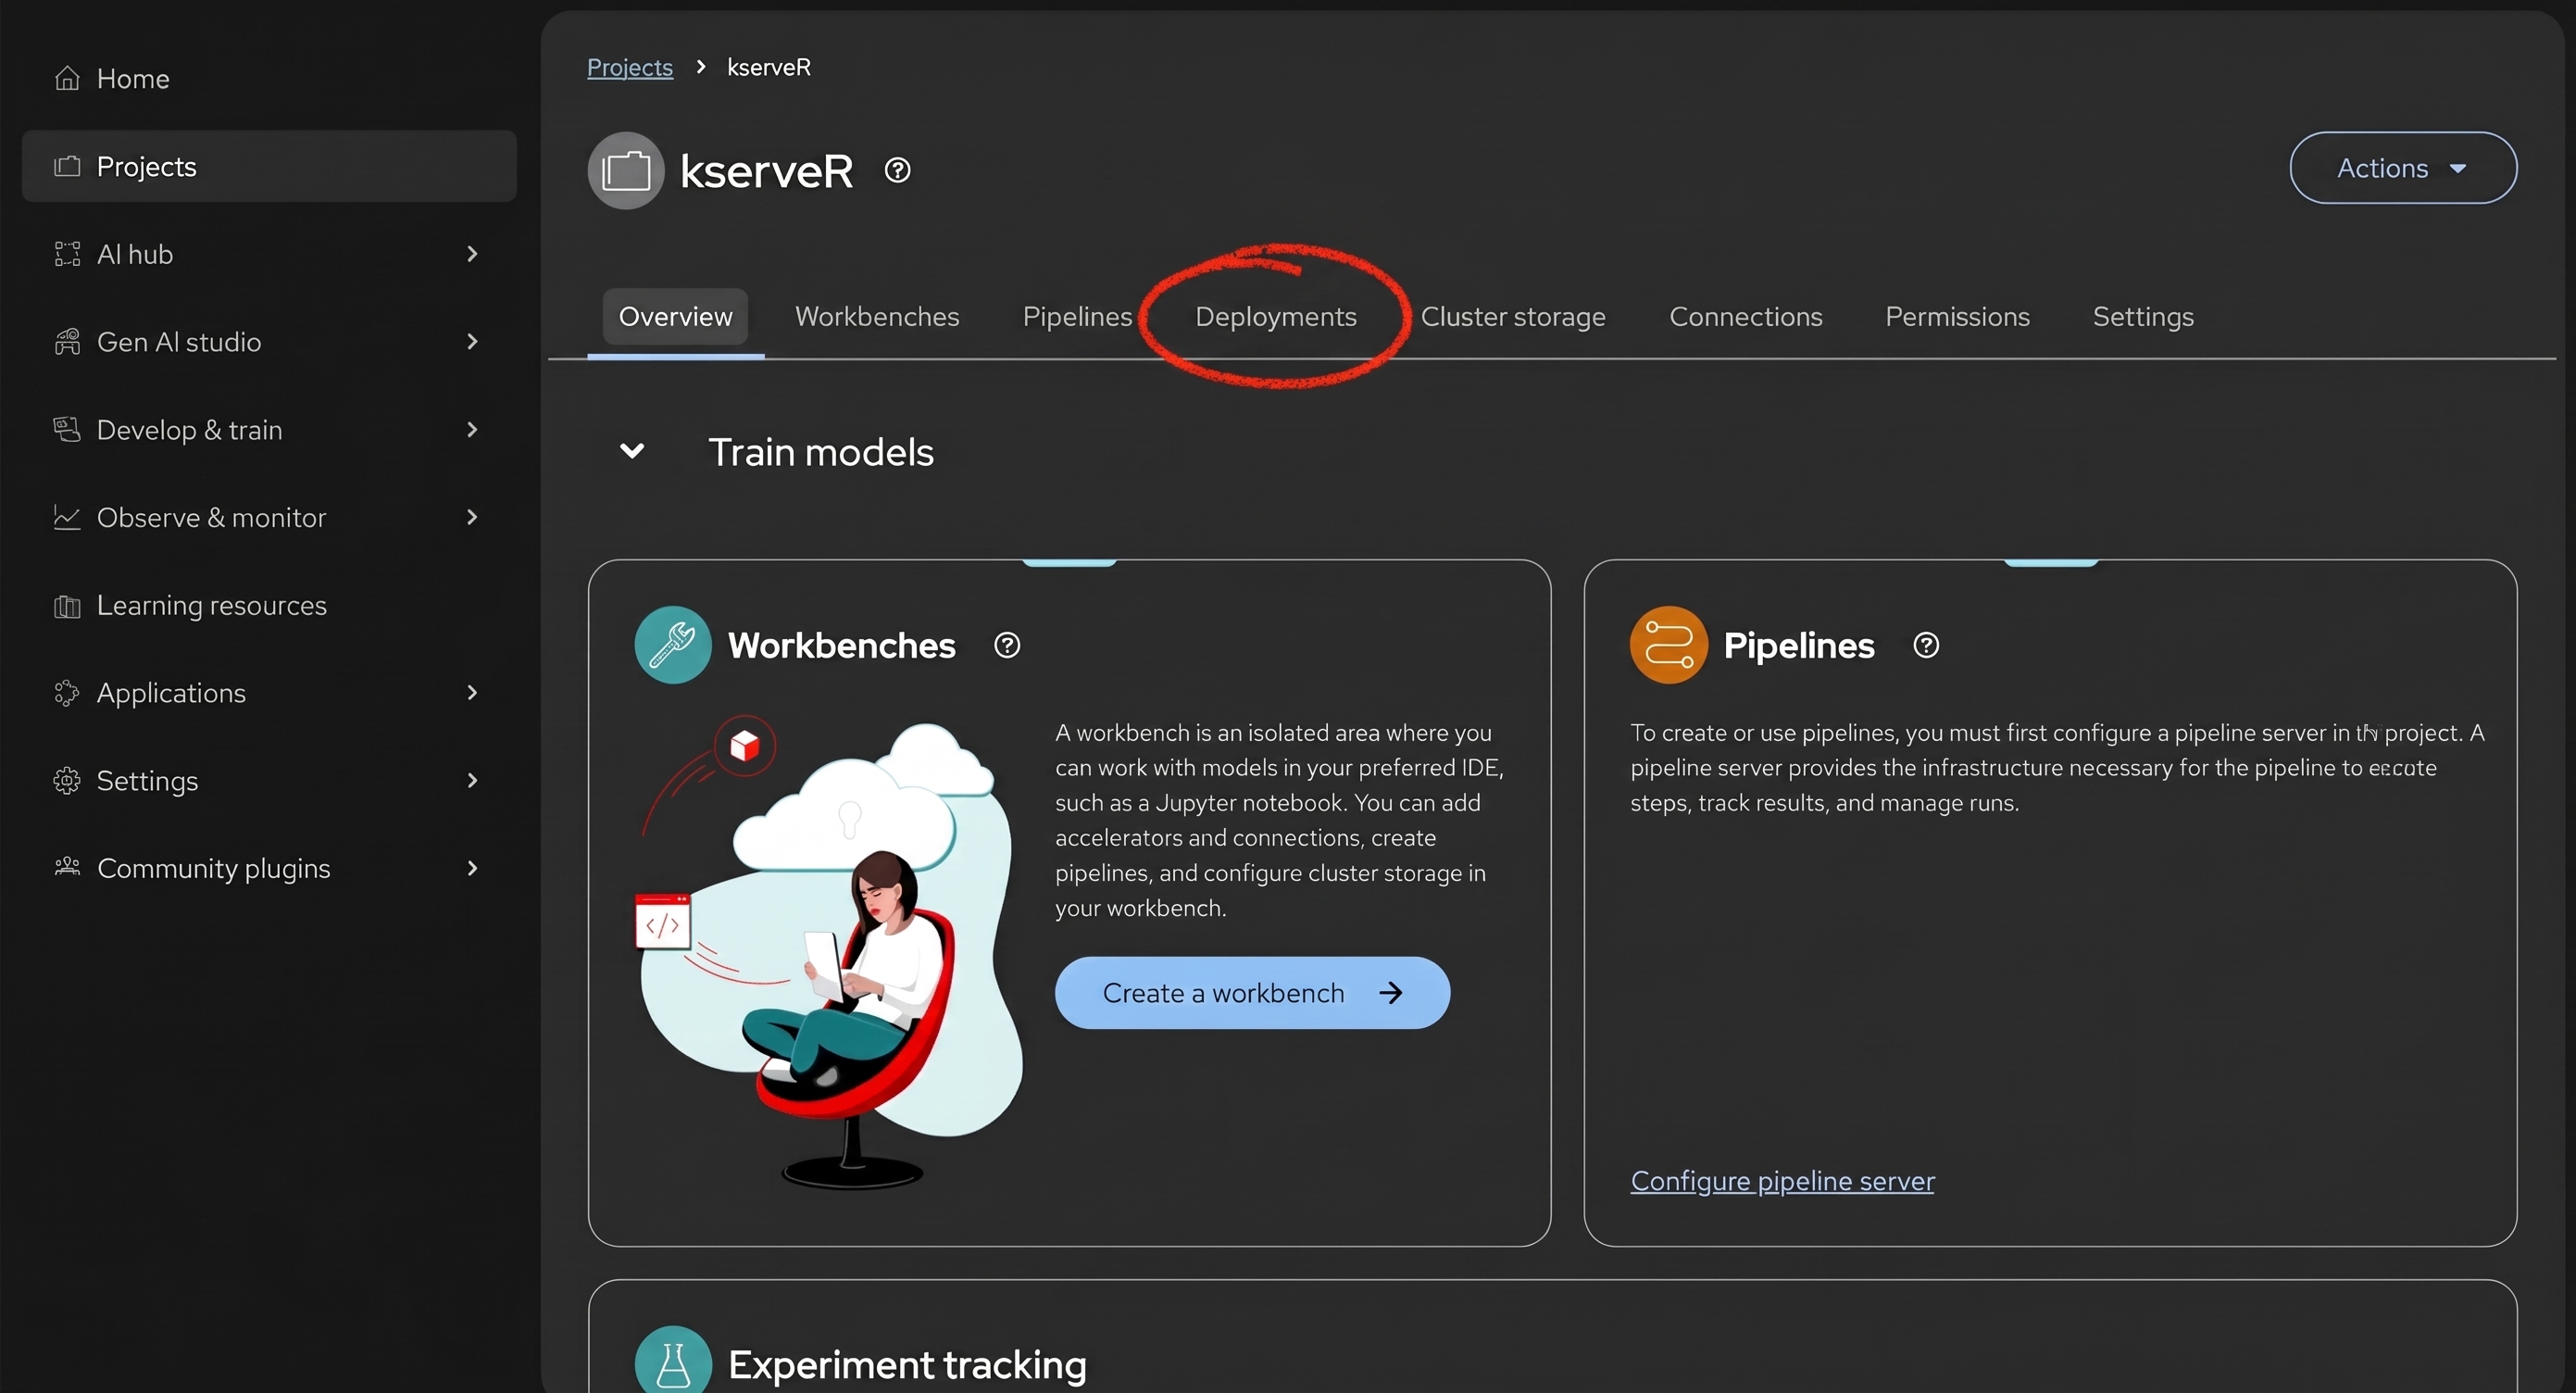
The Deployments view is currently empty because we haven't deployed anything yet. But we shall now.
Select Deploy model, select Predictive model as the model serving type, and choose URI under Model location (Figure 5).In the URI field, enter your ModelCar image URI, or enter the sample image URI, seen down below. After completing the model location fields, select Next.
oci://quay.io/sara_banderby/kserver-runtime:v1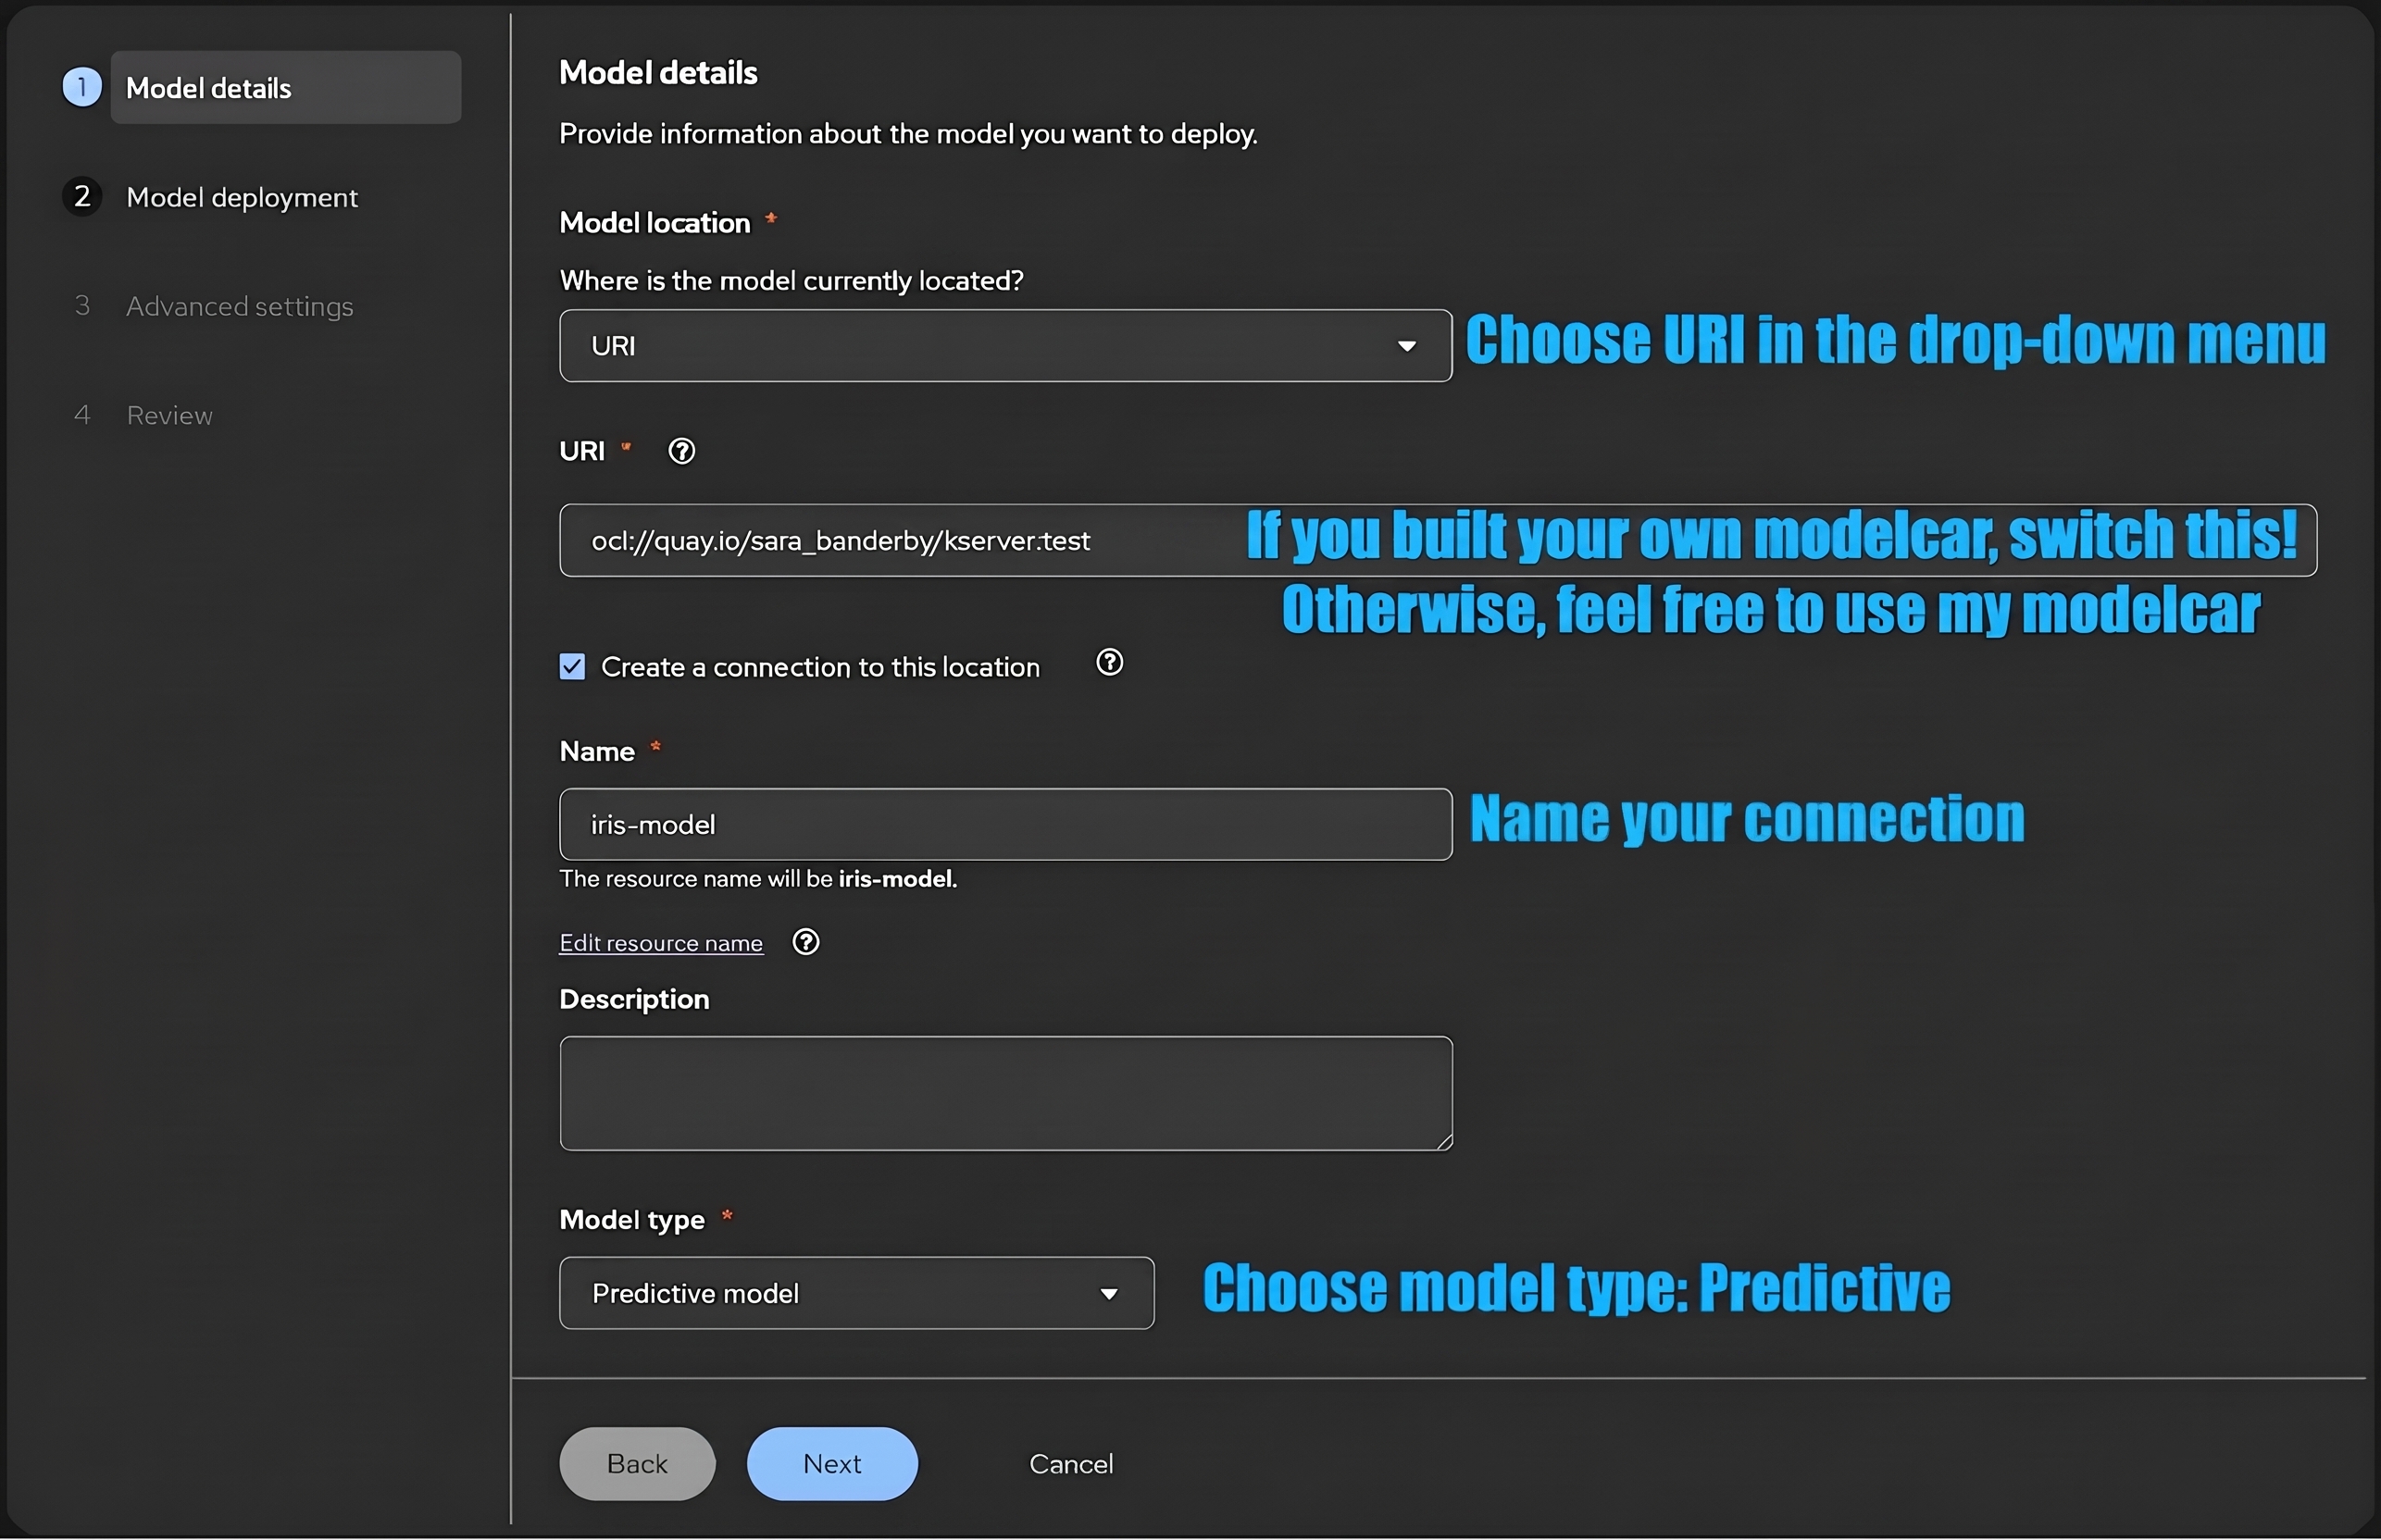
The Model deployment view appears. The project name is automatically populated with kserveR. For the model deployment name, enter iris-rf. The deployment runs on standard CPU compute, so select the default CPU profile in the Model server size list. Next, select the model framework R-1, which automatically populates kserveR as the serving runtime.
In the Model route section, set the number of replicas to 1. Once all required fields are complete (see Figure 6), select Next to proceed to the Advanced settings step.
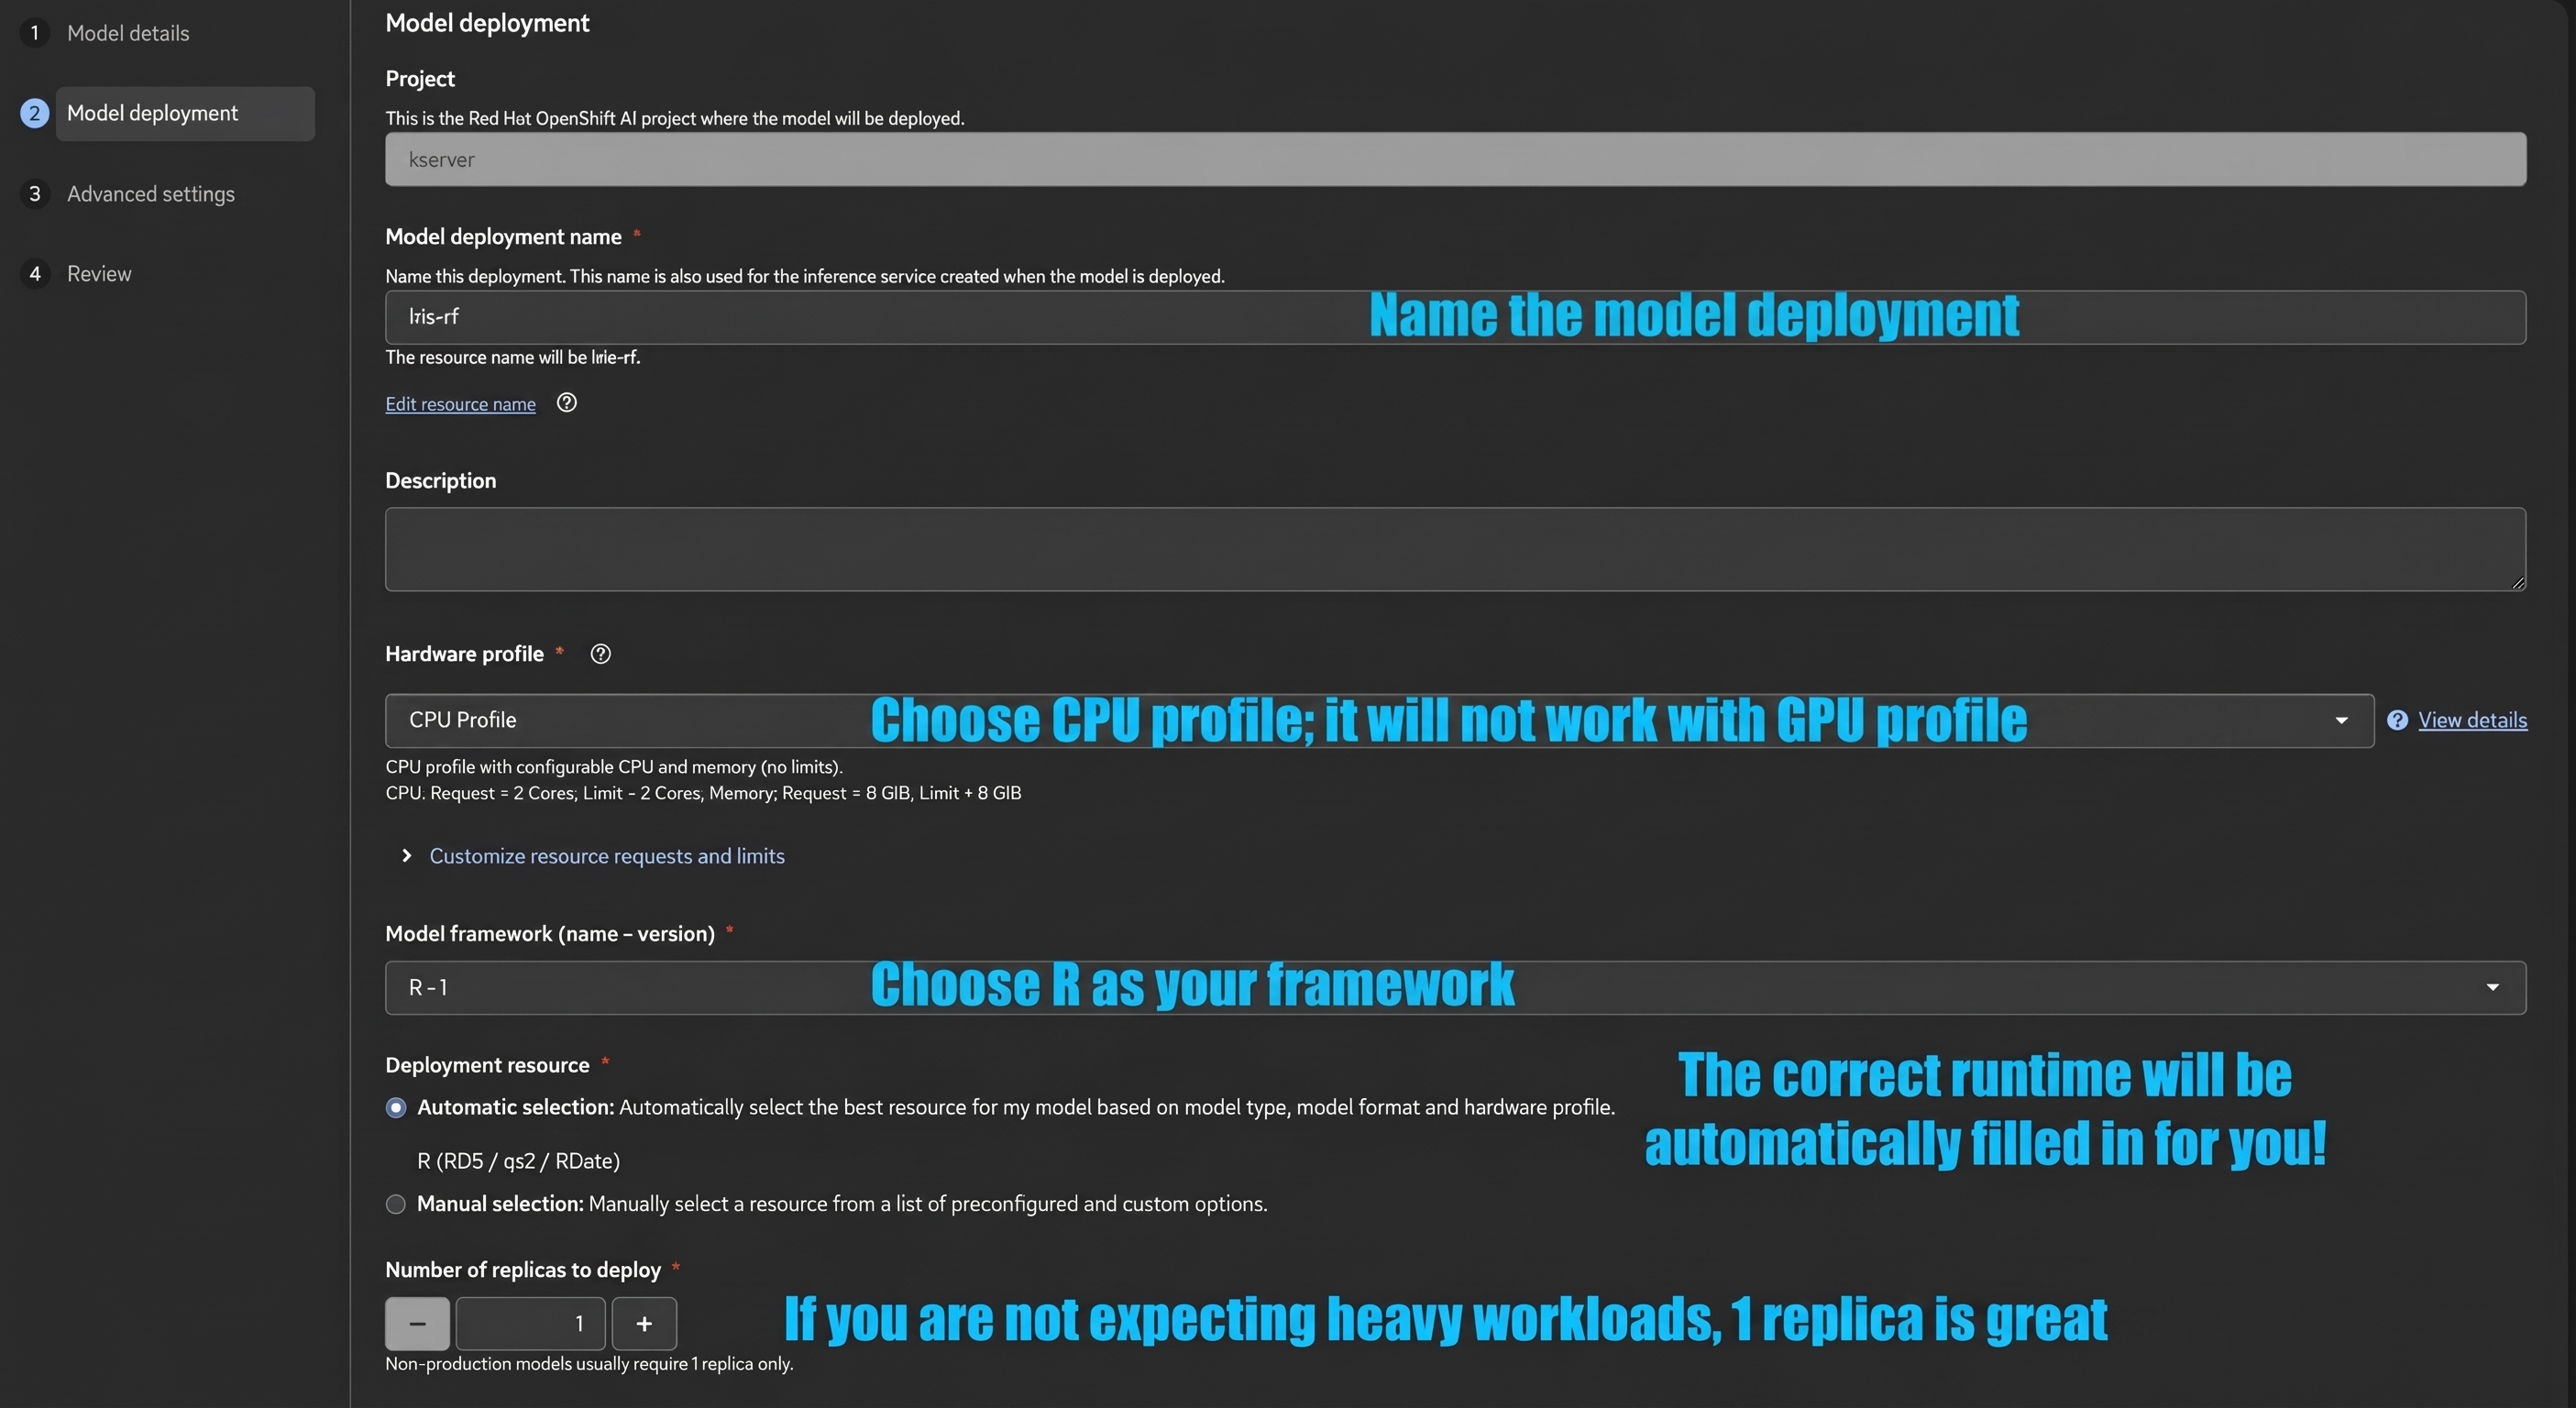
Figure 6: Model deployment form with R framework and 1 replica selected in the OpenShift AI web console.
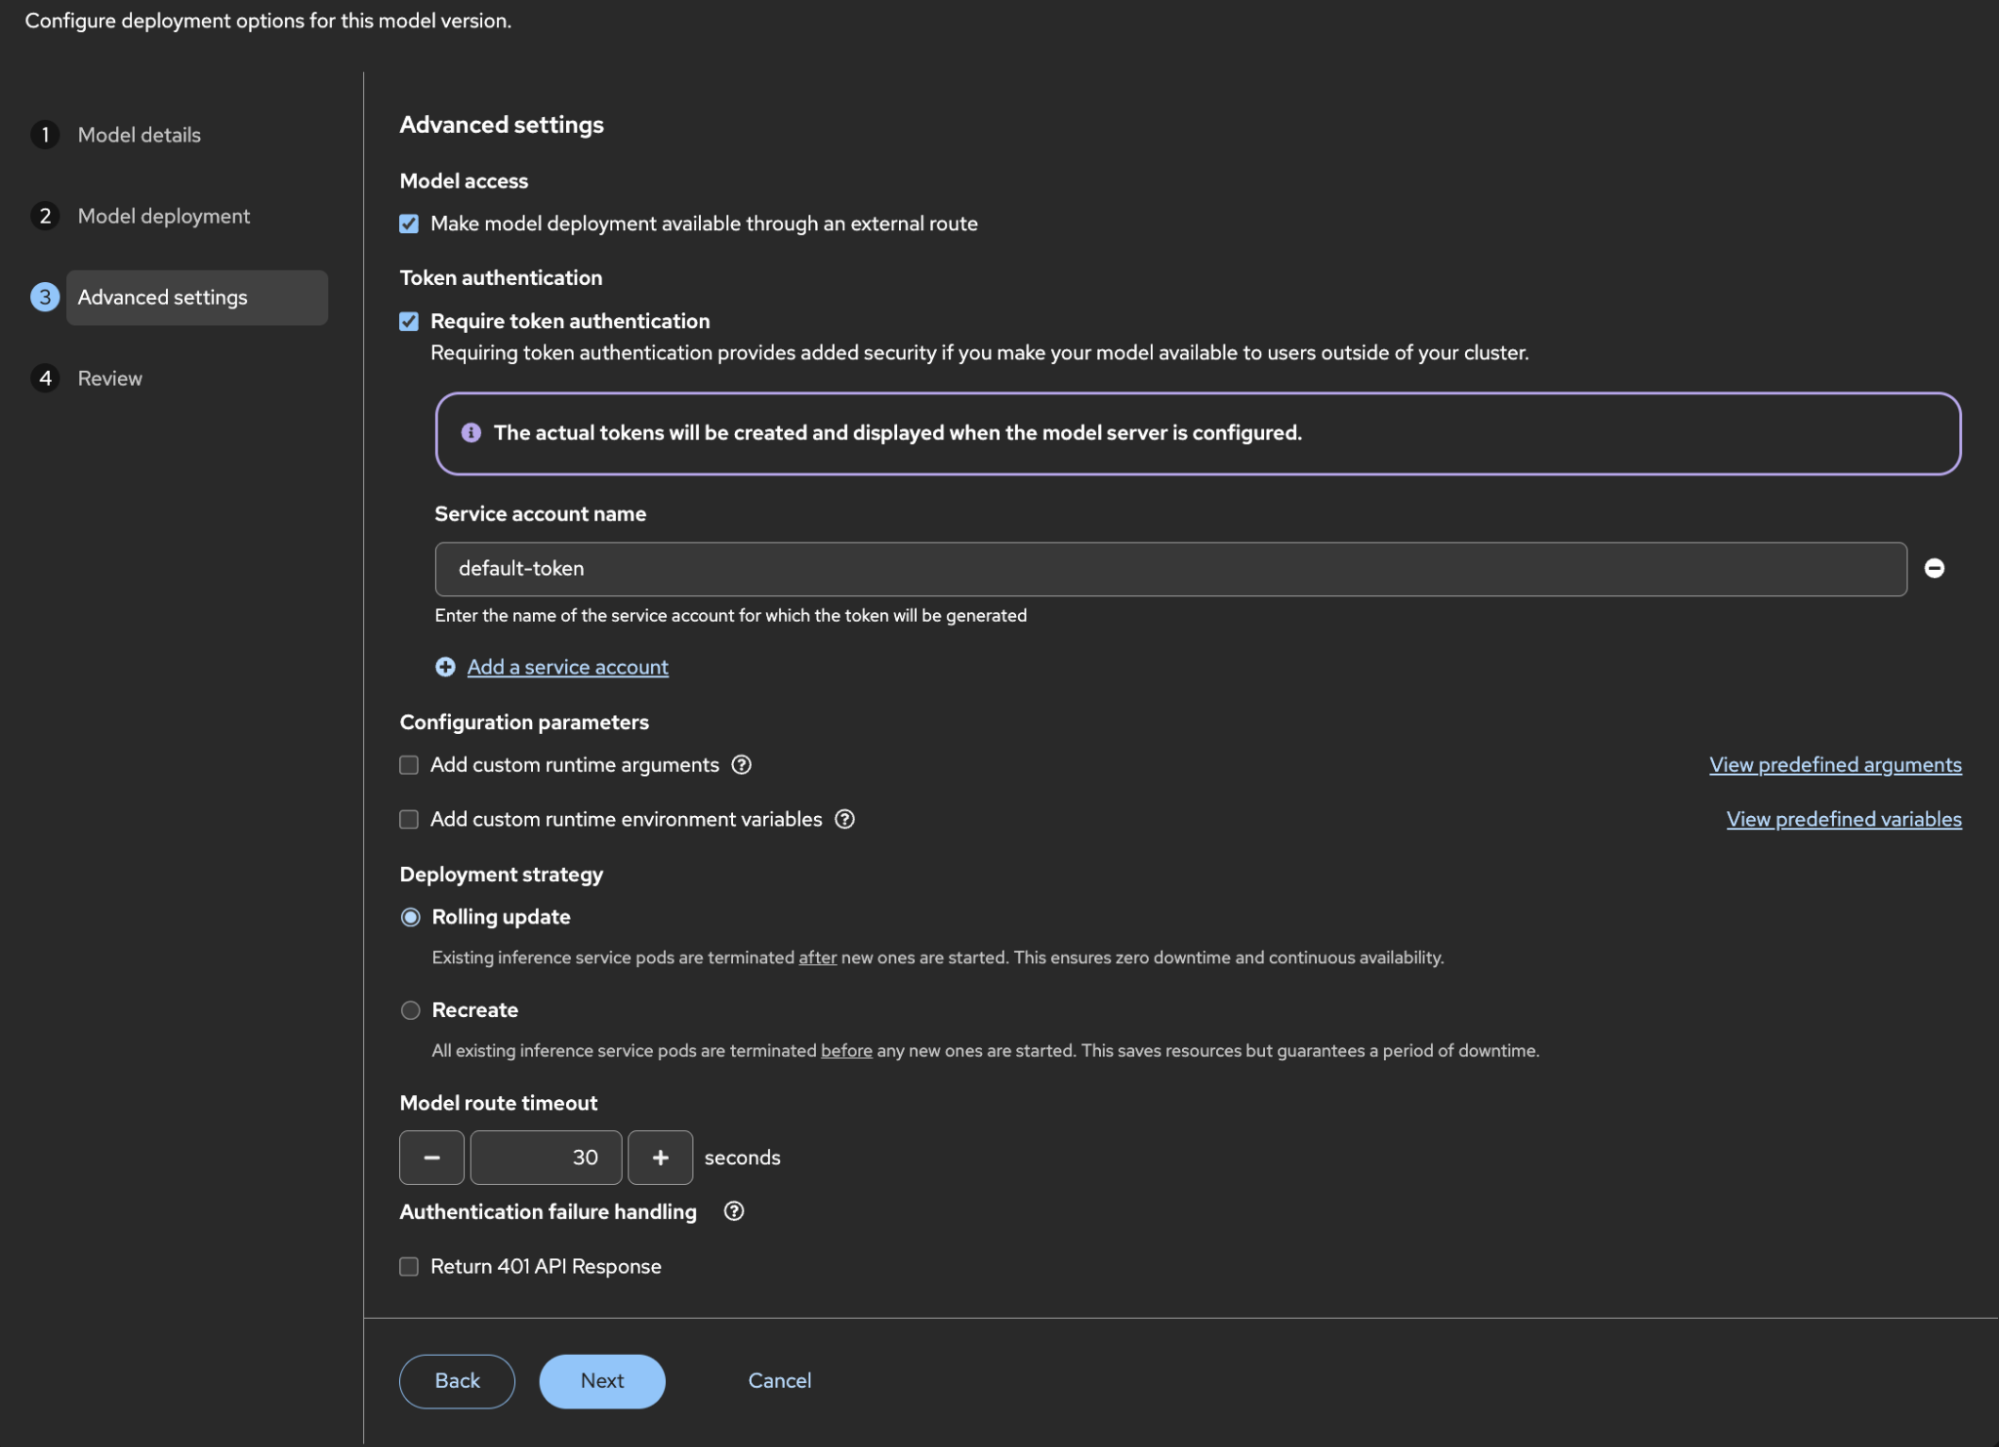
In the Advanced settings view, shown in Figure 7, you can configure additional Kubernetes deployment options. Here, we get an overview of all the nice things we can now add to our deployment because we are using containers and Kubernetes-native features.
We will be adding an external route to this model and requiring authentication to it. Select these options in this view, and then select Next to progress to the final review step.
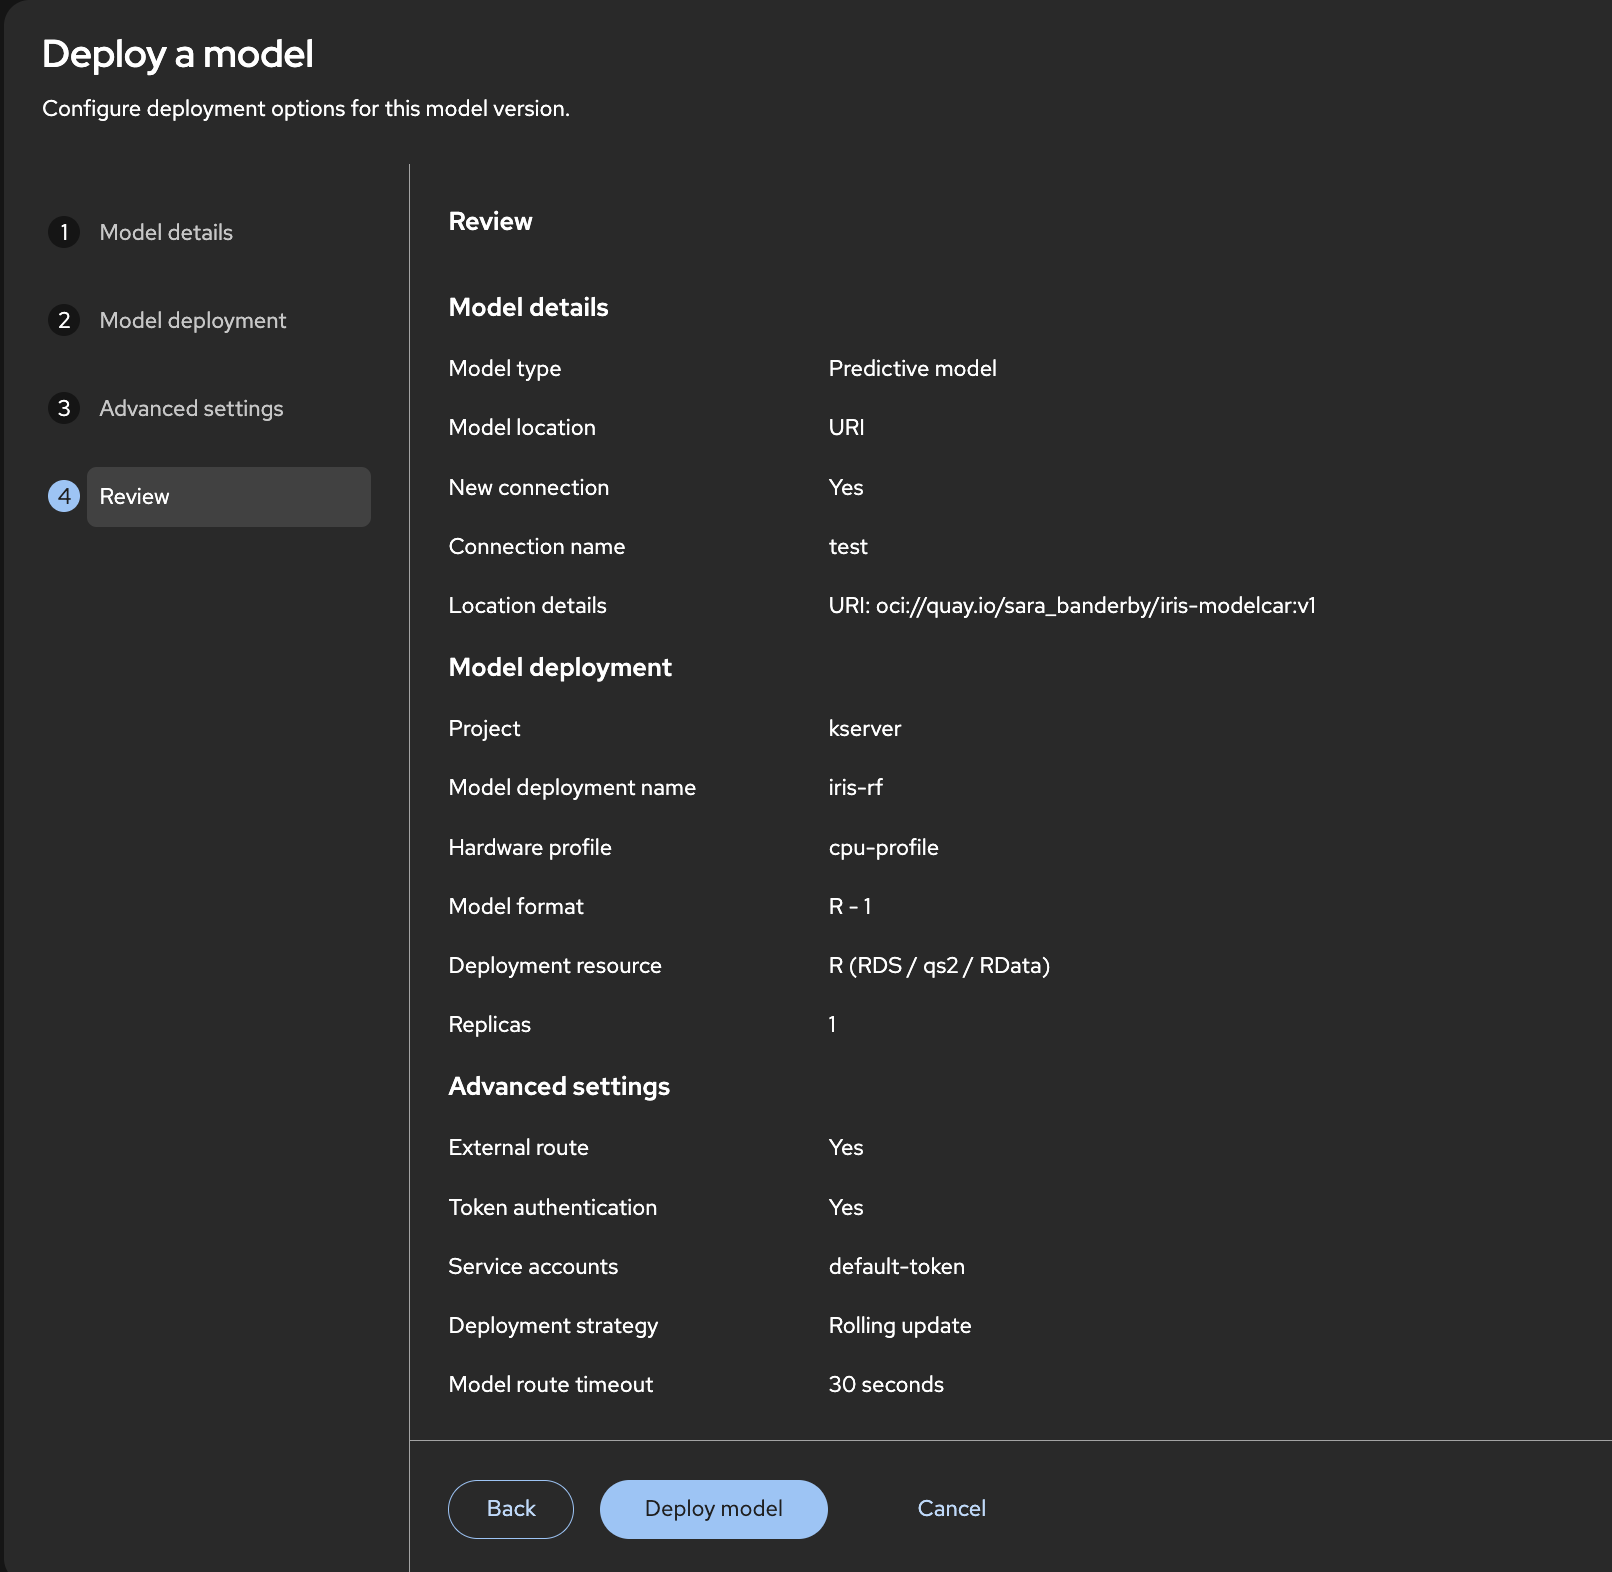
Your final review form should look like Figure 8. The URL in the Location details might differ from this image. Once verified, select Deploy model.
The web console returns to the Deployments view, where the Status column displays deployment progress. The status updates several times until it lands on the colour green and Ready, as shown in Figure 9.
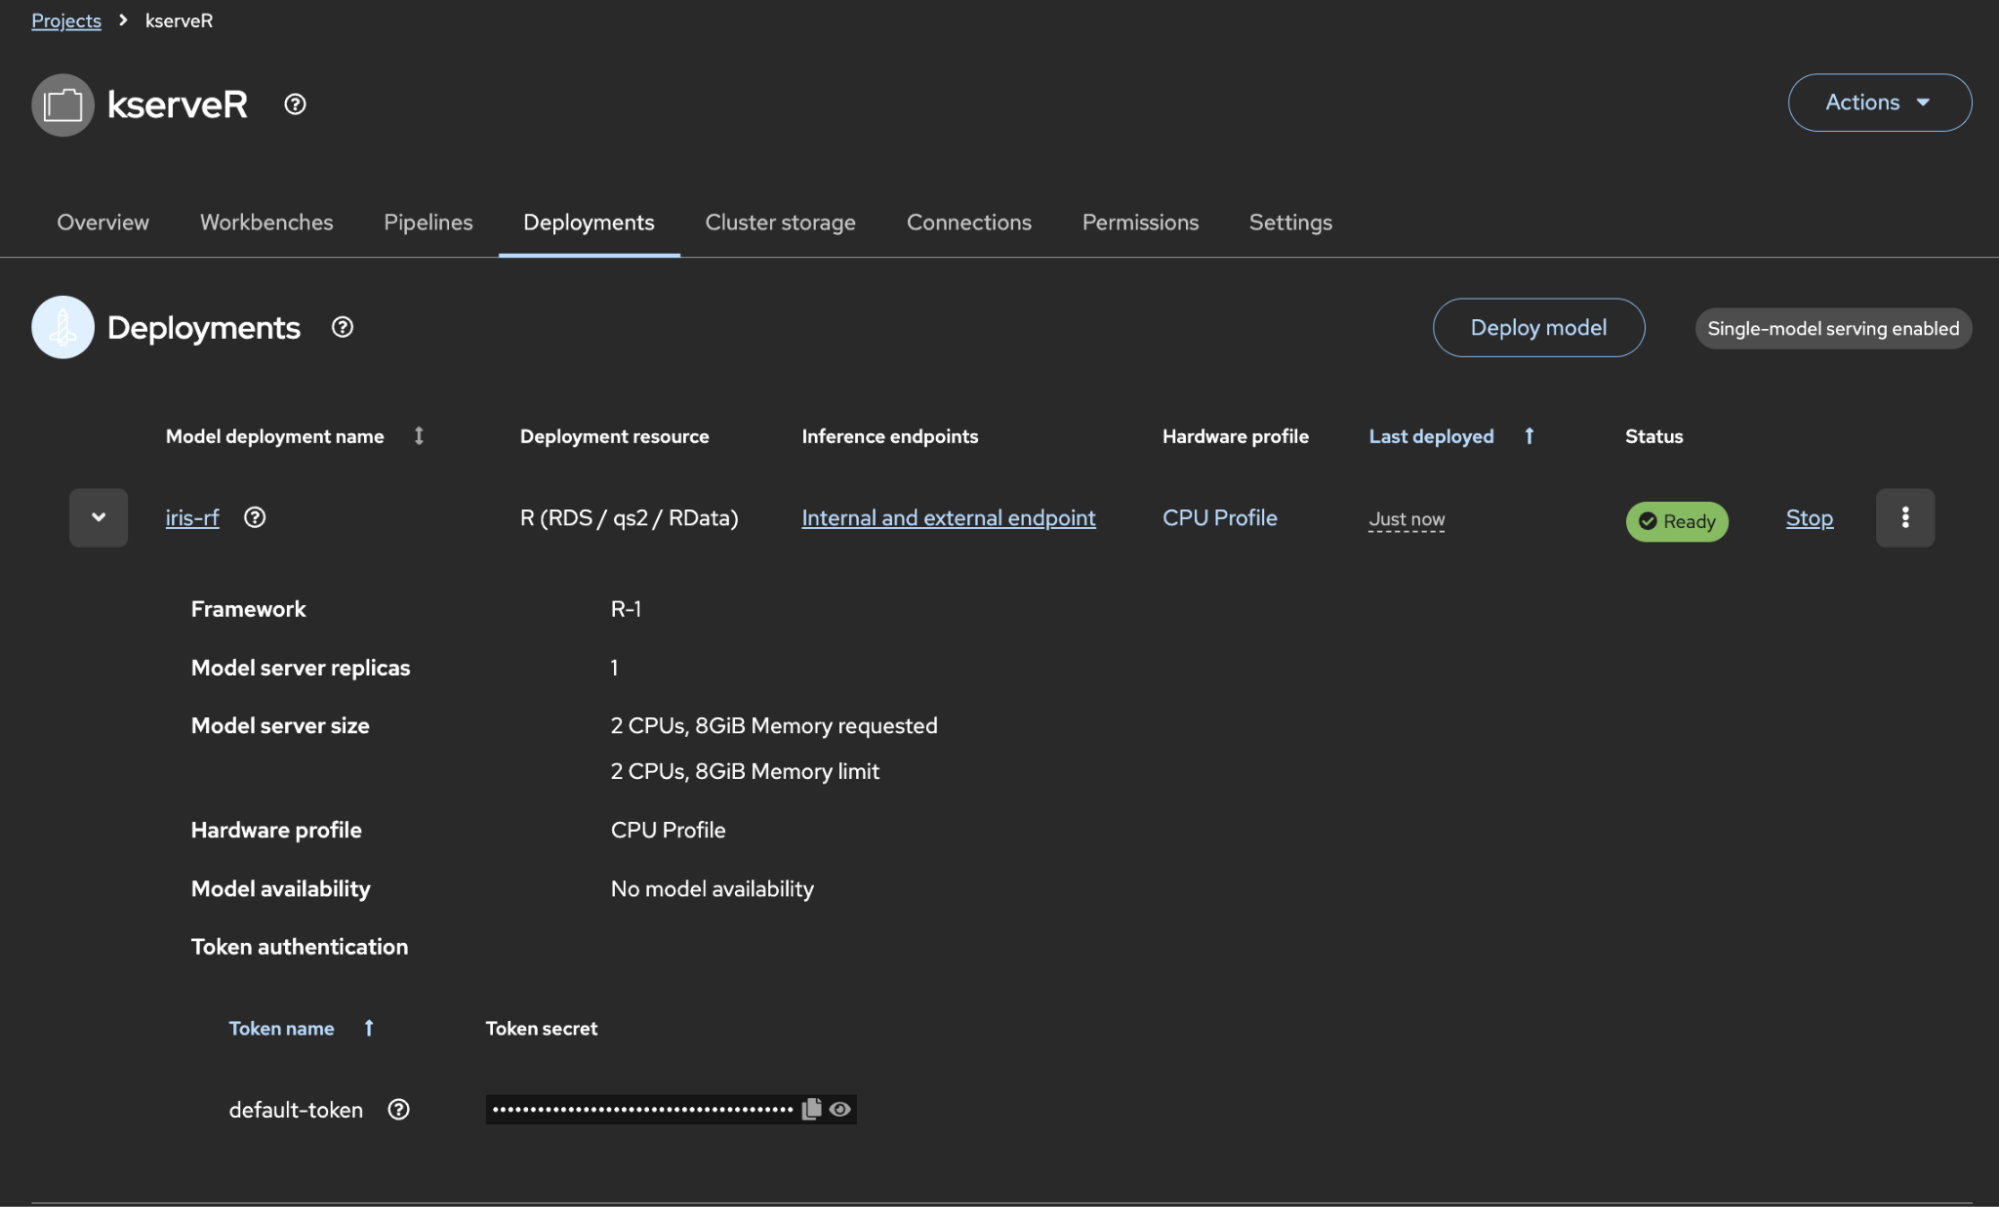
We shall now test the model server to generate a prediction. Select Internal and external endpoint and copy the external route. Copy your token, replace the placeholder values with your specific token and route, and run the following command:
TOKEN=<paste from the dashboard>
curl -k -X POST https://your-hostname/v2/models/iris-rf/infer \
-H "Authorization: Bearer $TOKEN" \
-H 'Content-Type: application/json' \
-d @examples/iris-rf/request.json
If the request succeeds, the terminal returns the following response:
{"model_name":"iris-rf","model_version":"1","outputs":[{"name":"predictions","datatype":"BYTES","shape":[4],"data":["setosa","versicolor","virginica","virginica"]}],"id":"iris-sample"}Magical—our deployment works.
Step 5: The magic of model deployment on Red Hat OpenShift and OpenShift AI
You have now deployed a random forest model in its native R file format with KServe on Red Hat OpenShift and OpenShift AI.
We have moved from the workbench and into production, where your model can now serve predictions through API requests. We can standardise according to our organization's policies, making it faster to go from prototyping to deployment without sacrificing security, all while easily integrating with other applications.
Best of all, we don't have to manage the underlying hardware. Red Hat OpenShift handles load balancing, autoscaling, self-healing, resource management, rolling updates, monitoring, and alerting, while enforcing the security policies that your organisation has in place.
Because we build with UBI (a Red Hat Universal Base Image that follows open container standards), we can use standard tools to scan for common vulnerabilities and exposures (CVEs), helping us identify security risks and ensure our container images comply with our organisation's security policies.
As a data scientist who used to work in life sciences and healthcare, this was once the biggest hurdle for me. I remember many debates and arguments when moving from my experimental environment into the organisation's production environment. Now, it's a straighter path.
While OpenShift AI provides many model serving runtimes out of the box, it also supports bringing your own custom runtime into the platform using this standard.
What next? You can now deploy your models, configure data drift and model drift monitoring, trigger pipelines, and above all, experiment and build new models, because Red Hat OpenShift and OpenShift AI will manage the deployment lifecycle.
Thank you for taking the time to read this blog post. I hope you have enjoyed it and learned something new. Explore the following resources for further reading:
- Working with Red Hat Enterprise Linux Universal Base Images (UBI)
- Build modular AI pipelines with OpenShift AI and reusable components
- Red Hat OpenShift AI
If you have questions or suggestions, open an issue in the kserveR GitHub repository. As always, pull requests are welcome.

