When exploring agentic AI, engineering teams often encounter a common barrier, establishing a dedicated agentic platform service. This involves deploying a new runtime, operating a new control plane, and managing a new set of credentials, all before executing a single workflow. However, the continuous integration (CI) pipeline already serves as the most ideal system for scheduling and orchestration for most teams. This article demonstrates how to build agentic workflows directly inside your existing CI/CD pipeline using cicaddy, a platform-agnostic pipeline AI agent framework, requiring no separate agentic platform. Your CI system is the scheduler, the executor, and the audit trail.
CI as an agentic runtime
An agentic workflow breaks a goal into steps, invokes tools, reasons over results, and produces an output. A CI pipeline does the same thing. It sequences stages, passes context between jobs, integrates with external services, and records artifacts. The difference is that an agentic pipeline step uses a Large Language Model (LLM) to reason over data instead of (or in addition to) deterministic logic.
Figure 1 shows the architecture.
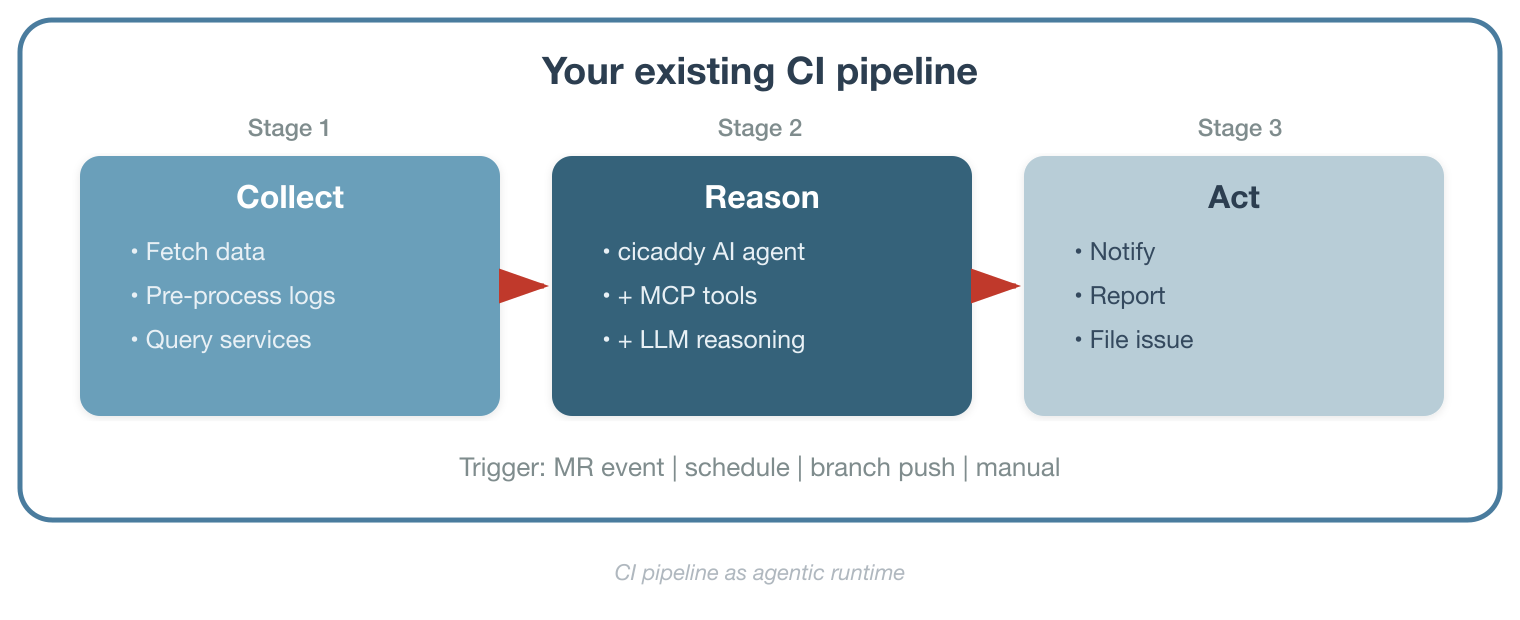
The key insight is that you don't replace your existing workflows; you extend them. The deterministic steps you already trust (data fetching, integration with internal APIs, and log collection) stay the same. The AI agent step slots in where LLM reasoning adds value: pattern analysis, report generation, anomaly detection.
One-shot execution with multi-turn reasoning
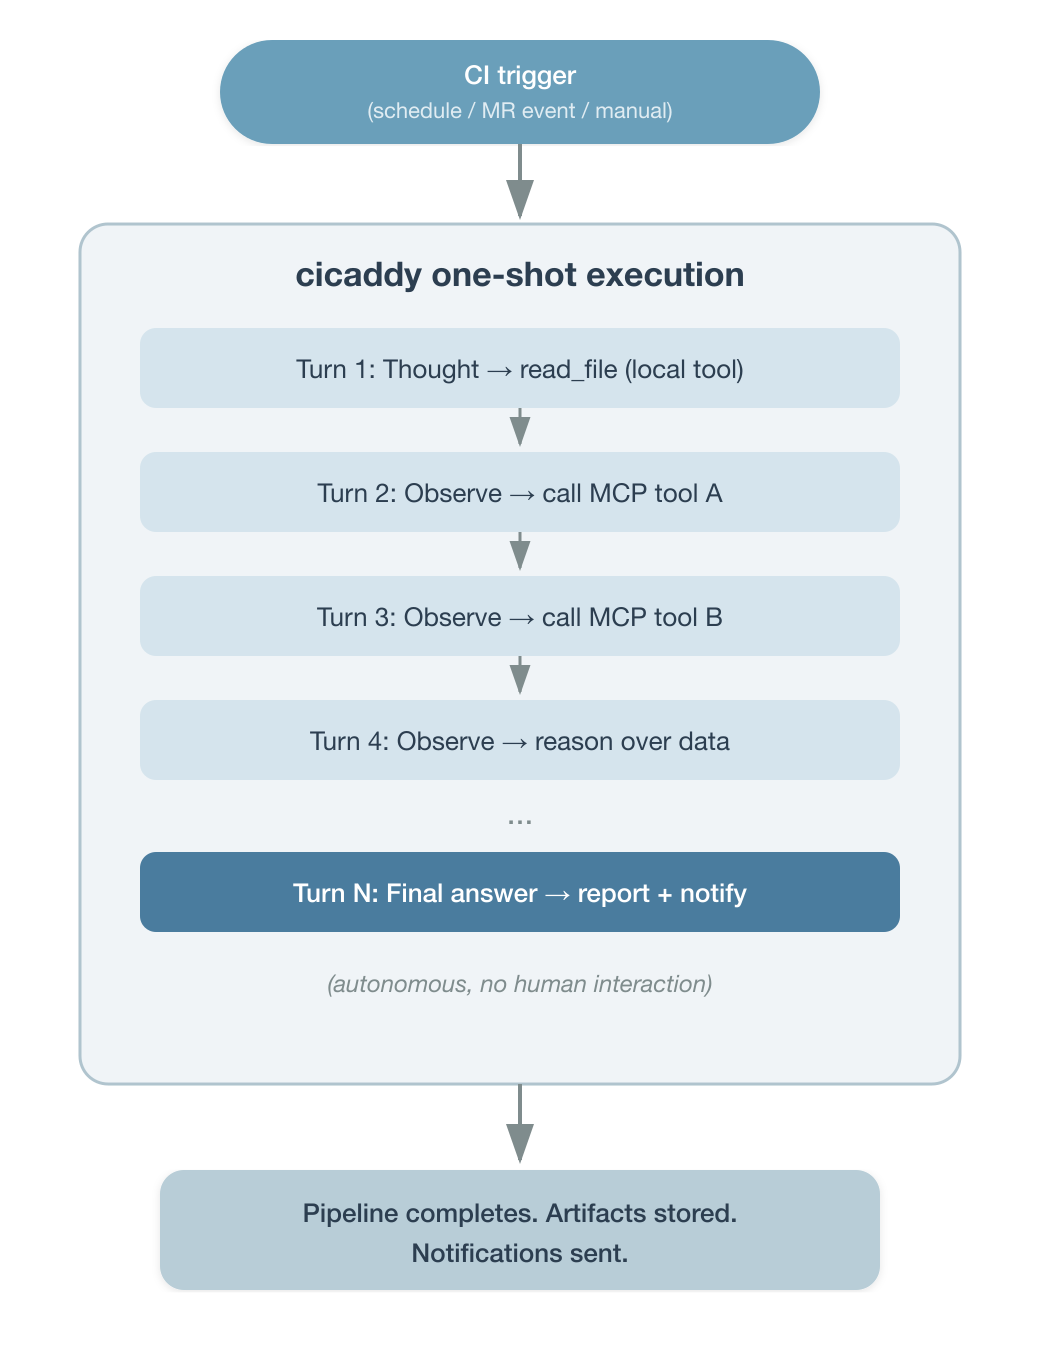
Without an agentic platform service, there is no persistent chat interface or long-running agent process waiting for user input. This is a one-shot execution model where a CI trigger fires, the agent runs autonomously through its task, produces output, and exits (Figure 2).
But one-shot does not mean a single step. Inside that execution, the agent operates a multi-turn reasoning loop. Using the ReAct pattern, it iterates (reading local files, calling Model Context Protocol tools, observing results, and reasoning about what to do next) until the task is complete or the token budget is exhausted. A single pipeline job might involve 10, 20, or 30 inference turns as the agent investigates a problem, gathers data from multiple sources, and synthesizes a report.
The scheduling layer is your CI system, including cron schedules, webhook events, manual pipeline triggers, or downstream pipeline calls. The agent doesn't maintain state between runs. Each execution is independent, self-contained, and auditable as a pipeline job.
This model fits a large class of engineering workflows (i.e., scheduled monitoring, event-driven analysis, report generation, and code review). It does not cover interactive, conversational agent sessions. For those, you would need a persistent service. But for the automation patterns most engineering teams start with, one-shot execution with multi-turn reasoning is the right fit.
What is cicaddy?
Cicaddy is a Python-based framework that runs AI-driven tasks inside CI pipeline jobs. It provides:
- Multi-LLM support: Gemini, OpenAI, Claude
- MCP tool integration: Connects to any Model Context Protocol (MCP) server (i.e., HTTP, stdio, SSE, and WebSocket), so the agent can call external services at inference time.
- Local agent tools: Built-in tools like
read_fileandglob_filesallow the agent to inspect files in the workspace, such as configuration, logs, test results, or any artifact from prior pipeline stages. - DSPy-based task definitions: YAML configuration files that declare inputs, outputs, tool constraints, and reasoning strategy (i.e., chain-of-thought, ReAct, or simple).
- Token-aware execution engine: Manages multi-turn reasoning with recovery mechanisms and token budget tracking.
- Plugin architecture: Custom agents, CLI args, env vars, and config loaders register via Python entry points, needing no core modification.
- Notification system: Slack, email, and CI-native reporting (GitLab comments, GitHub step summaries).
Security through containerization
CI pipeline jobs typically run in containerized environments with limited filesystem and network access. For example, GitLab CI jobs are scheduled to run on ephemeral pods from a connected Red Hat OpenShift Container Platform Kubernetes cluster. These jobs run in containers built on Red Hat Universal Base Images (UBI), which are trusted, OCI-compliant base images designed for production workloads. This provides natural security isolation for the agent's local tools. The read_file can only access what's inside the container workspace, and outbound network access is restricted to what the CI system allows. The agent operates within the same security boundary as any other pipeline step, without elevated privileges. This is a significant advantage over deploying an agent as a standalone service, where filesystem and network access require additional hardening.
3 agent types map to 3 CI triggers
The CI pipeline uses three agent types to automate workflows.
- MR Agent
- CI trigger: Merge request event
- What it does: Analyzes code diff, posts review comments, sends notifications
- Branch Agent
- CI trigger: Branch push
- What it does: Runs branch-level analysis with commit comment integration
- Task Agent
- CI trigger: Pipeline schedule / manual / any event
- What it does: General-purpose agent for monitoring, report generation, data analysis, and custom workflows
These aren't arbitrary categories. They map directly to how CI systems expose events to pipeline jobs. The MR Agent and Branch Agent activate on merge requests and push events respectively. The Task Agent is the general-purpose workhorse. It runs on any trigger (cron schedules, manual runs, API calls, or downstream pipeline events) and executes whatever task definition you give it. Cicaddy detects the context automatically and selects the right agent type.
How MCP servers become your integration layer
The Model Context Protocol (MCP) gives the AI agent a standardized way to interact with external services at inference time. Instead of writing custom API client code for every service, you configure MCP servers and let the agent's reasoning loop decide which tools to call.
MCP_SERVERS_CONFIG: >-
  [
    {"name": "devlake", "protocol": "http",
     "endpoint": "https://devlake-mcp.example.com/mcp",
     "headers": {"Authorization": "Bearer ${DEVLAKE_TOKEN}"},
     "timeout": 300},
    {"name": "internal-data-service", "protocol": "http",
     "endpoint": "https://internal-data-service-mcp.example.com/mcp",
     "timeout": 120},
    {"name": "context7", "protocol": "http",
     "endpoint": "https://mcp.context7.com/mcp",
     "headers": {"CONTEXT7_API_KEY": "$CONTEXT7_API_KEY"},
     "timeout": 300}
  ]
MCP operates as an input and output channel:
- Read from MCP: Query databases, fetch metrics, access monitoring data, look up documentation
- Write via MCP: Send results to data collection services, post to ticketing systems, trigger notifications
For services that already expose an MCP interface, integration is configuration, not code. For services that don't have MCP support yet, the deterministic pre-processing stages in your pipeline can collect that data and write it to files the agent reads with its local tools in the next stage.
Pipeline as workflow definition
A workflow in this model is a pipeline configuration file. Each stage can be a deterministic step (shell scripts, API calls, data transformations) or an AI agent step (cicaddy invocation with a DSPy task file and MCP tools). The pipeline YAML is the workflow specification.
A daily service monitoring workflow on GitLab CI is a concrete example of this. The pipeline job references a DSPy task file that defines the analysis structure as follows:
include:
  - project: 'your-org/agents/pipeline-agent'
    file: 'gitlab/ai_task_template.yml'
    ref: 'main'
daily_service_health:
  extends: .ai_task_template
  stage: analysis
  variables:
    AI_PROVIDER: "gemini"
    GEMINI_API_KEY: $GEMINI_API_KEY
    AI_TASK_FILE: "tasks/service_health_analysis.yml"
    MCP_SERVERS_CONFIG: >-
      [{"name": "internal-data-service", "protocol": "http",
        "endpoint": "${DATA_SERVICE_MCP_ENDPOINT}",
        "timeout": 120}]
    SLACK_WEBHOOK_URL: $SLACK_MONITORING_WEBHOOK
  rules:
    - if: $CI_PIPELINE_SOURCE == "schedule"
The pipeline schedule in your CI system handles the cron. The template handles container setup, SSL certificates, and credential management. The DSPy task file (service_health_analysis.yml) defines the persona, inputs, outputs, tool constraints, reasoning strategy, and prompt, all in a structured, reviewable format. The pipeline job stays clean, including the provider, task file, MCP config, and notification target.
Success story: GitLab AI Agent in production
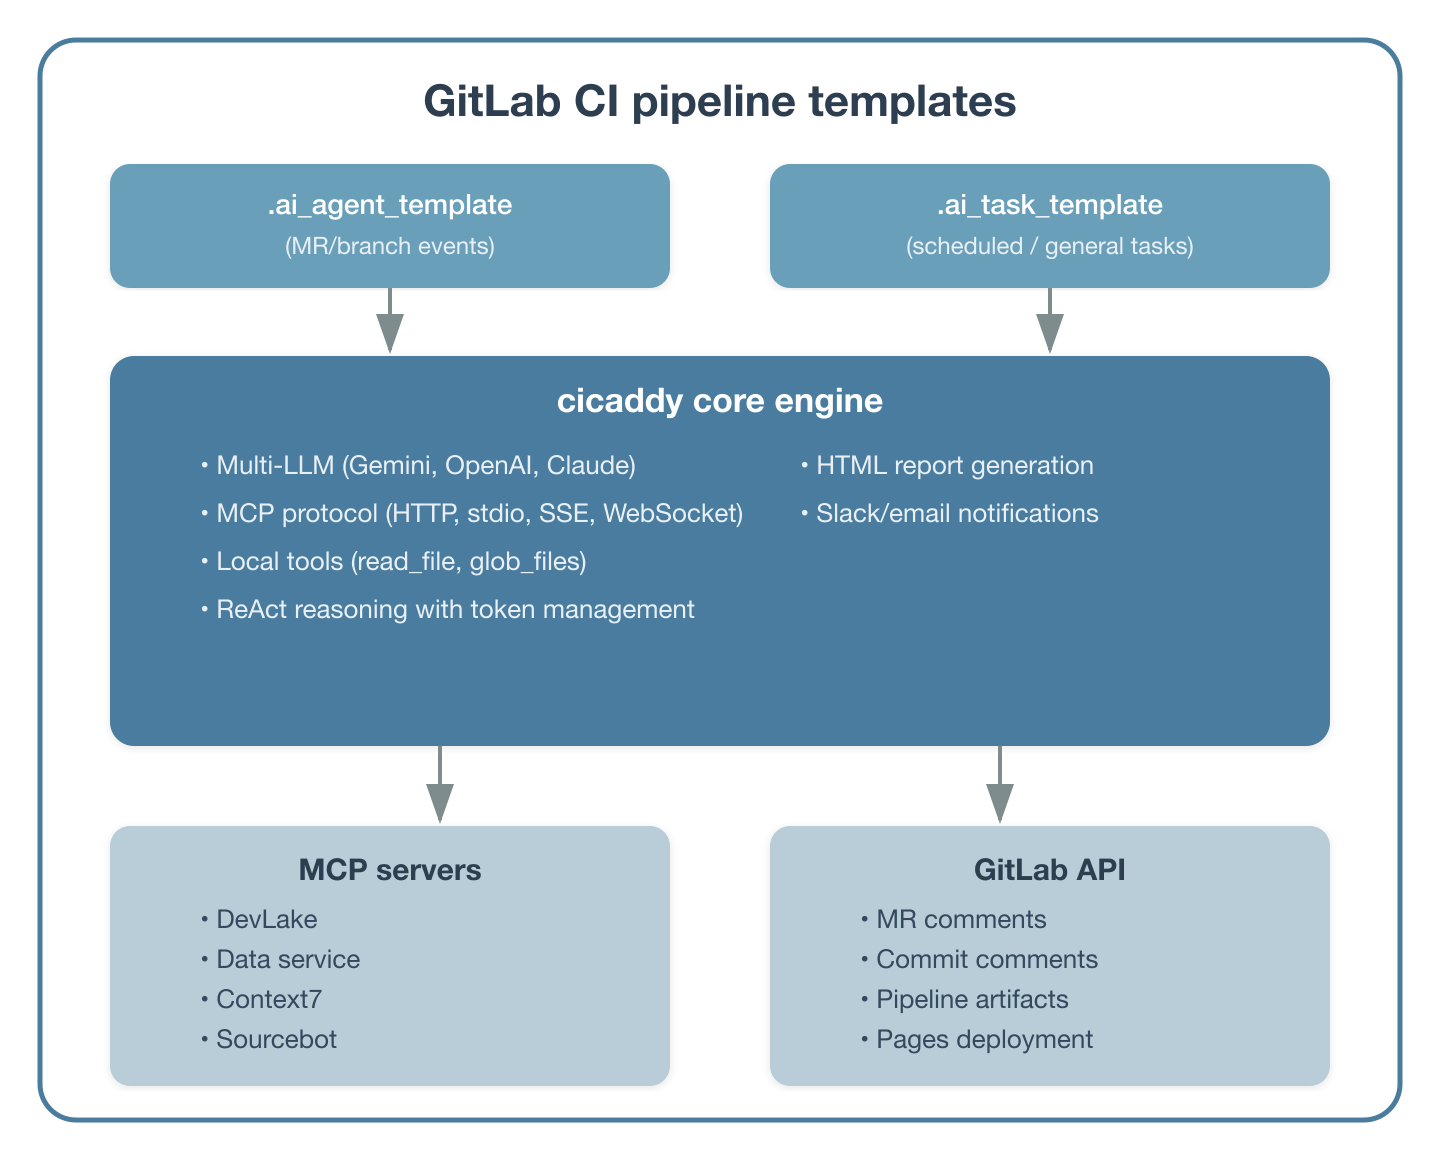
We built a production AI agent system internally using cicaddy as the core engine, deployed as GitLab CI pipeline templates. Teams across the organization adopt workflows by adding an include statement and setting variables without an agent infrastructure to provision.
Figure 3 shows the architecture.
Workflow 1: Service monitoring and reporting
A daily scheduled pipeline monitors service health using an internal data service MCP server. The Task Agent queries request volumes, failure rates, and component event statuses across multiple inference turns. Then it generates an HTML report with an executive summary and prioritized action items. Reports deploy to GitLab Pages automatically and Slack notifications go out with key findings.
This workflow replaced a manual process where team members would log into dashboards, collect metrics, and write summaries. The AI agent handles the data collection and analysis in a one-shot execution, and the pipeline schedule handles the daily cadence.
Workflow 2: Developer productivity metrics
Using the Konflux DevLake MCP server, we built workflows that generate developer productivity reports at multiple granularities:
- DORA metrics: Deployment frequency, lead time for changes, change failure rate, mean time to recovery
- Deep-dive reports: PR cycle time breakdowns, retest pattern analysis, code coverage trends across repositories
The pipeline architecture uses a parent-child pattern for parallel analysis.
GitLab Schedule
    └── Parent pipeline
        ├── Child: Retest analysis (4 parallel repo jobs + summary)
        ├── Child: Coverage analysis via DevLake MCP + AI
        └── Child: DORA metrics via DevLake MCP + AI
Each child pipeline is a cicaddy Task Agent invocation with a specific DSPy task file and MCP configuration. The parent pipeline orchestrates them and publishes combined results to GitLab Pages. Each agent execution is one-shot. The pipeline schedule and parent-child structure provide the coordination, not a persistent agent service.
Workflow 3: MR code review
This workflow involves MR code review with up-to-date library knowledge. When a merge request is created, the MR Agent analyzes the diff and posts review comments directly to the merge request. By adding an MCP server like Context7 to the agent's configuration, the agent accesses current library documentation during review, catching deprecated patterns and suggesting modern alternatives that wouldn't be visible to an LLM relying solely on its training data. The MCP server configuration is the same as shown in the integration layer section. No additional template changes are needed beyond adding the server to MCP_SERVERS_CONFIG and instructing the task file to verify library best practices.
Template-based adoption
Teams adopt these workflows through GitLab CI templates. A project that wants daily monitoring adds this to its .gitlab-ci.yml.
include:
  - project: 'your-org/agents/pipeline-agent'
    file: 'gitlab/ai_task_template.yml'
    ref: 'main'
Then it defines variables for their specific use case with no containers to deploy, no services to maintain, and no new infrastructure. The scheduling system they already use (i.e., GitLab CI schedules) drives execution.
Mixing deterministic and AI processing in a pipeline
Not every step in an agentic workflow should use an LLM. LLMs are powerful for pattern recognition, natural language analysis, and generating human-readable summaries. They are not the right tool for high-accuracy data extraction, structured log parsing, or cases where you need deterministic guarantees.
The pipeline model makes this easy to mix (Figure 4).
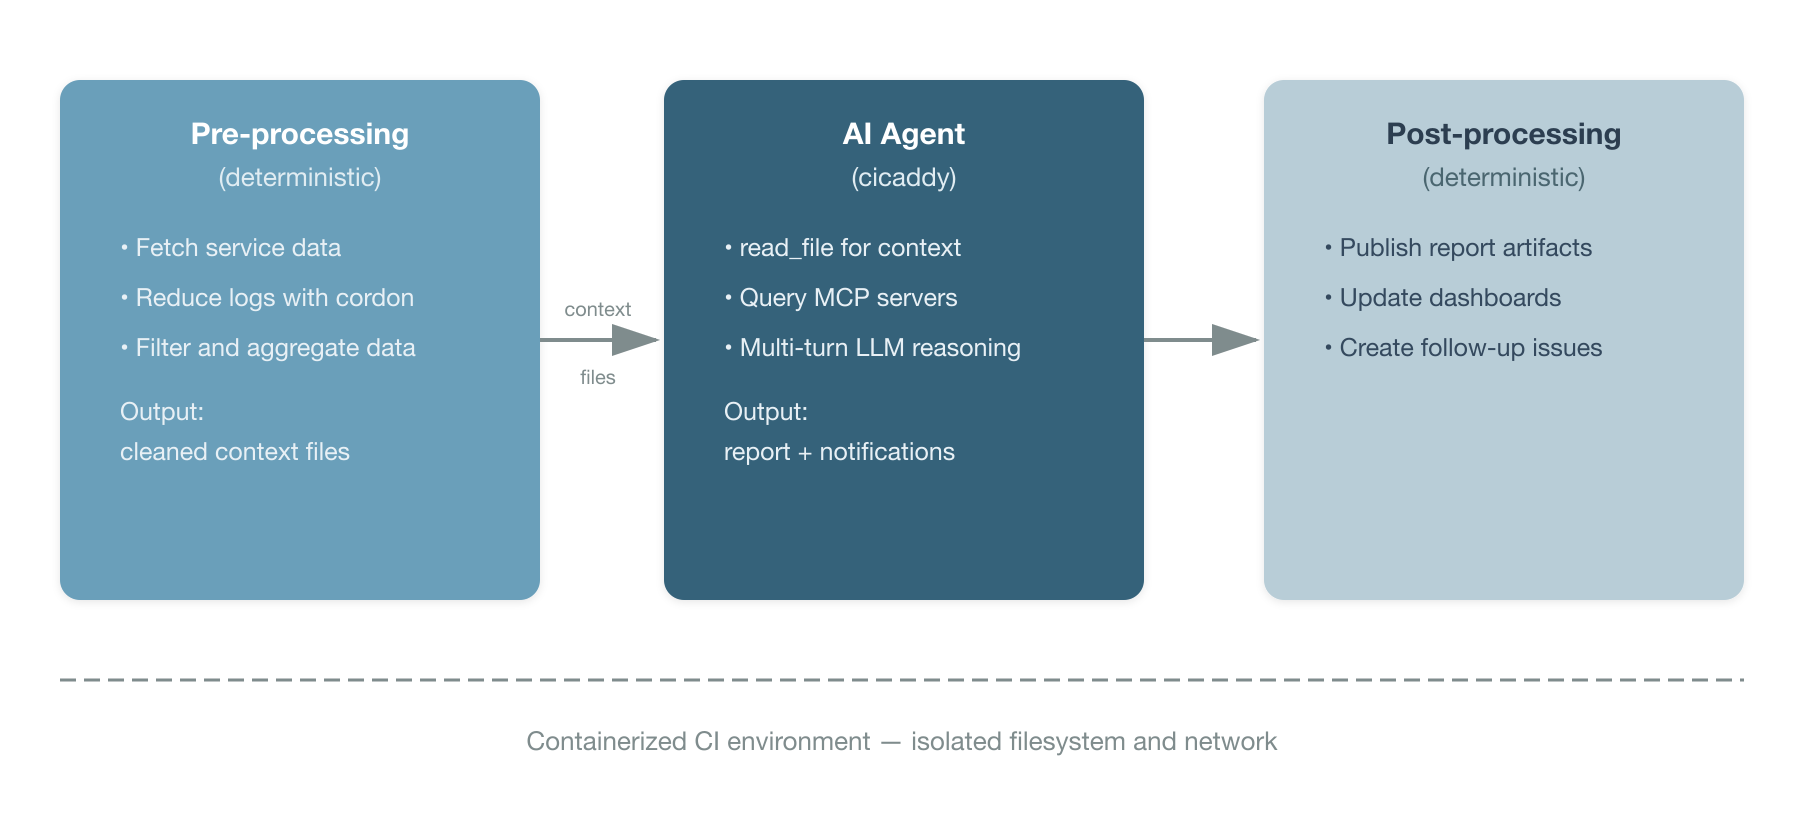
This pattern addresses the following several practical concerns.
Services without MCP access: Not every internal service has an MCP interface. The pre-processing stage can use direct API calls, database queries, or CLI tools to collect data and write it to workspace files. The agent then reads those files with its local read_file tool in the next stage.
High-accuracy requirements: When you need exact numerical values or structured data extraction, deterministic processing in the pre-processing stage gives you guarantees that LLM inference cannot.
Excessive log volume: Raw CI logs may contain thousands of lines of repetitive output that would overwhelm an LLM's context window. A pre-processing step using cordon, a tool that reduces logs to their semantic anomalies, can strip the noise and surface of only the meaningful deviations before the main analysis agent processes them. This keeps the agent focused on what actually matters and prevents token waste on repetitive log lines.
Context restriction: When you want to limit what the AI agent can see (for security or focus), the pre-processing step acts as a filter, writing only relevant data to the workspace. The containerized CI environment ensures the agent can only access what's in that workspace. It cannot reach outside the container's filesystem or network boundaries.
The AI LLM analysis step is the low-hanging fruit for automation. Start there, with monitoring reports, trend analysis, anomaly detection, without replacing the deterministic workflows your team already trusts. The existing integrations, dashboards, and service connections stay intact. The AI step adds a new capability: reasoning over the data your pipeline already collects.
Structured prompts for reproducible workflows
Cicaddy uses YAML task definitions inspired by DSPy patterns. DSPy task definitions are structured prompts for reproducible workflows. Each task file declares a persona, inputs, outputs, reasoning strategy, tool constraints, prompt, and guardrail constraints — everything the agent needs to execute a workflow in a structured, reviewable format.
For a complete example, see the DORA metrics task definition in the cicaddy repository.
Task files are version-controlled, reviewable, and shareable. A team that developed a useful analysis pattern can publish it as a template for other teams to adopt. The pipeline job references the task file via AI_TASK_FILE, keeping the CI configuration clean and the workflow logic in a dedicated, structured format.
1. Define your first workflow
Identify a monitoring or reporting task that currently requires manual effort.
Good candidates:
- Daily or weekly status reports assembled from multiple data sources
- Failure pattern analysis across test runs or deployments
- Metrics collection and trend analysis
2. Create a DSPy task file
Define your workflow as a YAML task file following the format described in the DSPy task definitions section above. Start with a persona, outputs, reasoning mode, and prompt. Add tool constraints and inputs as your workflow matures.
3. Set up the pipeline
This outlines the necessary steps for configuring the CI pipeline.
include:
  - project: 'your-org/agents/pipeline-agent'
    file: 'gitlab/ai_task_template.yml'
    ref: 'main'
my_first_workflow:
  extends: .ai_task_template
  variables:
    AI_PROVIDER: "gemini"
    GEMINI_API_KEY: $GEMINI_API_KEY
    AI_TASK_FILE: "tasks/my_first_analysis.yml"
    SLACK_WEBHOOK_URL: $SLACK_WEBHOOK_URL
  rules:
    - if: $CI_PIPELINE_SOURCE == "schedule"
4. Add MCP servers for richer data access
As your workflows mature, add MCP server connections for services that support the protocol. Each new MCP server extends what the agent can query and act on without changing the agent code or the task file.
Why this approach works
This approach works because there is no new infrastructure to manage. The CI system you already maintain handles scheduling, execution, logging, secrets, and artifact storage. Adding an AI agent step is operationally equivalent to adding any other pipeline job.
One-shot fits most automation patterns. Scheduled monitoring, event-driven analysis, report generation, and code review are all naturally one-shot tasks. The agent runs, produces output, and exits. The multi-turn reasoning loop inside the execution gives it the depth of an interactive session without requiring a persistent service.
There is containerized security isolation. The agent runs inside the same containerized environment as any other CI job. Local tools like read_file are scoped to the container workspace. Network access is limited to what the CI system permits. No additional hardening is required beyond what you already have for your pipeline.
It offers incremental adoption. Start with one scheduled analysis job. Add MCP servers when services expose them. Introduce pre-processing stages when you need them. Each step adds value without requiring a platform migration.
There is a separation of concerns. Deterministic logic stays deterministic. AI reasoning is applied where it adds value, such as pattern analysis, natural language reporting, and anomaly detection. The pipeline YAML handles orchestration, and the DSPy task file handles the agent's behavior.
It provides template-based sharing. Once a workflow proves useful, it becomes a CI template that other teams include with a single line. The task files, MCP configurations, and pipeline templates are all version-controlled and reviewable.
Your CI system is already the scheduling system. Pipeline schedules, webhook triggers, and manual runs are mature, understood mechanisms. Using them for agentic workflows means you get monitoring, alerting, retry logic, and access control for free.
Wrap up
Agentic AI workflows don't require a dedicated agentic platform. For engineering teams with established CI/CD pipelines, the scheduling system, execution environment, and operational tooling already exist. Cicaddy provides the bridge and a pipeline-native AI agent framework that connects LLM reasoning and MCP tool access to the pipeline stages you already define.
The execution model is one-shot with multi-turn reasoning. Your CI trigger fires, the agent reasons autonomously through its task across multiple inference turns, and the pipeline job completes. This has no persistent service and no chat interface—just a pipeline step that thinks. You can start with the low-hanging fruit: automated monitoring reports and analysis that currently require manual effort. Use your existing service integrations for data collection. Let the AI agent handle the reasoning and report generation. Scale by sharing pipeline templates across teams. The workflow is the pipeline. The scheduler is your CI system. The agent is a step.
Most model serving platforms (i.e., vLLM, TGI, and Ollama) offer an OpenAI-compatible API, a key feature for teams that opt for self-hosted inference models. Cicaddy can be extended to support this interface natively, so any self-hosted model that provides OpenAI-compatible API access would work out of the box. Red Hat AI offers a solution for hosting and serving inference models on your infrastructure. This platform grants full control of data residency and model choice while integrating seamlessly with cicaddy's support for multiple LLMs.