Page
Configuring the ROSA HCP cluster
Now that OpenShift Service on AWS has been installed and enabled, there are several configurations to be made for our environment to work. One of which is to create a cluster with several specific users and items added to it.
Note
If you do not have a cluster created, please see the cluster creation resource.
Prerequisites:
- An Amazon Web Services account.
- A Red Hat account.
- Necessary permissions to create clusters and Identity Access Management (IAM) resources within your AWS instance.
- A ROSA-enabled cluster with HCP.
- Configured Keycloak instance, users, and groups.
Note
If you do not already have a Keycloak instance configured, follow Lesson 3 - Create a Keycloak instance on AWS to create one before proceeding.
In this lesson, you will:
- Enable and configure external auth within the ROSA cluster.
- Create a Break-Glass user.
- Configure role-based access control (RBAC).
Configure external authentication on the cluster
Returning to your newly created (or already existing) ROSA cluster, it’s time to enable and configure an external authentication provider. For this learning path, we will be using Keycloak.
First, go ahead and verify that your cluster is ready with external authentication enabled with the following command:
rosa describe cluster -c $CLUSTER_NAME
# Confirm: External Authentication: Enabled
Next, you will have to configure the authenticator for Keycloak. This can be accomplished one of two ways:
Option 1: Using a certificate authority
Should you wish to have a self-signed or custom certificate authority (CA), then you can use this option to configure your cluster.
Obtain Keycloak CA (if applicable):
echo | openssl s_client -servername $KEYCLOAK_DOMAIN -connect $KEYCLOAK_DOMAIN:443 2>/dev/null | openssl x509 -outform PEM > keycloak-ca.crt

export KEYCLOAK_CA_FILE="keycloak-ca.crt"
Create an external auth provider with CA:
rosa create external-auth-provider \
  --cluster=$CLUSTER_NAME \
  --name=keycloak \
  --issuer-url=https://$KEYCLOAK_DOMAIN/realms/$KEYCLOAK_REALM \
  --issuer-audiences=$KEYCLOAK_CLIENT_ID \
  --claim-mapping-username-claim=email \
  --claim-mapping-groups-claim=groups \
  --console-client-id=$KEYCLOAK_CLIENT_ID \
  --console-client-secret=$KEYCLOAK_CLIENT_SECRET \
  --issuer-ca-file=$KEYCLOAK_CA_FILE
Option 2: WITHOUT a certificate authority
Should you wish to use a publicly trusted certificate, then proceed with the following step:
rosa create external-auth-provider \
  --cluster=$CLUSTER_NAME \
  --name=keycloak \
  --issuer-url=https://$KEYCLOAK_DOMAIN/realms/$KEYCLOAK_REALM \
  --issuer-audiences=$KEYCLOAK_CLIENT_ID \
  --claim-mapping-username-claim=email \
  --claim-mapping-groups-claim=groups \
  --console-client-id=$KEYCLOAK_CLIENT_ID \
  --console-client-secret=$KEYCLOAK_CLIENT_SECRET
Creating a break-glass user
As part of the key configurations to make in preparation, you will next make a break-glass user. A break-glass credential will provide temporary oc access to the cluster, allowing you to configure RBAC so that when users authenticate through the external auth provider (Keycloak), they are granted the correct cluster permissions.
- Go to the console.
- Open your cluster.
Within the Access control menu, select Credentials, then click New Credentials. (Figure 1).
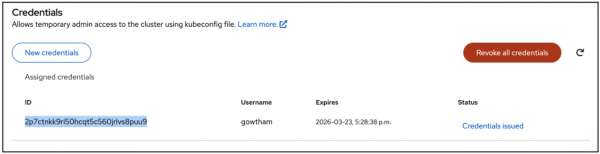
Figure 1: The credentials menu within the console with the newly created credentials for your Break-Glass user. Copy the generated ID and set the name as
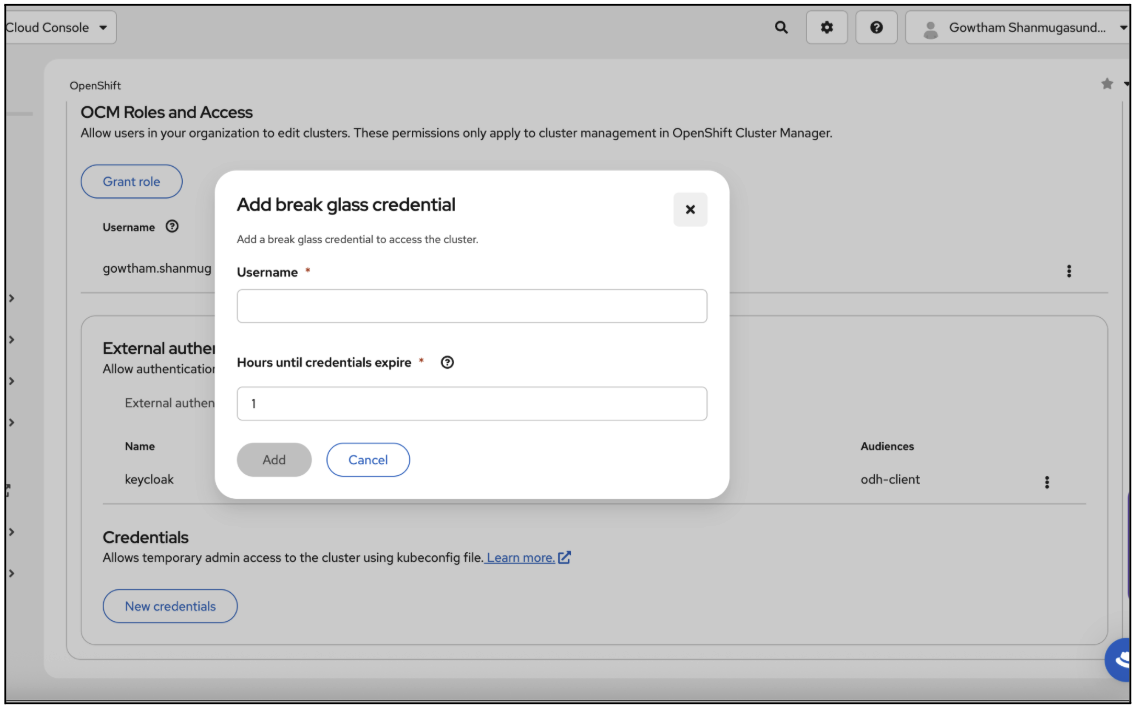
BREAK_GLASS_USER_ID(Figure 2).
Figure 2: The Break-Glass credential menu where the name and hours until expiration can be set. Alt text: A screenshot of the Add break glass credential screen asking for a username and the amount of hours until the credential expires. Fig. 2. The break-glass credential menu where the name and hours until expiration can be set. Next, you’ll download
kubeconfigfor the break-glass credential to obtain temporary command-line interface (CLI) access using the following command:export KUBECONFIG="/path/to/your/kubeconfig.yaml" rosa describe break-glass-credential $BREAK_GLASS_USER_ID -c $CLUSTER_NAME --kubeconfig > $KUBECONFIG

Configure role-based access control (RBAC)
Finally, you will need to create ClusterRoleBinding for your odh-admin group. This can be done through the following:
oc apply -f - <<EOF
apiVersion: rbac.authorization.k8s.io/v1
kind: ClusterRoleBinding
metadata:
  name: rosa-hcp-admins
roleRef:
  apiGroup: rbac.authorization.k8s.io
  kind: ClusterRole
  name: cluster-admin
subjects:
- apiGroup: rbac.authorization.k8s.io
  kind: Group
  name: odh-admin
EOF
Now that you have successfully configured the cluster, you’re ready to create a Keycloak instance.
