Page
Configure the testing pipeline environment
In our first lesson, we will clone the repository and configure our environment to prepare the pipeline. Detailed YAML files for each step of the process will be found in this GitHub repository. They include everything from setting up the project and volumes to executing the pipeline.
Note
For this learning path, we will be using Open5GS as the 5G core implementation, but the overall automation approach applies to any 5G core solution that can be deployed on OpenShift.
Prerequisites:
- Download Red Hat OpenShift version 4.18 or higher.
- Deploy a 5G core solution with deployment artifacts accessible to the CI/CD pipeline from a central repository.
- Have access to a code repository platform, like GitHub, for storing playbooks.
- Install an artifact registry platform, like Red Hat Quay, for storing container images.
- Install the Red Hat OpenShift Pipelines operator for CI/CD.
- Install a test orchestration tool, like Rebaca ABot via OperatorHub or Helm, but any comparable solution will work.
- Install
oc CLIinstalled on your local machine.
In this lesson, you will:
- Configure four Red Hat Ansible Automation Platform playbooks for the pipeline.
- Create a persistent volume claim (PVC) and Ansible Automation Platform credentials in a new pipelines project.
- Add the
cluster-adminrole to the pipeline service account. - Configure inbound and outbound Quay repositories.
- Configure Rebaca ABot, our testing orchestrator, with the correct properties files.
- Integrate Slack notifications into the 5G core testing pipeline.
Get access to the source content
Clone the repository:
git clone https://github.com/rh-telco-tigers/open5gs-test-framework.git cd open5gs-test-framework- Create a new GitHub repository.
- Go to github.com and sign in.
- Click the + icon (top right) → New repository.
- Give it a name (e.g.,
open5gs-playbooks) and click Create repository. - Copy the repository URL. You'll need it in the next step.
Push the playbooks folder.
# Navigate into the playbooks folder
cd playbooks

# Initialize a new git repo and push to GitHub
git init
git add .
git commit -m "Initial commit: Add playbooks"
git remote add origin https://github.com/<your-username>/open5gs-playbooks.git git push -u origin main
Note
Replace <your-username> and open5gs-playbooks with your actual GitHub username and repo name.
Configure Ansible Automation Platform
- Go to your Ansible Automation Platform server URL at https://<AAP_SERVER_NAME>/ and log in to the web UI with your credentials.
Go to Projects > Add, set the Source Control Type to Git, and enter the repository URL where your playbooks are stored (Figure 1).
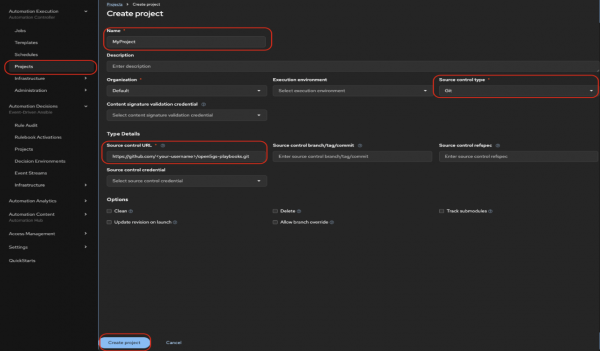
Figure 2: Create a project in Ansible Automation Platform. Figure 1: Create a project in Ansible Automation Platform. - For each playbook (
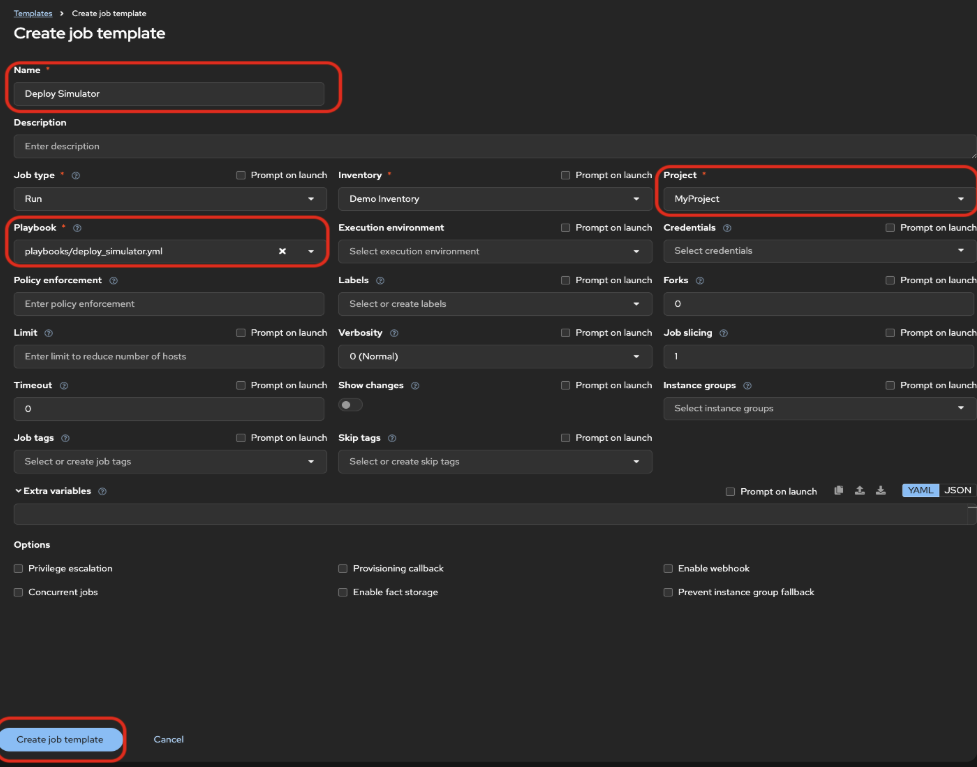
Deploy Simulator,Execute Test,Result Validation, andSlack):- Go to Templates > Add > Job Template (Figure 2).
- Select the project and inventory.
- Choose the appropriate playbook.
Save the template.

Figure 2: The job template in Ansible Automation Platform.

Create a pipelines project
In your Openshift container folder, create a new project:
oc new-project pipelinesCreate a PVC and Ansible Automation Platform credentials in the pipelines project
We need a PVC to store the necessary scripts and playbooks so they are accessible throughout the pipeline run. Create the PVC using the following command:
oc apply -f https://raw.githubusercontent.com/rh-telco-tigers/open5gs-test-framework/refs/heads/main/pvc.yamlNext, create a secret with your Ansible Automation Platform credentials:
oc create secret generic aap-credentials --from-literal=username=<your-username> --from-literal=password=<your-password> -n pipelinesAdd cluster-admin role to the pipeline service account
In OpenShift, the default service account is the pipeline service account. It's created automatically in namespaces with OpenShift Pipelines. We'll stick with using this account. You can assign the cluster-admin role by logging into your cluster and running the following command in your terminal:
oc adm policy add-cluster-role-to-user cluster-admin \
>   system:serviceaccount:test:pipeline
Configure Quay repositories
Now we need to configure the webhook URL on the inbound registry.
Create inbound and outbound repositories. Get the route of the event listener:
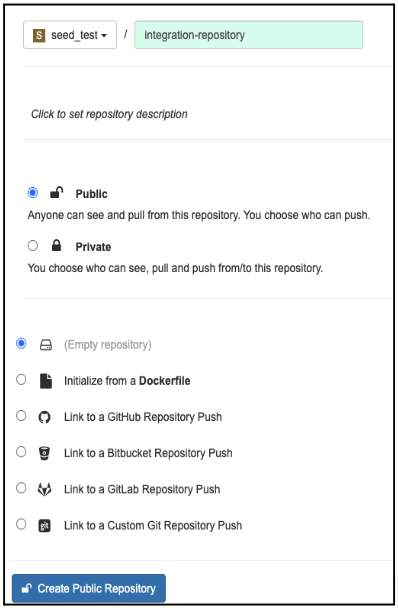
oc get route -n pipelinesIn the Quay UI, create two public repositories and ensure the repository is set to public (Figure 3):
inbound-repository(used for 5G core image push triggers)integration-repository(used for promoted images)

Figure 3: Creating repositories in Quay. For
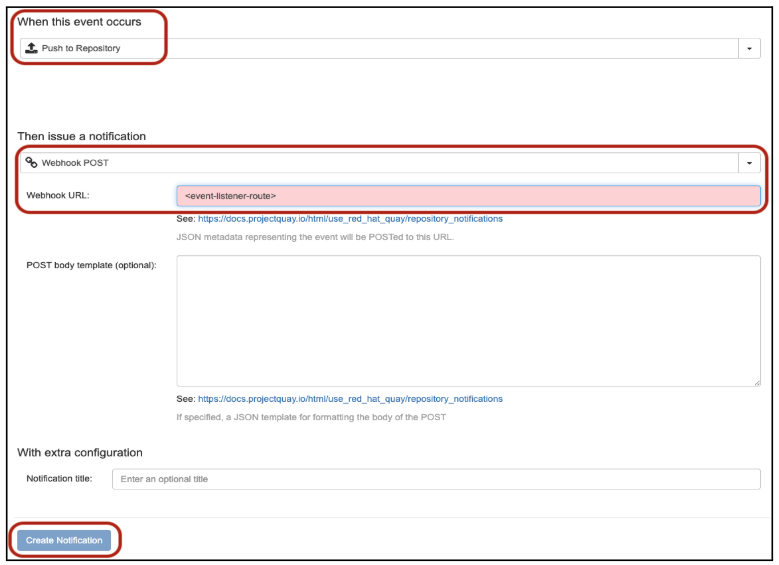
inbound-registry, go to Settings > Notifications > Create Notification (Figure 4).
Figure 4: Create notifications in Quay. - Set Trigger: Push to repository.
- Action: Webhook POST.
- URL: Use the event listener route from Step 1.
Click Create Notification (Figure 5).

Figure 5: Setting the trigger and action for the notification in Quay.
Now we will configure robot accounts in Quay. Open your repository and go to Settings → Robot accounts → Create robot account.
Enter a name and assign admin permissions for both inbound and outbound registries (Figure 6).
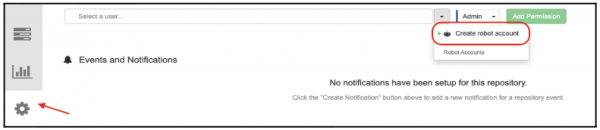
Figure 6: Creating robot accounts in Quay. Open the new robot account to retrieve the username (e.g.,
robot$your-account) and token (password) as shown in Figure 7.
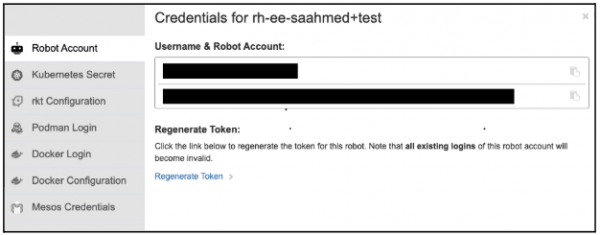
Figure 7: Accessing robot accounts credentials. Store the token in an OpenShift secret by using the following command with your username and password from Step 6:
oc create secret generic quay-auth-secret \
  --from-literal=username='username' \
  --from-literal=password='your-robot-token' \
  --namespace=pipelines


Configure ABot
This learning path uses Ansible Automation Platform playbooks and REST APIs to interact with the Rebaca ABot test orchestrator. A crucial setup step involves configuring ABot with the correct properties files via the update_config_properties API. This defines the System Under Test (SUT), and in a 5G core context, it could be any specific network function such as the Access and Mobility Management Function (AMF), Policy Control Function (PCF), Session Management Function (SMF), or User Plane Function (UPF).
Note
The config files (config_file_path and ip_file_path) are pre-created and out of scope for this learning path. We just reference them directly.
Update these variables in the vars.yaml file:
abot_endpoint: "<your-abot-endpoint>"
config_file_path: "<path-to-your-sut-config>.properties"
ip_file_path: "<path-to-your-ip-config>.properties"
slack_webhook_url:"<add-your-slack-webhook>"
output_dir: "/mnt/output"
The deploy_simulator playbook first logs into ABot, retrieves an API token, and then uses it to update the configuration and IP settings for the 5G core simulation.
Once configured, the test is triggered via ABot's feature_files/execute API, running with the configuration previously set from the update_config_properties API call and validating the interactions with the simulated 5G core.
Configure Slack notifications
To integrate Slack notifications into the 5G core testing pipeline:
- Set up a new channel in your Slack workspace for pipeline notifications.
- Create a Slack App and follow the setup steps here to activate a webhook.
- Copy the webhook URL and update the
slack_webhook_urlandabot_endpointfields in thesend_report.yamlplaybook in your GitHub repository.
With this setup, your 5G core testing pipeline will send real-time notifications to your Slack channel.