The Automotive Stream Distribution (AutoSD) and its downstream Red Hat product Red Hat In-Vehicle Operating System is an open source project targeting use of Linux in cars. One very important requirement for cars is the ability to have a verified boot. This article explains what verified boot is, how it works in AutoSD, and how you can use it.
Verified boot means that a chain of checks limit what code is running at each stage, so that it's not possible to (deliberately or by accident) tamper with the code running in the car without it being detected. This article discusses how this is achieved in AutoSD, and how to use it.
Supported boot mechanisms
The two supported mechanisms for booting AutoSD are Android Verified Boot (sometimes referred to as aboot), and UEFI (sometimes just EFI). UEFI is the standard that is used on regular laptops, desktops, and servers, and supports the CPU architectures aarch64 and x86. Aboot has "android" in the name, and originates from Android phones, but it's used on other embedded devices in the Arm ecosystem, and can boot things other than Android. The boot mechanism is implemented by the hardware board firmware, not supplied by AutoSD, but it describes the interface that AutoSD relies on to boot.
The primary goal of the boot firmware is to load a Linux kernel and an initramfs into memory, and start execution of it. The firmware checks the loaded kernel, by reading a digital signature for the loaded kernel and validating it against a public key that is built into the board firmware. This allows for the first step in a chain that leads to a verified boot.
Android verified boot
Aboot is a simple interface. The system has two things that it can boot, called "slots", which are differentiated by the names A and B. For each slot there is a separate partition, called boot_a and boot_b, respectively. These partitions store a standard linux kernel, an initrd, a device tree blob (DTB) and a kernel command line. At boot, the firmware looks at the internal state to see which is the active slot, loads that, and starts the kernel.
If verification is enabled, there are two additional separate partitions, vbmeta_a and vbmeta_b. These contain the checksum of the corresponding boot partition and a signature of it. At boot, the boot partition is loaded, the signature in it is validated, and the checksum is compared to the loaded boot partition before the kernel is started.
When the system is updated, the update is written to the inactive slot. The firmware is then instructed to boot from this new slot. This includes resetting a boot counter for the new slot, and if the system fails to boot successfully after a certain number of attempts, the firmware automatically reverts to the previous slot.
UEFI boot
The UEFI boot mechanism is much more complex and doesn't have a built-in A/B switching mechanism. UEFI looks into a partition known as the EFI system partition, which is a FAT filesystem, for executable files in the EFI executable file format. AutoSD supports EFI by using the ukiboot EFI program. This program implements something similar to android boot, but using the EFI interfaces. It loads either the ukiboot_a or the ukiboot_b partition, which contain a Unified Kernel Image. This is an EFI binary that contains the kernel, initramfs, and kernel command line all in a single image. This combination of EFI and ukiboot means that system boot and system updates are very similar to aboot, and supports simple, robust A/B slot switching.
When verification (known as "secure boot" in UEFI) is enabled, each EFI binary contains a signature that is validated against a public key which was enrolled in the EFI firmware (typically in NVRAM). This means that both the ukiboot EFI binary, and the content of the ukiboot partition must be signed.
Signing boot files
From a technical perspective, signing the individual boot files is easy. AutoSD ships the pesign tool that signs individual EFI files by appending a signature, and the avbtool tool (part of android-tools RPM) that can create the vbmeta partition data as needed.
However, in practice the handling of signatures is very complicated due to the security requirements involved. For example, to sign a file, you need the private key that corresponds to the public key that is deployed in the cars. Such private keys are extremely sensitive and must not be leaked. Generally private keys (at least those used in production) are stored on dedicated hardware that is disconnected from the network with only a few people having access to it. This is complicated because it means that signing is typically handled by a dedicated and sometimes external part of the organization that is not accessible by network and only by a limited number of people.
Using bootc to sign images
In AutoSD, disk images are built using the automotive-image-builder tool. In a build tool like that, the natural approach to image signing would ideally be to do it as part of the build. However, the sensitivity of the handling of the private key makes this approach non-viable, Instead, automotive-image-builder relies on the fact that AutoSD uses the bootc container workflow to support signatures.
In the bootc workflow, disk images are built in two phases. First, a bootc container image is built. This looks like a regular container image and can be stored locally or on standard container registries. Such container images can be used to update existing systems, but to initialize a new system the container image has to first be converted into a disk image (with partition tables, filesystems, bootloaders, and so on) which can be flashed to a target board.
The use of bootc leads to a signing workflow as shown in figure 1.
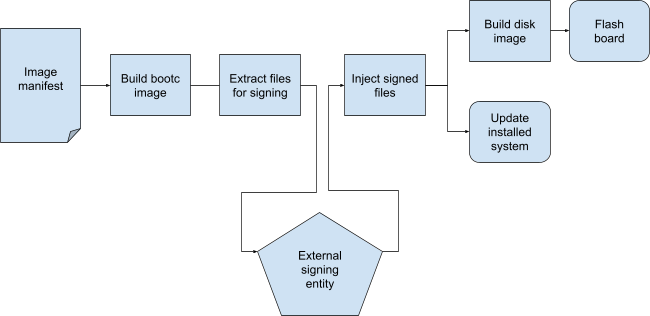
There is a natural point in the "middle" of the build where the build is stopped and the files are sent for signing (using whatever process is available to you), and then the build can be restarted when the signed files are returned. The signed files are injected, creating a new signed bootc container which can be used to perform updates or to create a new disk image.
Sealed images
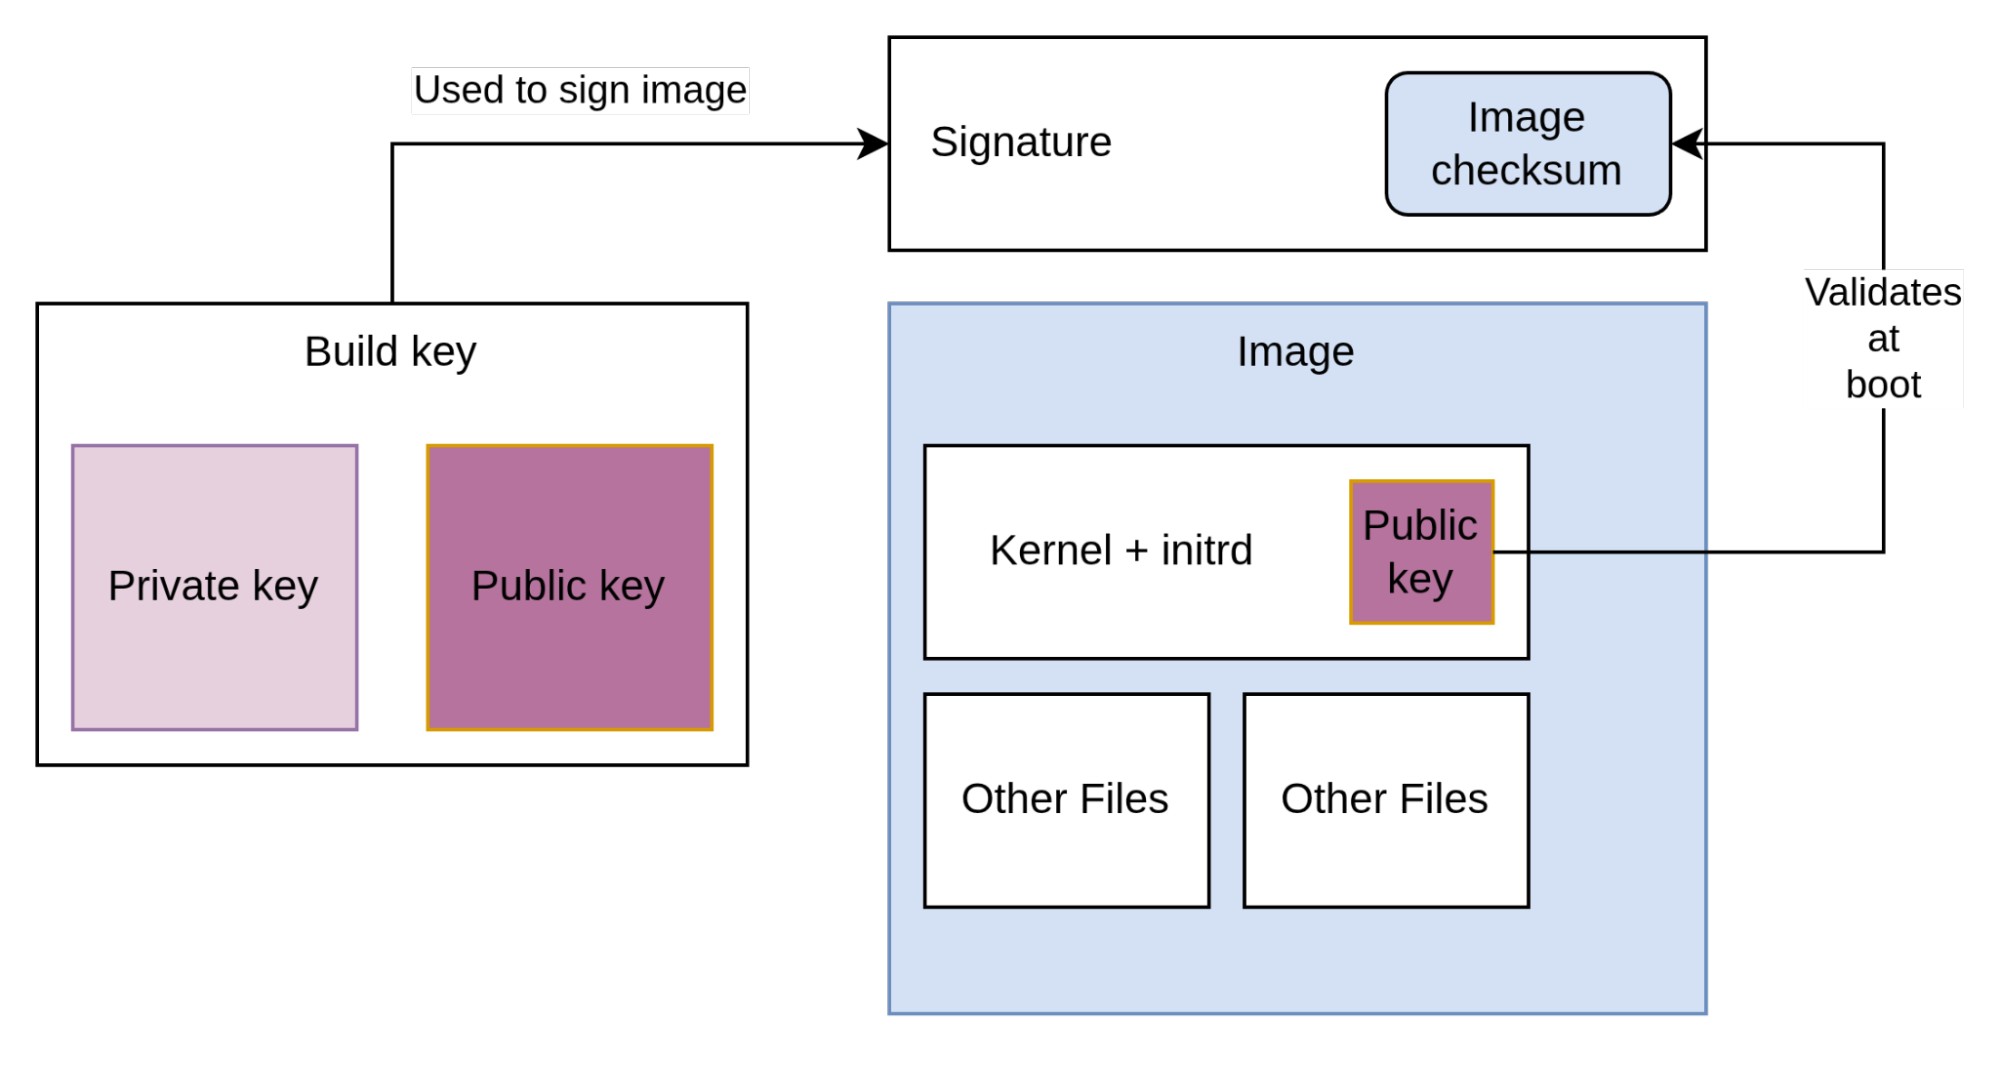
Signing boot files is just the first step in the boot chain. A verified boot mechanism must validate each step of the chain. The entire process looks like Figure 2.

The kernel and the initrd contain code to mount the main root filesystem (containing the operating system itself and any end user programs and data). This filesystem can be rather large, so it cannot be validated entirely each time the system boots. Instead, AutoSD uses a mechanism called composefs, where the kernel dynamically validates data when accessed, based on a hierarchical checksum. The top-level image checksum is signed by a one-time private key generated during the image build. This signed checksum is validated at boot using the public key, which is stored in the initrd. Images using this approach are called "sealed" (illustrated in Figure 3).
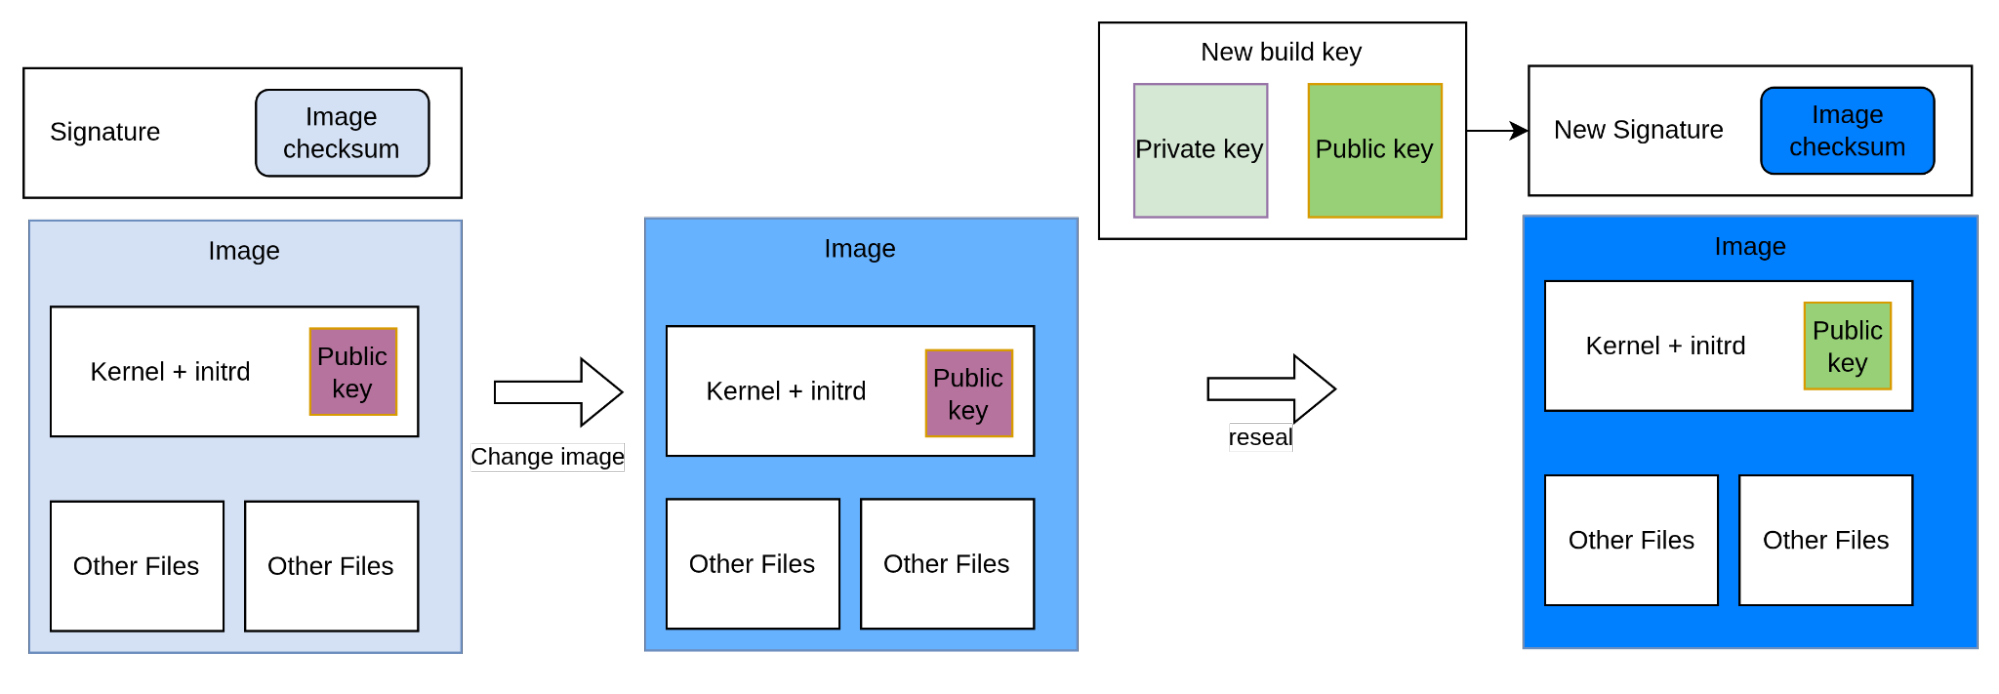
The sealing of images is done automatically when images are initially built. However, if a bootc container is changed after being built, for example, using a Containerfile to extend it, then the checksum of the root filesystem changes and does not match the one expected by the initramfs. To fix this, automotive-image-builder has a reseal operation that can be used to update the expected checksum in the initramfs inside a bootc image (illustrated in Figure 4).
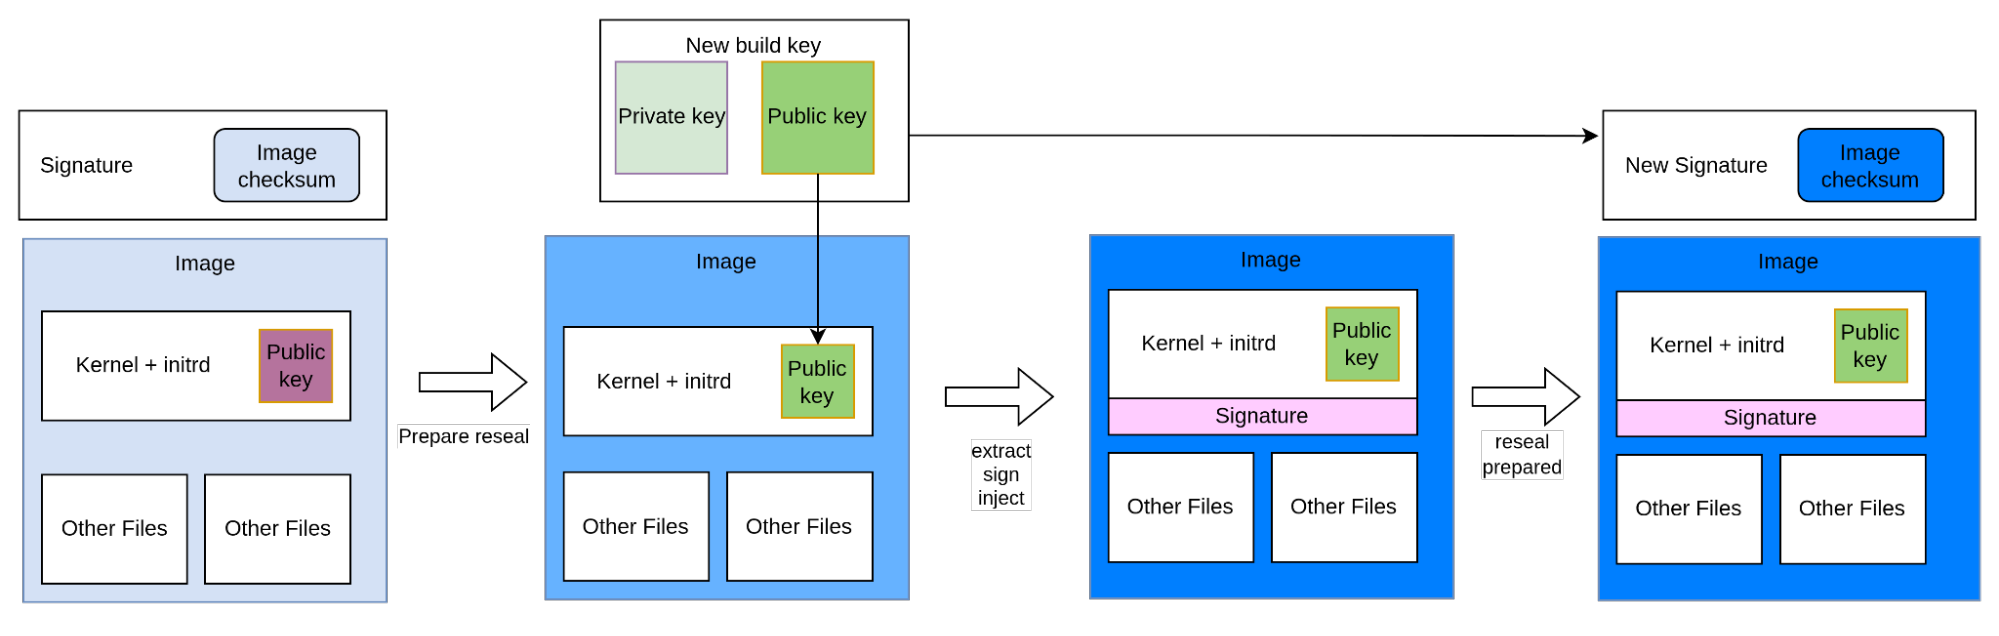
Unfortunately image sealing interacts with the signing of the image in complex ways:
- Sealing changes the initramfs, which invalidates any signatures that exists on the initramfs
- Injecting the signed initramfs into a bootc image changes the image contents which invalidates the sealing
To handle this cyclic dependency, there is a split up version of the reseal command where you first run prepare-reseal with a build key. Then the initramfs is signed, and then the reseal operation is finished with the one-time key (illustrated in Figure 5).
Using the tools
Let's demonstrate how to sign and seal an image, starting with an unsigned example. A minimal manifest, called demo.aib.yml:
name: democontent:
  rpms:
    - vim
auth:
  root_password: ""
Build a bootc for the default (qemu) target, and then convert the bootc into a disk image:
$ automotive-image-builder build demo.aib.yml localhost/demo:unsigned
$ automotive-image-builder to-disk-image localhost/demo:unsigned unsigned.img
To test it in a virtual machine, you can run:
$ automotive-image-runner unsigned.imgEFI example
This image is sealed, and EFI based. However, it is not a signed image, because there are no signatures in the EFI files. To sign the image, you must first create a one-time key and prepare to seal using it, and then extract the files for signing:
$ openssl genpkey -algorithm ed25519 -outform PEM -out private.pem
$ automotive-image-builder prepare-reseal --key private.pem localhost/demo:unsigned localhost/demo:prepared
$ automotive-image-builder extract-for-signing localhost/demo:prepared to-sign
Extracting aboot.img from /usr/lib/modules/6.12.0-168.el10iv.x86_64/aboot.img
Extracting ukibootx64.efi from /usr/lib/bootupd/updates/EFI/centos/ukibootx64.efi
Extracting slot_a.addon.efi from /usr/lib/bootupd/updates/EFI/centos/ukiboot_a.efi.extra.d/slot_a.addon.efi
Extracting slot_b.addon.efi from /usr/lib/bootupd/updates/EFI/centos/ukiboot_b.efi.extra.d/slot_b.addon.efi
At this point a directory with EFI files requires signing, like this:
to-sign/
├── efi│
├── aboot.img
│   ├── slot_a.addon.efi
│   ├── slot_b.addon.efi
│   └── ukibootx64.efi
└── signing_info.json
In a production environment, you hand these files over to the person responsible for signing them. But to make it possible to experiment with the signing workflow, there are some prebuilt test tools in the automotive-image-builder sources, specifically in the contrib/secure-boot directory. These include a container script for signing files and some pre-generated test keys.
With the repo checked out, you can run this directory:
$ podman build -t efi-signer signer
$ podman run --privileged --rm -ti -v .:/work efi-signer \
--certificates contrib/secure-boot/pregenerated/db.p12 \
--password-file contrib/secure-boot/pregenerated/password \
to-sign/efi/*
This signs all EFI files with the pregenerated keys. After that, re-inject the signed files and complete the sealing:
$ automotive-image-builder inject-signed --reseal-with-key private.pem \
localhost/demo:prepared to-sign localhost/demo:signed
Injecting aboot.img from to-sign/efi/aboot.img
Injecting ukibootx64.efi from to-sign/efi/ukibootx64.efi
Injecting slot_a.addon.efi from to-sign/efi/slot_a.addon.efi
Injecting slot_b.addon.efi from to-sign/efi/slot_b.addon.efi
Then convert the signed container image to a disk image and run it with the pregenerated public key:
$ automotive-image-builder to-disk-image localhost/demo:signed signed.img
$ automotive-image-runner --secureboot-vars \
contrib/secure-boot/pregenerated/secboot_vars.fd \
signed.img
You can see in the console during the log that secureboot is enabled:
EFI stub: UEFI Secure Boot is enabled.At this point, remove the private.pem file to ensure it's never used for anything else. Also, creating keys like this are stored unencrypted during the signing process. These keys should be encrypted with a password (for example by passing the -aes-256-cbc argument to openssl).
Android boot example
Almost everything above is the same for Android verified boot, if the --target option to the initial build command is for a board that uses aboot. For testing, you can use the abootqemukvm target, and some pregenerated keys in the contrib/avb directory.
The only real difference is the output of extract-for-signing:
to-sign/
├── aboot
│   ├── aboot.img
│   └── vbmeta.img
└── signing_info.json
In this case you need some extra information from the signing_info.json file:
{
  "signed_files": [
    {
      "type": "aboot",
      "filename": "aboot.img",
      "paths": [
        "/usr/lib/modules/6.12.0-167.el10iv.aarch64/aboot.img"
      ],
      "partition_size": 134217728
    },
    {
      "type": "vbmeta",
      "filename": "vbmeta.img",
      "paths": [
        "/usr/lib/modules/6.12.0-167.el10iv.aarch64/vbmeta.img"
      ]
    }
  ]
}
In particular, the partition_size information must be passed to the following avbtool commands to sign the files:
$ avbtool add_hash_footer --image "to_sign/aboot/aboot.img" \
    --partition_name "boot" --algorithm SHA256_RSA4096 \
    --key "contrib/avb/testkey_rsa4096.pem" --rollback_index 0 \
    --partition_size 134217728
$ avbtool make_vbmeta_image --include_descriptors_from_image "to_sign/aboot/aboot.img" \
    --algorithm SHA256_RSA4096 \
    --key "contrib/avb/testkey_rsa4096.pem" --rollback_index 0 --output "to_sign/aboot/vbmeta.img"
The remaining steps are the same as for EFI, except when running the image, make sure to pass the --avb option to automotive-image-runner to enable android verified boot.
Conclusion
Verified boot in AutoSD ensures that every step in the boot chain is validated, from the firmware loading a signed kernel to the composefs-sealed root filesystem. Whether using UEFI secure boot or Android verified boot, the bootc container workflow provides a practical way to integrate signing into your build pipeline without exposing private keys to the build system.
To get started, try the examples above with the pregenerated test keys, and consult the AutoSD documentation for more details on integrating this into your production workflow.

