By incorporating identities provided by SPIFFE and SPIRE, Argo CD can communicate with remote clusters without the need for long-lived tokens. This is made possible by components from the open source community, specifically KIND as the Kubernetes runtime environment, and the upstream Argo CD project. Red Hat OpenShift has included support for Argo CD as OpenShift GitOps for some time now, and starting in OpenShift 4.20 support for SPIFFE and SPIRE projects is available as the zero trust workload identity manager. In this article, I demonstrate how OpenShift GitOps can leverage identities provided by zero trust workload identity manager to secure access for the management of remote OpenShift instances.
There's one drawback to this architecture. Once external authentication has been enabled within an OpenShift environment to integrate Red Hat zero trust workload identity manager, only SPIFFE identities can authenticate to the cluster, potentially limiting how access can be granted. However, in a future OpenShift release, support in the external authentication feature will enable the use of multiple identity providers, eliminating those restrictions.
Architectural overview
Before getting started, let's take a step back and review the components required, and their role in enabling OpenShift GitOps to manage remote clusters using short-lived credentials. Figure 1 depicts the end state architecture:
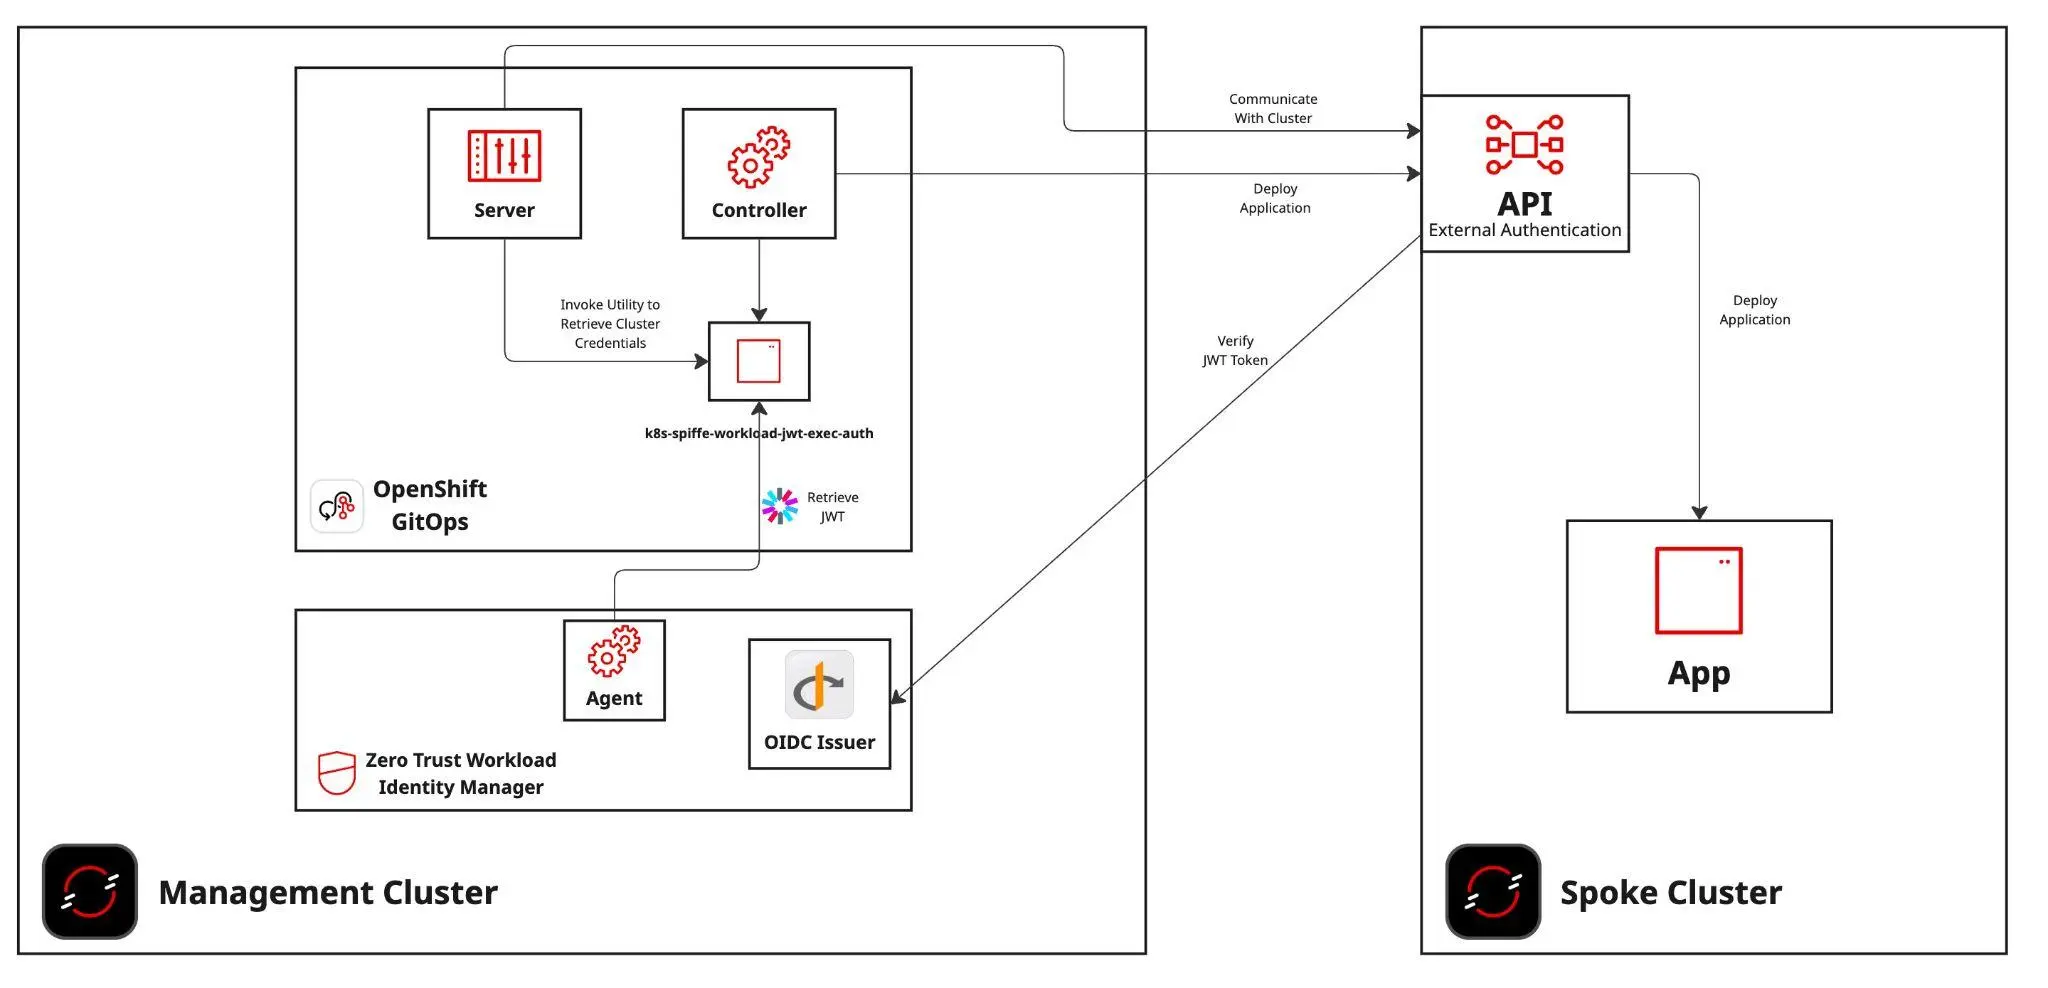
As illustrated in the above diagram, two OpenShift clusters are required: One represents the management plane, which includes both OpenShift GitOps and zero trust workload identity manager, and the other OpenShift cluster is managed by OpenShift GitOps (the spoke) running on the management plane.
In order for identities that are provided by zero trust workload identity manager to be used as a form of authentication, the spoke cluster must have the external authentication feature enabled. In addition, connectivity in both must be available between each of the clusters. A full discussion that provides an overview of external authentication, how it is configured to support this architecture, and the implications of the connectivity between the clusters is addressed in subsequent sections.
Prerequisites
The following resources are required in order to implement the architecture described within this article.
- Two OpenShift clusters
- Management cluster version 4.20+
- Spoke cluster version 4.18+
- Command-line utilities installed on the local machine
Management cluster configuration
The management cluster represents where the majority of the work is placed in order to achieve the desired architecture. This environment must be an OpenShift cluster with version 4.18 or higher, because these releases include support for zero trust workload identity manager.
As you follow along with this article, you'll have to interact with multiple OpenShift clusters. It is recommended that you use certificate-based authentication (such as the admin kubeconfig that was produced when the cluster was installed) to avoid accidental loss of access to the cluster when changes are applied to the way OpenShift handles authentication.
Authenticate to the management cluster
To begin configuration, authenticate to the management cluster. Once authenticated, change the name of the OpenShift context associated with the cluster to a name you can easily reference. For example, rename the context to management-cluster using the following command:
oc config rename-context \
$(oc config current-context) management-cluster
Deploy zero trust workload identity manager
Zero trust workload identity manager is Red Hat's supported integration of the SPIFFE/SPIRE project. Use the following steps to deploy and configure the zero trust workload identity manager operator.
First, you must export two variables, one referencing the apps subdomain for the management cluster, and the other referencing the default channel for the zero trust workload identity manager operator:
export MANAGEMENT_CLUSTER_APP_DOMAIN=apps.$(oc --context=management-cluster get dns cluster -o jsonpath='{ .spec.baseDomain }')

export MANAGEMENT_CLUSTER_ZTWIM_OPERATOR_CHANNEL=$(oc --context=management-cluster get packagemanifests openshift-zero-trust-workload-identity-manager -o jsonpath='{ .status.defaultChannel }')
The deployment of the zero trust workload identity manager operator and instance is facilitated by the Kustomize functionality included within the OpenShift command-line interface. Create two directories to store Kustomization files used to deploy the zero trust workload identity Manager operator and instance:
mkdir -p ztwim/{operator,instance}Generate the Kustomization file for zero trust workload identity manager operator:
cat << EOF > ztwim/operator/kustomization.yaml
apiVersion: kustomize.config.k8s.io/v1beta1
kind: Kustomization

resources:
  - https://github.com/redhat-cop/gitops-catalog/zero-trust-workload-identity-manager/operator/overlays/${MANAGEMENT_CLUSTER_ZTWIM_OPERATOR_CHANNEL}

patches:
  - target:
      kind: Subscription
      name: openshift-zero-trust-workload-identity-manager
    patch: |-
      - op: replace
        path: /spec/channel
        value: '$MANAGEMENT_CLUSTER_ZTWIM_OPERATOR_CHANNEL'
EOF
Use oc to deploy the zero trust workload identity manager operator to the OpenShift management cluster:
oc --context=management-cluster apply -k ztwim/operatorWait until the operator has been deployed and the custom resource definitions (CRD) have been installed in the cluster:
until oc --context=management-cluster wait crd/spireservers.operator.openshift.io --for condition=established --timeout 120s >/dev/null 2>&1 ; do sleep 1 ; doneNext, generate the Kustomization file that deploys the zero trust workload identity manager resources:
cat << EOF > ztwim/instance/kustomization.yaml
apiVersion: kustomize.config.k8s.io/v1beta1
kind: Kustomization

resources:
  - https://github.com/redhat-cop/gitops-catalog/zero-trust-workload-identity-manager/instance/overlays/${MANAGEMENT_CLUSTER_ZTWIM_OPERATOR_CHANNEL}

patches:
  - target:
      kind: SpireOIDCDiscoveryProvider
      group: operator.openshift.io
      version: v1alpha1
    patch: |-
      - op: replace
        path: /spec/jwtIssuer
        value: 'https://spire-spiffe-oidc-discovery-provider.$MANAGEMENT_CLUSTER_APP_DOMAIN'
  - target:
      kind: ZeroTrustWorkloadIdentityManager
      group: operator.openshift.io
      version: v1alpha1
    patch: |-
      - op: replace
        path: /spec/trustDomain
        value: '$MANAGEMENT_CLUSTER_APP_DOMAIN'
  - target:
      kind: SpireServer
      group: operator.openshift.io
      version: v1alpha1
    patch: |-
      - op: replace
        path: /spec/jwtIssuer
        value: 'https://spire-spiffe-oidc-discovery-provider.$MANAGEMENT_CLUSTER_APP_DOMAIN'
EOF
You can now deploy zero trust workload identity manager:
oc --context=management-cluster apply -k ztwim/instanceAfter a few minutes, zero trust workload identity manager is deployed to OpenShift. To confirm, first verify the contents of the zero-trust-workload-identity-manager namespace:
oc --context=management-cluster -n \
zero-trust-workload-identity-manager get pods
Wait until all of the pods are both in a running and READY status, similar to the following:
NAME                                                              READY   STATUS    RESTARTS      AGE
spire-agent-gfdhq                                                 1/1     Running   1 (78s ago)   2m7s
spire-agent-gkw4q                                                 1/1     Running   1 (78s ago)   2m7s
spire-agent-xbxdc                                                 1/1     Running   1 (79s ago)   2m7s
spire-server-0                                                    2/2     Running   0             2m7s
spire-spiffe-csi-driver-lx7mf                                     2/2     Running   0             2m7s
spire-spiffe-csi-driver-nb2fs                                     2/2     Running   0             2m7s
spire-spiffe-csi-driver-pfnjz                                     2/2     Running   0             2m7s
spire-spiffe-oidc-discovery-provider-9fc47c7f4-mpd72              1/1     Running   0             2m7s
zero-trust-workload-identity-manager-controller-manager-8dwmjpd   1/1     Running   0             21m
It's important to note that the number of spire-agent- pods are relative to the number of nodes in your cluster.
Locate the route associated with the zero trust workload identity manager OIDC discovery provider. Retrieve the OIDC discovery document exposed by OIDC discovery provider:
ZTWIM_OIDC_PROVIDER_INGRESS_HOST=$(oc --context=management-cluster get route -n zero-trust-workload-identity-manager spire-oidc-discovery-provider -o jsonpath='{ .spec.host }')Confirm that the OIDC discovery endpoint is available:
curl -L $ZTWIM_OIDC_PROVIDER_INGRESS_HOST/.well-known/openid-configurationIf the OIDC discovery document was retrieved, zero trust workload identity manager has been deployed successfully.
OpenShift GitOps deployment
The second primary component that is deployed to the management cluster is an instance of OpenShift GitOps. It will be configured to leverage the instance of zero trust workload identity manager deployed previously.
By default, zero trust workload identity manager ignores issuing identities to workloads running in namespaces starting with openshift-*. As a result, the default instance of OpenShift GitOps running within the openshift-gitops namespace cannot be used for this purpose.
To mitigate this issue, an instance of OpenShift GitOps can be deployed in an alternate namespace, such as ztwim-gitops.
First, install the OpenShift GitOps Operator and configure the newly deployed operator to omit creating the default OpenShift GitOps instance by setting the DISABLE_DEFAULT_ARGOCD_INSTANCE environment variable within the Subscription resource:
oc --context=management-cluster apply -f - <<EOF
apiVersion: v1
kind: Namespace
metadata:
  annotations:
    openshift.io/description: OpenShift GitOps Operator
    openshift.io/display-name: OpenShift GitOps Operator
  labels:
    openshift.io/cluster-monitoring: 'true'
  name: openshift-gitops-operator
---
apiVersion: operators.coreos.com/v1
kind: OperatorGroup
metadata:
  name: openshift-gitops-operator
  generateName: openshift-gitops-operator-
  namespace: openshift-gitops-operator
spec:
---
apiVersion: operators.coreos.com/v1alpha1
kind: Subscription
metadata:
  name: openshift-gitops-operator
  namespace: openshift-gitops-operator
spec:
  channel: latest
  installPlanApproval: Automatic
  name: openshift-gitops-operator
  source: redhat-operators
  sourceNamespace: openshift-marketplace
  config:
    env:
      - name: DISABLE_DEFAULT_ARGOCD_INSTANCE
        value: "true"
EOF
Wait until the Operator has created the ArgoCD custom resource definition:
until oc --context=management-cluster wait --for condition=established crd/argocds.argoproj.io &>/dev/null; do sleep 5; doneNow create a new namespace called ztwim-gitops to use to contain the instance of OpenShift GitOps:
oc --context=management-cluster apply -f - <<EOF
apiVersion: v1
kind: Namespace
metadata:
  annotations:
    openshift.io/description: Integration of zero trust workload identity Manager and OpenShift GitOps
    openshift.io/display-name: zero trust workload identity Manager GitOps
  name: ztwim-gitops
EOF
Next, create the ArgoCD custom resource within the newly created ztwim-gitops namespace with support for obtaining identities from zero trust workload identity manager.
oc --context=management-cluster apply -f - <<EOF
apiVersion: argoproj.io/v1beta1
kind: ArgoCD
metadata:
  name: openshift-gitops
  namespace: ztwim-gitops
spec:
  applicationSet:
    resources:
      limits:
        cpu: "2"
        memory: 1Gi
      requests:
        cpu: 250m
        memory: 512Mi
    webhookServer:
      ingress:
        enabled: false
      route:
        enabled: false
  controller:
    initContainers:
      - command:
          - /bin/bash
          - '-c'
          - 'curl -v -L https://github.com/spiffe/k8s-spiffe-workload-jwt-exec-auth/releases/download/v0.0.7/k8s-spiffe-workload-jwt-exec-auth_Linux_x86_64.tar.gz -o /tmp/k8s-spiffe-workload-jwt-exec-auth.tar.gz && tar -xzvf /tmp/k8s-spiffe-workload-jwt-exec-auth.tar.gz -C /tmp && mv /tmp/k8s-spiffe-workload-jwt-exec-auth /binaries'
        image: 'registry.redhat.io/ubi9/ubi:latest'
        name: install-jwt-spiffe
        resources: {}
        volumeMounts:
          - mountPath: /binaries
            name: binaries
    volumeMounts:
      - mountPath: /binaries
        name: binaries
      - mountPath: /run/spire/sockets
        name: spiffe-workload-api
        readOnly: true
    volumes:
      - emptyDir: {}
        name: binaries
      - csi:
          driver: csi.spiffe.io
          readOnly: true
        name: spiffe-workload-api
    processors: {}
    resources:
      limits:
        cpu: "2"
        memory: 2Gi
      requests:
        cpu: 250m
        memory: 1Gi
    sharding: {}
  grafana:
    enabled: false
    ingress:
      enabled: false
    resources:
      limits:
        cpu: 500m
        memory: 256Mi
      requests:
        cpu: 250m
        memory: 128Mi
    route:
      enabled: false
  ha:
    enabled: false
    resources:
      limits:
        cpu: 500m
        memory: 256Mi
      requests:
        cpu: 250m
        memory: 128Mi
  initialSSHKnownHosts: {}
  monitoring:
    enabled: false
  notifications:
    enabled: false
  prometheus:
    enabled: false
    ingress:
      enabled: false
    route:
      enabled: false
  rbac:
    defaultPolicy: "role:admin"
    policy: |
      g, system:cluster-admins, role:admin
      g, cluster-admins, role:admin
    scopes: '[groups]'
  redis:
    resources:
      limits:
        cpu: 500m
        memory: 256Mi
      requests:
        cpu: 250m
        memory: 128Mi
  repo:
    resources:
      limits:
        cpu: "1"
        memory: 1Gi
      requests:
        cpu: 250m
        memory: 256Mi
  resourceExclusions: |
    - apiGroups:
      - tekton.dev
      clusters:
      - '*'
      kinds:
      - TaskRun
      - PipelineRun
  server:
    host: ztwim-gitops.$MANAGEMENT_CLUSTER_APP_DOMAIN
    autoscale:
      enabled: false
    grpc:
      ingress:
        enabled: false
    ingress:
      enabled: false
    initContainers:
    - command:
        - /bin/bash
        - '-c'
        - 'curl -v -L https://github.com/spiffe/k8s-spiffe-workload-jwt-exec-auth/releases/download/v0.0.7/k8s-spiffe-workload-jwt-exec-auth_Linux_x86_64.tar.gz -o /tmp/k8s-spiffe-workload-jwt-exec-auth.tar.gz && tar -xzvf /tmp/k8s-spiffe-workload-jwt-exec-auth.tar.gz -C /tmp && mv /tmp/k8s-spiffe-workload-jwt-exec-auth /binaries'
      image: 'registry.redhat.io/ubi9/ubi:latest'
      name: install-jwt-spiffe
      resources: {}
      volumeMounts:
        - mountPath: /binaries
          name: binaries
    volumeMounts:
      - mountPath: /binaries
        name: binaries
      - mountPath: /run/spire/sockets
        name: spiffe-workload-api
        readOnly: true
    volumes:
      - emptyDir: {}
        name: binaries
      - csi:
          driver: csi.spiffe.io
          readOnly: true
        name: spiffe-workload-api
    resources:
      limits:
        cpu: 500m
        memory: 256Mi
      requests:
        cpu: 125m
        memory: 128Mi
    route:
      enabled: true
      tls:
        termination: reencrypt
        insecureEdgeTerminationPolicy: Redirect
    service:
      type: ""
  sso:
    dex:
      openShiftOAuth: true
      resources:
        limits:
          cpu: 500m
          memory: 256Mi
        requests:
          cpu: 250m
          memory: 128Mi
    provider: dex
EOF
For the purpose of this article, the OpenShift GitOps instance has been configured to elevate any authenticated user to the admin role. For production use, adjust this configuration to meet your organization's security policies.
Resources from the zero trust workload identity manager are being leveraged. Specifically, the CSI driver injects the workload API into the pod, and the k8s-spiffe-workload-jwt-exec-auth project is used to return a JWT produced by zero trust workload identity manager in the ExecCredential format. Additionally, init containers have been defined within the ArgoCD custom resource created to obtain the k8s-spiffe-workload-jwt-exec-auth utility within pods that require obtaining identities as part of its operational use.
Once all OpenShift pods are running and ready within the ztwim-gitops namespace, log in to the newly deployed OpenShift GitOps instance. Get the location of the OpenShift GitOps user interface with this command:
echo https://$(oc --context=management-cluster get routes \
-n ztwim-gitops openshift-gitops-server \
-o=jsonpath='{ .spec.host }')
Open the URL in a web browser, and log in with your OpenShift credentials.
Now that the tooling has been made available to OpenShift GitOps to retrieve identities provided by zero trust workload identity manager, execute the following command within the OpenShift GitOps server component to emulate the way Argo CD obtains an SPIFFE/SPIRE identity:
oc --context=management-cluster rsh -n ztwim-gitops \
-c argocd-server $(oc --context=management-cluster get pods \
-n ztwim-gitops \
-l=app.kubernetes.io/name=openshift-gitops-server \
-o jsonpath='{ .items[].metadata.name }') bash -c
"SPIFFE_ENDPOINT_SOCKET=unix:///run/spire/sockets/spire-agent.sock SPIFFE_JWT_AUDIENCE=openshift-spoke/binaries/k8s-spiffe-workload-jwt-exec-auth | grep token" |  tr -d '\r' | awk '{ print $2 }'
This command invokes the k8s-spiffe-workload-jwt-exec-auth binary configured by the init container to return a SPIFFE JWT. Environment variables are used to dictate the execution of this tool. SPIFFE_ENDPOINT_SOCKET references the location of the SPIRE socket while SPIFFE_JWT_AUDIENCE instructs SPIFFE to set the value of the audience to include in the returned JWT from SPIRE. The EXEC_CREDENTIAL_VERSION environment variable also needs to be specified because Argo CD uses the v1beta1 version of an ExecCredential instead of the default value of v1.
If the command hangs and no token is displayed, there may be an issue with the configuration associated with the deployment of zero trust workload identity manager. Otherwise, when a token is displayed, OpenShift GitOps is able to use the provided identity to manage resources on remote clusters.
Spoke cluster configuration
With the baseline set of configurations for the management OpenShift cluster now complete, focus can now shift to the spoke cluster. As with the management cluster, you can deploy the spoke cluster in any environment. The key prerequisite is that it must use version 4.19 or later in order to be able to leverage the external authentication feature.
Similar to how access was configured for the management cluster, authenticate to the spoke cluster using certificate-based authentication, and change the name of the OpenShift context associated with the cluster to a name you can easily reference. For example, rename the context to spoke-cluster:
oc config rename-context \
$(oc config current-context) spoke-cluster
External authentication
The unsung hero of this architecture is a feature known as external authentication, which bypasses the standard OpenShift OAuth server and enables an external OIDC provider to authenticate to the cluster. By enabling external authentication and integrating the feature with zero trust workload identity manager from the management cluster, identities (such as those obtained by OpenShift GitOps) can be used to authenticate and manage resources on the spoke cluster.
External authentication before 4.20
In OpenShift clusters prior to version 4.20, external authentication is only enabled by setting the TechPreviewNoUpgrade feature. With this setting enabled, a cluster can no longer be upgraded, and this flag cannot be reverted. Additional information is available in the documentation. Execute the following command on the spoke cluster to enable the feature set.
oc --context=spoke-cluster patch featuregate cluster --type=merge \
--patch '{"spec": {"featureSet": "TechPreviewNoUpgrade"}}'
Confirm the TechPreviewNoUpgrade feature set has been enabled:
oc --context=spoke-cluster get featuregate cluster -o json | jq -r '.status.featureGates[0].enabled[] | select(.name == "ExternalOIDC") | length > 0'If the response is true, then the cluster is eligible to use the external authentication feature.
Enable external authentication
Before you enable external authentication, you must ensure that a method leveraging certificate-based authentication against the spoke cluster (such as the admin kubeconfig that was produced when the cluster was installed) is available. This is needed because other authentication forms outside of OIDC-based authentication aren't available, and you don't want to accidentally lock yourself out of your cluster! External authentication supports two types integrations:
- Command-line/API
- Web Console
Identities obtained from zero trust workload identity manager are performed in a non-interactive fashion, which does not leverage the OIDC authentication code flow, so only the command-line/API option is applicable.
The configurations associated with external authentication are defined within the cluster Authentication.config.openshift.io custom resource. Update this resource:
oc --context=spoke-cluster apply -f - <<EOF
apiVersion: config.openshift.io/v1
kind: Authentication
metadata:
  name: cluster
spec:
  oidcProviders:
  - claimMappings:
      groups:
        claim: groups
      username:
        claim: sub
        prefixPolicy: NoPrefix
    issuer:
      audiences:
      - openshift-spoke
      issuerCertificateAuthority:
        name: ""
      issuerURL: https://$ZTWIM_OIDC_PROVIDER_INGRESS_HOST
    name: ztwim-oidc-server
    oidcClients:
    - clientID: openshift-cli
      componentName: cli
      componentNamespace: openshift-console
  type: OIDC
  webhookTokenAuthenticator: null
EOF
Some notes on this configuration:
- The value of
ZTWIM_OIDC_PROVIDER_INGRESS_HOSTwas set previously to the value of the host associated with the zero trust workload identity manager OIDC discovery provider ingress. - If the TLS certificate associated with the zero trust workload identity manager OIDC discovery provider ingres is leveraging a self-signed or non trusted certificate, then the contents must be added to a new ConfigMap with the key called
ca-bundle.crt. The value of the ConfigMap must be added to the name property of theissuerCertificateAuthorityproperty. In the example, this field is empty. - The
typeproperty must be updated to a value ofOIDC. - The
webhookTokenAuthenticatorproperty must be updated to a value ofnullwhen type isOIDC. - This example does not make use of prefixes for either users or groups. The use of prefixes is beneficial to segregate users and groups that originate from the external authentication source (zero trust workload identity manager), and will be important when multiple OIDC issuers are supported in the future.
After the authentication custom resource has been patched, a new revision of the Kubernetes API server is applied to all control plane instances. Confirm the status of the Kubernetes API server from the Kubernetes API server operator:
oc --context=spoke-cluster get co kube-apiserverWhen the Available column reports a value of True and the Progressing and Degraded columns report False, external authentication has been successfully enabled within OpenShift.
Verify external authentication using SPIFFE identities
Now you must verify that identities issued by zero trust workload identity manager on the management cluster can be used to authenticate against the spoke cluster. Utilize the same command to obtain a JWT from zero trust workload identity manager:
OPENSHIFT_GITOPS_JWT=$(oc --context=management-cluster rsh -n ztwim-gitops -c argocd-server $(oc --context=management-cluster get pods -n ztwim-gitops -l=app.kubernetes.io/name=openshift-gitops-server -o jsonpath='{ .items[].metadata.name }') bash -c "SPIFFE_ENDPOINT_SOCKET=unix:///run/spire/sockets/spire-agent.sock SPIFFE_JWT_AUDIENCE=openshift-spoke /binaries/k8s-spiffe-workload-jwt-exec-auth | grep token" | tr -d '\r' | awk '{ print $2 }')Use this token to log in to the spoke cluster:
oc login --token=${OPENSHIFT_GITOPS_JWT} --server=$(oc --context=spoke-cluster whoami --show-server)Once authenticated, the oc login command creates a new context using details from the location of the OpenShift API server and the authenticated user. Rename the context to spoke-cluster-gitops so that it's easily referencable:
oc config rename-context $(oc config current-context) \
spoke-cluster-gitops
With the OpenShift CLI authenticated using the identity of the OpenShift GitOps server pod, obtain additional information related to the authenticated user:
oc --context=spoke-cluster-gitops auth whoamiYou get a response similar to this:
ATTRIBUTE   VALUE
Username    spiffe://$SPIFFE_TRUST_DOMAIN/ns/ztwim-gitops/sa/openshift-gitops-argocd-server
Groups      [system:authenticated]
The username displayed is in SPIFFE ID format and by default, represents the trust domain, namespace, and the service account within the management cluster. In this case, the identity being used represents the OpenShift GitOps server (corresponding to the command obtaining the identity remotely connected to the OpenShift GitOps server).
You can view additional details included in the JWT with jq:
jq -R 'split(".") | .[1] | @base64d | fromjson' <<< $OPENSHIFT_GITOPS_JWTThe value of the decoded JWT is similar to this:
{
  "aud": [
    "openshift-spoke"
  ],
  "exp": 1752616189,
  "iat": 1752612589,
  "iss": "https://$ZTWIM_OIDC_PROVIDER_INGRESS_HOST",
  "sub": "spiffe://$SPIFFE_TRUST_DOMAIN/ns/ztwim-gitops/sa/openshift-gitops-argocd-server"
}
There are several important properties included in this JWT corresponding specifically to how external authentication on the spoke cluster was configured:
- The
sub(short for "subject") field is used as the user name within OpenShift, as specified in the OIDC claim mappings property. - The
aud(short for "audience") field includes all of the intended destinations that receive the token, which is validated by the spoke OpenShift API server. - The
iss(short for "issuer") field represents the entity that produced the JWT and corresponds to the URL of the SPIFFE OIDC discovery provider.
The combination of these fields ensures that only valid tokens can authenticate with OpenShift and were defined within the authentication custom resource when external authentication was enabled.
Assigning privileges to SPIFFE identities
Now that identities issued by zero trust workload identity manager on the management cluster can authenticate against the spoke cluster, the next step is to grant privileges for these entities to perform actions within the spoke cluster.
While the identity of the OpenShift GitOps server provided by zero trust workload identity manager was used to authenticate to the spoke cluster, it does not have permission to perform most actions. This can be confirmed by listing all of the projects available:
$ oc --context=spoke-cluster-gitops get projects
No resources found
For OpenShift GitOps on the management cluster to be able to perform meaningful actions on the spoke cluster, RBAC policies must be created on the spoke cluster for each OpenShift GitOps component that communicates with the spoke cluster.
In addition to the OpenShift GitOps server for which an identity has been issued previously, the OpenShift GitOps application controller is another component within OpenShift GitOps that needs to communicate with the spoke cluster. You can create a ClusterRoleBinding on the spoke cluster to grant access to these components.
The SPIFFE trust domain is a core component of the SPIFFE ID representing the identities of these entities, so you can set a new environment variable named SPIFFE_TRUST_DOMAIN by obtaining the value from the spire-server ConfigMap on the management cluster:
SPIFFE_TRUST_DOMAIN=$(oc --context=management-cluster get cm -n zero-trust-workload-identity-manager spire-server -o jsonpath='{ .data.server\.conf }' | jq -r '.server.trust_domain')Now create the ClusterRoleBinding on the spoke cluster to provide access to the OpenShift components on the management cluster:
oc --context=spoke-cluster apply -f - <<EOF
apiVersion: rbac.authorization.k8s.io/v1
kind: ClusterRoleBinding
metadata:
  name: ztwim-gitops-admins
roleRef:
  apiGroup: rbac.authorization.k8s.io
  kind: ClusterRole
  name: cluster-admin
subjects:
- apiGroup: rbac.authorization.k8s.io
  kind: User
  name: spiffe://$SPIFFE_TRUST_DOMAIN/ns/ztwim-gitops/sa/openshift-gitops-argocd-server
- apiGroup: rbac.authorization.k8s.io
  kind: User
  name: spiffe://$SPIFFE_TRUST_DOMAIN/ns/ztwim-gitops/sa/openshift-gitops-argocd-application-controller
EOF
The ClusterRoleBinding above provides a broad level of access to perform actions against the cluster, but in the interest of brevity it is simplified. For production use, create a curated and restricted set of configurations that meet your organization's needs.
OpenShift GitOps remote cluster management
Now that all steps to enable OpenShift GitOps running on the management cluster to manage resources on the spoke OpenShift cluster have been completed, the next step is to add the spoke cluster as a remote cluster in OpenShift GitOps.
OpenShift GitOps manages the definitions of remote clusters as secrets within the same namespace that OpenShift is deployed within. In order to utilize the k8s-spiffe-workload-jwt-exec-auth plug-in to obtain identities to authenticate to remote clusters, the execProviderConfig property in the cluster configuration definition contains the logic to invoke the plugin with the necessary properties required.
Create the secret on the management cluster to add the spoke cluster to OpenShift GitOps:
oc apply --context=management-cluster -f - <<EOF
apiVersion: v1
kind: Secret
metadata:
  name: spoke-cluster
  namespace: ztwim-gitops
  labels:
    argocd.argoproj.io/secret-type: cluster
type: Opaque
stringData:
  name: spoke-cluster
  server: "https://$(oc --context=spoke-cluster whoami  --show-server)"
  config: |
    {
      "tlsClientConfig": {
        "insecure": true
      } ,
      "execProviderConfig": {
        "command": "/binaries/k8s-spiffe-workload-jwt-exec-auth",
        "apiVersion": "client.authentication.k8s.io/v1beta1",
        "env": {
            "SPIFFE_ENDPOINT_SOCKET": "unix:///run/spire/sockets/spire-agent.sock",
            "SPIFFE_JWT_AUDIENCE": "openshift-spoke",
            "EXEC_CREDENTIAL_VERSION": "v1beta1"
        }
      }
    }
EOF
This example secret definition disables TLS verification for the sake of brevity, which is not recommended for production deployment. You can enable TLS verification by setting the value of the insecure field to false and optionally setting the contents of the API server certificate from the spoke cluster in the caData field. Both of these values are configured in the tlsClientConfig property.
Also note that the value of the SPIFFE_JWT_AUDIENCE property is defined as openshift-spoke, which matches the value of the audience property in the Authentication custom resource when external authentication was enabled on the spoke cluster.
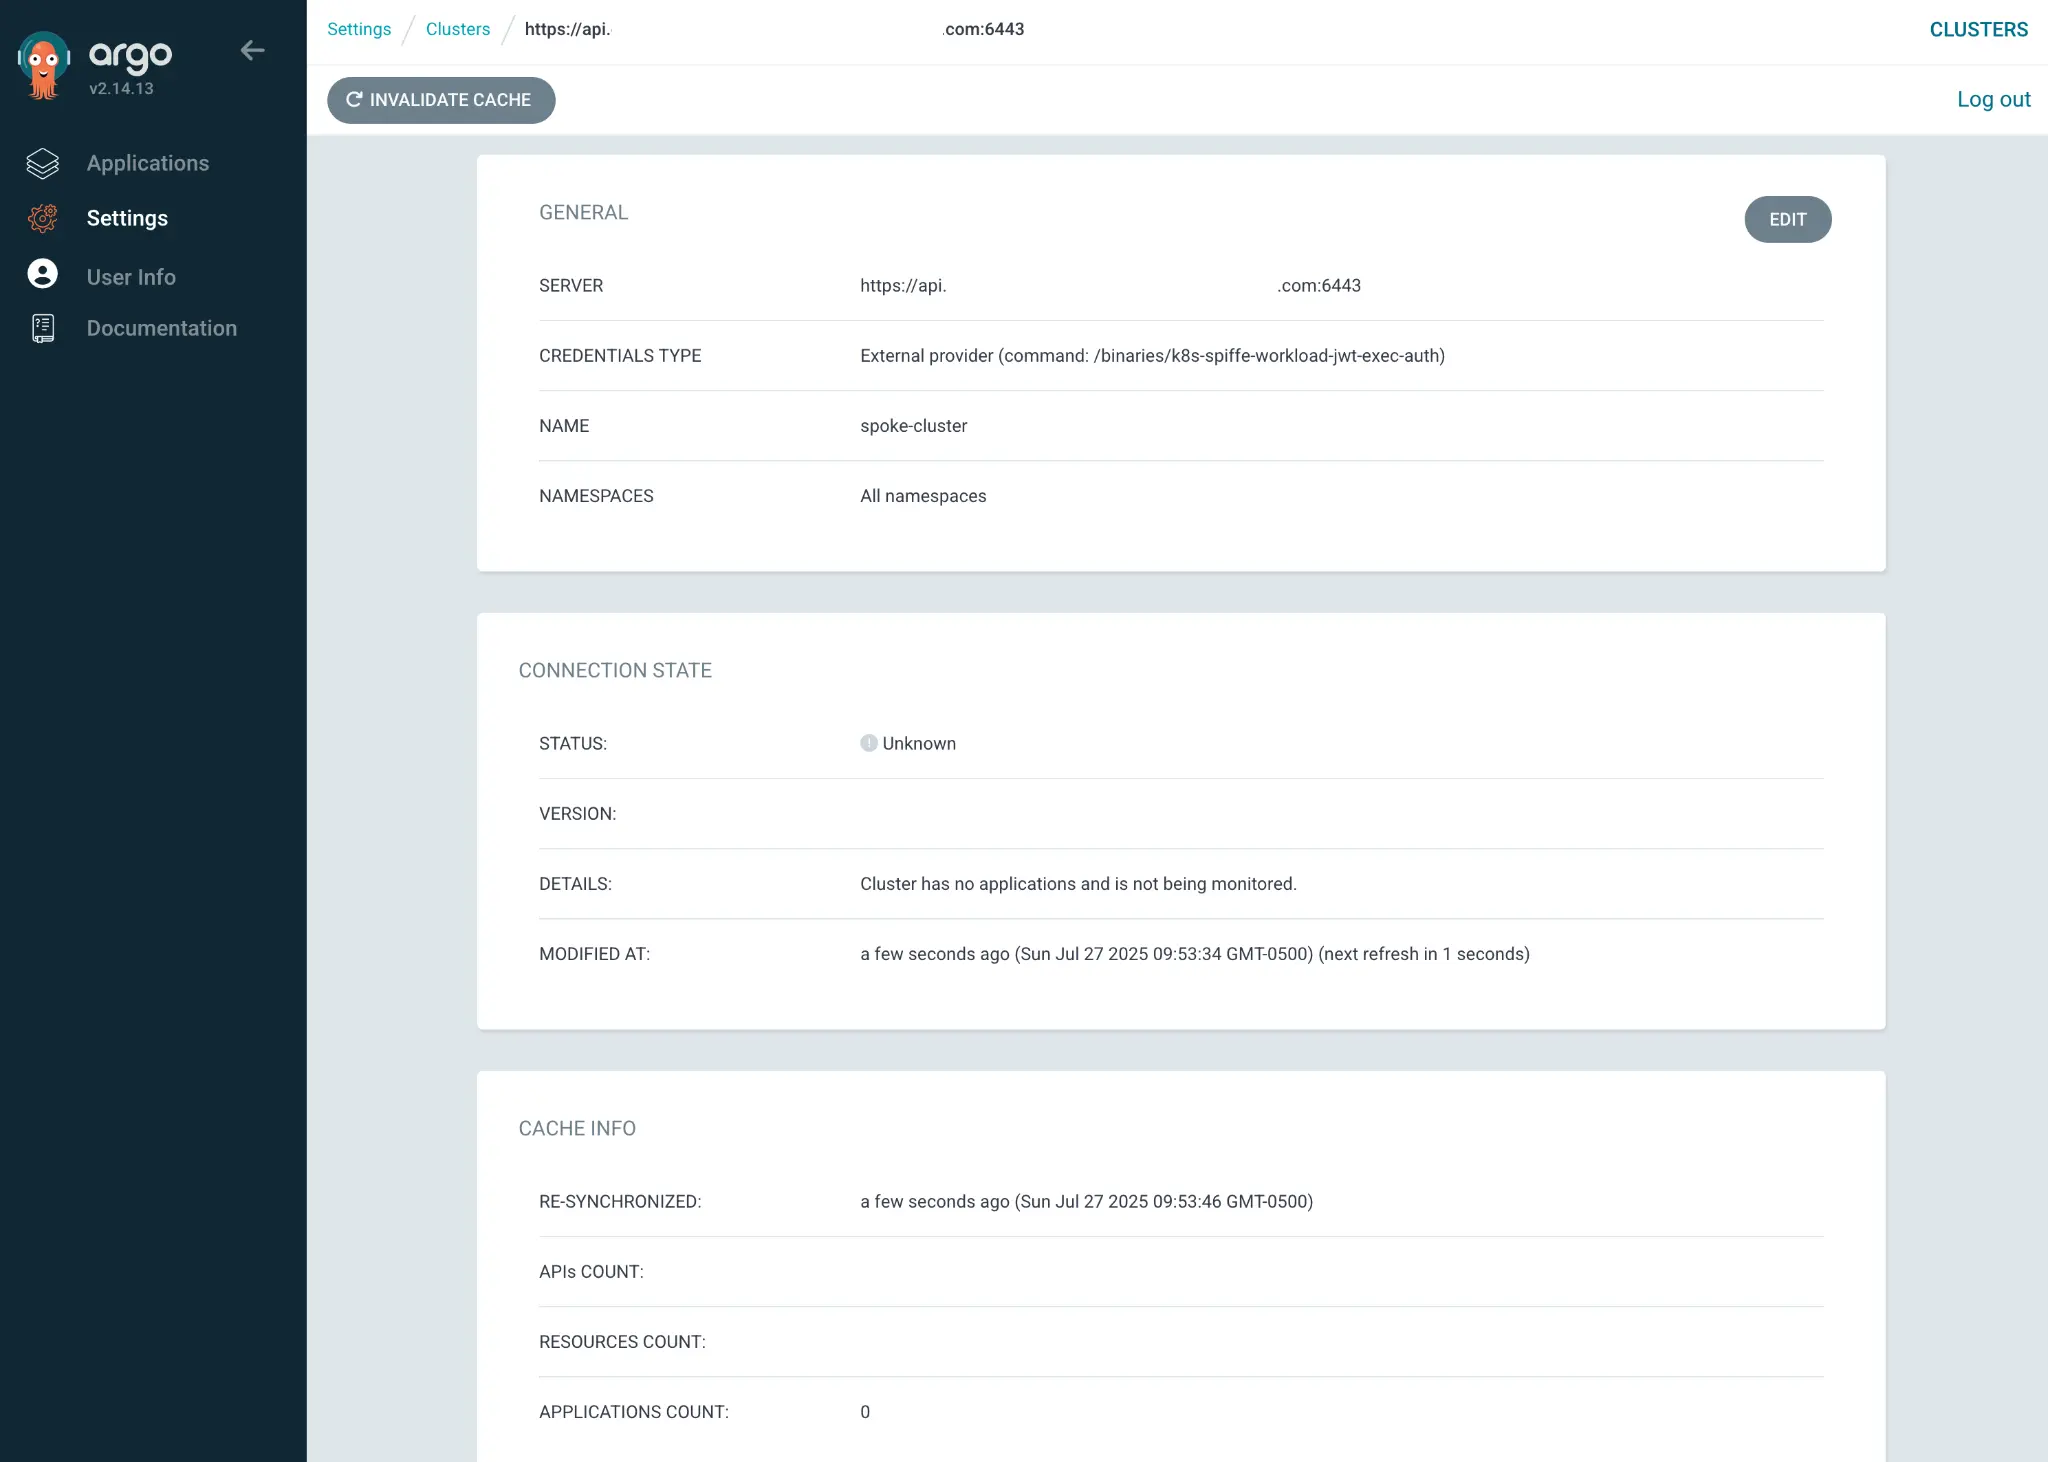
Next, navigate to the OpenShift GitOps user interface on the management cluster and select Settings in the navigation bar on the left, and select Clusters.
Both the default in-cluster and the newly created spoke-cluster clusters are displayed. Select spoke-cluster to display additional details, as shown in Figure 2.
The final task is to deploy an OpenShift GitOps application using the spoke cluster as a destination. In this example, I create an application called guestbook on the management cluster that deploys workloads to a new namespace called guestbook on the spoke cluster:
oc --context=management-cluster apply -f - <<EOF
apiVersion: argoproj.io/v1alpha1
kind: Application
metadata:
name: gitops-helm-quarkus
namespace: ztwim-gitops
spec:
destination:
namespace: gitops-helm-quarkus
name: spoke-cluster
project: default
source:
helm:
parameters:
- name: build.enabled
value: 'false'
- name: image.name
value: quay.io/ablock/gitops-helm-quarkus
path: alpha/quarkus-chart
repoURL: 'https://github.com/redhat-developer/redhat-helm-charts'
targetRevision: HEAD
syncPolicy:
automated:
prune: true
selfHeal: true
syncOptions:
- CreateNamespace=true
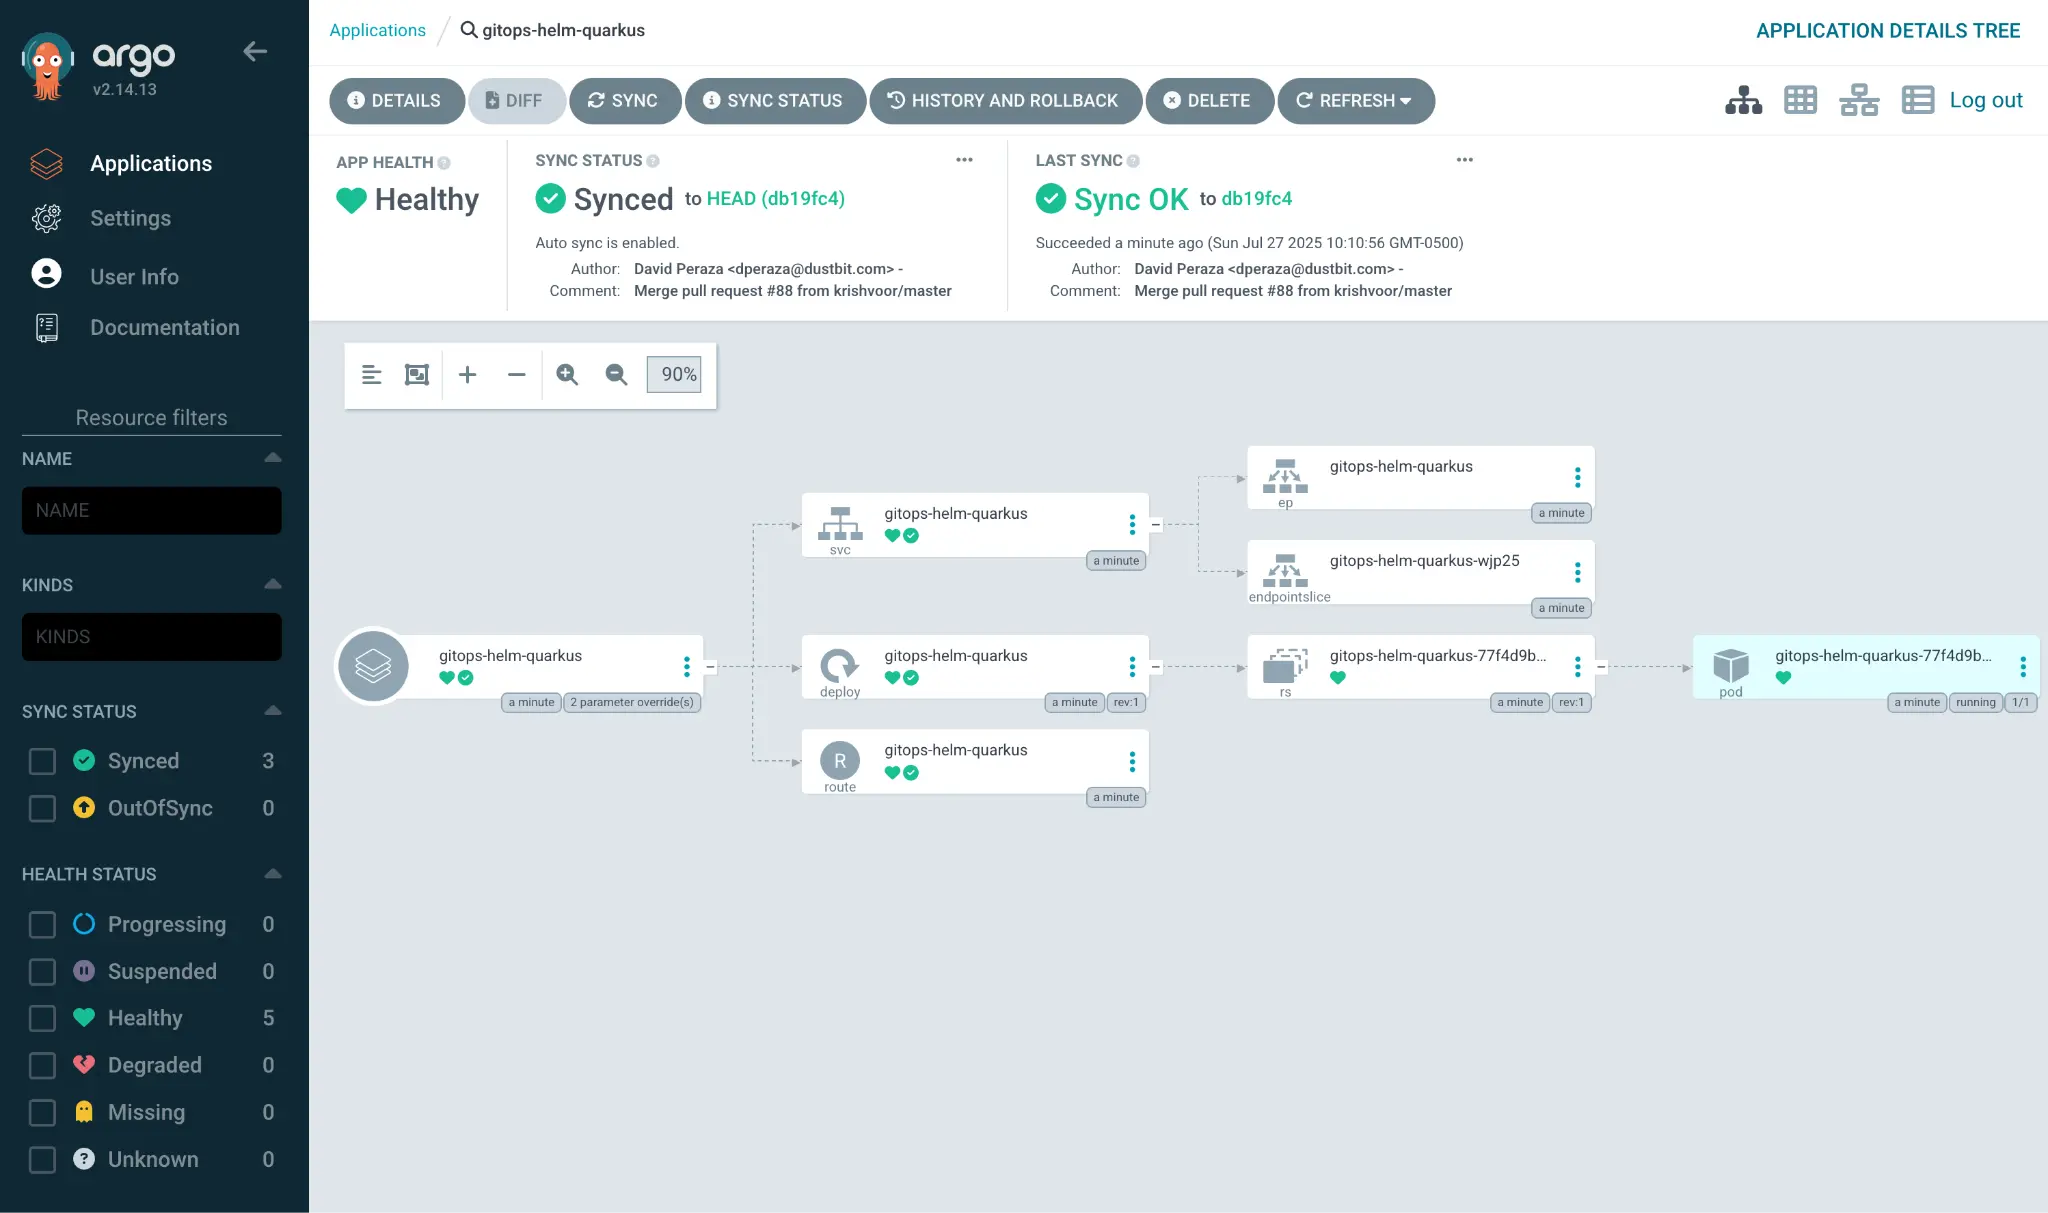
EOFIn the OpenShift GitOps user interface, select Applications in the left navigation pane to see the new application. Select the gitops-helm-quarkus application to view details including the associated components, as displayed in Figure 3:
The same set of details can be confirmed by viewing the list of running pods in the gitops-helm-quarkus namespace on the spoke cluster:
$ kubectl get pods --context=kind-spoke-cluster -n guestbook
NAME                             READY STATUS  RESTARTS AGE
gitops-helm-quarkus-77...dd965   1/1   Running 0        3m47s
Navigating back to the list of Clusters in the Settings page reveals that the spoke cluster now displays a Successful status (Figure 4) because there is an application targeting this destination.

Additional applications can be defined and deployed to spoke cluster from the management cluster as desired.
Conclusion
This article described how to integrate identities provided by Red Hat zero trust workload identity manager to enable OpenShift GitOps running on a management cluster to authenticate and manage workloads on a spoke cluster. By doing so, you avoid using long-lived tokens to communicate between clusters, increasing your overall security posture.