As Red Hat OpenShift and Kubernetes platforms scale to support higher virtual machine (VM) density and unified VM and containerized workloads, cluster and node sizing becomes a critical architectural decision. A frequent concern is the risk of node failure, and an assumption that larger core-count nodes are subject to a larger "blast radius" — the operational impact when a node fails during planned maintenance or unplanned outages.
This article evaluates whether deploying larger, higher-density "monster" servers materially increases blast radius failure recovery time compared to smaller nodes.
For this article, I built two three-node compact OpenShift clusters and benchmarked them side by side, under 60–65% sustained utilization, using different node sizing strategies. Through controlled, planned, and unplanned failure scenarios, the tests I ran demonstrate that when compute, network bandwidth, and storage I/O are scaled proportionally, larger nodes do not exhibit significantly longer recovery time. In planned maintenance scenarios, larger node recovery was significantly faster than smaller nodes
Goals and motivation
My testing focuses on validating real-world architectural concerns, including:
- Does higher core density increase operational risk?
- Are evacuation and recovery times worse with larger, higher core-count nodes?
- Is blast radius driven by node size, or by imbalance of compute, storage, and networking performance?
The goal is to empirically determine:
- Whether larger nodes inherently increase blast radius
- Whether recovery duration scales with workload density
- Whether proportional scaling mitigates perceived recovery time
- Whether large nodes are safe for Red Hat OpenShift virtualization
Test environment overview
The node resources I compare include:
- Side-by-side CPU, memory, and NIC comparison
- Small and Large nodes with proportionately balanced CPU core-count, memory capacity and NIC bandwidth
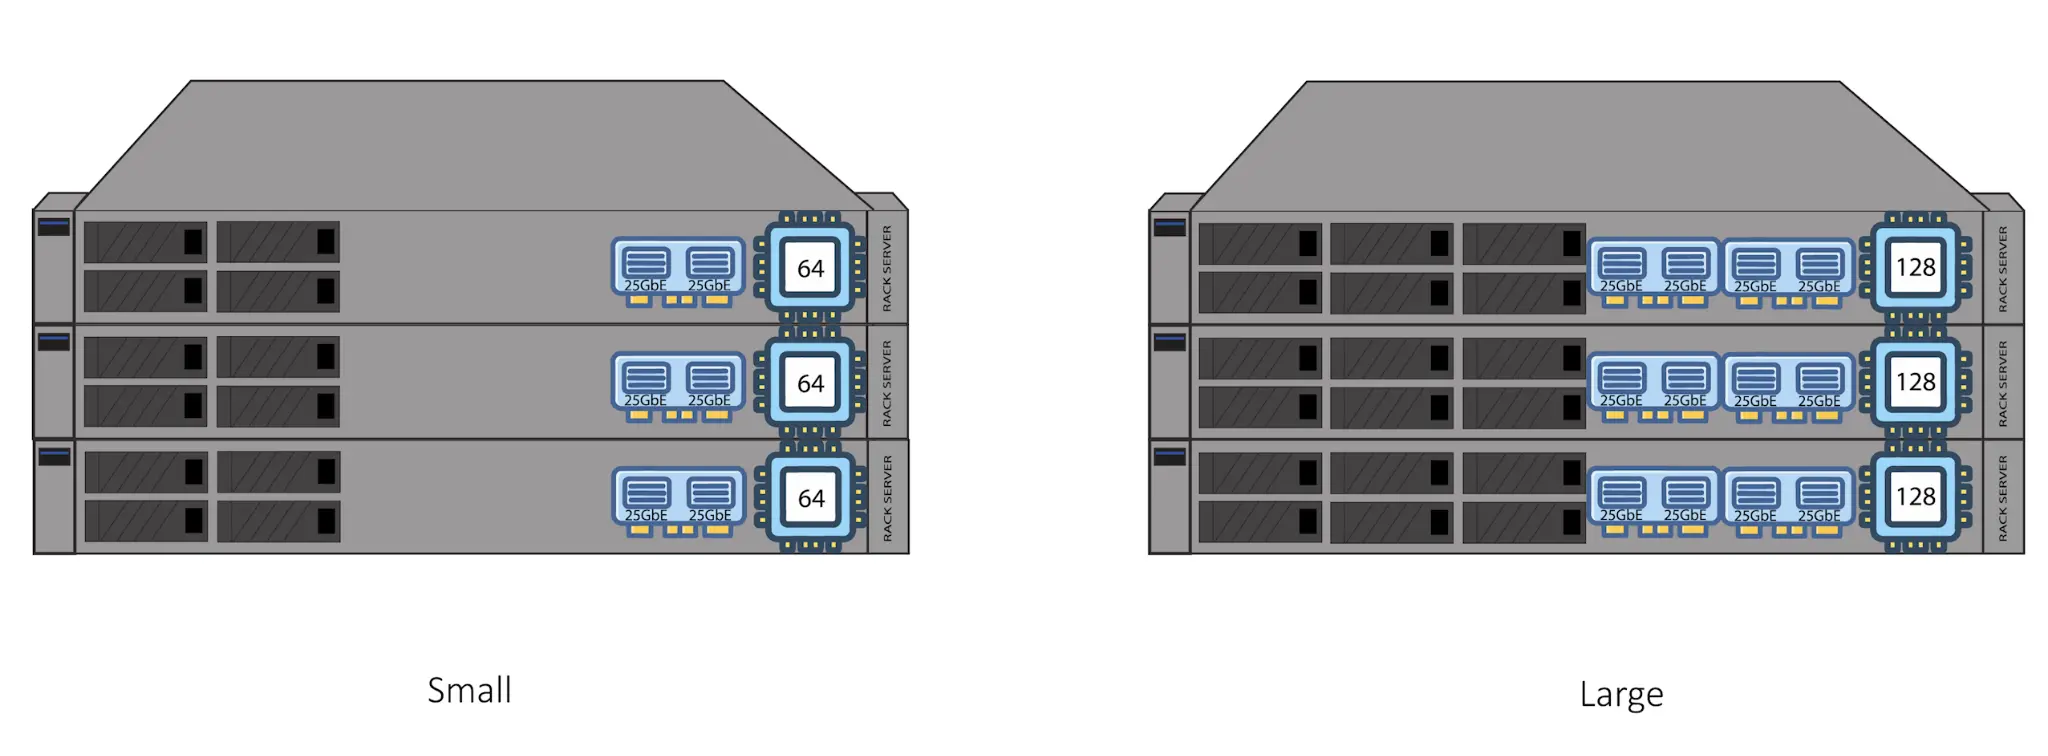
Both test clusters were deployed as three-node, compact OpenShift clusters, where a single node failure impacts 33% of cluster capacity.
| Attribute | Small Cluster (Reference) | Large Cluster (Blast) |
|---|---|---|
| Node Count | 3 | 3 |
| CPU Platform | Intel Xeon Gold 6430 2x32 Cores | AMD EPYC 9745 128-Core Processor |
| Physical Cores | 64 | 128 |
| VM Count | 60 | 120 |
| Container Count | 30 | 60 |
| VM Size | 2 vCPU / 4 GB RAM | 2 vCPU / 4 GB RAM |
| Avg CPU Utilization | 60–63% | 60–63% |
| Network | LACP 2x25 Gb | LACP 4x25 Gb |
| Enterprise Storage | Red Hat OpenShift Data Foundation 6 OSDs | Red Hat OpenShift Data Foundation 12 OSDs |
| Software High Availability Features | Descheduler, Self Node Remediation, Node Healthcheck | Descheduler, Self Node Remediation, Node Healthcheck |
| Software Scalability Features | Red Hat Ansible Automation, Red Hat Advanced Cluster Management for Kubernetes | Red Hat Ansible Automation, Red Hat Advanced Cluster Management for Kubernetes |
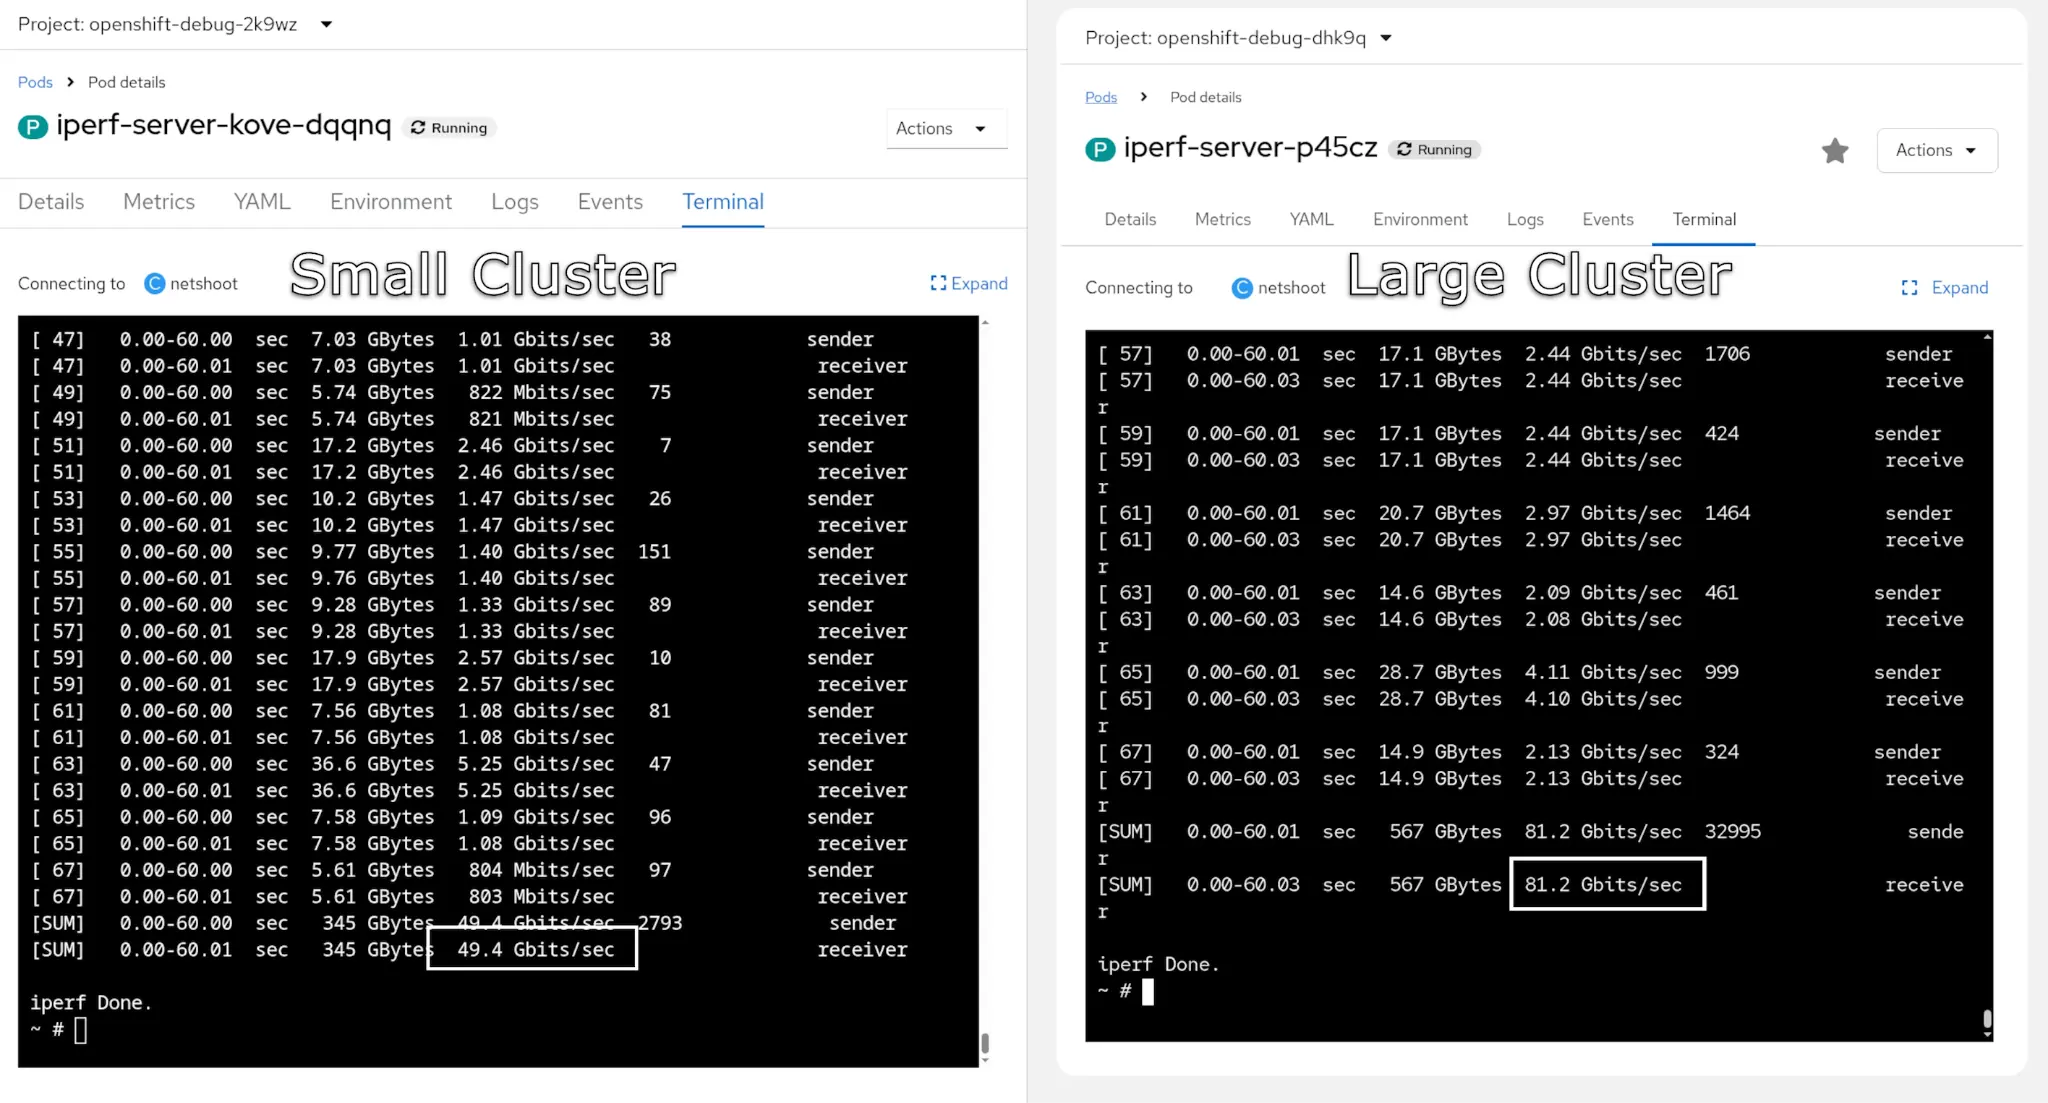
Network throughput using Iperf
As shown in the results of lperf in figure 2, the large cluster has twice the network bandwidth than the small cluster.
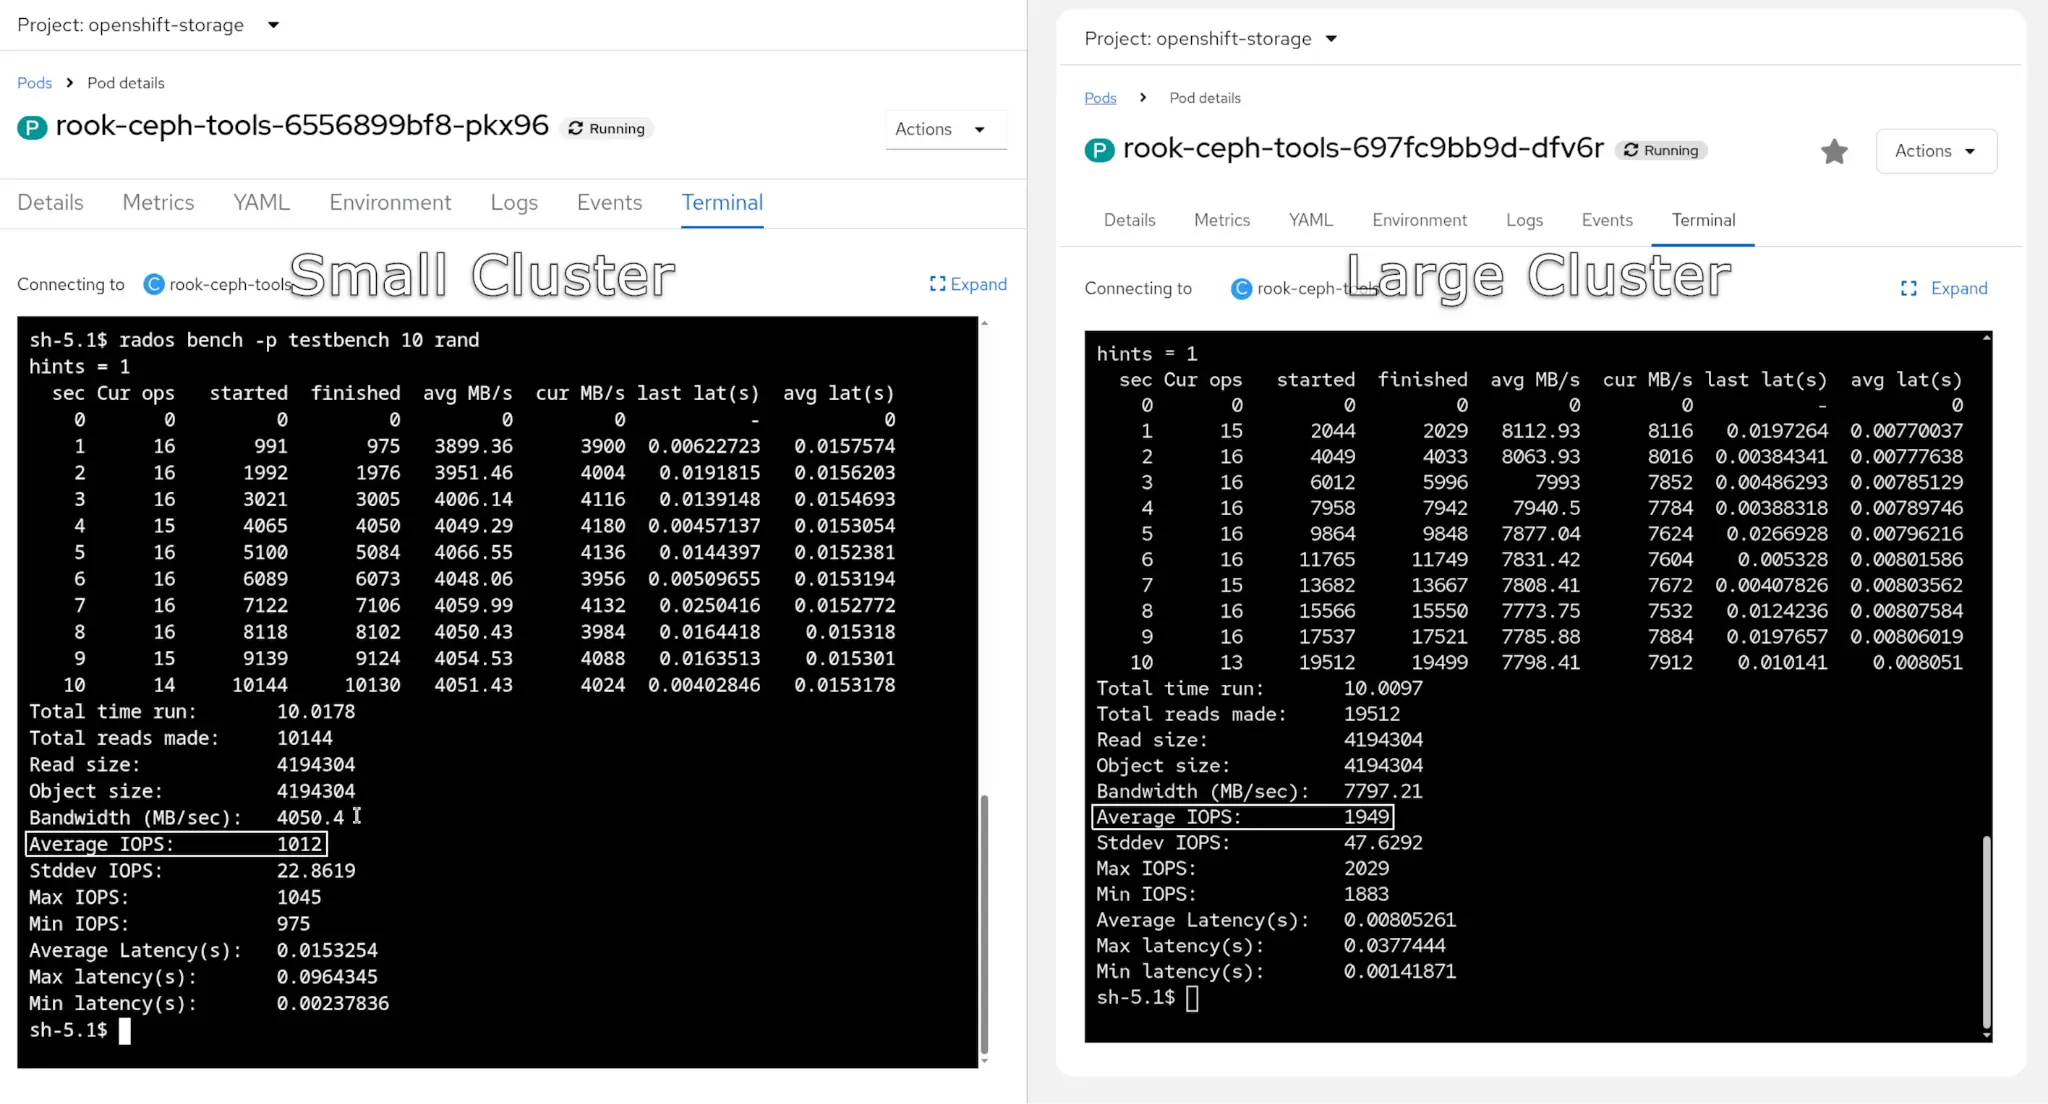
Storage benchmark using rados bench
The large cluster has twice the storage performance and IOPS, as shown in figure 3.
VM and pod distribution
The large cluster has twice the number of virtual machines running compared to the small cluster, as shown in figure 4.

Test methodology
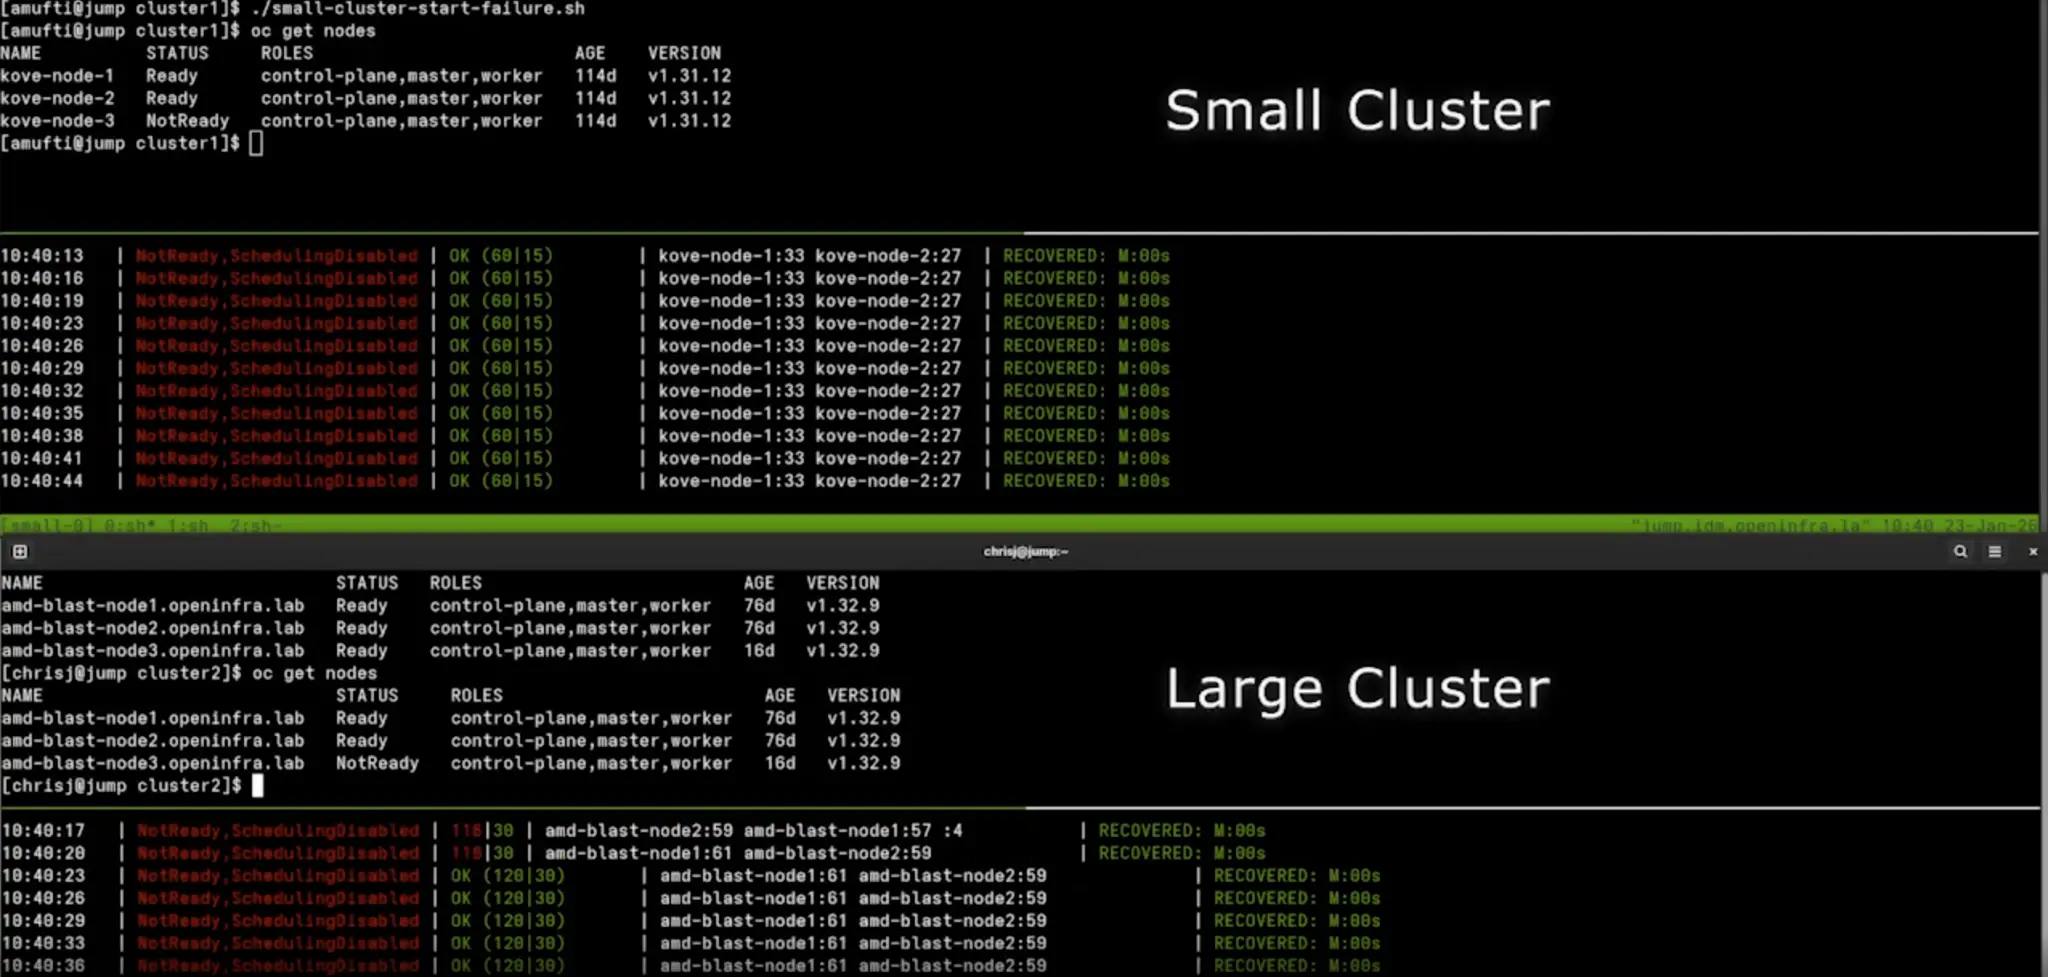
One test scenario involves a node going offline. For this, a graceful planned outage was engineered, forcing a live migration of pods, pod rescheduling. The node enters a SchedulingDisabled state as it evicts pods:
adm drain [node] --ignore-daemonsets \
--delete-emptydir-data --force \
--pod-selector='app notin  (rook-ceph-osd, rook-ceph-mon)'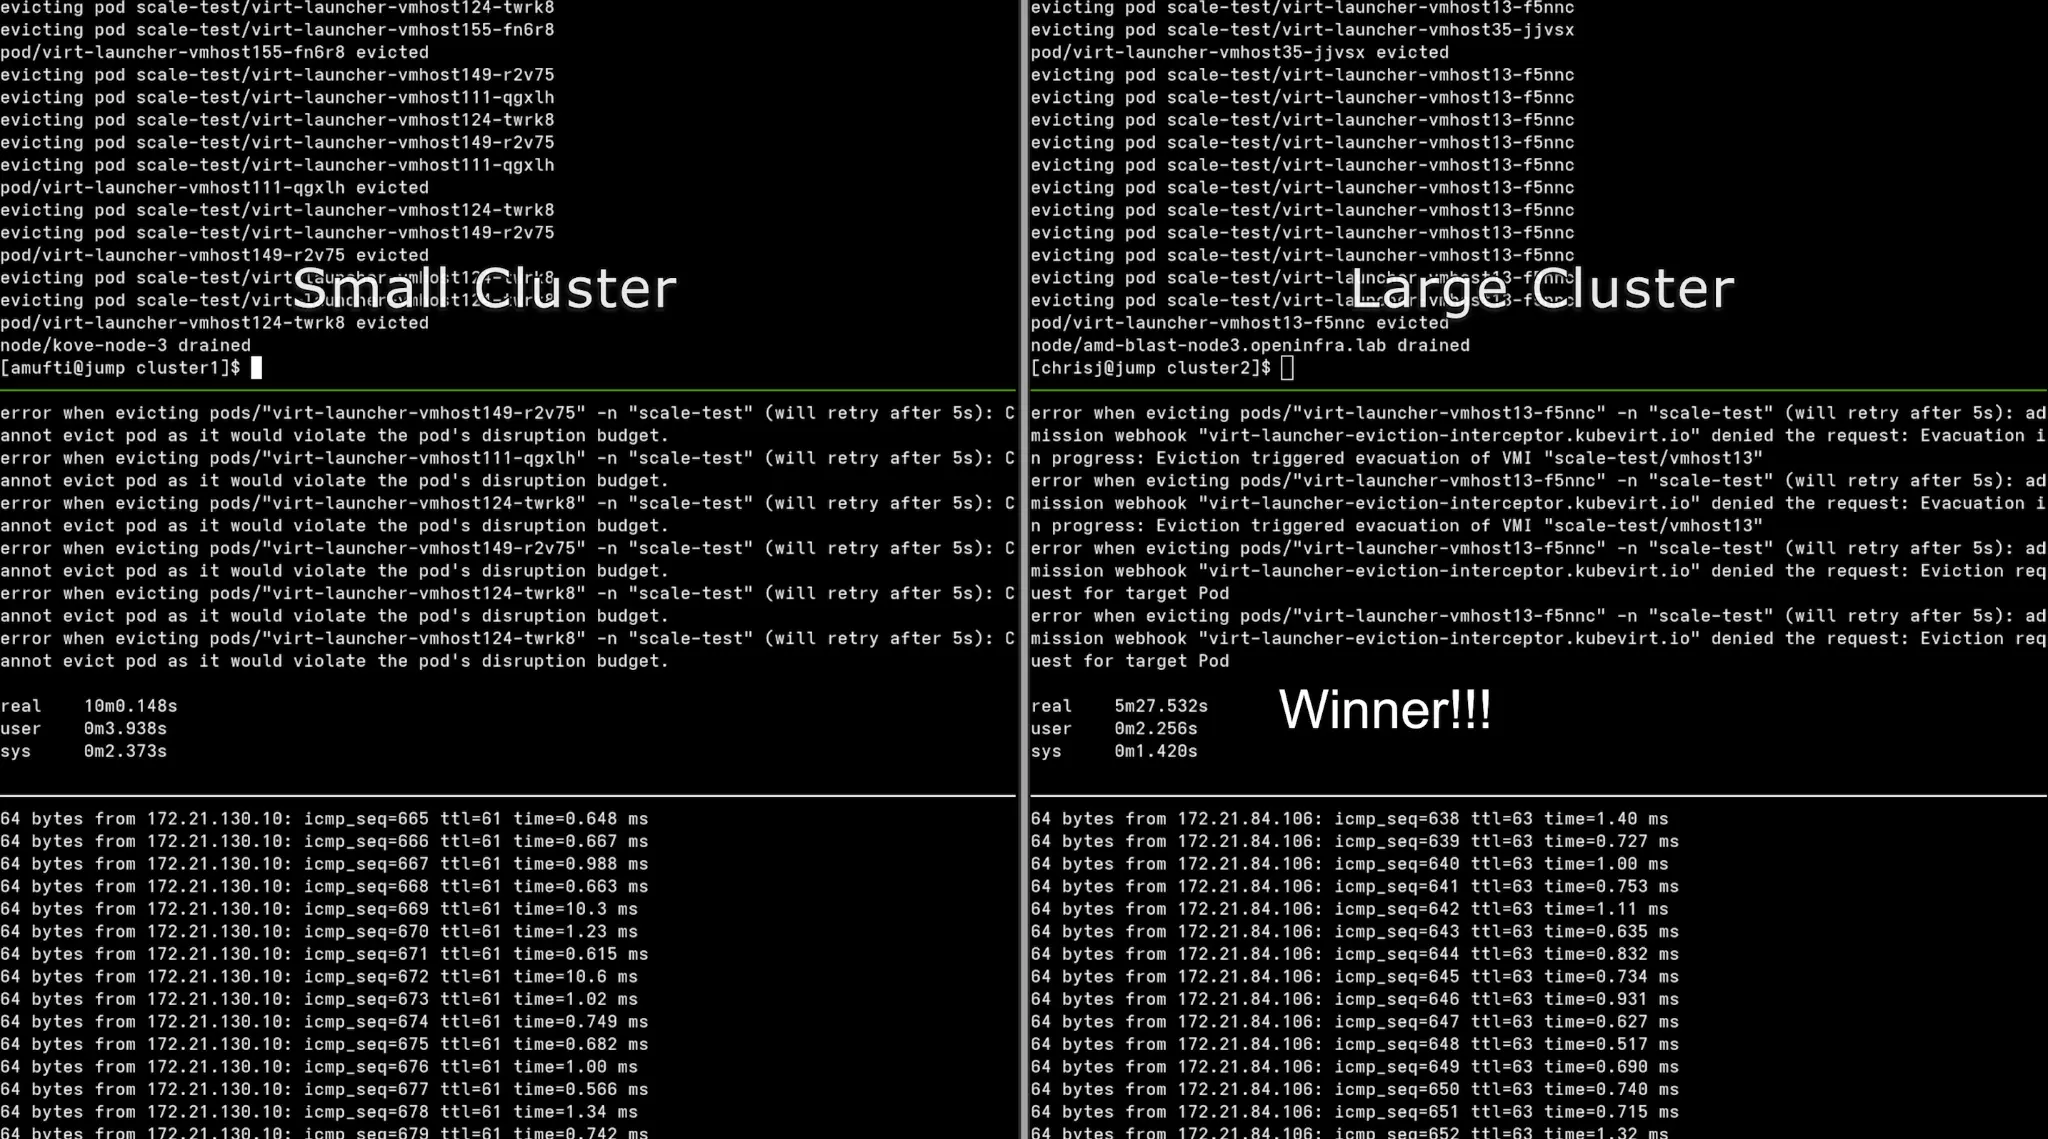
Continuous ping monitoring
As shown in the terminal output above, we kept a continuous ICMP ping running to show packet loss and recovery timestamps.
Unplanned outage (a node failure)
We also tested an unplanned outage by powering off a node using Redfish, iDRAC, or IPMI. This provided no graceful drain, and a failure was (as expected) detected by Red Hat OpenShift.
Failure detection and monitoring
In preparation for an unplanned outage, we've set up the self node remediation (SNR) operator together with the node health check (NHC) operator and set the failure detection timers to default 300 seconds. Finally, we have re-balance workloads VMs and containers on all the nodes to achieve ~60-70% resource utilization.
The planned outage has been triggered by the custom automation script that also tracked a recovery time.
Details about the NHC and SNR configuration are included <a href="#appendix">later in this article</a>.
Workload stress profile
During testing for both planned and unplanned outage scenarios, we ran stress-ng on all VMs and containers to generate real life utilization patterns. We have also monitored CPU, memory, disk, and network stress. Each node had a sustained load during all tests.
Test results
The planned maintenance recovery test results
cluster migration time (lower is better):
| Cluster | Recovery Time |
|---|---|
| Small Cluster | 10m 15s |
| Large Cluster | 5m 28s |
Observations:
- Large Cluster evacuated the test node and restarted workloads on the second node ~47% faster than for the Small Cluster
- The higher bandwidth and CPU compute capacity of the Large Cluster facilitated parallel workload migrations
The unplanned outage recovery test results
cluster migration time (lower is better):
| Cluster | Recovery time |
|---|---|
| Small Cluster | 11m 05s |
| Large Cluster | 11m 48s |
Observations:
- Both clusters recovered in similar time with a delta of 6.47%
- Detection timers dominated outage duration
- Larger cluster impacted more workloads, but for the very similar recovery time
Technical analysis
The results are in, but what have we learned? Why did larger nodes recover faster during the planned outage? There are a few advantages to a large cluster:
- Higher network throughput
- More CPU cores for parallel migration
- Greater IOPS capacity
- Reduced contention during boot storms
Blast radius revisited
Blast radius is determined primarily by recovery capability, not by node size alone. While larger nodes may host a greater number of workloads, the duration and severity of impact during a failure are governed by how quickly the platform can detect the failure, reallocate resources, and restore workload availability.
In both planned and unplanned scenarios, this testing shows that sufficient CPU headroom, network bandwidth, and storage I/O are more influential than workload density when it comes to recovery outcomes. When these resources are scaled appropriately, larger nodes can evacuate, restart, and stabilize workloads as fast as—or faster than—smaller nodes.
Additionally, unplanned outage recovery was dominated by failure detection and remediation timers, not by live migration or restart performance. As a result, increasing node size did not materially extend outage duration, even though more workloads were affected in absolute count.
Key takeaway
A larger node increases the scope of impact, but not necessarily the impact window. With proper architectural scaling and remediation strategies in place, blast radius can be effectively controlled regardless of node size
Risk mitigation strategies
To reduce blast radius impact on operations, consider using:
- Fencing-Based Remediation
- Kube Descheduler
- Physical Distribution (rack / leaf / power)
- Cluster Segmentation via Hosted Control Planes
Key findings
When engineered for resiliency and recovery from failure, large OpenShift nodes are both safe and operationally efficient. This study demonstrates that blast radius is not inherently dictated by node size, but by the platform's ability to detect failures, provide sufficient recovery headroom, and restore workloads predictably.
- CPU core and workload density ≠ longer node recovery times
- Unplanned recovery dominated by detection timers
- Planned maintenance benefits from larger nodes
- Network bandwidth and storage capacity scale matter as much as CPU
With adequate CPU capacity, network bandwidth, and storage I/O to support live migration, boot storms, and parallel recovery operations, larger nodes can achieve equal or better planned maintenance recovery characteristics compared to smaller nodes. As a result, concerns around large-node blast radius can be effectively mitigated through intentional resource scaling, remediation strategy selection, and sound cluster architecture design.
KubeVirt Descheduler configuration
The KubeDescheduler is configured to proactively rebalance workloads and relieve resource pressure on large Red Hat OpenShift nodes hosting mixed VM and container workloads.
Configuration summary
- Operates in automatic mode with a 60-second descheduling interval
- Uses the DevKubeVirtRelieveAndMigrate profile, optimized for KubeVirt environments
- Enables background evictions and soft tainting to minimize disruption
- Applies medium utilization thresholds to trigger workload redistribution
Operational impact
This configuration ensures continuous workload balancing during both steady-state operation and recovery scenarios. During planned and unplanned node failures, the descheduler assists in accelerating VM live migration and pod redistribution, directly reducing blast radius by preventing prolonged resource hotspots.
apiVersion: operator.openshift.io/v1
kind: KubeDescheduler
metadata:
  name: cluster
  namespace: openshift-kube-descheduler-operator
spec:
  managementState: Managed
  mode: Automatic
  logLevel: Normal
  operatorLogLevel: Normal
  deschedulingIntervalSeconds: 60
  profiles:
    - DevKubeVirtRelieveAndMigrate
  profileCustomizations:
    devEnableEvictionsInBackground: true
    devEnableSoftTainter: true
    devLowNodeUtilizationThresholds: Medium
    devDeviationThresholds: Low
  unsupportedConfigOverrides: null
Node health check (NHC) policy
Node health check (NHC) is used as the primary automated detection mechanism for node-level failures affecting availability, network connectivity, or kubelet health.
Configuration summary
- Applies to all worker and control-plane nodes
- Enforces a minimum healthy threshold of 51%, preventing cascading remediation
- Detects unhealthy states based on:
- Node
Ready=Falsefor more than 300 seconds NetworkUnavailable=Truefor more than 300 seconds- Prolonged
Ready=Unknownconditions
- Node
- Integrates directly with Self Node Remediation (SNR) for automated recovery
Operational impact
By enforcing quorum-based remediation thresholds, NHC ensures that large nodes can be remediated safely without risking cluster-wide instability. This directly supports controlled blast radius management by preventing simultaneous remediation of multiple critical nodes.
apiVersion: remediation.medik8s.io/v1alpha1
kind: NodeHealthCheck
metadata:
  name: example-node-healthcheck
spec:
  minHealthy: 51%
  selector:
    matchExpressions:
      - key: node-role.kubernetes.io/worker
        operator: Exists
      - key: node-role.kubernetes.io/control-plane
        operator: Exists
  unhealthyConditions:
    - type: Ready
      status: "False"
      duration: 300s
    - type: Ready
      status: Unknown
      duration: 300s
    - type: NetworkUnavailable
      status: "True"
      duration: 300s
  remediationTemplate:
    apiVersion: self-node-remediation.medik8s.io/v1alpha1
    kind: SelfNodeRemediationTemplate
    name: self-node-remediation-template
    namespace: openshift-workload-availability
Self node remediation (SNR) strategy
Self node remediation provides automated, node-local recovery actions once NHC identifies a node as unhealthy.
Configuration summary
- Uses the automatic remediation strategy
- Supports multiple remediation templates
- Acts as the execution layer triggered by NHC policies
- Deployed in the
openshift-workload-availabilitynamespace
Operational impact
SNR enables deterministic and fast remediation of failed nodes without operator intervention. When combined with NHC detection windows and descheduler workload relief, SNR ensures that node failures—planned or unplanned—are isolated and resolved with minimal workload impact.
apiVersion: self-node-remediation.medik8s.io/v1alpha1
kind: SelfNodeRemediationTemplate
metadata:
  name: self-node-remediation-template
  namespace: openshift-workload-availability
  labels:
    remediation.medik8s.io/default-template: "true"
spec:
  template:
    spec:
      remediationStrategy: Automatic
Integrated failure management flow
A layered remediation architecture is a key factor in maintaining predictable recovery times and limiting blast radius, even when operating large Red Hat OpenShift nodes at high utilization. The sequence is:
Detection → Remediation → Rebalancing
- NHC: Detects sustained node health degradation
- SNR: Executes automated remediation on the affected node
- KubeDescheduler: Redistributes VMs and pods to maintain balanced utilization
Red Hat Ansible inventory and VM provisioning parameters
This section documents Red Hat Ansible inventory structure and global variables used to provision and manage large-scale Red Hat Enterprise Linux (RHEL) virtual machine deployments for testing.
Inventory design
- A single logical host group (
scale6) was used to represent test VMs - Inventory scale was intentionally large to simulate high consolidation scenarios
- Static addressing enabled deterministic VM identification and repeatable testing
VM configuration model
- Uniform VM sizing ensured consistent workload behavior
- Explicit CPU and memory requests/limits were defined to avoid scheduler ambiguity
- Cloud-init and SSH-based access ensured automated post-provisioning control
Why this matters
A deterministic inventory and standardized VM profile eliminate configuration drift between test runs. This ensures that performance differences observed between small-node and large-node clusters are attributable to node architecture and resource scaling, not VM-level variability.
all:
  children:
    scale-group:
      hosts:
        vmhost01:
          ansible_host: 192.0.2.101
          ansible_user: cloud-user
        vmhost02:
          ansible_host: 192.0.2.102
          ansible_user: cloud-user
        vmhost03:
          ansible_host: 192.0.2.103
          ansible_user: cloud-user
        # Repeat pattern as needed
  vars:
    ansible_python_interpreter: auto_silent
    provision_group: scale-group
    vm_namespace: scale-test
    ssh_user: cloud-user
    ssh_public_key: |
      ssh-rsa AAAA...REDACTED...example
    host_defaults:
      cpu:
        cores: 2
        sockets: 1
        threads: 1
      memory: 4Gi
      resources:
        requests:
          cpu: "2000m"
          memory: 4Gi
        limits:
          cpu: "2000m"
          memory: 4Gi
      boot_disk:
        size: 100Gi
      default_network_name: default/vlanXXXX
      default_network_mtu: 9000
      gateway: 192.0.2.1
      dns:
        - 192.0.2.10
Automated stress injection using stress-ng
This section describes the automated workload generation used to apply sustained pressure on virtual machines during both planned and unplanned failure scenarios.
Stress strategy
stress-ngwas executed inside guest VMs via Ansible- Stress workloads covered CPU, memory, disk I/O, and network
- Long-duration execution ensured overlap with migration, remediation, and recovery phases
Workload characteristics
- CPU utilization capped below saturation to simulate real application load
- Memory pressure exercised live migration memory-copy paths
- Disk and network stress validated I/O stability during node failure events
Testing significance
Running recovery tests under active workload conditions ensures that observed behavior reflects production-like operating states. This validates that large-node recovery characteristics remain predictable even when the platform is under sustained resource pressure.
- name: Apply sustained stress workload
  hosts: "{{ provision_group }}"
  become: true
  gather_facts: false
  tasks:
    - name: Install stress-ng
      ansible.builtin.package:
        name: stress-ng
        state: present
    - name: Run stress-ng in background
      ansible.builtin.shell: |
        stress-ng \
          --cpu 2 \
          --cpu-load 75 \
          --vm 1 \
          --vm-bytes 80% \
          --io 2 \
          --hdd 1 \
          --timeout 7200 \
          --metrics-brief
      async: 45
      poll: 0
End-to-end VM lifecycle automation
This section documents the Red Hat Ansible automation used to provision, configure, and prepare RHEL virtual machines for blast-radius testing.
Automation scope
- Namespace initialization and API access configuration
- DNS record creation for deterministic VM naming
- VM creation using OpenShift Virtualization APIs
- Guest OS registration and dependency installation
- Post-provisioning configuration consistency
Why this matters
End-to-end automation ensures that:
- VM creation is repeatable and scalable
- Boot storms are intentional and measurable
- Test results are reproducible across environments
- Human intervention does not influence recovery timelines
This automation framework enables large-scale testing scenarios that would be impractical to execute manually.
- name: Provision RHEL VMs on OpenShift Virtualization
  hosts: localhost
  gather_facts: false
  tasks:
    - name: Initialize namespace and permissions
      ansible.builtin.include_role:
        name: setup
    - name: Create virtual machines
      ansible.builtin.include_role:
        name: kubevirt_rhel_vms
- name: Post-provision configuration
  hosts: "{{ provision_group }}"
  become: true
  gather_facts: false
  tasks:
    - name: Install required packages
      ansible.builtin.package:
        name: python3
        state: present
