Page
Package the Flask application and operating system into a verified image
Image mode for Red Hat® Enterprise Linux® lets you manage your OS like a container.
In this lesson, you will integrate your server configuration (the Podman Quadlets) and your security scripts directly into the Red Hat Enterprise Linux 10 OS image. When the server boots for the first time, it automatically downloads your application containers and starts the website. Because the application is decoupled from the OS, you can update your web server or database later without restarting the entire machine. To ensure accuracy before building the final disk, run a test by starting the image in container mode. This verifies that the Python code and database function together without starting a full virtual machine (VM).
Prerequisites:
- Create and run a Flask application locally.
- Your application and NGINX proxy configuration files are in the
flaskdev-hardenedproject directory. - Your Quadlet files are in the
flaskdev-hardened/quadletsdirectory.
In this lesson, you will:
- Automate credentials and the build process.
- Create the
Containerfile. - Build and test the application.
Package the application and operating system into a verified image
To integrate your Quadlets and your security scripts directly into the Red Hat Enterprise Linux 10 OS image, start by automating your credentials.
Step 1: Automate credentials with Podman secrets
To avoid the risk of hardcoding passwords in your configuration files, automate your credentials with Podman secrets, using a script called setup-secrets.sh. When Red Hat Enterprise Linux 10 boots for the first time, this script runs automatically. It generates strong, random passwords and stores them in the Podman secret store.
The database and application containers then pull these credentials directly from the encrypted store. This ensures that every instance of your server has its own unique set of credentials without you ever having to write a password in plain text.
This script checks for existing secrets. If none are found, it creates them and saves a backup of the generated passwords to /root/flask-secrets-generated.txt for your reference.
Copy the following text into the file flaskdev-hardened/setup-secrets.sh:
#!/bin/bash

# Skip setup if the secret already exists (server restart, OS update, etc.)
if podman secret inspect postgres_password &>/dev/null;
then
    echo "Password already exists. Skipping setup."
    exit 0
fi

# Generate a random password from the OS entropy pool.
DB_PASS=$(head -c 16 /dev/urandom | base64)

# Save a human-readable backup so you can retrieve the password after first boot.
echo " # Auto-generated Flask password — $(date -Iseconds)" > /root/flask-secrets-generated.txt
echo "POSTGRES_PASSWORD=$DB_PASS" >> /root/flask-secrets-generated.txt
chmod 600 /root/flask-secrets-generated.txt

# Store the password in Podman's encrypted secret store.
# Use echo -n to avoid adding a hidden newline to the end of the password.
echo -n "$DB_PASS" | podman secret create postgres_password -

echo "Password saved to /root/flask-secrets-generated.txt"
Next, create the systemd service that will execute this script during the initial boot process. Create a new directory for your systemd configurations:
mkdir -p flaskdev-hardened/systemdCreate the file flaskdev-hardened/systemd/flask-secrets.service and add the following configuration:
[Unit]
Description=Provision Flask podman secrets

[Service]
Type=oneshot
RemainAfterExit=yes
ExecStart=/usr/local/bin/setup-secrets.sh

[Install]
WantedBy=multi-user.target default.target
Step 2: Create the Containerfile
The Containerfile is the set of instructions for building your operating system. It starts with a Red Hat Enterprise Linux 10 base and adds the firewall, your Python code, your NGINX configuration, and your validated Quadlet files.
The most important part of this file is how it copies your configuration and code into the OS. You also include the setup-secrets.sh script and a systemd service to ensure your unique passwords are generated automatically on the first boot. The Flask runtime image itself is not embedded here, as the Quadlet pulls it from Quay.io on first boot, the same way it pulls the PostgreSQL and NGINX images. Create the file flaskdev-hardened/Containerfile.bootc as follows:
FROM registry.redhat.io/rhel10/rhel-bootc:latest

# Install firewalld for port management and cloud-init for automated  registration
RUN dnf install -y \
        --exclude=kernel-debug* \
        firewalld \
        cloud-init \
    && dnf clean all

# Copy the Flask application
COPY app/ /srv/app/

# Copy the NGINX proxy config
COPY nginx/flask.conf /etc/nginx/conf.d/flask.conf

# Copy quadlet unit files
COPY quadlets/flask.pod               /usr/share/containers/systemd/flask.pod
COPY quadlets/db-data.volume          /usr/share/containers/systemd/db-data.volume
COPY quadlets/postgresql.container    /usr/share/containers/systemd/postgresql.container
COPY quadlets/flask-app.container     /usr/share/containers/systemd/flask-app.container
COPY quadlets/nginx.container         /usr/share/containers/systemd/nginx.container

# Copy secret provisioning script and systemd service
COPY setup-secrets.sh /usr/local/bin/setup-secrets.sh
RUN chmod 755 /usr/local/bin/setup-secrets.sh
COPY systemd/flask-secrets.service /usr/lib/systemd/system/flask-secrets.service
RUN systemctl enable flask-secrets.service

# Open port 8080 for the web application
RUN firewall-offline-cmd --add-port=8080/tcp
Step 3: Create a build script to automate the build process
The following script packages everything into a local image named `flaskdev-hardened-bootc`. Create the file flaskdev-hardened/build-bootc.sh with the following contents:
#!/bin/bash
podman build \
   -f Containerfile.bootc \
    -t localhost/flaskdev-hardened-bootc:latest .
Set the permissions for the script from the command line as follows:
chmod 755 build-bootc.sh Step 4: Create test-container.sh
The following script (test-container.sh) tests your OS image by running it as a privileged container so systemd can manage services inside it. It starts the container, waits for systemd to initialize, then triggers the Quadlet-generated services and verifies they are active.
#!/bin/bash
podman rm -f flaskdev-bootc 2>/dev/null || true

# Run the OS image as a privileged container so systemd can manage services inside it.
podman run -d --name flaskdev-bootc \
  --privileged \
  --tmpfs /var/lib/containers:rw \
  -p 8080:8080 \
  localhost/flaskdev-hardened-bootc:latest \
  /sbin/init

echo "Waiting for systemd to initialize..."
sleep 5

# Quadlet generates the service units — use 'start' to trigger them.
podman exec flaskdev-bootc systemctl start postgresql flask-app nginx

echo "Waiting for database initialization..."
sleep 15

podman exec flaskdev-bootc systemctl is-active postgresql flask-app nginx


echo "Application is running at: http://127.0.0.1:8080"
echo "To remove: podman rm -f flaskdev-bootc"
Set the permissions for the script from the command line as follows:
chmod 755 test-container.sh Step 5: Build and test the application
To combine Red Hat Enterprise Linux 10 and your hardened Flask stack into a bootable container from the flaskdev-hardened directory, run the command:
./build-bootc.sh The test script starts the bootable container in container mode and uses the Quadlets you created to launch your hardened container services with the command:
./test-container.sh To test, point your web browser at http://localhost:8080. You should see results similar to Figure 1:
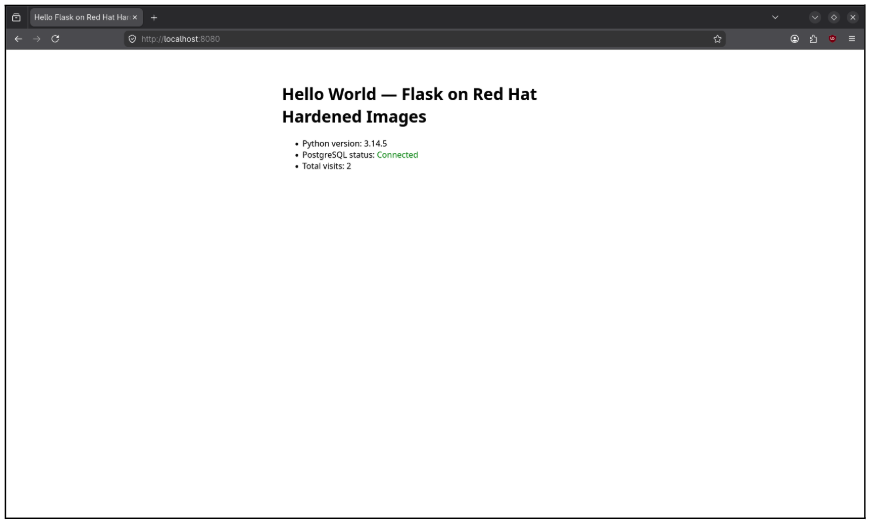
Here is what to look for to validate success:
- Python version: Confirms the Flask application container is processing code.
- PostgreSQL status: "Connected" means your application successfully authenticated with the hardened database.
- Total visits: Refresh the page to see the count increase, confirming persistent storage is working.
Success! You've demonstrated the bootable container functionality of your hardened Flask stack running

