Page
Create a bootable virtual machine to run your Flask application
The goal of image mode for Red Hat® Enterprise Linux® is to reduce the gap between containers and bootable OS environments. In this lesson, you will convert your bootc image into a physical disk file.
This process is called materialization. The bootc-image-builder tool inspects your container and generates a bootable disk. This disk includes the Red Hat Enterprise Linux 10 operating system, your Python code, configuration files, and the Red Hat Hardened Images for Flask, NGINX, and PostgreSQL.
Prerequisites:
- You will need a verified bootc image created in the previous lesson.
In this lesson, you will:
- Configure the user, storage, and subscription credentials.
- Create the image build script.
- Create a launch script for Linux KVM.
- Build and test your bootable virtual machine (VM).
Create a bootable virtual machine
You are now ready to take the verified bootc image and use bootc-image-builder to create a final .qcow2 disk file. This file can be used to run your application as a production-ready VM.
Step 1: Configure the user, storage, and subscription credentials for your image
When you build a VM, you need a way to log in. The following configuration file tells the builder to create an admin user, set a local password for sudo access, and inject your modern ed25519 public key. It also ensures the disk is large enough to hold your data.
Create the script flaskdev-hardened/bootc-config.sh with the following contents:
# Run ssh-keygen -t ed25519 first if you do not have a key yet.
PUB_KEY=$(cat ~/.ssh/id_ed25519.pub)

cat << EOF > config.toml
  [[customizations.user]]
  name = "admin"
  password = "changeme"
  groups = ["wheel"]
  key = "${PUB_KEY}"

  [[customizations.filesystem]]
  mountpoint = "/"
  minsize = "10 GiB"
  EOF
Execute the script to create the config.toml file, which Podman will use to build your container configuration with the following commands:
chmod 755 bootc-config.sh
./bootc-config.sh
Next, create the user-data file that cloud-init will read during the initial boot. This passes your Red Hat credentials to the system to automatically register the VM with Red Hat Lightspeed for Red Hat Enterprise Linux.
Create a file named flaskdev-hardened/user-data in your project directory. Add the following content, replacing the placeholder values with actual Red Hat Organization ID and activation keys:
# cloud-config
rh_subscription:
  org: "YOUR_ORG_ID"
  activation-key: "YOUR_ACTIVATION_KEY"
  auto-attach: true
You can generate these for testing in console.redhat.com with a no-cost developer subscription using the Create activation key button. For production workloads in commercial use cases, be sure to use official activation keys paid for by your organization.
Step 2: Create the image build script
The following script uses the bootc-image-builder tool. It performs a few important tasks:
- It moves your container from your local user storage to the system's root storage so the builder can see it.
- It pulls the NGINX, Flask, and PostgreSQL Hardened Images so they can be integrated into the disk.
- It outputs a
.qcow2file, which is a standard format for VM disks.
Create the file flaskdev-hardened/build-qcow2.sh with the following content:
#!/bin/bash

mkdir -p ./output

# bootc-image-builder runs as root, so copy the image from
# rootless user storage into root storage where the builder
# can see it.
podman save localhost/flaskdev-hardened-bootc:latest | sudo podman load

sudo podman run --rm --privileged \
    --security-opt label=type:unconfined_t \
    --authfile ${HOME}/.config/containers/auth.json \
    -v /var/lib/containers/storage:/var/lib/containers/storage \
    -v ./output:/output \
    -v ./config.toml:/config.toml:ro \
    registry.redhat.io/rhel10/bootc-image-builder:latest \
    --type qcow2 \
    localhost/flaskdev-hardened-bootc:latest

echo "Disk image ready at: ./output/qcow2/disk.qcow2"
Set the permissions for the script from the command line as follows:
chmod 755 build-qcow2.sh Step 3: Create a launch script for Linux KVM
Once the disk is ready, you need to start it. The following script uses virt-install to create a VM using the disk you built. It waits for the machine to start and then finds its IP address so you can visit your application.
Create the file flaskdev-hardened/launch-vm.sh with the following content:
#!/bin/bash

sudo virt-install \
    --connect qemu:///system \
    --name flaskdev-hardened \
    --cpu host-model \
    --vcpus 2 \
    --memory 4096 \
    --network network=default \
    --noautoconsole \
    --import \
    --disk ./output/qcow2/disk.qcow2,format=qcow2 \
    --os-variant rhel10-unknown \
    --cloud-init user-data=./user-data

echo "VM started. Waiting for IP address..."

# Poll the hypervisor until DHCP assigns an address.
VM_IP=""
while [ -z "$VM_IP" ]; do
    sleep 5
    VM_IP=$(sudo virsh domifaddr flaskdev-hardened 2>/dev/null | grep ipv4 | awk '{print $4}' | cut -d/ -f1 | head -n 1) || true
done

echo "App: http://${VM_IP}:8080"
echo "Login: admin / changeme  (update config.toml before production use)"
echo "Console: sudo virsh console flaskdev-hardened"
echo "To remove:"
echo "sudo virsh destroy flaskdev-hardened"
echo "sudo virsh undefine flaskdev-hardened && rm \-rf ./output"
Set the permissions for the script from the command line as follows:
chmod 755 launch-vm.sh Step 4: Build and test
Build the .qcow2 formatted disk image for the Linux-based KVM virtual machine from the command line with:
./build-qcow2.sh You'll be prompted for your password so that the sudo command can run. This will take several minutes, as it creates the 10GB disk image. On successful completion, you'll see output similar to what follows:
⏱  Duration: 49.02s
manifest - finished successfully
build:    	4e8343c0bf3ca000f32bf9cbfedd4f85640c60358e8547817eda1705060d9957
image:    	fdcb53951baacfa53804fb0f5295b8f1c166a34a7996f110e3c0bc16859a6b4c
qcow2:    	64f71d529c2b17ae8cdff44318d3326900159a345f99c10c430eb86b6ae0c73b
Build complete!
Results saved in .
qcow2 image created at: ./output/qcow2/disk.qcow2
Now, start the VM with:
./launch-vm.sh The launch command will give you the IP address to connect to for testing. For example:
Launching VM: flaskdev-hardened

Starting install...
Creating domain...                                          |         00:00
Domain creation completed.

VM 'flaskdev-hardened' started. Waiting for IP address...

VM 'flaskdev-hardened' is running at: 192.168.122.151
App: http://192.168.122.151:8080
Console: sudo virsh console flaskdev-hardened
Login: admin / changeme
Open the specified App: link in your browser (e.g., http://192.168.122.151:8080). You should see results similar to Figure 1:
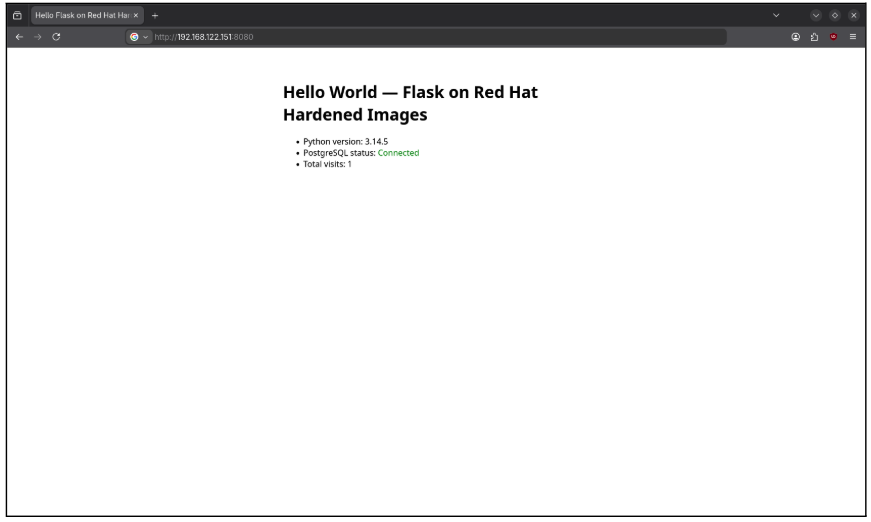
Here is what to look for to validate success:
- Python version: Confirms the Flask application container is processing code.
- PostgreSQL status: "Connected" means your application successfully authenticated with the hardened database.
- Total visits: Refresh the page to see the count increase, confirming persistent storage is working.
Note on database passwords
Because you used the setup-secrets.sh script to harden the system, the database passwords were randomly generated when the VM started. To find these unique credentials for your records, log in to the VM via SSH using the admin user, then run:
sudo cat /root/flask-secrets-generated.txtSuccess! You've created a bootable VM. Now that you have the application up and running, you can update your website or fix a database bug without having to reboot. You're now ready to manage and update your application.

