Page
Create and run a Flask application locally
In this lesson, you will launch a Python Flask stack using Red Hat® Hardened Images. You will use standard Podman command-line interface (CLI) commands to network and run Flask, NGINX, and PostgreSQL containers locally.
Prerequisites:
- The ability to create and edit Linux® text files.
- Understanding of how to traverse a Linux file system.
- A working knowledge of Python and the Flask web framework.
- A no-cost Developer subscription from developers.redhat.com.
- Red Hat Enterprise Linux, CentOS Stream, or Fedora Linux installed with the subscription-manager package, and subscription credentials provided on the host.
In this lesson, you will:
- Review the core application components.
- Develop the application.
- Launch and test the application.
Core application components
This application uses three Linux containers. NGINX and PostgreSQL run directly from Red Hat's Hardened Image catalog, configured through files rather than custom code, so no custom image is required. For Flask, your application code requires a custom runtime image built on top of the Python Hardened Image:
- Flask (via Gunicorn): Processes the code in
app.py. A multi-stageContainerfile.appuseshi/python:latest-builderto install Flask, Gunicorn, and the PostgreSQL driver, then copies only those packages into the minimalhi/python:latestruntime image. The resulting image is pushed to your registry and pulled by Podman on first boot, exactly like the other Red Hat Hardened Images. - PostgreSQL: A full-featured, open source SQL database that stores the timestamp of every visitor to your site. As your application evolves beyond the scope of this example, you can use this database to maintain data related to your application and even be configured to support read-scale replicas for scaling.
- NGINX: Acts as a reverse proxy. It handles incoming web traffic on port 8080 and passes requests to the Flask application server. It can also be configured to provide load balancing across PostgreSQL servers in more advanced configurations.
Step 1: Prepare the development workspace
Open your Linux terminal and create a directory for the project. Inside, create an app folder for your Python code and an nginx folder for the server configuration.
mkdir -p flaskdev-hardened/{app,nginx}
cd flaskdev-hardened
Step 2: Build the Flask runtime image
Red Hat Hardened Images are distroless, meaning the runtime image has no shell and no build tools. The builder variant (hi/python:latest-builder) exists specifically to give you a safe place to install dependencies. A multi-stage build uses the builder to install your packages, then copies only the results into the minimal runtime image, and build tools never remain in the final production image.
Create the file flaskdev-hardened/Containerfile.app with the following contents:
# Stage 1: builder — includes pip and a shell so you can install packages normally.
FROM registry.access.redhat.com/hi/python:latest-builder AS builder
USER root
RUN python3 -m venv /venv
RUN /venv/bin/pip install --no-cache-dir flask gunicorn psycopg2-binary

# Stage 2: runtime — minimal and distroless.
# Copy only the installed packages.
FROM registry.access.redhat.com/hi/python:latest
COPY --from=builder /venv /venv
WORKDIR /app
EXPOSE 8000
CMD ["/venv/bin/gunicorn", "--workers", "2", "--bind", "0.0.0.0:8000",
  "app:app"]
The builder stage installs Flask, Gunicorn, and the PostgreSQL driver into a virtual environment at /venv which provides a self-contained Python application environment. The runtime stage copies that directory into the final minimal production image. The CMD calls Gunicorn by its full path inside the virtual environment, so no shell or PATH resolution is needed.
Quay.io is a registry for storing, building, and distributing container images and other OCI artifacts. It offers both free and paid tiers to cater to various user needs. If you haven’t done so already, you’ll need to log in to Quay.io using your Red Hat account and set up your account by accepting terms and conditions.
Once you’ve accepted terms on the Quay.io site:
- Select your_account_name in the upper right corner of the page.
- Select Account Settings.
- Select CLI Password: Generate Encrypted Password
Once that step is complete, you can log in with credentials using the command:
podman login quay.ioYour Quay.io username will be the same as your Red Hat account username.
Build the image with two tags, a local tag for use in this lesson and a registry tag for the virtual machine (VM) to pull from later. Replace `YOUR\_USERNAME` with your Quay.io username, then push the image to the registry.
Now build the image from the flaskdev-hardened directory:
podman build \
    -f Containerfile.app \
    -t localhost/flask-runtime:latest \
    -t quay.io/YOUR_USERNAME/flask-runtime:latest .

podman push quay.io/YOUR_USERNAME/flask-runtime:latest
For this learning path, you’ll want to visit Quay.io and make sure that your flask-runtime repo is Public so that it can be accessed without a login by your runtime containers. You can
do by going to: quay.io/repository/YOUR_USERNAME/flask-runtime and selecting Settings > Repository > Visibility > Make Public.
Note on keeping your Flask image up to date
Red Hat rebuilds and republishes the hi/python images when vulnerabilities are found. When the base image is patched, you rebuild your flask-runtime image on top of it, as you would with any containerized application. In production, connect your Containerfile.app to a Quay.io build trigger pointed at the git repository where you store it. Quay.io then rebuilds and republishes your image automatically, and the AutoUpdate=registry setting in your Quadlet picks up the new digest with no manual intervention.
Step 3: Create the application logic
The Flask application logic will display "Hello World — Flask on Red Hat Hardened Images." The example below will also connect with the rest of the stack and perform the following tasks:
- Environment discovery: The script uses
os.getenv()to find the database credentials. This keeps secrets out of your code and lets the container platform manage them. - Database handshake: It uses the
psycopg2library to connect to the PostgreSQL container. If the connection fails, it catches the error so your whole page doesn't crash. - Schema automation: On the first run, the script automatically creates a
visitstable. This demonstrates how your app can set itself up in a new environment. - Persistence check: Every time you refresh, it inserts a new row with a timestamp and then counts the total rows. This confirms that your data volume is working and your data won't disappear if the container restarts.
Save the following code as flaskdev-hardened/app/app.py:
import os
import platform
from flask import Flask
import psycopg2

app = Flask(__name__)

@app.route('/')
def index():
    db_host = os.getenv('DB_HOST', 'localhost')
    db_user = os.getenv('DB_USER', 'appuser')
    db_pass = os.getenv('DB_PASS', 'apppass')
    db_name = os.getenv('DB_NAME', 'hellodb')
    status = 'Disconnected'
    error  = ''
    count  = 0
    try:
        conn = psycopg2.connect(
            host=db_host,
            user=db_user,
            password=db_pass,
            dbname=db_name
        )
        conn.autocommit = False
        cursor = conn.cursor()
        cursor.execute(
            "CREATE TABLE IF NOT EXISTS visits "
            "(id SERIAL PRIMARY KEY, "
             "visited_at TIMESTAMP DEFAULT NOW())"
        )
        conn.commit()
        cursor.execute("INSERT INTO visits (visited_at) VALUES (NOW())")
        conn.commit()
        cursor.execute("SELECT COUNT(*) FROM visits")
        count  = cursor.fetchone()[0]
        status = 'Connected'
        cursor.close()
        conn.close()
    except psycopg2.Error as e:
        error = str(e)
    python_ver  = platform.python_version()
    status_cls  = 'ok' if status == 'Connected' else 'fail'
    visits_html = f'<li>Total visits: {count}</li>' if status == 'Connected' else ''
    error_html  = f'<li class="fail">Error: {error}</li>' if error else ''
    return f"""
<html lang="en">
<head>
    <meta charset="UTF-8">
    <title>Hello Flask on Red Hat Hardened Images</title>
    <style>
            body {{ font-family: sans-serif; max-width: 600px; margin: 4em auto; }}
                .ok   {{ color: green; }}
                .fail {{ color: red; }}
    </style>
</head>
<body>
    <h1>Hello World — Flask on Red Hat Hardened Images</h1>
    <ul>
        <li>Python version: {python_ver}</li>
        <li>PostgreSQL status:
            <span class="{status_cls}">
                {status}
            </span>
        </li>
        {visits_html}
        {error_html}
    </ul>
</body>
</html>"""
Step 4: Configure the NGINX reverse proxy
The NGINX server needs to know where to forward incoming requests. NGINX communicates with Gunicorn over standard HTTP. Because all three containers share the same network namespace inside a pod, they reach each other on localhost. Create flaskdev-hardened/nginx/flask.conf with the following contents to tell NGINX to proxy traffic to the Flask container:
upstream flask_backend {
    server localhost:8000;
}

server {
    listen 8080;
    server_name _;
    location / {
        proxy_pass         http://flask_backend;
        proxy_set_header   Host              $host;
        proxy_set_header   X-Real-IP         $remote_addr;
        proxy_set_header   X-Forwarded-For   $proxy_add_x_forwarded_for;
        proxy_set_header   X-Forwarded-Proto $scheme;
    }
}
Step 5: Define the stack in a bash startup script
A bash script launches the stack using native Podman commands. A Podman pod groups the three containers into a single logical unit and gives them a shared network namespace, where they communicate on localhost rather than by container hostname, and port 8080 is published once at the pod level.
Create the file flaskdev-hardened/start-flask.sh with the following contents:
#!/bin/bash

podman pod create --name flask-pod -p 8080:8080 || true
podman volume create db-data || true

podman run -d --pod flask-pod --name postgresql \
    -e POSTGRES_USER=appuser \
     -e POSTGRES_PASSWORD=apppass \
    -e POSTGRES_DB=hellodb \
    -v db-data:/var/lib/postgresql/data:Z \
    registry.access.redhat.com/hi/postgresql:latest

podman run -d --pod flask-pod --name flask-app \
    -e DB_HOST=localhost \
    -e DB_USER=appuser \
    -e DB_PASS=apppass \
    -e DB_NAME=hellodb \ -v ./app:/app:z \
    localhost/flask-runtime:latest

podman run -d --pod flask-pod --name nginx \
    -v ./nginx/flask.conf:/etc/nginx/conf.d/default.conf:Z,ro \
     registry.access.redhat.com/hi/nginx:latest

echo "Stack is running at http://localhost:8080"
echo "To stop:   podman pod stop flask-pod"
echo "To remove: podman pod rm -f flask-pod"
Make the script executable:
chmod +x start-flask.sh Step 6: Launch and test results
To run the application in containers using your code and Red Hat Hardened Images, execute the bash script from the flaskdev-hardened/ directory:
./start-flask.sh To test, point your web browser to http://localhost:8080. You should see results similar to Figure 1 below:
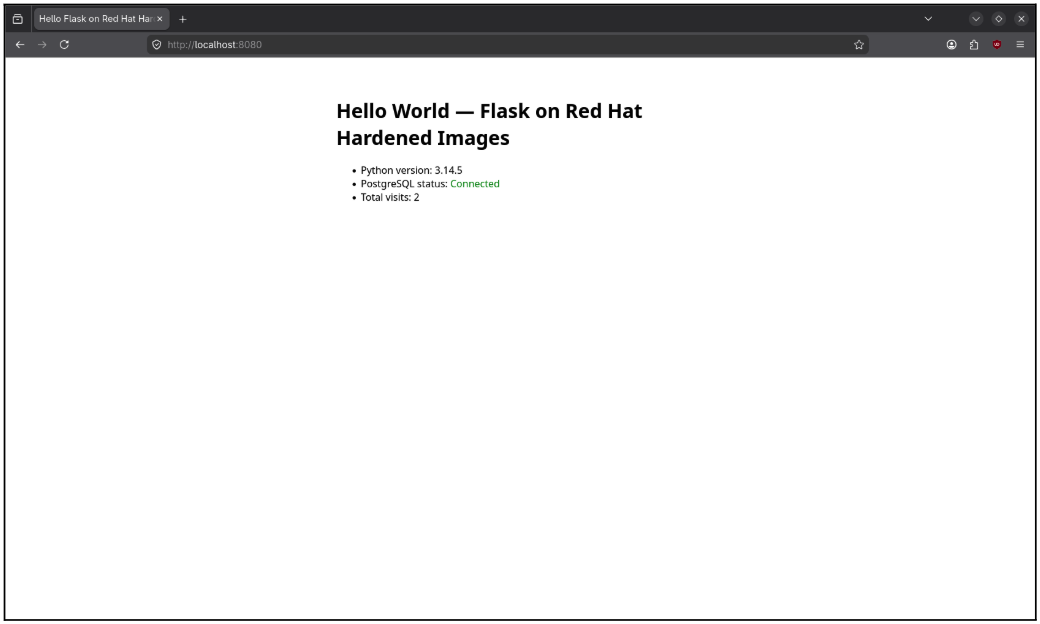
Here is what to look for:
- Python version: Confirms the Flask application container is processing code.
- PostgreSQL status: "Connected" means your application successfully authenticated with the hardened database.
- Total visits: Refresh the page to see the count increase, confirming persistent storage is working.
Success! You've developed, launched, and tested the application and confirmed the basic functionality of the Flask containers.
Next, you will use Podman Quadlets to tell the operating system how to manage those containers.

