Containers on Red Hat OpenShift can get automatic cryptographic identities through zero trust workload identity manager, but workloads running inside a virtual machine (VM) cannot. In this tutorial, I demonstrate how I bridged that gap using a virtual socket (VSOCK) and a dedicated in-VM SPIRE agent to give every workload — whether it's running as a container or as an application inside a VM — a short-lived, automatically rotating SPIFFE identity.
Why an application in a VM doesn't get a SPIRE identity
If you're running Red Hat OpenShift Virtualization alongside containerized workloads, you've likely encountered this kind of friction. Your containers enjoy automatic cryptographic identities through the zero trust workload identity manager. An application running inside a VM is stuck with static credentials, manual rotation, and an inconsistent security posture. Zero trust workload identity manager has no way to reach inside the guest OS to issue it an identity.
Zero trust workload identity manager works seamlessly for containers because the SPIRE agent runs as a DaemonSet on each node and the container storage interface (CSI) driver plug-in (spiffe-csi-driver) mounts its Unix socket to every pod. The SPIRE agent performs node attestation, then communicates with the SPIRE server to fetch cryptographic identities for workloads on its node. It issues these identities once workload attestation succeeds. But a VM is a complete computer running inside a computer with its own kernel, its own filesystem, its own process table.
Even though the VM runs inside a virt-launcher pod, the VM guest OS cannot see the mounted socket. The mount exists in the pod's filesystem. As a result, the virt-launcher pod itself can receive a cryptographic identity, but the workloads running inside the VM cannot.
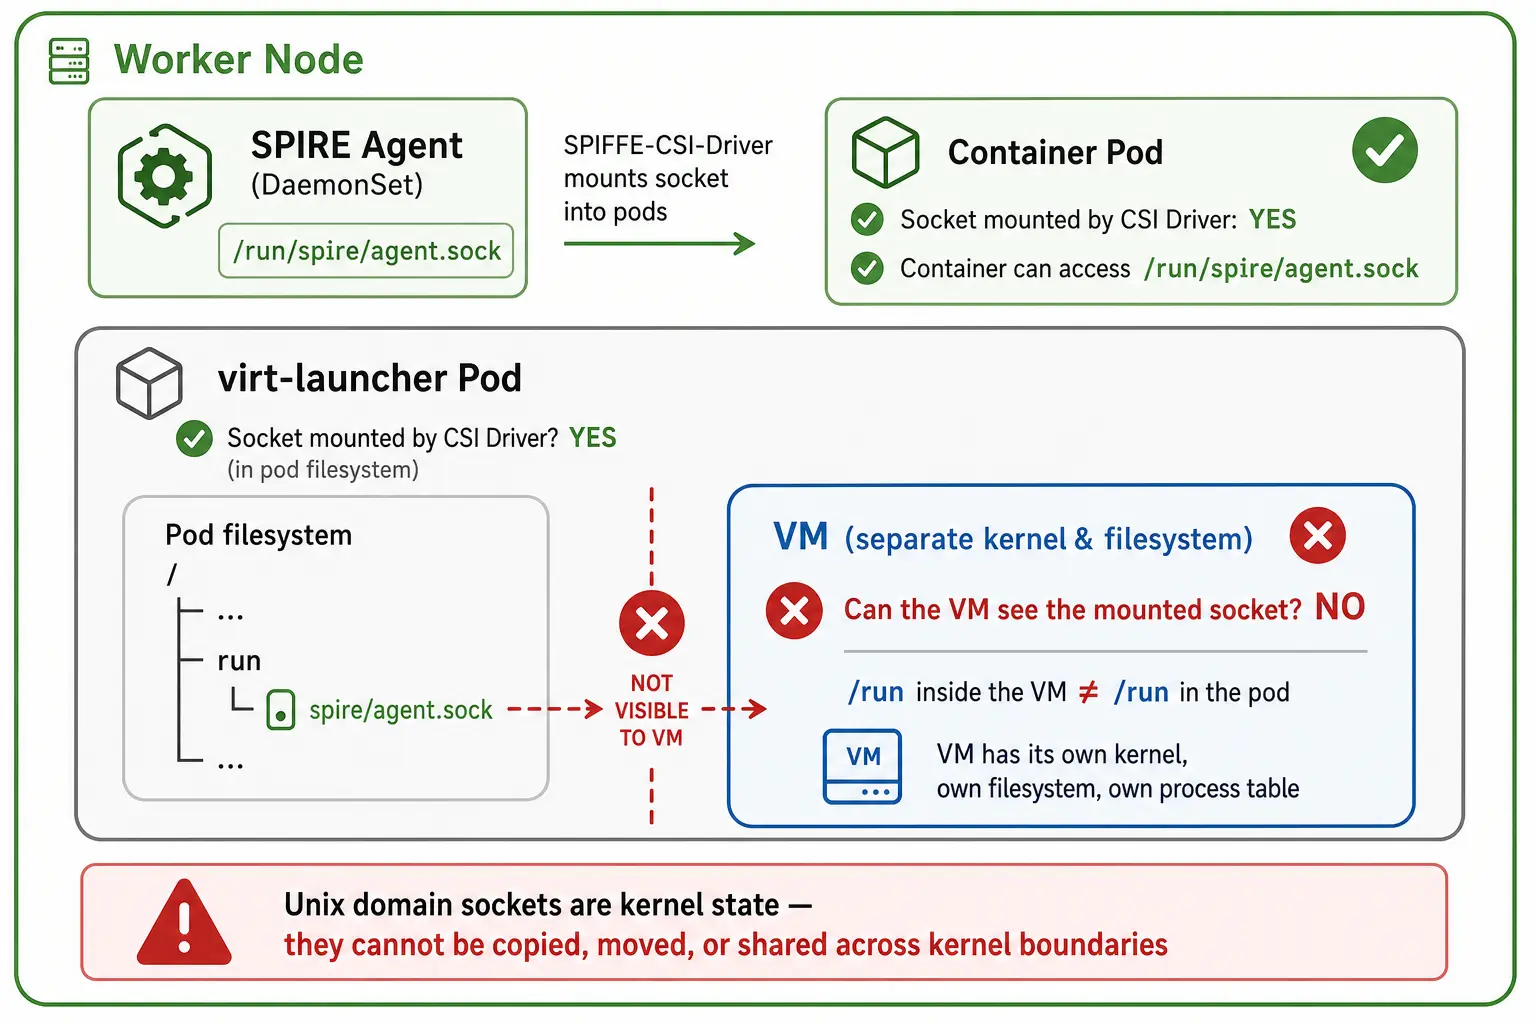
You can't copy a Unix domain socket into the VM, either. A socket is kernel state (buffers, queues) connected to a running process, not a portable file. It only exists in the kernel that created it.
So how do we give VM workloads the same zero-trust identity model that containers already enjoy?
Solution: VSOCK + a dedicated in-VM SPIRE agent
The basic idea is straightforward: Run a dedicated SPIRE agent inside each VM and connect it to the SPIRE server on the cluster using VSOCK, the secure communication channel built into the Linux kernel specifically for VM-to-host communication.
Why VSOCK instead of TCP?
- Network isolation: VSOCK is invisible to IP routing, port scanning, or any network-based attack.
- VM isolation: Each VM gets its own context ID (CID), so VMs can't snoop on each other.
- No exposure: If we used TCP over the pod network, then the connection would be visible to anything on the cluster's virtual network, which provides opportunity for interception or spoofing.
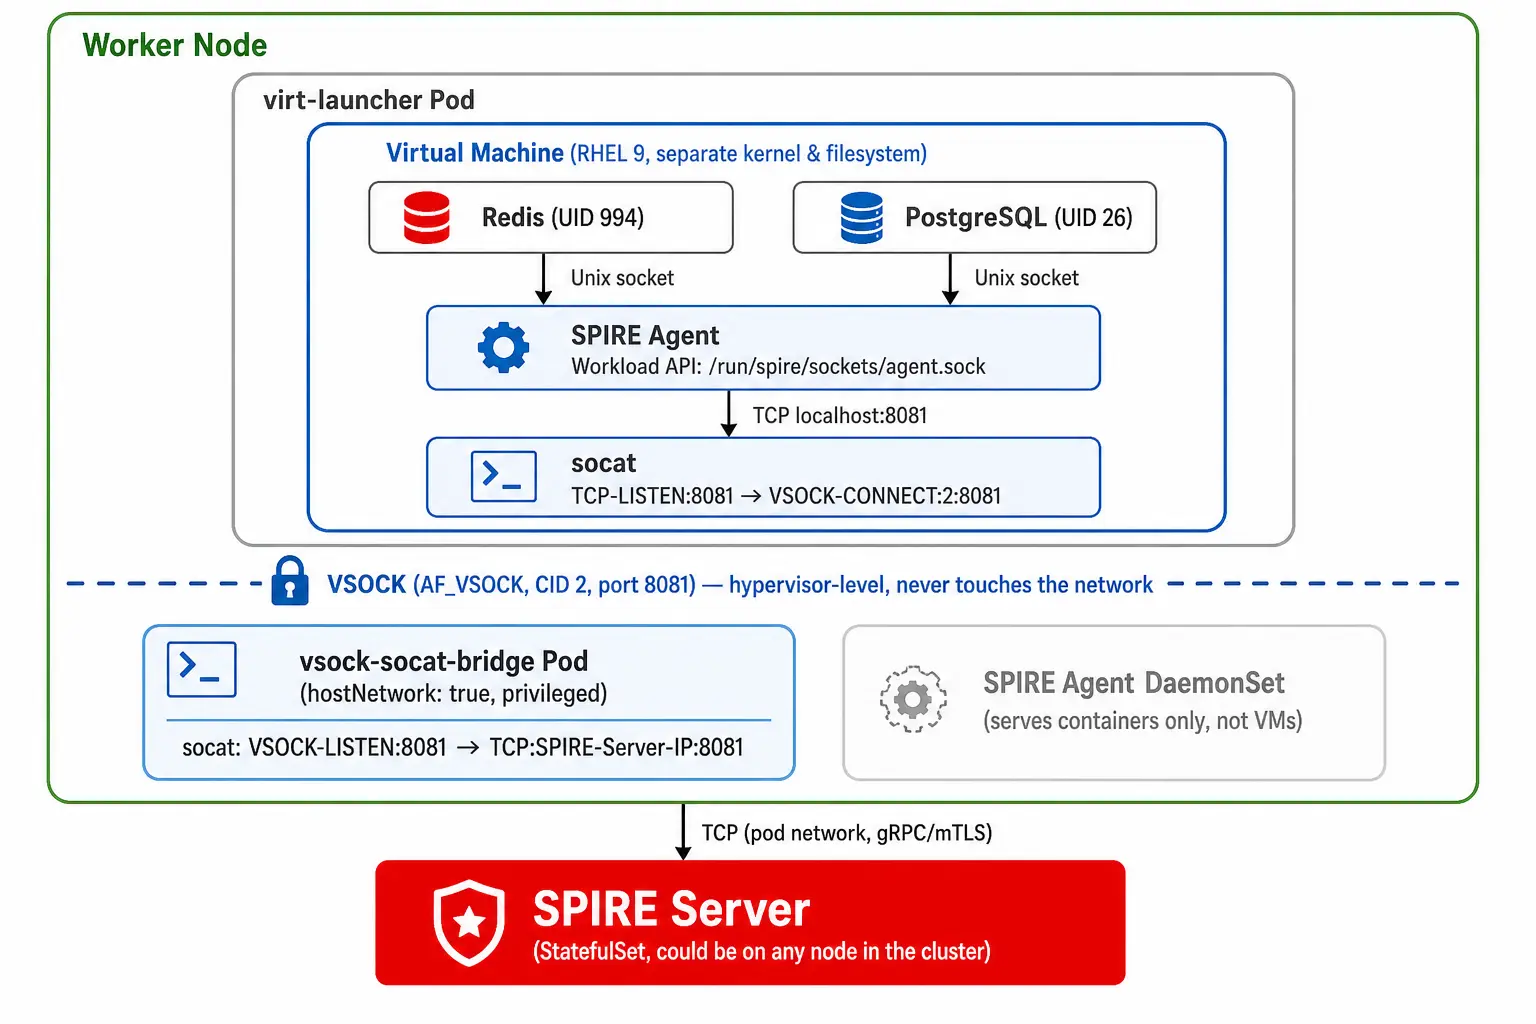
Two socat instances form a transparent tunnel. The SPIRE agent inside the VM sends TCP traffic to localhost:8081, and socat relays it over VSOCK to the host node. The second socat instance forwards it to the SPIRE server. Both the agent and server speak plain TCP, completely unaware that VSOCK sits in the middle.
Why per-VM agents?
A single SPIRE agent on the host can't distinguish between applications running inside a VM. From the host's perspective, the entire VM is just one QEMU process. To give each app (Redis, Postgres, and so on) its own identity, we need an agent inside the VM that can inspect the VM's /proc filesystem and see the individual processes.
This follows the same model that zero trust workload identity manager uses for Kubernetes nodes: Each node gets an agent, and the agent serves workloads on that node. We treat each VM like a node.
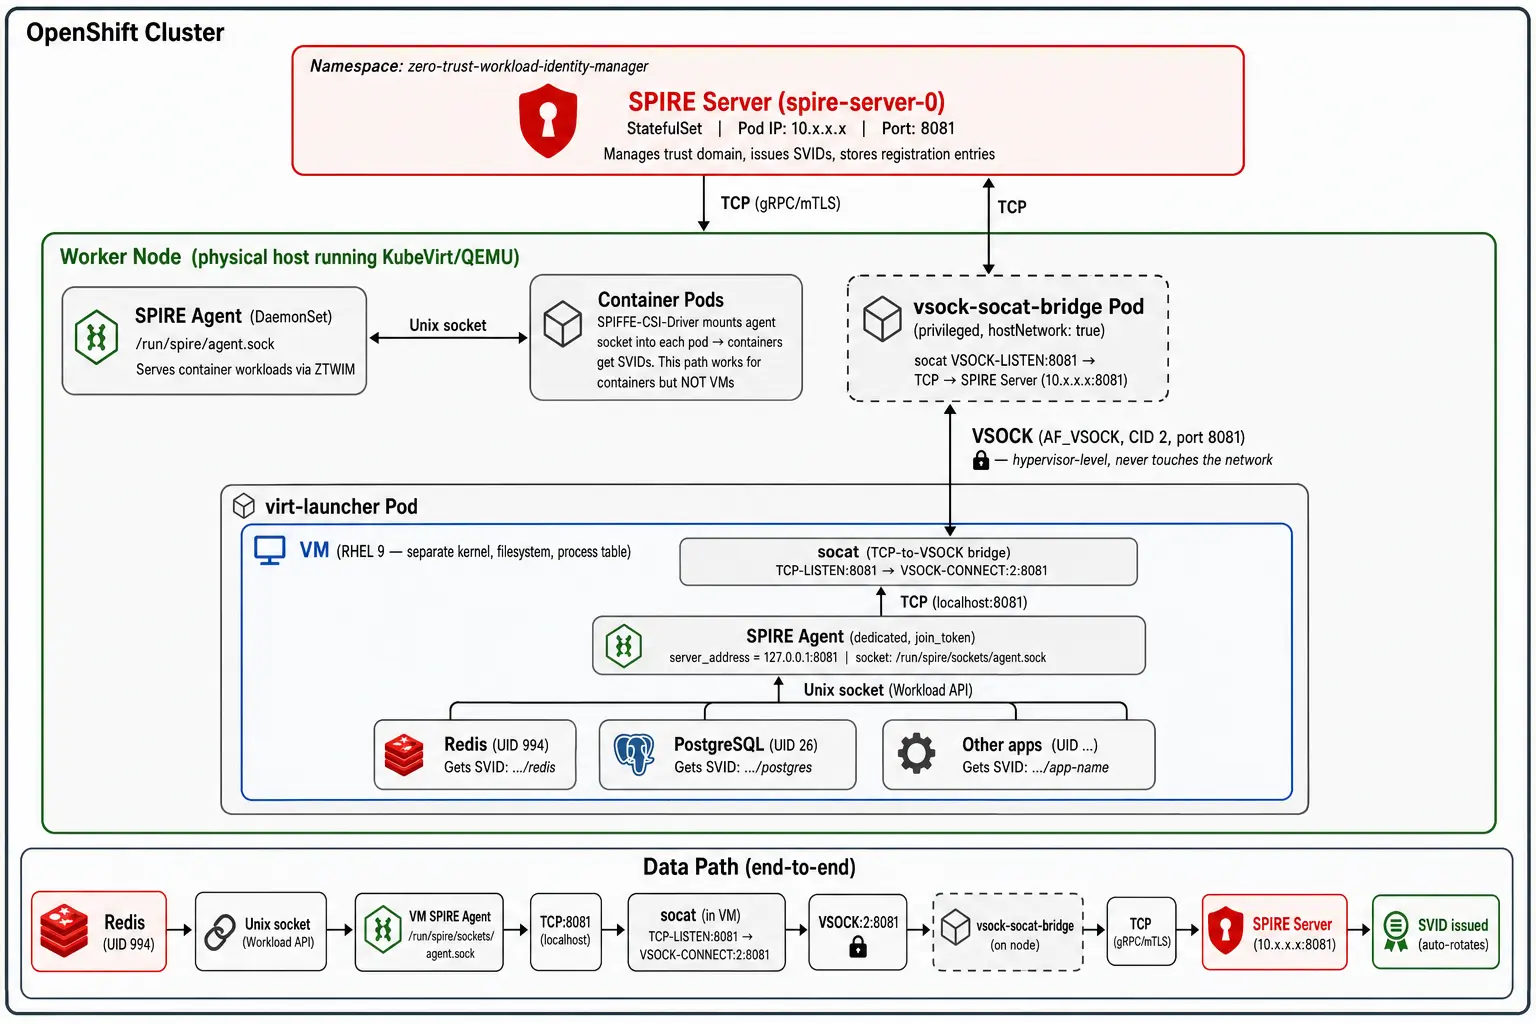
Deployment schema
Each application inside the VM gets its own unique cryptographic identity (an SVID) that rotates automatically. In this demonstration, time to live (TTL) is kept very short (120s for Redis, 180s for PostgreSQL) so rotation can be observed in real time.
Prerequisites
Before starting, you need:
- Red Hat OpenShift cluster with the zero trust workload identity manager operator installed
- Red Hat OpenShift Virtualization operator installed with a running VM (I used RHEL 9)
- The
ocandvirtctlcommands
Set these environment variables for your session:
export KUBECONFIG="/path/to/your/kubeconfig"
export APP_DOMAIN="apps.$(oc get dns cluster -o jsonpath='{ .spec.baseDomain }')"
export VM_NAME="your-vm-name"
export VM_NAMESPACE="openshift-cnv"
export SPIRE_NAMESPACE="zero-trust-workload-identity-manager"
export SPIRE_SERVER_POD="spire-server-0"
Step 1: Enable VSOCK on the cluster and VM
VSOCK must be enabled at two levels: The cluster feature gate and the individual VM spec. To enable the VSOCK feature gate at the cluster level:
oc annotate hyperconverged kubevirt-hyperconverged \
-n openshift-cnv \  'kubevirt.kubevirt.io/jsonpatch=[{"op":"add","path":"/spec/configuration/developerConfiguration/featureGates/-","value":"VSOCK"}]' \--overwrite
Enable VSOCK on your specific VM and restart it:
oc patch vm ${VM_NAME} -n ${VM_NAMESPACE} \
--type=merge -p \ '{"spec":{"template":{"spec":{"domain":{"devices":{"autoattachVSOCK":true}}}}}}'

oc virt stop ${VM_NAME} -n ${VM_NAMESPACE}
oc virt start ${VM_NAME} -n ${VM_NAMESPACE}
After the restart, verify that VSOCK is available inside the VM by checking for /dev/vsock:
ls -l /dev/vsockAs output, you see the character device. If it's missing, confirm the feature gate annotation was applied correctly and that the VM was restarted.
Step 2: Deploy the host-side VSOCK bridge
This pod runs on the same node as your VM and forwards VSOCK connections to the SPIRE server over TCP:
NODE=$(oc get vmi ${VM_NAME} -n ${VM_NAMESPACE} -o jsonpath='{.status.nodeName}')
SPIRE_POD_IP=$(oc get pod ${SPIRE_SERVER_POD} -n ${SPIRE_NAMESPACE} -o jsonpath='{.status.podIP}')

cat <<EOF | oc apply -f -
apiVersion: v1
kind: Pod
metadata:
  name: vsock-socat-bridge
  namespace: ${VM_NAMESPACE}
spec:
  nodeName: $NODE
  hostNetwork: true
  containers:
  - name: socat
    image: alpine/socat:latest
    command: ["socat", "-d", "-d", "VSOCK-LISTEN:8081,fork,reuseaddr", "TCP:${SPIRE_POD_IP}:8081"]
    securityContext:
      privileged: true
  restartPolicy: Always
EOF
Verify that the bridge is listening by reviewing its logs for something like listening on AF=40 cid:4294967295 port:8081.
Step 3: Set up the VM-side bridge and SPIRE agent
SSH to the VM and install socat, then start the TCP-to-VSOCK relay:
sudo dnf install socatsudo socat TCP-LISTEN:8081,fork,reuseaddr VSOCK-CONNECT:2:8081 &Verify that the full VSOCK path works with this Python test:
python3 -c "import sockets = socket.socket(socket.AF_VSOCK, socket.SOCK_STREAM)s.settimeout(5)s.connect((2, 8081))print('VSOCK connection successful!')s.close()"Now install the SPIRE agent binary:
curl -L \
https://github.com/spiffe/spire/releases/download/v1.13.3/spire-1.13.3-linux-amd64-musl.tar.gz \
-o /tmp/spire.tar.gzcd /tmp && \
tar xzf spire.tar.gzsudo cp spire-1.13.3/bin/spire-agent /usr/local/bin/
Get the trust bundle from the SPIRE server (on your workstation):
oc exec -n ${SPIRE_NAMESPACE} ${SPIRE_SERVER_POD} -- ./spire-server bundle show > bundle.pemCopy the bundle to the VM at /opt/spire/bundle.pem, then create the agent configuration at /opt/spire/conf/agent/agent.conf:
agent {
	data_dir = "/var/lib/spire/agent"
	log_level = "DEBUG"
	server_address = "127.0.0.1"
	server_port = "8081"
	socket_path = "/run/spire/sockets/agent.sock"
	trust_domain = "apps.your-cluster.example.com" #Must match the trust domain configured during zero trust workload identity manager  installation
	trust_bundle_path = "/opt/spire/bundle.pem"
}
plugins {
	NodeAttestor "join_token" {
		plugin_data {}
	}
	KeyManager "disk" {
		plugin_data {
			directory = "/var/lib/spire/agent"
		}
	}
	WorkloadAttestor "unix" {
		plugin_data {}
	}
}
Two configuration details are critical here. First, server_address points to localhost because socat handles the VSOCK relay transparently. Second, the Unix WorkloadAttestor lets the agent identify processes by UID, which is how we give each application its own identity.
Step 4: Attest the agent and register workloads
Generate a join token on your workstation:
oc exec -n ${SPIRE_NAMESPACE} ${SPIRE_SERVER_POD} -- \
./spire-server token generate \
-spiffeID "spiffe://${APP_DOMAIN}/vm/${VM_NAME}" \
-ttl 600000
Start the agent inside the VM with that token:
sudo mkdir -p /run/spire/sockets /var/lib/spire/agent
sudo /usr/local/bin/spire-agent run \
 -config /opt/spire/conf/agent/agent.conf \
 -joinToken <your-token> > /tmp/spire-agent.log 2>&1 &
Watch the logs with tail -f /tmp/spire-agent.log. The agent is connected and ready when you see Node attestation was successful and Starting Workload and SDS APIs.
Now register your workloads. On your workstation:
AGENT_ID="spiffe://${APP_DOMAIN}/spire/agent/join_token/<your-token-uuid>"
oc exec -n ${SPIRE_NAMESPACE} ${SPIRE_SERVER_POD} -- \
 ./spire-server entry create \
 -parentID "$AGENT_ID" \
 -spiffeID "spiffe://${APP_DOMAIN}/vm/${VM_NAME}/redis" \
 -selector unix:uid:994 \
 -x509SVIDTTL 120
oc exec -n ${SPIRE_NAMESPACE} ${SPIRE_SERVER_POD} -- \
 ./spire-server entry create \
 -parentID "$AGENT_ID" \
 -spiffeID "spiffe://${APP_DOMAIN}/vm/${VM_NAME}/postgres" \
 -selector unix:uid:26 \
 -x509SVIDTTL 180
Each registration entry tells the SPIRE Server: "any process running as this UID, attested by this VM's agent, gets this SPIFFE ID." The agent verifies the caller's UID via SO_PEERCRED on the Unix socket, which cannot be spoofed by userspace.
Step 5: Verify identity issuance and rotation
Back in the VM, fetch SVIDs as each application user:
sudo -u redis /usr/local/bin/spire-agent api fetch x509 \
 -socketPath /run/spire/sockets/agent.sock
Output:
Received 1 svid after 6.123148ms
SPIFFE ID:      spiffe://apps.gcp26feb.gcp.devcluster.openshift.com/vm/rhel9-magenta-gull-92/redis
SVID Valid After:  2026-02-27 08:55:07 +0000 UTC
SVID Valid Until:  2026-02-27 09:55:17 +0000 UTC
Each application gets its own unique X.509 certificate with the SPIFFE ID embedded in the subject alternative name (SAN) field. You can confirm this with the `openssl` command:
openssl x509 -in /tmp/redis-svid/svid.0.pem -noout -text | grep -A1 "Subject Alternative Name"The output:
X509v3 Subject Alternative Name:
URI:spiffe://apps.gcp26feb.gcp.devcluster.openshift.com/vm/rhel9-magenta-gull-92/redis
With the short TTLs I configured (120s for Redis, 180s for PostgreSQL), you can watch automatic rotation happen in real time. The agent renews SVIDs at roughly 50% of their TTL without any application intervention. Wait 70 seconds, re-fetch, and compare to see a completely new certificate with different serial numbers and validity dates.
What this proves
This proof-of-concetp validates four key things:
- VSOCK provides an isolated channel between VMs and the SPIRE server that never touches the cluster network.
- A per-VM SPIRE agent distinguishes individual applications inside the VM using Unix UID-based attestation.
- Multiple workloads get unique, short-lived identities that rotate automatically without application changes.
- The same trust domain spans containers and VMs, enabling unified zero-trust policies across your entire platform.
Moving toward production
For a production deployment, I'd replace several PoC-specific choices:
VM attestation
- Proof of concept:
join_token(one-time use) - Production: x509pop attestation or custom KubeVirt attestor plug-in (supports re-attestation)
Registration
- Proof of concept: Manual command-line entries
- Production: Explore the possibility of automating with spire-controller-manager
Host bridge
- Proof of concept: Manual pod deployment
- Production: Managed by zero trust workload identity manager operator, auto-deployed per node
VM bridge
- Proof of concept: Manual
socat - Production: systemd service with
cloud-init
Installation of per-VM SPIRE Agent
- Proof of concept: Manual
- Production: Explore the possibility of automating it with Red Hat Ansible Automation Platform
SPIRE Server Service Discovery
- Proof of concept: Connects directly to SPIRE server's pod IP
- Production: Connect using Kubernetes Service for SPIRE server
Get started
If you're running mixed container and VM workloads on OpenShift and want to extend zero-trust workload identity to your VMs:
- Install the zero trust workload identity manager operator from OperatorHub.
- Follow the steps in this tutorial to bridge SPIRE into your VMs with VSOCK.
- Explore the SPIFFE/SPIRE documentation for deeper understanding of workload identity standards.
- Check out the OpenShift Virtualization documentation for more on running VMs alongside containers.
Zero-trust shouldn't stop at the VM boundary. With VSOCK and a dedicated in-VM SPIRE Agent, it doesn't have to.

