Page
Build the Java application using Quarkus
In this lesson, you will create a simple Quarkus application. We will use a Quarkus REST endpoint as the backend service.
Prerequisites:
- Understand how to traverse a Linux file system.
- Understand how to create and edit Linux text files.
- Install the Red Hat build of Podman Desktop.
- Have a local folder on your machine to store your code (e.g.,
~/quarkus-dev).
In this lesson, you will:
- Configure a Java development container using Podman.
- Initialize a Quarkus project inside the container using Maven.
- Build the application into a native executable for more predictable performance.
The core application components
The application you are building consists of two main parts:
- The application: A Quarkus application with a simple REST endpoint. We will compile this into a fast-booting native executable.
- The process manager: A
systemdunit file that ensures the native executable starts automatically when the OS boots.
Build and utilize a Java container-based Red Hat developer environment
Let's start by creating a directory quarkus-dev where we’ll store all the files we’ll use for this project. We’ll place the following contents in the file Containerfile in our quarkus-dev project directory:
# Java/Quarkus Application Developer Container

# Use the official Red Hat Universal Base Image 10 as the foundation.
FROM registry.access.redhat.com/ubi10/ubi:latest

# Good practice to label your images.
LABEL maintainer="Your Name <youremail@example.com>" \
      description="Java and Quarkus development environment based on UBI 10, configured for native builds."

# Install OpenJDK 21, Maven, and other useful packages:
#     java-21-openjdk - Red Hat's supported OpenJDK
#     maven - Standard Java build tool
#     gcc, glibc-devel, zlib-devel, libstdc++-static - Required for native compilation
RUN dnf install -y \
        java-21-openjdk-devel \
        maven \
        gcc \
        glibc-devel \
        zlib-devel \
        libstdc++-static \
        ncurses \
        procps \
        unzip \
        zip \
    && dnf clean all

# NEW: Install SDKMAN! and the Quarkus CLI for project generation.
RUN curl -s "https://get.sdkman.io" | bash \
    && bash -c "source \"$HOME/.sdkman/bin/sdkman-init.sh\" && sdk install quarkus"

# NEW: Install Mandrel (GraalVM distribution) for native-image builds.
RUN bash -c "source \"$HOME/.sdkman/bin/sdkman-init.sh\" && sdk install java 25.0.2.r25-mandrel "

# Set the working directory to the new user's home.
WORKDIR /app

# Expose port 8080.
EXPOSE 8080

# Set the default command. When the container starts, it will drop you into a Bash shell.
CMD ["/usr/bin/bash"]
With the file quarkus-dev/Containerfile in place, we’re ready to build our app development container.
- Create the sub-directory
quarkus-dev/bootc/appon your local desktop using your preferred native desktop tools. We’ll use this directory as the central repository for our application files. You’ll be able to edit files either using the editors in your container or by using your favorite desktop text editor or IDE. Either way, they will be accessible from your container. Open the Red Hat build of Podman Desktop on your local machine and go to the Images section in the left navigation, as shown in Figure 1:
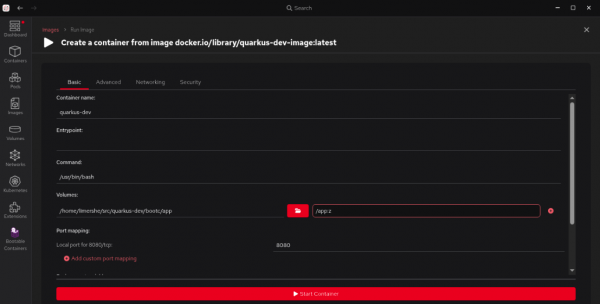
Figure 1: The Red Hat build of Podman Desktop Images section. - Select Build in the top right corner.
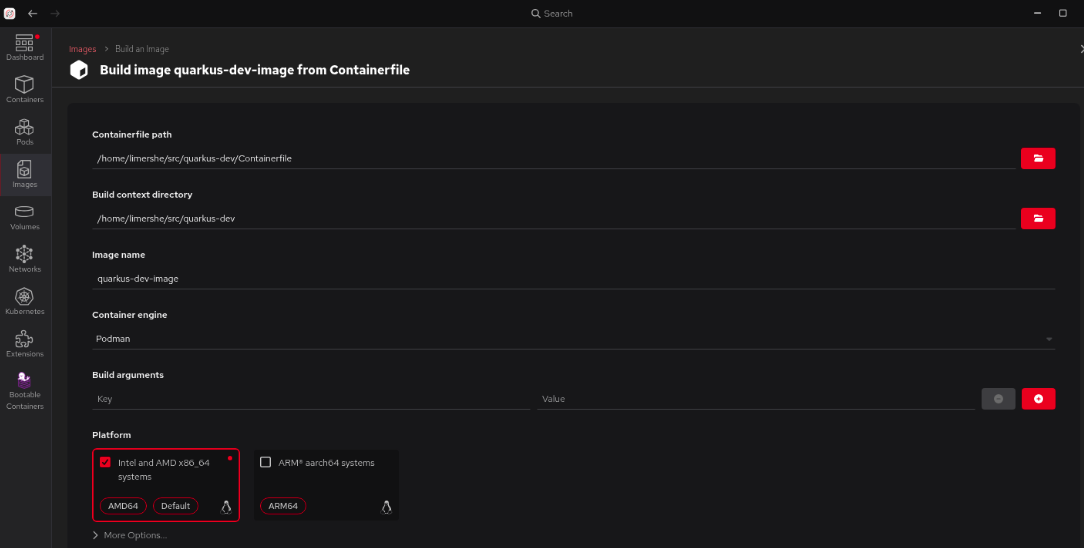
Specify the Containerfile path for the file we just created, specify the image name
quarkus-dev-image, and specify a platform (on my laptop, I chose the Intel and AMD x86_64 image option for my RHEL-based laptop), as shown in Figure 2: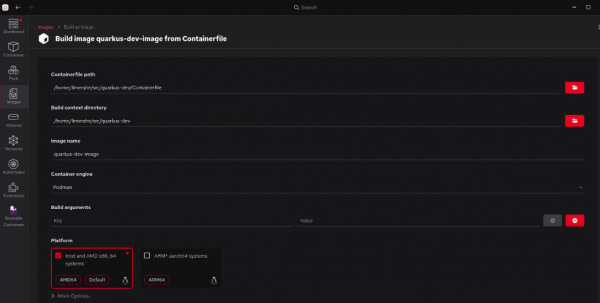
Figure 2: The Red Hat build of Podman Desktop Build screen. Now select Build at the bottom, and it will build your new image, as shown in Figure 3.
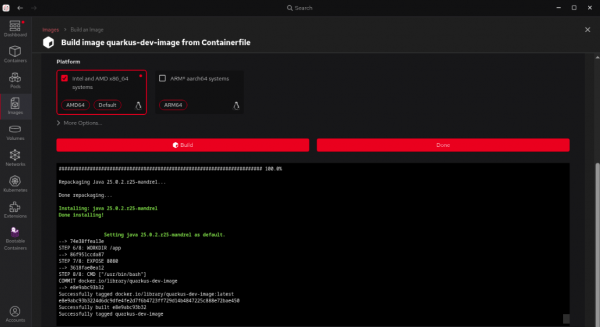
Figure 3: The Red Hat build of Podman Desktop Build process screen. - Then select Done.
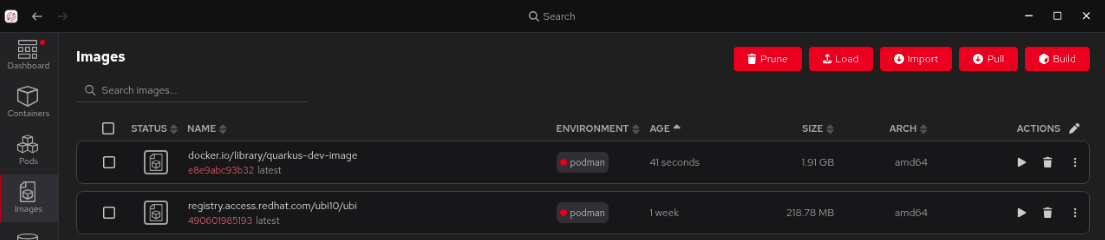
Back on the main Images section, select the right arrow next to the
quarkus-dev-imageimage to start the image, as shown in Figure 4.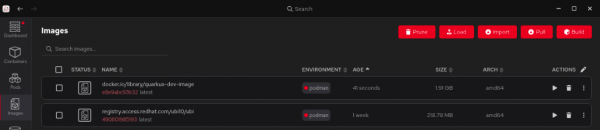
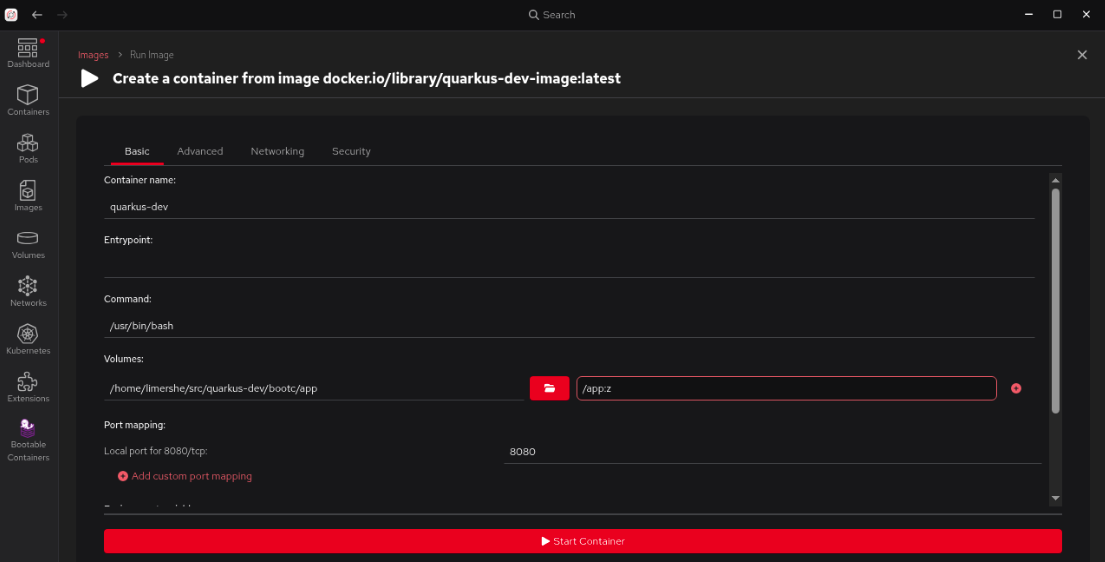
Figure 4: The Red Hat build of Podman Desktop Images screen with images listed. - Give the container the name
quarkus-devand, under Volumes, select the subdirectory we created earlierquarkus-dev/bootc/appas the path on the host. Specify
/app:zas the path inside the container, as shown in Figure 5.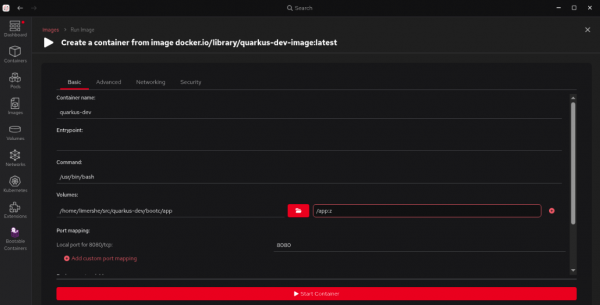
Figure 5: The Red Hat build of Podman Desktop Create Container screen (basic tab).
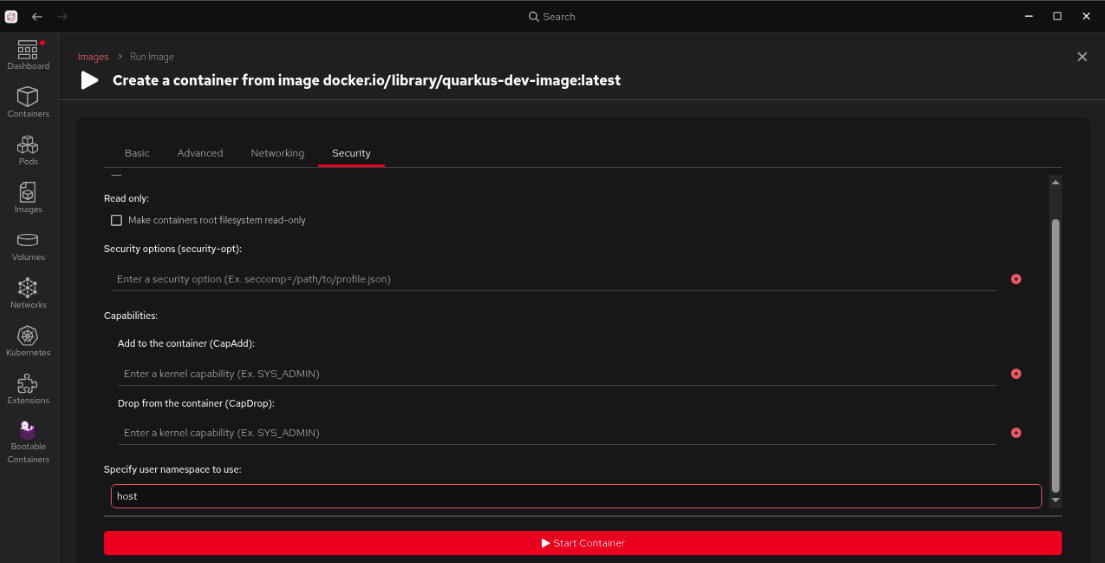
Note: The:zoption will not show up in the actual path in the container. It’s a directive to Podman to allow multiple containers to share the volume content with the local host (in this case, your desktop). This is achieved by relabeling the directory to "container_t" on SELinux-enabled Linux systems. It is only needed if our desktop is a Linux system such as RHEL. Do not select Start Container, as we still have an additional step to take.Select the Security section at the top of the top right of the form, scroll down to Specify user namespace use:, and enter host. This keyword will map the root user in your container to your local system user on the machine running Podman so that you can share files between your native desktop environment and your new development container. An example is shown in Figure 6:

Figure 6: The Red Hat build of Podman Desktop Create Container screen (Security tab). - Select Start container at the bottom. We now have a running container named
quarkus-dev. Go to the Containers section, double-click on the container, and select Terminal. For the next part of this learning path, our examples assume we’ll be working from a terminal screen, as seen in Figure 7:
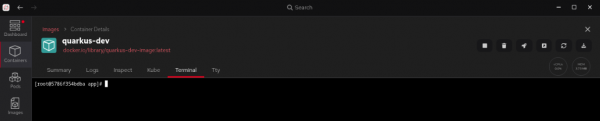
Figure 7: The Red Hat build of Podman Desktop Container Details screen (Terminal tab).


Create the application
Next, let’s start creating our “Hello, world” Quarkus application.
cd /app
quarkus create
This Quarkus command generates a minimal Quarkus project. Now, let’s navigate to the project folder.
cd code-with-quarkusNow, we will edit the existing application logic and see how it defines a simple REST endpoint. The file src/main/java/org/acme/GreetingResource.java already exists, but we’ll modify it to note that it’s running on image mode for Red Hat Enterprise Linux (RHEL):
package org.acme;

import jakarta.ws.rs.GET;
import jakarta.ws.rs.Path;
import jakarta.ws.rs.Produces;
import jakarta.ws.rs.core.MediaType;

@Path("/hello")
public class GreetingResource {

    @GET
    @Produces(MediaType.TEXT_PLAIN)
    public String hello() {
        return "Hello from Quarkus REST running on RHEL in image mode";
    }
}
A key feature of the project scaffolding is the automatically generated Maven Wrapper files (mvnw and mvnw.cmd). These files ensure that anyone who builds your project uses the exact same version of Maven, which improves build reproducibility. For the rest of this exercise, you will use ./mvnw instead of the globally installed mvn command.
We can test our application now by running it in development mode:
cd /app/code-with-quarkus
quarkus dev -Dquarkus.http.host=0.0.0.0
Once the process has started up, you can use your browser to connect to the local host:
http://localhost:8080/hello"Hello from Quarkus REST running on RHEL in image mode" will be displayed in your browser (Figure 8):

We now need to compile our application for production use. Stop the server using the keyboard command (Ctrl+C). We’ll perform the native build directly inside our development container. This produces the binary we’ll use in our RHEL bootable image.
We’ll start by initializing Mandrel, to ensure the container is using the Mandrel JDK for builds:
source $HOME/.sdkman/bin/sdkman-init.sh
sdk use java 25.0.2.r25-mandrel
Now we’re ready to compile our app:
./mvnw package -Dnative -DskipTestsWhen your build completes, you’ll see output that looks similar to this:
[INFO] [io.quarkus.deployment.pkg.steps.NativeImageBuildRunner] objcopy --strip-debug code-with-quarkus-1.0.0-SNAPSHOT-runner
[INFO] [io.quarkus.deployment.QuarkusAugmentor] Quarkus augmentation completed in 33966ms
[INFO] ------------------------------------------------------------------------
[INFO] BUILD SUCCESS
[INFO] ------------------------------------------------------------------------
[INFO] Total time:  37.946 s
[INFO] Finished at: 2026-03-03T01:57:32Z
[INFO] ------------------------------------------------------------------------
At this point, we’re ready to build the image mode for RHEL image used for production environments.