Introduction
Typically when using OpenShift GitOps and Argo CD in multi-cluster situations organizations would need to make a choice between two possible topologies: Centralized or Distributed? Each choice has positives and negatives associated with it.
In a Centralized topology where one Argo CD manages all Applications and clusters a convenient single pane of glass of management is provided however there are limitations to scaling this out as the number of clusters and applications under management grew. Additionally a Centralized topology becomes a Single Point of Failure (SPOF) requiring additional thought with respect to Disaster Recovery.
In a Distributed topology, where multiple Argo CD instances are managing clusters and applications, provides much more ability to scale and largely removes the concerns around SPOF. However the benefits of a single pane of glass for management are lost with teams potentially needing to interact with multiple Argo CD consoles.
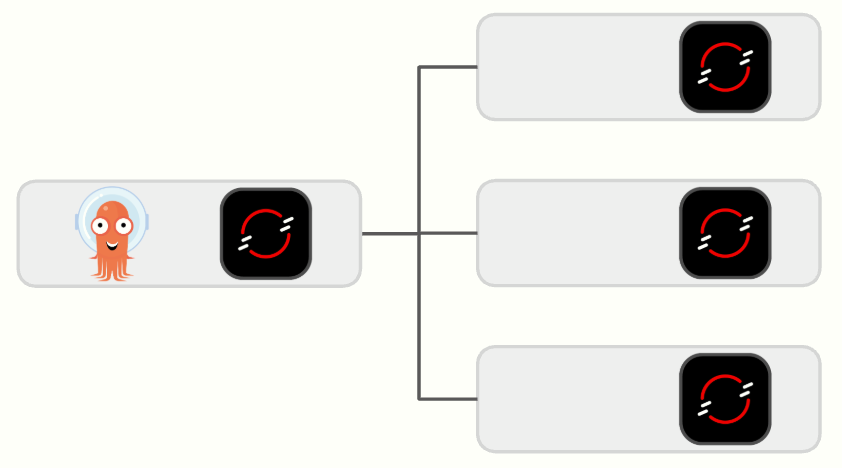
The Argo CD Agent combines the best of both of these topologies. It enables the single pane of glass for management purposes while providing better scalability by distributing Argo CD components, such as the application-controller, across the managed clusters.
The Argo CD Agent has been released as Tech Preview starting in OpenShift GitOps 1.17, this means it is available for customers to try out and provide feedback to Red Hat but is not intended for production use.
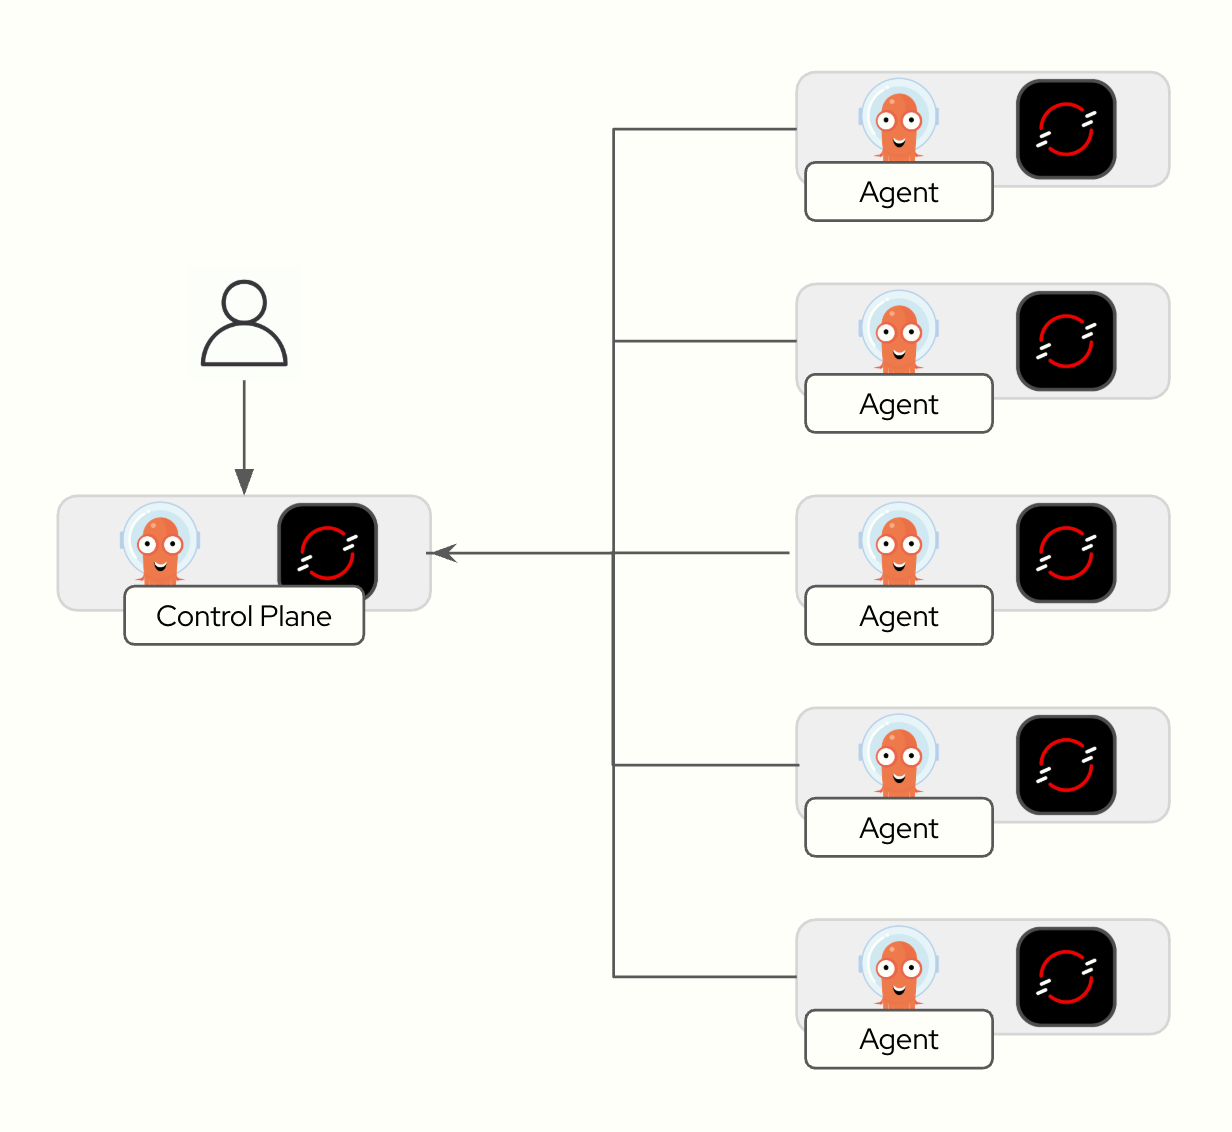
In this blog we will walk through the process of setting up the Agent running in Managed mode in a from-scratch installation using two clusters. One cluster will be the Control Plane for where the UI resides along with the Principal which provides the service Agents communicate with. The second cluster will be the Managed cluster where the Agent resides and is the target cluster for Applications.
Limitations
As of this writing, OpenShift GitOps 1.18 and Argo CD Agent 0.4.1, there are some known limitations with the current Technical Preview of the Argo CD Agent which will be addressed over time as it moves towards General Availability. These limitations include:
- The Principal on the control plane and the Agents in remote clusters must be installed in the same namespace (Issue #570, PR #571). As a result this means that you cannot use the Principal with a separate Agent to manage the Control Plane cluster.
- There are some known issues when using the Agent with the OpenShift GitOps Operator naming the CR something other than argocd, i.e. openshift-gitops. In particular the Operator doesn’t automatically update the redis address to reflect the different service name, argocd-redis versus openshift-gitops-redis and the operator doesn’t permit changing the destination at this time. A workaround would be to manually create a parallel service called argocd-redis to expose it. (GITOPS-7790)
- The Operator does not automatically expose the Principal via a Route, one must be created manually (GITOPS-7728)
- The Operator created service for the Principal is of type LoadBalancer. Be aware that when deploying this on OpenShift installed in a cloud environment (AWS, AKS, GKE) that this will cause an external network Load Balancer to be created in the cloud. This is not configurable at this time. (GITOPS-7728)
- The Agent is required to communicate with the local Redis but the operator managed NetworkPolicy disallows it by default. As a workaround a separate NetworkPolicy must be created to open the communication.
- The Agent requires a Resource Proxy service to be available in order for the Argo CD UI to show manifests and other resource information from the managed clusters. This service is not created by default by the Operator at this time and must be created manually.
- Tech Preview testing has been focused on using the argocd namespace.
The intent of this blog is to provide a basic installation of the Agent for users to try out but is not following recommended production practices at this time given the above limitations. As a result, this blog will focus on a basic installation of the Agent using the OpenShift GitOps operator in the argocd namespace and using argocd as the name of the CR to follow the currently tested happy-path.
Finally there are a few missing resources noted in the limitations, these are being provided in the GitHub repository that accompanies the blog so readers do not need to create these manually when following the included steps.
Prerequisites
To use these instructions the following prerequisites are required:
- Two non-production OpenShift Clusters, these instructions have been tested with OpenShift 4.18. The instructions assume that you have not installed the OpenShift GitOps operator as it will install the operator with the Subscription using specific configuration that disables the default instance in openshift-gitops.
- Access to those two clusters with cluster-admin privileges
- The oc command line tool available in your path
- The argocd-agentctl command line tool available in your path. This tool is used to manage the PKI requirements for the Agent.
- [Optional] The envsubst command available on your path (Often included in Linux gettext packages)
Download and install the argocd-agentctl from the argocd-agent repository releases to somewhere in your path, I typically put this in the same spot I have the oc binary installed. We will be installing version 0.4.1 of the Agent so use this version of the binary.
Clone Example Repository
To follow these instructions, in an empty folder you will need to clone the material provided in the example repository:
$ git clone https://github.com/gitops-examples/openshift-gitops-agent
This repository will be used to install the following:
1. OpenShift GitOps Operator and the Principal on the Control Plane cluster
2. OpenShift GitOps Operator and the Agent on the Managed cluster
3. Sample Application to test the installation
Cluster Namespaces
In this example we will be creating the following namespaces as shown below:
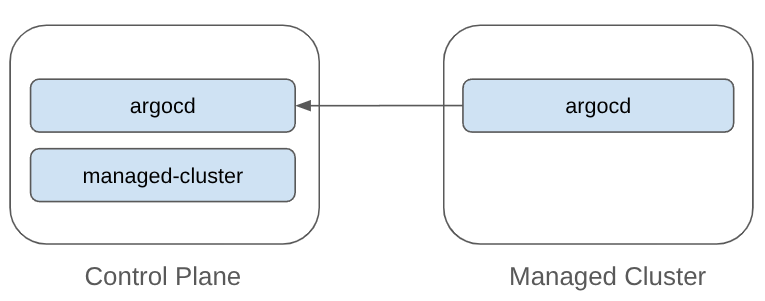
- argocd. This is the namespace where the Principal is installed, this is a pod that acts as an endpoint for Agents to communicate with. It will also be where our Argo CD UI and API will be installed to provide our single pane of glass for management.
- managed-cluster. The Argo CD Agent uses Apps in Any Namespace to map Applications to destination clusters. This namespace is used for Applications targeted to the remote cluster.
On the Managed Cluster we have a single namespace, argocd, which will be where we install the Agent to deploy applications on this cluster.
Installing the Control Plane
Log into the control plane cluster using the oc command:
oc login -u <cluster-admin-username> -p <cluster-admin-password> <control-plane-cluster-api-url>Once logged in provision the OpenShift GitOps operator with the following command:
IMPORTANT: This will install the Operator with additional configuration in the Subscription including the option which disables the default OpenShift GitOps instance in the openshift-gitops namespace. Do not run this command in a cluster where OpenShift GitOps is already installed and being actively used.
oc apply -k operator/basenamespace/openshift-gitops-operator created
operatorgroup.operators.coreos.com/openshift-gitops-operator created
subscription.operators.coreos.com/openshift-gitops-operator created
Wait for the operator to be installed and come up, you should see the operator pod running:
oc get pods -n openshift-gitops-operator
NAME                                                           READY   STATUS    RESTARTS   AGE
openshift-gitops-operator-controller-manager-b8bbdd9f5-p6xmc   2/2     Running   0          37s
Next create the required namespaces:
oc apply -k control-plane/namespaces/basenamespace/argocd created
namespace/managed-cluster created
The argocd-agentctl CLI makes heavy use of Kubernetes contexts, for clarity and simplification it is recommended to rename your local context. To do first switch to the argocd namespace:
oc project argocdNow using project "argocd" on server "https://<cluster-api>".And then rename the context:
oc config rename-context argocd/<cluster-api>/<user> principalContext "argocd/<cluster-api>/<user>" renamed to "principal".NOTE: If you find it confusing to rename the context by replacing the tokens you can run oc config get-contexts to view all of the contexts available. The one you are currently using which we want to rename is marked with an asterix (i.e. *).
The Argo CD Agent requires certificates to be provisioned on both the Control Plane and Agent clusters. These certificates are used to manage authorization and trust between the clusters. Longer term Red Hat Advanced Cluster Manager will provide an add-on that will manage this for you automatically but for now we will use the argocd-agentctl CLI to do this.
Initialize the PKI with the following command:
argocd-agentctl pki init --principal-context principal --principal-namespace argocd Generating CA and storing it in secret
Success. CA data stored in secret argocd/argocd-agent-ca
NOTE: While argocd-agentctl tool defaults to the current Kubernetes context and the argocd namespace here we fully specify the required options for clarity.
Next issue a certificate that will be used to expose the Principal outside of the cluster. In this demo we will be using an OpenShift Route to expose the Principal.
NOTE: Upstream documentation which is more Kubernetes oriented is using either a Node Port or LoadBalancer service to expose the Principal. In OpenShift a Route provides a more secure and slightly less costly way to accomplish this. Routes will be the default when the Agent reaches General Availability.
export SUBDOMAIN=$(oc get dns cluster -o jsonpath='{.spec.baseDomain}')
argocd-agentctl pki issue principal --dns argocd-agent-principal-argocd.apps.$SUBDOMAIN --principal-context principal --principal-namespace argocdargocd/argocd-agent-principal-tlsWe need to provision the certificate for the Principals resource-proxy, this is to enable the Argo CD server pod to communicate with the Principal to retrieve resources, for example when viewing manifests in the Argo CD UI:
argocd-agentctl pki issue resource-proxy --dns argocd-agent-resource-proxy.argocd.svc.cluster.local --principal-context principal --principal-namespace argocdSecret argocd/argocd-agent-resource-proxy-tls createdProvision the Argo CD Control Plane including Principal:
oc apply -k control-plane/principal/baseservice/argocd-agent-resource-proxy created
appproject.argoproj.io/managed-cluster created
argocd.argoproj.io/argocd created
route.route.openshift.io/argocd-agent-principal created
NOTE: This will create an Argo CD instance where users in the cluster-admins group have full access to Argo CD. If your cluster does not have this group you can either tweak the RBAC to match an existing group your user belongs to or create the group with oc adm groups new cluster-admins <user>.
Validate that all of the pods are running except for the Principal:
oc get pods -n argocdargocd-agent-principal-69594b5544-46sjz 0/1 CrashLoopBackOff 2 (14s ago) 39s
argocd-dex-server-7df8f66c56-94mlr 1/1 Running 0 9m58s
argocd-redis-54f6c4785b-7kknl 1/1 Running 0 9m59s
argocd-repo-server-678f575d9f-z4t9w 1/1 Running 0 9m59s
argocd-server-84fb9f44d-ldrqj 1/1 Running 0 9m59s
The Principal is failing because it requires the password for Redis but we need to have redis deployed by the operator before it can be created. Go ahead and create the password:
oc create secret generic argocd-redis -n argocd --from-literal=auth="$(oc get secret argocd-redis-initial-password -n argocd -o jsonpath='{.data.admin\.password}' | base64 -d)"secret/argocd-redis createdAnd then restart the principal:
oc rollout restart deploy/argocd-agent-principal -n argocddeployment.apps/argocd-agent-principal restartedAnd then validate all pods running including the Principal this time:
oc get pods -n argocdNAME READY STATUS RESTARTS AGE
argocd-agent-principal-d7f7f4486-fnkbp 1/1 Running 0 3s
argocd-dex-server-855749ff4f-f4cj2 1/1 Running 0 3m12s
argocd-redis-5dbf54886b-9hrmn 1/1 Running 0 3m12s
argocd-repo-server-54cf9f8994-c2bbv 1/1 Running 0 3m12s
argocd-server-55b4d94bfd-vk8cd 1/1 Running 0 3m12s
Notice there is no application-controller as would be expected in a typical Argo CD installation. This has been disabled on the Control Plane as the application-controller will run on managed-clusters with the Principal handling Application resources instead of the application-controller.
Finally we can create the Agent configuration on the Principal:
argocd-agentctl agent create managed-cluster \
  --principal-context principal \
  --principal-namespace argocd \
  --resource-proxy-server argocd-agent-resource-proxy.argocd.svc.cluster.local:9090 \
  --resource-proxy-username foo \
  --resource-proxy-password bar
Agent managed-cluster createdNOTE: The username and password are required by the command but not actually used, these parameters will be removed in a future release.
We have completed the Principal installation, now let’s install the Agent on the managed-cluster.
Installing the Agent
Log into the managed cluster using the oc command:
oc login -u <cluster-admin-username> -p <cluster-admin-password> <managed-cluster-api-url>Once logged in provision the OpenShift GitOps operator as we did previously with the following command, remember same as previously this will disable the default openshift-gitops instance.
oc apply -k operator/basenamespace/openshift-gitops-operator created
operatorgroup.operators.coreos.com/openshift-gitops-operator created
subscription.operators.coreos.com/openshift-gitops-operator created
Wait until the operator creates the openshift-gitops-operator namespace and operator pod then deploy the argocd instance to support the Agent:
oc apply -k managed-cluster/argocd/basenamespace/argocd created
argocd.argoproj.io/argocd created
Verify that all of the pods are running:
oc get pods -n argocdNAME READY STATUS RESTARTS AGE
argocd-application-controller-0 1/1 Running 0 10s
argocd-redis-5fd76d459-hsnrx 1/1 Running 0 10s
argocd-repo-server-7c59cf6968-8h7bv 1/1 Running 0 10s
NOTE: There is no server pod here since the UI and API is provided by the server pod on the Control Plane cluster that we installed previously.
Switch to the argocd namespace:
oc project argocdNow using project "argocd" on server "https://<cluster-api>"Rename the context to managed-cluster:
oc config rename-context argocd/<cluster-api>/<user> managed-clusterContext "argocd/<cluster-api>/<user>" renamed to "managed-cluster".Create the Redis password again so the Agent can access Redis:
oc create secret generic argocd-redis -n argocd --from-literal=auth="$(oc get secret argocd-redis-initial-password -n argocd -o jsonpath='{.data.admin\.password}' | base64 -d)"secret/argocd-redis createdAnd then run the following command to install the Agent PKI:
argocd-agentctl pki issue agent managed-cluster --principal-context principal --principal-namespace argocd --agent-context managed-cluster --agent-namespace argocd --upsertSecret argocd/argocd-agent-client-tls createdNow you will need to propagate the CA certificate stored in the argocd-agent-ca secret on the Principal to the managed-cluster:
argocd-agentctl pki propagate managed-cluster --principal-context principal --principal-namespace argocd --agent-context managed-cluster --agent-namespace argocdAgent CA secret argocd/argocd-agent-ca createdEnsure you still have the SUBDOMAIN variable set for the Control Plane cluster where the Principal resides:
echo $SUBDOMAIN<your-control-plane-cluster-domain> Deploy the Agent on the remote cluster:
NOTE: If you do not have envsubst available, remove it from the piped list of commands and manually edit the file managed-cluster/agent/base/kustomization.yaml to point the $SUBDOMAIN variable to the Principal route on the Control Plane cluster before executing the command below.
kustomize build managed-cluster/agent/base | envsubst | oc apply -f -serviceaccount/argocd-agent-agent created
role.rbac.authorization.k8s.io/argocd-agent-agent created
clusterrole.rbac.authorization.k8s.io/argocd-agent-agent created
rolebinding.rbac.authorization.k8s.io/argocd-agent-agent created
clusterrolebinding.rbac.authorization.k8s.io/argocd-agent-agent created
configmap/argocd-agent-params created
service/argocd-agent-agent-healthz created
service/argocd-agent-agent-metrics created
deployment.apps/argocd-agent-agent created
Wait a couple of minutes and then check the logs of the agent pod to ensure there are no unexpected errors:
oc logs deploy/argocd-agent-agent -n argocdValidate that the AppProject managed-cluster has been propagated from the Principal to the Agent:
oc get appproject -n argocdNAME AGE
managed-cluster 2m4s
If the AppProject doesn’t appear check the logs of the Agent pod on the Managed Cluster and the logs on the Principal pod in the Control Plane for any errors.
Deploying Test Application
With the principal and agent installed on separate clusters we are now ready to verify the installation by deploying a test application.
Switch back to the principal context:
oc config use-context principalSwitched to context "principal".The Argo CD Agent uses a Apps-in-Any-Namespace to map Applications to clusters so we will deploy a sample application in the managed-cluster namespace on the Principal. Validate the Application we will deploy:
cat control-plane/apps/managed-cluster/bgd/application.yaml
apiVersion: argoproj.io/v1alpha1
kind: Application
metadata:
  name: bgd
  namespace: managed-cluster
spec:
  destination:
    namespace: bgd
    name: managed-cluster
  source:
    path: apps/base
    repoURL: https://github.com/gitops-examples/openshift-gitops-agent
    targetRevision: HEAD
  project: managed-cluster
  syncPolicy:
    automated:
      prune: false
      selfHeal: true
Notice that the spec.destination.name is set to managed-cluster. Deploy the application:
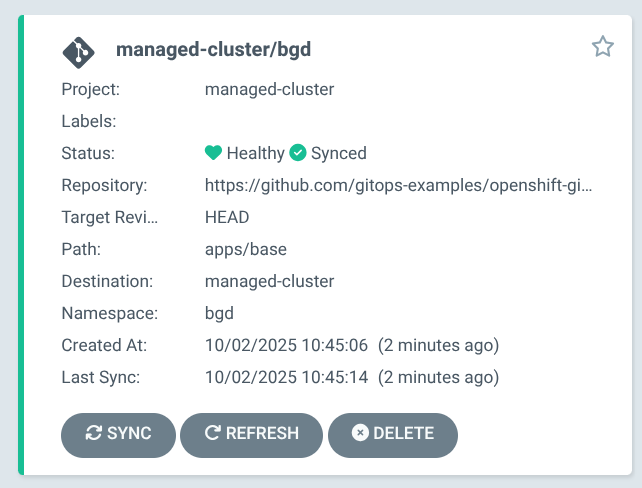
oc apply -f control-plane/apps/managed-cluster/bgd/application.yaml -n managed-clusterapplication.argoproj.io/bgd createdVerify that the Application has been synched and is healthy, this may take a couple of minutes:
oc get apps -n managed-clusterNAME SYNC STATUS HEALTH STATUS
bgd Synced Healthy
You can also check this in the Argo CD UI on the Principal:
Switch back to the managed-cluster:
oc config use-context managed-clusterSwitched to context "managed-cluster".
Validate that the bgd Application resources have been deployed on the managed-cluster:
oc get all -n bgdNAME READY STATUS RESTARTS AGE
pod/bgd-549f46857d-b7zkl 1/1 Running 0 7m4s
NAME TYPE CLUSTER-IP EXTERNAL-IP PORT(S) AGE
service/bgd ClusterIP 172.31.101.90 <none> 8080/TCP 7m4s
NAME READY UP-TO-DATE AVAILABLE AGE
deployment.apps/bgd 1/1 1 1 7m4s
NAME DESIRED CURRENT READY AGE
replicaset.apps/bgd-549f46857d 1 1 1 7m4s
NAME HOST/PORT PATH SERVICES PORT TERMINATION WILDCARD
route.route.openshift.io/bgd bgd-bgd.apps.cluster-p7rnv.dynamic.redhatworkshops.io bgd 8080 edge/Redirect None
Conclusion
In this blog we have performed a basic, non-production deployment of the new Argo CD Agent using the Managed mode of the Agent.
