Transforming monolithic Java applications into distributed, cloud-native microservices is never easy, but Red Hat's migration toolkit for applications helps you understand and evaluate the migration path. As a developer, you can apply the following features to a broad range of transformation use cases:
- Planning and work estimation
- Identifying migration issues and providing solutions
- Detailed reporting
- Built-in rules and migration paths
- Rule extensibility and customization
- Source code or application archive analysis
This article guides you through configuring Red Hat's migration toolkit for applications to analyze an existing monolithic Java application. We will set up our development environment in Red Hat CodeReady Workspaces. After that, I'll show you how to use the toolkit to analyze migration issues and generate potential solutions.
Note: Migration toolkit for applications is an extensible and customizable rule-based tool that helps simplify Java application migrations. The toolkit has a comprehensive set of cloud- and container-readiness rules to assess applications for Kubernetes deployment. It is available through Red Hat Runtimes.
Install a CodeReady Workspaces Operator
To start, we will create a new project and install a CodeReady Workspaces Operator. Log into an OpenShift 4 cluster with cluster-admin credentials, then use the menu on the console's left side to navigate to Home > Projects. Click Create Project in the top-right corner of the screen, then create a project. As shown in Figure 1, I've named the example project che-test.

Navigate to Operators > OperatorHub and type "codeready" in the search box. Select the Red Hat CodeReady Workspaces Operator, as shown in Figure 2.

Select the che-test namespace, then click Install, as shown in Figure 3.

Create a new CheCluster
After you select the che-test namespace, you will be presented with the option to create a new CheCluster, as shown in Figure 4.

Select the YAML view for creating a CheCluster, as shown in Figure 5, then add the following custom Che properties in the server configuration:
customCheProperties:
CHE_LIMITS_WORKSPACE_IDLE_TIMEOUT: "0"
CHE_INFRA_KUBERNETES_NAMESPACE_DEFAULT: <username>-che
These properties allow the CodeReady Workspaces server to create namespaces for any number of user workspaces. Figure 5 shows the server configuration to create the CheCluster with customCheProperties.

CodeReady Workspaces will create the number of namespaces required to deploy a CodeReady Workspaces pod for each user workspace.
Install the toolkit's IDE plug-in
Next, we'll configure a devfile to install the migration toolkit for applications IDE plug-in. Add the following development component to your CodeReady Workspaces devfile.json:
{

"alias": "mta-ide-plugin",
"type": "chePlugin",
"reference": "https://raw.githubusercontent.com/redhat-cop/agnosticd/development/ansible/roles/ocp4-workload-ccnrd/files/cheplugin-meta.yaml",
"memoryLimit": "1500M"

}
Note that we are configuring a development environment with multiple users. You can also use the devfile to define the source code, application runtimes, and a list of predefined commands. See the quarkus-quickstarts repository for an example.
Using Keycloak for access
Let’s say that you have created 10 developer credentials with the username (developer1...developer10). The password for each credential is the same as the username in Keycloak. You can use the Keycloak API and access token to create a developer account:
KEYCLOAK_TOKEN=$(curl -s -d "username=<YOUR_KEYCLOAK_ADMIN_USERNAME>&password=<YOUR_KEYCLOAK_ADMIN_PASSWORD>&grant_type=password&client_id=admin-cli" \
-X POST https://keycloak-che-test.<YOUR_ROUTE_SUBDOMAIN>/auth/realms/codeready/protocol/openid-connect/token | \
jq  -r '.access_token')

curl -v -H "Authorization: Bearer ${KEYCLOAK_TOKEN}" -H "Content-Type:application/json" \
-d '{"username":"developer1","enabled":true,"emailVerified": true,"firstName": "developer1","lastName": "Developer","email": "developer1@no-reply.com", "credentials":[{"type":"password","value":"developer1","temporary":false}]}' \
-X POST "https://keycloak-che-test.<YOUR_ROUTE_SUBDOMAIN>/auth/admin/realms/codeready/users"
Pre-warm the developer workspaces
Finally, let's configure the devfile to pre-warm each developer’s workspace. Pre-warming lets us avoid an initial wait to start the workspaces:
for i in $(eval echo "{1..10}") ; do

DEVELOPER_TOKEN=$(curl -s -d "username=developer${i}&password=developer${i}&grant_type=password&client_id=admin-cli" \
-X POST https://keycloak-che-test.<YOUR_ROUTE_SUBDOMAIN>/auth/realms/codeready/protocol/openid-connect/token | \
jq  -r '.access_token')

curl -X POST --header 'Content-Type: application/json' --header 'Accept: application/json' \
--header "Authorization: Bearer ${DEVELOPER_TOKEN}" -d @devfile.json \
"http://codeready-che-test.<YOUR_ROUTE_SUBDOMAIN>/api/workspace/devfile?start-after-create=true&namespace=developer1"

done
Open a workspace in CodeReady Workspaces
Return to the OpenShift developer console and navigate to the userXX-che project, where "XX" is the user number. For example, as shown in Figure 6, you might see a workspace pod running in the user1-che project.

Navigate to the che-test project in your developer console, then click a URL to open one of the pods in CodeReady Workspaces, as shown in Figure 7.

When you log in, you will be moved to your personal dashboard. Click the name of the pre-created workspace on the left, as shown in Figure 8.

After a few seconds, you will be moved to the workspace landing page, as shown in Figure 9.

Configuring migration toolkit for applications
Click the icon labeled "MTA Explorer" in Figure 10, then click the plus (+) icon to add a new migration toolkit for applications configuration.

After adding the required configuration elements (such as --input, --source, and --target server), click Run to run an analysis. The toolkit's command-line interface (CLI) will be executed automatically in a new terminal. After a few minutes, you will see that the analysis is complete. Click Open Report, as shown in Figure 11.

Next, you'll see the option to review your migration report, as shown in Figure 12.
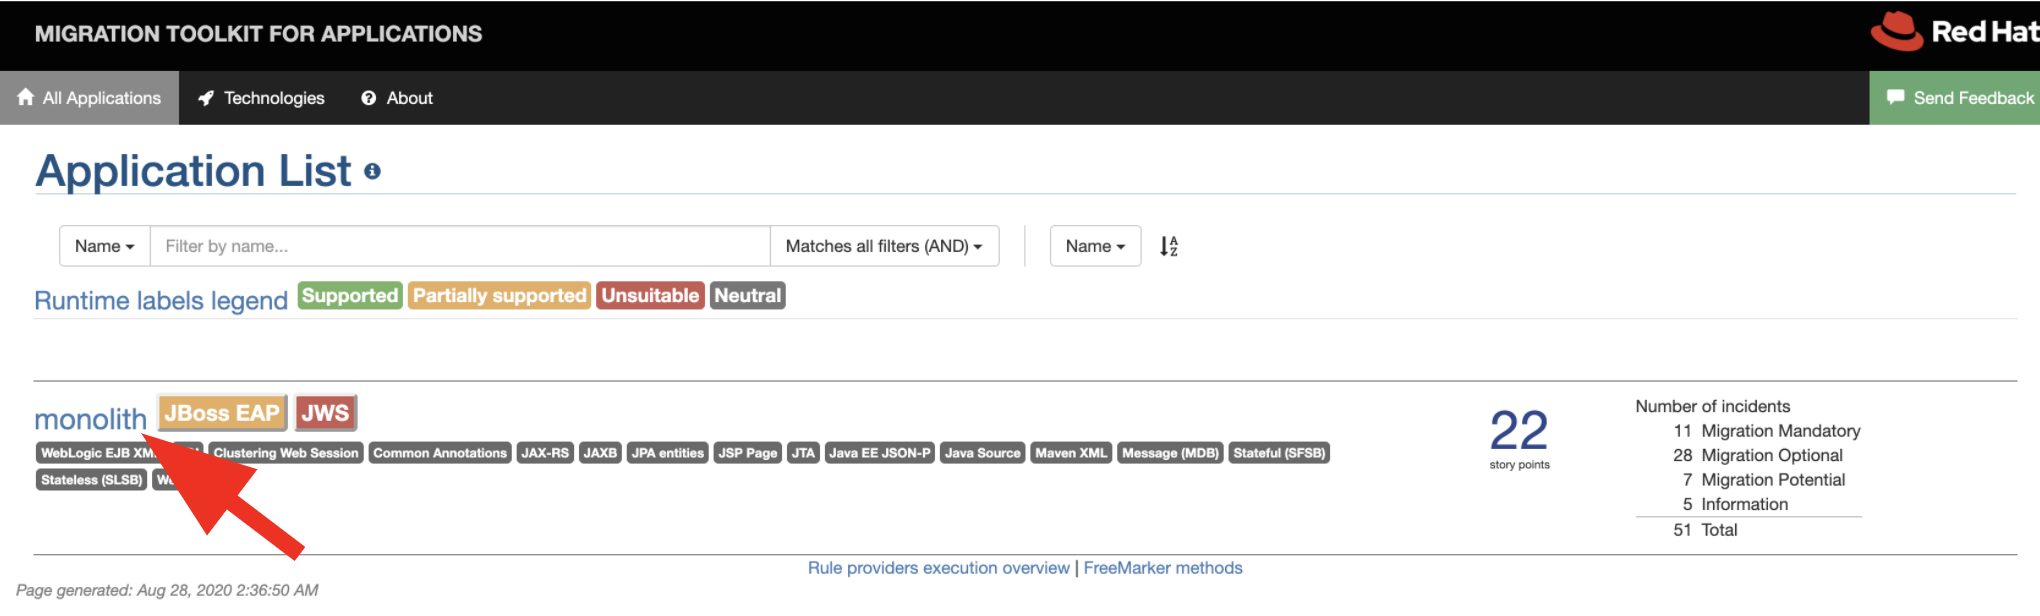
You might notice that there are 22 story points in this report. A story point is an abstract metric commonly used in agile software development to estimate the effort needed to implement a feature or a change. Red Hat's migration toolkit for applications uses story points to express the effort involved in migrating particular application constructs and the application as a whole. The level of effort will vary depending on the size and complexity of the application or applications you want to migrate.
What’s next for your transformation path
Analyzing your transformation path with migration toolkit for applications is just the beginning of modernizing a monolithic Java application. As a next step, you could break the application into microservices using cloud-native runtimes such as Quarkus, Spring Boot, and Node.js. With support from Red Hat Runtimes, you can gradually refactor your entire, monolithic application as a set of distributed cloud-native microservices.
Last updated: May 17, 2021