Redhat Developers  Logo
  • AI

    Get started with AI

    • Red Hat AI
      Accelerate the development and deployment of enterprise AI solutions.
    • AI learning hub
      Explore learning materials and tools, organized by task.
    • AI interactive demos
      Click through scenarios with Red Hat AI, including training LLMs and more.
    • AI/ML learning paths
      Expand your OpenShift AI knowledge using these learning resources.
    • AI quickstarts
      Focused AI use cases designed for fast deployment on Red Hat AI platforms.
    • No-cost AI training
      Foundational Red Hat AI training.

    Featured resources

    • OpenShift AI learning
    • Open source AI for developers
    • AI product application development
    • Open source-powered AI/ML for hybrid cloud
    • AI and Node.js cheat sheet

    Red Hat AI Factory with NVIDIA

    • Red Hat AI Factory with NVIDIA is a co-engineered, enterprise-grade AI solution for building, deploying, and managing AI at scale across hybrid cloud environments.
    • Explore the solution
  • Learn

    Self-guided

    • Documentation
      Find answers, get step-by-step guidance, and learn how to use Red Hat products.
    • Learning paths
      Explore curated walkthroughs for common development tasks.
    • Guided learning
      Receive custom learning paths powered by our AI assistant.
    • See all learning

    Hands-on

    • Developer Sandbox
      Spin up Red Hat's products and technologies without setup or configuration.
    • Interactive labs
      Learn by doing in these hands-on, browser-based experiences.
    • Interactive demos
      Click through product features in these guided tours.

    Browse by topic

    • AI/ML
    • Automation
    • Java
    • Kubernetes
    • Linux
    • See all topics

    Training & certifications

    • Courses and exams
    • Certifications
    • Skills assessments
    • Red Hat Academy
    • Learning subscription
    • Explore training
  • Build

    Get started

    • Red Hat build of Podman Desktop
      A downloadable, local development hub to experiment with our products and builds.
    • Developer Sandbox
      Spin up Red Hat's products and technologies without setup or configuration.

    Download products

    • Access product downloads to start building and testing right away.
    • Red Hat Enterprise Linux
    • Red Hat AI
    • Red Hat OpenShift
    • Red Hat Ansible Automation Platform
    • See all products

    Featured

    • Red Hat build of OpenJDK
    • Red Hat JBoss Enterprise Application Platform
    • Red Hat OpenShift Dev Spaces
    • Red Hat Developer Toolset

    References

    • E-books
    • Documentation
    • Cheat sheets
    • Architecture center
  • Community

    Get involved

    • Events
    • Live AI events
    • Red Hat Summit
    • Red Hat Accelerators
    • Community discussions

    Follow along

    • Articles & blogs
    • Developer newsletter
    • Videos
    • Github

    Get help

    • Customer service
    • Customer support
    • Regional contacts
    • Find a partner

    Join the Red Hat Developer program

    • Download Red Hat products and project builds, access support documentation, learning content, and more.
    • Explore the benefits

Apache Camel K development inside Eclipse Che: Iteration 1

January 24, 2020
Aurélien Pupier
Related topics:
JavaDeveloper toolsIDEs

    The Eclipse Che 7.6.0 release provides a new stack for Apache Camel K integration development. This release is the first iteration to give a preview of what is possible. If you like what you see, shout it out, and more will surely come.

    This article details how to test this release on a local instance deployed on minikube. The difference with a hosted instance is that we avoid the prerequisites involving Camel K installation in the cluster and specific rights for the user.

    Set up the Che instance

    A container host needs to be available. For instance, you can use minikube. Che requires a large amount of memory, so you need to increase what is allocated by default. For instance:

    $ minikube start --memory=4096

    This command provides output like this:

    ?  minikube v1.3.1 on Fedora 31
    ?  Creating virtualbox VM (CPUs=4, Memory=4096MB, Disk=50000MB) ...
    ?  Preparing Kubernetes v1.15.2 on Docker 18.09.8 ...
    ?  Pulling images ...
    ?  Launching Kubernetes ... 
    ⌛  Waiting for: apiserver proxy etcd scheduler controller dns
    ?  Done! kubectl is now configured to use "minikube"
    

    See the official Che 7 documentation for more details. Then, download chectl from GitHub releases. You will be able to install Che on your minikube instance with the following command:

    $ chectl server:start --platform minikube

    This command provides output like this:

      ✔ Verify Kubernetes API...OK
      ✔ ?  Looking for an already existing Che instance
        ✔ Verify if Che is deployed into namespace "che"...it is not
      ✔ ✈️  Minikube preflight checklist
        ✔ Verify if kubectl is installed
        ✔ Verify if minikube is installed
        ✔ Verify if minikube is running
        ↓ Start minikube [skipped]
          → Minikube is already running.
        ✔ Verify if minikube ingress addon is enabled
        ↓ Enable minikube ingress addon [skipped]
          → Ingress addon is already enabled.
        ✔ Retrieving minikube IP and domain for ingress URLs...192.168.99.123.nip.io.
      ❯ ?‍  Running Helm to install Che
        ✔ Verify if helm is installed
        ✔ Check Helm Version: Found v3.0.0+ge29ce2a
        ✔ Create Namespace (che)...done.
      ✔ ?‍  Running Helm to install Che
        ✔ Verify if helm is installed
        ✔ Check Helm Version: Found v3.0.0+ge29ce2a
        ✔ Create Namespace (che)...done.
        ✔ Check Cluster Role Binding...does not exists.
        ✔ Preparing Che Helm Chart...done.
        ✔ Updating Helm Chart dependencies...done.
        ✔ Deploying Che Helm Chart...done.
      ✔ ✅  Post installation checklist
        ✔ Devfile registry pod bootstrap
          ✔ scheduling...done.
          ✔ downloading images...done.
          ✔ starting...done.
        ✔ Plugin registry pod bootstrap
          ✔ scheduling...done.
          ✔ downloading images...done.
          ✔ starting...done.
        ✔ Che pod bootstrap
          ✔ scheduling...done.
          ✔ downloading images...done.
          ✔ starting...done.
        ✔ Retrieving Che Server URL...http://che-che.192.168.99.123.nip.io
        ✔ Che status check
    Command server:start has completed successfully.
    

    For more details and options, see the official Che 7 documentation.

    Create and configure a Camel K-ready workspace

    To create and configure your Camel K-ready workspace, you first need to create a workspace from the Camel K stack. At the end of the previous command's log, the URL to access the Che instance is provided after "Retrieving Che Server URL..."

    Open this URL in a browser. Select the Apache Camel K stack and then click the Create & Open button, which opens the page shown in Figure 1:

    The Eclipse Che workspace creation page.
    Figure 1: Create your new Apache Camel K workspace in Eclipse Che.">

    Wait for the workspace to be ready. This process can take several minutes, depending on your internet connection's speed.

    Next, you need to inject the kubeconfig login context into the Che workspace. For that, you can return to your host and call:

    $ chectl workspace:inject -k

    Ensure that the injection for vscode-camelkXXX is a success. This command provides output like this:

      ✔ Verify if namespace che exists
      ✔ Verify if the workspaces is running
      ✔ Injecting configurations
        ↓ injecting kubeconfig into container che-machine-execcc7 [skipped]
          → the container doesn't support file injection
        ↓ injecting kubeconfig into container theia-idenue [skipped]
          → kubeconfig already exists in the target container
        ✔ injecting kubeconfig into container vscode-xmlcem...done.
        ↓ injecting kubeconfig into container vscode-apache-camelt7t [skipped]
          → kubeconfig already exists in the target container
        ✔ injecting kubeconfig into container vscode-camelkrbj...done.

    Now, install Camel K. In the right column, click My Workspace to expand the panel. Then, expand the Plugins -> vscode-camelkXXX tree. Click New terminal, then type:

    $ kamel install

    The result is shown in Figure 2:

    Eclipse Che showing your newly created terminal.
    Figure 2: Create your new terminal inside your new workspace's Plugins.">

    Deploy and automatically redeploy a Camel K integration

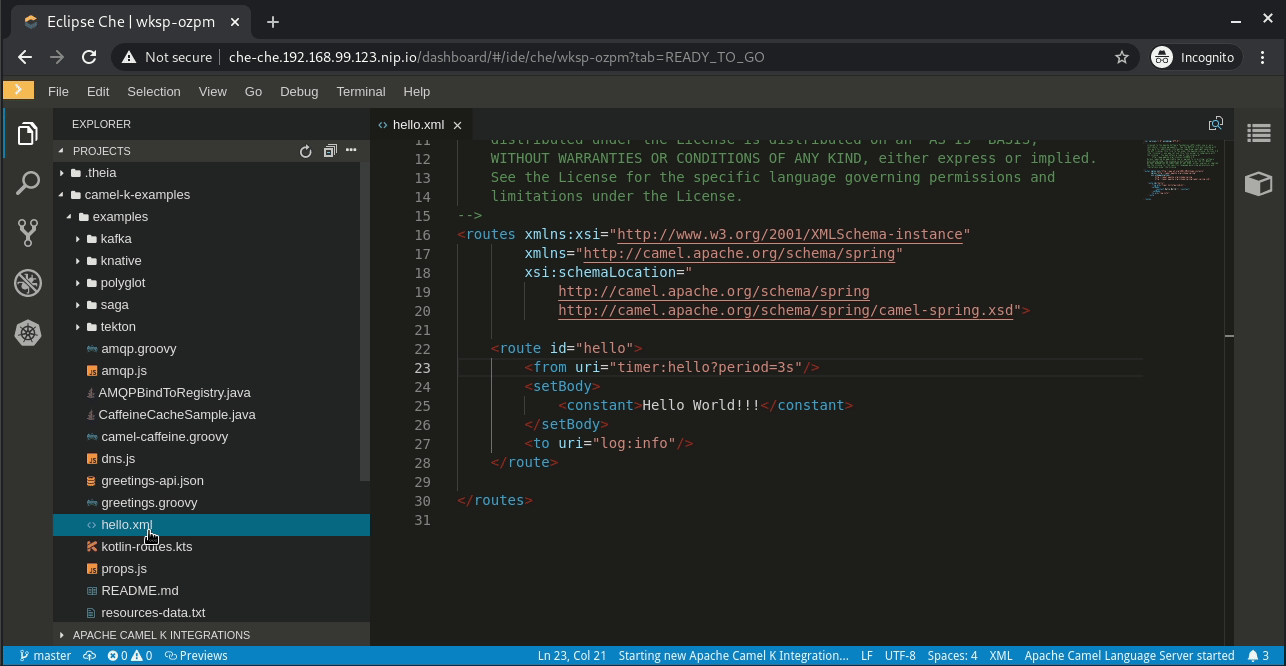
    The official Camel K examples are populated by default. You can open, for instance, hello.xml. Notice that the integration simply logs "Hello World!!!" every three seconds.

    Right-click on this example in the Projects panel. Select Start Apache Camel K integration and then Dev mode - Apache Camel integration in Dev mode, as shown in Figure 3:

    The sequence for deploying hello world.
    Figure 3: Deploy the Hello World example.">

    Wait several seconds (or minutes) for the first deployment. Again, how long this takes depends on your internet connection's speed.

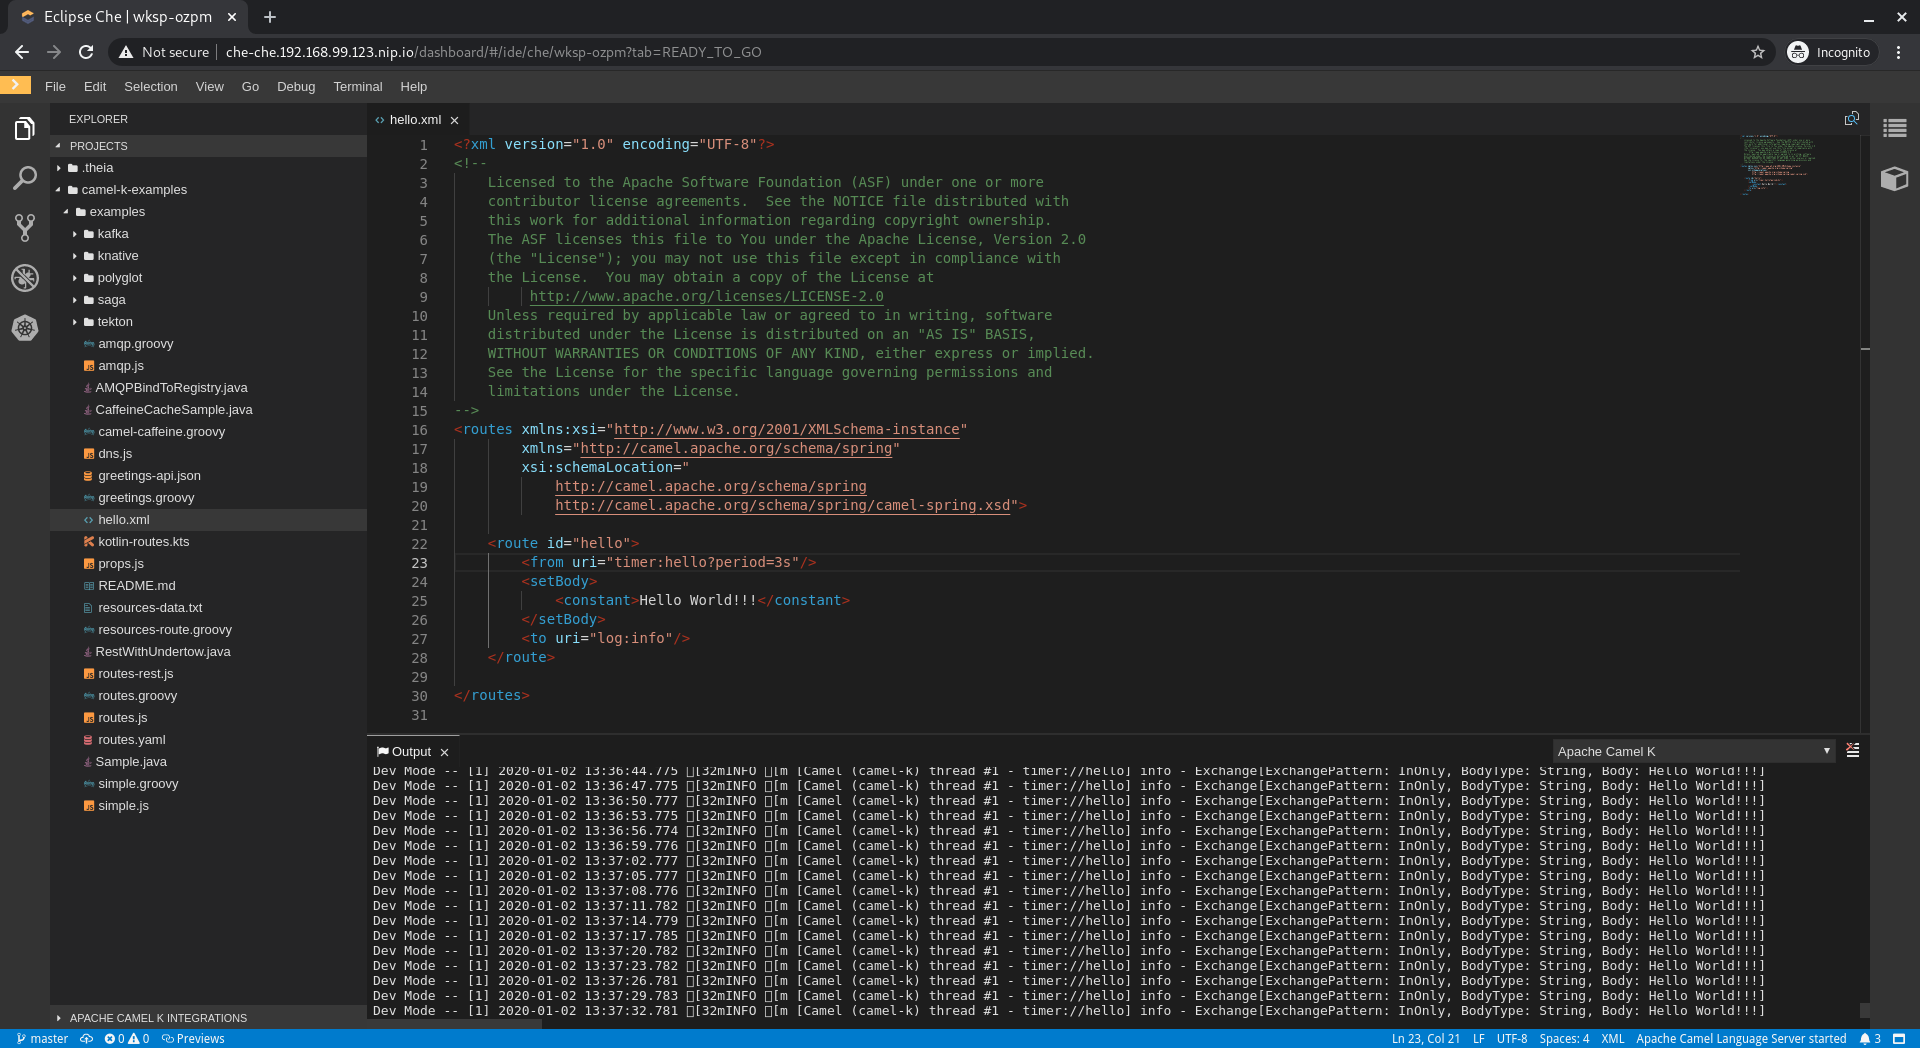
    When ready, go to the Output panel. Select Apache Camel K output, which should display "Hello World!!!" logged every three seconds, as shown in Figure 4:

    Eclipse Che showing the Apache Camel K output log.
    Figure 4: View the output log.">

    Modify the hello.xml file's content. For instance, you might change the constant to "Hello World from Che!!!" The integration is automatically redeployed in a few milliseconds, as you can see in Figure 5:

    Apache Camel K integration log after redeployment
    Figure 5: The output log now shows the updated results from the automatic redeployment.">

    Because the Che workspace reuses the VS Code extension, you can use all of the Tooling for Apache Camel K VS Code extension's features. See our previous article on how to create an integration sending a Telegram to take this example further.

    Known limitations

    There are two major known limitations. The login for the Camel K instance needs to be redone on each workspace startup, and on a remote cluster, special rights need to be given so you can install and access the Camel K instance.

    Last updated: June 29, 2020

    Recent Posts

    • Tekton joins the CNCF as an incubating project

    • Federated identity across the hybrid cloud using zero trust workload identity manager

    • Confidential virtual machine storage attack scenarios

    • Introducing virtualization platform autopilot

    • Integrate zero trust workload identity manager with Red Hat OpenShift GitOps

    Red Hat Developers logo LinkedIn YouTube Twitter Facebook

    Platforms

    • Red Hat AI
    • Red Hat Enterprise Linux
    • Red Hat OpenShift
    • Red Hat Ansible Automation Platform
    • See all products

    Build

    • Developer Sandbox
    • Developer tools
    • Interactive tutorials
    • API catalog

    Quicklinks

    • Learning resources
    • E-books
    • Cheat sheets
    • Blog
    • Events
    • Newsletter

    Communicate

    • About us
    • Contact sales
    • Find a partner
    • Report a website issue
    • Site status dashboard
    • Report a security problem

    RED HAT DEVELOPER

    Build here. Go anywhere.

    We serve the builders. The problem solvers who create careers with code.

    Join us if you’re a developer, software engineer, web designer, front-end designer, UX designer, computer scientist, architect, tester, product manager, project manager or team lead.

    Sign me up

    Red Hat legal and privacy links

    • About Red Hat
    • Jobs
    • Events
    • Locations
    • Contact Red Hat
    • Red Hat Blog
    • Inclusion at Red Hat
    • Cool Stuff Store
    • Red Hat Summit
    © 2026 Red Hat

    Red Hat legal and privacy links

    • Privacy statement
    • Terms of use
    • All policies and guidelines
    • Digital accessibility

    Chat Support

    Please log in with your Red Hat account to access chat support.