In the previous article in this series, we discussed the basics of Red Hat AMQ Streams on Red Hat OpenShift. Here are a few key points to keep in mind before we proceed:
- AMQ Streams is based on Apache Kafka.
- AMQ Streams for the OpenShift Container Platform is based on the Strimzi project.
- AMQ Streams on containers has multiple components, such as the Cluster Operator, Entity Operator, Mirror Maker, Kafka connect, and Kafka Bridge.
Now, let's continue on to setting up Kafka Connect, the Kafka Bridge, and Mirror Maker.
Kafka Connect
Kafka Connect is mainly used to stream data in and out of Kafka clusters; for instance, getting a Twitter feed and then pushing it to the cluster. We need to understand Kafka Connect's concepts before continuing:
- Connectors define where the data should be copied to or from.
- Tasks are the actors that actually copy the data.
- Workers are used to schedule units of work for connectors and tasks.
- Converters are used by task units to change data format.
- Transforms are used by connector units to do simple data adjustments, routing, and chain transformations.
Note: For more details on the basic concepts, I recommend reading Kafka Connect Concepts.
Creating a simple Kafka Connect instance
A Kafka Connect instance in OpenShift can be created using two different Kube objects: KafkaConnect and KafkaConnectS2I. By default, Kafka Connect includes two built-in connectors: FileStreamSourceConnector and FileStreamSinkConnector. However, before you build a new connector, first check the catalog of existing connectors.
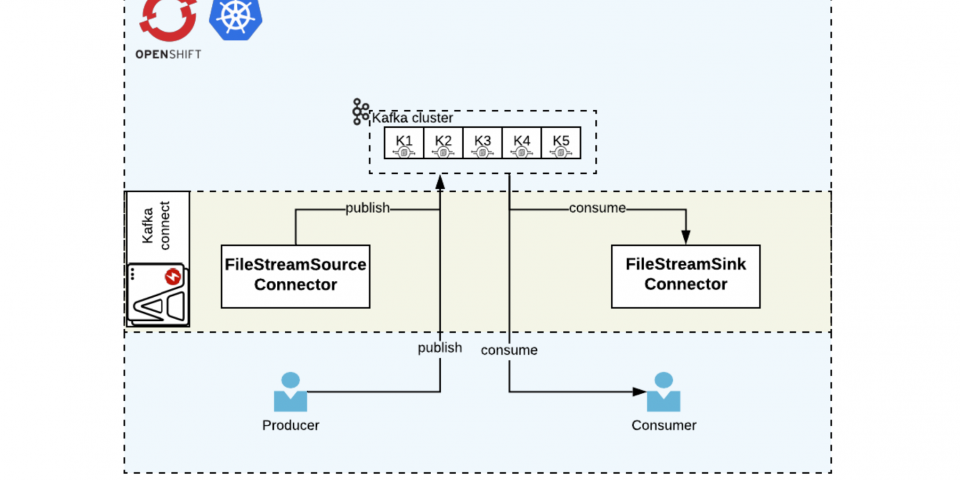
Let us set up a simple Kafka Connect instance and then perform the source and sink operations. Then, we can add a default producer sample app and a consumer sample app. This process will show multiple publishers and multiple consumers, as shown in Figure 1:

Begin by creating the Kafka Connect config amq-kafka-connect.yml. The example file present in examples/kafka-connect/kafka-connect.yml was used as a reference for this config file:
apiVersion: kafka.strimzi.io/v1beta1
kind: KafkaConnect
metadata:
  name: simple-connect-cluster
spec:
  version: 2.3.0
  replicas: 1
  bootstrapServers: simple-cluster-kafka-bootstrap:9093
  tls:
    trustedCertificates:
      - secretName: simple-cluster-cluster-ca-cert
        certificate: ca.crt
Next, execute the YAML:
$ oc create -f amq-kafka-connect.yml
You can see the result in Figure 2:

Preparing to test your new Kafka Connect instance
Let us set up to test the new instance by doing the following:
- Create a new config, which will sink from the
redhat-demo-topicstopic content to the fileamq-demo-sink.txt:
$ oc rsh simple-cluster-kafka-0
sh-4.2$ curl -X POST -H "Content-Type: application/json" --data '{"name": "redhat-file-sink-demo", "config": {"connector.class":"FileStreamSinkConnector", "tasks.max":"1", "file":"/tmp/amq-demo-sink.txt", "topic":"redhat-demo-topics", "value.converter.schemas.enable" : "false", "value.converter" : "org.apache.kafka.connect.storage.StringConverter", "value.converter.schemas.enable" : "false", "key.converter" : "org.apache.kafka.connect.storage.StringConverter", "key.converter.schemas.enable" : "false"}}' http://simple-connect-cluster-connect-api.amq-streams.svc:8083/connectors
Here is the output:
{"name":"redhat-file-sink-demo","config":{"connector.class":"FileStreamSinkConnector","tasks.max":"1","file":"/tmp/amq-demo-sink.txt","topics":"redhat-demo-topics","value.converter.schemas.enable":"false","value.converter":"org.apache.kafka.connect.storage.StringConverter","key.converter":"org.apache.kafka.connect.storage.StringConverter","key.converter.schemas.enable":"false","name":"redhat-file-sink-demo"},"tasks":[],"type":"sink"}
- Create a new config that will source into the
redhat-demo-topicstopic content from the fileamq-demo-source.txt:
$ oc rsh simple-cluster-kafka-0
sh-4.2$ curl -X POST -H "Content-Type: application/json" --data '{"name": "redhat-file-source-demo", "config": {"connector.class":"FileStreamSourceConnector", "tasks.max":"1", "file":"/tmp/amq-demo-source.txt", "topic":"redhat-demo-topics", "value.converter.schemas.enable" : "false", "value.converter" : "org.apache.kafka.connect.storage.StringConverter", "value.converter.schemas.enable" : "false", "key.converter" : "org.apache.kafka.connect.storage.StringConverter", "key.converter.schemas.enable" : "false"}}' http://simple-connect-cluster-connect-api.amq-streams.svc:8083/connectors
Here is the output:
{"name":"redhat-file-source-demo","config":{"connector.class":"FileStreamSourceConnector","tasks.max":"1","file":"/tmp/amq-demo-source.txt","topic":"redhat-demo-topics","value.converter.schemas.enable":"false","value.converter":"org.apache.kafka.connect.storage.StringConverter","key.converter":"org.apache.kafka.connect.storage.StringConverter","key.converter.schemas.enable":"false","name":"redhat-file-source-demo"},"tasks":[],"type":"source"}
- In a new terminal start the producer sample app:
$ oc run kafka-producer -ti --image=registry.redhat.io/amq7/amq-streams-kafka-23:1.3.0 --rm=true --restart=Never -- bin/kafka-console-producer.sh --broker-list simple-cluster-kafka-bootstrap:9092 --topic redhat-demo-topics
- In a new terminal start the consumer sample app:
$ oc run kafka-consumer -ti --image=registry.redhat.io/amq7/amq-streams-kafka-23:1.3.0 --rm=true --restart=Never -- bin/kafka-console-consumer.sh --bootstrap-server simple-cluster-kafka-bootstrap:9092 --topic redhat-demo-topics --from-beginning
Testing your new Kafka Connect instance
To test your instance, do the following:
- Log into the Kafka Connect pod and watch the
/tmp/amq-demo-sink.txtfile:
$ oc get po | grep connect
simple-connect-cluster-connect-7479b86c7-tmdbp 1/1 Running 0 3h
$ oc rsh simple-connect-cluster-connect-7479b86c7-tmdbp
sh-4.2$ tail -100f /tmp/amq-demo-sink.txt

hello world
from pramod
Here, you can see that the connector has already sunk two messages into the file.
- Log into the Kafka Connect pod in a different terminal, then add content into
/tmp/amq-demo-source.txt:
$ oc rsh simple-connect-cluster-connect-7479b86c7-tmdbp
sh-4.2$ echo redhat-is-my-world > /tmp/amq-demo-source.txt
This set of commands writes a message in /tmp/amq-demo-sink.txt, and also to the consumer sample app. Figure 3 shows the connector source push and sink output:

Figure 4 shows the sample app consuming the message:

- Now, send a message from the producer sample app. Figure 5 shows how this message flows through the system in three parts. From top to bottom, these are the connector sink, the consumer sample app, and then the producer sample app pushing the message
kafka connect sample app:

Kafka Bridge
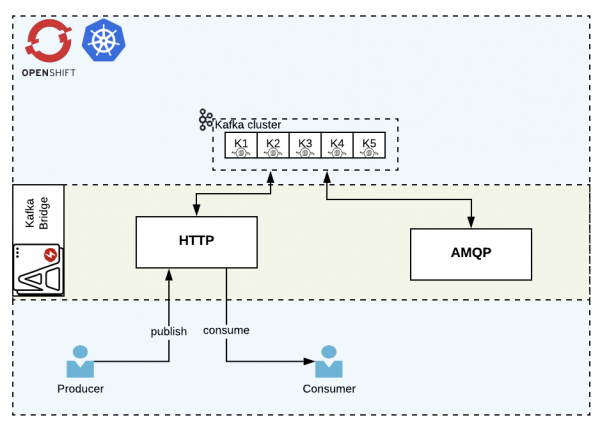
The Bridge component helps us connect to the Kafka Cluster using the HTTP or AMQP protocol. In this article, we demo the HTTP usage as shown in Figure 6:

Kafka Bridge produces a REST API for the HTTP protocol, through which it provides multiple operations, such as:
- Sending messages.
- Subscribing to topics.
- Receiving messages.
- Committing offsets.
- Seeking specific positions.
Creating your Kafka Bridge
- Create the
kafka-bridgeconfig fileamq-kafka-bridge.yml. The example file present inexamples/kafka-bridge/kafka-bridge.yamlwas used as a reference for the following config:
apiVersion: kafka.strimzi.io/v1alpha1
kind: KafkaBridge
metadata:
  name: simple-bridge
spec:
  replicas: 1
  bootstrapServers: simple-cluster-kafka-bootstrap:9092
  http:
    port: 8080
- Create the bridge in OCP:
$ oc create -f amq-kafka-bridge.yml
You can see the results in Figure 7:

- Create a route so that we can access the bridge from outside the cluster:
$ oc expose svc simple-bridge-bridge-service --name=simple-bridge-route
Testing your HTTP protocol-based Kafka Bridge
- Create the Kafka topic config
amq-kafka-topic.ymland apply it to the cluster:
apiVersion: kafka.strimzi.io/v1beta1
kind: KafkaTopic
metadata:
  name: simple-topic
  labels:
    strimzi.io/cluster: simple-cluster
spec:
  partitions: 5
  replicas: 1
  config:
    retention.ms: 7200000
    segment.bytes: 1073741824
oc create -f amq-kafka-topic.yml
- Get the route URL for the bridge endpoints:
#get the route to do the curl command

oc get route

NAME HOST/PORT PATH SERVICES PORT TERMINATION WILDCARD
simple-bridge-route simple-bridge-route-amq-streams.apps.redhat.demo.com simple-bridge-bridge-service rest-api None
- Publish a message on
simple-topic:
curl -X POST \
http://simple-bridge-route-amq-streams.apps.redhat.demo.com/topics/simple-topic \
-H 'content-type: application/vnd.kafka.json.v2+json' \
-d '{
"records": [
{
"value": "all hail the shadowman"
}
]
}'
Here is the output:
{"offsets":[{"partition":0,"offset":0}]}
- Create the consumer group
simple-rh-bridge-consumer-groupand the instancesimple-rh-bridge-consumer. For this task, we set the message format to JSON:
curl -X POST \
http://simple-bridge-route-amq-streams.apps.redhat.demo.com/consumers/simple-rh-bridge-consumer-group \
-H 'content-type: application/vnd.kafka.v2+json' \
-d '{
"name": "simple-rh-bridge-consumer",
"auto.offset.reset": "earliest",
"format": "json",
"enable.auto.commit": false,
"fetch.min.bytes": 512,
"consumer.request.timeout.ms": 30000
}'
- Create a subscriber for the
simple-topiccreated in step one:
curl -X POST http://simple-bridge-route-amq-streams.apps.redhat.demo.com/consumers/simple-rh-bridge-consumer-group/instances/simple-rh-bridge-consumer/subscription \
-H 'content-type: application/vnd.kafka.v2+json' \
-d '{
"topics": [
"simple-topic"
]
}'
- Consume the messages (note that the first request will register and the subsequent calls will provide the array of messages):
curl -X GET http://simple-bridge-route-amq-streams.apps.redhat.demo.com/consumers/simple-rh-bridge-consumer-group/instances/simple-rh-bridge-consumer/records \
-H 'accept: application/vnd.kafka.json.v2+json'
Here is the output:
[]
curl -X GET http://simple-bridge-route-amq-streams.apps.redhat.demo.com/consumers/simple-rh-bridge-consumer-group/instances/simple-rh-bridge-consumer/records \
-H 'accept: application/vnd.kafka.json.v2+json'
And the additional output:
[{"topic":"simple-topic","key":null,"value":"all hail the shadowman","partition":0,"offset":0}]
Mirror Maker
Kafka Mirror Maker replicates data from one Kafka cluster to another. The usual use case is across different data centers.
For the purpose of this demo, we use two different namespaces and projects, namely amq-streams and amq-streams-dc2. Doing so is the same as having multiple data centers with the same names. This setup is shown in Figure 8:

Kafka Mirror maker consumes from the active Kafka cluster and produces to the mirror (backup) Kafka cluster.
Setting up for the example
To demo the Kafka Mirror Maker, we need to create another namespace and Kafka cluster. First, create the new namespace amq-streams-dc2:
$ oc new-project amq-streams-dc2
Next, create a new Kafka cluster:
$ sed -i 's/namespace: .*/namespace: amq-streams-dc2/' install/cluster-operator/*RoleBinding*.yaml
On macOS, use the following instead:
$ sed -i '' 's/namespace: .*/namespace: amq-streams-dc2/' install/cluster-operator/*RoleBinding*.yaml
$ oc apply -f install/cluster-operator -n amq-streams-dc2
$ oc apply -f amq-kafka-cluster.yml -n amq-streams-dc2
You can see the result in Figure 9:

Creating a mirror with Kafka Mirror Maker
Create a kafka-mirror-maker config amq-kafka-mirror-maker.yml. In this file, we increase the consumer stream to two for faster response and use the group ID simple-source-group-id for the consumer. Additionally, we whitelist all of the topics using wildcards. This example file present in examples/kafka-mirror-maker/kafka-mirror-maker.yaml was used as a reference for the config:
apiVersion: kafka.strimzi.io/v1beta1
kind: KafkaMirrorMaker
metadata:
  name: simple-mirror-maker
spec:
  version: 2.3.0
  replicas: 1
  consumer:
    bootstrapServers: simple-cluster-kafka-bootstrap:9092
    groupId: simple-source-group-id
    numStreams: 2
  producer:
    bootstrapServers: simple-cluster-kafka-bootstrap.amq-streams-dc2.svc:9092
  whitelist: ".*"
amq-streams namespace:$ oc create -f amq-kafka-mirror-maker.yml -n amq-streams
Testing Kafka Mirror Maker
To test the Mirror Maker, create the following two namespaces: amq-streams and amq-streams-dc2. The amq-streams namespace will contain the producer sample app to produce new messages, and the consumer sample app to consume new messages. The amq-streams-dc2 namespace will contain the consumer sample app so it can consume new messages, so it can show that the messages are getting pushed to the DC2 cluster.
- Create a producer sample app and consumer sample app in the
amq-streamsnamespace:
$ oc project amq-streams
$ oc run kafka-producer -ti --image=registry.redhat.io/amq7/amq-streams-kafka-23:1.3.0 --rm=true --restart=Never -- bin/kafka-console-producer.sh --broker-list simple-cluster-kafka-bootstrap:9092 --topic redhat-demo-topics
$ oc run kafka-consumer -ti --image=registry.redhat.io/amq7/amq-streams-kafka-23:1.3.0 --rm=true --restart=Never -- bin/kafka-console-consumer.sh --bootstrap-server simple-cluster-kafka-bootstrap:9092 --topic redhat-demo-topics
- Create a Consumer sample app in the
amq-streams-dc2namespace
$ oc project amq-streams-dc2
$ oc run kafka-consumer -ti --image=registry.redhat.io/amq7/amq-streams-kafka-23:1.3.0 --rm=true --restart=Never -- bin/kafka-console-consumer.sh --bootstrap-server simple-cluster-kafka-bootstrap:9092 --topic redhat-demo-topics
- Send a message from the producer sample app.
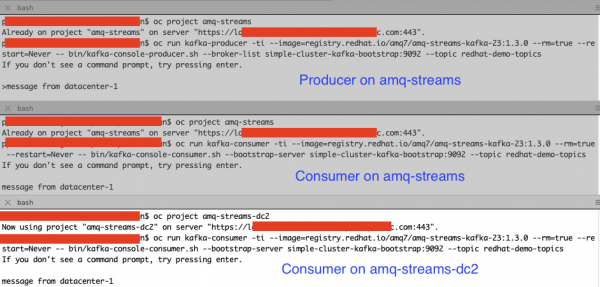
Is Mirror Maker working? You should see the message in the consumer app in both the namespaces, as shown in Figure 11:

Conclusion
In this article, we explored Red Hat AMQ Streams components like Kafka Connect, Kafka Bridge, and Mirror Maker. In the third and final part of the series, we will cover monitoring and administration.


