In this article, we'll cover microservice security concepts by using protocols such as OpenID Connect with the support of Red Hat Single Sign-On and 3scale. Working with a microservice-based architecture, user identity, and access control in a distributed, in-depth form must be carefully designed. Here, the integration of these tools will be detailed, step-by-step, in a realistic view.
This article exemplifies the use of tools that can securely run your businesses, avoiding using homemade solutions, and protecting your services by using an API gateway, preventing your applications from being exposed to the public network. The use of an API gateway also provides additional access control, monetization, and analytics.
| Technology | Version |
|---|---|
| Spring Boot | 2.1.8.RELEASE |
| Apache Camel | 7.4.0.fuse-740036-redhat-00002 (w/ spring boot 1.5.22.RELEASE) |
| 3scale | 2.6 |
| Red Hat Single Sign-On (RHSSO) | 7.3.3 (based on keycloak 4.8) |
TL;DR: This is a demonstration of how to protect APIs with Red Hat Single Sign-On (Keycloak) and 3scale.
This is a lengthy article with step-by-step instructions, screenshots of products, and architecture concepts. All source code is hosted on GitHub.
Note: This is a proof of concept. In production environments, additional configurations will be needed regarding scalability, security (refinement) and using a proper CA-trusted certificate.
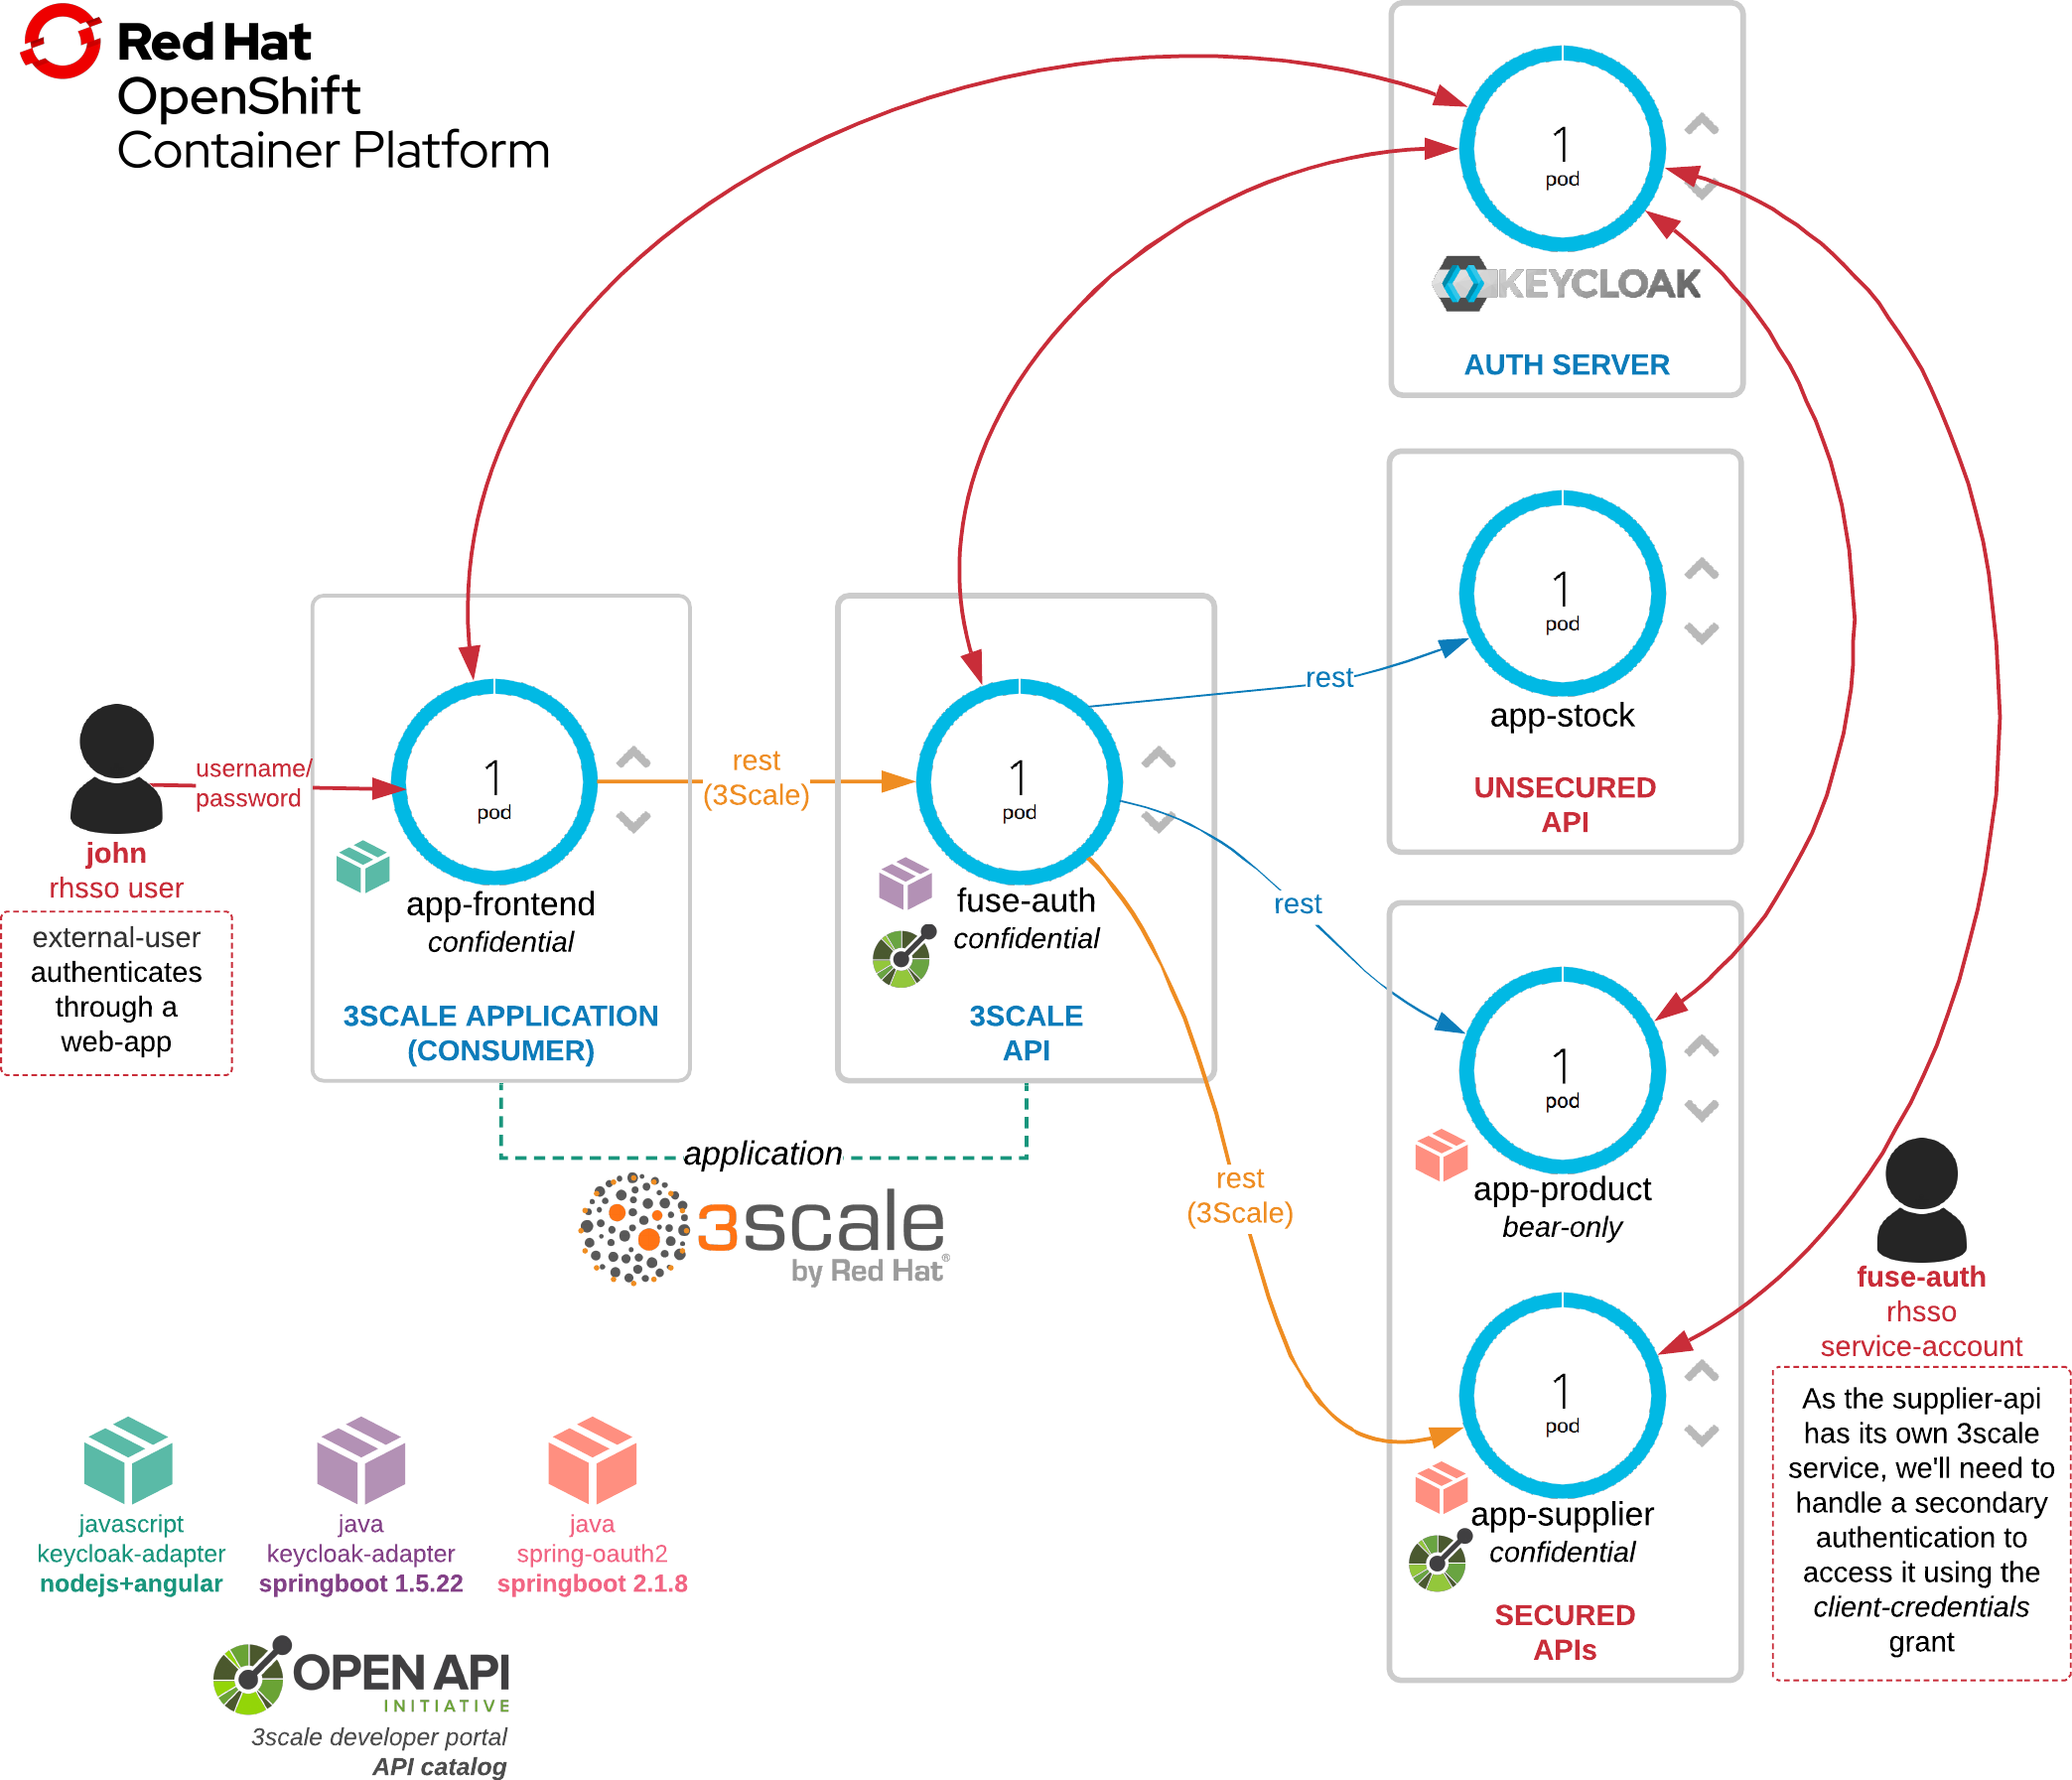
The use case scenario
The main purpose of this tutorial is to achieve concepts regarding the security of microservices using a whole use case scenario. A web app is offered to promote a more natural understanding of all API calls and authorizations used.
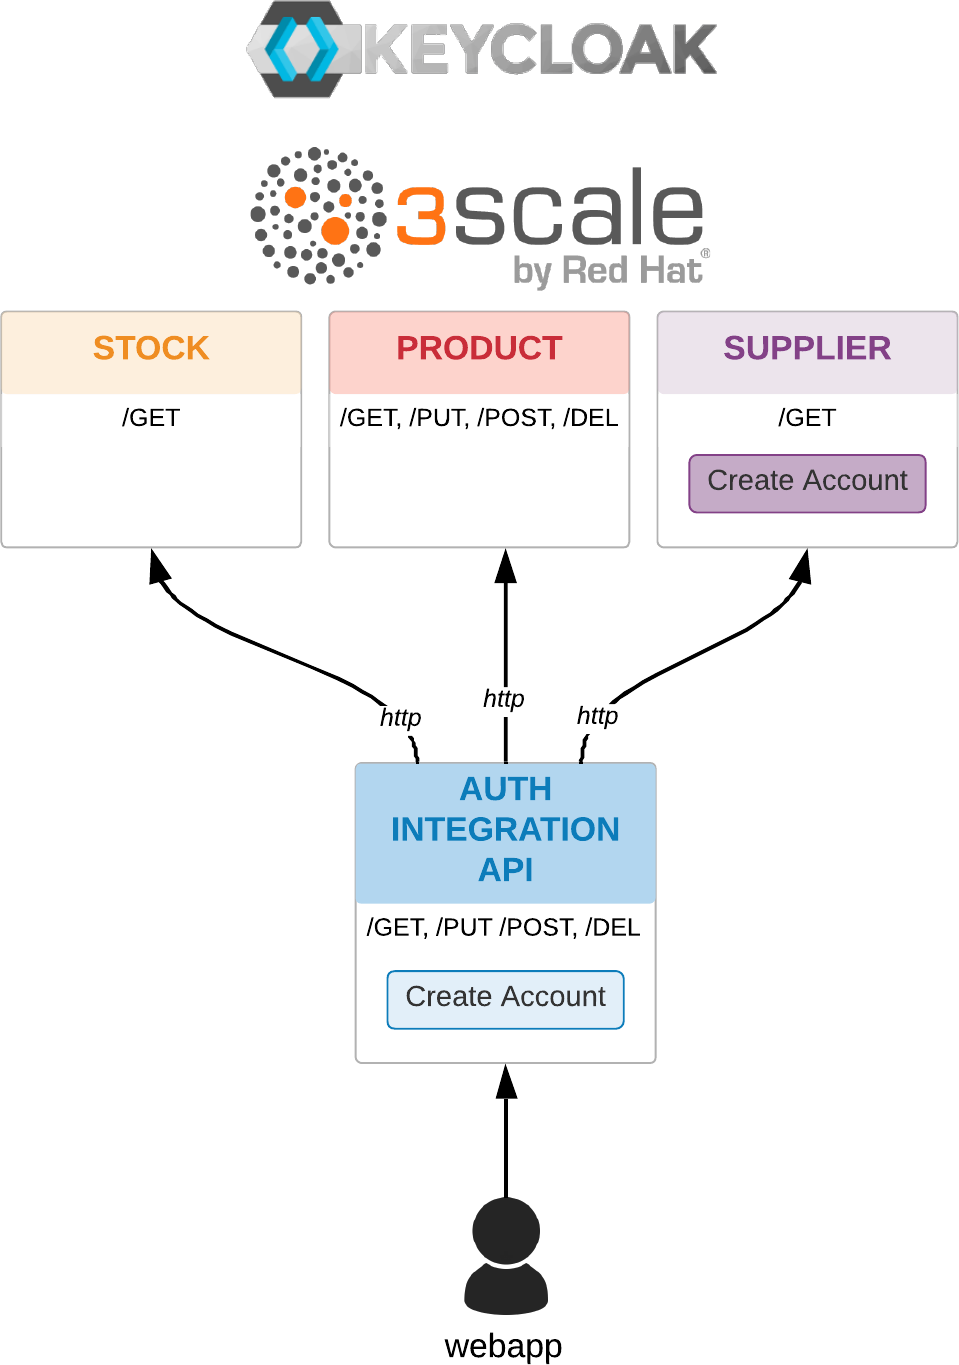
The All APIs catalog is exposed below.
auth-integration-api endpoints
:8081
| Method | URI | Description |
|---|---|---|
| GET | /health | API actuator embedded health. |
| GET | /metrics | API actuator embedded metrics. |
:8080
| Method | URI | Description | Secured? |
|---|---|---|---|
| POST | /api/v1/product | Create a new product. | true |
| DELETE | /api/v1/product/* | Delete product by ID. | true |
| PUT | /api/v1/product/* | Update product by ID. | true |
| GET | /api/v1/product$ | Retrieve all products | true |
| GET | /api/v1/product/* | Same as above. | true |
| GET | /api/v1/status | Check Integration API health. | true |
| GET | /api/v1/product/status | Check Product API health. | true |
| GET | /api/v1/supplier/status | Check Supplier API health. | true |
| GET | /api/v1/stock/status | Check Stock API health. | true |
| GET | /api/v1/stock/maintenance | Call Stock API maintenance. | true |
| GET | /api/v1/supplier/maintenance | Call Supplier API maintenance. | true |
stock-api endpoints
| Method | URI | Description |
|---|---|---|
| GET | /api/v1/sync | Stock Maintenance |
| GET | /actuator/health | Supplier Maintenance |
supplier-api endpoints
| Method | URI | Description | Secured? |
|---|---|---|---|
| GET | /api/v1/sync | Supplier Maintenance | true |
| GET | /actuator/health | Supplier Maintenance | true |
product-api endpoints
| Method | URI | Description | Secured? |
|---|---|---|---|
| GET | /api/v1/product | Retrieve all products. | true |
| GET | /api/v1/product/{id} | Retrieve product by ID. | true |
| POST | /api/v1/product | Create a new product. | true |
| PUT | /api/v1/product/{id} | Update product by ID. | true |
| DELETE | /api/v1/product/{id} | Delete product by ID. | true |
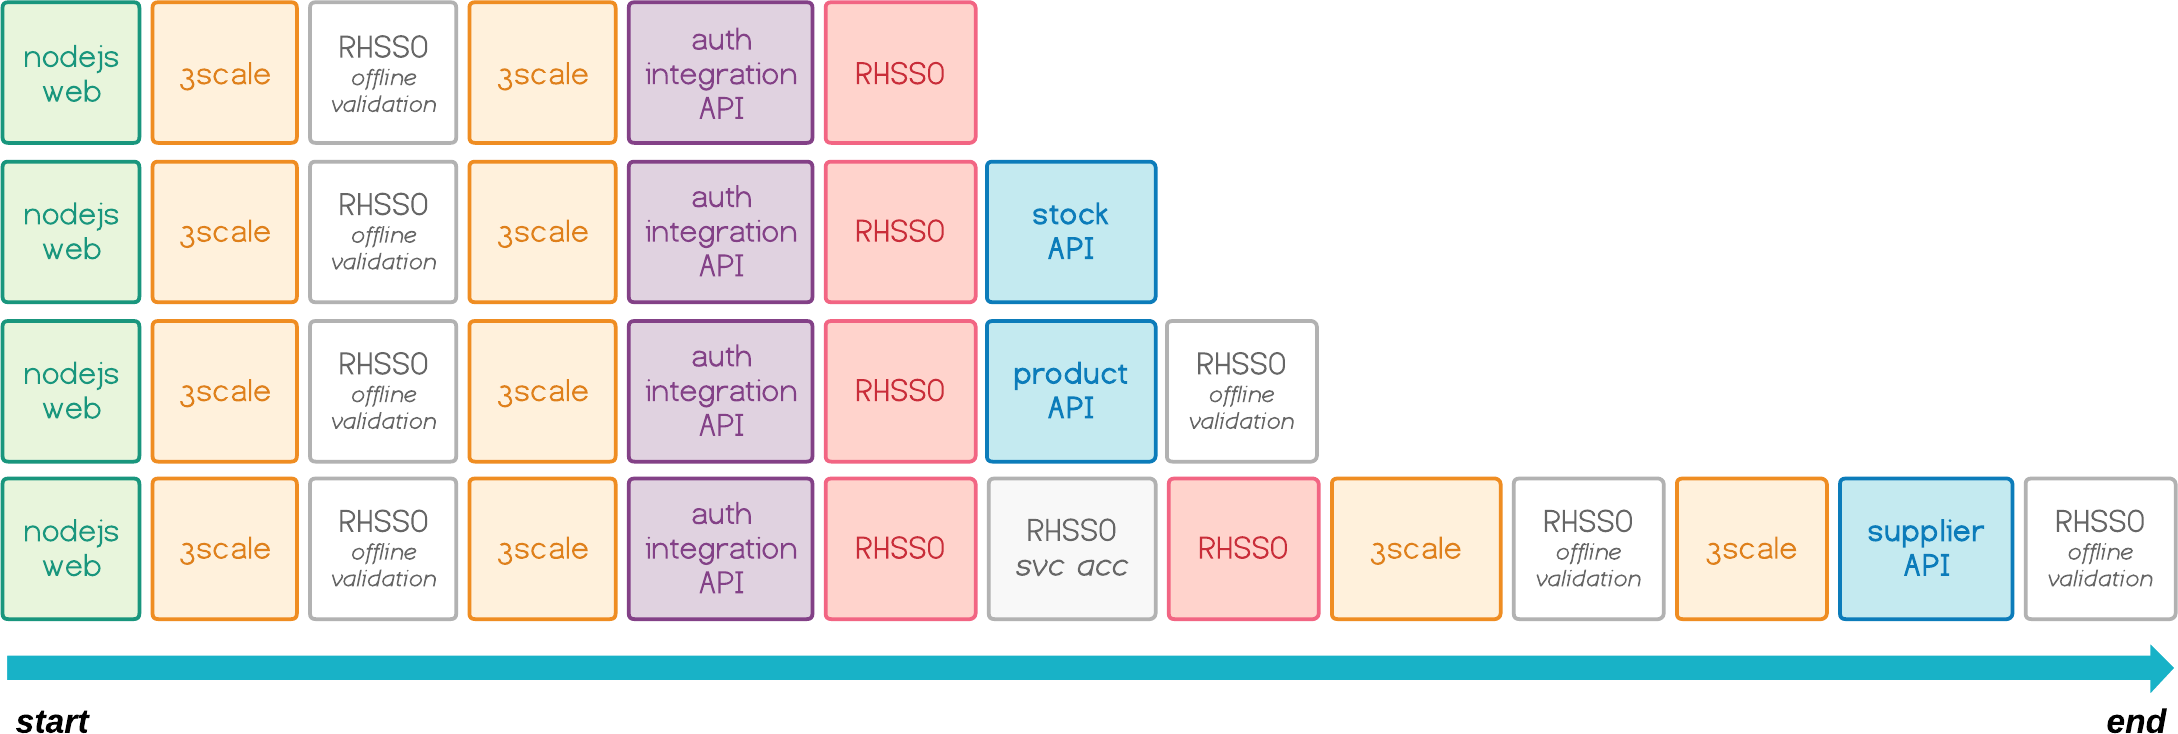
Security lab
Each endpoint has its own specificity, so to drive our test scenarios, I've ended up with three simple questions:
- Will this API be protected by an Integration Layer (FUSE)?
- Will this API be exposed as a unique service on 3scale AMP? (This factor enables API self-service subscriptions for external clients.)
- Will this API be managed by RHSSO (Keycloak) and have its client-id, groups, and roles?
So, I came up with the following requirements matrix:
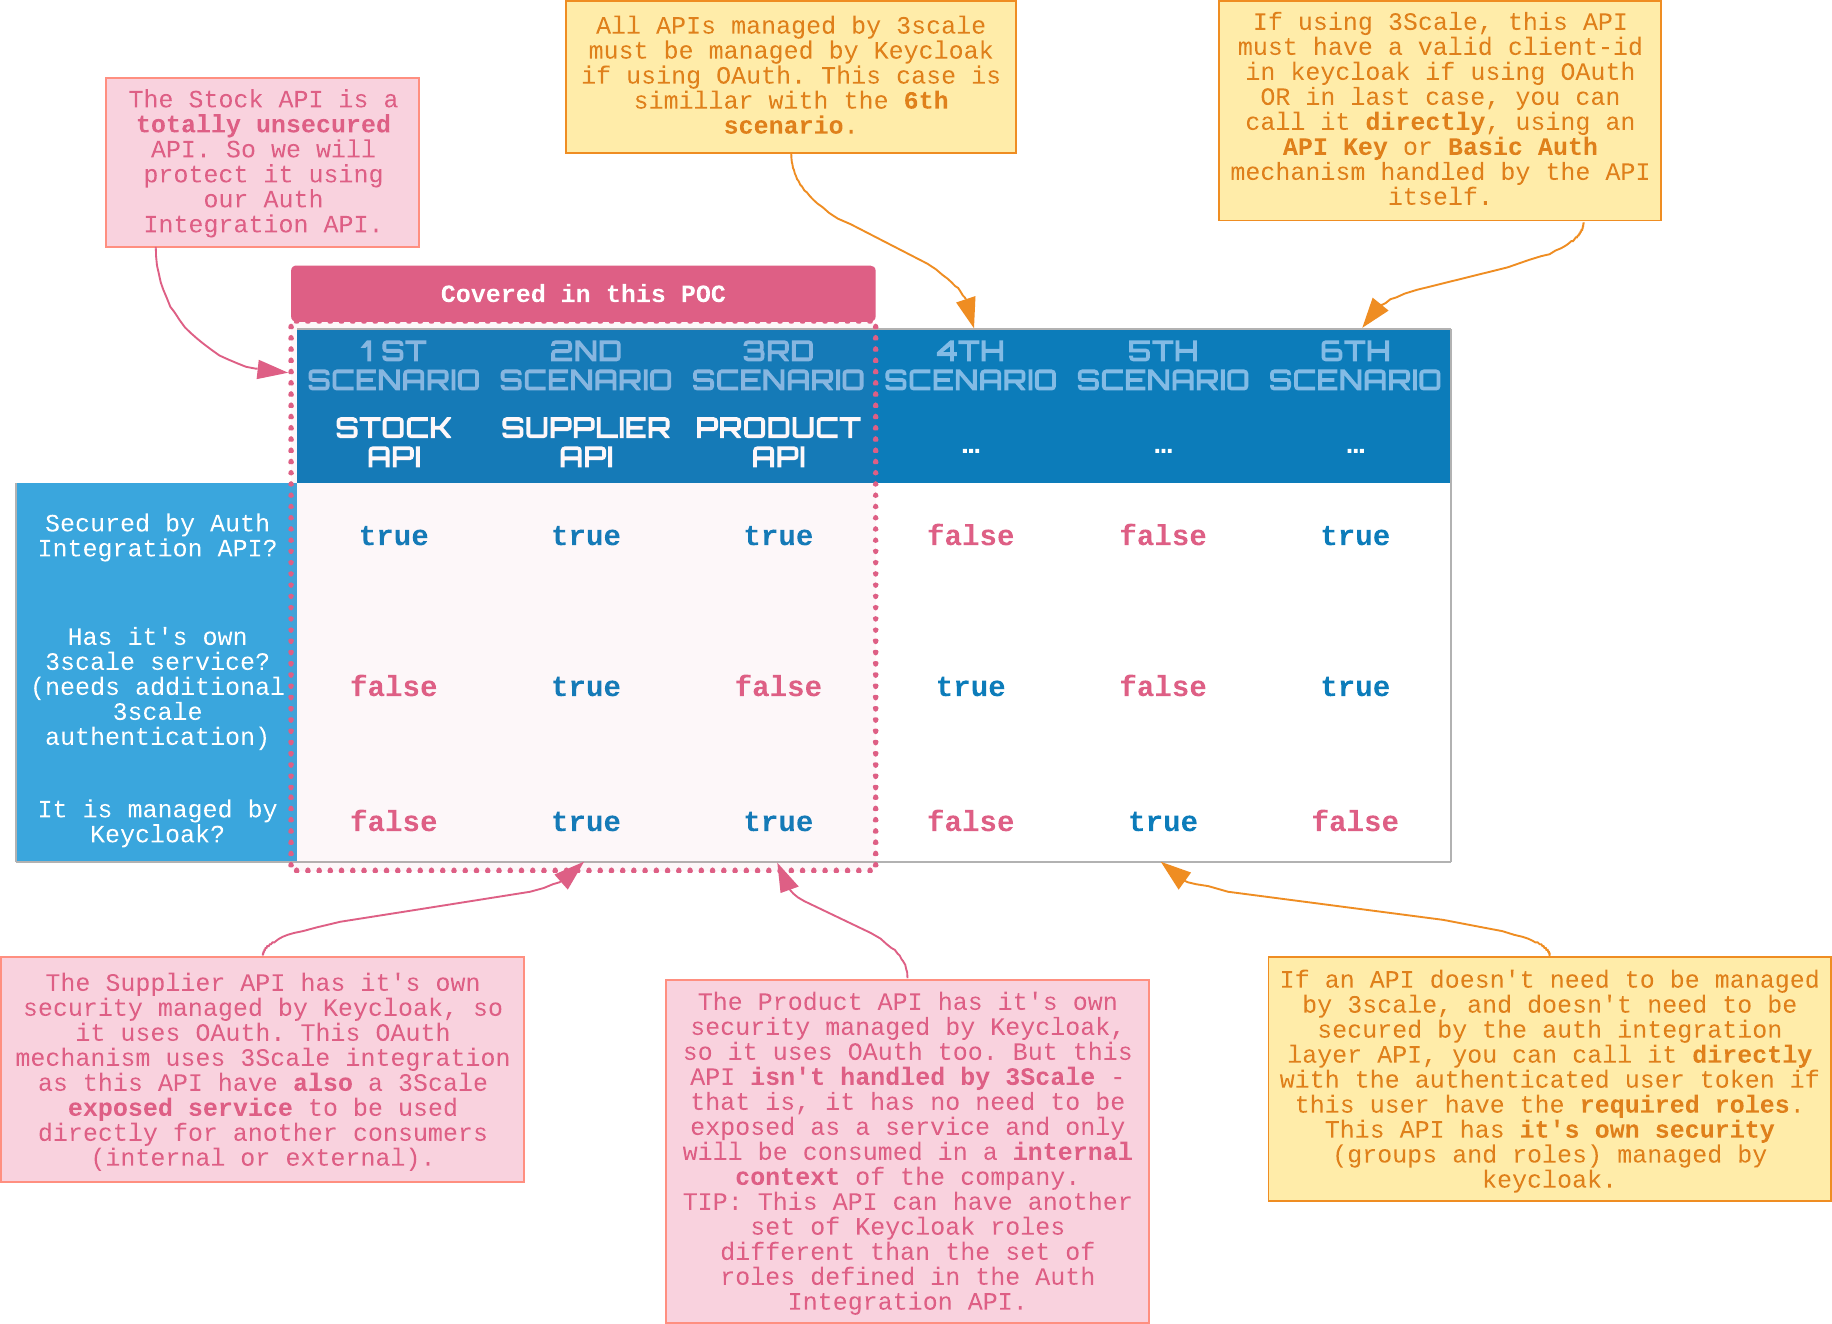
As we can see, each API has differences, and we will strive to demonstrate each one in this microservices security lab.
Step 1: Project creation
Create this project as follows:
|
export PROJECT_NAMESPACE=microservices |
Step 2: Nexus prototype deploy
Provide a Sonatype Nexus instance in the microservices namespace. Detailed instructions can be found in this readme.
Step 3: 3scale AMP deploy
You must also provision a 3scale AMP into your Red Hat Openshift Container Platform. Refer to the documentation on how to install the 3scale application.
Step 4: Red Hat Single Sign-On deploy
Additionally, install Red Hat Single Sign-On for this example. Refer to the documentation on how to install the RHSSO application.
Step 5: Nexus environment setup
Set up your Nexus environment as follows:
|
export PROJECT_NAMESPACE=microservices-security cd microservices-security/ |
Step 6: Create Red Hat Container Catalog secret
In order to import Red Hat container images, you must create a secret and set up your credentials on OpenShift:
|
NOTE. In order to import Red Hat container images, you must setup your credentials on openshift. See: https://access.redhat.com/articles/3399531 export $PROJECT_NAMESPACE=microservices-security oc delete secret redhat.io -n $PROJECT_NAMESPACE |
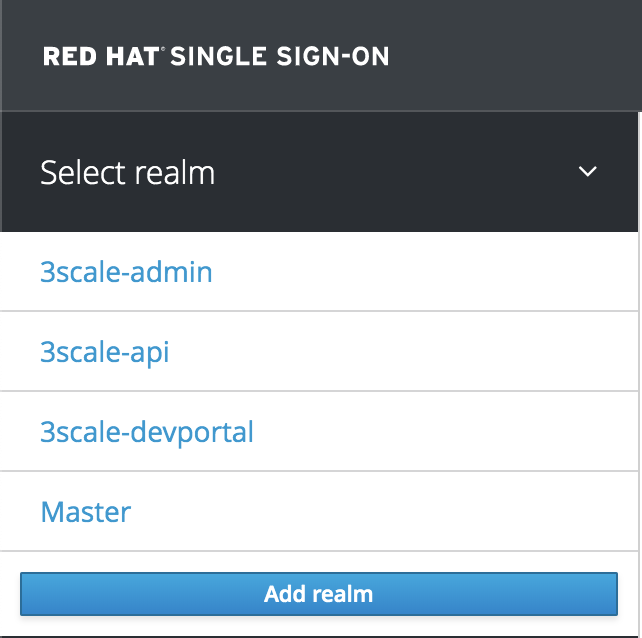
Step 7: RHSSO realms configuration
In this step, we will configure realms on RHSSO to register all five applications.
- Logging into RHSSO.
- Create three realms with default settings:
3scale-api3scale-admin3scale-devportal
After creating the realms, you'll have something like this:
- On the 3scale-api realm, create a client
3scalewith the following definition:
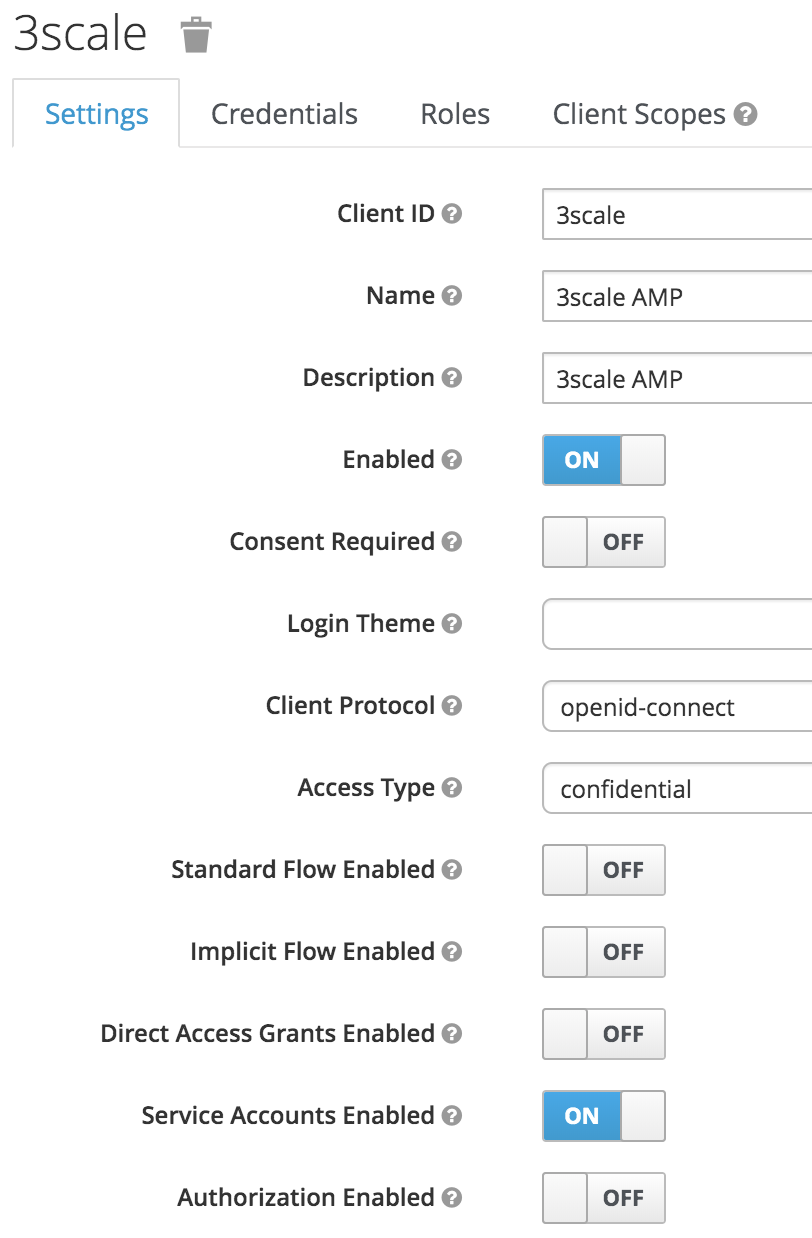
Leave these fields blank:
-
- root URL
- base URL
- admin URL
- On the Service Account Roles tab, assign the role
manage-clientsfromrealm-management. - Copy and save the
client-secretthat was generated for this client. This secret will be used later to configure OAuth service authentication on 3scale, and will look something like this:823b6ek5-1936-42e6-1135-d48rt3a1f632. - Under the realm
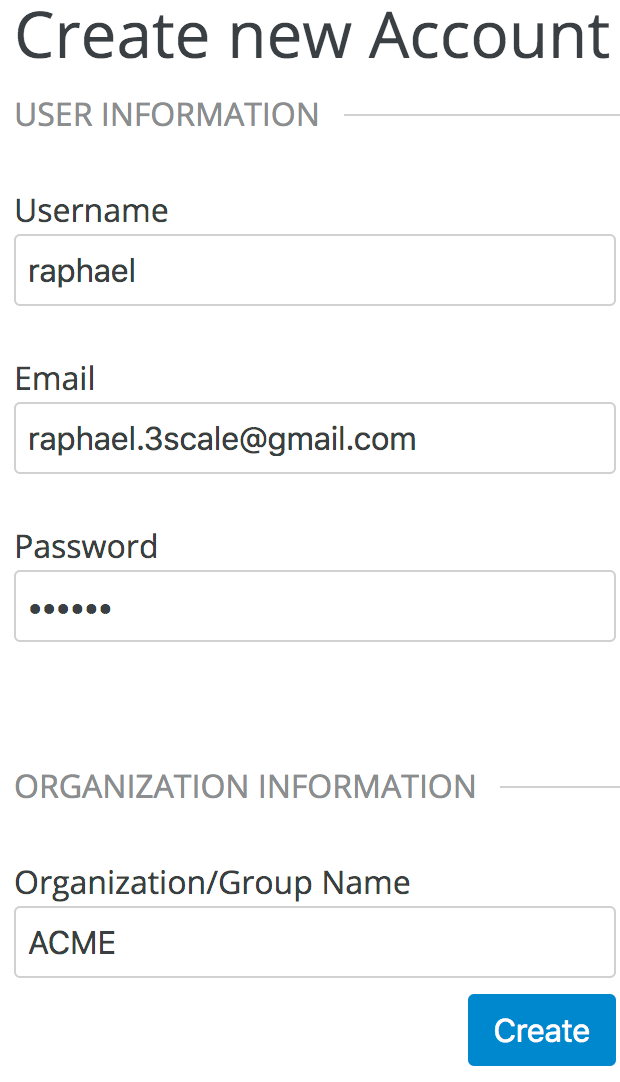
3scale-api, create a new user with the following definition:
- Set a new password for this user on the
Credentialstab withtemporary=false. - Set the
Email Verifiedattribute totrueon theDetailstab.
Step 8: 3scale microservices configuration
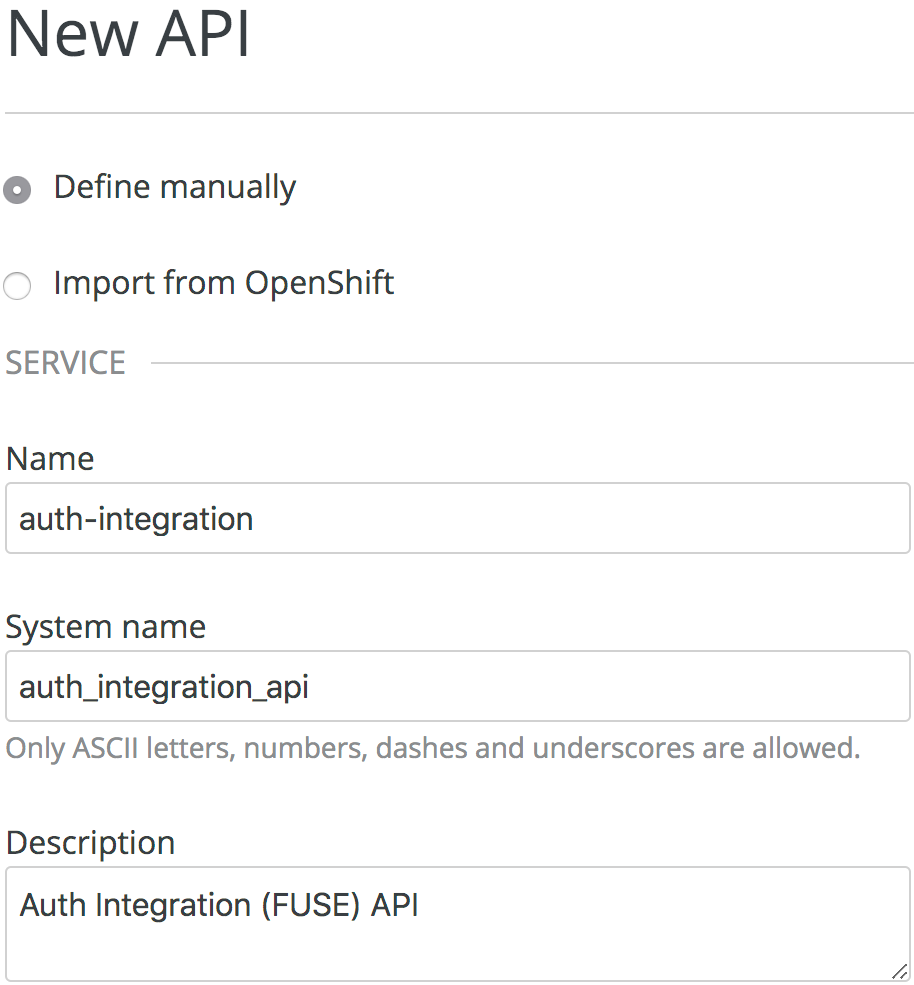
In this step, we register the APIs and configure them to enable 3scale automatic synchronization with RHSSO. Let's set up the auth-integration-api and the supplier-api:
- Create a new API on the 3scale admin portal. You can hit the NEW API button on the main dashboard:
![]()
This new API will represent the auth-integration-api, which we previously deployed:
- Navigate through the Configuration menu under Integration to set up the API mappings and security:
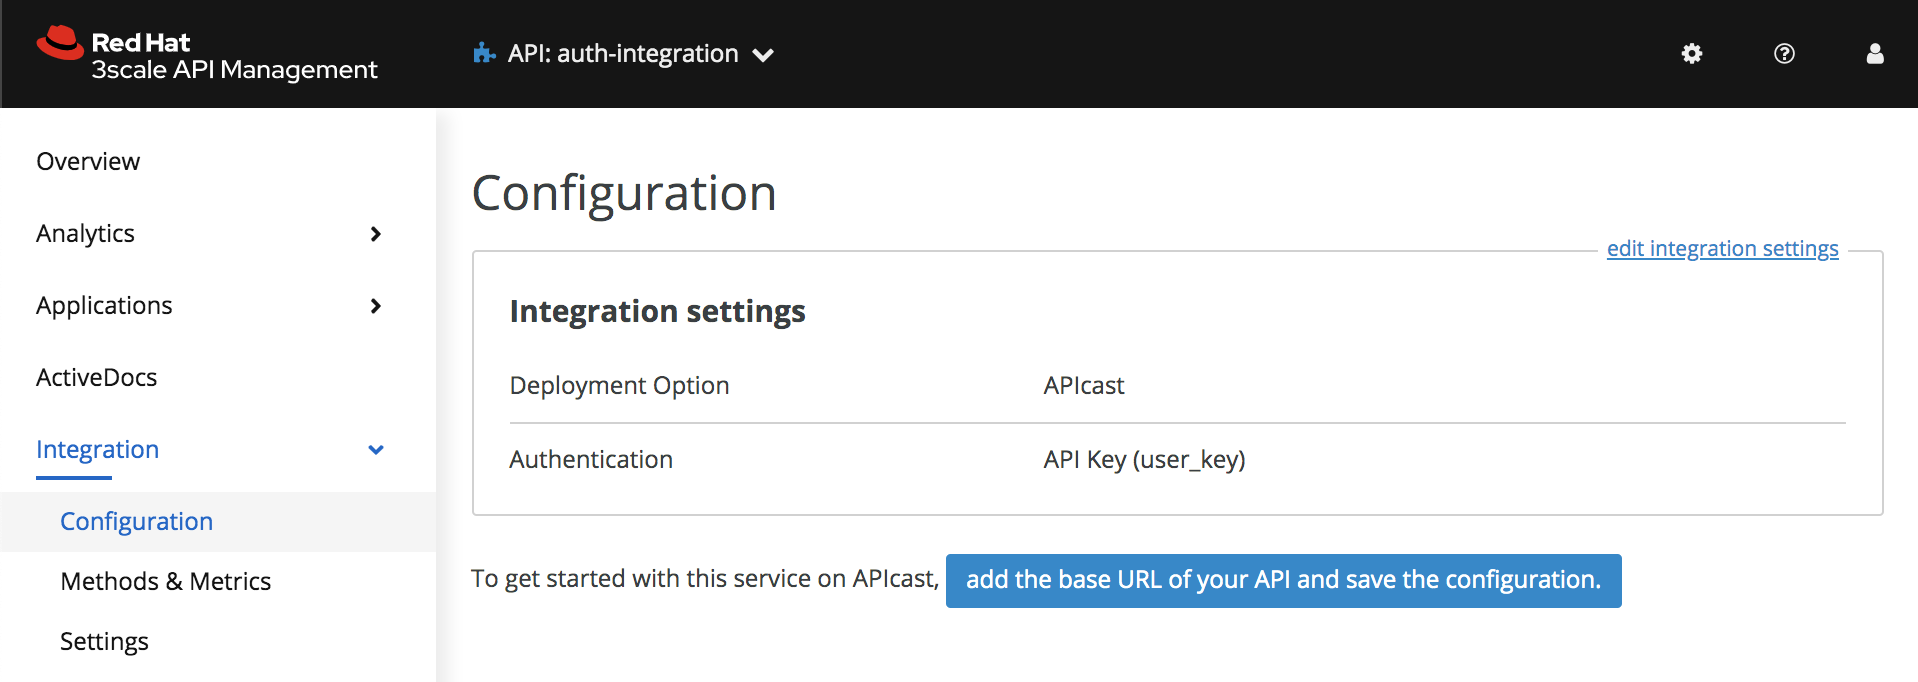
- Choose APIcast for the gateway:
- Choose OpenID Connect in Integration settings:
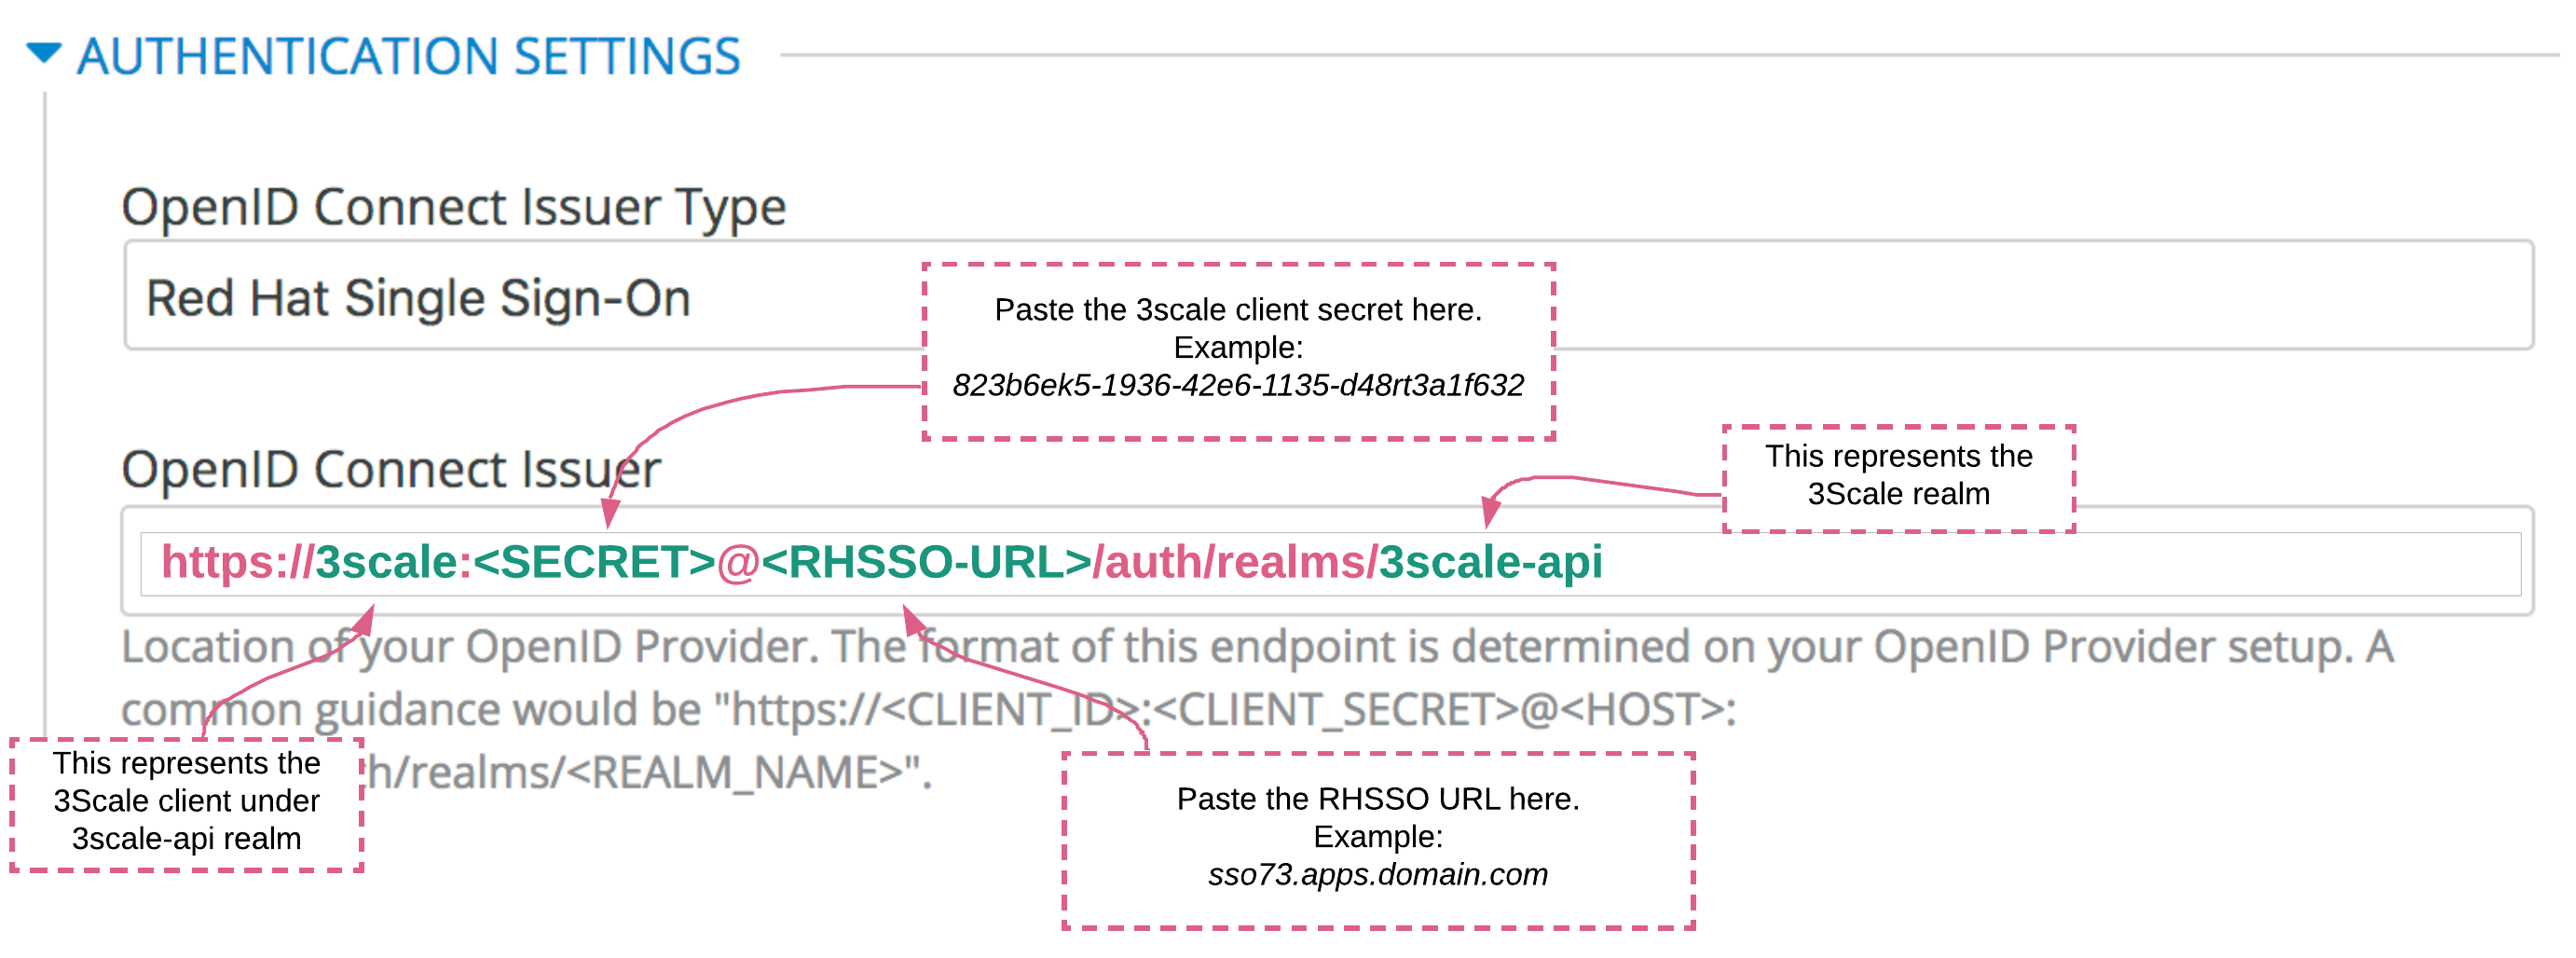
Note: OpenID Connect is chosen because we will to protect our APIs with the OAuth2 capabilities provided by RHSSO.
- Click:
![]()
- Define the Private Base URL (your
auth-integration-apiURL), the Staging Public Base URL, and the Production Public Base URL:
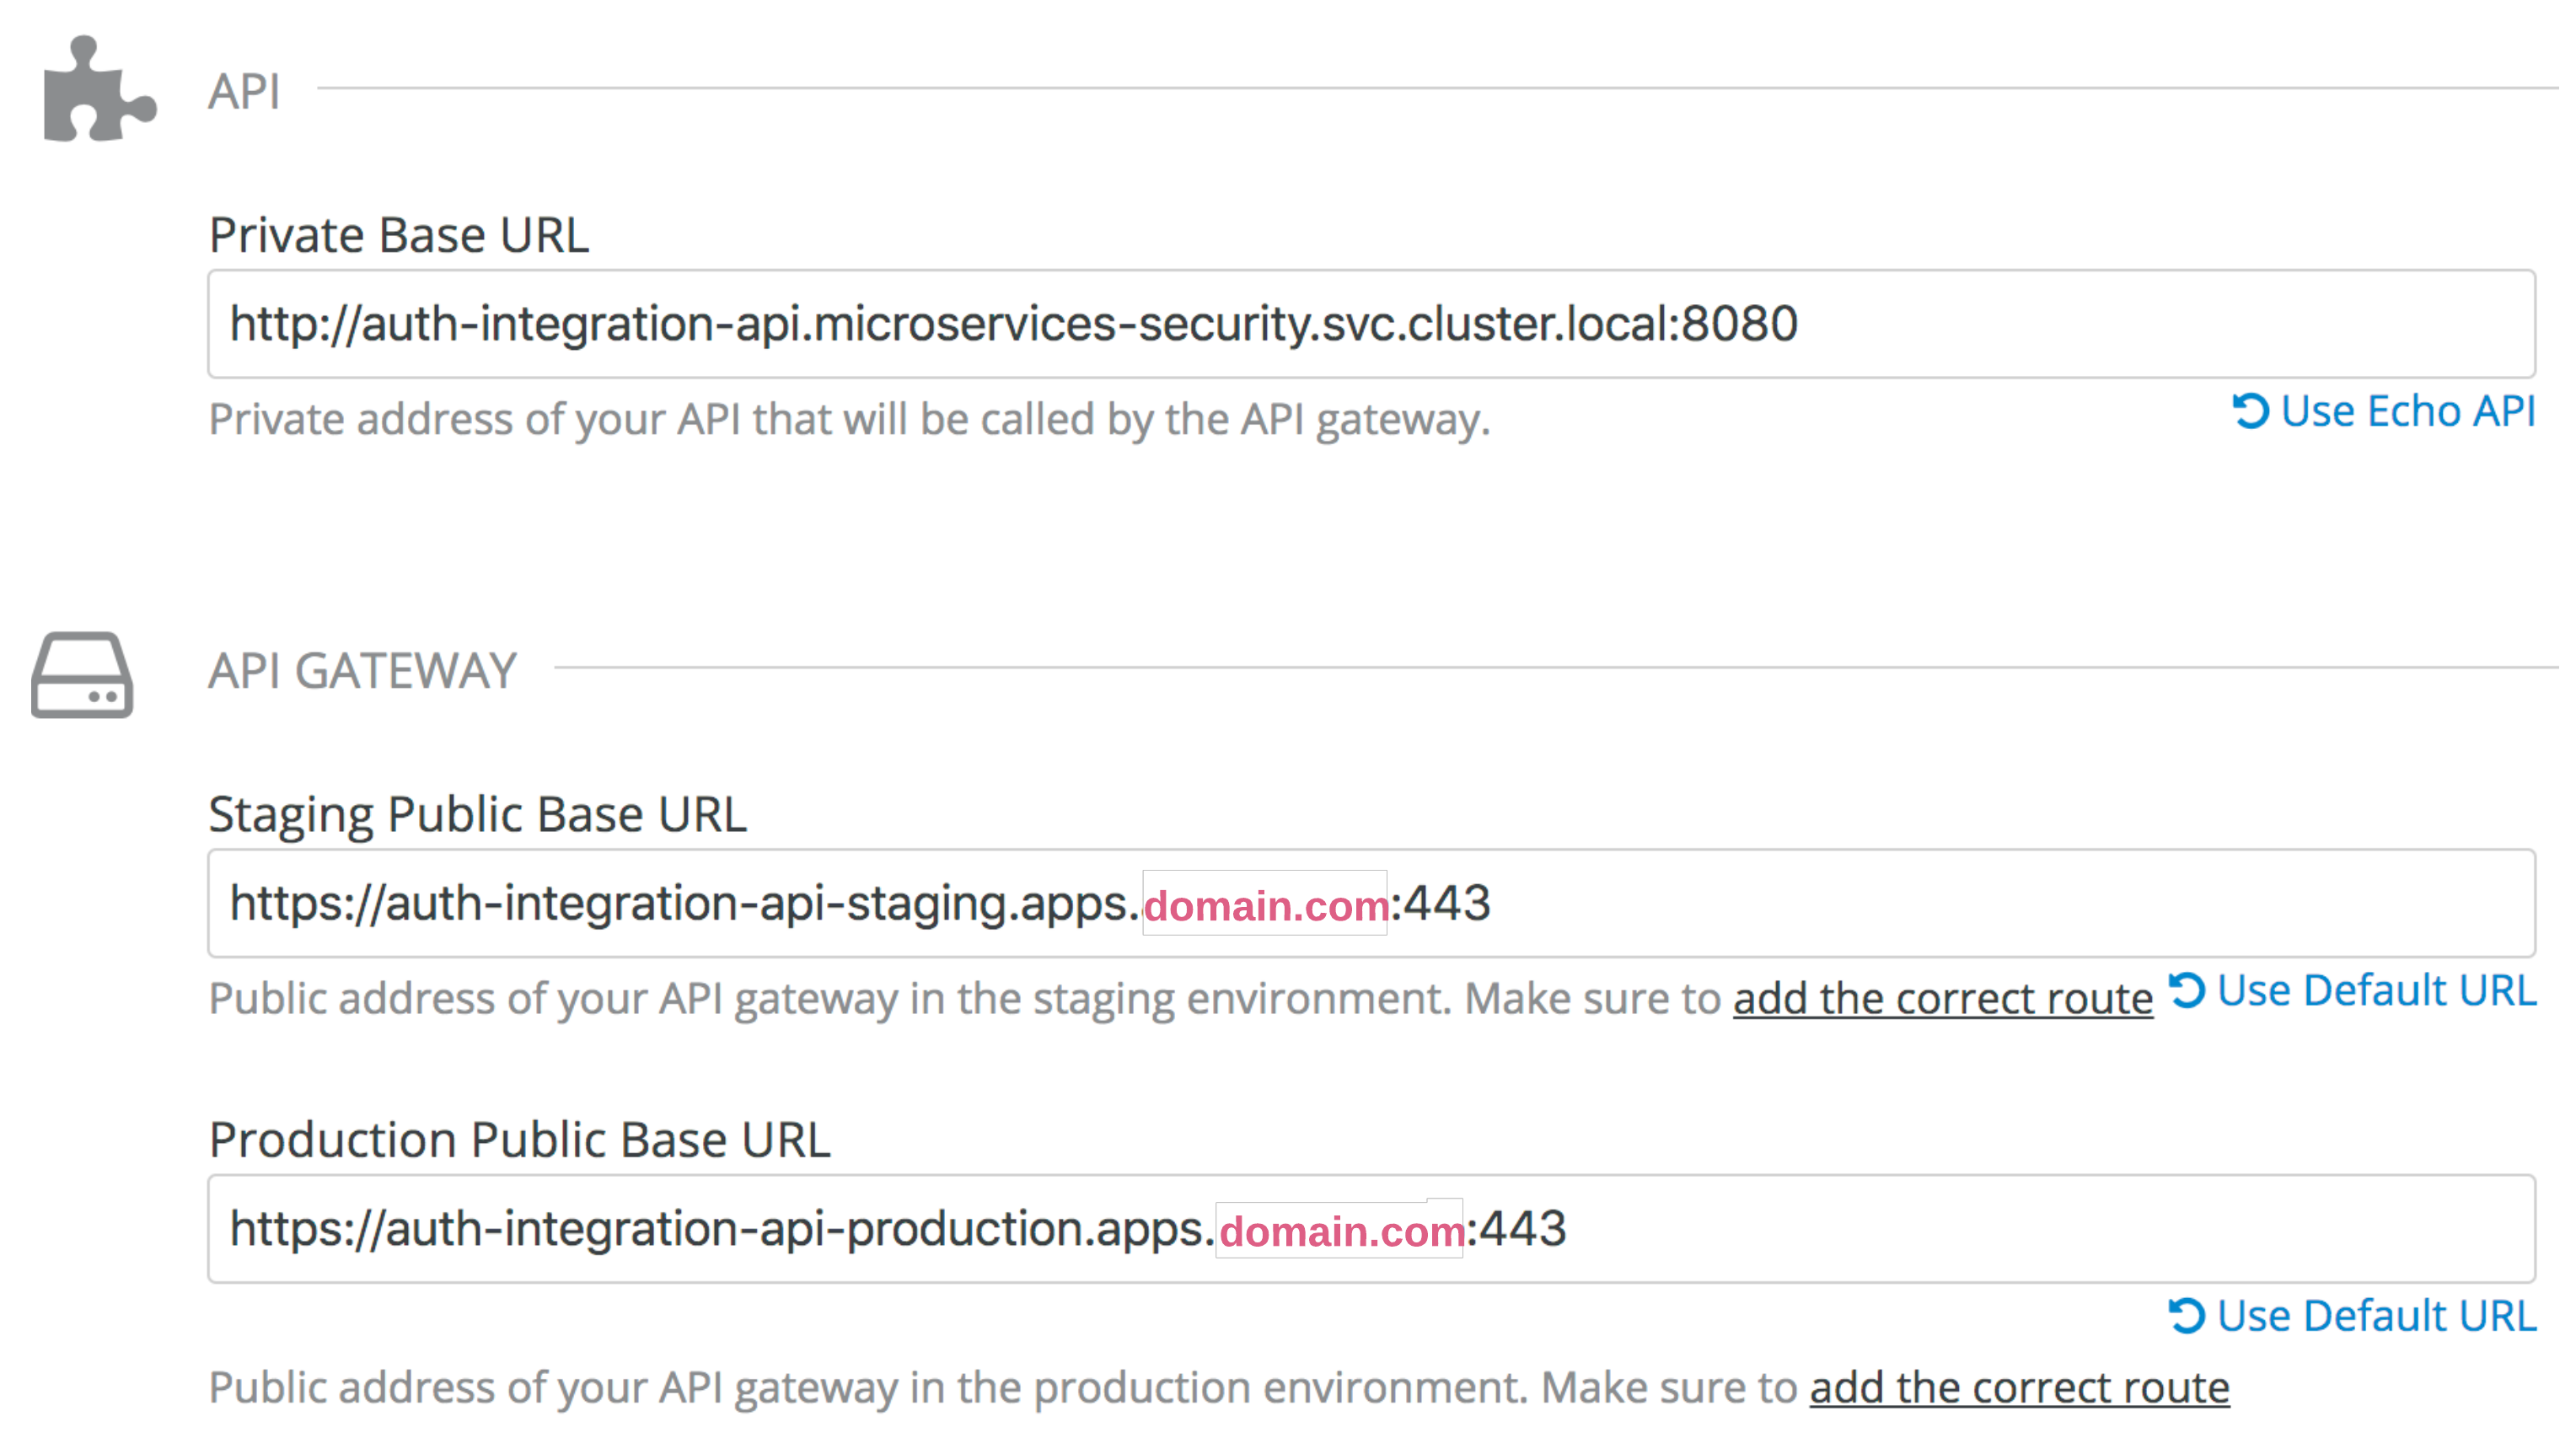
Note: Set the correct domain under each URL, which will become your API route on OpenShift.
- Define all of the mapping rules for this API, according to the following table:
| Verb | Pattern | + | Metric or Method |
|---|---|---|---|
| POST | /api/v1/product | 1 | hits |
| DELETE | /api/v1/product/* | 1 | hits |
| PUT | /api/v1/product/* | 1 | hits |
| GET | /api/v1/product$ | 1 | hits |
| GET | /api/v1/product/* | 1 | hits |
| GET | /api/v1/status | 1 | hits |
| GET | /api/v1/product/status | 1 | hits |
| GET | /api/v1/supplier/status | 1 | hits |
| GET | /api/v1/stock/status | 1 | hits |
| GET | /api/v1/stock/maintenance | 1 | hits |
| GET | /api/v1/supplier/maintenance | 1 | hits |
- Define the authentication mechanism for this API:
- Configure the API policies required to enable proper communication between resources inside the OpenShift Container Platform:
Please follow the next steps carefully:
- Select Authorization Code Flow, Service Accounts Flow, and Direct Access Grant Flow under the OIDC AUTHORIZATION FLOW section.
- In Credentials location set As HTTP Headers.
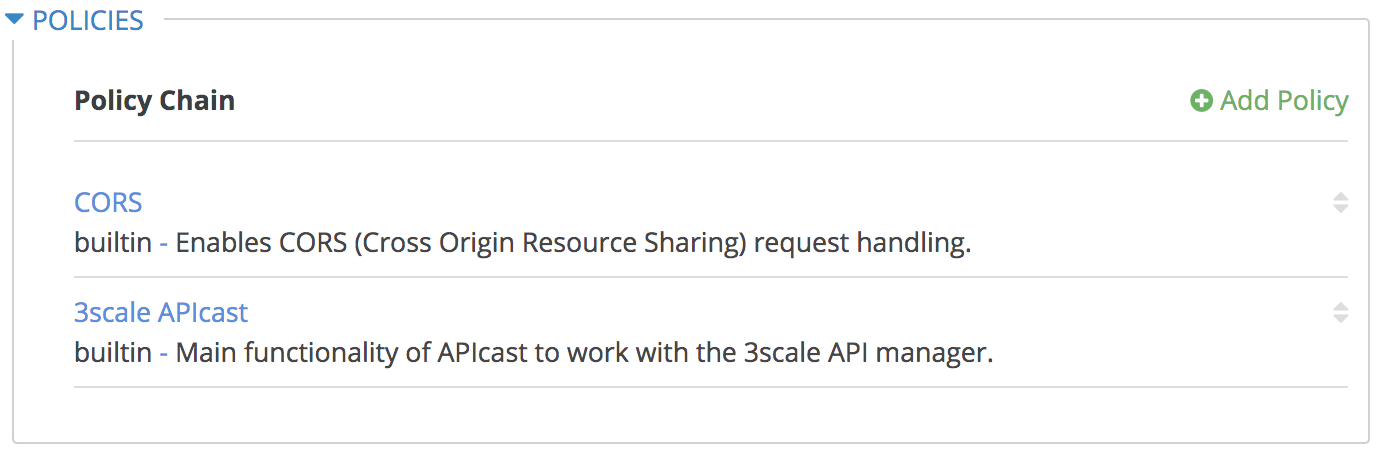
- In the Policies section, add (in this order)
CORSand3scale APIcast. - Expand CORS configuration, and set the following:
ALLOW_HEADERSadds a 1x1 per input array:
Enabled=checked
ALLOW_HEADERS
| 3scale CORS Policy: HEADERS |
|---|
| Content-Type |
| Authorization |
| Content-Length |
| X-Requested-With |
| Origin |
| Accept |
| X-Requested-With |
| Content-Type |
| Access-Control-Request-Method |
| Access-Control-Request-Headers |
| Accept-Encoding |
| Accept-Language |
| Connection |
| Host |
| Referer |
| User-Agent |
| Access-Control-Allow-Origin |
| X-Business-FooBar |
Note: The last header is used only for testing purposes.
-
ALLOW_METHODSadds a 1x1 per input array:
allow_credentials=checked
ALLOW_METHODS
| 3scale CORS Policy: HTTP Methods |
|---|
| GET |
| HEAD |
| POST |
| PUT |
| DELETE |
| OPTIONS |
- Leave
allow_originempty, and the rest as default. - Save the CORS configuration.
Note: After every change, remember to promote the staging configuration to production, by clicking:
![]()
Your auth-integration-api is ready to be used.
Repeat the same sequence of steps in this section for the Supplier API. This API has only two mapping rules:
| Verb | Pattern | + | Metric or Method |
|---|---|---|---|
| POST | /api/v1/sync | 1 | hits |
| GET | /actuator/health | 1 | hits |
Step 9: 3scale microservices application plans
Let's define the API's application plans. These plans will be used upon client registration for creating a new application:
Click  under the Applications/Application Plans menu, then set the following configuration:
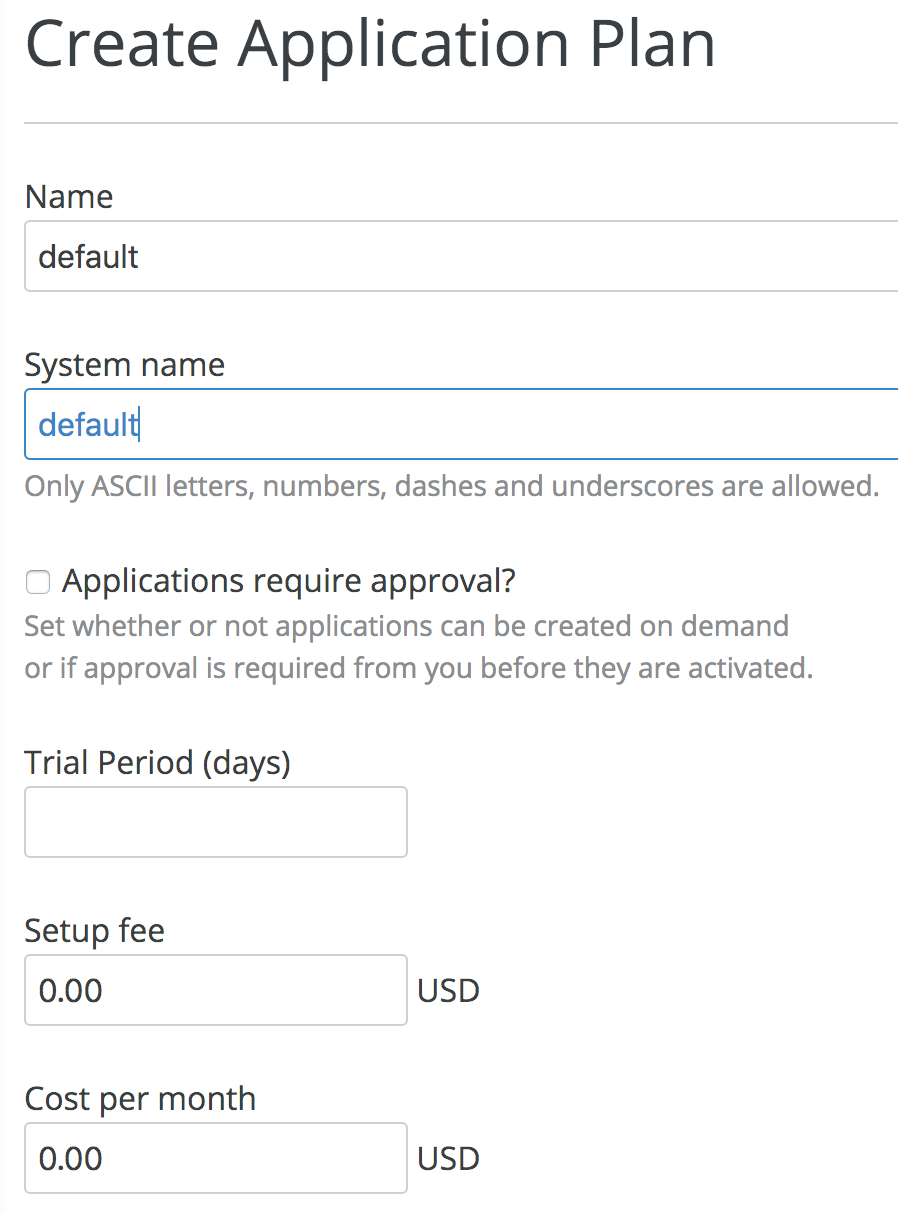
After doing this, click the Publish link to publish the application plan.
Follow the same steps for the Supplier API. Remember to publish this application plan as well.
After you have done all of the previous steps, you'll get something like this:
Step 10: 3scale microservices application
Navigate through the Audience menu and under Accounts/Listing, click ![]() to create a new account. Then, create a new account with your credentials for this demo:
to create a new account. Then, create a new account with your credentials for this demo:
This action creates a new 3scale application. If the application couldn't be created, just hit the ![]() link.
link.
This new application is created for use with the auth-integration-api. A client-id and a Client-Secret will be generated automatically and pushed into RHSSO in the 3Scale-api realm by the zynnc-que 3scale application:
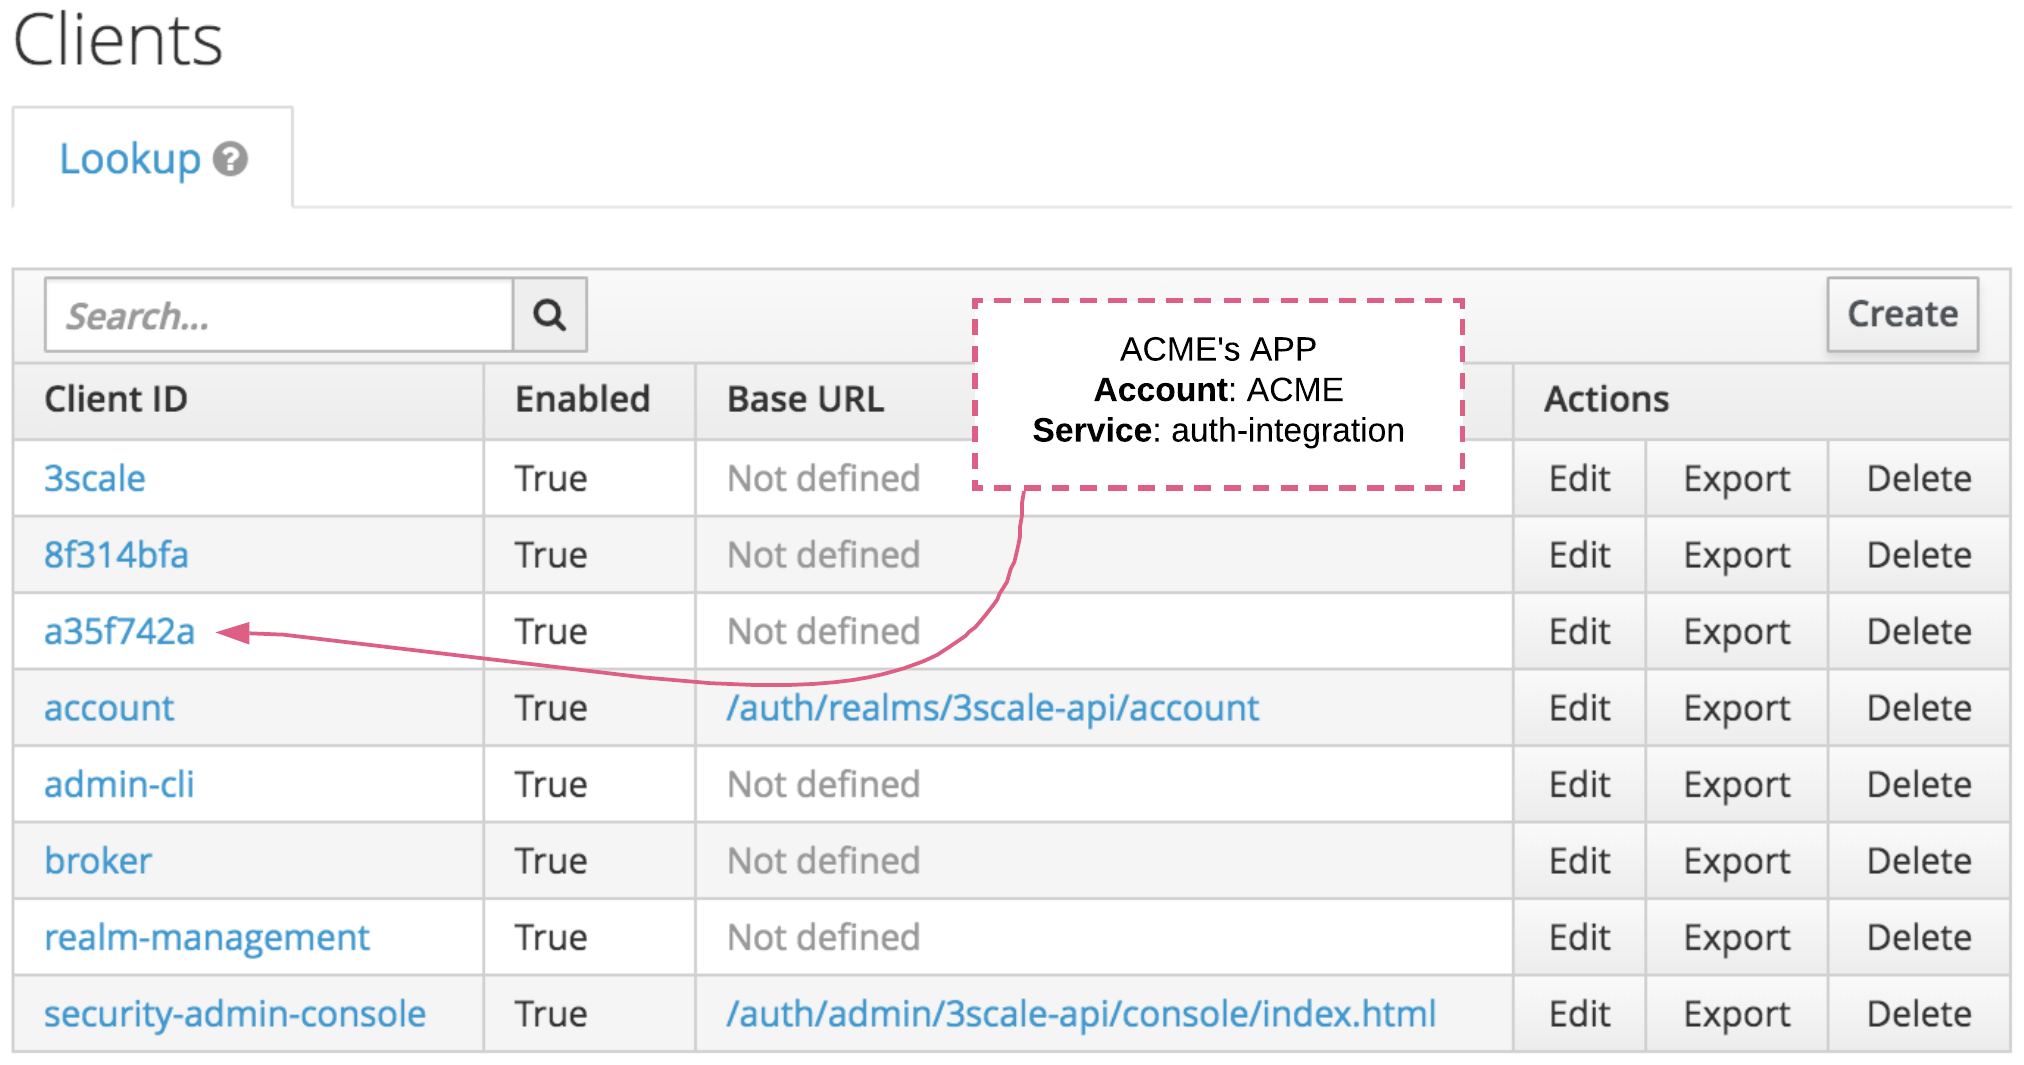
After creating the API definition on 3scale, check if the generated client was pushed into the 3scale-api realm on RHSSO. If you're using a self-signed certificate, you'll need to make additional configurations in order to enable zynnc-que 3scale application synchronization. Please refer to the Documentation: Troubleshooting SSL issues and Configure Zync to use custom CA certificates.
To fix this problem, proceed with the self-signed certificate installation:
|
export THREESCALE_NAMESPACE=3scale26 # oc delete configmap zync-que-ca-bundle oc patch dc/zync-que --type=json -p '[{"op": "add", "path": "/spec/template/spec/containers/0/volumeMounts/0/subPath", "value":"zync-que.pem"}]' -n ${THREESCALE_NAMESPACE} # wait for the container restart and check the logs for any issue. # Voila! You have the 3Scale in sync with RHSSO using a self-signed certificate. |
Step 11: Node.js web application deployment
In this step, we will test all scenarios with a suited NodeJS webapp based on Angular and Bootstrap. This application was designed to ease the understanding process and can be used to give clarification regarding the authorization behavior using our Jon Doe user account:
|
# Deploy nodejs-web application oc import-image rhscl/nodejs-10-rhel7 --from=registry.redhat.io/rhscl/nodejs-10-rhel7 -n openshift --confirm export APIS_NAMESPACE=microservices-security echo -e \ sed "s/^.//g" temp >> nodejs-config.properties rm -fr temp # oc delete configmap nodejs-web-config # oc delete all -lapp=nodejs-web # with the properties defined, set the environment variable on nodejs-web container. |
Note: Set all environment variables on the nodejs-web container in order to enable API calls properly.
Expose the web app route:
|
oc create route edge --service=nodejs-web --cert=webapp/server.cert --key=webapp/server.key -n ${APIS_NAMESPACE} |
Step 12: Application settings and roles
Now we create our application roles. These roles are assigned to the application users that will be used to log into our web app.
Access the client-id that represents the auth-integration client registered previously by the 3scale application process, then go to the client's Settings tab and apply additional configurations. Valid redirect URIs include:
http://*
https://*
and valid web origins are simply:
*
Go to the Roles tab on the Clients menu on RHSSO (Keycloak) and create the following roles:
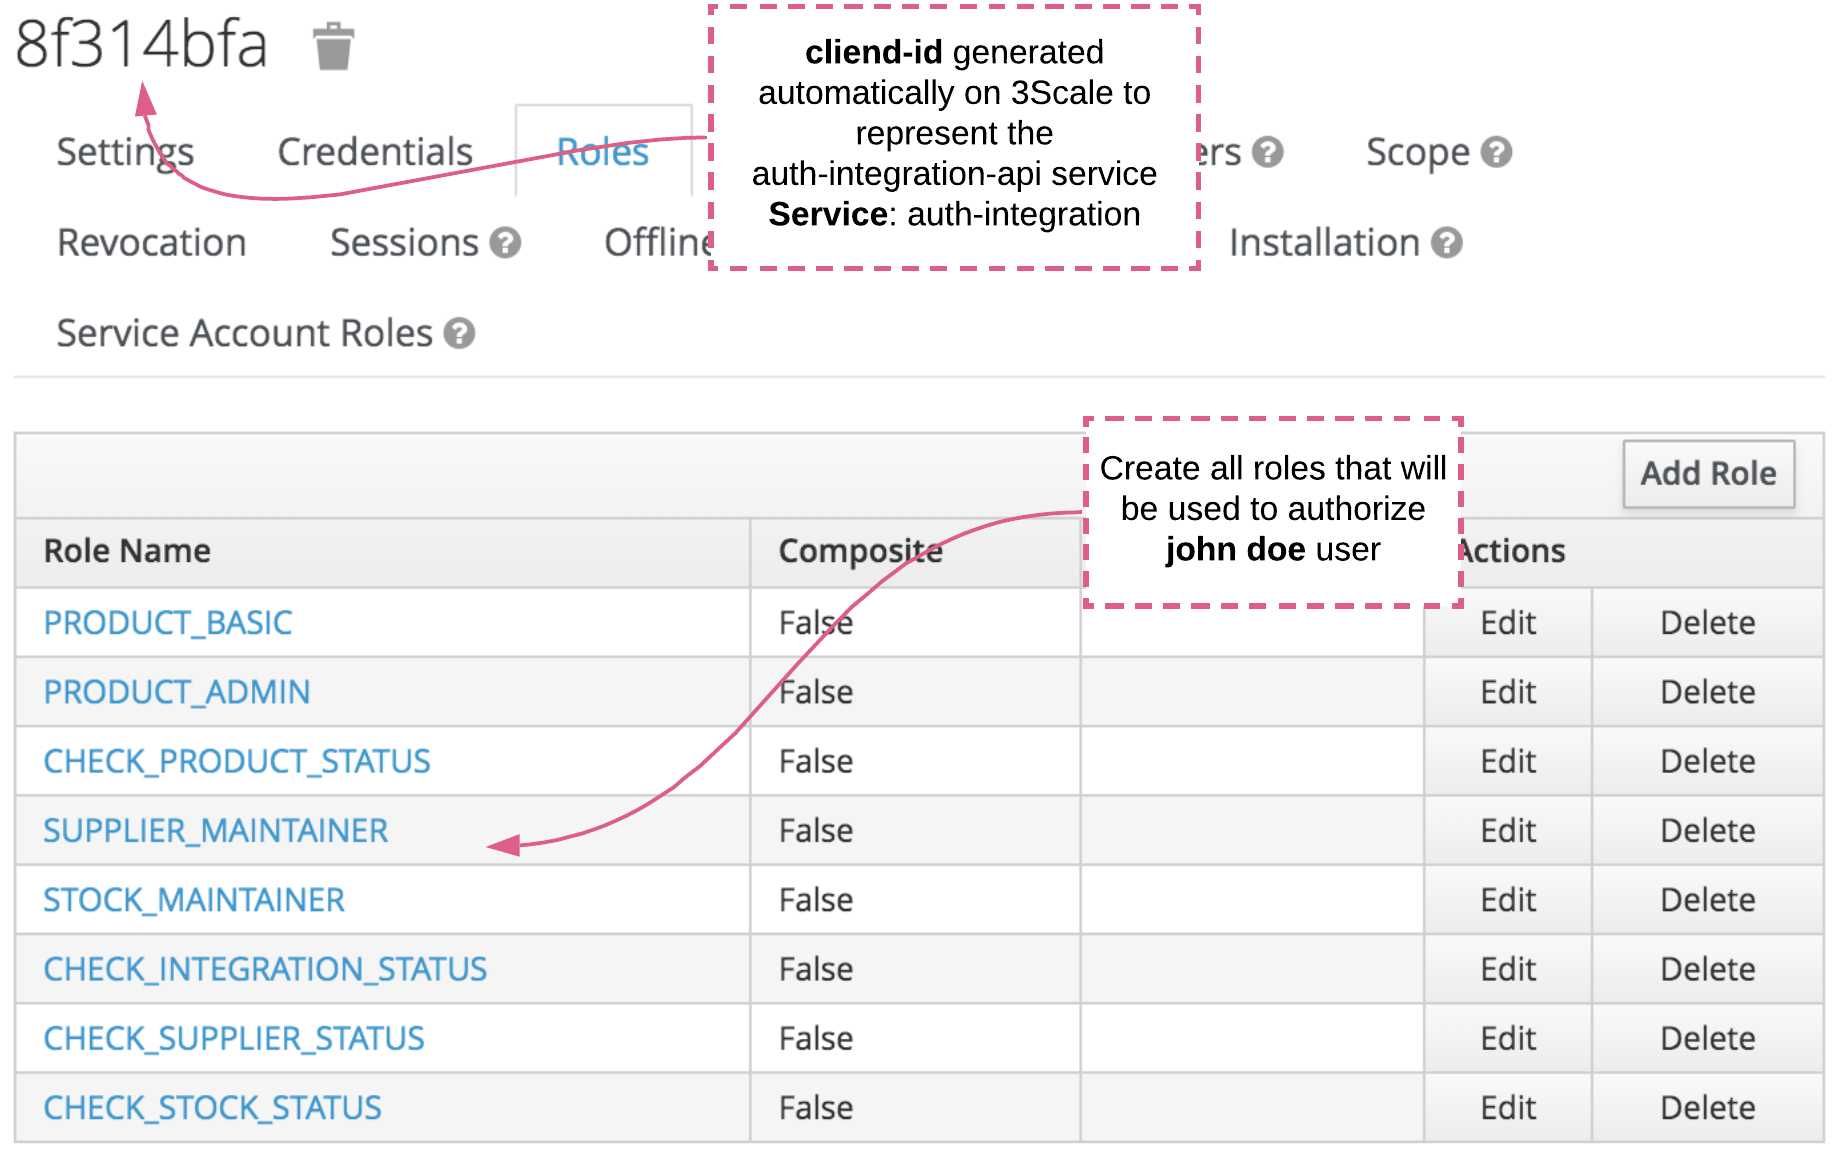
Repeat the same steps for the Supplier API client. This client will have only one role defined:
Note: This client was also generated through 3scale. (You must create two applications: one for auth-integration-api and another for supplier-api.
Step 13: User roles
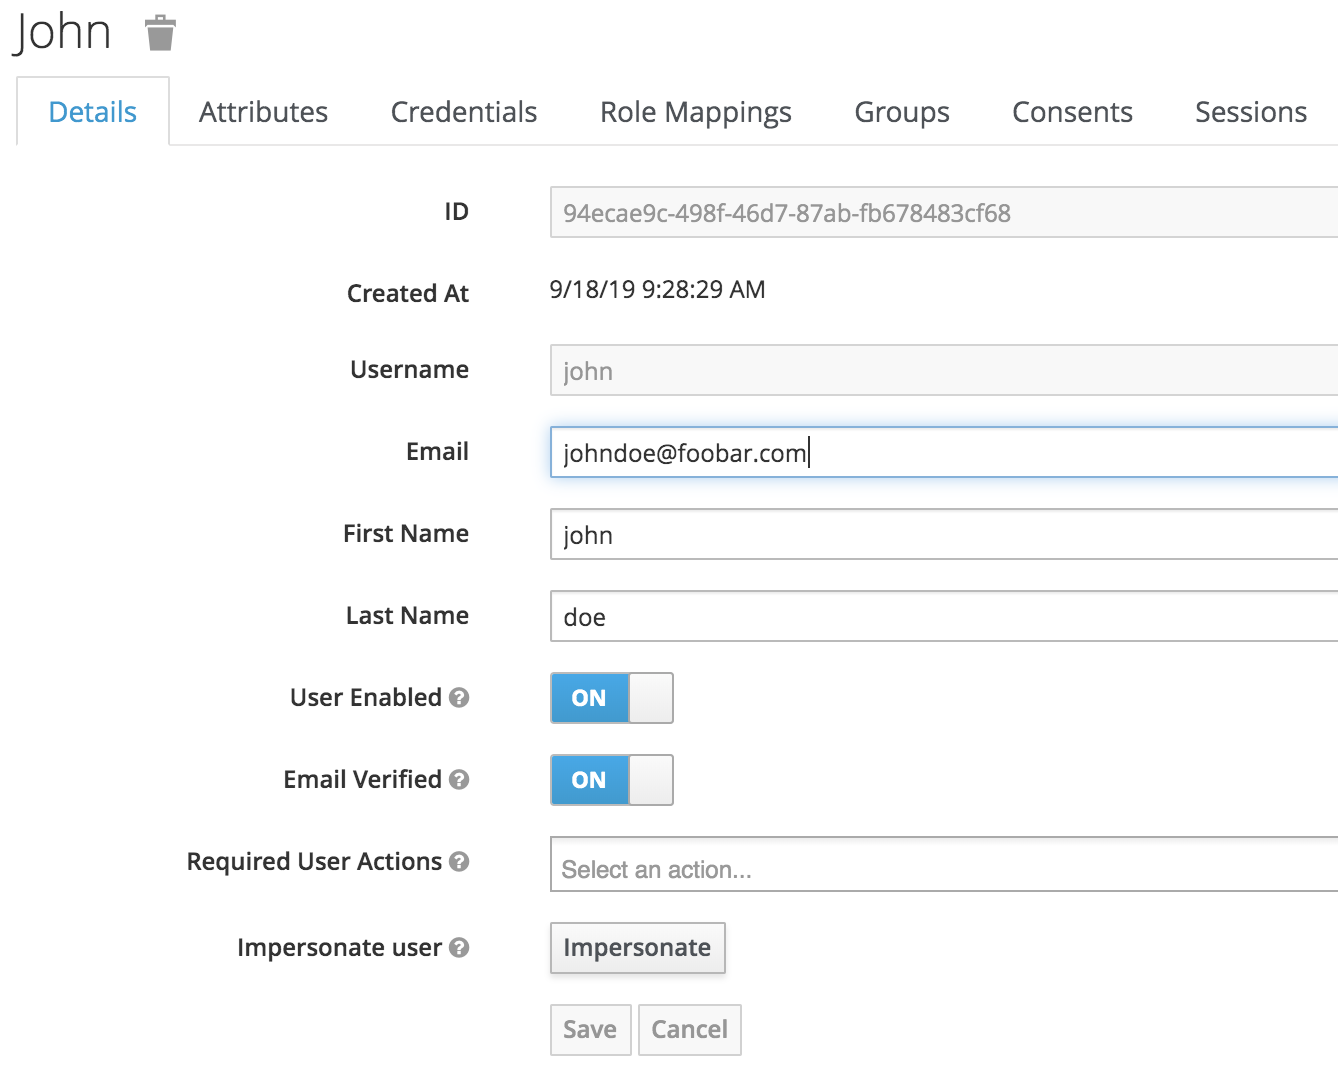
In this step, we assign all client roles to the john doe user and the service-account user will handle the supplier-service calls inside the auth-integration-api.
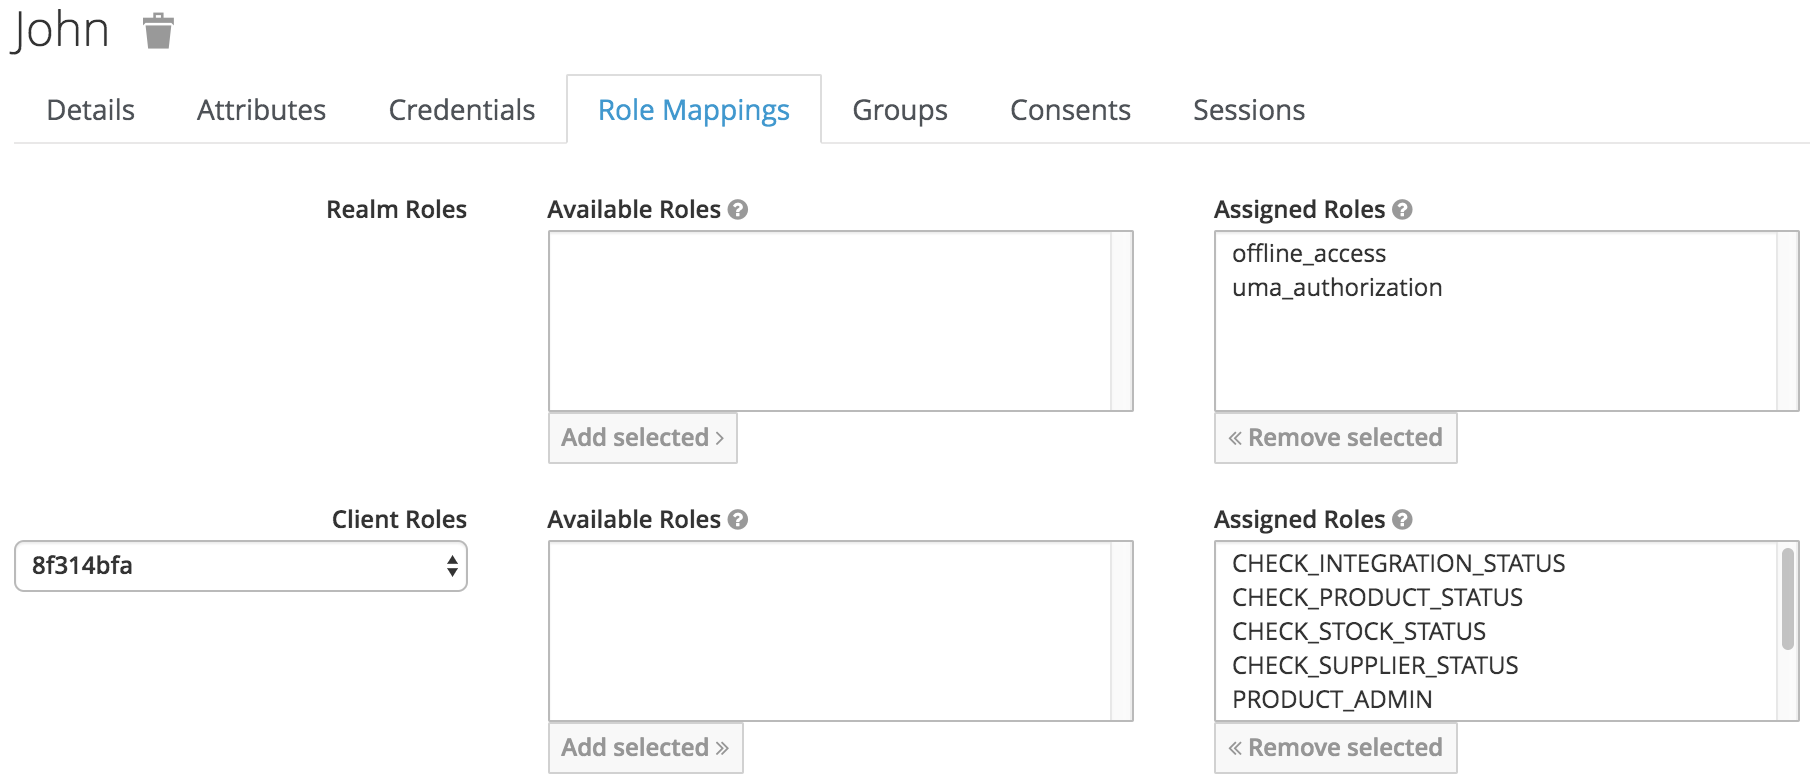
Go to the Role Mappings tab on the John Doe user details page in the Users menu. Assign all roles to the user, following the image below:
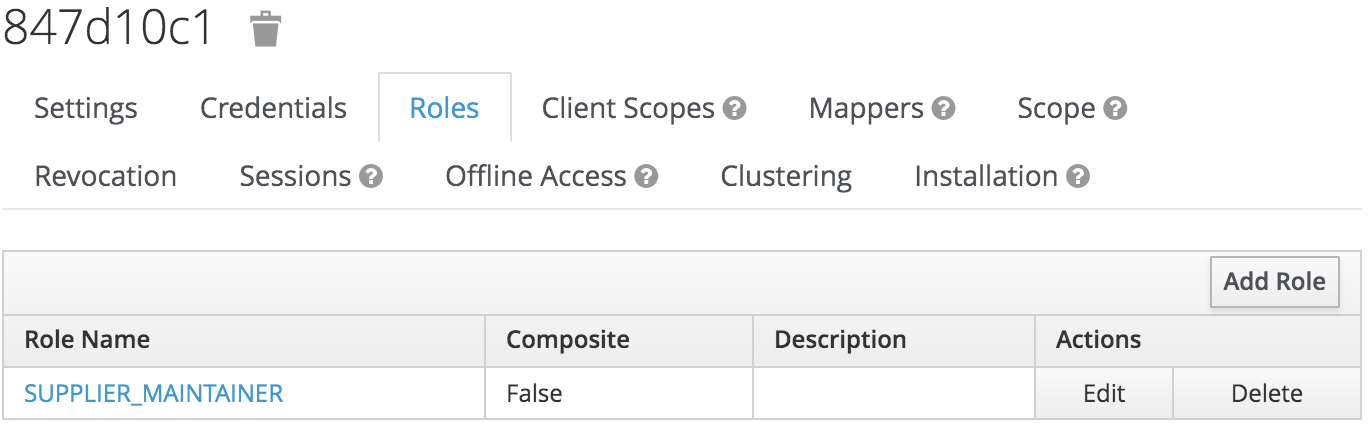
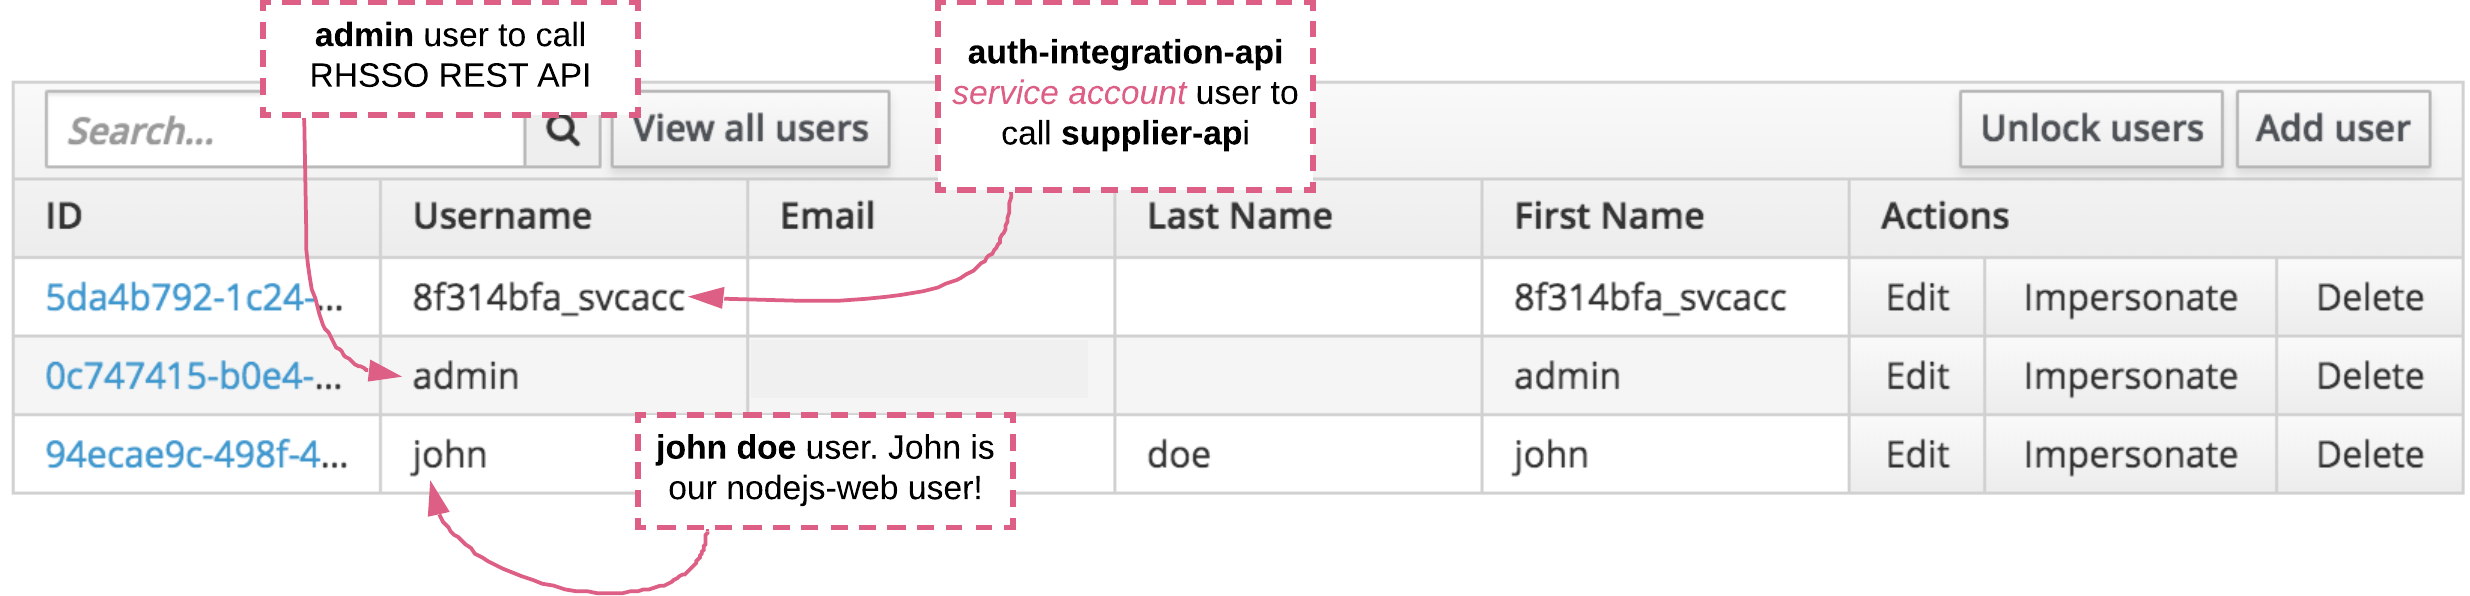
In Step 7 we created the John Doe user. We need to create another user that will be used as a service-account to call the Supplier API inside the auth-integration-api (see line 123 of application.yaml). This user will also have a password, so reset its credentials with 12345. The name of this user can be the id of the Supplier API client-id generated by 3scale appended with the _svcacc suffix (see line 131 of application.yaml).
We also need to assign the SUPPLIER_MAINTAINER role to this user.
NOTE: This procedure is used as an alternative to the token-exchange mechanism, but we could do a more detailed study of other possibilities of consuming third-party APIs by using the token-exchange feature.
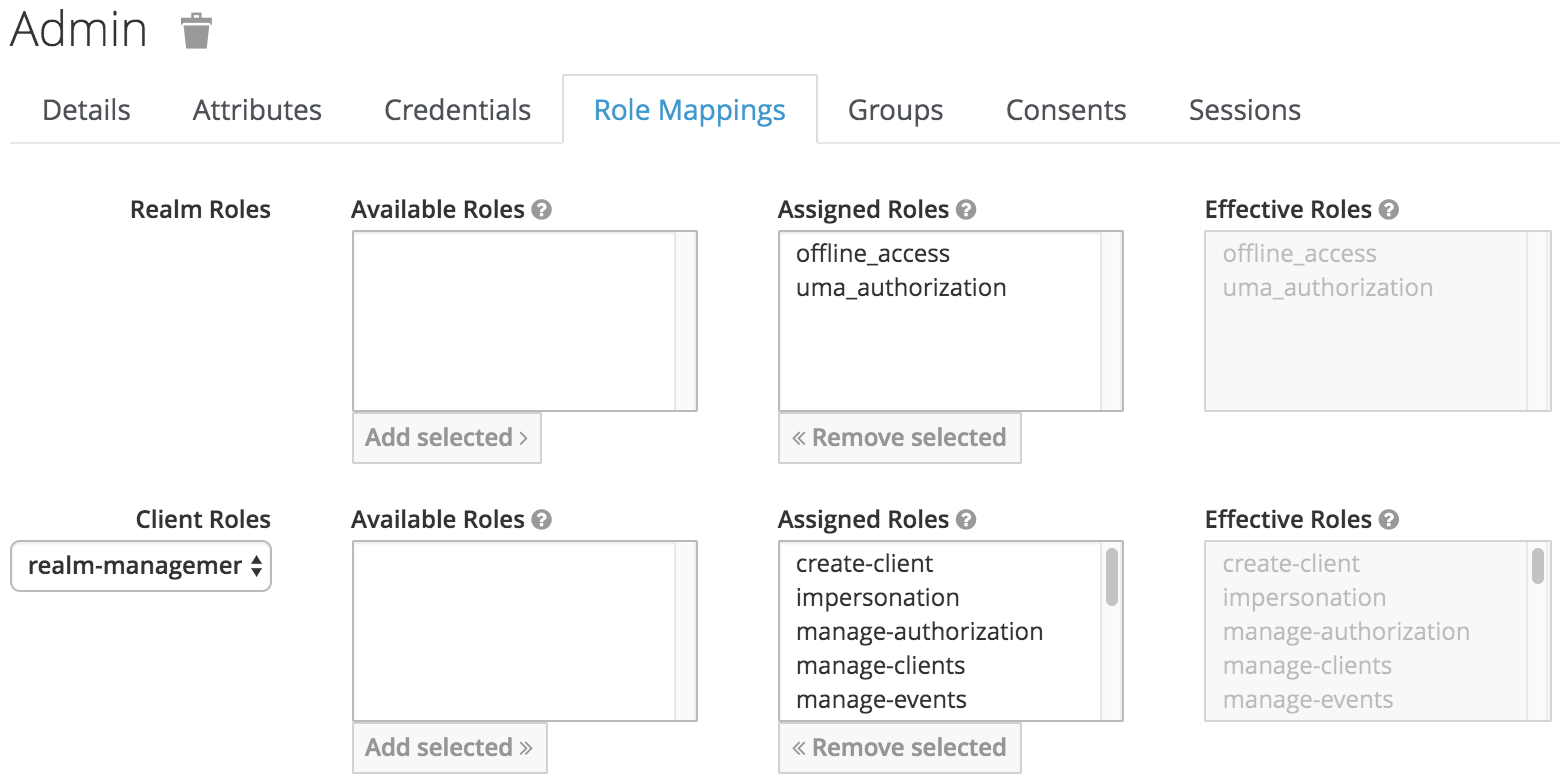
At last, create a realm-admin user. This user will serve to consume the RHSSO REST API. Assign the credentials 12345 and all realm-management roles:
In the end, we will have three users in the 3scale-api realm:
Step 14: Archive the SSO-common library jar on Nexus
To make sure the auth-integration-api (Fuse) works correctly, we need to archive a library, and then use that library to enable authentication and authorizations on top of Red Hat Single Sign-On:
|
# NOTE: To make sure the auth-integration-api (Fuse) works correctly, we need to archive a library that will be used to provide authentication and authorizations capabilities on top of Red Hat Single Sign-On (Keycloak).Then, this library will be used on auth-integration-api to enable such capabilities. # Deploy auth-sso-common library on nexus mvn clean package deploy -DnexusReleaseRepoUrl=$MAVEN_URL_RELEASES -DnexusSnapshotRepoUrl=$MAVEN_URL_SNAPSHOTS -s ./maven-settings.xml -e -X -pl auth-sso-common |
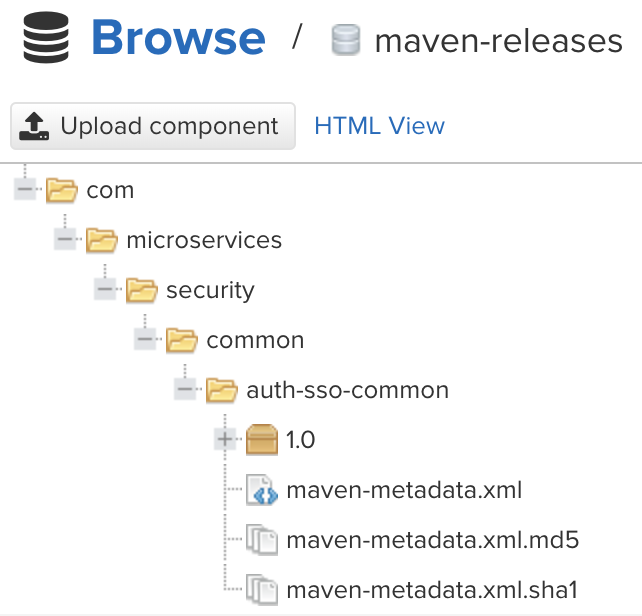
This action creates the following artifact on Nexus:
Step 15: Microservices deployment
Retrieve RHSSO realm public key:
|
export RHSSO_REALM=3scale-api TKN=$(curl -k -X POST "$TOKEN_URL" \ export REALM_KEYS_URL=https://${RHSSO_URI}/auth/admin/realms/${RHSSO_REALM}/keys RSA_PUB_KEY=$(curl -k -X GET "$REALM_KEYS_URL" \ # Create a valid .pem certificate # Check the generated .pem certificate |
Then, deploy the parent project:
|
# Deploy parent project on nexus |
Now, deploy the stock-api:
|
# oc delete all -lapp=stock-api oc patch svc stock-api -p '{"spec":{"ports":[{"name":"http","port":8080,"protocol":"TCP","targetPort":8080}]}}' oc label svc stock-api monitor=springboot2-api |
Use the provided configmap and secret to set the required variables:
|
oc create -f configuration/configmap/stock-api-env.yml -n ${PROJECT_NAMESPACE} export APP=stock-api |
Deploy the supplier-api, but first check all settings in the application.yaml file before continuing. The attributes here must be updated to reflect your actual environment:
rest.security.issuer-urion Line 61.security.oauth2.resource.idon Line 71.security.oauth2.resource.jwt.key-valueon Line 75.
|
# oc delete all -lapp=supplier-api oc patch svc supplier-api -p '{"spec":{"ports":[{"name":"http","port":8080,"protocol":"TCP","targetPort":8080}]}}' oc label svc supplier-api monitor=springboot2-api |
Use the provided configmap and secret to set the required variables:
|
oc create -f configuration/configmap/supplier-api-env.yml -n ${PROJECT_NAMESPACE} export APP=supplier-api |
Deploy the product-api, but again, check all settings in the application.yaml file before continuing. The following attributes must be updated to reflect your actual environment: rest.security.issuer-uri on Line 61, and thesecurity.oauth2.resource.jwt.key-value on Line 75:
|
# oc delete all -lapp=product-api oc patch svc product-api -p '{"spec":{"ports":[{"name":"http","port":8080,"protocol":"TCP","targetPort":8080}]}}' oc label svc product-api monitor=springboot2-api |
Use the provided configmap and secret to set the required variables:
|
oc create -f configuration/configmap/product-api-env.yml -n ${PROJECT_NAMESPACE} export APP=supplier-api |
Step 16: Integration deployment (FUSE)
Now that the microservices APIs are deployed, let’s deploy the integration layer:
|
# import a new spring-boot camel template oc delete template s2i-microservices-fuse74-spring-boot-camel -n ${PROJECT_NAMESPACE} # NOTE. You may want to check the ..self-signed.yaml template as it uses a customized imagestream for use with self-signed certificates. (see the APPENDIX-README.md for for info) # the previous template have some modifications regarding services,route and group definitions. # Use this param if using a different TAG (example) # check the created services: # in order to auth-integration-api call the others APIs, we need to change it's configuration: # NOTE. If you have changed the service or application's name, you need to edit and change the downloaded application.yaml file with your definitions. # create a configmap and mount a volume for auth-integration-api oc create -f configuration/configmap/auth-integration-api-env.yml -n ${PROJECT_NAMESPACE} oc set env dc/${APP} --from=secret/auth-integration-api-secret |
Note: All application roles are prefixed with ROLE_ on source-code. This prefix can be changed if you want on line 80 in the ../configuration/security/JwtAccessTokenCustomizer.java class. On RHSSO, these roles are registered without this prefix. See this stack overflow reference.
Step 17: Testing the NodeJS application with Red Hat Single Sign-On
Open the NodeJS web app in your browser:
|
export MICROSERVICES_NAMESPACE=microservices-security |
If you're using a self-signed certificate, the browser will request authorization to open an insecure URL. Navigate through the menus and test all actions by clicking on every button to see the final result. If an action returns 401 or 403, there is probably pending configuration on 3scale, or missing or invalid credentials on some application. If you get HTTP error 500, maybe the application is unavailable. Try changing Jon Doe roles and check every situation after refreshing the access token:
(Click on the image to see it larger.)
I hope you enjoyed this tutorial. The troubleshooting was somewhat difficult because of all the OAuth2 adapters and security mechanisms involved. Please let me know if you want to improve something, or add more context to this PoC. Thank you.
References
- API Key Generator
- JWT Key Generator
- OpenID Connect Debugger
- Generate Plain Old Java Objects from JSON or JSON-Schema
- Securing REST API using Keycloak and Spring Oauth2 (@bcarun)
- Keycloak: A real Scenario from Development to Production
- HOW-TO setup 3scale OpenID Connect (OIDC) Integration with RH SSO
- Red Hat Openshift Single Sign-On Secured N-tier application (@mechevarria)
