This article explores the service model of Red Hat AMQ Online 1.1 and how it maps to a GitOps workflow for different teams in your organization. For more information on new features in AMQ Online 1.1, see the release notes.
AMQ Online is an operator of stateful messaging services running on Red Hat OpenShift. AMQ Online is built around the principle that the responsibility of operating the messaging service is separate from the tenants consuming it. The operations team in can manage the messaging infrastructure, while the development teams provision messaging in a self-service manner, just as if they were using a public cloud service.
GitOps is a way to do Continuous Delivery (CD) where the source code and all configuration of an application is stored in Git. Changes to a production environment involve creating a pull/change request to a Git repository. Once the pull request (PR) has been tested and reviewed, it can be merged. When merged, a CD job is triggered that will apply the current state of the Git repository to the system. There are variants of this where you run A/B testing and so on; the sky is the limit.
The declarative GitOps workflow fits well with the declarative nature of Red Hat OpenShift. You can store your OpenShift configuration in Git and trigger a process to apply the configuration to an OpenShift cluster. If you store your application code together with the OpenShift configuration, you enable development teams to be in full control of their application deployment. With AMQ Online, both operations and development teams can use GitOps to manage configuration in a declarative manner.
Let's assume that you have a team in your organization managing Red Hat AMQ Online on OpenShift and that you have two independent developer teams that both want to use messaging in their applications. The following diagram describes the flow:
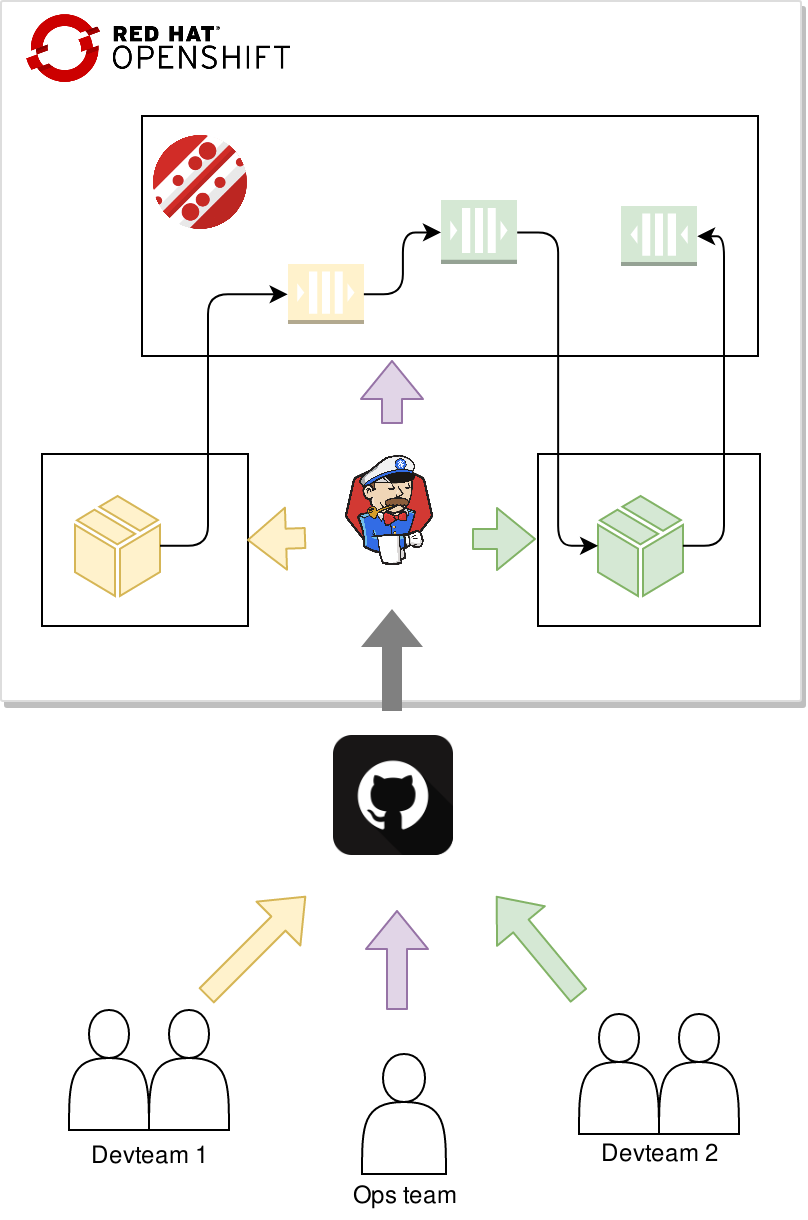
The operations team will manage AMQ Online and commit the desired configuration that they want to support to Git. A CI process then applies the AMQ Online configuration to the cluster.
Independently of the operations team, the development teams commit their application code along with the messaging resource manifests (e.g., AddressSpace, Address, and MessagingUser; we will get back to what these are). A CI process builds the applications and applies the application and messaging resources manifests.
Operations team
Managing an AMQ Online installation in Git can be as simple as unpacking the release bundle and committing the parts that is used for a particular installation. Additionally, the desired messaging configuration and available plans can be created. This configuration contains instances of the following resource types:
AuthenticationService— Describes an authentication service instance used to authenticate messaging clients.AddressSpacePlan—Describes the messaging resources available for address spaces using this plan.AddressPlan— Describes the messaging resources consumed by a particular address using this plan.StandardInfraConfig— Describes the AMQ Interconnect and AMQ Broker configuration for the standard address space type.BrokeredInfraConfig— Describes the AMQ Broker configuration for the brokered address space type.
When created, these resources define the configuration that is available to the messaging tenants. The relationship between all these entities are described in this figure:
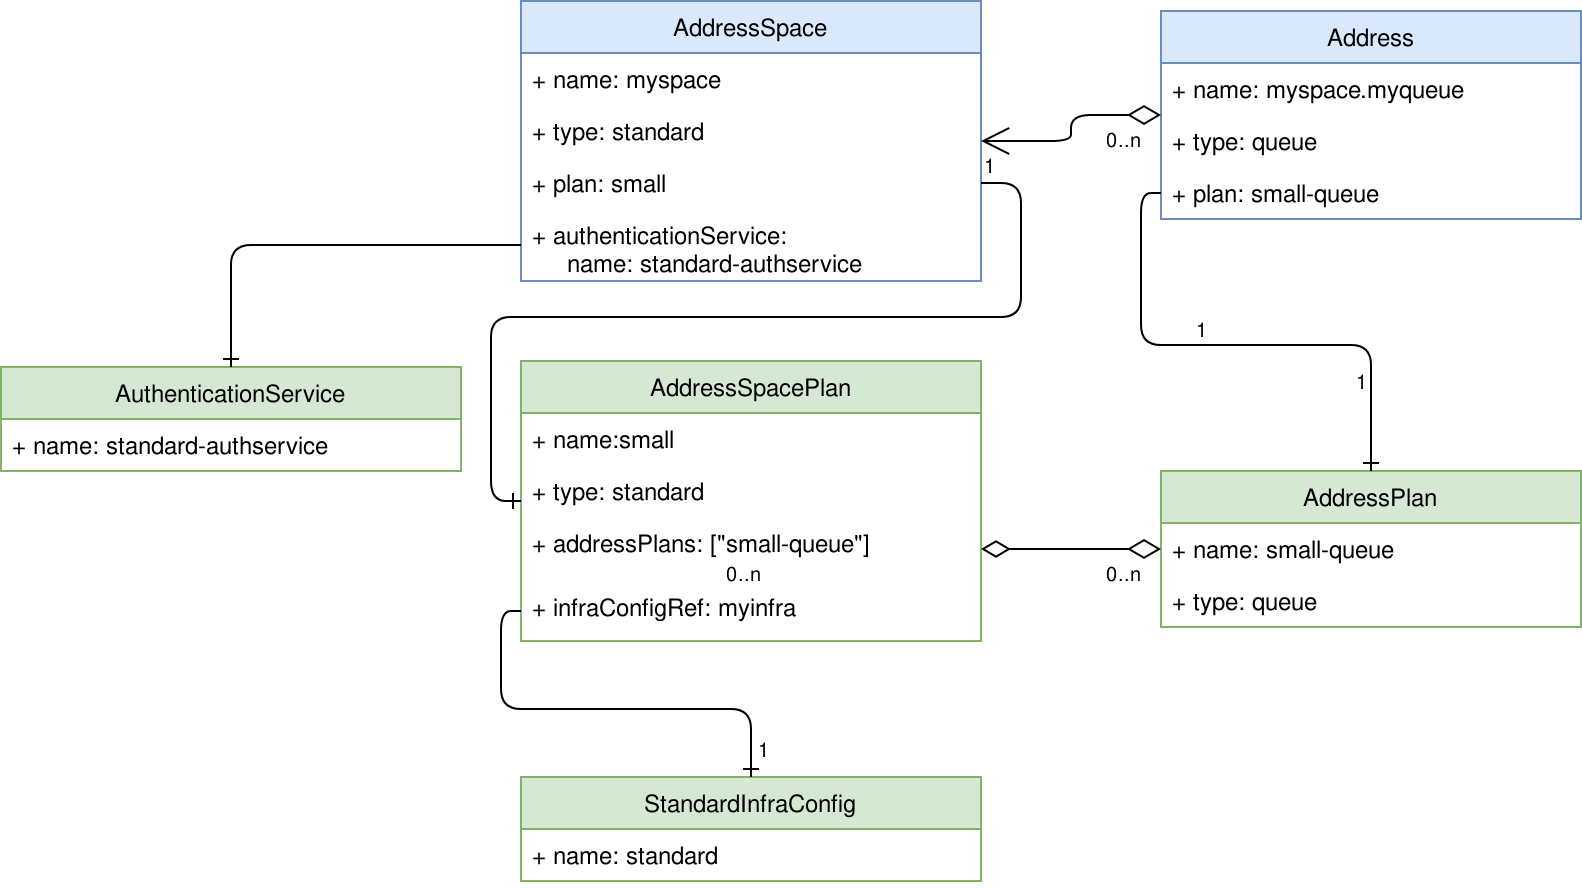
The green entities are managed by the operations team, whereas the blue entities are created by the developer teams.
For more information about configuring AMQ Online, see Configuring AMQ Online.
In this article, we will create a simple configuration to serve the needs of our developer teams.
Authentication services
Authentication services are used to authenticate and authorize messaging clients using SASL. AMQ Online supports three types of authentication services supporting different SASL mechanisms:
none— Supports any mechanism but will grant all clients full access.standard— Supports PLAIN, SCRAMSHA1, SCRAMSHA256 and SCRAMSHA512 mechanisms as well as using OpenShift service account tokens.external— Implements your own authentication service bridge to your own identity management system. For more information on external authentication services, see external authentication service API.
A standard authentication service will allow developer teams to apply authentication and authorization policies for their address spaces:
apiVersion: admin.enmasse.io/v1beta1
kind: AuthenticationService
metadata:
  name: standard-authservice
spec:
  type: standard
Infrastructure configuration
Configuration, such as memory, storage, access policies, and other settings that relate to AMQ Interconnect and AMQ Broker, can be specified in the infrastructure configuration.
The StandardInfraConfig resource type is used to define the configuration for the infrastructure serving the standard address space types:
apiVersion: admin.enmasse.io/v1beta1
kind: StandardInfraConfig
metadata:
  name: standard
spec:
  router:
    minReplicas: 2
  broker:
    addressFullPolicy: FAIL
    resources:
      memory: 2Gi
The above configuration will ensure that at least two AMQ Interconnect instances are running, and that brokers will use 2 GB of memory. Default values will be provided for all settings that are not set. Brokers are created on demand once an address of the queue address type is created by the developer team.
Plans
Plans control how much resources that are consumed by developer teams. Requirements such as "never spin up more than two brokers" and "allow max 1000 addresses" can be implemented using plans. Plans are offered at two levels, for the address spaces, and for the addresses.
Address space plans
The address space plan configures the max amount of resources that may be in use by an address space:
apiVersion: admin.enmasse.io/v1beta2
kind: AddressSpacePlan
metadata:
  name: small
spec:
  addressSpaceType: standard
  infraConfigRef: standard
  addressPlans:
  - small-queue
  resourceLimits:
    router: 2.0
    broker: 2.0
    aggregate: 4.0
The above plan allows developer team address spaces to consume up to two AMQ Interconnect and two AMQ Broker instances, and only the small-queue address plan can be used.
Address plans
The address plan configures the amount of resource an address uses on the interconnect and broker instances. It is also used by AMQ Online to determine if another broker is needed:
apiVersion: admin.enmasse.io/v1beta2
kind: AddressPlan
metadata:
  name: small-queue
spec:
  addressType: queue
  resources:
    router: 0.0001
    broker: 0.002
With this plan, developers may create up to 2.0 / 0.002 = 1000 addresses. When the 501st address is created, another broker will be created (0.002 * 501 = 1.002 => 2 brokers). When maxed out, the system will use two brokers, and 500 addresses will be assigned to each broker.
Development teams
The development teams can use the same workflow as the operations team, but they do not need to care about the underlying messaging infrastructure. All the underlying components, such as AMQ Interconnect and AMQ Broker, are all hidden behind the address space abstraction.
Application
Now let's create a simple messaging application. Writing messaging clients can be a challenging task, as it's asynchronous by nature. The vertx-amqp-client allows you to write simple reactive AMQP 1.0 clients. The following example shows how the application can get all its configuration from the environment:
Vertx vertx = Vertx.vertx();
// Use OpenShift service account to authenticate client
AmqpClientOptions options = new AmqpClientOptions()
  .setSsl(true)
  .setPemKeyCertOptions(new PemKeyCertOptions()
  .addCertPath(""/var/run/secrets/kubernetes.io/serviceaccount/ca.crt"))
  .setHost(System.getenv("MESSAGING_HOST"))
  .setPort(Integer.parseInt(System.getenv("MESSAGING_PORT")))
  .setUsername("@@serviceaccount@@")
  .setPassword(new String(Files.readAllBytes(Paths.get("/var/run/secrets/kubernetes.io/serviceaccount/token")), StandardCharsets.UTF_8));

AmqpClient client = AmqpClient.create(vertx, options);
// Initiate the connection
client.connect(ar -> {
  if (ar.succeeded()) {
    AmqpConnection connection = ar.result();
    connection.createSender("confirmations", done -> {
      if (done.succeeded()) {
        AmqpSender sender = done.result();
        connection.createReceiver("orders"), order -> {
          // TODO: Process order
          AmqpMessage confirmation = AmqpMessage.create().withBody("Confirmed!").build();
          sender.send(confirmation);
        }, rdone -> {
          if (rdone.succeeded()) {
            startPromise.complete();
          } else {
            startPromise.fail(rdone.cause());
          }
        });
      } else {
        startPromise.fail(done.cause());
      }
    });
  } else {
    startPromise.fail(ar.cause());
  }
});
For full example clients, see example clients.
Messaging resources
Once your application is written, some configuration for using the messaging resources available on
your cluster is needed.
Address spaces
An AMQ Online AddressSpace is a group of addresses that share connection endpoints as well as authentication and authorization policies. When creating an AddressSpace, you can configure how your messaging endpoints are exposed:
apiVersion: enmasse.io/v1beta1
kind: AddressSpace
metadata:
  name: app
  namespace: team1
spec:
  type: standard
  plan: small
  endpoints:
  - name: messaging
    service: messaging
    cert:
      provider: openshift
    exports:
    - name: messaging-config
      kind: configmap
For more information about address spaces, see the address space documentation.
Addresses
Messages are sent and received from an address. An address has a type that determines its semantics and a plan that determines the amount of resources reserved for this address. An address can be defined like this:
apiVersion: enmasse.io/v1beta1
kind: Address
metadata:
  name: app.orders
  namespace: team1
spec:
  address: orders
  type: queue
  plan: small-queue
Authentication and authorization
To ensure that only trusted applications are able to send and receive messages to your addresses, a messaging user must be created. For applications running on-cluster, you can authenticate clients using an OpenShift service account. A serviceaccount user can be defined like this:
apiVersion: user.enmasse.io/v1beta1
kind: MessagingUser
metadata:
  name: myspace.app
  namespace: team1
spec:
  username: system:serviceaccount:team1:default
  authentication:
    type: serviceaccount
  authorization:
  - operations: ["send", "recv"]
    addresses: ["orders"]
With the above three resources, you have the basics needed for an application to use the messaging service.
Discovering endpoints
But how does your application get to know the endpoints for its address space? You may have noticed the exports field in the address space definition. Exports are a way to instruct AMQ Online that you want a configmap with the hostname, ports, and CA certificate to be created in your namespace. To allow AMQ Online to create this resource, we also need to define a Role and RoleBinding for it:
---
apiVersion: rbac.authorization.k8s.io/v1
kind: Role
metadata:
  name: messaging-config
  namespace: team1
spec:
  rules:
  - apiGroups: [ "" ]
    resources: [ "configmaps" ]
    verbs: [ "create" ]
  - apiGroups: [ "" ]
    resources: [ "configmaps" ]
    resourceNames: [ "messaging-config" ]
    verbs: [ "get", "update", "patch" ]
---
apiVersion: rbac.authorization.k8s.io/v1
kind: RoleBinding
metadata:
  name: messaging-config
  namespace: team1
roleRef:
  apiGroup: rbac.authorization.k8s.io
  kind: Role
  name: messaging-config
subjects:
- kind: ServiceAccount
  name: address-space-controller
  namespace: amq-online-infra
Wiring configuration into an application
With messaging configuration in place, we can write the deployment manifest for our application:
apiVersion: apps/v1
kind: Deployment
metadata:
  name: myapp
  labels:
    app: myapp
spec:
  replicas: 1
  template:
    metadata:
      matchLabels:
        application: demo
    spec:
      containers:
      - name: app
        image: myapp:latest
        env:
        - name: MESSAGING_HOST
          valueFrom:
            configMapKeyRef:
              name: messaging-config
              key: service.host
        - name: MESSAGING_PORT
          valueFrom:
            configMapKeyRef:
              name: messaging-config
              key: service.port.amqps
As you can see, the values of the configmap is mapped as environment variables to our application.
Summary
We have seen how an operations team and a set of development teams can manage messaging as Red Hat OpenShift manifests. This allows your whole organization to follow the GitOps model when deploying your applications using messaging on OpenShift.
Last updated: March 15, 2024