Red Hat Enterprise Linux 8 ships a new tool, called Image Builder, that allows you to create custom Red Hat Enterprise Linux system images in a variety of formats. These include compatibility with major cloud providers and virtualization technologies available in the market. As a result, it enables you to quickly spin up new Red Hat Enterprise Linux (RHEL) systems in different platforms, according to your requirements.
In this article, we'll show how to set up Image Builder in Red Hat Enterprise Linux 8 and create a couple of images to test its capabilities. Red Hat recommends running Image Builder on its own dedicated virtual machine.
To follow this tutorial, you will need a virtual machine running Red Hat Enterprise Linux 8 where we'll install Image Builder. This virtual machine needs to be subscribed and have access to the Red Hat Enterprise Linux 8 packages repositories. We'll not cover Red Hat Enterprise Linux 8 installation in this post. For more information, consult the product documentation.
Installing Image Builder
Image Builder relies on the functionality provided by the "lorax-composer" package. We recommend that you install Image Builder in a dedicated virtual machine as it has specific security requirements. For this tutorial we'll use a virtual machine named —rh8comp2— to install Image Builder.
You can use Image Builder via GUI, through the web console interface or CLI by installing the composer-cli package. For this tutorial, we'll use a combination of both.
Install the the required packages by running this command:
# yum install -y lorax-composer composer-cli cockpit-composer
This command will also download the dependencies, including Cockpit (to enable the web console) if it's not installed.
Next, ensure that the firewall allows access to the Web Console:
# firewall-cmd --add-service=cockpit && firewall-cmd --add-service=cockpit --permanent
Warning: ALREADY_ENABLED: 'cockpit' already in 'public'
success
Warning: ALREADY_ENABLED: cockpit
success
# firewall-cmd --list-services
cockpit dhcpv6-client ssh
Finally, enable and start the "lorax-composer" and "cockpit" services:
# systemctl enable lorax-composer.socket
Created symlink /etc/systemd/system/sockets.target.wants/lorax-composer.socket → /usr/lib/systemd/system/lorax-composer.socket.
# systemctl enable cockpit.socket
Created symlink /etc/systemd/system/sockets.target.wants/cockpit.socket → /usr/lib/systemd/system/cockpit.socket.
# systemctl start lorax-composer
# systemctl start cockpit
Now you have Image Builder up and running. Next, let's use the web console GUI to create an image using Image Builder.
Creating a custom image using the web console
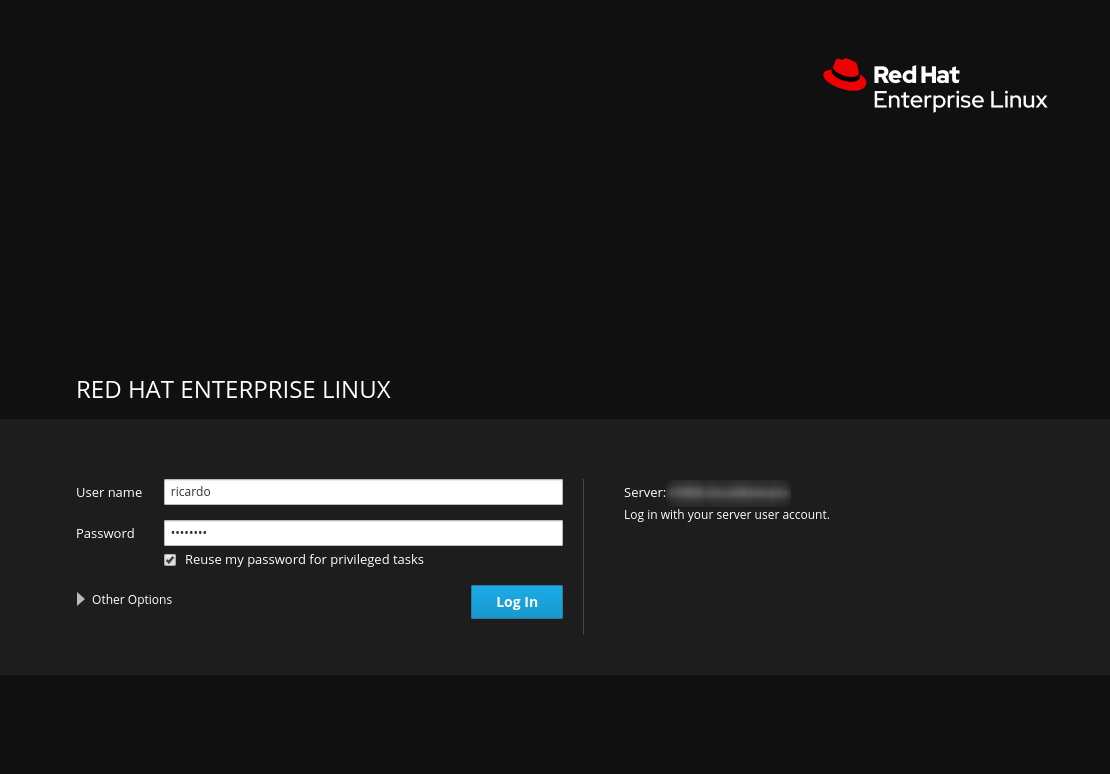
Once you have Image Builder and the Web Console installed, you can access the system administration GUI by pointing your browser to the virtual machine's hostname or IP address on port 9090. Log in using your administrator user credentials:
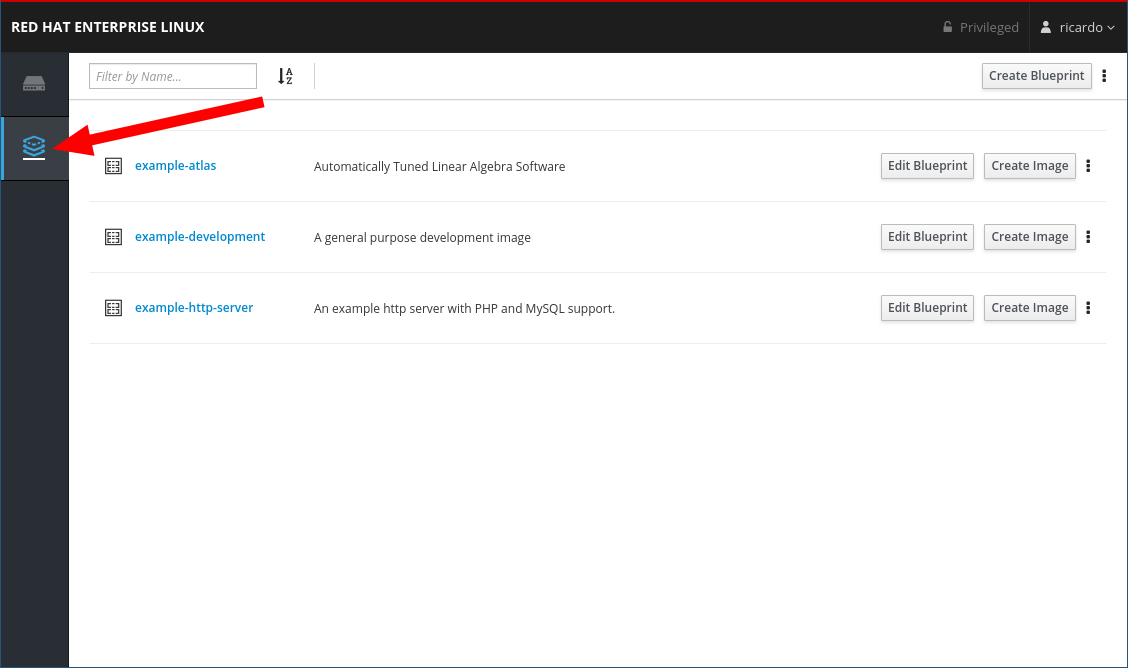
Once logged in, click on the Image Builder icon on the left side of the menu:
Creating an image Blueprint
Next, create a Blueprint for your image. The Blueprint defines what should be included in your image. Through the web console GUI, you can only specify rpm packages to include. To specify users, we'll use the Composer CLI later in this tutorial.
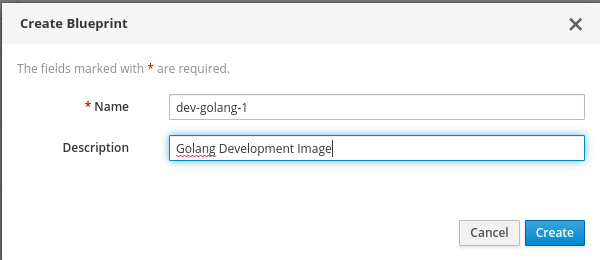
Create a new Blueprint by clicking on the Create Blueprint button. After that, specify a name and a description for the Blueprint. For this example, we're creating an image that contains tools to compile programs written in Go; therefore, we're calling it dev-golang-1:
On the next screen, select which packages you want to include in the image. You can use the filter bar on the left to make it easier to find packages. For example, type tmux and press Enter to see the tmux package. Add the package to the Blueprint by clicking on the plus (+) sign beside its name. Notice that the GUI automatically adds the dependencies for the packages. For this example, we're adding the following packages to the Blueprint:
- cockpit
- openssh
- golang
- tmux
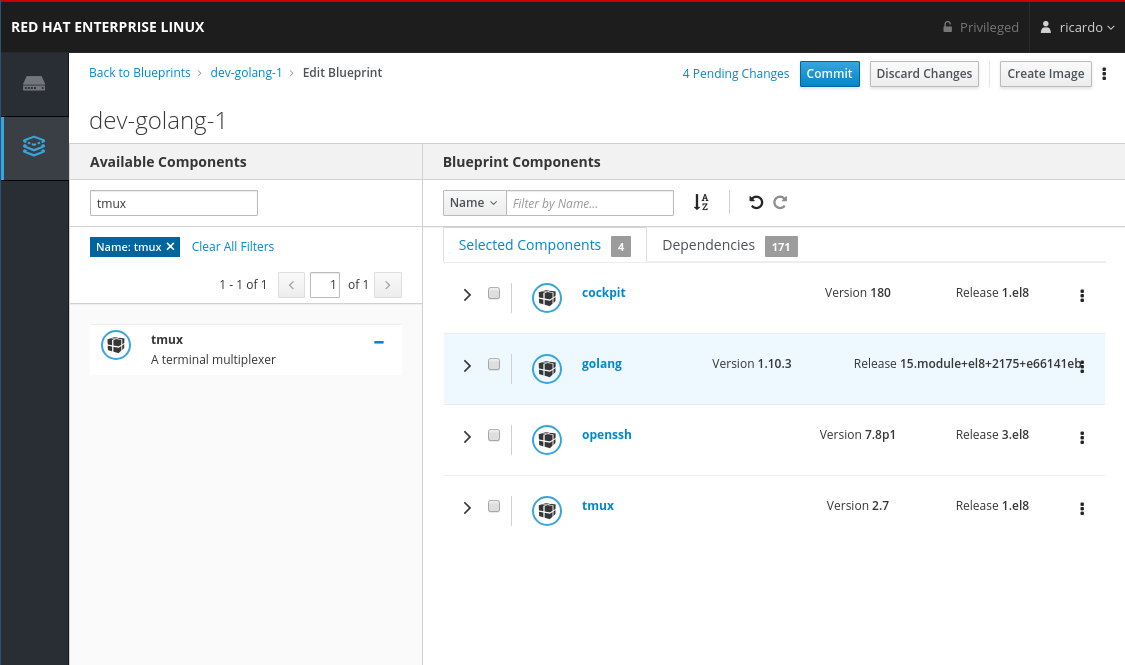
Note that the package versions available may be different on your system.
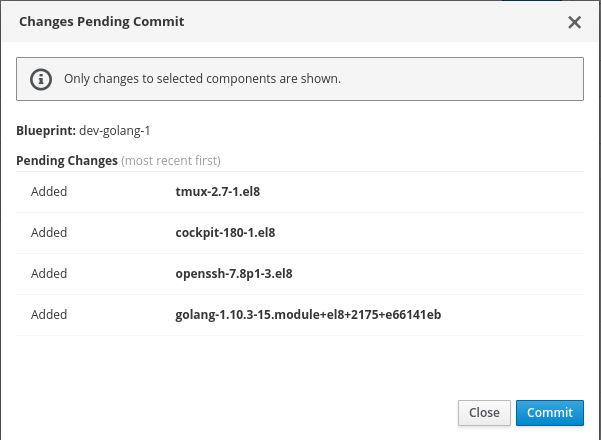
After you include all required packages, commit your changes by clicking on the Commit button at the top of the screen. On the pop-up screen, confirm your changes and click on the Commit button to commit:
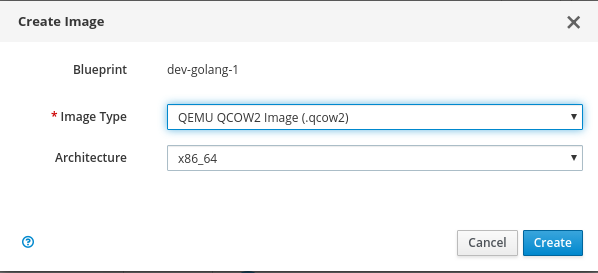
Start the image creation
Now that the Blueprint has been defined, you can start the image creation process by clicking on the Create Image button at the top right. On the pop-up screen, select the type of image. Image Builder can create a variety of images, including AWS, Azure, OpenStack, VMware, and more. For this example, to deploy a local KVM virtual machine, select the QEMU QCOW2 format and click on Create:
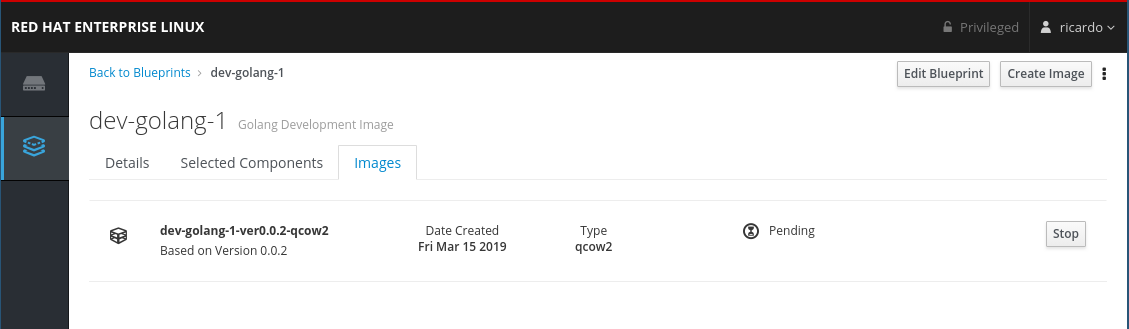
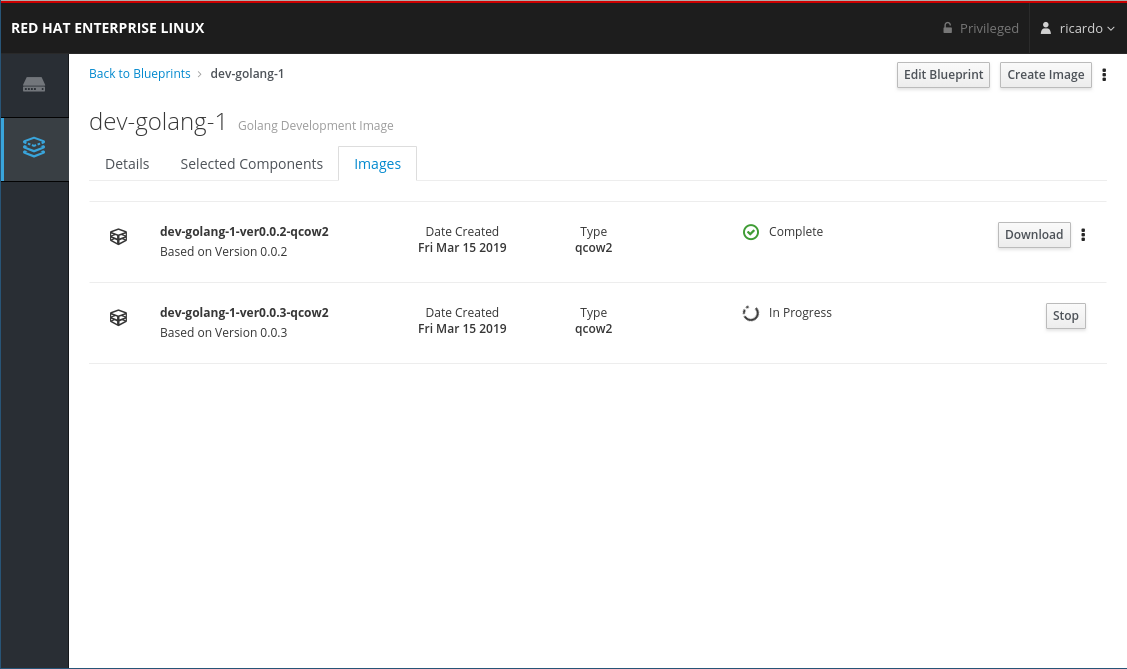
It may take a few minutes to create the image. You can follow the progress on web console by navigating to the Blueprint and clicking on the Images tab:
You can also follow detailed logs on the Image Builder Virtual Machine by checking the journalctl logs for the lorax-composer unit:
# journalctl -fu lorax-composer
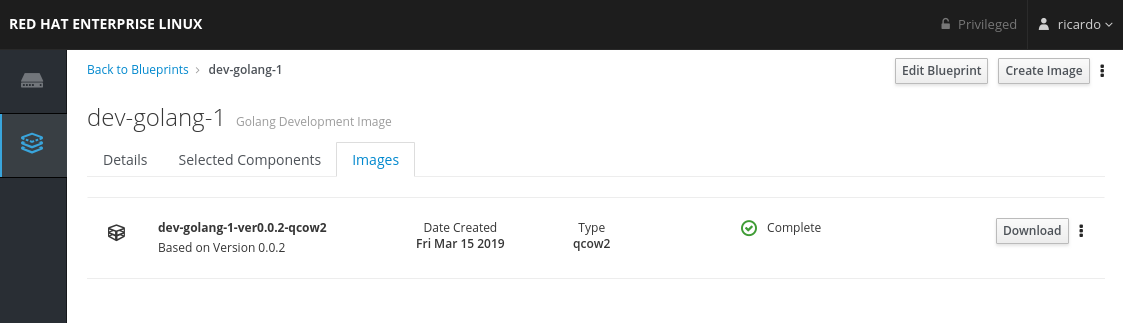
Once the image is created, download it by clicking on the Download button beside the image name:
Use an image to create a virtual machine
Now you can use this image to create a virtual machine on KVM/Libvirt. Because we did not specify an user for this image, you can use libvirt tools, such as virt-customize, to further customize the image before using it:
$ sudo virt-customize -a f492077c-6d4b-458a-8ac6-bfbc49fae499-disk.qcow2 --root-password password:test123 --hostname dev01
[   0.0] Examining the guest ...
[   5.8] Setting a random seed
[   5.8] Setting the hostname: dev01
[   5.8] Setting passwords
[   6.9] Finishing off
Finally, create a virtual machine using your brand new image:
In the next step, we'll use the Image Builder CLI to add users to the image directly.
Creating a custom image using the CLI
In addition to using the web console, you can also use the Image Builder CLI to create images. When using the CLI, you have access to a few more customization options, such as adding users and groups to the image. We already installed the composer-cli package in the Image Builder virtual machine, so let's use it.
Log in to the Image Builder virtual machine rh8comp2 as root. First, list all available Blueprints:
# composer-cli blueprints list
dev-golang-1
example-atlas
example-development
example-http-server
As you can see, the dev-golang-1 Blueprint that we created using the GUI is available. We'll edit this Blueprint to include an administrator user. To edit the Blueprint, save it to a file:
# composer-cli blueprints save dev-golang-1
# ls -l dev-golang-1.toml
-rw-r--r--. 1 root root 295 Mar 15 14:38 dev-golang-1.toml
This command saves the Blueprint in the TOML format.
Next, edit the dev-golang-1.toml file to add the new user:
# vi dev-golang-1.toml
name = "dev-golang-1"
description = "Golang Development Image"
version = "0.0.2"
modules = []
groups = []
[[packages]]
name = "cockpit"
version = "*"
[[packages]]
name = "golang"
version = "*"
[[packages]]
name = "openssh"
version = "*"
[[packages]]
name = "tmux"
version = "*"
As you can see, the file contains all the packages we included when creating the Blueprint using the GUI. To add a new user, we include a new section with the required customization. Before that, bump the version up by 0.0.1 to indicate a new minor version of the Blueprint:
version = "0.0.3"
Now, add the section customizations.users with the details about the user you want to create, including user name, password, SSH keys, and groups.
[[customizations.user]]
name = "ricardo"
description = "Ricardo user account"
password = "$6$nt7IeYW0hFj3ShZC$FdBCgZpfIi92q0sdcTozX1z8KnDAxtxy2b4A76fP4.QKy9kyLS82Vci76BjJFIMp3RHJNCBqUq.aihV0icdHf1"
key = "ssh-rsa AAAAB3NzaC1yc2EAAAADAQABAAABAQDHmjYFDBCrB1mgacb47t+y8UXSscnJl2WWlJluzqtInpT6At0nwqtdV3niYTHxju7e/As4MX3iwC8ubVp2DH8qXgvorDliV9SsIQTqvNKlwGkxZ5cqfYFlV4SUuS7tVTOg0yIqVSddZ2t0Sjmdp3PF7zrp6ayH7a9BBA0/8HQXU/lpdk76SGYL9L8PHOtMYnxtmr+WduoJ+X9zO9d3SUypX36NleFqhlpr1UfnSSkFO/PfRYUhry6HEmUk3Da7aS9hNS0lX/j6uf9RnSrNSzquVezyVMgsRnJ+5xr7KyhwtEig//Wr/j8TWmqvj645IWXTmj6Jw4uvi26bEORZVM5x ricardo@localhost"
home = "/home/ricardo/"
shell = "/usr/bin/bash"
groups = ["users", "wheel"]
You can use this command to generate a hashed version of the password using the SHA512 algorithm:
# python3 -c "import crypt, getpass; print(crypt.crypt(getpass.getpass(), crypt.METHOD_SHA512))"
Password:
$6$nt7IeYW0hFj3ShZC$FdBCgZpfIi92q0sdcTozX1z8KnDAxtxy2b4A76fP4.QKy9kyLS82Vci76BjJFIMp3RHJNCBqUq.aihV0icdHf1
If Python 3 is not available, install it using yum.
# yum -y install python3
Once you're done editing the file, save the changes and push the new version of your Blueprint to Image Builder like this:
# composer-cli blueprints push dev-golang-1.toml
Next, start the image creation process, using the QCOW2 format:
# composer-cli compose start dev-golang-1 qcow2
Compose e63c7b29-df96-4f8c-aeb4-c2b0a98bd05e added to the queue
Then, check the creation status like this:
# composer-cli compose status
e63c7b29-df96-4f8c-aeb4-c2b0a98bd05e RUNNING  Fri Mar 15 14:43:35 2019 dev-golang-1    0.0.3 qcow2
f492077c-6d4b-458a-8ac6-bfbc49fae499 FINISHED Fri Mar 15 14:14:13 2019 dev-golang-1    0.0.2 qcow2            1990852608
Download the image and create a virtual machine
You can keep checking the status until it's completed. Creating the image takes a few minutes:
# composer-cli compose status
f492077c-6d4b-458a-8ac6-bfbc49fae499 FINISHED Fri Mar 15 14:14:13 2019 dev-golang-1    0.0.2 qcow2            1990852608
e63c7b29-df96-4f8c-aeb4-c2b0a98bd05e FINISHED Fri Mar 15 14:49:17 2019 dev-golang-1    0.0.3 qcow2            1990983680
After completion, you can download the image using the CLI:
# composer-cli compose image e63c7b29-df96-4f8c-aeb4-c2b0a98bd05e
e63c7b29-df96-4f8c-aeb4-c2b0a98bd05e-disk.qcow2: 1898.75 MB
Alternatively, you can check the image creation status or download the new image using the web console:
Once you have the image, you can use it to spin up a new virtual machine using KVM, as you've done before. The difference now is that the image already has an administrator user so you don't need to create one. Because we provided an SSH key, use it to log in the new system without a password:
$ ssh ricardo@192.168.122.227
The authenticity of host '192.168.122.227 (192.168.122.227)' can't be established.
ECDSA key fingerprint is SHA256:2xZm9mk8qrCUcwVb9dyb9Pvj21T021/wiXrD96nFKgE.
Are you sure you want to continue connecting (yes/no)? yes
Warning: Permanently added '192.168.122.227' (ECDSA) to the list of known hosts.
Activate the web console with: systemctl enable --now cockpit.socket
After you log in the new system, verify that Go is installed as per the Blueprint:
[ricardo@localhost ~]$ go version
go version go1.10.3 linux/amd64
[ricardo@localhost ~]$
Using the Image Builder CLI lets you automate the image creation process and integrate it with your CI/CD pipelines.
Summary
The Image Builder tool is a versatile solution to configure and create custom system images that lets you quickly spin up new Red Hat Enterprise Linux systems in a variety of cloud and virtualization platforms.
You can find more information about Image Builder in the Red Hat Enterprise Linux 8 documentation or in the upstream project blog.
Last updated: July 24, 2023
