This blog describes how a script can be used to automate Open vSwitch PVP testing. The goal for this PVP script was to have a quick (and dirty) way to verify the performance (change) of an Open vSwitch (DPDK) setup. This script either works with a Xena Networks traffic generator or the T-Rex Realistic Traffic Generator. For details on what the PVP test does, please refer to the following blog post, Measuring and comparing Open vSwitch performance.
This setup tutorial needs two machines with Red Hat Enterprise Linux, in this example, we use version 7.3. One machine will be used as a traffic generator using T-Rex; the other one will be the DUT running Open vSwitch. We use two Intel 82599ES 10G adapters to interconnect the machines.
Setup the T-Rex traffic generator
One of the two machines we will use for the T-Rex traffic generator. We will also use this machine to run the actual PVP script, so some additional setup steps are related to this.
Please check out the T-Rex Installation Manual for the minimal system requirements to run T-Rex. For example having a Haswell or newer CPU. Also, do not forget to enable VT-d in the BIOS.
Register Red Hat Enterprise Linux
We continue here right after installing Red Hat Enterprise Linux. First, need to register the system, so we can download all the packages we need:
# subscription-manager register
Registering to: subscription.rhsm.redhat.com:443/subscription
Username: user@domain.com
Password:
The system has been registered with ID: xxxxxxxx-xxxx-xxxx-xxxxxxxxxxxxxxxxxx

# subscription-manager attach --pool=xxxxxxxxxxxxxxxxxxxxxxxxxxxxxxxx
Successfully attached a subscription for: xxxxxxxxxxxxxxxxxx
Install the packages we need
Add the epel repository for some of the python packages:
yum -y install https://dl.fedoraproject.org/pub/epel/epel-release-latest-7.noarch.rpm
Now we can install the packages we need:
yum -y clean all
yum -y update
yum -y install lshw emacs gcc git python-devel python-setuptools python-pip \
           tmux tuned-profiles-cpu-partitioning wget
Tweak the kernel
Rather than using the default 2M huge pages we configure 32 1G pages. You can adjust this to your system's specifications. In this step, we also enable iommu needed by some of the DPDK PMD drivers used by T-Rex:
sed -i -e 's/GRUB_CMDLINE_LINUX="/GRUB_CMDLINE_LINUX="default_hugepagesz=1G hugepagesz=1G hugepages=32 iommu=on intel_iommu=pt /'  /etc/default/grub
grub2-mkconfig -o /boot/grub2/grub.cfg
Download and installation of T-Rex
Download and unpack the T-Rex traffic generator:
mkdir trex
cd trex
wget http://trex-tgn.cisco.com/trex/release/v2.29.tar.gz
tar -xvzf v2.29.tar.gz
cd v2.29
Figure out PCI address of the card we would like to use, using the lshw utility:
# lshw -c network -businfo
Bus info          Device     Class          Description
=======================================================
pci@0000:01:00.0  em1        network        82599ES 10-Gigabit SFI/SFP+ Network
pci@0000:01:00.1  em2        network        82599ES 10-Gigabit SFI/SFP+ Network
pci@0000:07:00.0  em3        network        I350 Gigabit Network Connection
pci@0000:07:00.1  em4        network        I350 Gigabit Network Connection
In our case, we will use em1, so PCI 0000:01:00.0. However as T-Rex likes port pairs, we will also assign em2, 0000:01:00.1, to T-Rex.
NOTE: Make sure your network card has a kernel driver loaded, i.e. has a Device name in the output above, or else configuration in the step below might fail.
Next step is to configure T-Rex:
# cd ~/trex/v2.29
# ./dpdk_setup_ports.py -i
By default, IP based configuration file will be created. Do you want to use MAC based config? (y/N)y
+----+------+---------+-------------------+------------------------------------------------+-----------+-----------+----------+
| ID | NUMA |   PCI   |        MAC        |                      Name                      |  Driver   | Linux IF  |  Active  |
+====+======+=========+===================+================================================+===========+===========+==========+
| 0  | 0    | 01:00.0 | 24:6e:96:3c:4b:c0 | 82599ES 10-Gigabit SFI/SFP+ Network Connection | ixgbe     | em1       |          |
+----+------+---------+-------------------+------------------------------------------------+-----------+-----------+----------+
| 1  | 0    | 01:00.1 | 24:6e:96:3c:4b:c2 | 82599ES 10-Gigabit SFI/SFP+ Network Connection | ixgbe     | em2       |          |
+----+------+---------+-------------------+------------------------------------------------+-----------+-----------+----------+
| 2  | 0    | 07:00.0 | 24:6e:96:3c:4b:c4 | I350 Gigabit Network Connection                | igb       | em3       | *Active* |
+----+------+---------+-------------------+------------------------------------------------+-----------+-----------+----------+
| 3  | 0    | 07:00.1 | 24:6e:96:3c:4b:c5 | I350 Gigabit Network Connection                | igb       | em4       |          |
+----+------+---------+-------------------+------------------------------------------------+-----------+-----------+----------+
Please choose even number of interfaces from the list above, either by ID , PCI or Linux IF
Stateful will use order of interfaces: Client1 Server1 Client2 Server2 etc. for flows.
Stateless can be in any order.
Enter list of interfaces separated by space (for example: 1 3) : 0 1

For interface 0, assuming loopback to it's dual interface 1.
Destination MAC is 24:6e:96:3c:4b:c2. Change it to MAC of DUT? (y/N).
For interface 1, assuming loopback to it's dual interface 0.
Destination MAC is 24:6e:96:3c:4b:c0. Change it to MAC of DUT? (y/N).
Print preview of generated config? (Y/n)y
### Config file generated by dpdk_setup_ports.py ###

- port_limit: 2
  version: 2
  interfaces: ['01:00.0', '01:00.1']
  port_info:
  - dest_mac: 24:6e:96:3c:4b:c2 # MAC OF LOOPBACK TO IT'S DUAL INTERFACE
    src_mac:  24:6e:96:3c:4b:c0
  - dest_mac: 24:6e:96:3c:4b:c0 # MAC OF LOOPBACK TO IT'S DUAL INTERFACE
    src_mac:  24:6e:96:3c:4b:c2

  platform:
  master_thread_id: 0
  latency_thread_id: 27
  dual_if:
    - socket: 0
      threads: [1,2,3,4,5,6,7,8,9,10,11,12,13,14,15,16,17,18,19,20,21,22,23,24,25,26]


Save the config to file? (Y/n)y
Default filename is /etc/trex_cfg.yaml
Press ENTER to confirm or enter new file:
Saved to /etc/trex_cfg.yaml.
As we would like to run the performance script on this machine, we decided to not dedicate all CPUs to T-Rex. Below you see what we changed in the /etc/trex_cfg.yaml file to exclude threads 1-3:
17c17
< threads: [1,2,3,4,5,6,7,8,9,10,11,12,13,14,15,16,17,18,19,20,21,22,23,24,25,26]
---
> threads: [4,5,6,7,8,9,10,11,12,13,14,15,16,17,18,19,20,21,22,23,24,25,26]
Tweak the system for T-Rex usage
We know which threads will be used by T-Rex; let's dedicate them to this task. We do this by applying the cpu-partitioning profile and configure the isolated core mask:
systemctl enable tuned
systemctl start tuned
echo isolated_cores=4,5,6,7,8,9,10,11,12,13,14,15,16,17,18,19,20,21,22,23,24,25,26 >> /etc/tuned/cpu-partitioning-variables.conf
tuned-adm profile cpu-partitioning
Now it's time to reboot the machine to active the isolated cores and use the configured 1G huge pages:
# reboot
Start the T-Rex server
Now we're ready to start the T-Rex server in a tmux session, so we can look at the console if we want to:
cd ~/trex/v2.29
tmux
./t-rex-64 -i
Setup the T-Rex host to run the actual PVP script
As our T-Rex machine has enough resources to also run the PVP script, we decided to run it there. However, in theory, you can run the PVP script on a third machine or even the DUT. But make sure to keep the machine close to the traffic generator (either the T-Rex or Xena), as it needs to communicate with it to capture statistics.
Install the PVP scripts
First, we need to install the script on the machine:
git clone https://github.com/chaudron/ovs_perf.git
Install additional packages needed by the PVP script
We need to install a bunch of Python libraries we need for the PVP script. We will use pip to do this:
pip install --upgrade enum34 natsort netaddr matplotlib scapy spur
We also need the Xena Networks traffic generator libraries:
cd ~
git clone https://github.com/fleitner/XenaPythonLib
cd XenaPythonLib/
python setup.py install
Finally, we need to install the T-Rex stateless libraries:
cd ~/trex/v2.29
tar -xzf trex_client_v2.29.tar.gz
cp -r trex_client/stl/trex_stl_lib/ ~/pvp_test
cp -r trex_client/external_libs/ ~/pvp_test/trex_stl_lib/
Setup the Device Under Test (DUT), Open vSwitch
For this tutorial, we use Open vSwitch in combination with the DPDK, userspace datapath. At the end of this document, we also explain how to redo the configuration to use the Linux kernel datapath.
Register Red Hat Enterprise Linux
As with the T-Rex system we first need to register the system:
# subscription-manager register
Registering to: subscription.rhsm.redhat.com:443/subscription
Username: user@domain.com
Password:
The system has been registered with ID: xxxxxxxx-xxxx-xxxx-xxxxxxxxxxxxxxxxxx

# subscription-manager attach --pool=xxxxxxxxxxxxxxxxxxxxxxxxxxxxxxxx
Successfully attached a subscription for: xxxxxxxxxxxxxxxxxx
Add the packages we need
We need "Red Hat Enterprise Linux Fast Datapath 7" for Open vSwitch, and "Red Hat Virtualization 4" for Qemu. If you do not have access to these repositories, please contact your Red Hat representative.
subscription-manager repos --enable=rhel-7-fast-datapath-rpms
subscription-manager repos --enable=rhel-7-server-rhv-4-mgmt-agent-rpms
Add the epel repository for sshpass and others:
yum -y install https://dl.fedoraproject.org/pub/epel/epel-release-latest-7.noarch.rpm
Now we can install the packages we need:
yum -y clean all
yum -y update
yum -y install aspell aspell-en autoconf automake bc checkpolicy \
           desktop-file-utils driverctl emacs gcc gcc-c++ gdb git graphviz \
           groff hwloc intltool kernel-devel libcap-ng libcap-ng-devel \
           libguestfs libguestfs-tools-c libtool libvirt lshw openssl \
           openssl-devel openvswitch procps-ng python python-six \
           python-twisted-core python-zope-interface qemu-kvm-rhev \
           rpm-build selinux-policy-devel sshpass sysstat systemd-units \
           tcpdump time tmux tuned-profiles-cpu-partitioning \
           virt-install virt-manager wget
Tweak the system for OVS-DPDK and Qemu usage
There is work in progress for Open vSwitch DPDK to play nicely with SELinux, but for now, the easiest way is to disable it:
sed -i -e 's/SELINUX=enforcing/SELINUX=permissive/' /etc/selinux/config
setenforce permissive
Rather than using the default 2M huge pages we configure 32 1G pages. You can adjust this to your system's specifications. In this step, we also enable iommu needed by the DPDK PMD driver:
sed -i -e 's/GRUB_CMDLINE_LINUX="/GRUB_CMDLINE_LINUX="default_hugepagesz=1G hugepagesz=1G hugepages=32 iommu=pt intel_iommu=on/'  /etc/default/grub
grub2-mkconfig -o /boot/grub2/grub.cfg
Our system is a single NUMA node using Hyper-Threading and we would like to use the first Hyper-Threading pair for system usage. The remaining threads we would like dedicate to Qemu and Open vSwitch.
NOTE: If you have a multi-NUMA system the cores you assign to both Open vSwitch and Qemu need to be one same NUMA node as the network card. For some more background, information on this see the OVS-DPDK Parameters: Dealing with multi-NUMA blog post.
To figure out the numbers of threads, and the first thread pair we execute the following:
# lscpu |grep -E "^CPU\(s\)|On-line|Thread\(s\) per core"
CPU(s):                28
On-line CPU(s) list:   0-27
Thread(s) per core:    2

# lstopo-no-graphics
Machine (126GB)
  Package L#0 + L3 L#0 (35MB)
L2 L#0 (256KB) + L1d L#0 (32KB) + L1i L#0 (32KB) + Core L#0
  PU L#0 (P#0)
  PU L#1 (P#14)
L2 L#1 (256KB) + L1d L#1 (32KB) + L1i L#1 (32KB) + Core L#1
  PU L#2 (P#1)
  PU L#3 (P#15)
L2 L#2 (256KB) + L1d L#2 (32KB) + L1i L#2 (32KB) + Core L#2
  ...
  ...
Now we apply the cpu-partitioning profile, and configure the isolated core mask:
systemctl enable tuned
systemctl start tuned
echo isolated_cores=1-13,15-27 >> /etc/tuned/cpu-partitioning-variables.conf
tuned-adm profile cpu-partitioning
Now it's time to reboot the machine to active the isolated cores, and use the configured 1G huge pages:
# reboot
...
# cat /proc/cmdline
BOOT_IMAGE=/vmlinuz-3.10.0-693.1.1.el7.x86_64 root=/dev/mapper/rhel_wsfd--netdev67-root ro default_hugepagesz=1G hugepagesz=1G hugepages=4 crashkernel=auto rd.lvm.lv=rhel_wsfd-netdev67/root rd.lvm.lv=rhel_wsfd-netdev67/swap console=ttyS1,115200 nohz=on nohz_full=1-13,15-27 rcu_nocbs=1-13,15-27 tuned.non_isolcpus=00004001 intel_pstate=disable nosoftlockup
Setup Open vSwitch
In the Open vSwitch DPDK configuration the physical interface is under the direct control of DPDK, hence it needs to be removed from the kernel. To do this we first need to figure out the interface's PCI address. An easy way of doing this is using the lshw utility:
# lshw -c network -businfo
Bus info          Device      Class          Description
========================================================
pci@0000:01:00.0  em1         network        82599ES 10-Gigabit SFI/SFP+ Network Connection
pci@0000:01:00.1  em2         network        82599ES 10-Gigabit SFI/SFP+ Network Connection
pci@0000:07:00.0  em3         network        I350 Gigabit Network Connection
pci@0000:07:00.1  em4         network        I350 Gigabit Network Connection
For our performance test, we would like to use the 10GbE interface em1. You could use the dpdk-devbind utility to bind the interface to DPDK; however, this configuration will not survive a reboot. The preferred solution is to use driverctl:
# driverctl -v set-override 0000:01:00.0 vfio-pci
driverctl: setting driver override for 0000:01:00.0: vfio-pci
driverctl: loading driver vfio-pci
driverctl: unbinding previous driver ixgbe
driverctl: reprobing driver for 0000:01:00.0
driverctl: saving driver override for 0000:01:00.0

# lshw -c network -businfo
Bus info          Device      Class          Description
========================================================
pci@0000:01:00.0              network        82599ES 10-Gigabit SFI/SFP+ Network Connection
pci@0000:01:00.1  em2         network        82599ES 10-Gigabit SFI/SFP+ Network Connection
pci@0000:07:00.0  em3         network        I350 Gigabit Network Connection
pci@0000:07:00.1  em4         network        I350 Gigabit Network Connection
Start Open vSwitch, and automatically start it after every reboot:
systemctl enable openvswitch
systemctl start openvswitch
For OVS-DPDK, we would like to use the second Hyper Thread pair (CPU 1,15) for the PMD threads. The third Hyper Thread pair (CPU 2,16) for the none PMD DPDK threads. To configure this we execute the following commands:
ovs-vsctl set Open_vSwitch . other_config:dpdk-init=true
ovs-vsctl set Open_vSwitch . other_config:dpdk-socket-mem=2048
ovs-vsctl set Open_vSwitch . other_config:pmd-cpu-mask=0x00008002
ovs-vsctl set Open_vSwitch . other_config:dpdk-lcore-mask=0x00010004
systemctl restart openvswitch
For the Physical to Virtual back to Physical(PVP) test, we only need one bridge with two ports. In addition, we will configure our interfaces with 2 receive queues:
ovs-vsctl --if-exists del-br ovs_pvp_br0
ovs-vsctl add-br ovs_pvp_br0 -- \
      set bridge ovs_pvp_br0 datapath_type=netdev
ovs-vsctl add-port ovs_pvp_br0 dpdk0 -- \
      set Interface dpdk0 type=dpdk -- \
      set Interface dpdk0 options:dpdk-devargs=0000:01:00.0 -- \
      set interface dpdk0 options:n_rxq=2 \
        other_config:pmd-rxq-affinity="0:1,1:15" -- \
      set Interface dpdk0 ofport_request=1
ovs-vsctl add-port ovs_pvp_br0 vhost0 -- \
      set Interface vhost0 type=dpdkvhostuserclient -- \
      set Interface vhost0 options:vhost-server-path="/tmp/vhost-sock0" -- \
      set interface vhost0 options:n_rxq=2 \
        other_config:pmd-rxq-affinity="0:1,1:15" -- \
      set Interface vhost0 ofport_request=2
Create the loopback Virtual Machine
Get the Red Hat Enterprise Linux 7.4 KVM Guest Image. If you do not have access to the image please contact your Red Hat representative. Copy the image for use by qemu:
# ls -l ~/*.qcow2
-rw-r--r--. 1 root root 556247552 Jul 13 06:10 rhel-server-7.4-x86_64-kvm.qcow2
mkdir -p /opt/images
cp ~/rhel-server-7.4-x86_64-kvm.qcow2 /opt/images
Start and enable libvirtd:
systemctl enable libvirtd.service
systemctl start libvirtd.service
Setup as much as possible with a single call to virt-install:
# virt-install --connect=qemu:///system \
  --network vhostuser,source_type=unix,source_path=/tmp/vhost-sock0,source_mode=server,model=virtio,driver_queues=2 \
  --network network=default \
  --name=rhel_loopback \
  --disk path=/opt/images/rhel-server-7.4-x86_64-kvm.qcow2,format=qcow2 \
  --ram 8192 \
  --memorybacking hugepages=on,size=1024,unit=M,nodeset=0 \
  --vcpus=4,cpuset=3,4,5,6 \
  --check-cpu \
  --cpu Haswell-noTSX,+pdpe1gb,cell0.id=0,cell0.cpus=0,cell0.memory=8388608 \
  --numatune mode=strict,nodeset=0 \
  --nographics --noautoconsole \
  --import \
  --os-variant=rhel7
If you have a multi-NUMA system and you are not on NUMA node 0, you need to change the nodeset values above accordingly.
Note that we have been using cores 1,2,15,16 for OVS, and above we have assigned cores 3-6 to the loopback Virtual Machine (VM). For optimal performance, we need to pin the vCPUs to real CPUs. In addition, we will also assign an additional core for Qemu related task to make sure they will not interrupt any PMD threads running in the VM:
virsh vcpupin rhel_loopback 0 3
virsh vcpupin rhel_loopback 1 4
virsh vcpupin rhel_loopback 2 5
virsh vcpupin rhel_loopback 3 6
virsh emulatorpin rhel_loopback 7
We need to tweak some Virtual Machine profile settings manually, as not all options are available through virt-install. This is related to memory sharing, and pinning of the Virtual Machine to dedicated CPUs (the above commands will no survive a reboot). We will do this using virsh edit. Below are the commands used, and the diff of the applied changes:
# virsh shutdown rhel_loopback
# virsh edit rhel_loopback

diff:
@@ -18,2 +18,9 @@
 <vcpu placement='static' cpuset='3-6'>4</vcpu>
+ <cputune>
+ <vcpupin vcpu='0' cpuset='3'/>
+ <vcpupin vcpu='1' cpuset='4'/>
+ <vcpupin vcpu='2' cpuset='5'/>
+ <vcpupin vcpu='3' cpuset='6'/>
+ <emulatorpin cpuset='7'/>
+ </cputune>
 <numatune>
@@ -33,3 +40,3 @@
 <numa>
- <cell id='0' cpus='0' memory='8388608' unit='KiB'/>
+ <cell id='0' cpus='0' memory='8388608' unit='KiB' memAccess='shared'/>
 </numa>
Tweak the virtual machine such that it will have the interfaces named through network manager, and the cloud configuration removed on the next boot:
# LIBGUESTFS_BACKEND=direct virt-customize -d rhel_loopback \
  --root-password password:root \
  --firstboot-command 'rm /etc/systemd/system/multi-user.target.wants/cloud-config.service' \
  --firstboot-command 'rm /etc/systemd/system/multi-user.target.wants/cloud-final.service' \
  --firstboot-command 'rm /etc/systemd/system/multi-user.target.wants/cloud-init-local.service' \
  --firstboot-command 'rm /etc/systemd/system/multi-user.target.wants/cloud-init.service' \
  --firstboot-command 'nmcli c | grep -o --  "[0-9a-fA-F]\{8\}-[0-9a-fA-F]\{4\}-[0-9a-fA-F]\{4\}-[0-9a-fA-F]\{4\}-[0-9a-fA-F]\{12\}" | xargs -n 1 nmcli c delete uuid' \
  --firstboot-command 'nmcli con add con-name ovs-dpdk ifname eth0 type ethernet ip4 1.1.1.1/24' \
  --firstboot-command 'nmcli con add con-name management ifname eth1 type ethernet' \
  --firstboot-command 'reboot'
Start the VM, and attach to the console:
# virsh start rhel_loopback
Domain rhel_loopback started

# virsh console rhel_loopback
Connected to domain rhel_loopback
Escape character is ^]

[root@localhost ~]#
The VM needs the same tweaking as the OVS-DPDK instance. Below is a quick command sequence that needs to be executed on the VM. For details, see the beginning of the Setup the Device Under Test (DUT), Open vSwitch section above:
[root@localhost ~]# subscription-manager register
[root@localhost ~]# subscription-manager attach --pool=xxxxxxxxxxxxxxxxxxxxxxxxx
[root@localhost ~]# subscription-manager repos --enable=rhel-7-fast-datapath-rpms
[root@localhost ~]# yum -y clean all
[root@localhost ~]# yum -y update
[root@localhost ~]# yum -y install driverctl gcc kernel-devel numactl-devel tuned-profiles-cpu-partitioning wget
[root@localhost ~]# yum -y update kernel
[root@localhost ~]# sed -i -e 's/GRUB_CMDLINE_LINUX="/GRUB_CMDLINE_LINUX="default_hugepagesz=1G hugepagesz=1G hugepages=2 /'  /etc/default/grub
[root@localhost ~]# grub2-mkconfig -o /boot/grub2/grub.cfg
[root@localhost ~]# echo "options vfio enable_unsafe_noiommu_mode=1" > /etc/modprobe.d/vfio.conf
[root@localhost ~]# driverctl -v set-override 0000:00:02.0 vfio-pci
[root@localhost ~]# systemctl enable tuned
[root@localhost ~]# systemctl start tuned
[root@localhost ~]# echo isolated_cores=1,2,3 >> /etc/tuned/cpu-partitioning-variables.conf
[root@localhost ~]# tuned-adm profile cpu-partitioning
[root@localhost ~]# reboot
We need the testpmd tool from DPDK on this VM. As an exercise, we build it from source:
[root@localhost ~]# cd ~
[root@localhost ~]# wget http://fast.dpdk.org/rel/dpdk-17.08.tar.xz
[root@localhost ~]# tar xf dpdk-17.08.tar.xz
[root@localhost ~]# cd dpdk-17.08
[root@localhost dpdk-17.08]# make install T=x86_64-native-linuxapp-gcc DESTDIR=_install
[root@localhost dpdk-17.08]# ln -s /root/dpdk-17.08/x86_64-native-linuxapp-gcc/app/testpmd /usr/bin/testpmd
You can quickly check if your VM is setup correctly by starting testpmd as follows:
[root@localhost dpdk-17.08]# cd ~
[root@localhost dpdk-17.08]# testpmd -c 0x7 -n 4 --socket-mem 1024,0 -w 0000:00:02.0 -- \
  --burst 64 --disable-hw-vlan -i --rxq=2 --txq=2 \
  --rxd=4096 --txd=1024 --coremask=0x6 --auto-start \
  --port-topology=chained

EAL: Detected 4 lcore(s)
EAL: Probing VFIO support...
EAL: WARNING: cpu flags constant_tsc=yes nonstop_tsc=no -> using unreliable clock cycles !
EAL: PCI device 0000:00:02.0 on NUMA socket -1
EAL:   Invalid NUMA socket, default to 0
EAL:   probe driver: 1af4:1000 net_virtio
Interactive-mode selected
previous number of forwarding cores 1 - changed to number of configured cores 2
Auto-start selected
USER1: create a new mbuf pool : n=163456, size=2176, socket=0
Configuring Port 0 (socket 0)
Port 0: 52:54:00:70:39:86
Checking link statuses...
Done
Start automatic packet forwarding
io packet forwarding - ports=1 - cores=2 - streams=2 - NUMA support enabled, MP over anonymous pages disabled
Logical Core 1 (socket 0) forwards packets on 1 streams:
  RX P=0/Q=0 (socket 0) -> TX P=0/Q=0 (socket 0) peer=02:00:00:00:00:00
Logical Core 2 (socket 0) forwards packets on 1 streams:
  RX P=0/Q=1 (socket 0) -> TX P=0/Q=1 (socket 0) peer=02:00:00:00:00:00

  io packet forwarding - CRC stripping enabled - packets/burst=64
  nb forwarding cores=2 - nb forwarding ports=1
  RX queues=2 - RX desc=4096 - RX free threshold=0
  RX threshold registers: pthresh=0 hthresh=0 wthresh=0
  TX queues=2 - TX desc=1024 - TX free threshold=0
  TX threshold registers: pthresh=0 hthresh=0 wthresh=0
  TX RS bit threshold=0 - TXQ flags=0xf00
testpmd> quit
Telling cores to stop...
Waiting for lcores to finish...

  ---------------------- Forward statistics for port 0  ----------------------
  RX-packets: 0              RX-dropped: 0             RX-total: 0
  TX-packets: 0              TX-dropped: 0             TX-total: 0
  ----------------------------------------------------------------------------

  +++++++++++++++ Accumulated forward statistics for all ports+++++++++++++++
  RX-packets: 0              RX-dropped: 0             RX-total: 0
  TX-packets: 0              TX-dropped: 0             TX-total: 0
  ++++++++++++++++++++++++++++++++++++++++++++++++++++++++++++++++++++++++++++

Done.

Shutting down port 0...
Stopping ports...
Done
Closing ports...
Done

Bye...

Shutting down port 0...
Stopping ports...
Done
Closing ports...
Port 0 is already closed
Done

Bye...
[root@localhost ~]#
Finally, get the IP address assigned to this VM, as we need it later when executing the PVP script.
[root@localhost ~]# ip address show eth1
3: eth1: <BROADCAST,MULTICAST,UP,LOWER_UP> mtu 1500 qdisc pfifo_fast state UP qlen 1000
link/ether 52:54:00:06:7e:0a brd ff:ff:ff:ff:ff:ff
inet 192.168.122.5/24 brd 192.168.122.255 scope global dynamic eth1
   valid_lft 3590sec preferred_lft 3590sec
inet6 fe80::1c38:e5d7:1687:d254/64 scope link
   valid_lft forever preferred_lft forever
Running the PVP script
Now we are all set to run the PVP script. We move back to the T-Rex host as we use this to execute the script.
Before we start, we need to set the back-end to not use a GUI and create a directory to store the results:
echo export MPLBACKEND="agg" >> ~/.bashrc
source ~/.bashrc
mkdir ~/pvp_results
cd ~/pvp_results/
Now we can do a quick 64-byte packet run with 1000 flows. For details on the supported PVP script options, see the ovs_performance.py Supported Options in the GitHub documentation:
# ~/pvp_test/ovs_performance.py \
  -d -l testrun_log.txt \              # Enable script debugging, and save the output to testrun_log.txt
  --tester-type trex \                 # Set tester type to T-Rex
  --tester-address localhost \         # IP address of the T-Rex server
  --tester-interface 0 \               # Interface number used on the T-Rex
  --ovs-address 10.19.17.133 \         # DUT IP address
  --ovs-user root \                    # DUT login user name
  --ovs-password root \                # DUT login user password
  --dut-vm-address 192.168.122.5 \     # Address on which the VM is reachable, see above
  --dut-vm-user root \                 # VM login user name
  --dut-vm-password root \             # VM login user password
  --dut-vm-nic-queues=2 \              # Number of rx/tx queues to use on the VM
  --physical-interface dpdk0 \         # OVS Physical interface, i.e. connected to T-Rex
  --physical-speed=10 \                # Speed of the physical interface, for DPDK we can not detect it reliably
  --virtual-interface vhost0 \         # OVS Virtual interface, i.e. connected to the VM
  --dut-vm-nic-pci=0000:00:02.0 \      # PCI address of the interface in the VM
  --packet-list=64 \                   # Comma separated list of packets to test with
  --stream-list=1000 \                 # Comma separated list of number of flows/streams to test with
  --no-bridge-config \                 # Do not configure the OVS bridge, assume it's already done (see above)
  --skip-pv-test                       # Skip the Physical to Virtual test

- Connecting to the tester...
- Connecting to DUT, "10.19.17.133"...
- Stop any running test tools...
- Get OpenFlow and DataPath port numbers...
- Get OVS datapath type, "netdev"...
- Create "test_results.csv" for writing results...
- [TEST: test_p2v2p(flows=1000, packet_size=64)] START
  * Create OVS OpenFlow rules...
  * Clear all OpenFlow/Datapath rules on bridge "ovs_pvp_br0"...
  * Create 1000 L3 OpenFlow rules...
  * Create 1000 L3 OpenFlow rules...
  * Verify requested number of flows exists...
  * Initializing packet generation...
  * Clear all statistics...
  * Start packet receiver on VM...
  * Start CPU monitoring on DUT...
  * Start packet generation for 20 seconds...
  * Stop CPU monitoring on DUT...
  * Stopping packet stream...
  * Stop packet receiver on VM...
  * Gathering statistics...
- Packets send by Tester      :          270,574,060
- Packets received by physical:           44,172,736 [Lost 226,401,324, Drop 226,401,324]
- Packets received by virtual :           44,172,290 [Lost 446, Drop 446]
- Packets send by virtual     :           44,171,170 [Lost 1,120, Drop 0]
- Packets send by physical    :           44,171,170 [Lost 0, Drop 0]
- Packets received by Tester  :           44,171,170 [Lost 0]
- Receive rate on VM: 2,319,236 pps
  ! Result, average: 2,254,424.93125 pps
  * Restoring state for next test...
- [TEST: test_p2v2p(flows=1000, packet_size=64)] END
- Done running performance tests!
If this is successful, we can go ahead and do a full run. Depending on the hardware configuration, this will take around an hour:
rm -rf ~/pvp_results
mkdir ~/pvp_results
cd ~/pvp_results/
~/pvp_test/ovs_performance.py \
  -d -l testrun_log.txt \
  --tester-type trex \
  --tester-address localhost \
  --tester-interface 0 \
  --ovs-address 10.19.17.133 \
  --ovs-user root \
  --ovs-password root \
  --dut-vm-address 192.168.122.5 \
  --dut-vm-user root \
  --dut-vm-password root \
  --dut-vm-nic-queues=2 \
  --physical-interface dpdk0 \
  --physical-speed=10 \
  --virtual-interface vhost0 \
  --dut-vm-nic-pci=0000:00:02.0 \
  --no-bridge-config \
  --skip-pv-test
Analyzing the results
The full run above will generate the following files:
# ls | more
test_p2v2p_1000000_l3.png
test_p2v2p_100000_l3.png
test_p2v2p_10000_l3.png
test_p2v2p_1000_l3.png
test_p2v2p_10_l3.png
test_p2v2p_all_l3.png
test_p2v2p_all_l3_ref.png
test_results_l3.csv
testrun_log.txt
The test_results_l3.csv file has all the throughput numbers and CPU utilization details. Below is an output example with the CPU data removed as it generates quite some noise:
# cat test_results_l3.csv | grep -v cpu
"Physical port, ""dpdk0"", speed 10 Gbit/s"


"Physical to Virtual to Physical test, L3 flows"
,Packet size
Number of flows,64,128,256,512,1024,1514
10,4727031.0,4667014.3125,4364770.8125,2287722.54375,1173820.56875,789753.2374999999
1000,2250850.53125,2220449.0625,2173334.875,2046172.8687500001,1163426.2874999999,792140.7312500001
10000,1953503.9875,1920673.01875,1850640.8375,1739899.65,1159738.70625,797117.66875
100000,1282826.4,1291901.2249999999,1230113.23125,1163795.4125,1027805.6124999999,771230.91875
1000000,135964.475,131447.69375,134586.19999999998,129209.65624999997,125609.67500000003,125875.18125000001
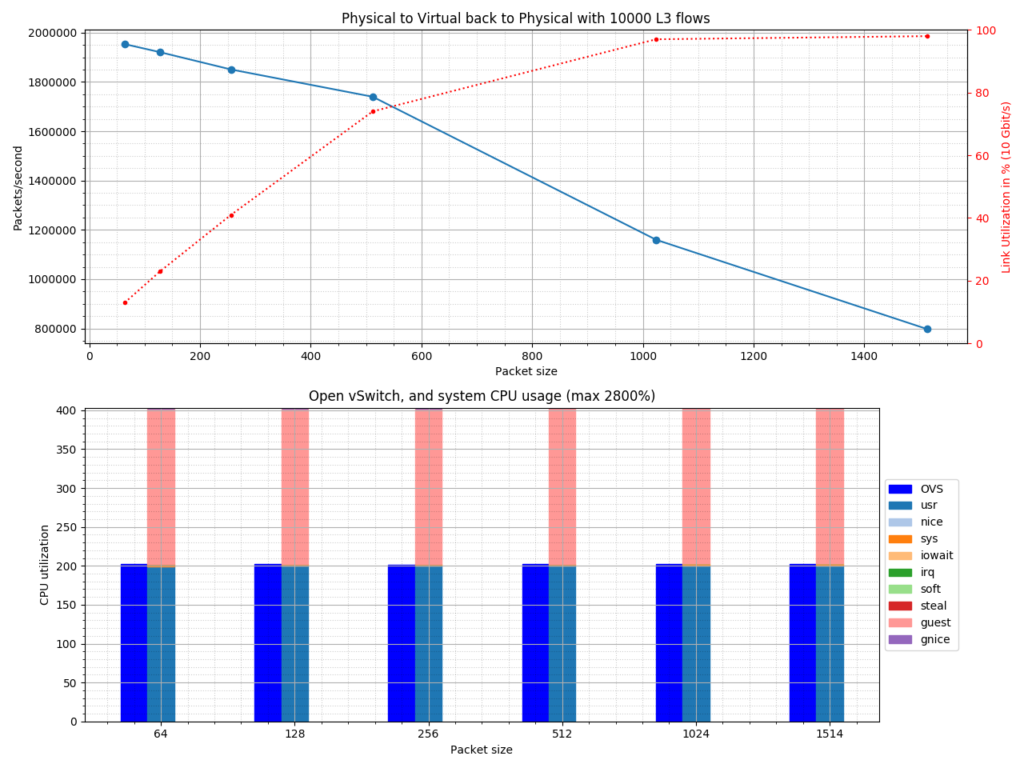
For every flow size a separate graph is created, test_p2v2p_xxx_l3.png, in addition to two overall graphs. The test_p2v2p_all_l3_ref.png will show all flow sizes in one graph with the addition of the theoretical maximum, the test_p2v2p_all_l3.png does not show the theoretical maximum.
Below you will find the content of the test_p2v2p_10000_l3.png and test_p2v2p_all_l3_ref.png as an example.
test_p2v2p_10000_l3.png:
test_p2v2p_all_l3_ref.png:
![]()
The following system configuration was used to gather these numbers and create the graphs:
- Dell PowerEdge R730, single socket
- Intel Xenon E5-2690 v4 @ 2.60GHz
- 128G of system memory
- Intel 82599ES 10G adapter