When you migrate to Red Hat OpenShift Virtualization, you are modernizing your infrastructure, but obviously you want to do so without breaking existing network dependencies or compromising security boundaries. Traditional architectures frequently struggle to resolve this, forcing teams to rely on complex, fragile NAT rules to maintain connectivity for imported VMs or on burdensome, manual configurations to preserve multi-tenant isolation across shared clusters. Ethernet virtual private network (EVPN) elegantly resolves these friction points by extending your existing data center fabric directly into the Red Hat OpenShift environment. Rather than requiring fragile workarounds, it leverages native, industry-standard protocols to bridge the gap between legacy bare-metal networks and modern Kubernetes clusters.
By extending the Layer 2 broadcast domain using EVPN with MAC-VRFs, you can import a virtual machine (VM) into OpenShift Virtualization—migrating its storage and booting it up on the new cluster without altering its network identity. This import process is not a live migration, but the stretched Layer 2 fabric ensures that the newly booted VM retains its original IP and MAC addresses and can seamlessly communicate with the rest of its application stack still residing on the legacy platform.
Furthermore, enterprise environments are fundamentally multi-tenant, frequently running distinct, isolated networks (such as "HR" and "Finance") that may utilize overlapping IP address spaces. A core motivation for adopting EVPN is to seamlessly extend this strict network isolation from the legacy physical network directly into the OpenShift cluster, ensuring that overlapping tenant networks remain completely isolated across the shared environment.
How to configure EVPN in OpenShift
As an example, figure 1 displays an example bare-metal OpenShift lab. A 3-node OpenShift cluster has 2 physical NICs attached to each node. The primary physical NIC is connected to a standard Red Hat OpenShift Container Platform machine network (the blue one on the left). The secondary physical NIC (the orange one on the right) is connected to the customer's provider network.
For testing purposes, an external Linux box (the external router on the right) acts as the customer BGP router and is also connected to the orange network.
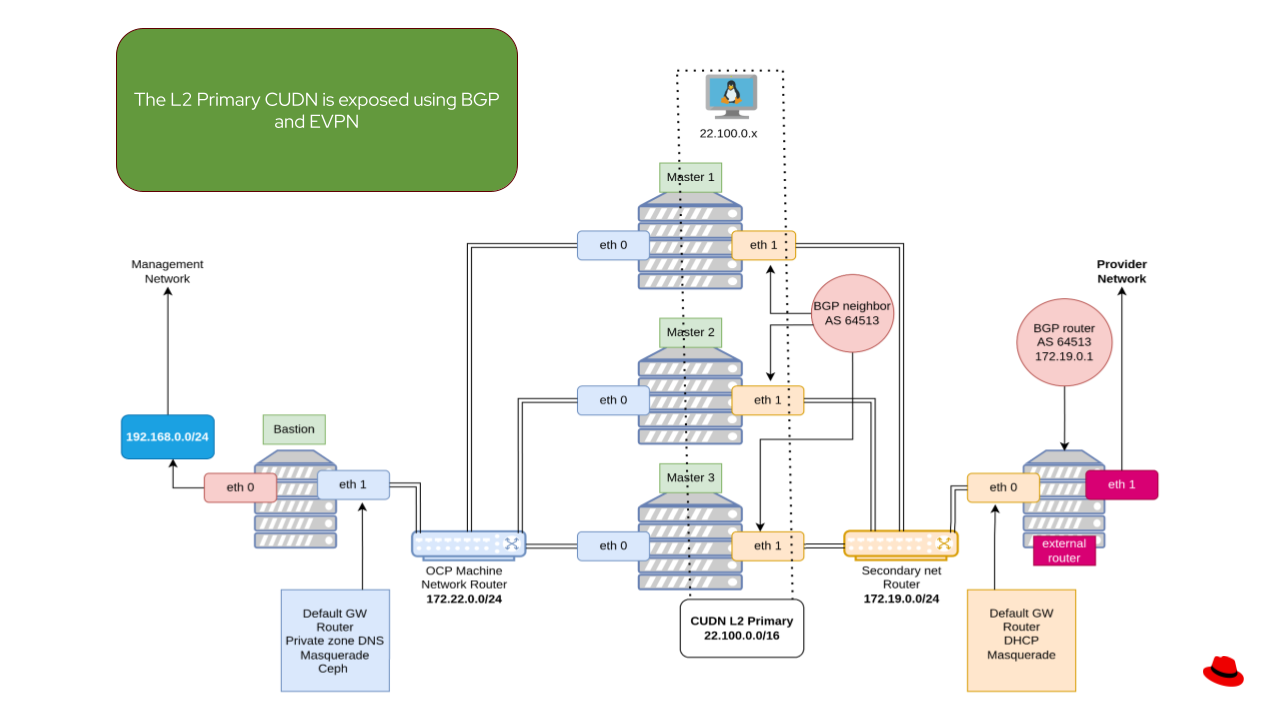
The goal is to create an L2 primary CUDN, announce the CUDN network with BGP, and extend the L2 Layer to the provider network. A new VM will be created and attached to the CUDN. Thanks to BGP and EVPN, we'll be able to reach the VM from the external router using a specific VNI.
BGP for EVPN step by step
The setup occurs on both OpenShift and the external router. I'm focusing on the OpenShift configuration because, on a real production system, an external BGP-speaking router is expected to be up and running. The required configuration steps are listed here, and explained in the following sections:
- Enable BGP in the cluster
- Set static IPV4 for the secondary physical NICs
- Create the VTEP CR
- Create the FRRConfiguration CR
- Create the namespace
- Create the cluster UDN
- Create the RouterAdvertisement
- Create the VM in the namespace
1. Enable BGP
To enable the BGP capabilities in OpenShift, configure the network operator. This is a one-time operation:
apiVersion: operator.openshift.io/v1
kind: Network
metadata:
   name: cluster
spec:
  additionalRoutingCapabilities:
    providers:
    - FRR
 …
  defaultNetwork:
    ovnKubernetesConfig:
        gatewayConfig:
            ipForwarding: "Global"
            routingViaHost: true
        routeAdvertisements: Enabled
    type: OVNKubernetes
2. Set static IPv4 for the secondary physical NICs
Provide a Kubernetes-NMState NNCP for each OpenShift node (each NNCP provides a static IP configuration of the secondary physical NIC).
The configuration for eth1 on Master 1:
apiVersion: nmstate.io/v1
kind: NodeNetworkConfigurationPolicy
metadata:
  name: node-1-fixed-ip
spec:
  nodeSelector:
    node: "1"
  desiredState:
    interfaces:
    - name: eth1
      type: ethernet
      state: up
      ipv4:
        dhcp: false
        address:
          - ip: 172.19.0.100
            prefix-length: 24
        enabled: true
      ipv6:
        enabled: false
The configuration for eth2 on Master 2:
apiVersion: nmstate.io/v1
kind: NodeNetworkConfigurationPolicy
metadata:
  name: node-2-fixed-ip
spec:
  nodeSelector:
    node: "2"
  desiredState:
    interfaces:
    - name: eth1
      type: ethernet
      state: up
      ipv4:
        dhcp: false
        address:
          - ip: 172.19.0.101
            prefix-length: 24
        enabled: true
      ipv6:
        enabled: false
The configuration for eth3 on Master 3:
apiVersion: nmstate.io/v1
kind: NodeNetworkConfigurationPolicy
metadata:
  name: node-3-fixed-ip
spec:
  nodeSelector:
    node: "3"
  desiredState:
    interfaces:
    - name: eth1
      type: ethernet
      state: up
      ipv4:
        dhcp: false
        address:
          - ip: 172.19.0.102
            prefix-length: 24
        enabled: true
      ipv6:
        enabled: false
Verify connectivity from the external router to the OpenShift nodes' secondary physical NIC (see figure 2 for an illustration):
vale@external-router:~$ for h in 172.19.0.100 172.19.0.101 172.19.0.102; do ping -c 3 $h & done; wait
64 bytes from 172.19.0.100: icmp_seq=1 ttl=64 time=0.238 ms
64 bytes from 172.19.0.101: icmp_seq=1 ttl=64 time=0.261 ms
64 bytes from 172.19.0.102: icmp_seq=1 ttl=64 time=0.637 ms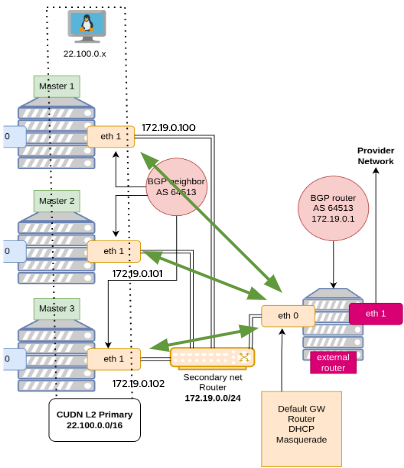
3. Create the VTEP
The secondary physical NIC IP addresses configured previously are automatically selected by the VXLAN tunnel endpoint (VTEP) controller because they fall within the VTEP CIDR range defined in our VTEP custom resource (CR). By matching these addresses to the specified CIDR, the controller verifies their eligibility and assigns them as the node's official VTEP IP addresses.
The VTEP controller checks for the node k8s.ovn.org/host-cidrs annotation and, if the VTEP controller finds a node with an IPv4 as part of the VTEP's specified CIDRs, it adds a new k8s.ovn.org/vteps annotation to the node, containing the VTEP's assigned IPv4.
apiVersion: k8s.ovn.org/v1
kind: VTEP
metadata:
  name: evpn-vtep
spec:
  cidrs:
    - 172.19.0.0/24
  mode: Unmanaged
Verify that the VTEPs are accepted:
$ oc get nodes -o yaml | grep cidrs
k8s.ovn.org/host-cidrs: '["172.19.0.100/24","172.22.0.11/24"]'
k8s.ovn.org/host-cidrs: '["172.19.0.101/24","172.22.0.12/24"]'
k8s.ovn.org/host-cidrs: '["172.19.0.102/24","172.22.0.13/24"]'
In this example:
- 172.22.0.0/24 is the OpenShift cluster's machine network
- 172.19.0.0/24 is the secondary network, and the one we want to use for VTEP
The VTEP status is listed as Allocated.
$ oc get vtep
NAME            ACCEPTED   REASON
evpn-vtep       True       Allocated
After the VTEP is accepted, a new VTEP annotation ik8s.ovn.org/vteps is added to the OpenShift nodes:
$ oc get nodes -o yaml | grep vteps
k8s.ovn.org/vteps: '{"evpn-vtep":{"ips":["172.19.0.100"]}}'
k8s.ovn.org/vteps: '{"evpn-vtep":{"ips":["172.19.0.101"]}}'
k8s.ovn.org/vteps: '{"evpn-vtep":{"ips":["172.19.0.102"]}}'
4. Create the FRRConfiguration
To enable FRRouting, create an FRRConfiguration:
apiVersion: frrk8s.metallb.io/v1beta1
kind: FRRConfiguration
metadata:
  name: underlay-peering
  namespace: openshift-frr-k8s
  labels:
    evpn: "true"
spec:
  nodeSelector: {}
  bgp:
    routers:
    - asn: 64513
      neighbors:
      - address: 172.19.0.1
        asn: 64513
        disableMP: true
        dualStackAddressFamily: false
        toAdvertise:
          allowed:
            mode: all
        toReceive:
          allowed:
            mode: all
If the underlay-peering FRRConfiguration is accepted, then a new FRRConfiguration custom resource is created for each node. There are 3 OCP nodes, so there are 3 OVN-Kubernetes generated configurations:
$oc get frrconfigurations.frrk8s.metallb.io
NAME                                                AGE
ovnk-generated-74jm6             40h
ovnk-generated-clz95             40h
ovnk-generated-j7srv             40h
underlay-peering                 40h
5. Create the namespace
Create a new namespace:
apiVersion: v1
kind: Namespace
metadata:
  labels:
    k8s.ovn.org/primary-user-defined-network: ""
    network: finance
  name: evpn-test
The CUDN label selector is network: finance.
6. Create the CUDN
Create an EVPN-based ClusterUserDefinedNetwork (notice the evpn parameter in the example below) using a MAC-VRF and VXLAN VNI 100. By specifying ipam.lifecycle Persistent, you are configuring the network with persistent VM IP addresses during live migration:
apiVersion: k8s.ovn.org/v1
kind: ClusterUserDefinedNetwork
metadata:
  labels:
    advertise: "true"
  name: finance
spec:
  namespaceSelector:
    matchLabels:
      network: finance
  network:
    layer2:
      role: Primary
      subnets:
        - 22.100.0.0/16
       ipam:
          mode: Enabled
          lifecycle: Persistent
    topology: Layer2
  transport: EVPN
  evpn:
    vtep: evpn-vtep
    macVRF:
      vni: 100
7. Create the route advertisement
Create a RouteAdvertisement to share the cluster's internal network paths with the external physical network:
apiVersion: k8s.ovn.org/v1
kind: RouteAdvertisements
metadata:
  name: advertise-evpn
spec:
  advertisements:
  - "PodNetwork"
  nodeSelector: {}
  frrConfigurationSelector:
    matchLabels:
      evpn: "true"
  networkSelectors:
  - networkSelectionType: ClusterUserDefinedNetworks
    clusterUserDefinedNetworkSelector:
      networkSelector:
        matchLabels:
          advertise: "true"
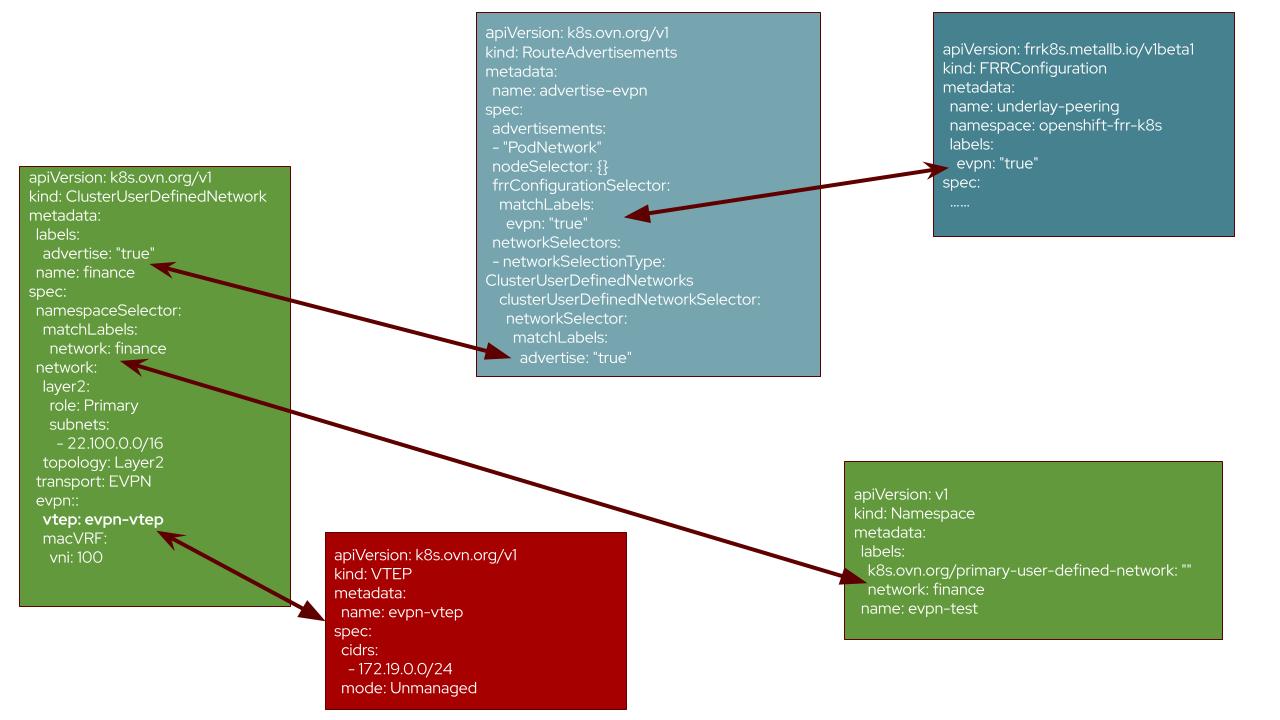
Notice that the selectors target parameters from the other configurations we've created up to this point. For example, evpn: true appears in the FRRConfiguration YAML, and advertise: true appears in the CUDN configuration YAML (and so on, as illustrated in figure 3).
8. Create the VM in the namespace
Create a VM in the evpn-test namespace, and obtain its IPv4 address and MAC address:
$ oc get vmi
NAME     AGE   PHASE     IP                    NODENAME
fedora   59m   Running   22.100.0.3            58-47-ca-7e-51-e4
......
mac: 0a:58:16:64:00:03
The VM fedora is running on the OpenShift Container Platform node 3.
This concludes the OpenShift configuration.
External router configuration
For context, this section provides some reference configurations for an external router. This meant as reference only, and in a real production environment you probably have a real router already, which you must configure accordingly.
For example, I'm using a standard Fedora 44 Linux server running an FRR BGP router container to simulate an external router in my lab. To configure it, you must:
- Create a bridge interface
- Create a VXLAN interface
- Provide FRR router configuration
The VXLAN ID (VNI) configured for the CUDN is 100 (this must match the VNI configuration of the ClusterUserDefinedNetwork you defined in the CUDN configuration section.
Create a Linux bridge:
ip link add br100 type bridge
ip link set br100 up
Create the VXLAN with id=100:
ip link add vxlan100 type vxlan id 100 \
dstport 4789 local 172.19.0.1 nolearninge
Attach the VXLAN to the Linux bridge:
ip link set vxlan100 master br100
ip link set vxlan100 up
Finally, assign an IPV4 address to the bridge. The bridge's IPv4 address must be part of the subnet configured in the CUDN.
ip addr add 22.100.0.1/16 dev br100External router (frr.conf)
This is the relevant code for FRRouter (found in frr.conf) in the external router:
...
address-family l2vpn evpn
  neighbor 172.19.0.100 activate # node 1
  neighbor 172.19.0.101 activate # node 2
  neighbor 172.19.0.102 activate # node 3
  advertise-all-vni
  advertise-svi-ip
  advertise-gateway-macip
  advertise ipv4 unicast
  vni 100 # same as CUDN's vni
exit-address-family
After starting the FRR BGP router, verify that the EVPN MAC addresses have been imported correctly. You should be able to see the VM's MAC and assigned IP address, confirming that communication is established in the BGP/EVPN/VXLAN fabric.
Finally, ensure the route targets the correct VTEP IP for the node where the VM is currently running:
- 172.19.0.100 for node 1
- 172.19.0.101 for node 2
- 172.19.0.102 for node 3
Verify the VM's IPv4 and MAC again:
oc get vmi
NAME     AGE   PHASE     IP                    NODENAME
fedora   59m   Running   22.100.0.3            58-47-ca-7e-51-e4
......
mac: 0a:58:16:64:00:03
Verify that the MAC is received in the external router through BGP/EVPN:
FRR Router command -> "show evpn mac vni 100"
Number of MACs (local and remote) known for this VNI: 2
Flags: N=sync-neighs, I=local-inactive, P=peer-active, X=peer-proxy
MAC                    Type         Flags Intf/Remote ES/VTEP
0a:58:16:64:00:03      remote       172.19.0.102
b6:bb:1c:86:82:77      local            br100
As expected, 172.19.0.102 is the VTEP of the OpenShift node where the VM is running
Ping the VM from the external router:
[external-router]$ ping 22.100.0.3
PING 22.100.0.3 (22.100.0.3) 56(84) bytes of data.
64 bytes from 22.100.0.3: icmp_seq=1 ttl=64 time=0.149 ms
64 bytes from 22.100.0.3: icmp_seq=2 ttl=64 time=0.182 ms
What if the VM live-migrates to another OCP node?
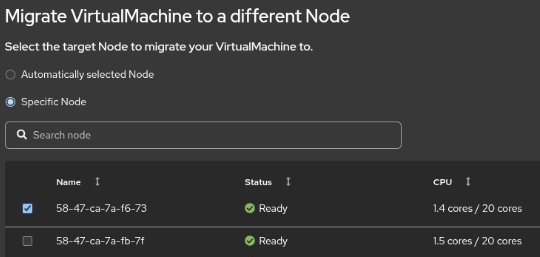
$ oc get vmi
NAME     AGE   PHASE     IP                    NODENAME
fedora   59m   Running   22.100.0.3            58-47-ca-7e-51-e4
......
mac: 0a:58:16:64:00:03
Before the migration, the VM was running on node 3 (58-47-ca-7e-51-e4) and is now running on node 1 (58-47-ca-7e-51-e4). The VM's MAC address did not change.
FRR Router command -> "show evpn mac vni 100"
Number of MACs (local and remote) known for this VNI: 2
Flags: N=sync-neighs, I=local-inactive, P=peer-active, X=peer-proxy
MAC                    Type         Flags Intf/Remote ES/VTEP
0a:58:16:64:00:03      remote       172.19.0.100
b6:bb:1c:86:82:77      local            br100
The external router received the BGP/EVPN update. Now the selected VTEP is 172.19.0.100, which is the IPv4 address of the node 1 secondary physical NIC acting as the node's VTEP.
Conclusion
The transition from legacy bare-metal infrastructure to modern platforms like Red Hat OpenShift Virtualization can present a logistical challenge for enterprise environments. Organizations require the ability to adopt new infrastructure through a phased migration approach, allowing administrators to move virtual machines at their own pace rather than forcing a risky reconstruction of the entire cluster at once. To enable this phased adoption, it's critical to stretch Layer 2 networks across both the legacy bare-metal clusters and the Red Hat OpenShift environment.
By adopting an EVPN-integrated approach, organizations can successfully execute on these two essential use cases:
- Seamless VM imports with L2 adjacency: Imported VMs retain their original IP and MAC addresses, allowing them to boot in OpenShift and immediately communicate with legacy application tiers without costly re-addressing or downtime.
- Robust multi-tenant isolation: EVPN enforces strict end-to-end network segmentation. This allows distinct tenants - even those with overlapping IP spaces - to coexist securely on the same physical infrastructure without the risk of collisions or manual configuration drift.
For more information about the technologies featured in this article:
- Red Hat OpenShift EVPN docs
- Upstream OVN-Kubernetes docs
- RFC 7432: BGP MPLS-based ethernet VPN
- RFC 8365: A network virtualization overlay solution using ethernet VPN (EVPN)

