The autoresearch project by Andrej Karpathy, former AI director at Tesla and OpenAI co-founder, gives an AI agent a GPT training script and lets it experiment autonomously. It modifies code, trains for 5 minutes, and keeps improvements while reverting failures and then repeating. We wanted to see if Red Hat OpenShift AI could run an autonomous ML research loop end-to-end, and what a 24-hour unsupervised agent would actually find. So we took that idea, packaged it into a container built on Red Hat AI base images, deployed it to an OpenShift cluster with H100 GPUs, and walked away.
From bare metal to oc apply
Karpathy's repo assumes a bare-metal setup: 1 GPU, Python, and the command to run the script: uv run train.py. That works on a personal workstation, but not when your GPUs sit behind a Kubernetes API.
We built a multi-stage Containerfile on a Red Hat OpenShift AI workbench image for PyTorch CUDA (odh-workbench-jupyter-pytorch-cuda-py312-rhel9). The image ships PyTorch and CUDA pre-configured on universal base image (UBI) 9, so the Containerfile adds what autoresearch needs: uv, git, and the Claude Code CLI.
FROM registry.redhat.io/rhoai/odh-workbench-jupyter-pytorch-cuda-py312-rhel9:v2.25.3
RUN curl -LsSf https://astral.sh/uv/install.sh | sh
RUN curl -fsSL https://claude.ai/install.sh | bash
The entrypoint supports 3 modes -- prepare for data download, manual for a single validation run, and agent for the autonomous loop. A set of Kubernetes manifests handles the rest (namespace, PVCs for data and workspace), a ConfigMap for the research strategy, and the agent pod.
Requesting a GPU is 1 line in the pod spec:
resources:
  requests:
    nvidia.com/gpu: 1
The GPU operator on OpenShift handles drivers, device plug-ins, and monitoring. No manual CUDA installation, and no driver version juggling is needed.
H100 vs. A100: same cluster, different nodeSelector
We tested on both GPU architectures. Switching between them from within OpenShift AI is pretty simple, requiring only one field change:
| Metric | H100 80GB | A100 80GB |
|---|---|---|
| Baseline val_bpb | 0.9951 | 1.1044 |
| MFU | 39.4% | 15.7% |
| Steps per 5 min | 943 | 384 |
| Tokens/sec | ~1,630,000 | ~430,000 |
The H100 Hopper architecture runs native Flash Attention 3 kernels, giving 2.5x the throughput compared to the A100 Ampere for this workload. It's the same container image, and the same manifests. It's the nodeSelector is the difference:
nodeSelector:
  nvidia.com/gpu.product: NVIDIA-H100-80GB-HBM3
What the agent discovered in 24 hours
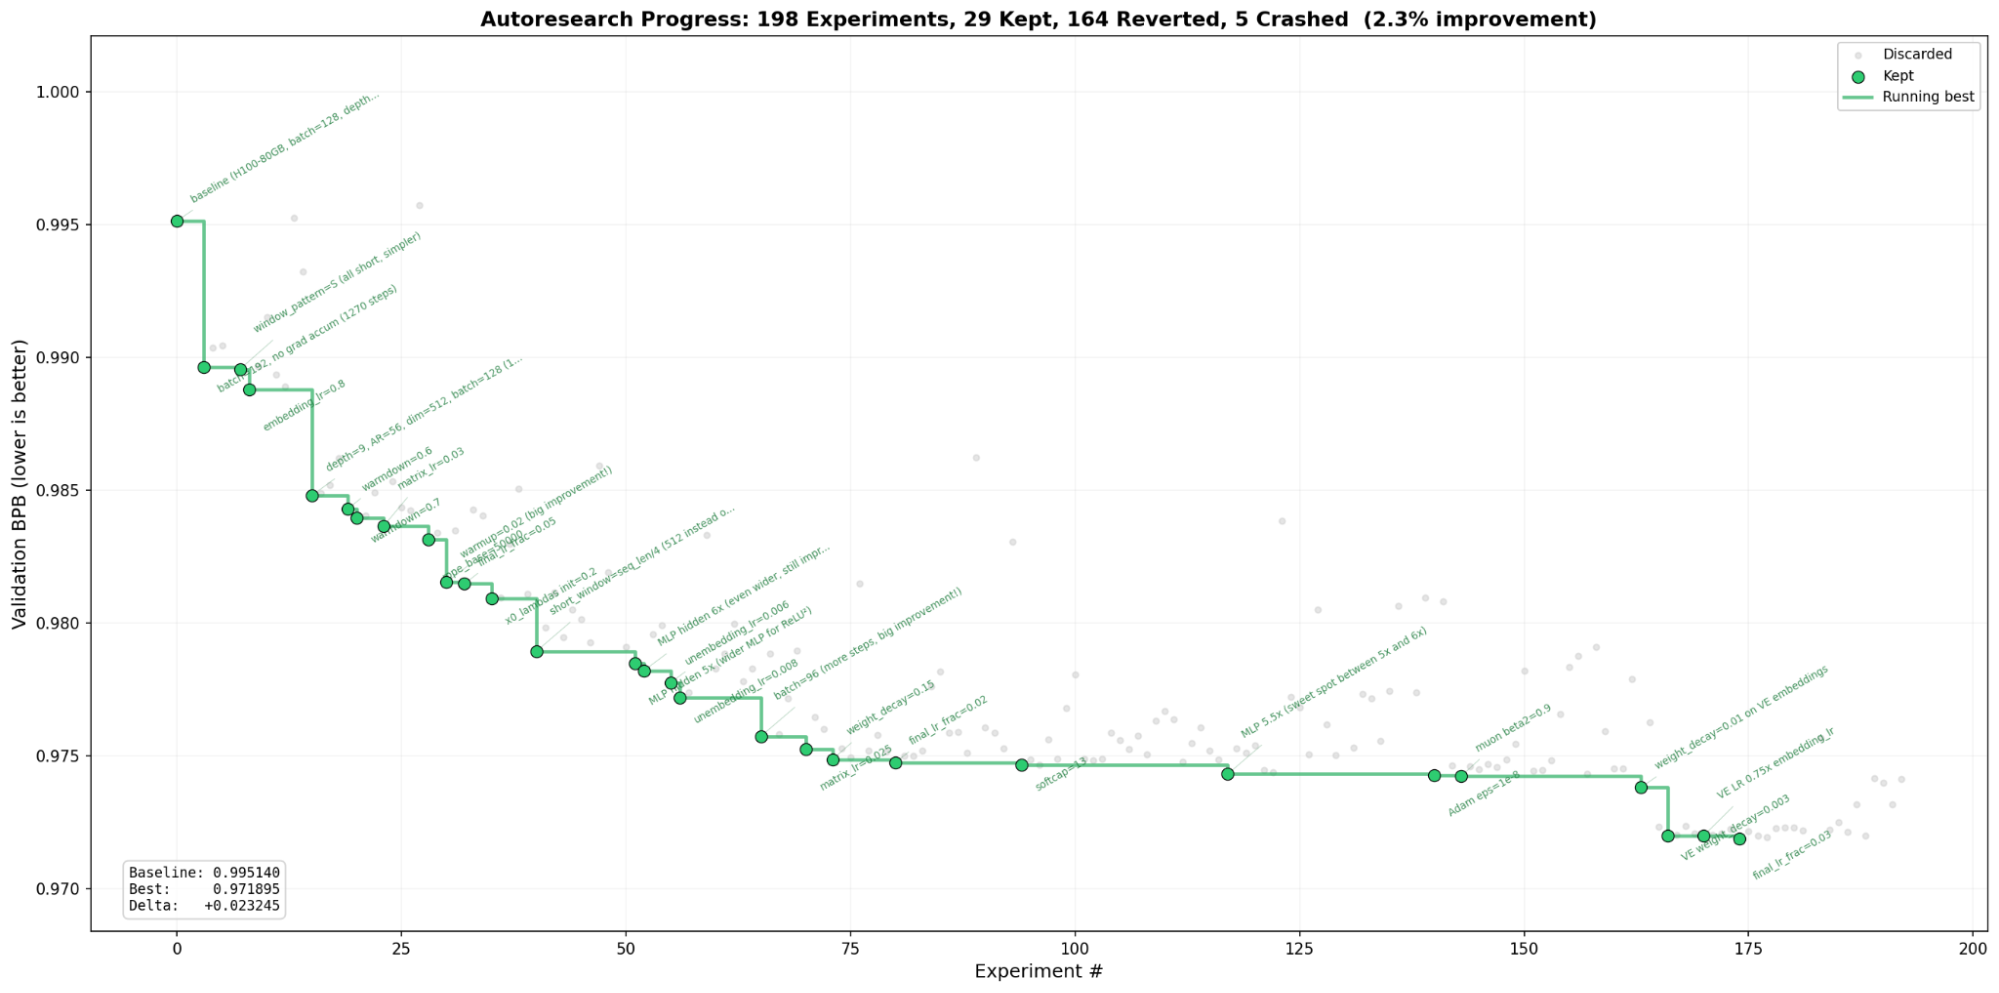
The agent ran Claude Code Opus for more than 20 hours in a single session without restarting. It systematically explored architecture changes, optimizer tuning, and hyperparameter sweeps:
- Step count dominates fixed-time training: Reducing batch size from 128 to 96 and eliminating gradient accumulation gave more training steps per 5-minute window, consistently beating larger-model approaches.
- Wider multi-layer perceptrons (MLP) beat deeper networks: MLP at 5.5x hidden dimension with depth 9 outperformed depth 10+ at 4x MLP width.
- Value embedding regularization was the late-run breakthrough: Adding weight decay (0.003) and learn rate (LR) scaling (0.75x) to value embeddings pushed validation loss (val_bpb) from 0.974 to 0.972 in the final hours.
- Some ideas fail spectacularly: Weight tying produced 3.2 BPB (catastrophic regression). Label smoothing hit 1.3 BPB.
There's a catch
The version of Red Hat OpenShift AI used for these tests (v3.4.0-ea.1) includes a base image with CUDA 12.8 compatibility libraries. On nodes running later drivers (580.x / CUDA 13.0), these load instead of the host driver and cause cudaErrorSystemDriverMismatch. The fix is 1 line in the entrypoint:
export LD_LIBRARY_PATH="/usr/lib64${LD_LIBRARY_PATH:+:$LD_LIBRARY_PATH}"This fix applies to any Red Hat OpenShift AI image running on nodes with CUDA 13.0 or later drivers.
Try it yourself
The full deployment (Containerfile, Kubernetes manifests, entrypoint, results, and the progress visualization) is published at github.com/aicatalyst-team/autoresearch. The README walks through setup in 8 steps: create namespace and storage, configure credentials, build or pull the image, prepare data, and launch the agent.
If you have an OpenShift cluster with GPU nodes, you can go from git clone to a running autonomous research agent in less than an hour.
If you don't have OpenShift AI yet, start with a 60 day trial.