With Red Hat OpenShift 4, Red Hat completely re-architected how developers install, upgrade, and manage OpenShift to develop applications on Kubernetes. Under the hood, the installation process uses the OpenShift installer to automate container host provisioning using Red Hat Enterprise Linux (RHEL) CoreOS. It is then easy to initialize the cluster and set up the cloud domain name system (DNS), load balancer, storage, and so on.
Initially, the fully automated OpenShift installation option (called installer-provisioned infrastructure) was available only for public and private clouds. In OpenShift 4.5, the installer was updated to support installer-provisioned infrastructure on VMware vSphere.
This article is for enterprise IT users and developers who run their workloads on vSphere. I will show you how to bring up your OpenShift clusters in 30 minutes without the pain of needing to do manual tasks each time.
Prerequisites
Let's walk through the prerequisites for using OpenShift's installer-provisioned infrastructure with vSphere. Make sure your development environment is set up as follows:
- To download and run the OpenShift installer binary, you will need a Linux virtual machine (VM) or a Linux guest on your laptop. This host must be able to access your vCenter and VM subnet.
- You will also need a VMware cluster with the following configuration:
- One vCenter instance.
- An ESXi cluster with the minimum for provisioning a standard OpenShift cluster.
- vSphere 6.5 with hardware version 13 or 6.7 update 2.
- 800GB storage from the datastore.
- 18 or more virtual central processing units (vCPUs). The minimum setup is three leaders with four vCPUs per node and three followers with two vCPUs per node. The recommended configuration is four vCPUs on followers, even for lab purposes. You will also need a temporary vCPU for the bootstrap machine.
- 88GB memory. You will need three leaders with 16GB RAM per node, three followers with 8GB RAM per node, and 16GB temporary RAM for the bootstrap machine.
Network configurations
You will need a network and subnet with Dynamic Host Configuration Protocol (DHCP) enabled with the long-lease time for this pool. As an example, my lab network is VM Network with the IP address of 198.18.1.0/24. The DHCP pool is at 198.18.1.11-200.
For the DNS server IP requirements, you will need a DNS server with two A records. Note that the two DNS A records point to the API and ingress virtual IP addresses. These will point to the OpenShift installer-provisioned cluster load balancer (HAProxy with Keepalived run as containers in OpenShift nodes).
Here is how OpenShift vSphere's installer-provisioned infrastructure simplifies the load balancer service for the cluster:
api.<cluster-name>.<base-domain>with one reserved IP address for the API virtual IP on the same cluster network. As an example, the IP address forapi.ocp01.example.comcould be 198.18.1.201.*.apps.<cluster-name>.<base-domain>with one reserved IP address for the ingress virtual IP on the same cluster network. As an example, the IP address forapi.ocp01.example.comcould be 198.18.1.202.The DNS test result should look like this:
[root@centos7-tools1 ~]# nslookup api.apps.ocp01.example.com Server: 198.18.133.1 Address: 198.18.133.1#53 Name: api.ocp01.example.com Address: 198.18.1.201 [root@centos7-tools1 ~]# nslookup api.apps.ocp01.example.com Server: 198.18.133.1 Address: 198.18.133.1#53 Name: api.ocp01.example.com Address: 198.18.1.201
Account privileges
You will also need to configure the vCenter account privileges specified in the OpenShift guide to installing a cluster on vSphere. Please set your account privileges before continuing with this guide.
Finally, you'll need a Red Hat account to access cloud.redhat.com and retrieve your pull secret for the OpenShift self-supported 60-day trial.
When you are done, the infrastructure preparation should look similar to the diagram in Figure 1.

Once your development environment is set up, we can continue to the next step.
Set up the installer VM
You need to perform a few one-time tasks before starting the OpenShift installer. Once you've done these tasks, you will be able to re-use them to deploy as many clusters as you like.
Generate the SSH private key
Generate your secure shell (SSH) private and public key if you don't have one in your ~/.ssh/ directory. You will need the key for OpenShift node access when it is time to perform debugging tasks:
ssh-keygen -t rsa -b 4096 -N '' -f ~/.ssh/id_rsa
Obtain the installation and client binaries
You can create your free account and go to the Red Hat Cloud Services Portal—OpenShift Cluster Manager to obtain the installer and client binaries for your operating system. Do the following from the portal's web user interface:
- Log in to the OpenShift Cluster Manager.
- Click Create an OpenShift cluster.
- Choose Red Hat OpenShift Container Platform.
- On Select an infrastructure provider, select Run on VMware vSphere.
- In the OpenShift installer, select your operating system binary, for example, Linux. Then, click Download installer. If you want the latest release, use this download URL: https://mirror.openshift.com/pub/openshift-v4/clients/ocp/latest/openshift-install-linux.tar.gz.
- Click Download pull secret or copy the pull secret and save it to a file.
- Click Download command-line tools and select your operating system. Or, you can use this URL for the latest Linux binary: https://mirror.openshift.com/pub/openshift-v4/clients/ocp/latest/openshift-client-linux.tar.gz.
Extract the installation and client programs. For example, run this command:
tar xvf openshift-install-linux.tar.gz
tar xvf openshift-client-linux.tar.gz
cp oc /usr/local/bin/
Add the vCenter root CA certificates to your system trust
The OpenShift installer requires access to vCenter's API, so the vCenter certificate must be trusted. Download the vCenter's root certificate authority (CA) certificates and extract and copy them to your system trust:
export VCENTER=<your vcenter hostname or IP Address>

wget https://${VCENTER}/certs/download.zip --no-check-certificate
unzip download.zip
cp certs/lin/* /etc/pki/ca-trust/source/anchors
update-ca-trust extract
Your installer machine is now set up, and you can run the installer as many times as you want.
Demonstration: Deploying a simple cluster
For this demonstration, we will deploy a quick, standard cluster that doesn't require any customization.
Run the installer
The OpenShift installer is a command-line interface that requests your input for the following:
- SSH public key: For example,
/root/.ssh/id_rsa.pub. - Platform: vSphere.
- vCenter: Your vCenter hostname, for example,
vc1.example.com. - Username: Your vCenter username, for example,
administrator@vsphere.local. - Password: Your vCenter password.
- Network: Select your cluster network with the DHCP you previously set up.
The OpenShift installer will connect to your vCenter and list your network for you to select. - A virtual IP address for the API: This is the IP address that you allocated and mapped to the
api.<cluster-name>.<base-domain>DNS record (for example, 198.18.1.201). - A virtual IP address for ingress: This is the IP address that you allocated and mapped to the
*.apps.<cluster-name>.<base-domain>DNS record (for example, 198.18.1.202). - Base domain: This will be the same as your
<base-domain>, such asexample.com. - Cluster name: This will be the same as your
<cluster-name>, such asocp01. - Pull secret: The pull secret that you downloaded or copied from the OpenShift cluster management page.
Here is an example of output from the OpenShift installer's installation process:
export INSTALLATION_DIR=$HOME/ocp01-01
mkdir $INSTALLATION_DIR

./openshift-install create cluster --dir=$INSTALLATION_DIR --log-level=info
? SSH Public Key /root/.ssh/id_rsa.pub
? Platform vsphere
? vCenter vc1.example.com
? Username administrator@vsphere.local
? Password [? for help] *************
INFO Connecting to vCenter vc1.example.com
INFO Defaulting to only available datacenter: DC1
INFO Defaulting to only available cluster: DC1-Cluster
INFO Defaulting to only available datastore: NFS_Datastore
? Network: VM Network
? Virtual IP Address for API: 198.18.1.201
? Virtual IP Address for Ingress: 198.18.1.202
? Base Domain: example.com
? Cluster Name: ocp01
? Pull Secret [? for help] ***************
Provision a bootstrap machine and leader nodes
The OpenShift installer will now provision a bootstrap machine and three leader nodes. Your API virtual IP and ingress virtual IP will first host on the bootstrap machine for the leader nodes to self-initialize with the ignition and bootstrapping process. The deployment in the bootstrapping stage will look like the diagram in Figure 2.

When the bootstrapping is complete and all the leader node's API servers are up, the OpenShift bootstrap node will be destroyed automatically with the installer. Then, the installer will start provisioning the follower nodes with an OpenShift MachineSet. For this, you could do a machine auto-scaler or manually increase or decrease the nodes later, using either the OpenShift web console or command-line tools (oc or kubectl). The API virtual IP and ingress virtual IP will also be moved to hosted status on the leader nodes and infrastructure and follower nodes.
Your deployment in the provisioning stage will look like the diagram in Figure 3.

Provisioning the OpenShift cluster normally takes 40 to 60 minutes to complete.
Post-installation configuration
You can log into your cluster as a default system user by exporting a kubeconfig file to KUBECONFIG ENV vars. This file is created during the installation for a specific cluster and stored in $INSTALLATION_DIR/auth/kubeconfig. Let's go through the post-installation configuration process together.
First, export the kubeadmin credentials:
export KUBECONFIG=$INSTALLATION_DIR/auth/kubeconfig
Next, verify that you can run the oc command successfully using the exported configuration:
oc whoami
oc get node
Infrastructure administrators and developers can use the OpenShift console to work with Kubernetes clusters. To access the console for the first time, the installer generates a kubeadmin credential in the $INSTALLATION_DIR/auth/password file. Use the oc command to get the URL for your OpenShift console:
oc -n openshift-console get route
Copy the URL and open it in your web browser, and use the initial credentials to log in. For the username, enter kubeadmin; for the password, use the password from $INSTALLATION_DIR/auth/kubeadmin_password, as shown in Figure 4.

Figure 5 shows the overview page in the OpenShift console.

Container registry storage
Red Hat OpenShift Container Platform uses an internal registry to upgrade clusters and support continuous integration and continuous deployment (CI/CD) with containers built within clusters. You will need to set up storage for OpenShift's internal registry before you can deploy the demo application.
Note: For our example, we will use ReadWriteOnce (RWO) storage that supports only a single registry instance. For production, Red Hat recommends using the scalable registry that requires ReadWriteMany (RWX) storage.
Configuring the OpenShift image registry
You can configure the OpenShift image registry using either the web console or a command-line tool. I'll show you how to do this task both ways. If you are new to Kubernetes, you might find the OpenShift console helpful for seeing and understanding your cluster's status. On the other hand, using a CLI tool is powerful and gets the tasks done quickly with JSON or YAML declarations.
Using the OpenShift web console
The first thing you'll do is create a persistent volume claim (PVC) with 100GB capacity from the default storage class ("thin") using the VMware datastore:
- Change to the openshift-image-registry project.
Go to Storage > Persistent Volume Claims and click Create Persistent Volume Claim, as shown in Figure 6.

Figure 6: Create a persistent volume claim. - Enter the following parameters:
- Storage Class:
thin. - Persistent Volume Claim Name:
image-registry-storage. - Access Mode:
Single User (RWO). - Size:
100GiB.
- Storage Class:
Then, click Create, as shown in Figure 7.

Figure 7: Configure and create the persistent volume claim.


Next, you will edit the registry configuration to use the <PVC name> you've just created and also update the managementState and updateStrategy:
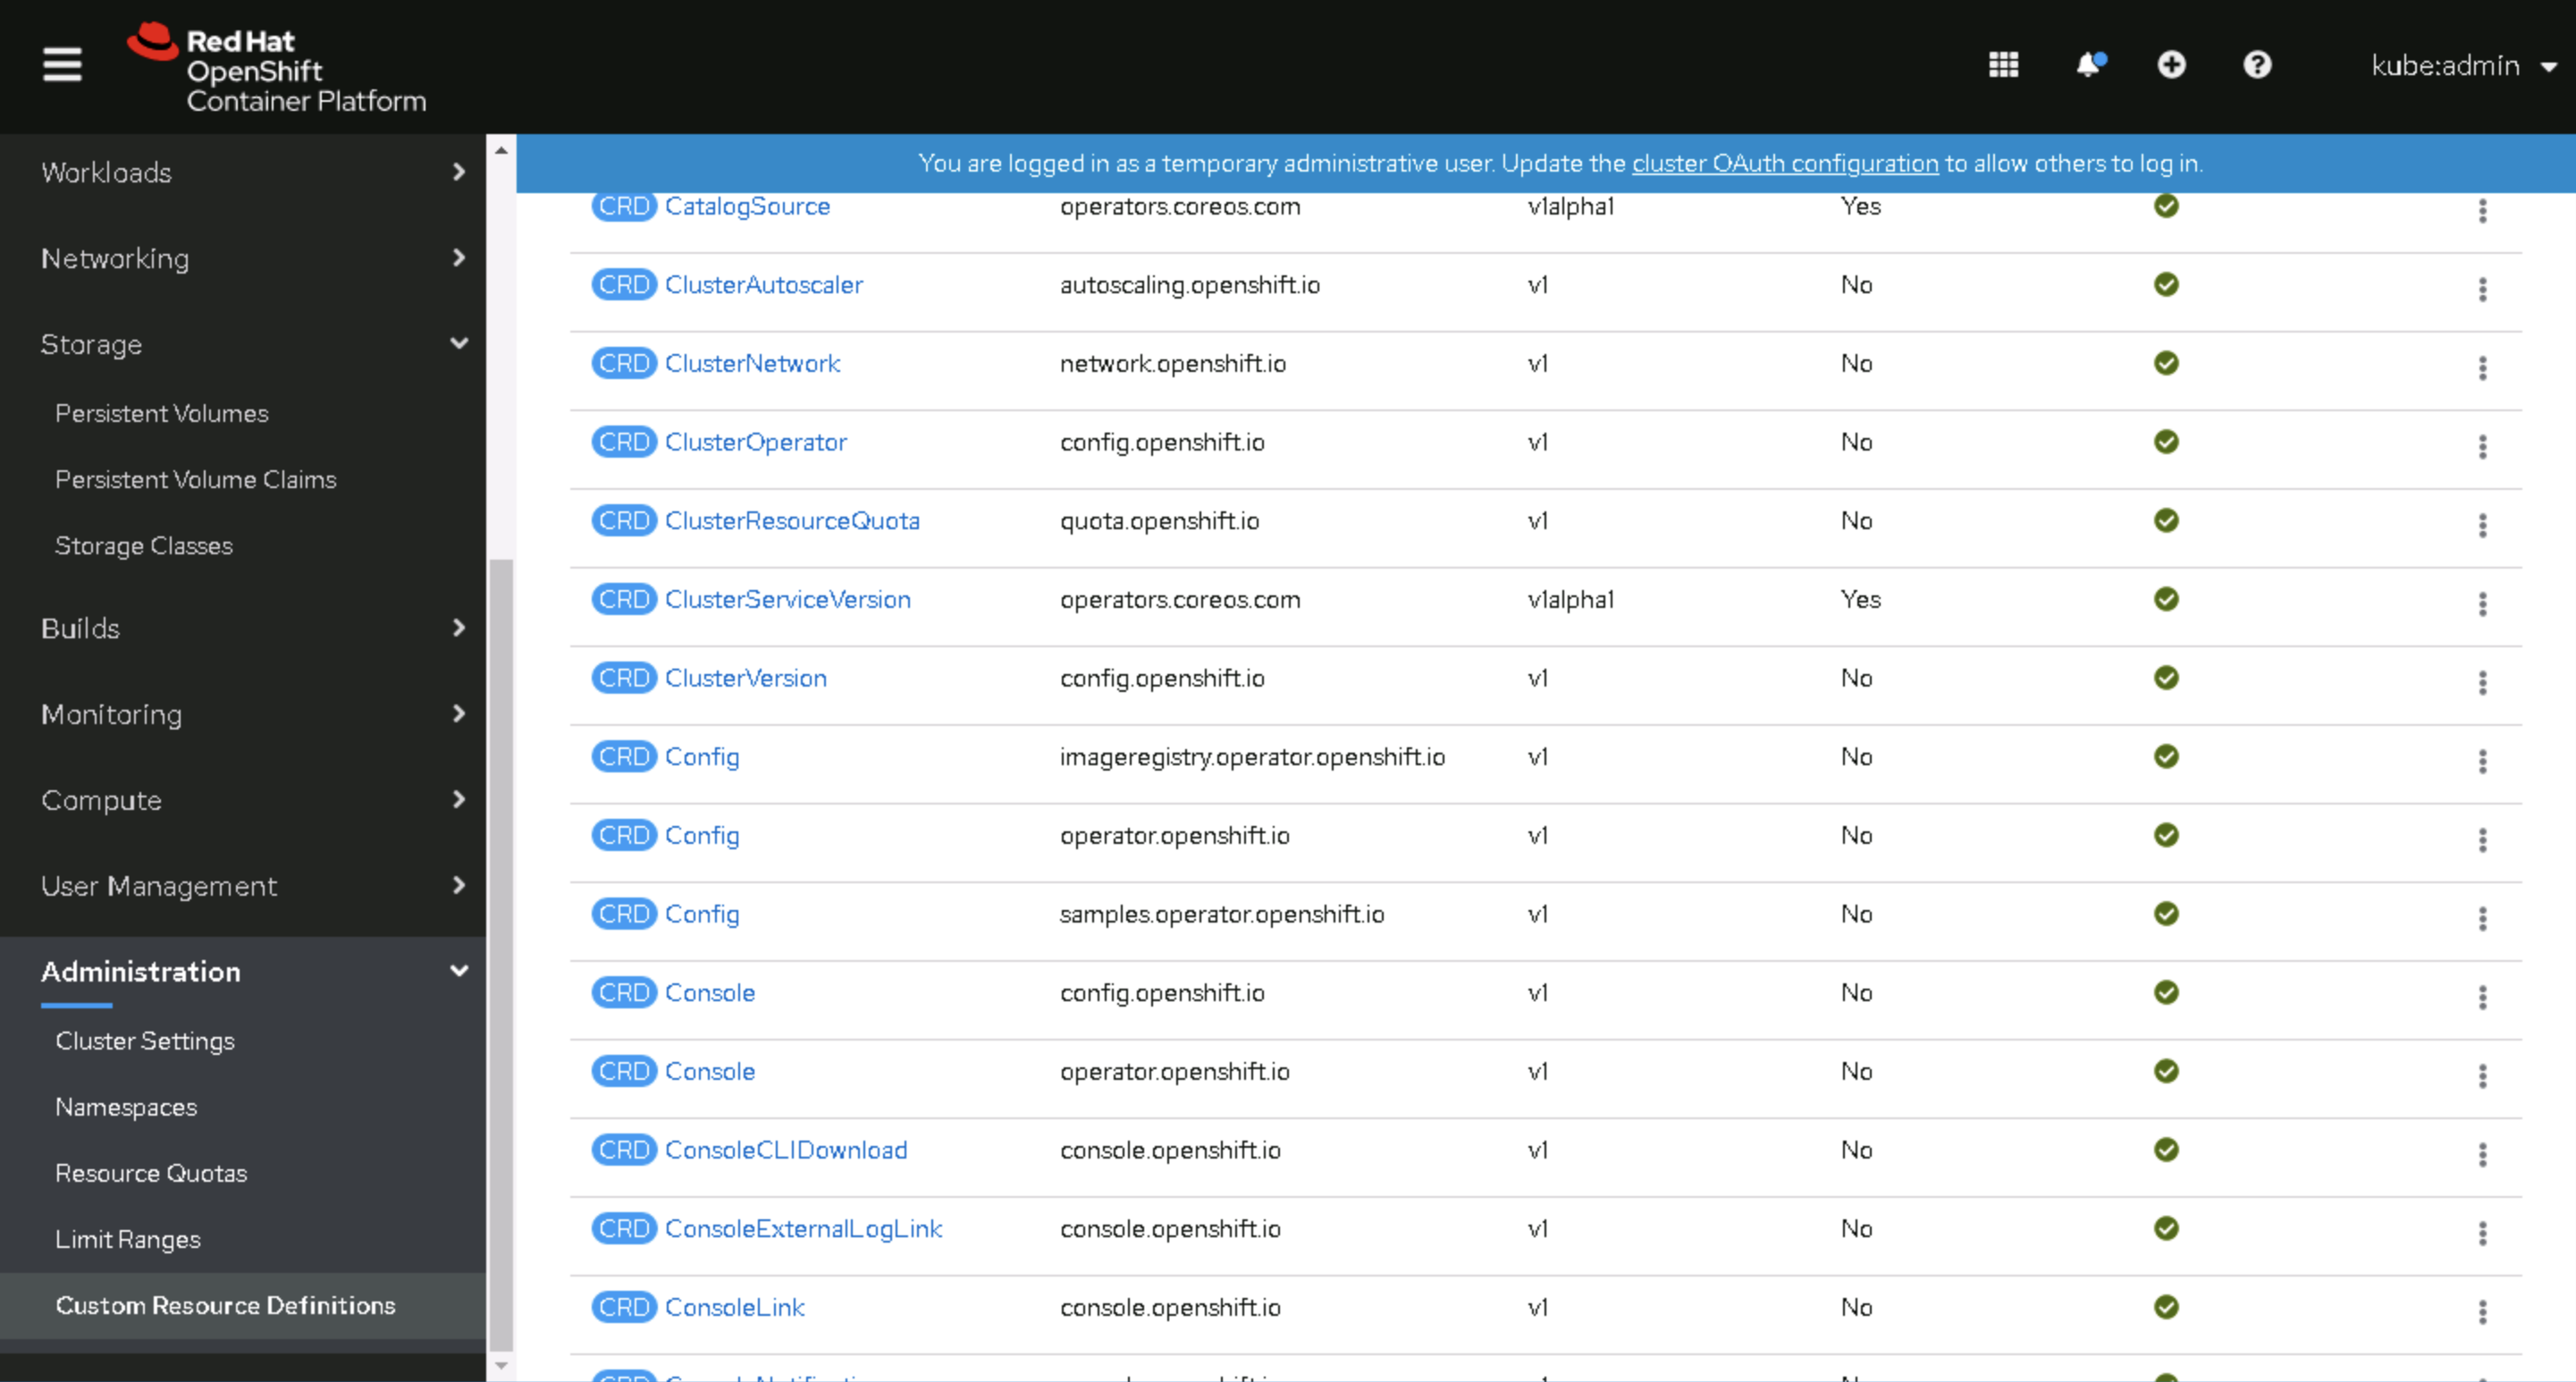
Go to Administration > Custom Resource Definitions, shown in Figure 8.

Figure 8: Go to Administration > Custom Resource Definitions in the OpenShift web console. Click on the CRD Config of
imageregistry.operator.openshift.io, shown in Figure 9.
Figure 9: Click CRD Config. Change to the Instance tab and click on the config name cluster, shown in Figure 10.

Figure 10: Click the config name, cluster. Select the action Edit Config, shown in Figure 11:

Figure 11: Select Edit Config. Edit the following parameters and click Save:
managementState: Managed
rolloutStrategy: Recreate
storage:
  pvc:
    claim: image-registry-storage
Figure 12 shows the resulting YAML file on the Config Details page.

Figure 12: The edited configuration file.


The Image Registry Operator will now create an image registry for your OpenShift cluster. You can check by selecting Project = openshift-image-registry and going to Workloads > Pods. You will see the image-registry pod is in the process of being created, as shown in Figure 13.

Using the OpenShift CLI
Now, we'll perform the same tasks using the OpenShift CLI. Once again, we start by creating a persistent volume claim:
cat <<EOF >> image-registry-pvc.yaml
apiVersion: v1
kind: PersistentVolumeClaim
metadata:
  name: image-registry-storage
  namespace: openshift-image-registry
spec:
  accessModes:
    - ReadWriteOnce
  resources:
    requests:
      storage: 100Gi
  storageClassName: 'thin'
EOF

oc apply -f image-registry-pvc.yaml
Next, patch the imageregistry.operator.openshift.io config "cluster":
$ oc patch configs.imageregistry.operator.openshift.io cluster --type merge --patch '{"spec":{"managementState":"Managed","rolloutStrategy":"Recreate","storage":{"pvc":{"claim":"image-registry-storage"}}}}'That's it! Your OpenShift cluster is ready to build and deploy to your container applications.
Conclusion and next steps
This article showed you how to use OpenShift's installer-provisioned infrastructure to quickly create and configure an enterprise-grade, production-ready Kubernetes cluster with Red Hat OpenShift Container Platform on VMware vSphere. Visit learn.openshift.com for free, guided hands-on labs to keep learning how to deploy your applications or learn basic OpenShift operations.
Last updated: September 25, 2024