Following the first announcement of odo earlier in the year, we are pleased to announce the beta release of odo, an official project hosted on the OpenShift GitHub repository. After months of hard work, the beta release indicates that the API is stable and that functionality going forward will not change.
OpenShift Do (odo, for short) is a fast and straightforward CLI for developers who write, build, and iterate constantly on their source code. Instead of using more-refined tools such as oc, odo focuses on the iterative inner-loop cycle of coding (iterating on code changes prior to committing to Git) rather than the management of each application deployed to OpenShift. This article provides an overview of odo's functionality.
We have created odo as a tool for developers to focus on their source code rather than worry about deployment scenarios. It’s as easy as having odo know about your source code by using odo create and specifying the framework for your application. Whether you’re pushing source code or a binary, odo will be smart enough with odo push to know how to run or build it as needed.
With odo, you can iterate on your source code and watch as odo automatically validates and deploys the source code to OpenShift with one simple command: odo watch.
Red Hat OpenShift is an on-premise platform built around containers and on top of Kubernetes, providing developers with a user interface and command line to deploy their applications. OpenShift automates the build, deployment, and management of all applications so you can focus on what matters most: code.
When first developing applications on Red Hat OpenShift, developers typically accomplish their tasks in this order:
- Connect to an OpenShift cluster.
- Package their source code into a Docker image or use a template or Source-2-Image.
- Go through either OpenShift reference documentation or follow the step-by-step GUI on OpenShift Console.
- Use
ocor OpenShift Console to deploy their application. - Modify their source code and re-deploy the application.
- Check that the source code has been deployed correctly and works.
- Repeat the above steps until satisfied.
Odo automates the workflow by combining steps 2 through 6.
- Connect to an OpenShift cluster.
- Create your application and define it with
odo create. - Deploy your application with
odo push. This can either be source code or binary data. - Iterate or have odo automatically push new local changes with
odo watch.
Odo features
- Simple and easy deployment centered around similar concepts such as project, application, and component.
- Completely client-based, no server required.
- Supports multiple languages and frameworks (Node.js, Java, Ruby, Perl, PHP, and Python)
- Detects changes to local source and pushes it to the cluster accordingly, giving instant feedback to any build changes in real-time.
- Lists all available and deployment components to the OpenShift cluster. Configure locally, deploy anywhere.
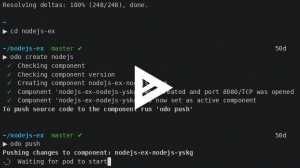
Demonstration
The following is a demonstration on deploying an example Node.js application to a Red Hat OpenShift cluster:
Asciilink: https://asciinema.org/a/225717
Upcoming tutorials and workshops
At Red Hat Summit, you can attend the “Put the dev back in DevOps: Cloud-native at local speed” breakout session, on Tuesday, May 7 at 3:45 p.m., where Jorge Morales will walk you through some of the drivers of odo, talk about other competing tools, and show it in action.
If you prefer a deep dive workshop, Jan Kleinert will lead “Developing applications on Red Hat OpenShift as mere mortals” on Thursday, May 9 at 10:45 a.m., a two-hour hands-on workshop introducing odo in more depth.
What’s next?
- Check out our GitHub repository: https://github.com/redhat-developer/.
- Get started with your source code and deploy your application. Follow our getting started guide: https://github.com/openshift/odo/blob/master/docs/getting-started.adoc.
Additional reading
"Easing application development on OpenShift with odo" by Jorge Morales Pou
If you haven’t registered for Red Hat Summit yet, sign up now to attend. See you in Boston!
Last updated: June 27, 2023