This guide is related to the recent deprecation of the Red Hat Mobile Application Platform Build Farm. Throughout this guide, we'll guide you through the steps required to build on a machine of your own an application that was originally built using the Build Farm. Further information surrounding the Build Farm deprecation is available in our product release notes.
Red Hat Mobile Supported Configurations Documentation
Before getting started, it's important to be aware of the versions of the tools, frameworks, and SDKs that the Build Farm uses to build mobile applications. This information can be found on the Red Hat Mobile Application Platform Supported Configurations page. This guide will call out the specific versions in each section and also note where you need to confirm versions for your specific project and/or requirements.
This guide contains six primary sections:
- Prerequisites
- Building native iOS applications
- Building native Android applications
- Building Apache Cordova applications for iOS
- Building Apache Cordova applications for Android
- Updating Application connection tags
Prerequisites
System requirements
- Windows 10, macOS 10.11.5, and/or recent a Linux OS, for example, Ubuntu 14.04 or newer.
- iOS applications will require a macOS machine to build; the minimum OS version required depends on your target iOS version since Xcode releases often require macOS updates.
- A general guideline is a minimum of 4GB of RAM is required, and 8GB is recommended for all platforms.
Software versions
The following versions of software were used in the creation of this guide. More-recent releases are likely to work; however, minor adjustments that fall beyond the scope of this post might be necessary.
- Android Studio 3.1
- Xcode 8
- Cordova CLI v6.3.1
- Node.js v8.x
- npm (this will be installed alongside Node.js)
- FHC (Red Hat Mobile command-line tools) 7.2.0
- Git 2.18
- Ruby 2.4.2
We recommend using the Node Version Manager to install and manage Node.js versions. Once Node.js is installed, you can install the recommended Cordova (necessary if you are building a Cordova application) and FHC versions using the following commands. Different versions of these tools can be installed at your own discretion by changing the semver tag after the @ symbol in the following commands:
$ npm install -g cordova@6.3.1
$ npm install -g fh-fhc@7.2.0
NOTE: Depending on your Node.js installation method, you may need to prefix these commands with a sudo if an EACCESS error is reported during the installation. Always exercise caution when using sudo. Installing Node.js via Node Version Manager or following this npm guide also provides a workaround to avoid using sudo.
Once these are installed, it is possible to execute fhc and cordova commands in a terminal. Finally, configure FHC using the fhc targetand fhc login commands. Refer to the FHC documentation for more information on this process.
Access to source code via Git
Access to your source code stored in Red Hat Mobile Application Platform is managed by Git. Please refer to our local development documentation to ensure you have correctly configured your Git installation and SSH keys before proceeding any further.
After you have configured Git SSH access, you can clone your application source code from Red Hat Mobile Application Platform to your machine. This can be achieved using the Git Clone URL that is displayed on the Details screen of your application in Red Hat Mobile Application Platform, like so:
$ git clone $GIT_CLONE_URL
Alternatively, you can use FHC to clone your entire project locally; this still requires the Git and local development prerequisites to be fulfilled. Running the following command will clone all Client and Cloud code repositories for the project:
$ fhc projects clone --project=$PROJECT_ID
Certificates and signing credentials
You can obtain a copy of your signing credentials for both iOS and Android platforms from the Credentials screen of the Red Hat Mobile Application Platform Studio as shown.
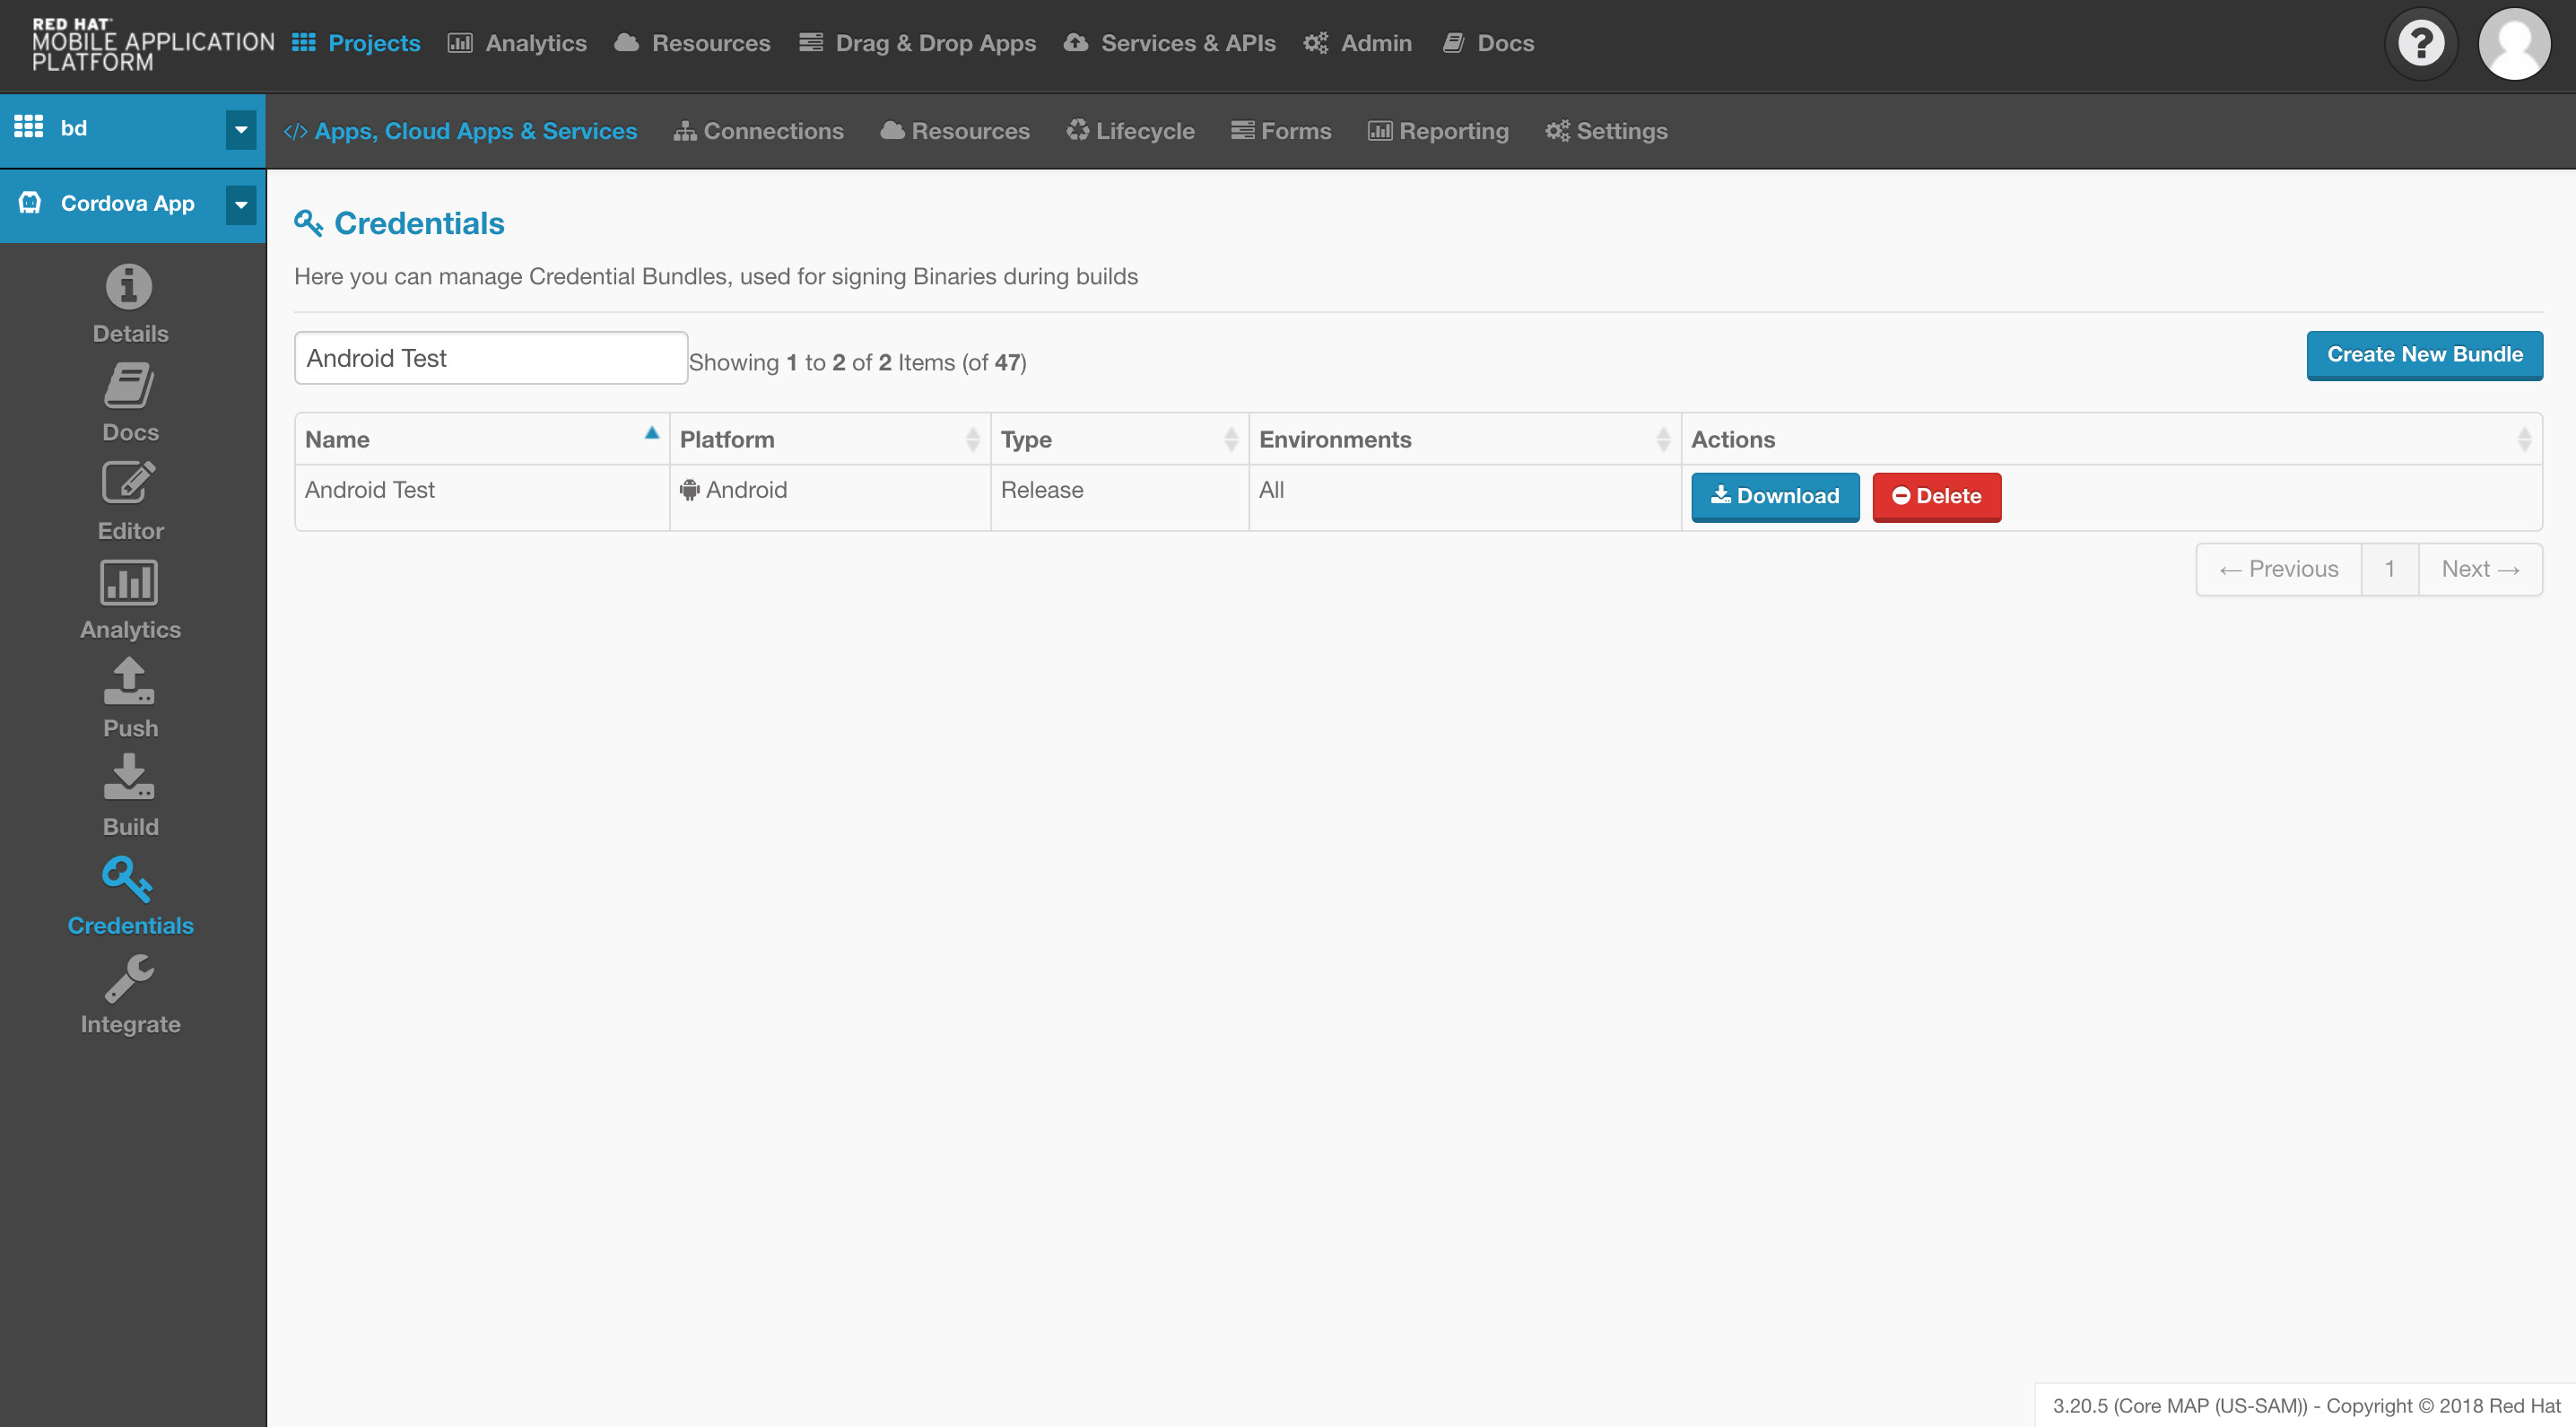
Alternatively, you can download the credentials via FHC using the following commands:
# List and find your credential bundle ID
$ fhc credential list

# Download the bundle using the retrieved ID
$ fhc credential download --id=$CREDENTIAL_ID --output=$OUTPUT_FILE_PATH
Android credentials
When you uploaded your keystore to Red Hat Mobile Application Platform you had to split it using commands from our documentation into cert and key PEM files. If you still have the original keystore file, then you can skip this step and use that keystore for signing your application; otherwise, you'll need to follow these steps to re-create your keystore from the downloaded credentials.
# Generate a cert.p12 file from the cert and key pem files you downloaded
$ openssl pkcs12 -export -out cert.p12 \
-in rhmap-cert.pem -inkey rhmap-key.pem \
-passin pass:$OLD_PASSWORD -passout pass:$NEW_PASSWORD

# Create a new keystore.jks file from the cert.p12
$ keytool -importkeystore -srckeystore cert.p12 \
-srcstoretype pkcs12 \
-destkeystore keystore.jks \
-deststoretype jks
Each set of credentials in this new keystore file will have an alias that identifies it. To find the alias of your credentials, execute this command:
$ keytool -list -keystore keystore.jks -v
To change the alias, you can use the following command:
$ keytool -changealias -keystore keystore.jks \
-alias $OLD_ALIAS -destalias $NEW_ALIAS
You should now have a keystore file with your signing credentials and a known alias that you can use to sign production builds of your Android application.
iOS credentials
If you have already added your iOS credentials to your Mac, you can skip this step; otherwise, you need to download the signing credentials and add them to your Keychain and Xcode. To do this, ensure the files you downloaded from the Red Hat Mobile Application Platform or developer.apple.com have the following extensions:
- Provisioning Profile:
mobileprovision - Certificate:
cer - Key:
p12
With the correct extensions, the files will appear with the icons visible in the screenshot below:
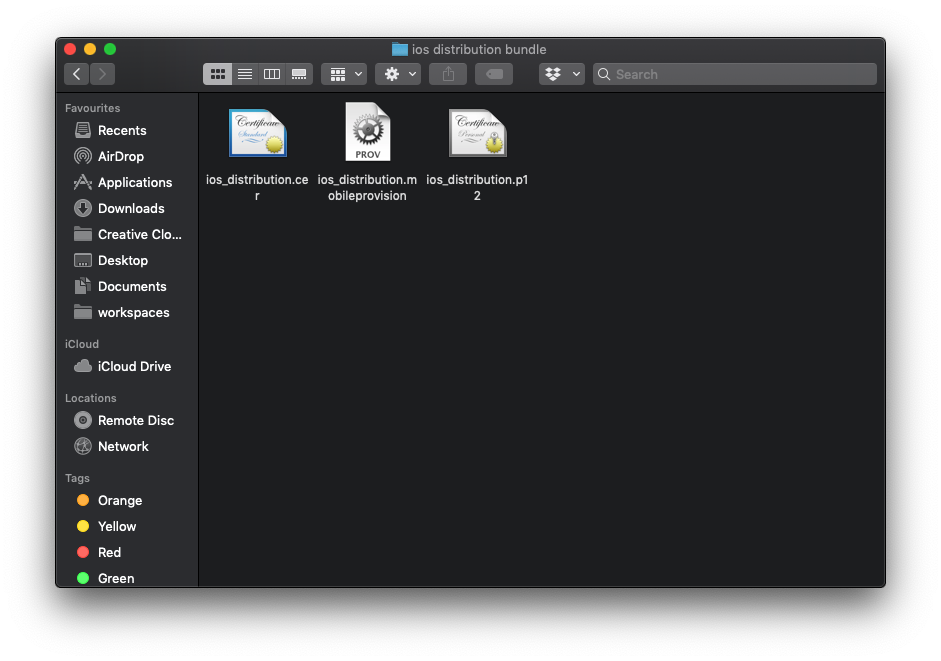
Once the files have the correct extensions, you can double-click them and macOS will take the appropriate action by adding the key and cert to your Keychain and adding the provisioning profile to Xcode.
NOTE: You will need to perform this action twice since Apple requires you to use credentials to create both Debug and Release builds of your iOS application.
Building native iOS applications
At this point, you should have met the following prerequisites:
- Signing key and certificate downloaded and installed in the macOS Keychain
- Provisioning Profile downloaded and added to Xcode
- Application source code cloned locally using Git or FHC
You now need to install the iOS project dependencies using CocoaPods. If you don't have CocoaPods installed, you can execute the following commands to install and configure it:
$ gem install cocoapods
$ pod setup
NOTE: The gem command might require you to use the sudo prefix depending on how your Mac and Ruby installation is configured.
Once these commands are complete, you need to run the following from the root of the application source code directory:
$ pod install
This will install the various SDK components required by your application and once complete, it will instruct you to use the newly created project-name.xcworkspace when working with your iOS application. Go ahead and open that file now.
Create a development (debug) build
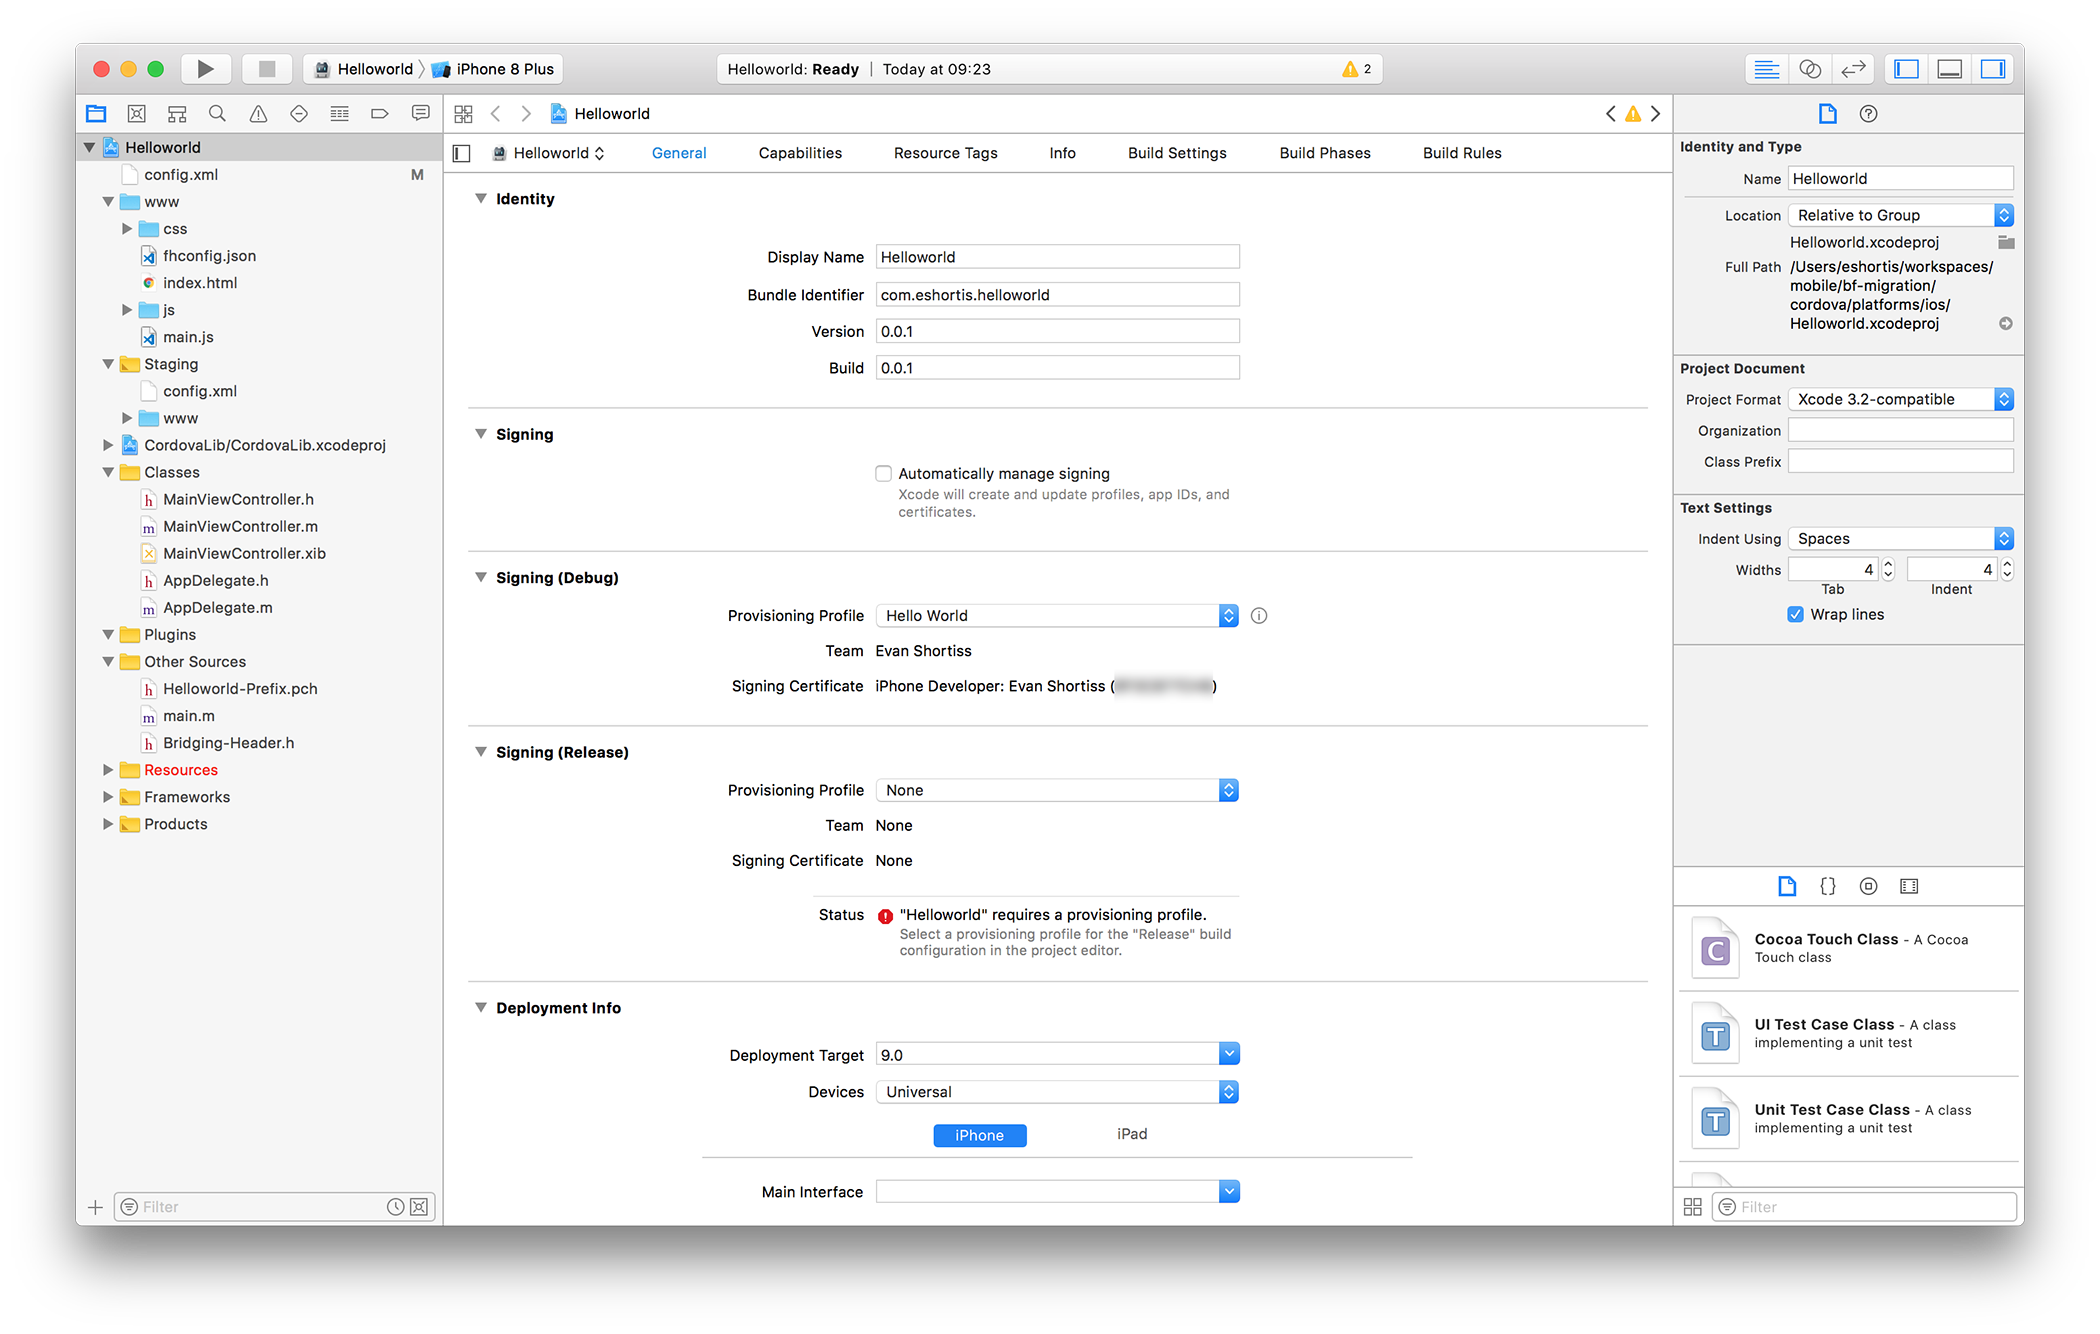
Choose your project from the left pane, which is known as the Navigator in Xcode. This should allow you to view the General tab from the center column. Expand the Signing section and uncheck Automatically manage signing. Next, expand the Signing (Debug) section and choose a valid Provisioning Profile using the dropdown. Do the same for the Signing (Release) section. Also, verify that the Bundle Identifier matches that of the provisioning profile you created or downloaded. Finally, configure the target SDK version and device type. An example is shown below.
Once you are finished configuring these settings, you’ll need to select the Generic iOS Device type from the device selector in the top left. Next, select Product > Archive to trigger a build. After the build completes successfully, you’ll be presented with a window that displays your build(s). Choose the latest build from the list, and then click Export on the right. When prompted to select a distribution method, select Development. On the next screen, choose App Thinning options, if necessary, and select the manifest generation checkbox if you’d like to host the binary for download on your own server. Finally, select a Provisioning Profile, review the final IPA contents and click Export.
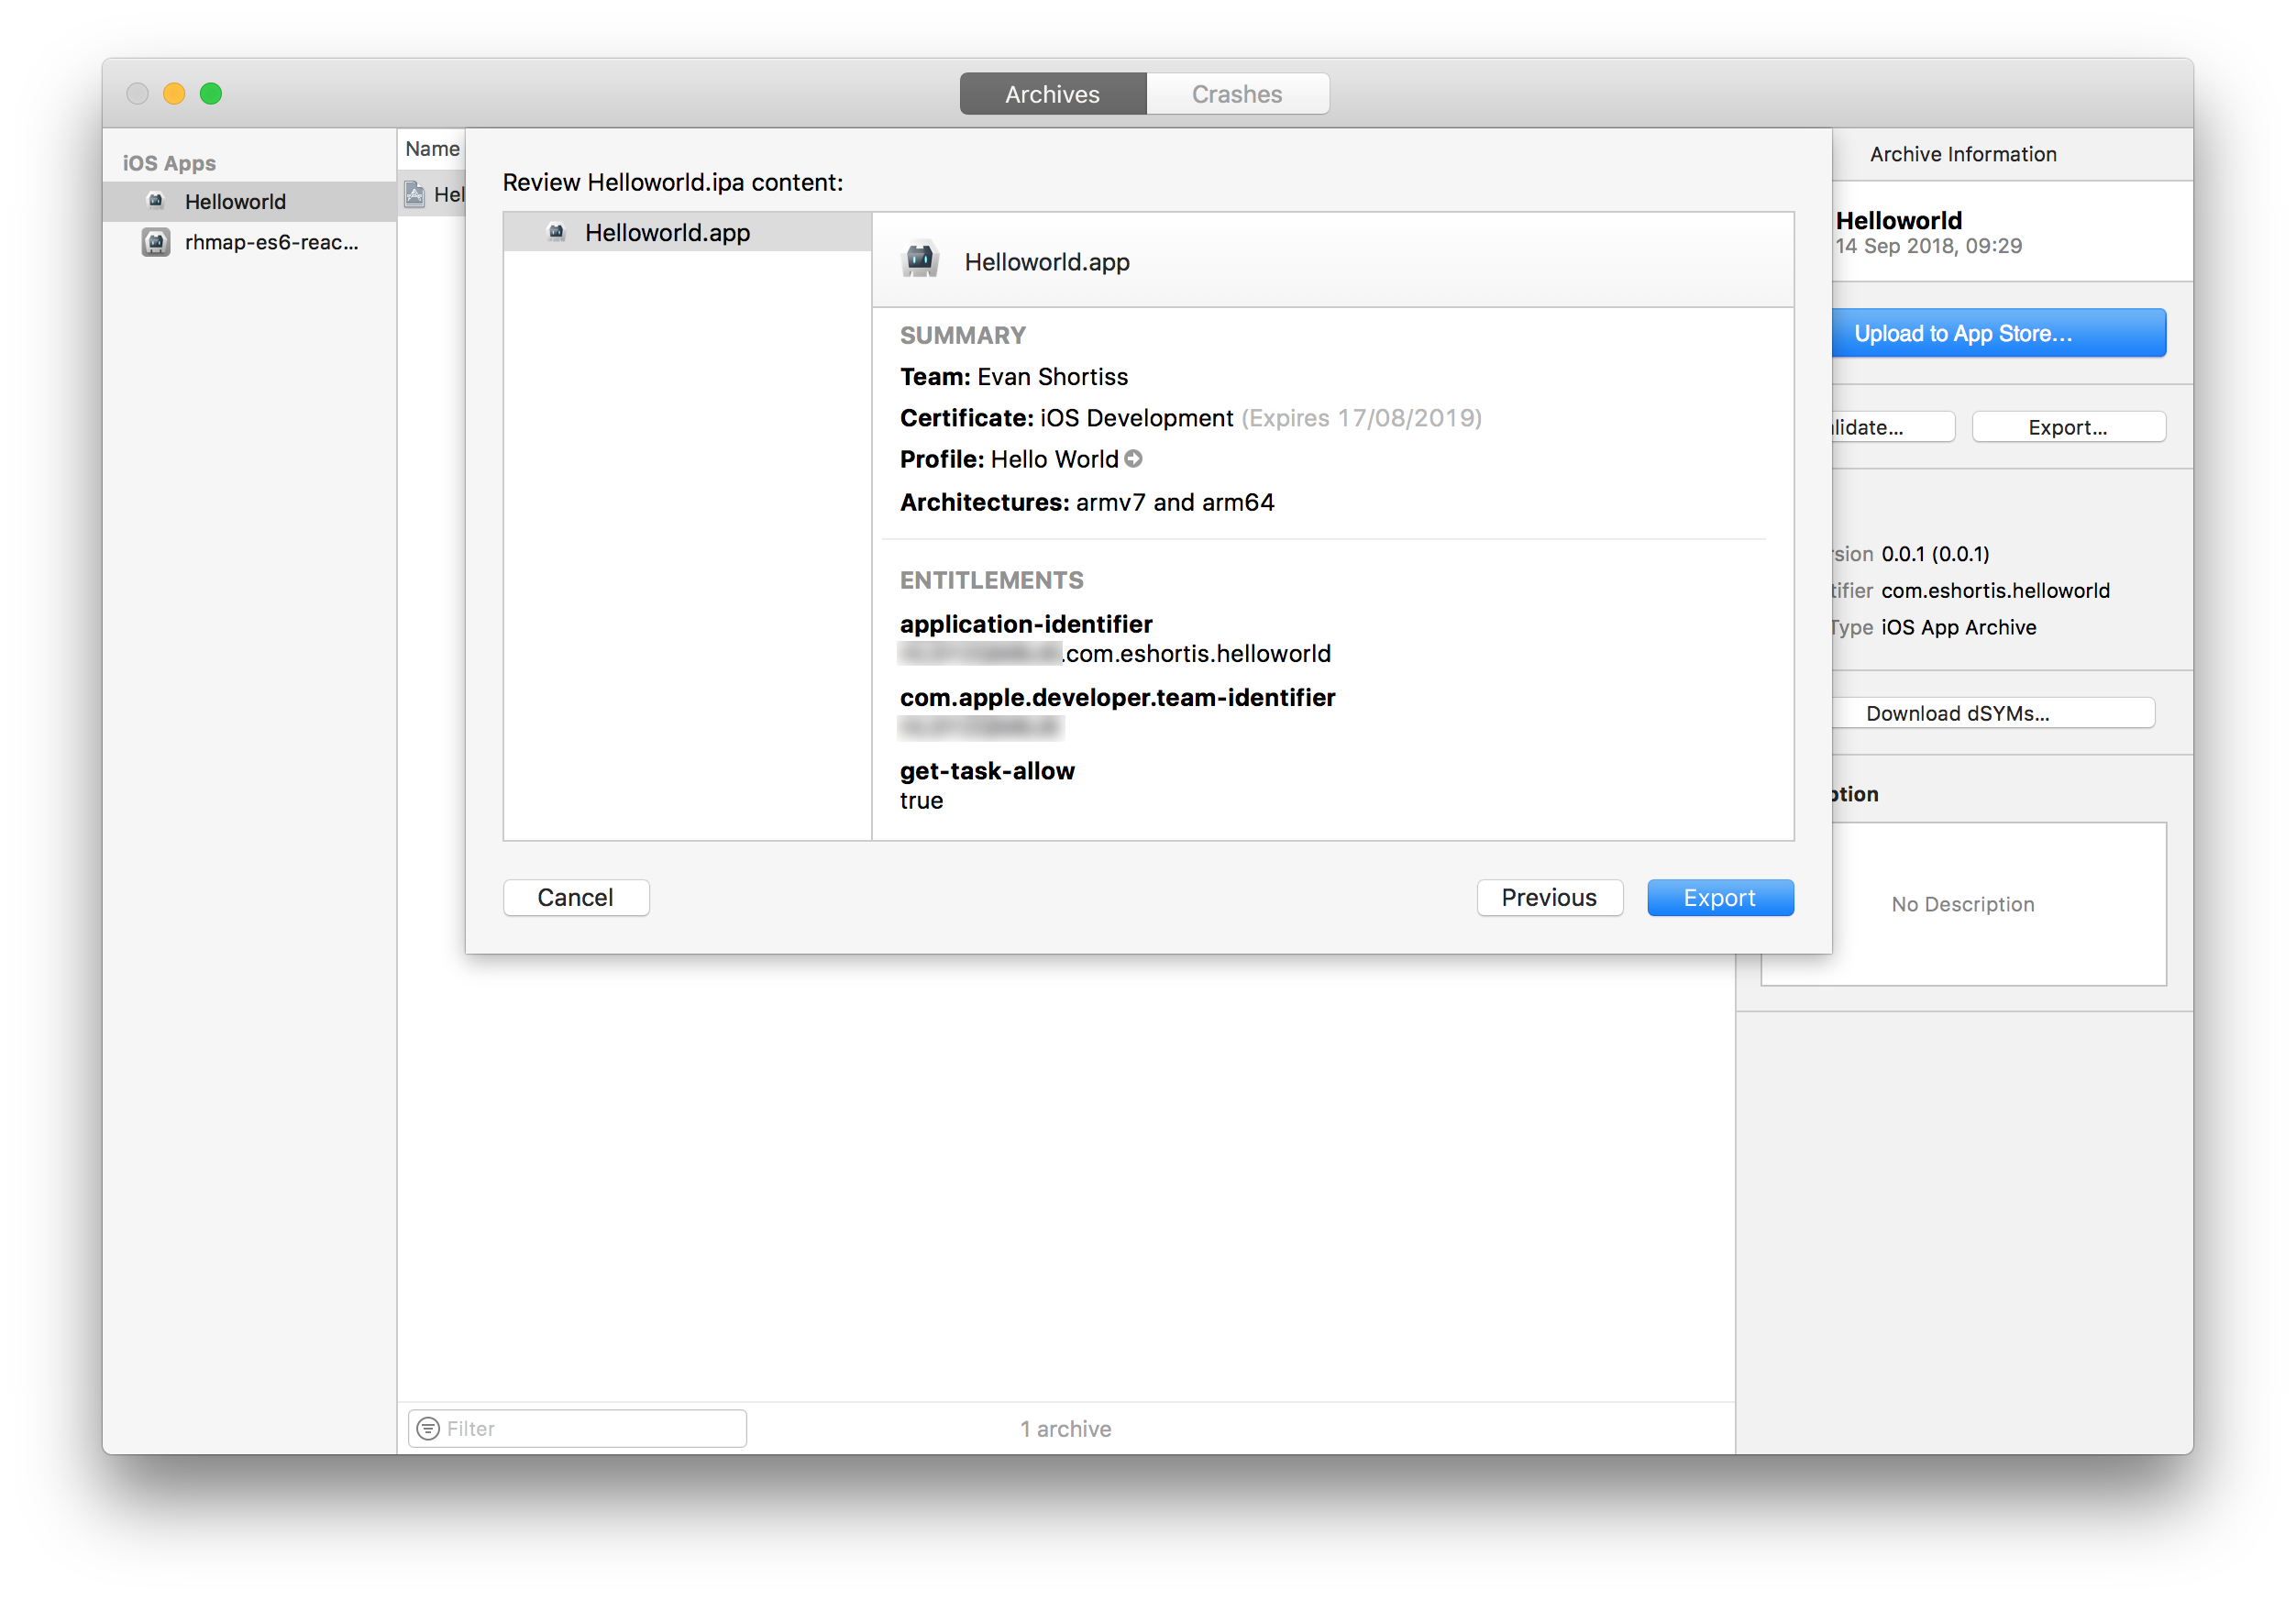
An IPA file will be exported to the chosen folder and can be distributed using your method of choice.
Create a production (release) build
The steps for creating a production build for iOS are the same as those for development: simply choose the appropriate packaging method on the Archives screen—that is, AdHoc, Enterprise, or AppStore—and have the necessary production signing credentials available.
Building native Android applications
At this point, you should have met the following prerequisites:
- Regenerated keystore from PEM files (if necessary)
- Application source code cloned locally using Git or FHC
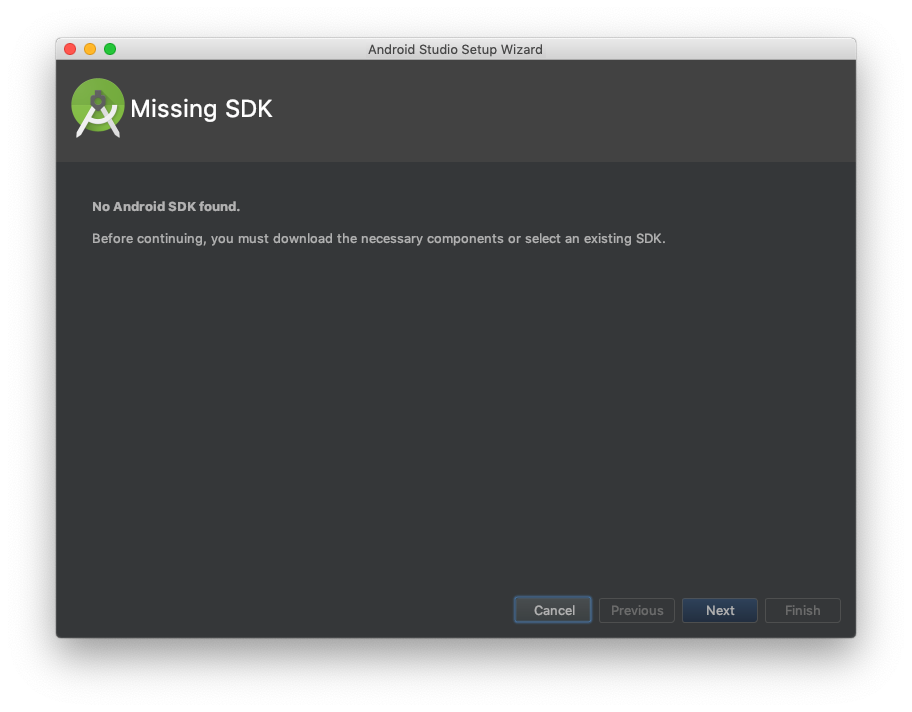
Launch Android Studio and open your project from the initial prompt or File menu. If this is your first time launching Android Studio, you might be prompted to install an SDK using a dialog box similar to the one shown below. If this happens, follow the prompts and you'll be able to open your project after the downloads complete.
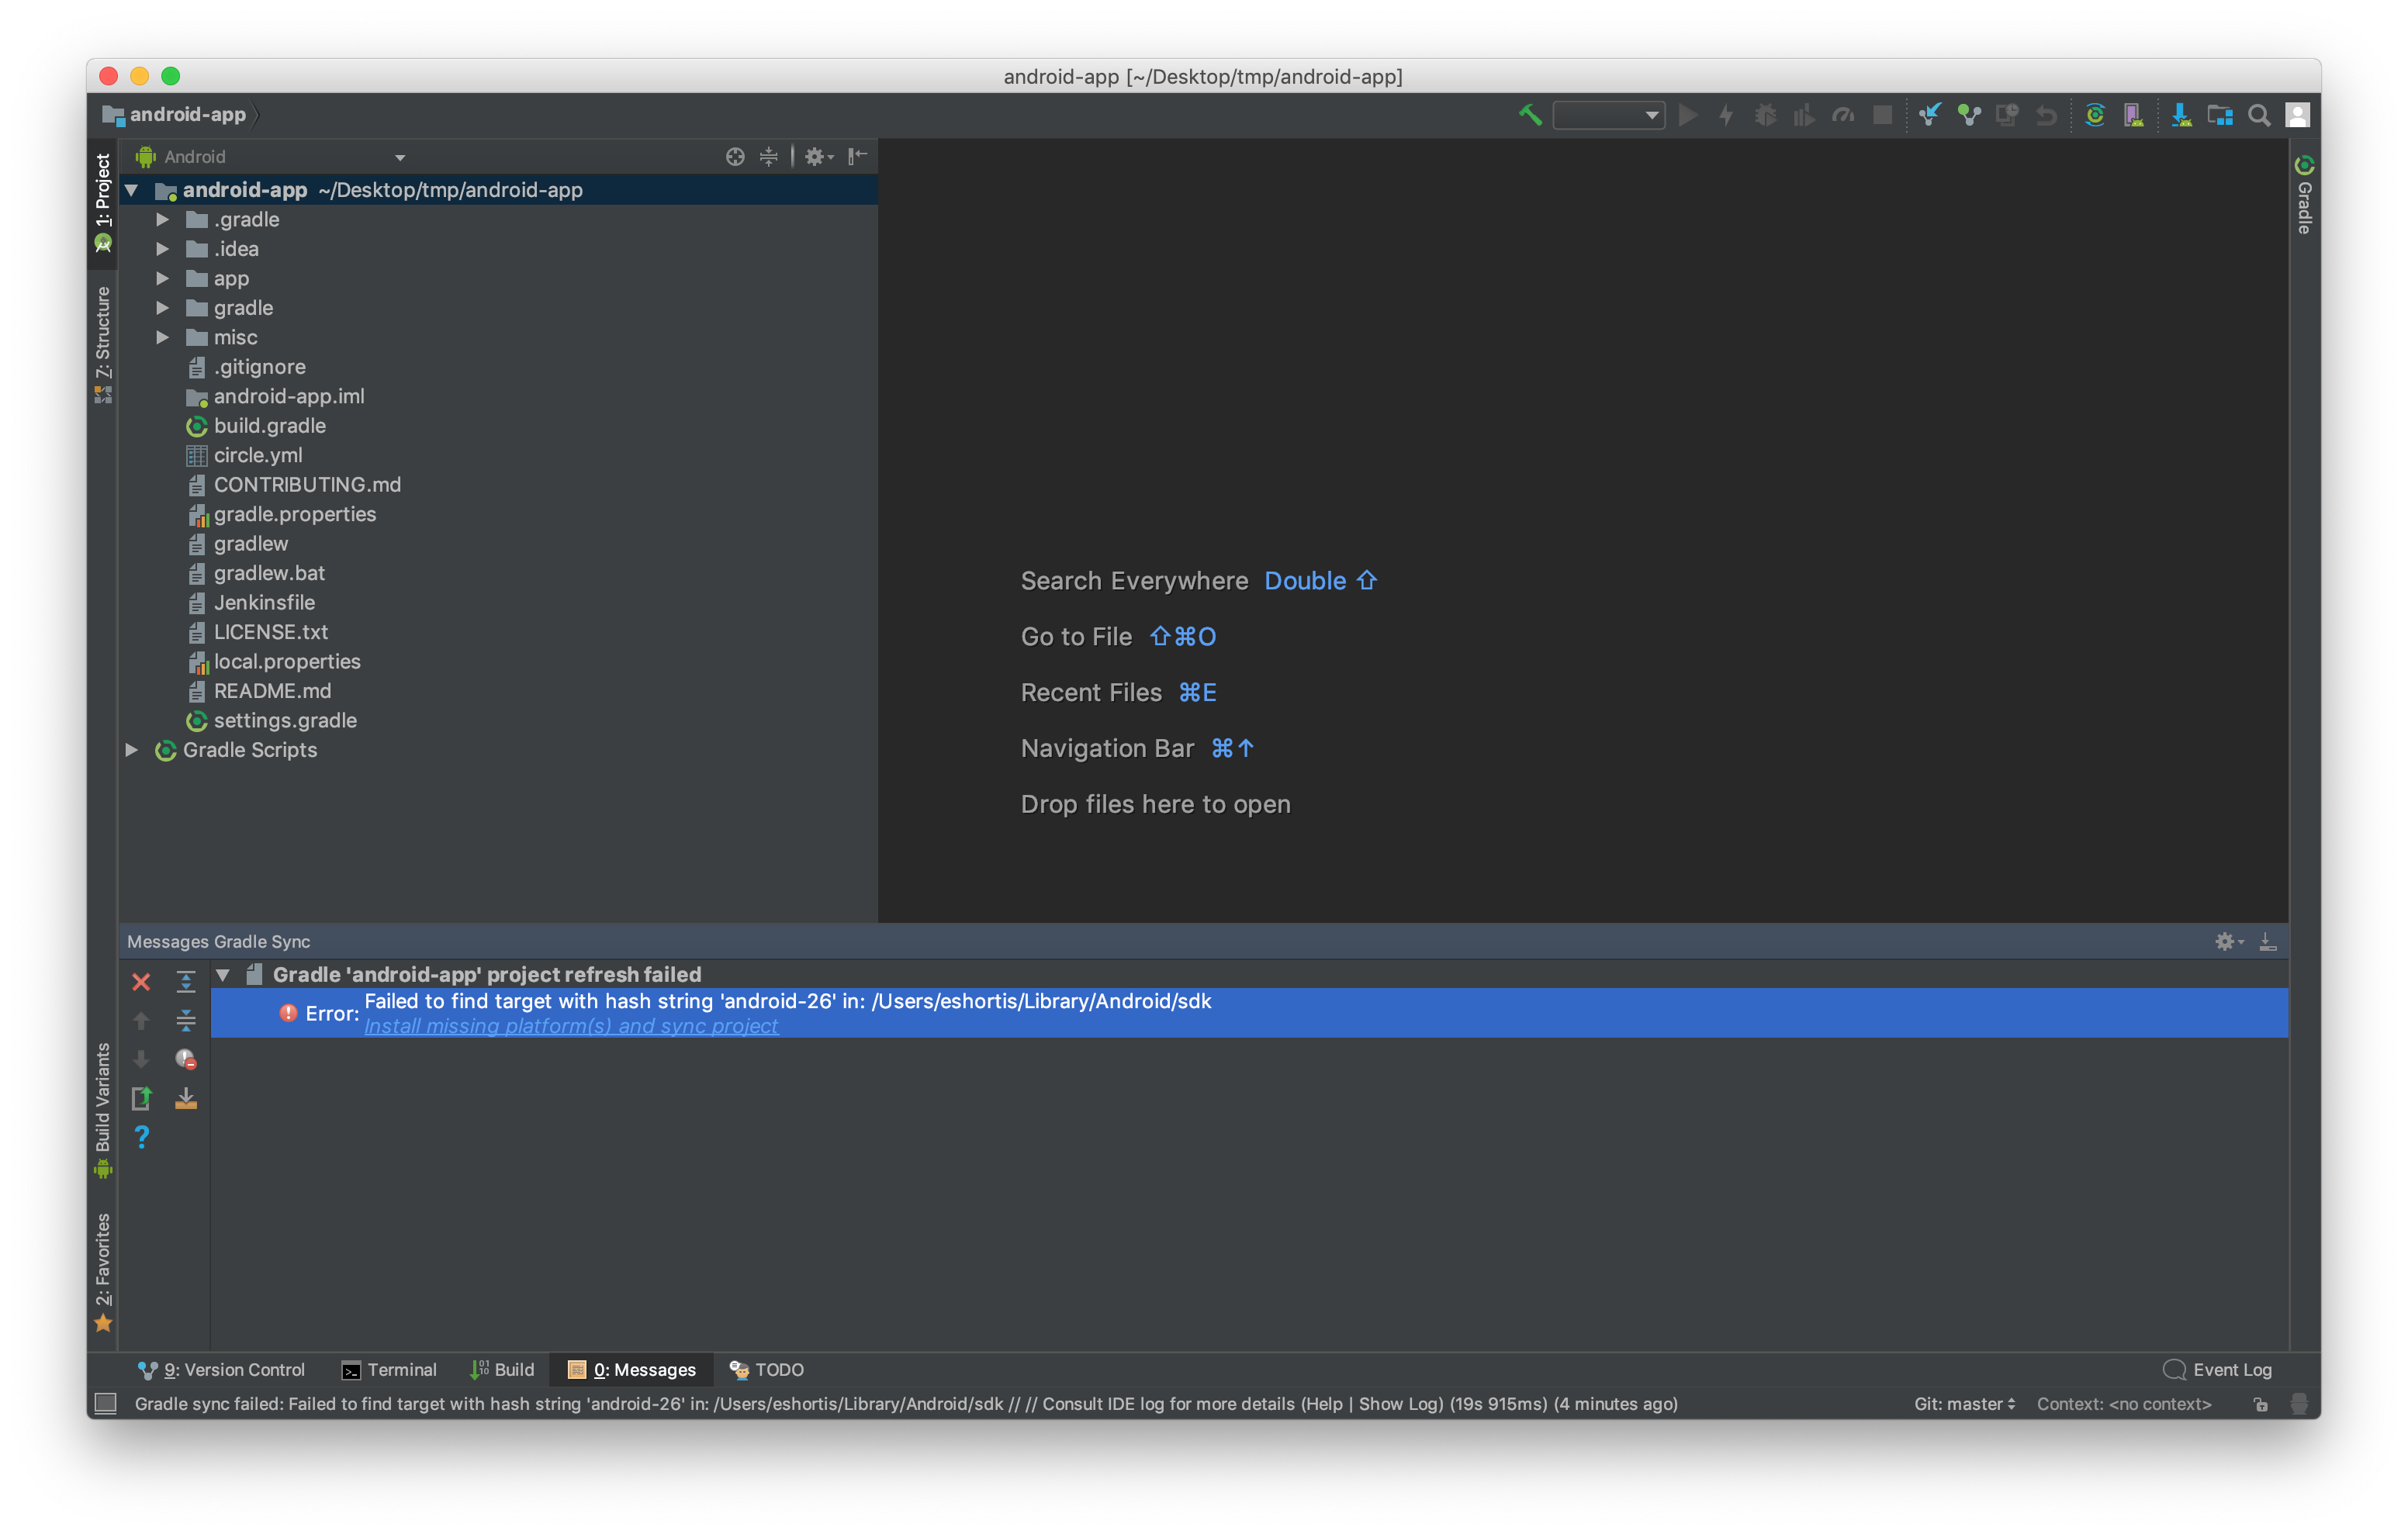
When your project opens, you should check the information pane at the bottom of the Android Studio UI and address any SDK or Gradle issues that it reports. In the screenshot below, you can see that the example application being used requires Android Platform SDK version 26 and it prompts you to click the link to install it. If this happens, you'll typically be prompted to install Build Tools for the same version after installing the Platform SDK.
Create a debug build
To create a debug build using Android Studio, simply choose Build > Build APK(s) from the menu. Android Studio will provide a UI popup with a link to locate the generated APK, or you can typically find it in app/build/outputs/apk in your source code directory.
Create a production build
Creating a production build uses the Build > Generate Signed APK option. When prompted, choose your application from the list of options to sign, though it should be selected by default. Next, choose your production keystore using the Choose Existing button. Enter the key password, alias, and keystore password and choose Next.
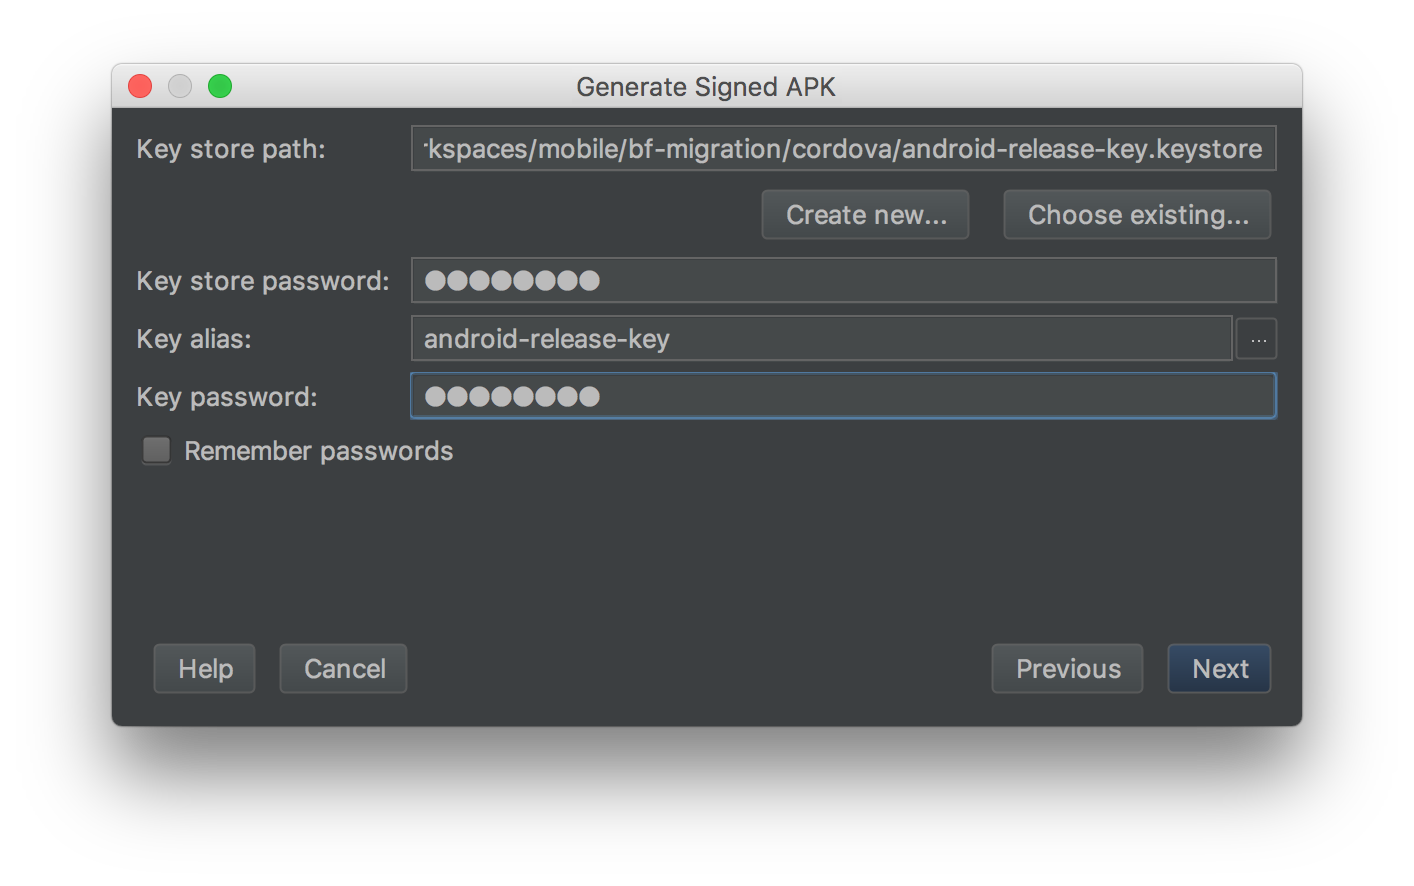
Finally, choose the output folder or accept the default. Ensure Build Type is set to release and then choose one or both Signature Version options, depending on your target device versions; you can read more about signatures on source.android.com. Click Finish and your signed APK will be available in the APK Destination Folder for installation on devices.
Building Apache Cordova applications for iOS
This guide uses specific versions of the Cordova tools and libraries to walk you through building a Cordova application locally. If your project relies on different versions, you will need to install those and configure your environment according to the requirements of those versions and your project. For more information on the versions of cordova, cordova-android, and cordova-ios used by Red Hat Mobile Application Platform, please refer to our supported configurations document.
Before proceeding further, ensure you've met the following prerequisites:
- Installed Node.js and npm
- Installed the Cordova CLI v6.3.1
- Installed Xcode
- Cloned the application source code locally using Git or FHC
To get started, add the iOS platform to your project by running the following from the root of the source code folder:
$ npm install
$ cordova platform add ios@$VERSION
This will initialize an iOS project in a platforms/ios folder in the root of your project using the specified cordova-ios $VERSION. Per the Red Hat Mobile Application Platform supported configurations, the $VERSION can be a value from 3.5.1 to 4.2.0. Recent releases might work, but were not supported by the Build Farm. This guide was designed using 4.2.0.
Note: These cordova-ios version ranges assumes the use of Xcode 8. If you are using Xcode 9, you may need to follow this guide to patch it for use with the version range of cordova-ios in use here.
Create a development (debug) iOS build
Using Xcode
The process to create a development Cordova iOS build is the same as for native applications. Please refer to "Create a development (debug) build" in the "Building native iOS applications" section of this guide for instructions on creating a development build using Xcode.
Using the Cordova CLI
To create a signed debug build using the Cordova CLI, the cordova build command with multiple arguments is required. These arguments are:
- Apple Developer Team ID (obtained by visiting developer.apple.com/account/#/membership)
- A Code Sign Identity (should be “iPhone Developer” if you are using Xcode 8 and above)
- Package Type (set to “development”)
- Provisioning Profile ID (more on this below)
To obtain the Provisioning Profile ID, you can open the provisioning profile in a text editor and find the following lines:
<key>UUID</key>
<string>THE-ID-WILL-BE-HERE</string>
Once you have the required information, you can build the application using the following command:
$ cordova build ios --device \
--developmentTeam=$THE_TEAM_ID \
--codeSignIdentity="iPhone Developer" \
--packageType="development" \
--provisioningProfile=$THE_PROFILE_ID
Note: If you receive a build failure with an error related to setting the build team, it can be resolved by opening the project in Xcode and setting the signing information and then retrying using the CLI.
Once the command finishes executing the build, it will print the path to the folder containing the IPA file that can be installed on devices.
Create a production (release) iOS build
The steps for creating a production build for iOS are the same as those for development; simply choose the appropriate packaging method—that is, AdHoc, Enterprise, or AppStore—and have the necessary signing credentials available.
Building Apache Cordova applications for Android
This guide uses the specific versions of the Cordova tools and libraries to walk you through building a Cordova application locally. If your project relies on different versions, you will need to install those and configure your environment according to the requirements of those versions and your project. For more information on the versions of cordova, cordova-android, and cordova-ios used by Red Hat Mobile Application Platform, please refer to our supported configurations document.
Before proceeding further, ensure you've met the following prerequisites:
- Installed Node.js and npm
- Installed the Cordova CLI v6.3.1
- Cloned the application source code locally using Git or FHC
- JDK 8 installed and have set the
JAVA_HOMEenvironment variable
Installing the Android development tools
The setup required for building Cordova-based Android applications that were developed on Red Hat Mobile Application Platform diverges from the latest Apache Cordova and Android Studio installation guides. Please follow these steps to configure your environment for compatibility with your Red Hat Mobile Application Platform–based Apache Cordova Android applications.
To get started, create the necessary directories on your machine to house the Android SDK and tools.
Here are example commands to create the required folder structure on macOS or Linux:
$ mkdir -p ~/.android-sdk/tools
Or on Windows:
C:\Users\<username>\AppData\Local\android-sdk\tools
Download the Android tools package for your chosen platform using one of the following links. Unzip these and place them into the tools subdirectory created previously; they must be placed in the tools subdirectory to work.
Set the ANDROID_HOME environment variable and point it to your installation; for example, on Linux/macOS, add this to your bash_profile or similar configuration file:
export ANDROID_HOME=~/.android-sdk
You should also update your PATH environment variable with the location of the Android tools:
export PATH=${PATH}:$ANDROID_HOME/tools:$ANDROID_HOME/platform-toolsVerify the installation by executing the android command from a new terminal session that has these environment variables applied. If your environment is configured correctly, you will see the following window displayed. If not, verify you’ve followed the steps correctly and try again.
Configure the project and install an Android SDK
To determine which SDK version needs to be installed, run the following commands from the root of your project:
$ npm install
$ cordova platform add android@$VERSION
$ cordova requirements android
This will initialize an Android project in a platforms/android folder in the root of your project using the specified cordova-android $VERSION. Per the Red Hat Mobile Application Platform supported configurations, the $VERSION can be a value from 3.5.1 to 5.2.0. Recent releases might work, but were not supported by the Build Farm. This guide was designed using 5.2.0.
The last command verifies your environment and that you have the appropriate Android target SDK installed. Here’s sample output from the requirements command; if your environment has been configured correctly up to this point, you should see similar output:
Requirements check results for android:
Java JDK: installed 1.8.0
Android SDK: installed
Android target: not installed
Please install Android target: "android-23".

Hint: Open the SDK manager by running: /Users/eshortis/android-sdk/tools/android

You will require:
  1. "SDK Platform" for android-23
  2. "Android SDK Platform-tools (latest)
  3. "Android SDK Build-tools" (latest)
Gradle: installed
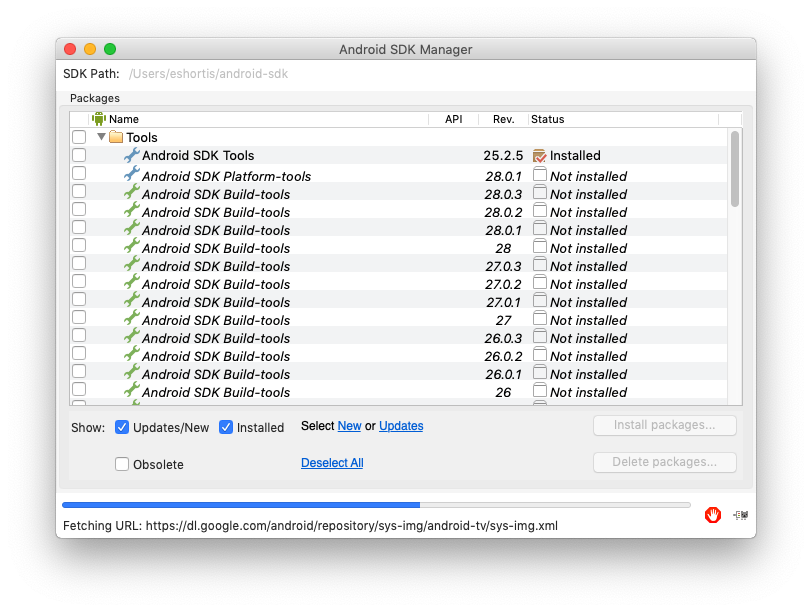
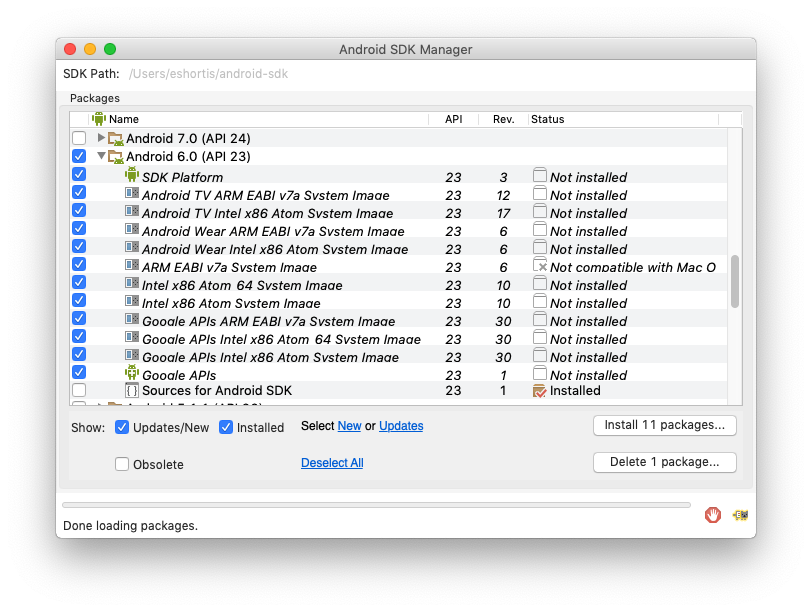
This tells you the specific Android SDK target and tools required for the project. To install the missing tools and SDK run the android command to launch the SDK Manager and select the corresponding checkbox(es) for the missing tools, for example, platform-tools, build-tools, and API Level 23 in the case of the above output and as shown in the following screenshots. You should also select Extras > Android Support Repository from the bottom of the list in SDK Manager.
 Once the various tools and SDK have downloaded and installed, you can verify your application requirements are met by running the
 cordova requirements command again. Your output should be similar to the following:
$ cordova requirements android

Requirements check results for android:
Java JDK: installed 1.8.0
Android SDK: installed
Android target: installed android-23,Google Inc.:Google APIs:23
Gradle: installed
Create a debug Android build
After confirming your environment is correctly configured using cordova requirements, you can generate a debug build using the following command:
$ cordova build android
The APK files can be found in the folder at platforms/android/app/build/outputs/apk. For debug builds, a file named android-debug.apk is generated. You can install the application on an emulator or Android device connected by USB by issuing the adb install command and passing to it as an argument the path to the APK that was created.
Create a release Android build
Creating a production build requires the original keystore you generated for your application. Please refer to the "Certificates and Signing Credentials" section of this guide for more information on obtaining a keystore. With the keystore available, you can issue the following command to create a production build:
cordova build android --release \
--keystore=$KEYSTORE_PATH \
--password=$KEYSTORE_PASS \
--storePassword=$KEYSTORE_STORE_PASS \
--alias=$KEYSTORE_ALIAS
The resulting APK files will be placed in the same folder as the debug APK, but instead will be named android-release.apk.
Updating application connection tags
Previously, the Build Farm would either automatically generate a new Connection Tag for each build or it would allow you to specify a tag to use. The Build Farm would then inject this new Connection Tag information into the fhconfig file in your application. Connection Tags are used to associate a specific build of a client/mobile application with a given cloud application instance in a given environment. You can read more about Connection Tags in our documentation. The documentation for the specific format for each platform is available using the following links:
When building locally, you need to manually update the fhconfig file in your source code with a new Connection Tag when you deem it necessary. You can create a new Connection Tag from the Connections section of your project in the Studio. Alternatively, the following FHC command can be used to generate a new tag. You can find the necessary variables in the Studio or using FHC commands such as fhc projects list, fhc admin environments list, and fhc projects apps read.
$ fhc connections create --client=$CLIENT_APP_ID \
--cloud=$CLOUD_APP_ID --type=$APP_TYPE \
--env=$ENV --project=$PROJECT_ID
Once the new tag is created, you can obtain the fhconfig file from the Connections screen of your project by clicking the Configure button for the required tag, as shown.

