With the release of Apache Camel 2.21, some new components were added to the project and Camel WordPress was one of them. Camel is one of the upstream community projects for Red Hat Fuse. In this article, we will see how to use this new component to publish an auto-generated news post based on a soccer statistics API. The example consumes the statistics API, generates the text based on a Natural Language Generation (NLG) library and then publishes it to the WordPress blog.
WordPress is one of the most used open source tools for creating websites. More than 30% of the web is built on top of WordPress. Besides creating websites, blogs, and apps, WordPress leverages a huge plugin repository maintained by a passionate community. There are even plugins that can turn a WordPress website into an e-commerce platform.
Since version 4.7, WordPress exposes a REST API capable of interacting with its resources, for example, users, categories, pages, posts, and custom types. Now it’s possible for third parties to integrate with the WordPress platform and perform almost anything with their resources.
Some companies implement internal websites, blogs, and project sites using WordPress. Integrating such platforms with another company’s components—such as CRM, ERP, LDAP, and Calendar Services—would add extra value to WordPress-based projects. Camel WordPress can help integrate those components easily. To get started using this new component, nothing is better than a demo.
The demo
For this demo, we are going to implement a scenario where Apache Camel will generate news describing results of soccer matches based on a soccer statistics API. Then that news will be published on our Soccer News Blog.
This demo was inspired by news-writing bots that, in the future, could easily write a couple of paragraphs based on a set of rules, NLG, and AI. Of course, for this simple demonstration, we won’t create anything too fancy. We have a pre-formatted set of templates with possibles results from a soccer match prepared to receive the fixtures from the API. These templates were inspired by the dissertation of João Aires called “Automatic Generation of Sports News,” published by the University of Porto (Portugal).
Take a look at the figure below to understand the demo architecture and the routes flow.
There are two REST endpoints that expose the use cases of this demo. The first one, “summary,” just converts the soccer match details into a news post. The second one, “send,” posts the generated news to our blog. Take your time figuring out the flow.
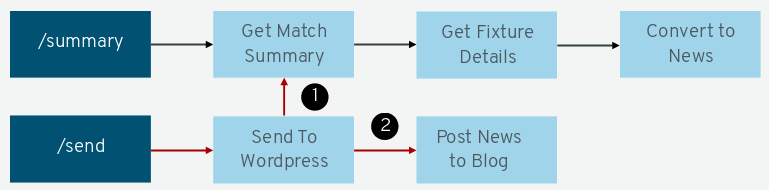
Sharp readers will note that we reused some of our routes in two different use cases. Camel is a powerful framework that makes code reuse a lot easier, thanks to its input/output process design. Before starting to code your routes, take your time planning what you’re going to do and try to simplify the routes by breaking them down into smaller pieces. This way, you can achieve a better architecture and clean code.
The REST endpoints are pretty straightforward since we implemented the Camel REST capabilities to expose our routes. If you are not familiar with this feature, take a look at the Camel documentation.
The routes
Let’s dig into the Get Fixture Details and Convert to News routes.
The Get Fixture Details route calls a REST endpoint of the Football Data API. The API owner was very kind to offer basic usage of his API for free. We took the free tier for this demo. If you are going to run this demo, I advise doing the same, since you are going to need an API key.
The route takes as argument the fixture ID of a match, calls the third-party API, and converts its JSON results into our internal domain model (Statistics):
from("direct:get-fixture-detail")
  .routeId("get-fixture-details")
  .setHeader("X-Auth-Token",
    constant(config.getFootballApiToken()))
  .toF("rest:get:%s?host=%s&synchronous=true",
    config.getFootballApiFixturePath(),
    config.getFootballApiHost())
  .unmarshal().json(JsonLibrary.Jackson, Statistics.class);
With the results of the API in place, it’s time to convert this data into text. For this task, we use the Simple NLG library. This library facilitates the generation of natural language in English idiom. As an example, let’s create a simple sentence like Mary chases the monkey:
SPhraseSpec p = nlgFactory.createClause();
p.setSubject("Mary");
p.setVerb("chase");
p.setObject("the monkey");
String output2 = realiser.realiseSentence(p);
System.out.println(output2);
Note that we only pass to the library the verb in the infinitive form and leave the grammatical rules to the engine. We can even turn this sentence to the past form with a simple argument:
p.setFeature(Feature.TENSE, Tense.PAST);
“Mary chased the monkey” would then be the output.
This is just the tip of the iceberg; you can do much more with NLG libraries. It’s beyond the scope of this article to go deep into NLG, but if you are interested there’s a good tutorial in Github explaining how to use it.
The route responsible for converting the match data into text is called Convert to News, which is a simple bean call:
from("direct:convert-nlg")
  .routeId("convert-nlg")
  .bean(ContentFactory.class, "generate");
The domain data to text conversion happens inside the class ContentFactory. This factory is responsible for coordinating the text generation inside the nlg package. The figure below illustrates the relationship inside this package in a class diagram. In real-world scenarios, such conversion could be the responsibility of another microservice; this way Camel would handle only the integration part.
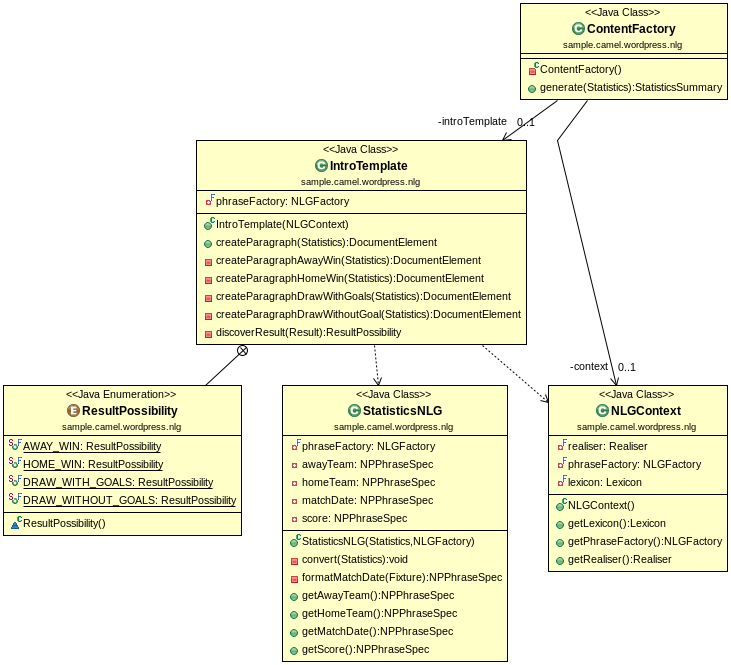
The ContentFactory delegates the summary generation to the IntroTemplate class, which will create the first paragraph of our news. For demo purposes, it’s a one-sentence only paragraph. You could easily add more content by creating more template classes inside this package, for example, a “best player match” paragraph describing how well a player performed along the match.
If we took a hypothetical match were Germany beats Brazil by the score of 7x1, this engine would generate something like:
On July 8th, Germany visited Brazil to bring home an outstanding victory by the score of 1x7.
Having generated the match summary, the route outputs it in the form of a domain model called StatisticsSummary. This domain model contains data about the match summary, the date, and the teams’ names. This structure will be the input to the last route, which will convert this statistics domain into a WordPress post and publish it to our blog.
Finally, we get to the route Send to Wordpress. This route will delegate the publication of the post to the Camel WordPress component, having converted the match summary into a WordPress post using the Camel type converter feature:
from("direct:post-news-summary")
.routeId("post-news-summary")
.convertBodyTo(Post.class)
.to("wordpress:post");
To use the Camel type converter feature, just add the file TypeConverter inside the path services/org/apache/camel with the fully qualified name of the converter class. Let’s take a look at this class:
@Converter
public final class StatisticsToPostConverter {

  private static final int DEFAULT_AUTHOR_ID = 1;

  private static final Logger LOGGER =
    LoggerFactory.getLogger(StatisticsToPostConverter.class);

  @Converter
  public static Post toPost(StatisticsSummary statisticsSummary,
                            Exchange exchange) {
    final Post post = new Post();
    final Content postContent =
      new Content(statisticsSummary.getSummary());
    postContent.setRaw(statisticsSummary.getSummary());
    final Content titleContent =
      new Content(String.format("%s X %s Results",
             statisticsSummary.getFixture().getHomeTeamName(),
             statisticsSummary.getFixture().getAwayTeamName()));
    titleContent.setRaw(titleContent.getRendered());
    post.setContent(postContent);
    post.setFormat(Format.standard);
    post.setStatus(PublishableStatus.publish);
    post.setTitle(titleContent);
    post.setAuthor(DEFAULT_AUTHOR_ID);
    LOGGER.debug("Converted StatisticsSummary {} to Post {}",
      statisticsSummary, post);
    return post;
  }
}
The responsibility of this converter is to create a new Post object and populate it according to WordPress rules for a new, published post.
The first lines just set the raw content and format of the post. The post's publication status also could be set to draft or private. Draft status will save the post in the WordPress database for later intervention. In the private status, the post will be visible only to administrators. Check for other statuses in the WordPress documentation.
The author ID is another important property while creating a new post. If you are not sure, it could be fetched using the author operation by the Camel WordPress plugin or by looking into the WordPress user’s dashboard.
Another important thing to check is the WordPress configuration and connectivity. For the Camel WordPress plugin to work, the plugin Basic Authentication must be installed. This way, Camel can use HTTP Basic authentication to connect to WordPress and perform write operations.
Future versions of Camel WordPress will use token-based authentication, which is a more secure and reliable method than HTTP Basic in non-TLS connections. It’s worth noting that you should never use plain HTTP connections to authenticate via HTTP Basic, because credentials are passed in base64 encoded strings and an attacker could easily steal those credentials.
Camel WordPress configuration
To get Camel WordPress working, some configuration is needed. This configuration could be done in the route definition. There, we’re passing the WordPress URL and user credentials that are able to create new posts:
final WordpressComponentConfiguration configuration =
  new WordpressComponentConfiguration();
final WordpressComponent component = new WordpressComponent();
configuration.setUrl(config.getWordpressUrl());
configuration.setPassword(config.getWordpressPassword());
configuration.setUser(config.getWordpressUser());
component.setConfiguration(configuration);
getContext().addComponent("wordpress", component);
All these configurations were externalized using Spring Boot properties injected later into the Camel Context:
camel.springboot.name=CamelSampleWordpress
camel.component.servlet.mapping.context-path=/api/*

logging.level.org.apache.http=DEBUG
logging.level.org.apache.http.wire=ERROR
logging.level.org.restlet=DEBUG
logging.level.org.apache.camel=DEBUG

football.api.fixture.path=v1/fixtures/{fixtureId}
football.api.host=https://api.football-data.org
football.api.token=${FOOTBALL_API_TOKEN:<your_api_token>}

wordpress.url=${WORDPRESS_URL:http://localhost/wp-json/}
wordpress.user=${WORDPRESS_USER:user}
wordpress.password=${WORDPRESS_PASS:pass}
These properties were set in the application.properties file that later will be available in the class ExampleCamelWordpressRouteConfig to be used across the routes.
Running the demo
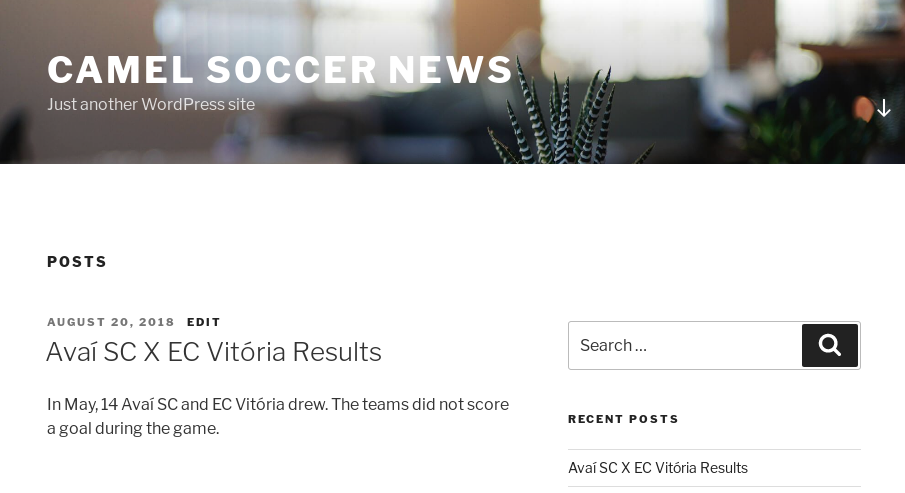
To get the demo running we have a Red Hat OpenShift template that creates a WordPress blog backed by a MySQL database and this Camel demo microservice. Visit the “summary” endpoint to see the NLG engine working:
curl http://<camel-wp-example-host>/api/match/158186/summary
{"fixture":{"date":"2017-05-14T19:00:00.000+0000",
"status":"FINISHED" (...)
To send this summary to the WordPress blog, make a simple GET request to the “send” endpoint:
curl http://<camel-wp-example-host>/api/match/158186/send
{"id":6,"author":1,"date":"2018-08-20T18:05:37.000+0000",
"modified":"2018-08-20T18:05:37.000+0000",
"slug":"avai-sc-x-ec-vitoria-results-2" (...)
For the sake of simplicity in this demo, we used the GET verb, but in real-world scenarios it would be preferable to use the POST verb to create new content.
Finally, we should see our news published to the WordPress front page:
Summary
In this article, we've seen how to use Apache Camel to auto-generate news posts with NLG and publish them to a WordPress blog via a soccer public API that retrieves statistics. The Camel WordPress component behaves like the Facebook, Twitter, and others components that integrate with social media to generate new content. Besides creating posts, the component also has author operations that could be used to integrate users' data across databases.
I hope this example can help you write new integrations and use cases using WordPress. The full source code is hosted on GitHub (contributions are welcome!). Stay tuned because we are planning to add many more operations to the Camel WordPress component.
Last updated: March 26, 2023