Creating, associating, and using a JBoss Data Grid (with persistence) with a MicroProfile-based microservice
In this blog post, I will cover how to create, populate, and associate a JBoss Data Grid (with persistence using a Postgresql database) to your MicroProfile-based microservice. I will also cover how to modify the microservice so that it makes use of JBoss Data Grid (JDG).
This is the continuation of the “A MicroProfile-based microservice on OpenShift Container Platform - Part 2; Creating, associating and using a database with a MicroProfile-based microservice” blog post and it assumes you have completed all its steps. If you have not done Part 2, please do so at this time.

Steps
Adding the JDG image stream for and JDG with persistence template to OpenShift Container Platform
A template describes a set of objects that can be parameterized and processed to produce a list of objects for creation by OpenShift Container Platform. There exists a set of OpenShift Middleware template samples that can be found at:
https://github.com/jboss-openshift/application-templates
We will use one of these templates, namely the “JDG 7.1 + postgreSQL persistent” template.
My OpenShift Container Platform didn’t come with an image stream of JDG so we need to install this before we install the template. To obtain the image stream for JDG, head to:
https://raw.githubusercontent.com/jboss-openshift/application-templates/master/jboss-image-streams.json
(the non-raw version is here: https://github.com/jboss-openshift/application-templates)
The link above contains the image streams for much JBoss middleware but we only want the image stream for JDG. Locate the section for JDG in the raw file (search for the string "jboss-datagrid71-openshift" to locate the block for JDG 7.1) and copy and paste the JDG image stream block to a local file, which you can name “jboss-datagrid-image-stream.json”. If you don’t want to search for the block in the raw file, you can copy and paste the following text into your local file “jboss-datagrid-image-stream.json” (I placed it in my $HOME directory):
{
"kind": "ImageStream",
"apiVersion": "v1",
"metadata": {
"name": "jboss-datagrid71-openshift",
"annotations": {
"openshift.io/display-name": "Red Hat JBoss Data Grid 7.1"
}
},
"spec": {
"tags": [
{
"name": "1.0-8",
"annotations": {
"description": "JBoss Data Grid 7.1 S2I images.",
"iconClass": "icon-jboss",
"tags": "datagrid,jboss,xpaas",
"supports": "datagrid:7.1,xpaas:1.0",
"version": "1.0-8",
"openshift.io/display-name": "Red Hat JBoss Data Grid 7.1"
},
"from": {
"kind": "DockerImage",
"name": "registry.access.redhat.com/jboss-datagrid-7/datagrid71-openshift"
}
}
]
}
}
Next, we need to install the “JDG 7.1 + postgreSQL persistent” template, which can be found here:
(the non-raw version can be found here: https://github.com/jboss-openshift/application-templates/blob/master/datagrid/datagrid71-postgresql-persistent.json)
Copy the entire content of the file above and paste it in a local file named “datagrid71-postgresql-persistent.json” (I placed it in my $HOME directory). Note: In the pasted text, please ensure that the ImageStreamTag for the datagrid component of the template matches the version number of the JDG image stream. In the pasted text, search for the string "jboss-datagrid71-openshift:" in the text and change the string from "jboss-datagrid71-openshift:TP" to "jboss-datagrid71-openshift:1.0-8".
Now, we need to create the JDG image stream and the template in the OpenShift cluster, which should already be up and running (if not, enter “oc cluster up” from a “Terminal” window). To accomplish this, first open a “Terminal” window and log in to your OpenShift cluster by entering:
$ oc login -u system:admin
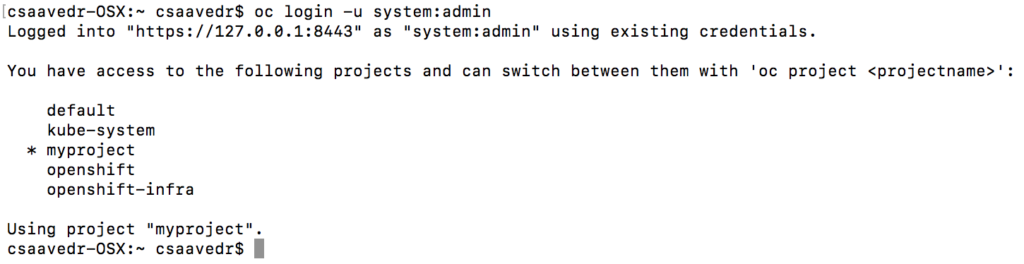
Make sure that your current project is “myproject”. If not, enter “oc project myproject” at the command prompt.
At this point, we create the JDG image stream by entering the following command:
$ oc create -n openshift -f jboss-datagrid-image-stream.json

Then, we need to create the “JDG 7.1 + postgreSQL persistent” template by entering:
$ oc create -n openshift -f datagrid71-postgresql-persistent.json

Creating an instance of the JDG with persistence template in your project
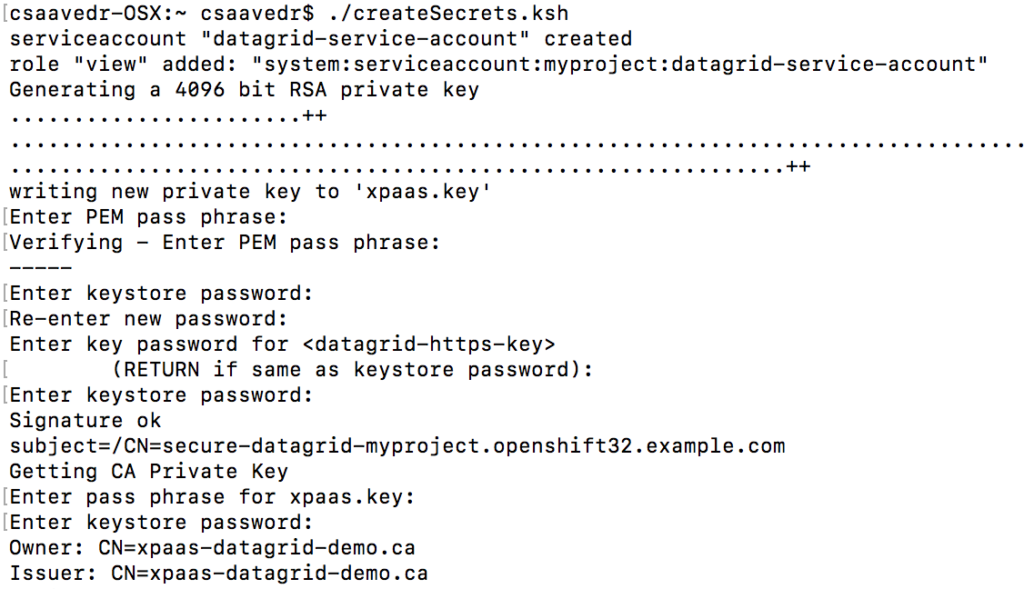
The template requires the creation of a serviceaccount, the addition of a role policy, and the creation SSL and JGroups keystores. To make it easier for me, I put all these commands in a Korn shell script named “createSecrets.ksh”, whose content is listed below:
#!/bin/ksh
oc create serviceaccount datagrid-service-account
oc policy add-role-to-user view system:serviceaccount:$(oc project -q):datagrid-service-account
openssl req -new -newkey rsa:4096 -x509 -keyout xpaas.key -out xpaas.crt -days 365 -subj "/CN=xpaas-datagrid-demo.ca"
keytool -genkeypair -keyalg RSA -keysize 2048 -dname "CN=secure-datagrid-myproject.openshift32.example.com" -alias datagrid-https-key -keystore datagrid-https.jks
keytool -certreq -keyalg rsa -alias datagrid-https-key -keystore datagrid-https.jks -file datagrid.csr
openssl x509 -req -CA xpaas.crt -CAkey xpaas.key -in datagrid.csr -out datagrid.crt -days 365 -CAcreateserial
keytool -import -file xpaas.crt -alias xpaas.ca -keystore datagrid-https.jks
keytool -import -file datagrid.crt -alias datagrid-https-key -keystore datagrid-https.jks
keytool -import -file xpaas.crt -alias xpaas.ca -keystore keystore.jks
keytool -genseckey -alias jgroups -storetype JCEKS -keystore jgroups.jceks
oc secret new datagrid-jgroup-secret jgroups.jceks
oc secret new datagrid-app-secret datagrid-https.jks keystore.jks
oc secrets link datagrid-service-account datagrid-jgroup-secret datagrid-app-secret
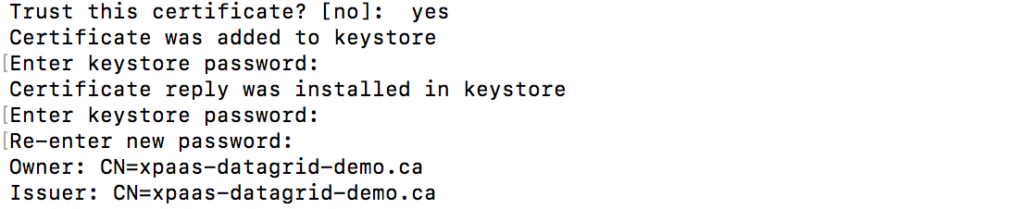
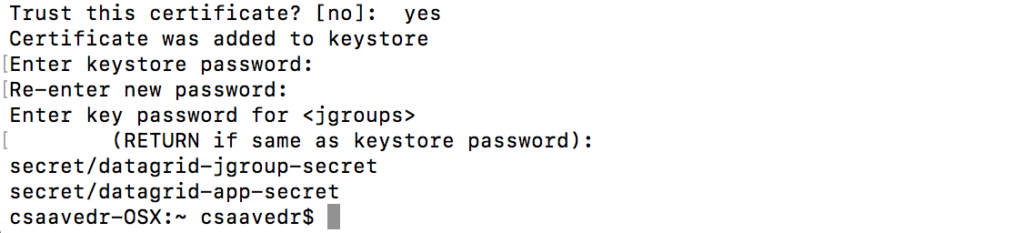
You can cut and paste the commands above and put them in a local file and execute it or you can enter one command at a time in the same “Terminal” window you already have open. I chose to execute the shell script as follows (I entered the same password for all passphrase/password prompts):
$ ./createSecrets.ksh
...
...
Here’s the list of commands executed by the Korn shell script above with a short explanation for each:
- Create a service account named “datagrid-service-account”:
$ oc create serviceaccount datagrid-service-account
- Add a view role to the service account:
$ oc policy add-role-to-user view system:serviceaccount:$(oc project -q):datagrid-service-account
- The template requires an SSL keystore and a JGroups keystore. Generate a CA certificate:
$ openssl req -new -newkey rsa:4096 -x509 -keyout xpaas.key -out xpaas.crt -days 365 -subj "/CN=xpaas-datagrid-demo.ca"
- Generate a Certificate for the SSL keystore:
$ keytool -genkeypair -keyalg RSA -keysize 2048 -dname "CN=secure-datagrid-myproject.openshift32.example.com" -alias datagrid-https-key -keystore datagrid-https.jks
- Generate a Certificate Sign Request for the SSL keystore:
$ keytool -certreq -keyalg rsa -alias datagrid-https-key -keystore datagrid-https.jks -file datagrid.csr
- Sign the Certificate Sign Request with the CA certificate:
$ openssl x509 -req -CA xpaas.crt -CAkey xpaas.key -in datagrid.csr -out datagrid.crt -days 365 -CAcreateserial
- Import the CA into the SSL keystore:
$ keytool -import -file xpaas.crt -alias xpaas.ca -keystore datagrid-https.jks
- Import the signed Certificate Sign Request into the SSL keystore:
$ keytool -import -file datagrid.crt -alias datagrid-https-key -keystore datagrid-https.jks
- Import the CA into a new truststore keystore:
$ keytool -import -file xpaas.crt -alias xpaas.ca -keystore keystore.jks
- Generate a secure key for the JGroups keystore:
$ keytool -genseckey -alias jgroups -storetype JCEKS -keystore jgroups.jceks
- Create the keystore secrets with the JGroups keystore, and with the SSL keystore and truststore. The truststore is included in this example because it was necessary to sign the example SSL keystore.
$ oc secret new datagrid-jgroup-secret jgroups.jceks
$ oc secret new datagrid-app-secret datagrid-https.jks keystore.jks
- Link the secrets to the service account created earlier:
$ oc secrets link datagrid-service-account datagrid-jgroup-secret datagrid-app-secret
At this point, we need to create a pod using the template above. Go to the OpenShift console (https://127.0.0.1:8443), and log in as developer/developer.
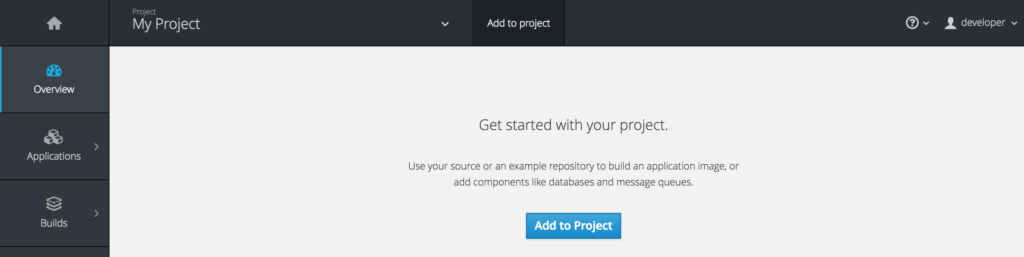
Click on the “My Project” to open your project.
Click on the “Add to project” button.
In the “Add To Project” window, enter “jdg” in the search field “Choose from web frameworks, databases, and other components to add content to your project.”
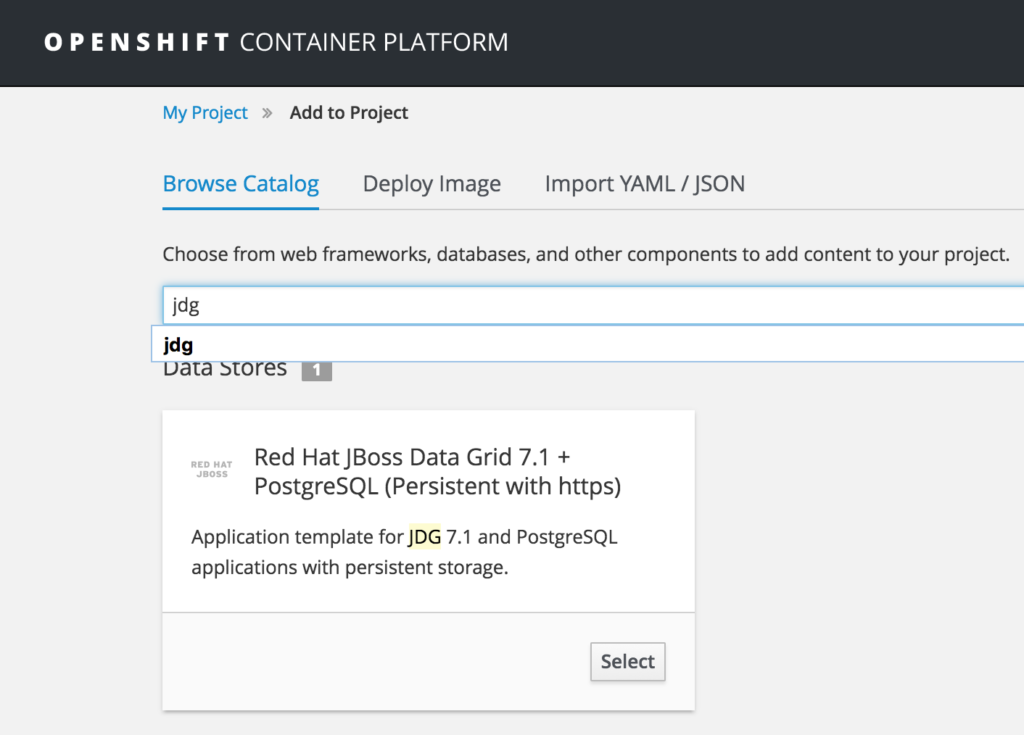
Click the “Select” button for the template titled “Red Hat JBoss Data Grid 7.1 + PostgreSQL (Persistent with https)”. This will open up the template setup screen.
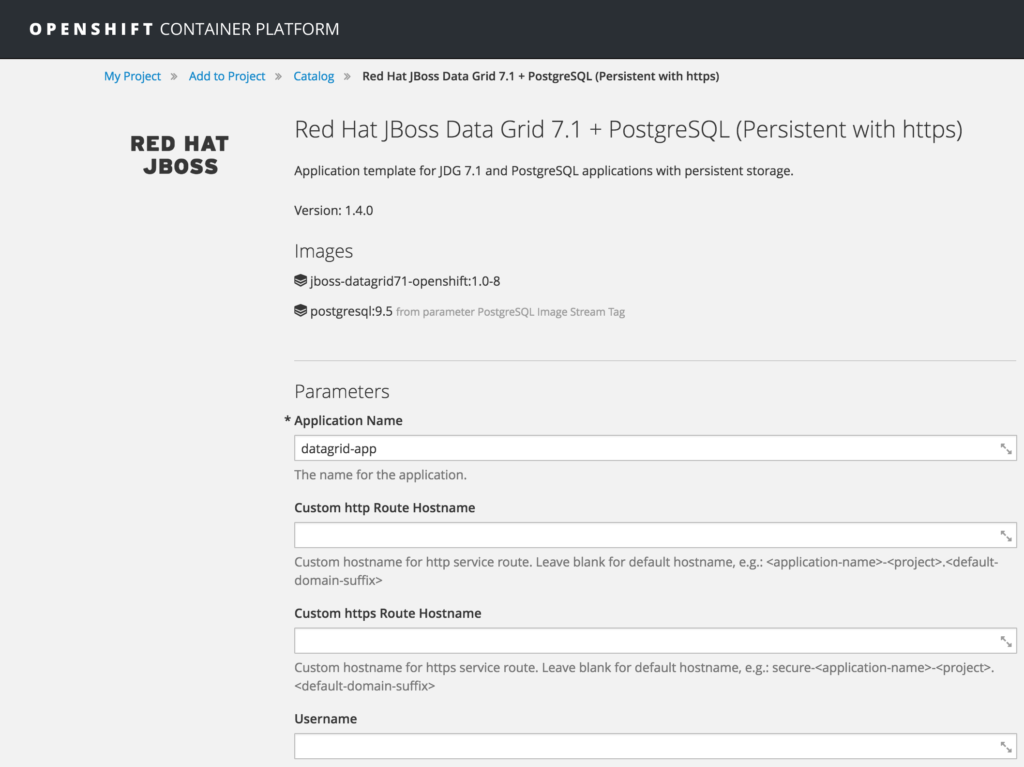
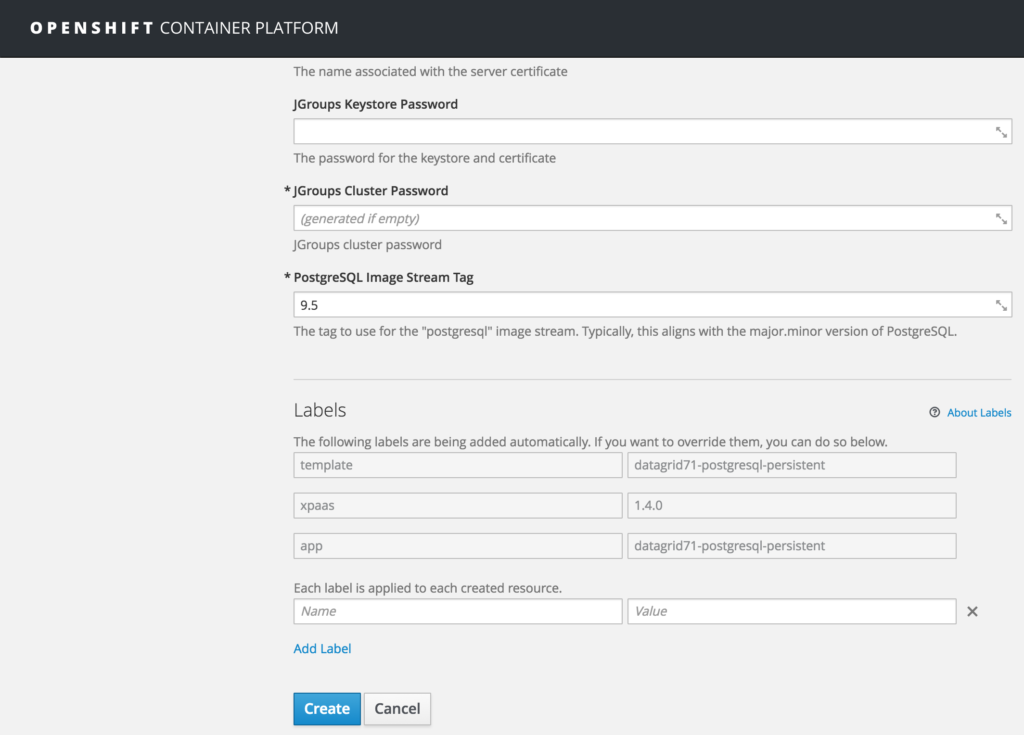
In the template creation screen, ensure the following values are populated in the indicated fields (leave other pre-populated field values as they are):
| Field name | Field value |
| Name of application | datagrid-app |
| Server Keystore Secret Name | datagrid-app-secret |
| Server Keystore Filename | keystore.jks |
| Database Name | mydb |
| Database Username | dbuser |
| Database Password | dbpassword |
| Infinispan Connectors | rest |
| Memcached Cache Name | default |
| JGroups Secret Name | datagrid-app-secret |
| JGroups Keystore Filename | jgroups.jceks |
| PostgreSQL Image Stream Tag | 9.5 |
Once, you have verified all fields are set to their indicated values, click on the Create button at the bottom of the page.
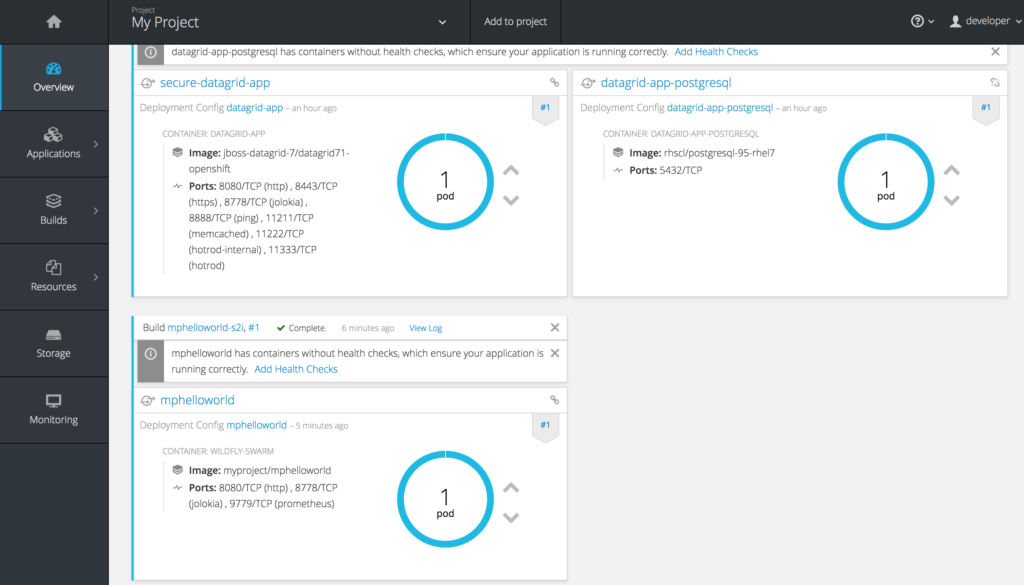
The template will create an instance of JDG (actually two: one secure and one non-secure) and a corresponding postgresql database with a table (whose name will contain the suffix “default”) to which it will persist the in-memory keys and values. You will see the following screen once the template is successfully created:
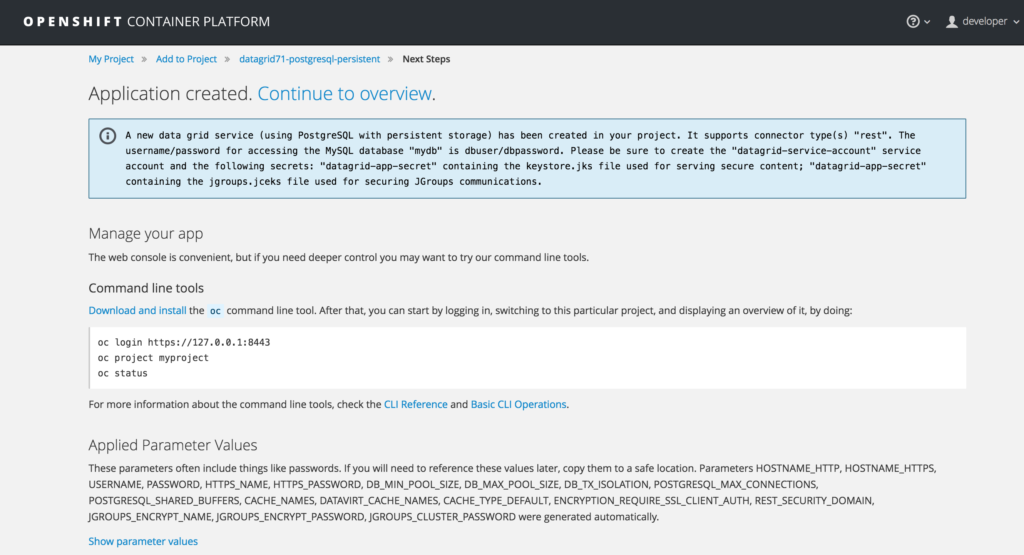
Click on “Continue to overview”. This will take you to the Overview screen on the console, where you will see your JDG and Postgresql pods up and running.
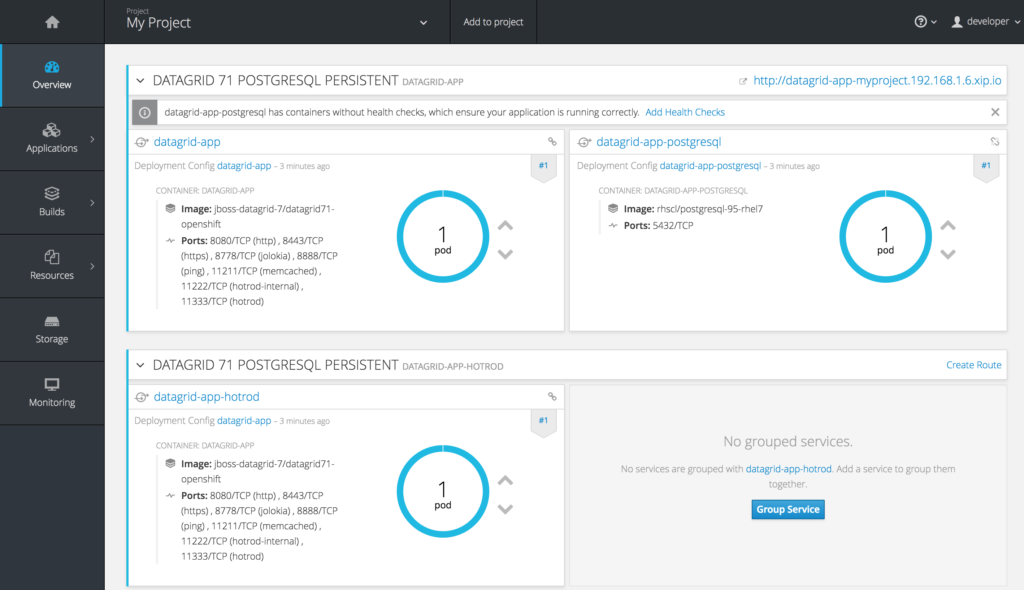
To inspect the automatically created Postgresql artifacts, go to your postgresql pod by clicking on the circle that says “1 pod” for the “datagrid-app-postgresql” pod.
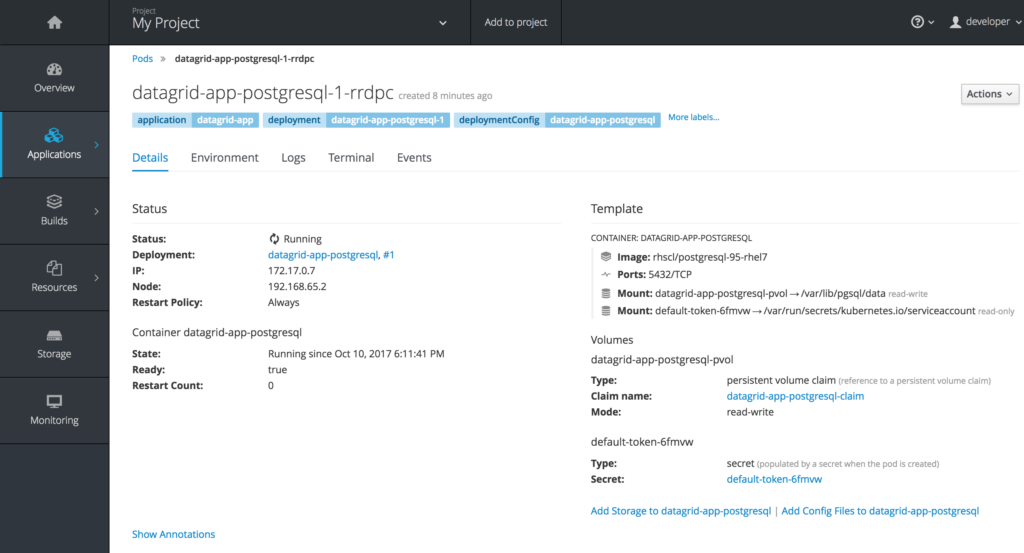
Click on the “Terminal” tab.
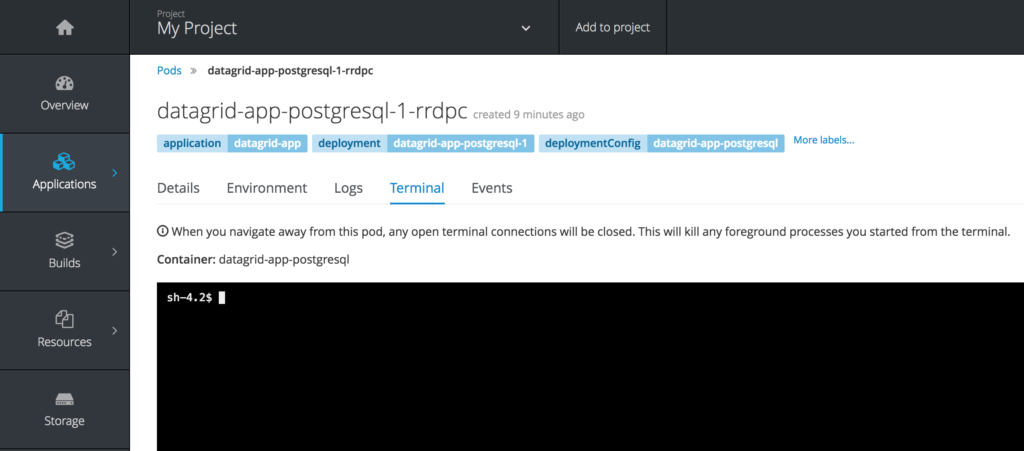
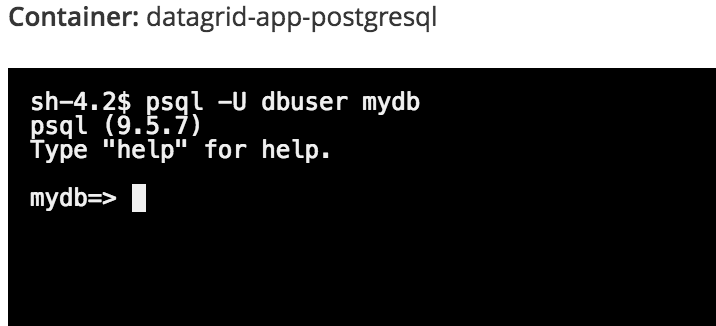
In the Terminal window of the pod, enter:
$ psql -U dbuser mydb
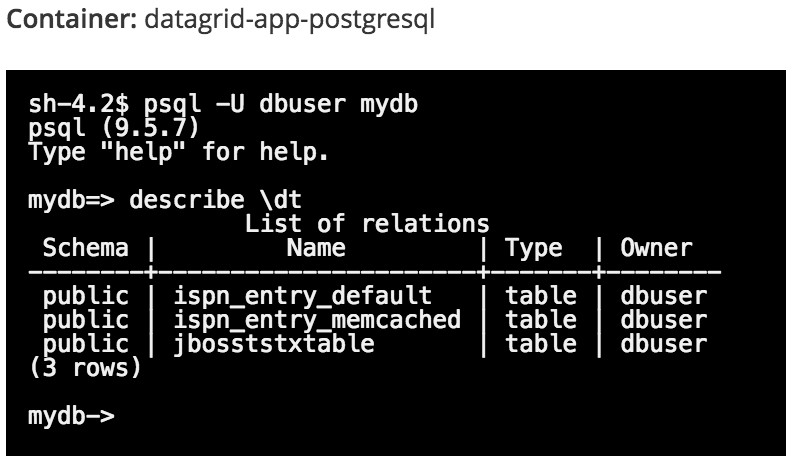
To list all the tables in the "mydb" database (created by the template), enter the following psql command:
mydb=> describe \dt
To see the structure of the ispn_entry_default table, which is where the IMDG data will be persisted, enter:
mydb=> \d ispn_entry_default;
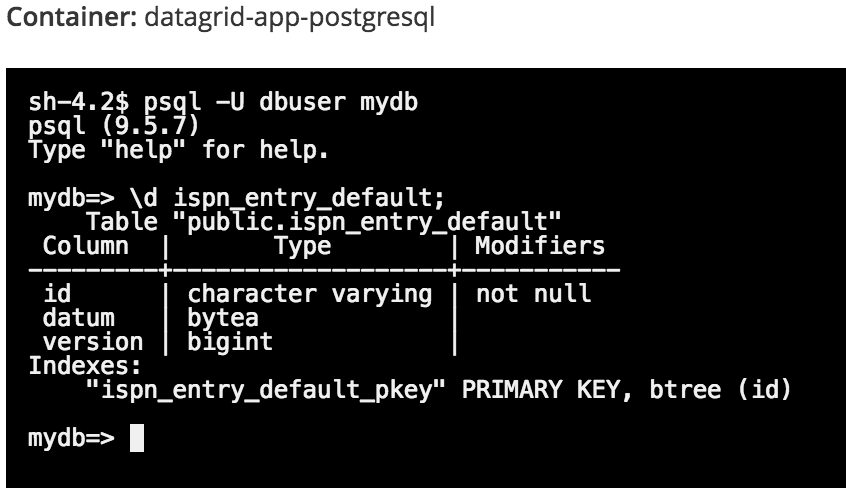
To see the messages that have been persisted to the mydb database table named ispn_entry_default, enter:
mydb=> select * from ispn_entry_default;
![]()
The table is empty because we haven’t entered any data into JDG yet. You will do the same query later once we enter data into JDG to verify that in-memory data has been persisted to Postgresql.
Populating the JDG in-memory data grid
Similar to part 2 of this 3-part blog series, the MicroProfile microservice will display hello messages on the browser iterating across different names but in this case, the names will reside in JBoss Data Grid (JDG) instead of a database. Behind the scenes, JDG will persist the data to a Postgresql database but this is completely transparent to the microservice. JDG has a REST interface that we can use to populate it with data.
The syntax for the url for REST calls into JDG is as follows:
<URL>/rest/<cache name>/<cache key>
We need to populate JDG with the names of the people that our MicroProfile-based microservice will be consuming. From a “Terminal” window, if you’re not logged on to the OpenShift cluster, then log in and make sure you’re on the “myproject” project:
$ oc login -u system:admin
$ oc project myproject
Create an environment variable that captures the route name to the datagrid-app, as follows:
$ APP_PATH=$(oc describe route datagrid-app | grep "^Requested Host:" | awk '{ print $3 }')
Then enter the following commands to insert the five names to the IMDG:
$ curl -X PUT http://${APP_PATH}/rest/default/0 -d "Johnny"
$ curl -X PUT http://${APP_PATH}/rest/default/1 -d "Jenny"
$ curl -X PUT http://${APP_PATH}/rest/default/2 -d "Billy"
$ curl -X PUT http://${APP_PATH}/rest/default/3 -d "Mary"
$ curl -X PUT http://${APP_PATH}/rest/default/4 -d "Bobby"

JDG will also persist these names to the postgresql database.
If you’d like to verify that the five entries made it to the persistent store, go to the “Terminal” window of the Postgresql pod, and enter at the shell prompt:
$ psql -U dbuser mydb
$ select * from ispn_entry_default;
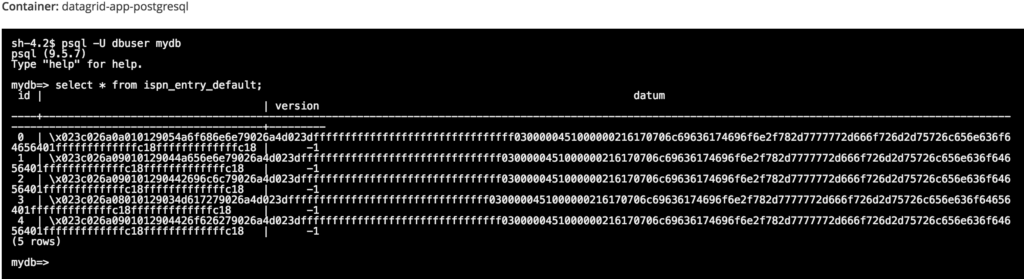
The five names are encrypted in the ispn_entry_default table in the Postgresql database.
Modifying the MicroProfile-based microservice
So now, we need to modify the MicroProfile-based microservice to invoke JDG. The fastest protocol to communicate with JDG is Hot Rod, but we will use the REST interface since it’s the easiest to implement and doesn’t require us to include another WildFly Swarm fraction to our MicroProfile-based microservice. In fact, we can do away with the “datasources” fraction that we included in part 2 of this 3-part blog series and remove it from our microservice.
Edit the “.java” and replace its content with the following block of code:
package com.mpexample.mpHelloWorld.rest;
import java.io.BufferedReader;
import java.io.IOException;
import java.io.InputStreamReader;
import java.net.HttpURLConnection;
import java.net.URL;
import java.util.concurrent.ThreadLocalRandom;
import javax.enterprise.context.ApplicationScoped;
import javax.ws.rs.Path;
import javax.ws.rs.core.Response;
import javax.ws.rs.GET;
import javax.ws.rs.Produces;
@ApplicationScoped
@Path("/hello")
public class HelloWorldEndpoint {
@GET
@Produces("text/plain")
public Response doGet() {
String greeting = "Greeting should not be this one";
// fetch env var for number of data items in IMDG and determine key
int keyValue;
String numOfDataItemsStr = System.getenv("NUM_OF_DATA_ITEMS");
int numOfDataItems = Integer.parseInt(numOfDataItemsStr);
keyValue = ThreadLocalRandom.current().nextInt(0, numOfDataItems);
// fetch env var for REST calling url and append key to it
String urlCacheName = System.getenv("URL_CACHE_NAME");
urlCacheName += keyValue;
try {
String name = getMethod(urlCacheName);
greeting = "Hello " + name + " from MicroProfile microservice";
} catch (IOException e) {
return Response.ok("REST call to microservice problem!" + e.toString()).build();
}
return Response.ok(greeting.toString()).build();
}
/**
* Method that gets a value by a key in url as param value.
* @param urlServerAddress
* @return String value
* @throws IOException
*/
public String getMethod(String urlServerAddress) throws IOException {
String line = new String();
StringBuilder stringBuilder = new StringBuilder();
URL address = new URL(urlServerAddress);
HttpURLConnection connection = (HttpURLConnection) address.openConnection();
connection.setRequestMethod("GET");
connection.setRequestProperty("Content-Type", "text/plain");
connection.setDoOutput(true);
BufferedReader bufferedReader = new BufferedReader(new InputStreamReader(connection.getInputStream()));
connection.connect();
while ((line = bufferedReader.readLine()) != null) {
//stringBuilder.append(line + '\n');
stringBuilder.append(line);
}
connection.disconnect();
return stringBuilder.toString();
}
}
Edit the pom.xml and remove the “datasources” fraction. The new pom.xml should look like this:
<?xml version="1.0" encoding="UTF-8"?>
<project xmlns="http://maven.apache.org/POM/4.0.0" xmlns:xsi="http://www.w3.org/2001/XMLSchema-instance"
xsi:schemaLocation="http://maven.apache.org/POM/4.0.0 http://maven.apache.org/maven-v4_0_0.xsd">
<modelVersion>4.0.0</modelVersion>
<groupId>com.mpexample</groupId>
<artifactId>mpHelloWorld</artifactId>
<name>WildFly Swarm Example</name>
<version>1.0.0</version>
<packaging>war</packaging>
<properties>
<version.wildfly.swarm>2017.8.1</version.wildfly.swarm>
<maven.compiler.source>1.8</maven.compiler.source>
<maven.compiler.target>1.8</maven.compiler.target>
<failOnMissingWebXml>false</failOnMissingWebXml>
<project.build.sourceEncoding>UTF-8</project.build.sourceEncoding>
<fabric8.maven.plugin.version>3.1.92</fabric8.maven.plugin.version>
</properties>
<dependencyManagement>
<dependencies>
<dependency>
<groupId>org.wildfly.swarm</groupId>
<artifactId>bom-all</artifactId>
<version>${version.wildfly.swarm}</version>
<scope>import</scope>
<type>pom</type>
</dependency>
</dependencies>
</dependencyManagement>
<build>
<finalName>demo</finalName>
<plugins>
<plugin>
<groupId>io.fabric8</groupId>
<artifactId>fabric8-maven-plugin</artifactId>
<version>${fabric8.maven.plugin.version}</version>
<executions>
<execution>
<goals>
<goal>resource</goal>
</goals>
</execution>
</executions>
<configuration>
<generator>
<includes>
<include>wildfly-swarm</include>
</includes>
</generator>
</configuration>
</plugin>
<plugin>
<groupId>org.wildfly.swarm</groupId>
<artifactId>wildfly-swarm-plugin</artifactId>
<version>${version.wildfly.swarm}</version>
<executions>
<execution>
<goals>
<goal>package</goal>
</goals>
</execution>
</executions>
</plugin>
</plugins>
</build>
<dependencies>
<!-- Java EE 7 dependency -->
<dependency>
<groupId>javax</groupId>
<artifactId>javaee-api</artifactId>
<version>7.0</version>
<scope>provided</scope>
</dependency>
<dependency>
<groupId>org.postgresql</groupId>
<artifactId>postgresql</artifactId>
<version>9.4-1200-jdbc41</version>
</dependency>
<!-- WildFly Swarm Fractions -->
<dependency>
<groupId>org.wildfly.swarm</groupId>
<artifactId>microprofile</artifactId>
</dependency>
</dependencies>
</project>
Verifying your deployment, creating a route, and testing your MicroProfile-based microservice
At this point, with your OCP up and running, ensure that you are in your mpHelloWorld project directory, open a Terminal window and enter:
$ cd <dir of your choice>/mpHelloWorld

Then, log in to the running OpenShift, by entering:
$ oc login https://127.0.0.1:8443 -u developer -p developer

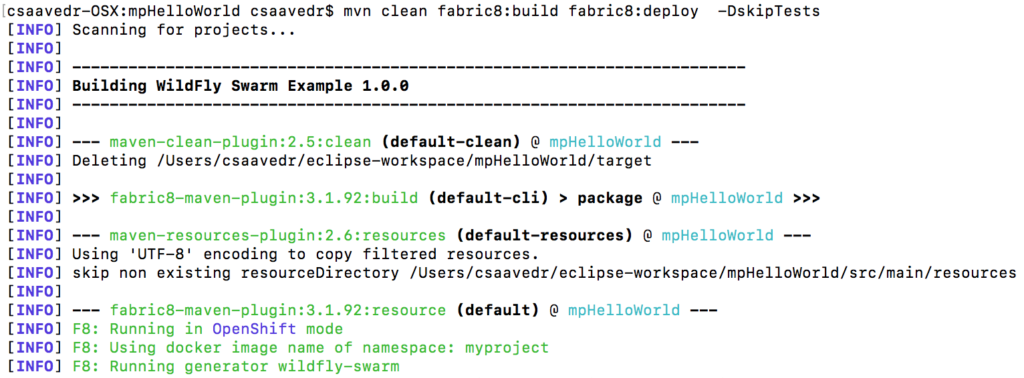
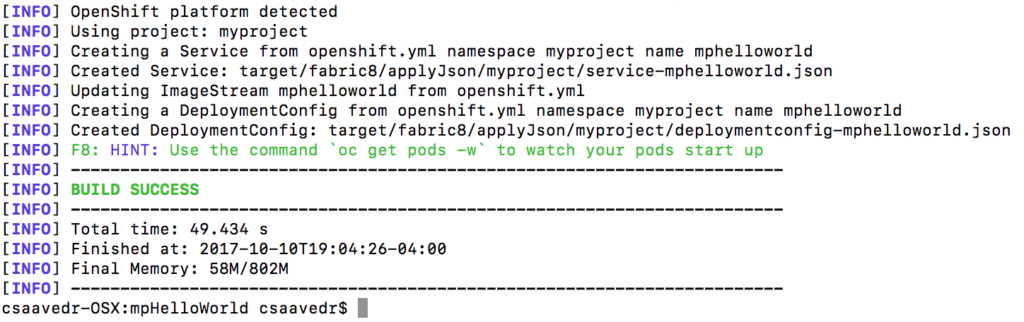
Now, build and deploy your project to OpenShift by entering:
$ mvn clean fabric8:build fabric8:deploy -DskipTests
...
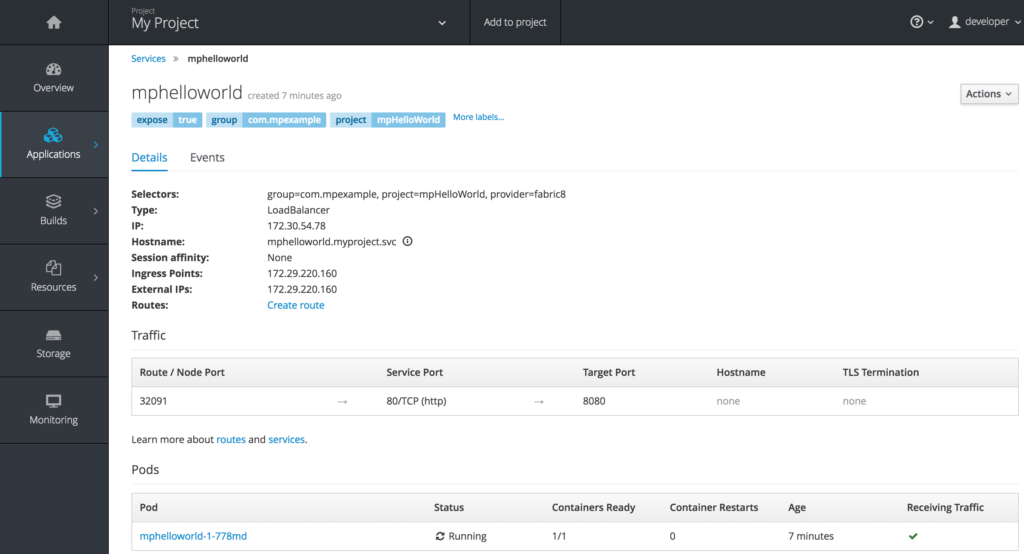
Now that your MicroProfile microservice pod is up and running on OpenShift Container Platform, you have to create a Route for it so that you can call it from a browser window. On the OpenShift Container Platform console, go to the project “My Project”, and on the Overview screen, scroll all the way to the bottom, you will see the “mphelloworld” pod:
Click on “mphelloworld” next to the icon that looks like a small circle with two arrows.
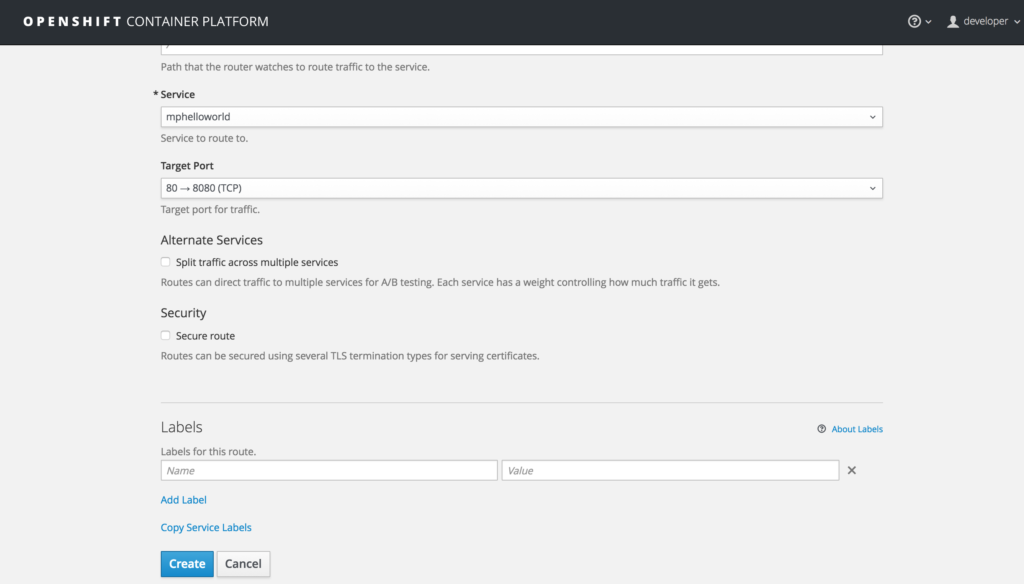
Click on “Create Route” next to the “Routes:” label and accept all defaults.

Scroll down and click on the “Create” button.
This will create a route for this microservice so that it can be called from outside OpenShift Container Platform.
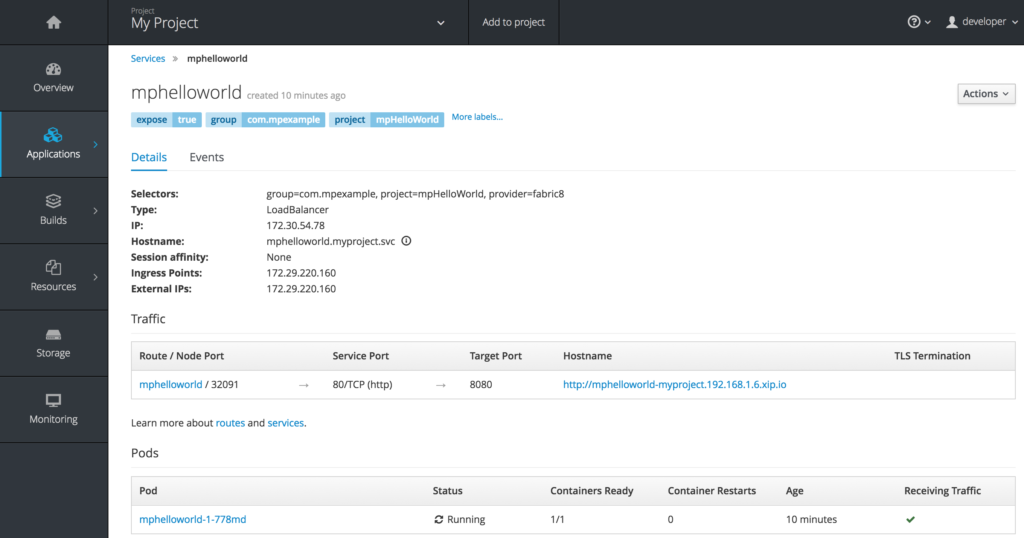
You can see the created route under the "Traffic" section above. The URL to invoke the service from outside OpenShift Container Platform is "http://mphelloworld-myproject.192.168.1.6.xip.io".
Associating the microservice to JDG
As you could see in the new MicroProfile Java code, the updated microservice uses some environment variables. In order for the microservice “mphelloworld” to be able to communicate with JDG, we need to include some environment variables in its DeploymentConfig. The first variable is the REST url that the microservice will use to call JDG. As we mentioned before, the syntax for the url for REST calls into JDG is as follows:
<URL>/rest/<cache name>/<cache key>
In our case, the <URL> will be the Route that was created in the previous section, “rest” stays the same, and <cache name> is “default”.
To set these environment variables, we need to apply changes to the deployment configuration of the microservice pod. First, make sure you’re logged in to the OpenShift cluster by entering the following command at a “Terminal” window on your laptop:
$ oc login https://127.0.0.1:8443 -u developer -p developer

Then enter the following commands:
$ APP_PATH=$(oc describe route datagrid-app | grep "^Requested Host:" | awk '{ print $3 }')
$ oc env dc mphelloworld -e URL_CACHE_NAME=http://${APP_PATH}/rest/default/ -e NUM_OF_DATA_ITEMS=5

This will cause an update to the “mphelloworld” microprofile pod and it will automatically be re-started by OpenShift Container Platform.
Invoking the MicroProfile-based microservice
To test the MicroProfile microservice, open a browser window and enter:
http://mphelloworld-myproject.192.168.1.6.xip.io/hello
You should see the string “Hello <name>from MicroProfile microservice”, which is what the microservice returns as JSON, appear in the browser window:

Notice that every time you invoke this REST service by refreshing the web page, you should see a different name in the greeting:

This concludes our 3-part series on Eclipse MicroProfile on OpenShift Container Platform. I hope you have enjoyed it and for more information on Eclipse MicroProfile, please refer to the following links:
Eclipse MicroProfile Google group
Red Hat OpenShift Application Runtimes
WildFly Swarm Tech Preview (MicroProfile 1.2 implementation)
For help on For help on the Tech Preview of MicroProfile 1.2, please enter your question at WildFly Swarm Forum
To build your Java EE Microservice visit WildFly Swarm and download the cheat sheet.
Last updated: February 26, 2024