This blog aims for Administrators who need to handle large numbers of VLANs in virtualization/namespaces with a bridge. With the VLAN filter, people don't need to create dozens of VLANs and bridges anymore. With only ONE bridge, you can control all VLANs. See more details in this blog.
Bridge and VLAN
Virtualization, Cloud, OpenStack, and Docker. These technologies are getting increasingly important and popular. But behind them, there are two indispensable features: Bridge and VLAN.
A bridge is a way to connect two Ethernet segments together in a protocol independent way. Packets are forwarded based on Ethernet address, rather than IP address (as a router would do). Since forwarding is done at Layer 2, all protocols can go transparently through the bridge. The Linux bridge is actually a virtual switch and widely used with KVM/QEMU hypervisor, namespaces, etc.
VLAN is another very important function in virtualization. It allows network administrators to group hosts together even if the hosts are not on the same physical network switch. This can greatly simplify network design and deployment. Also, it can separate hosts/guests under the same switch/bridge into different subnets.
These two important features used to be considered as two completely distinct features and we needed to configure complex topologies to combine them together. In this blog, we will show the new bridge feature, VLAN filter, which hopefully makes life easier.
This feature was introduced in Linux kernel 3.8 and was added to RHEL in version 7.0.
Let's take an example that is widely used in virtualization: different subnets on a bridge with bond load balance.
Without VLAN filtering
Previously, if we wanted to use distinct subnets with guests on a virtualization server, we need to create multiple VLANs and bridges. Something like:
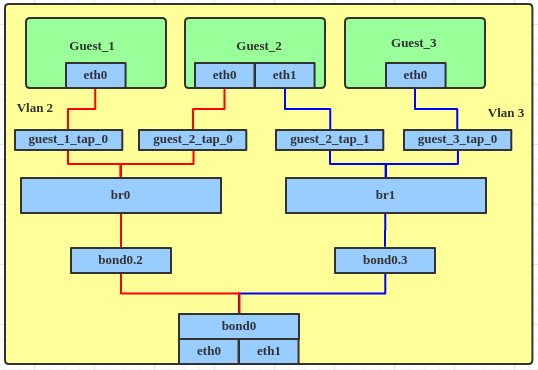
And the steps would be, approximately:
- Create a bond device.
# ip link add bond0 type bond # ip link set bond0 type bond miimon 100 mode balance-alb # ip link set eth0 down # ip link set eth0 master bond0 # ip link set eth1 down # ip link set eth1 master bond0 # ip link set bond0 up - Create VLANs on bond. We need to create more VLANs if dictated by requirements.
# ip link add link bond0 name bond0.2 type vlan id 2 # ip link set bond0.2 up # ip link add link bond0 name bond0.3 type vlan id 3 # ip link set bond0.3 up - Add a bridge device, to which we can attach the VLAN interface.
# ip link add br0 type bridge # ip link set bond0.2 master br0 # ip link set br0 up # ip link add br1 type bridge # ip link set bond0.3 master br1 # ip link set br1 up - Attach tap device to bridge.
# ip link set guest_1_tap_0 master br0
# ip link set guest_2_tap_0 master br0

# ip link set guest_2_tap_1 master br1
# ip link set guest_3_tap_0 master br1
When creating a bond, VLAN, and bridge interfaces, we can use nmcli or update ifcfg files to make the configuration permanent.
With VLAN filtering
Now, with the VLAN filtering feature, we only need one bridge interface and no VLAN interfaces.
Let's see how to do that.
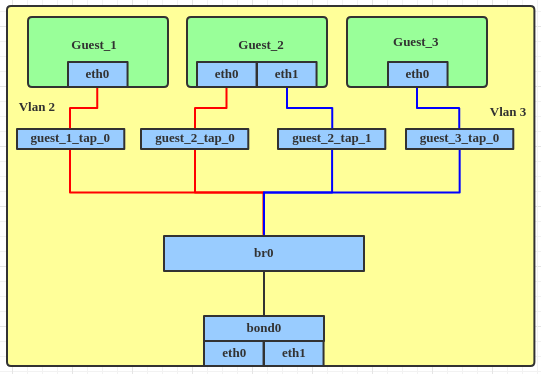
- Create a bond device, the same as above.
# ip link add bond0 type bond # ip link set bond0 type bond miimon 100 mode balance-alb # ip link set eth0 down # ip link set eth0 master bond0 # ip link set eth1 down # ip link set eth1 master bond0 # ip link set bond0 up - Create the bridge interface, enable VLAN filter and attach the bond interface to the bridge directly.
# ip link add br0 type bridge # ip link set br0 up # ip link set br0 type bridge vlan_filtering 1 # ip link set bond0 master br0 - Attach the tap device to the bridge.
# ip link set guest_1_tap_0 master br0 # ip link set guest_2_tap_0 master br0 # ip link set guest_2_tap_1 master br0 # ip link set guest_3_tap_0 master br0 - Set the tap interface with the VLAN filter.
# bridge vlan add dev guest_1_tap_0 vid 2 pvid untagged master # bridge vlan add dev guest_2_tap_0 vid 2 pvid untagged master # bridge vlan add dev guest_2_tap_1 vid 3 pvid untagged master # bridge vlan add dev guest_3_tap_0 vid 3 pvid untagged master # bridge vlan add dev bond0 vid 2 master # bridge vlan add dev bond0 vid 3 master - To dump the VLAN information from the bridge interface.
# bridge vlan show
port    vlan ids
bond0    1 PVID Egress Untagged
         2
         3

br0      1 PVID Egress Untagged

guest_1_tap_0    1 Egress Untagged
         2 PVID Egress Untagged

guest_2_tap_0    1 Egress Untagged
         2 PVID Egress Untagged

guest_2_tap_1    1 Egress Untagged
         3 PVID Egress Untagged

guest_3_tap_0    1 Egress Untagged
         3 PVID Egress Untagged
Summary
With the VLAN filter, the Linux bridge acts more like a real switch now. We don't need to create multiple VLANs and bridges anymore. The topology appears simpler and easier to manage. Administrators can set up distinct subnets on virtualization servers more easily and efficiently.
Note: The performance of these two scenarios is almost the same when guests communicate between Hosts/Servers. But there will be a little decrease when VMs communicate to each other on the same Host/Server. That's because with the previous method the same VLAN is on the same bridge. But with the VLAN filter, all VLAN are in one bridge. So we need to tag/untag VLANs when communicate.
Download this Kubernetes cheat sheet for automating deployment, scaling and operations of application containers across clusters of hosts, providing container-centric infrastructure.
Last updated: August 11, 2023