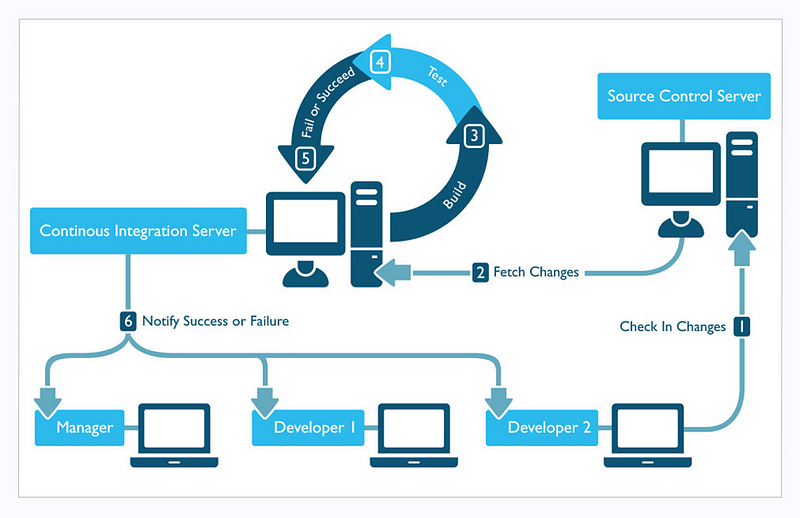
Typical CI process (source: www.pepgotesting.com)
Continuous Integration (CI) is a phase in the software development cycle where code from different team members or different features are integrated together. This usually involves merging code (integration), building the application and carrying out basic tests all within an ephemeral environment.
In the past, the code was integrated at an “integration phase” of the software development life cycle. This phase came after different teams would have spent weeks, months or even years working in separately, dedicated to different (parts of) application or services. You can guess how painful the integration phase of the project would have been. It was not uncommon to spend weeks or even months in this phase. This was during the waterfall era.
With Extreme Programming (XP) and agile, integration became frequent with developers integrating as often as possible usually soon after a unit is complete. This is done on the shared source code repository. The frequent integration became automated and continuous which prompted the need for some kind of checks before the new code is integrated. Thus, Continuous Integration.
CI workflows vary a lot depending on tools, programming language, project and many other factors but a common flow has these steps.
• Pushing to the code repository
• Static analysis
• Pre-deployment testing
• Packaging and deployment to the test environment
• Post-deployment testing
Let’s take a look at how this flow would work on a java project with Gradle as the build tool.
Code repository
Typically, there would have a code repository and some kind of workflow for contributing new code. Depending on the workflow, committing code kicks off the CI pipeline, which often starts with static code analysis. You could refer to this post to help choose an appropriate workflow.
Static analysis
Static (code) analysis is done on the code base of the application without the need to run the software. The goal here is to ensure the code doesn’t have possible bugs and conforms to standard formatting and styling.
Let's add FindBugs to check for possible errors and Checkstyle to ensure the project conforms to coding standard (we’ll use the Google Java Style).
The Gradle build script would be something like this:
https://gist.github.com/abdulbasitkay/e231751b04cf9fb66f20a42d3258dca9
Gradle build script with Findbugs and Checkstyle
To complete the Checkstyle configuration, we’ll need to add a Checkstyle configuration file to the project path config/checkstyle/checkstyle.xml. There’s a sample config file on GitHub based on the Google Java style. With FindBugs and Checkstyle configured, static analysis can now be run:
$ gradle check
At this phase, any test that could be run without deploying to a server should be. This will include unit tests and various other types of tests (maybe functional or integration). This phase is used to ensure that the change set doesn’t break functionalities and works well with other parts code since the tests are run on the whole code base, not just the new changes (as the author might have done on the dev env).
Packaging and deployment to the test/staging environment
Depending on the kind of project, the application is built, packaged, sent to a test or staging environment (that mimics production). This ensures that the integrated changes build well with other parts and can be deployed for a functional test can to be carried out. It’s at this phase that we also verify that the new changes are compatible with other libraries and the deployment environment. This is phase should also automated.
For tests that need the application to be deployed, this phase of the CI pipeline is where they’re run. The tests vary depending on tools, frameworks, and language of the application but they’re usually functional integration and performance tests. Successful execution of this phase ends the CI pipeline for the changeset signalling it’s good enough for users.
Once the CI pipeline completes successfully, the deployed application could undergo a manual test by a “user” or the QA team to ensure that it fits the client’s requirements. The packages or artifacts generated by the CI pipeline can now be taken/deployed to production. This can also be automated with a successful implementation of a Continuous Delivery (CD) pipeline.
Hope you find this useful. look forward to seeing how this is implemented for different projects.
I am willing to implement this for an open source project then blog about it. Please feel free to suggest a project.
Take advantage of your Red Hat Developers membership and download RHEL today at no cost.
Last updated: February 6, 2024