Through the exercises presented here, you’ll see how to deploy a three-tier Node.js application on Red Hat OpenShift. The example application is a concession kiosk, used to streamline the process of placing concession orders. The user will place an order via the front end web application. The order information will be saved in a MongoDB database, and then the user will be given an order number. Once their order number is called, users can go to the concession window to pay and receive their food.
Prerequisites
Before you start, you’ll need access to a Red Hat OpenShift cluster. If you don’t already have access to one, you can install Red Hat CodeReady Containers, which will allow you to run OpenShift in the CodeReady Containers virtual machine on your local computer. To install CodeReady Containers, go to https://www.redhat.com/en/technologies/cloud-computing/openshift/try-it and choose Laptop as your infrastructure provider:
Another option is to sign up for OpenShift Online’s free starter tier or a 30-day free trial of the pro tier.
Once you have access to an OpenShift cluster, be sure you have access to the oc command-line tool. If you’re using CodeReady Containers, it comes with oc. If you’re accessing OpenShift another way, you may need to download oc. You can download the appropriate version for your operating system here.
You have two different options for logging in with oc. One option is to use your username and password:
oc login <cluster addr>:<cluster port> -u <username> -p <password>
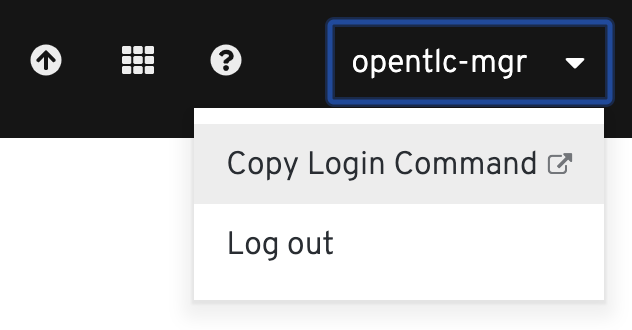
Another option is to first log into the OpenShift Web Console and then click your username in the top right corner. A drop-down menu will appear.
Click on Copy Login Command and follow the instructions, and you’ll get an oc login command with your API token. It will be in a format similar to this:
oc login --token=<abc…> --server=<cluster addr>:<cluster port>
Once you’re logged in, you’re ready to move on to the next section.
Part 1: Deploy and link the back end
Overview of the back end app
The back end is written using Node.js and Express and will serve as the intermediary between the front end and the database (which we’ll create later in part 3). It will save the order information to the database (if the database is available) and generate an order number that will be provided to the customer.
Log in to the OpenShift cluster
If you just completed the prerequisites, you are probably still logged into your OpenShift cluster. If not, you can do this multiple ways: you can authenticate with a token, which you can get from the web console, or you can use a username and password. Choose one of these options:
oc login <cluster addr>:<cluster port> --token=<abc…>
oc login <cluster addr>:<cluster port> -u <username> -p <password>
Deploy the back end on OpenShift
First, we need to create a project. We will deploy the back end, front end, and database in this project.
oc new-project concession-kiosk
The code for our back end is in this GitHub repo: https://github.com/jankleinert/concession-kiosk-backend.
We’ll use the oc new-app command to build a container image from this source code and then deploy it on OpenShift. The oc new-app command uses Source-to-Image, which can infer which builder image to use based on characteristics of your code. In this case, since we have a package.json file in the repo, new-app knows to use the Node.js builder image.
oc new-app https://github.com/jankleinert/concession-kiosk-backend --name backend
Your output should look something like this:
--> Found image a7092f1 (3 days old) in image stream
"openshift/nodejs" under tag "10" for "nodejs"

    Node.js 10.16.3
    ---------------
    Node.js 10.16.3 available as a container is a base platform for
building and running various Node.js 10.16.3 applications and
frameworks. Node.js is a platform built on Chrome's JavaScript runtime
for easily building fast, scalable network applications. Node.js uses
an event-driven, non-blocking I/O model that makes it lightweight and
efficient, perfect for data-intensive real-time applications that run
across distributed devices.

    Tags: builder, nodejs, nodejs-10.16.3

    * The source repository appears to match: nodejs
    * A source build using source code from
https://github.com/jankleinert/concession-kiosk-backend will be
created
      * The resulting image will be pushed to image stream tag
"backend:latest"
      * Use 'oc start-build' to trigger a new build
    * This image will be deployed in deployment config "backend"
    * Port 8080/tcp will be load balanced by service "backend"
      * Other containers can access this service through the hostname
"backend"

--> Creating resources ...
    imagestream.image.openshift.io "backend" created
    buildconfig.build.openshift.io "backend" created
    deploymentconfig.apps.openshift.io "backend" created
    service "backend" created
--> Success
    Build scheduled, use 'oc logs -f bc/backend' to track its
progress.
    Application is not exposed. You can expose services to the outside
world by executing one or more of the commands below:
     'oc expose svc/backend'
    Run 'oc status' to view your app.
Run oc logs -f bc/backend to watch the status of the build. Once it displays Push successful, the build is complete.
One of the resources created by running this command was a service. A service gives us a way of accessing the pod(s) for our back end application within the cluster. Run the following to see some basic information about the back end service:
oc get svc backend
The output should look something like this:
NAME      TYPE        CLUSTER-IP      EXTERNAL-IP   PORT(S)    AGE
backend   ClusterIP   172.30.236.87           8080/TCP   7m53s
The back end service is accessible within your OpenShift cluster via the service name backend and using port 8080. In Part 2, you’ll see that when we link the front end and the back end, the front end will be able to communicate with the back end through its service name and port.
Part 2: Deploy the front end
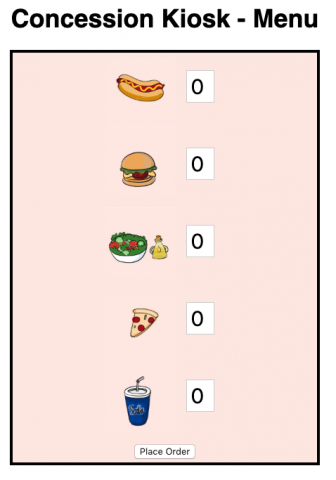
The front end for the application is a simple web app built with Node.js and EJS (embedded JavaScript) for templating. It displays a menu for the concession kiosk. Once a user places their order, it displays a confirmation page with an order number, so that they can wait for their order to be called.
Deploy the front end
Similar to what we did for the back end, we’ll use oc new-app to deploy the front end as well. This time though, we are passing in some environment variables. These are the environment variables that need to be set in order for the front end to talk to the back end through its service name as mentioned in the previous section.
oc new-app https://github.com/jankleinert/concession-kiosk-frontend --name frontend -e COMPONENT_BACKEND_HOST=backend -e COMPONENT_BACKEND_PORT=8080
As before, you can watch the logs as the build progresses:
oc logs -f bc/frontend
Create a URL for the front end
With our front end deployed, we want to be able to access it in the browser, so we need a publicly accessible URL for it. To do that, we will create a Route to expose the service.
oc expose svc/frontend
Then, we can run the following command to get the route that was created.
oc get routes
Copy that URL and paste it into your browser. You should see a Concession Kiosk Menu like the one below.
Try it out to see how it works. Users can select the items and quantities they want to order and once their order is placed, they’ll receive an order number. The order number is just a placeholder for now, until we have a database in place.
In Part 3, we’ll deploy and link the database so that the orders are stored and real order numbers are generated.
Part 3: Deploy and link the database
Up to this point, we’ve been using some hard-coded values for the order number, and we haven’t actually stored the order information anywhere. In this part, we will update that by deploying and connecting to a MongoDB database.
Create a MongoDB Database Service
Make sure you are logged in to your Red Hat OpenShift cluster and confirm that you are still in the concession-kiosk project:
oc project concession-kiosk
We will use a template to create a MongoDB database. A template describes a set of objects that can be parameterized and processed to produce a list of objects for creation by OpenShift. There are a set of templates that are included with OpenShift. The one we will use is the mongodb-ephemeral template.
Note: The mongodb-ephemeral template does not use persistent storage and should therefore only be used for testing. The mongodb-persistent template is better used if you desire persistent storage.
Create the database using the template:
oc new-app --template=mongodb-ephemeral
You should see output that looks something like this:
--> Deploying template "openshift/mongodb-ephemeral" to project
concession-kiosk

     MongoDB (Ephemeral)
     ---------
     MongoDB database service, without persistent storage. For more
information about using this template, including OpenShift
considerations, see
https://github.com/sclorg/mongodb-container/blob/master/3.2/README.md.

     WARNING: Any data stored will be lost upon pod destruction. Only
use this template for testing

     The following service(s) have been created in your project:
mongodb.

            Username:
            Password:
       Database Name: sampledb
      Connection URL: mongodb://:@mongodb/sampledb

     For more information about using this template, including
OpenShift considerations, see
https://github.com/sclorg/mongodb-container/blob/master/3.2/README.md.

     * With parameters:
        * Memory Limit=512Mi
        * Namespace=openshift
        * Database Service Name=mongodb
        * MongoDB Connection Username= # generated
        * MongoDB Connection Password= # generated
        * MongoDB Database Name=sampledb
        * MongoDB Admin Password= # generated
        * Version of MongoDB Image=3.6

--> Creating resources ...
    secret "mongodb" created
    service "mongodb" created
    deploymentconfig.apps.openshift.io "mongodb" created
--> Success
    Application is not exposed. You can expose services to the outside
world by executing one or more of the commands below:
     'oc expose svc/mongodb'
    Run 'oc status' to view your app.
Update the back end to communicate with the database
With the database up and running, we need to set an environment variable for our back end application that tells it the MongoDB Connection URL. Copy the Connection URL from the output. It will be in this format:
mongodb://<generated username>:<generated password>@mongodb/sampledb
If you look into the index.js file for the back end, you’ll see the following line. We’ll use the oc set env command to set the MONGODB_URL environment variable.
const dbConnectionUrl = process.env.MONGODB_URL ||
'mongodb://localhost:27017/sampledb’;
Run this command, replacing the MongoDB connection string with your own:
oc set env dc/backend MONGODB_URL=mongodb://<generated username>:<generated password>@mongodb/sampledb
This change will trigger a new deployment, which should not take long to complete. Reload the front end in your browser and place a new order. Now, for each order you place, you should see a new order number and the contents of your order should be displayed on the thank you page as well.


