Red Hat Advanced Cluster Security for Kubernetes provides an image scanning API through its Central component that CI/CD pipelines depend on for vulnerability assessment. Red Hat Advanced Cluster Security upgrades and restarts introduce downtime windows that can block critical build paths. This post describes a reference architecture that eliminates scan API downtime by running two Central service instances with a client-side failover mechanism.
The challenge
The Red Hat Advanced Cluster Security control pane consists of Central and its supporting services Scanner, Scanner V4, and Central DB. In the following, I refer to those components as "Central Services".
Problem 1: Downtime of Central Services
During upgrades or configuration changes of Red Hat Advanced Cluster Security, Central Services get restarted. Depending on the version delta, the amount of data stored and database migrations involved, this can take anywhere from seconds to several minutes, or even hours for very large installations. For organizations running hundreds of CI builds per hour, even brief unavailability of the scan API can cause pipeline failure for critical deployments.
Problem 2: Decoupling upgrades of multiple Central Service installations
The Red Hat Advanced Cluster Security operator reconciles all Central custom resources in a cluster. When the operator is upgraded, it upgrades every Central instance simultaneously, defeating the purpose of running a second instance for availability. This architecture addresses both problems: Running 2 independent Central instances and staggering their upgrades.
Problem 3: No data synchronization between different Central Service installations
Central services have no capabilities to synchronize data to a 2nd instance, leading to difficulties with setting up an active-passive solution using multiple instances.
Architecture overview
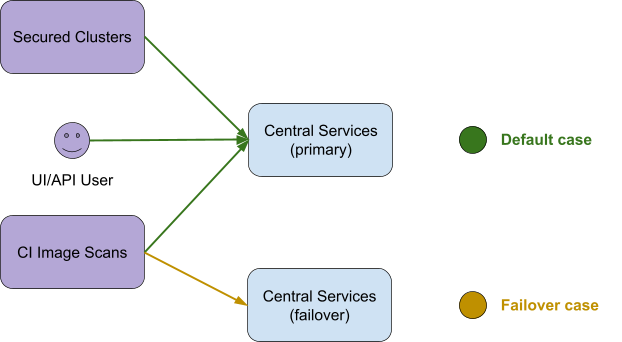
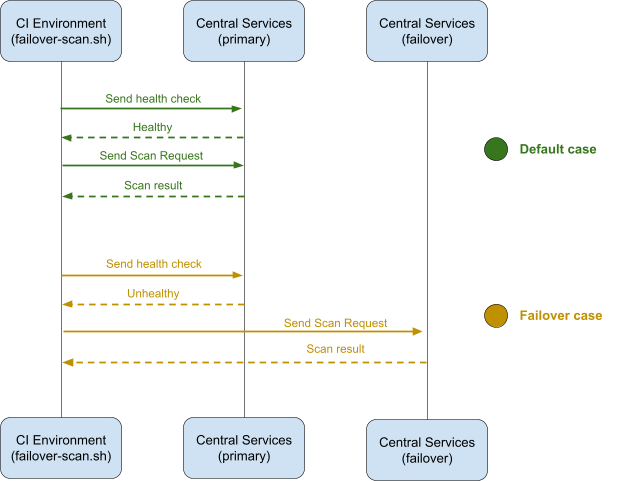
The overarching idea (illustrated in figures 1 and 2) is to set up 2 Central Service instances, a primary and a failover instance. The primary instance is used for all features of Red Hat Advanced Cluster Security, while the failover's only intent is to receive image scan requests from CI at times when the primary is unhealthy.
Because the data used for scan API consists mostly of image and vulnerability data, the failover Central Service is able to produce valid scans by duplicating the image registry integration and build time policy configuration. The tradeoff is that caches of the failover instance will be cold, leading to a temporary longer duration of image scan requests and additional traffic towards image registries on failover.
Important
This architecture relies on client-side failover handling and is suggested as a stop gap solution until Central Services implement HA capabilities for a single installation. The Red Hat Advanced Cluster Security team is actively working on implementing those capabilities.
Client side failover is not the only option to achieve HA scanning with Red Hat Advanced Cluster Security. Server-side load-balancing could be leveraged for this purpose, but its availability depends on the customer environment and actual technologies in use. Server-side load balancing is out of scope for this article.
The steps to setup this solution are:
- Install a failover Central Service instance using the ACS operator
- Stagger upgrades by annotating central CRs with
stackrox.io/pause-reconcile - Use a lightweight client-side failover script for CI
The client (CI pipeline) probes the primary Central's health endpoint before each scan. If the primary is unavailable, it falls back to the failover instance. Both instances are fully independent, with separate databases, separate scanner deployments, separate namespaces.
Prerequisites
- Red Hat OpenShift cluster with the Red Hat Advanced Cluster Security operator installed
- Operator update approval set to Manual (this is critical for staggered upgrades)
- A primary Central Service instance is already installed
ocauthenticated to the clusterroxctlCLI installed
Installation
This article assumes you have a primary Central Service installation already set up and installed to the stackrox namespace. This section describes how to install the failover instance.
First, create the failover project:
oc new-project stackrox-failoverCreate a failover Central custom resource (CR):
# failover-central.yaml
apiVersion: platform.stackrox.io/v1alpha1
kind: Central
metadata:
  name: stackrox-central-services
  namespace: stackrox-failover
spec:
  central:
    exposure:
      route:
        enabled: true
# Specify any additional configuration for the primary Central in this file
Apply it:
oc apply -f failover-central.yamlWait for all pods to become ready:
oc get pods -n stackrox-failover -wPost-installation configuration
Retrieve the routes using oc:
PRIMARY_HOST=$(oc get route central -n stackrox -o jsonpath='{.spec.host}')
FAILOVER_HOST=$(oc get route central -n stackrox-failover -o jsonpath='{.spec.host}')

echo "Primary:  https://${PRIMARY_HOST}"
echo "Failover: https://${FAILOVER_HOST}"
Authentication
The failover central instance doesn't have any authentication configuration during installation, except the generated admin password. Get the admin password for your Central UI:
oc get secret -n stackrox-failover central-htpasswd -o jsonpath='{.data.password}' | \
base64 -d
If you are interested in a highly available setup of Red Hat Advanced Cluster Security, chances are you are using a more sophisticated identity setup for your primary central instance already. It is best to replicate that setup to the failover central instance by using declarative configuration or follow the documentation to configure Access Control in the UI.
Note
You can use any authentication method or user configured for central, that would give you rights to create integrations, manage build time policies, generate API tokens or machine to machine authentication configuration.
Once your Access Control setup is done, log in to the UI and continue with the next step.
Configure image integrations
Image registry integrations must be configured on both Central instances independently. Log in to each Central UI and configure the registries your CI pipelines pull images from. This is necessary for Central to pull image metadata and layers for vulnerability scanning.
Configure custom build time policies
CI pipelines may want to enforce ACS build time policies using roxctl image check. In that case, customer-defined build time policies need to be replicated from the primary to the failover Red Hat Advanced Cluster Security Central service instance.
The preferred way to manage replication of policy configuration is the Policies as Code (PaC) feature. Even if you don't manage the policies for your primary instance with PaC, you can generate the policy CR YAML files from your primary instances UI and apply it to the namespace of the failover instance.
- Log in to the UI of your primary central instance.
- Navigate to Platform Configuration > Policy Management
- Select all policies by clicking the checkbox at the top left corner of the Policy table
- Click Bulk actions > Save as Custom Resources
- Apply the CRs to the
stackrox-failovernamespace
unzip <filename.zip>
oc apply -n stackrox-failover -f <path-to-unzipped-folder>
Configure CI access (Machine-to-Machine method)
One way to configure CI access is to use Machine-to-Machine (M2M) authentication. Red Hat Advanced Cluster Security has a feature to allow a CI pipeline to authenticate itself using a federated identity provider token compatible with OpenID Connect (OIDC). Many CI technologies provide such tokens to their pipeline runs. For instance GitHub Actions Workflows run with a GITHUB_TOKEN environment variable.
If you are already using M2M authentication for the CI with your primary instance, then replicate that configuration to your failover instance. Otherwise, create a M2M configuration that fits your CI pipeline technology for both the primary and failover instance. In case that's not possible, fallback to the Central API tokens method (described in the next section).
Note
This article uses GitHub Actions in this example, but M2M authentication is available for other OIDC-compliant tokens as well. Refer to the documentation for setup instructions.
How to setup the GitHub Action Machine-to-Machine configuration:
- Open the Central UI for each instance.
- Navigate to Platform Configuration > Integrations > Authentication.
- Click Machine access configuration, and then click Create Configuration.
- Select GitHub action for configuration type.
- Put a lifetime (for example,
1h). - Click Add new rule to configure authorization. For example, this authorizes all GHAs running in the
stackroxorganization to perform common CI tasks:- Key: "aud",
- Value: "https://github.com/stackrox",
- Role: Continuous Integration
Configure CI access (Using central API tokens)
If using M2M authentication is not an option for your use case, then you can fallback to issuing long-lived Central API tokens.
Create an API token with the Continuous Integration role on each Central instance:
- Open the Central UI for each instance
- Navigate to Platform Configuration > Integrations > Authentication > API Token
- Click Generate Token, choose the Continuous Integration role, and create it
Failover CI implementation
You can implement CI using GitHub Actions or with a Bash script.
Example 1: GitHub Actions
Uses OIDC-based M2M token exchange with consecutive login steps. If the primary Central is unavailable, then the 1st login fails with the continue-on-error option, with the 2nd login targets the failover instance.
# Example GitHub Actions workflow: scan an image via ACS Central with failover.
#
# Uses stackrox/central-login (OIDC-based M2M token exchange) with consecutive
# login steps. If the primary Central is unavailable, the first login fails with
# continue-on-error and the second login targets the failover instance.
#
# Requires M2M Github authentication configured on both centrals.

name: ACS Image Scan with Failover

on:
  workflow_dispatch:
    inputs:
      image:
        description: "Image reference to scan"
        required: true
        default: "quay.io/stackrox-io/main:latest"

env:
  PRIMARY_CENTRAL: central-primary.example.com:443
  FAILOVER_CENTRAL: central-failover.example.com:443

permissions:
  id-token: write

jobs:
  scan:
    runs-on: ubuntu-latest
    steps:
      - name: Install roxctl
        uses: stackrox/roxctl-installer-action@v1

      - name: Login to primary Central
        id: primary-login
        uses: stackrox/central-login@v1
        continue-on-error: true
        with:
          endpoint: https://${{ env.PRIMARY_CENTRAL }}

      - name: Login to failover Central
        if: steps.primary-login.outcome == 'failure'
        uses: stackrox/central-login@v1
        with:
          endpoint: https://${{ env.FAILOVER_CENTRAL }}

      - name: Scan image
        run: roxctl image scan --output=table --image="${{ inputs.image }}"
Example 2: Generic Bash script
#!/usr/bin/env bash
set -euo pipefail

# Required environment variables:
#   PRIMARY_CENTRAL         - Endpoint for the primary Central (e.g. central-primary.acs.rhcloud.com:443)
#   FAILOVER_CENTRAL        - Endpoint for the failover Central (e.g. central-failover.acs.rhcloud.com:443)
#
# Authentication (one mode required, IDP_TOKEN takes precedence if set):
#   Mode 1 - Machine-to-machine token exchange:
#     IDP_TOKEN               - OIDC identity token exchanged for a short-lived access token per Central
#   Mode 2 - API tokens:
#     PRIMARY_ROX_API_TOKEN   - API token for the primary Central
#     FAILOVER_ROX_API_TOKEN  - API token for the failover Central
#
# Arguments:
#   $1                      - Full image reference to scan (e.g. quay.io/myorg/myimage:latest)
#   $@                      - Extra args passed to roxctl (e.g. --output json, --force)

: "${PRIMARY_CENTRAL:?PRIMARY_CENTRAL must be set}"
: "${FAILOVER_CENTRAL:?FAILOVER_CENTRAL must be set}"
HEALTHCHECK_TIMEOUT="${HEALTHCHECK_TIMEOUT:-5}"
HEALTHCHECK_RETRIES="${HEALTHCHECK_RETRIES:-3}"

if [[ -z "${IDP_TOKEN:-}" && ( -z "${PRIMARY_ROX_API_TOKEN:-}" || -z "${FAILOVER_ROX_API_TOKEN:-}" ) ]]; then
    echo "Error: set IDP_TOKEN for M2M token exchange, or both PRIMARY_ROX_API_TOKEN and FAILOVER_ROX_API_TOKEN for API token auth" >&2
    exit 1
fi

IMAGE="${1:?Usage: $0 <image> [extra roxctl args...]}"
shift
EXTRA_ARGS=("$@")

is_available() {
    curl -sS -m"${HEALTHCHECK_TIMEOUT}" --retry "${HEALTHCHECK_RETRIES}" --retry-all-errors "https://${1}/v1/ping" > /dev/null
}

roxctl_auth() {
    local endpoint="$1"
    local token_var="$2"
    # suppress token output in case -x option is set
    { set +x; } 2>/dev/null
    if [[ -n "${IDP_TOKEN:-}" ]]; then
        roxctl -e "$endpoint" central m2m exchange --token "$IDP_TOKEN"
    else
        local token_var="$2"
        export ROX_API_TOKEN="${!token_var}"
    fi
    { set -x; } 2>/dev/null
}

scan_image() {
    local endpoint="$1"
    local token_var="$2"

    echo "Scanning image ${IMAGE} via ${endpoint}"
    roxctl_auth "$endpoint" "$token_var"
    roxctl -e "$endpoint" image scan --image "$IMAGE" "${EXTRA_ARGS[@]}"
}

if is_available "$PRIMARY_CENTRAL"; then
    scan_image "$PRIMARY_CENTRAL" PRIMARY_ROX_API_TOKEN
elif is_available "$FAILOVER_CENTRAL"; then
    echo "Primary Central: ${PRIMARY_CENTRAL} is unavailable, falling back to failover: ${FAILOVER_CENTRAL}" >&2
    scan_image "$FAILOVER_CENTRAL" FAILOVER_ROX_API_TOKEN
else
    echo "Both Primary Central (${PRIMARY_CENTRAL}) and Failover Central (${FAILOVER_CENTRAL}) are unavailable" >&2
    exit 1
fi
Run with M2M authentication:
export PRIMARY_CENTRAL="${PRIMARY_HOST}:443"
export FAILOVER_CENTRAL="${FAILOVER_HOST}:443"
export IDP_TOKEN="<token from your IDP or CI environment>"

roxctl-scan-failover.sh quay.io/myorg/myimage:latest --output json
Run with API token authentication:
export PRIMARY_CENTRAL="${PRIMARY_HOST}:443"
export FAILOVER_CENTRAL="${FAILOVER_HOST}:443"
export PRIMARY_ROX_API_TOKEN="<token from primary instance>"
export FAILOVER_ROX_API_TOKEN="<token from failover instance>"

roxctl-scan-failover.sh quay.io/myorg/myimage:latest --output json
Staggered upgrades
The Red Hat Advanced Cluster Security operator reconciles all Central CRs in a cluster. An operator upgrade triggers simultaneous upgrades of both Central instances, which defeats the purpose of this architecture. The solution is to pause reconciliation on the failover instance before upgrading the operator.
Upgrade procedure
- Pause reconciliation on the failover instance so it remains on the current version while the primary is upgraded:
oc annotate central -n stackrox-failover stackrox-central-services \
stackrox.io/pause-reconcile=true- Find and approve the operator install plan. When a new Red Hat Advanced Cluster Security version is available, OLM creates an install plan that requires manual approval (because we set update approval to Manual during installation):
oc get installplan -n rhacs-operator
oc patch installplan <plan-name> -n rhacs-operator --type merge \
-p '{"spec":{"approved":true}}'- Wait for the operator to roll out:
oc get pods -n rhacs-operator -w- Wait for the primary instance to finish upgrading. All pods in
stackroxshould reachReady:
oc get pods -n stackrox -wDuring this window, all scan requests are automatically routed to the failover instance by the failover script.
- Resume reconciliation on the failover instance:
oc annotate central -n stackrox-failover stackrox-central-services \
stackrox.io/pause-reconcile-- The failover instance upgrade begins. During this window, scan requests are served by the now-upgraded primary instance.
oc get pods -n stackrox-failover -wAt no point during this process is the scan API unavailable to CI pipelines.
Limitations
This architecture is designed exclusively for HA image scanning using roxctl. The 2 Central instances are fully independent tenants with no shared state. This setup does not provide general-purpose HA for Red Hat Advanced Cluster Security. Specifically:
- No data synchronization: The 2 instances do not share databases, caches, or configuration. Vulnerability scan results, image metadata caches, and scanner indexes are maintained independently per instance.
- Configuration must be duplicated: Image registry integrations, authentication credentials, API tokens, custom certificates, and policy configurations must be created and maintained on both instances separately. Consider using declarative configuration to manage this as code and reduce drift.
- No secured cluster or delegated scanning support: This architecture does not cover secured cluster services or delegated scanning. You can keep connecting Secured Clusters to your primary instance, but there is no data synchronization to the failover instance.
- Cold caches on failover: When traffic shifts to the failover instance, its image metadata and vulnerability caches may not be populated. Initial scans against the failover will be slower and cause more traffic against your image registries until caches are warmed. This is transient and resolves as the failover instance processes requests.
- No sync for vulnerability updates: Both instances update their data about known CVEs in a different interval, leading to brief time windows (5-25 minutes) where new vulnerabilities identified by one instance might not be identified by the other.

