AI
  • Get started with AI

    • Red Hat AI

      Accelerate the development and deployment of enterprise AI solutions.

    • AI learning hub

      Explore learning materials and tools, organized by task.

    • AI interactive demos

      Click through scenarios with Red Hat AI, including training LLMs and more.

    • AI/ML learning paths

      Expand your Red Hat OpenShift AI knowledge using these learning resources.

    • AI quickstarts

      Focused AI use cases designed for fast deployment on Red Hat AI platforms.

    • No-cost AI training

      Foundational Red Hat AI training.

  • Featured resources

    • Red Hat OpenShift AI
    • Open source AI for developers
    • AI product application development
    • Open source-powered AI/ML for hybrid cloud
    • AI and Node.js cheat sheet

Red Hat AI Factory with NVIDIA

Red Hat AI Factory with NVIDIA is a co-engineered, enterprise-grade AI solution for building, deploying, and managing AI at scale across hybrid cloud environments.

Learn
  • Self-guided

    • Documentation

      Find answers, get step-by-step guidance, and learn how to use Red Hat products.

    • Learning paths

      Explore curated walkthroughs for common development tasks.

    • Guided learning

      Receive custom learning paths powered by our AI assistant.

    • See all learning
  • Hands-on

    • Developer Sandbox

      Spin up Red Hat's products and technologies without setup or configuration.

    • Interactive labs

      Learn by doing in these hands-on, browser-based experiences.

    • Interactive demos

      Click through product features in these guided tours.

  • Browse by topic

    • AI/ML
    • Automation
    • Java
    • Kubernetes
    • Linux
    • See all topics
  • Training & certifications

    • Courses and exams
    • Certifications
    • Skills assessments
    • Red Hat Academy
    • Learning subscription
    • Explore training
Build
  • Get started

    • Red Hat build of Podman Desktop

      A downloadable, local development hub to experiment with our products and builds.

    • Developer Sandbox

      Spin up Red Hat's products and technologies without setup or configuration.

  • Download products

    • Red Hat Enterprise Linux
    • Red Hat AI
    • Red Hat OpenShift
    • Red Hat Ansible Automation Platform
    • See all products
  • Featured

    • Red Hat build of OpenJDK
    • Red Hat JBoss Enterprise Application Platform
    • Red Hat OpenShift Dev Spaces
    • Red Hat Developer Toolset
  • References

    • E-books
    • Documentation
    • Cheat sheets
    • Architecture center
Community
  • Get involved

    • Events
    • Live AI events
    • Red Hat Summit
    • Red Hat Accelerators
    • Community discussions
  • Follow along

    • Articles & blogs
    • Developer newsletter
    • Videos
    • Github
  • Get help

    • Customer service
    • Customer support
    • Regional contacts
    • Find a partner

Join the Red Hat Developer program

Download Red Hat products and project builds, access support documentation, learning content, and more.

ConsoleDocsSupport Search
New For you

Recommended

We'll recommend resources you may like as you browse. Try these suggestions for now.

  • Product downloads
  • Cheat sheets
  • Red Hat Developer learning portal
  • Developer blog
  • E-books
  • Developer Sandbox
Log in

Get more with a Red Hat Developer account

  • Product downloads
  • Console access
  • Event registration
  • Training & trials
Explore more account benefitsLog in or register

A subscription may be required for some services.

Contact us

Explore the full capabilities of the Web Terminal Operator

Web Terminal Operator basics and customizations.

September 2, 2024
David Kwon
Related topics:
Developer productivityDeveloper tools
Related products:
Red Hat OpenShift

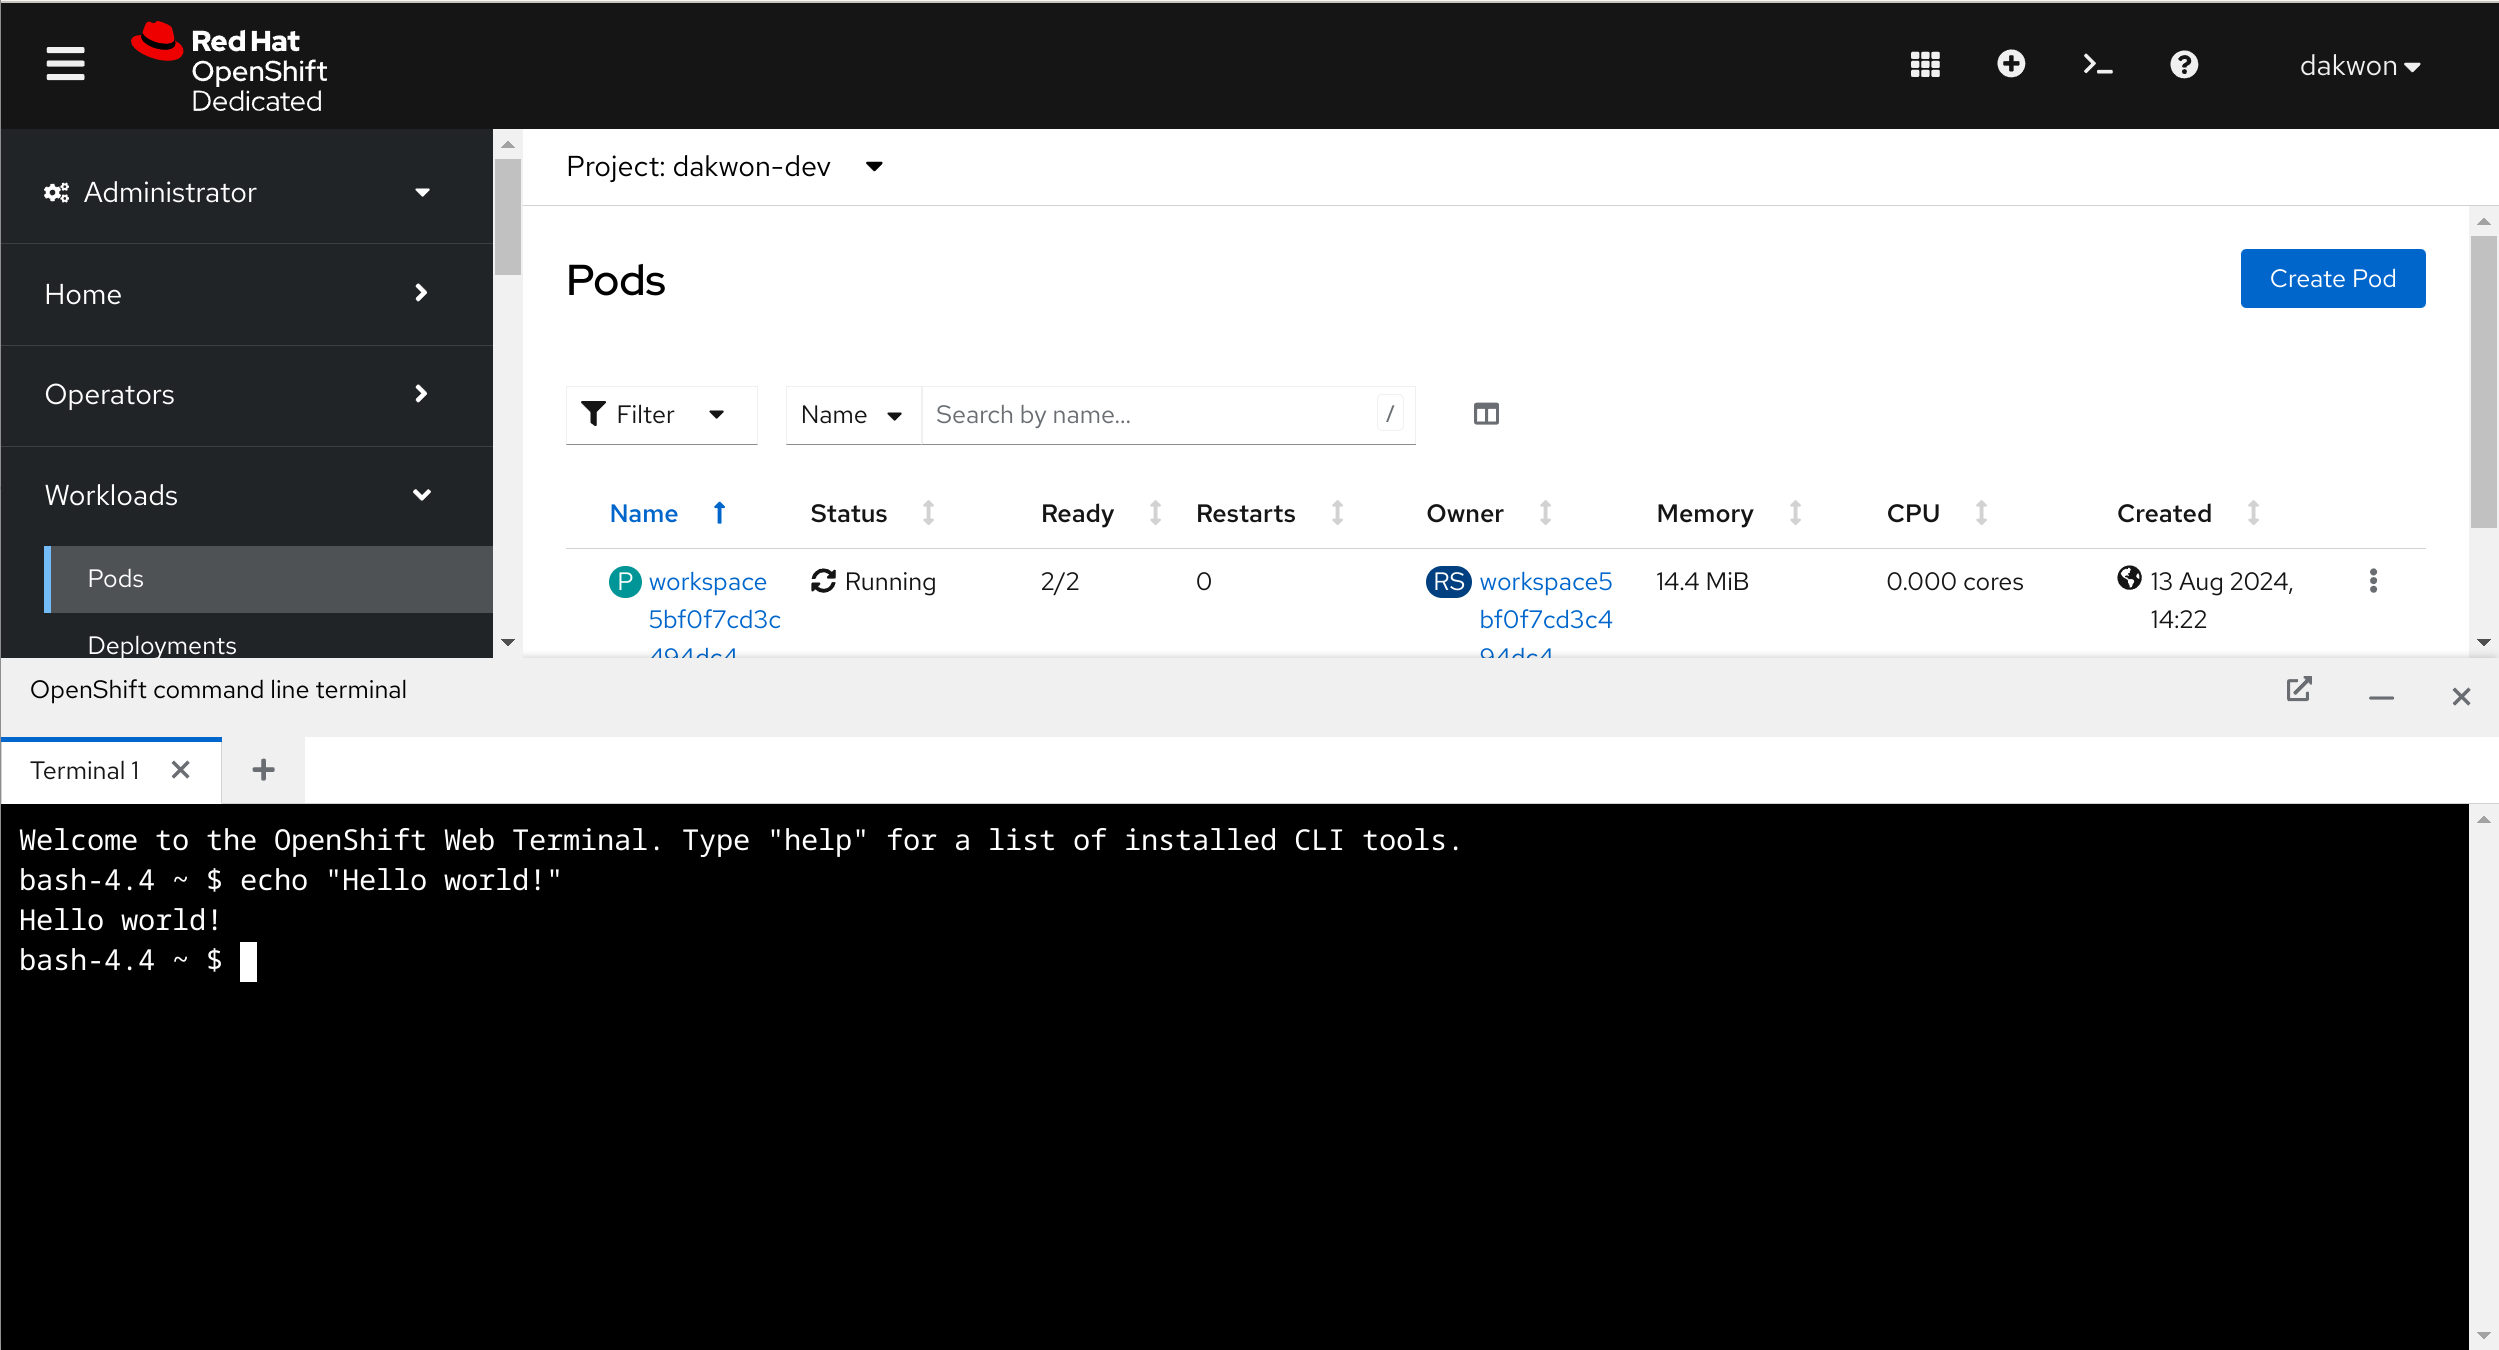
    The Web Terminal Operator is a useful tool that provides users with a shell environment from the Red Hat OpenShift web console. Within the shell environment, preinstalled tools such as oc and kubectl help you manage your OpenShift resources without leaving the web console. Figure 1 shows an instance of the web terminal.
    Screenshot of the OpenShift web console with a web terminal instance open.
    Figure 1. A web terminal instance open in the OpenShift web console
    Figure 1: A web terminal instance open in the OpenShift web console.

    In this introductory article, we will go through noteworthy nuances within the web terminal lifecycle, as well as how to further customize your web terminal to your liking using the built-in wtoctl tool.

    This article is an overview of the web terminal from a user’s perspective. For an article introducing the Web Terminal Operator from a more technical and design standpoint, check out this article here.

    The web terminal lifecycle

    When you open a web terminal for the first time, a DevWorkspace custom resource (CR) is created. Every web terminal has its own DevWorkspace custom resource. It’s where details such as the web terminal tooling image, persistent storage details, and environment variables for your web terminal live.

    From the OpenShift cluster’s perspective, this is what happens when a web terminal is running in your namespace (Figure 2).
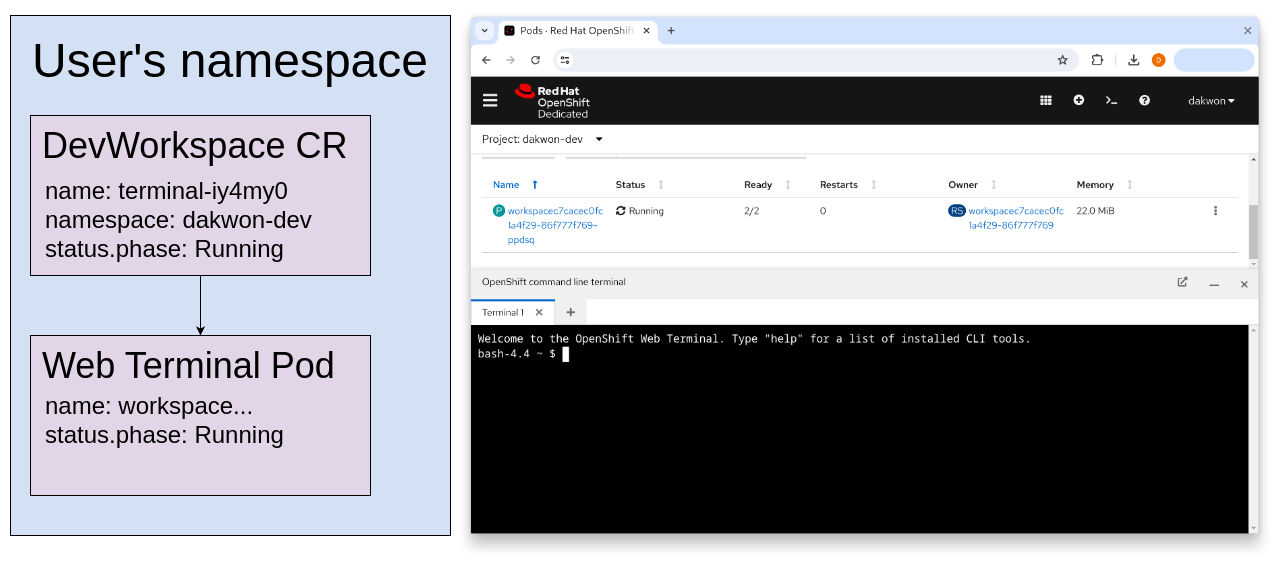
    Diagram that displays the web terminal pod and DevWorkspace CR status when the web terminal is running.
    Figure 2. The web terminal pod and DevWorkspace CR status when the web terminal is running.
    Figure 2: The web terminal pod and DevWorkspace CR status when the web terminal is running.

    When the web terminal is closed, the DevWorkspace CR and web terminal pod still exist (Figure 3).
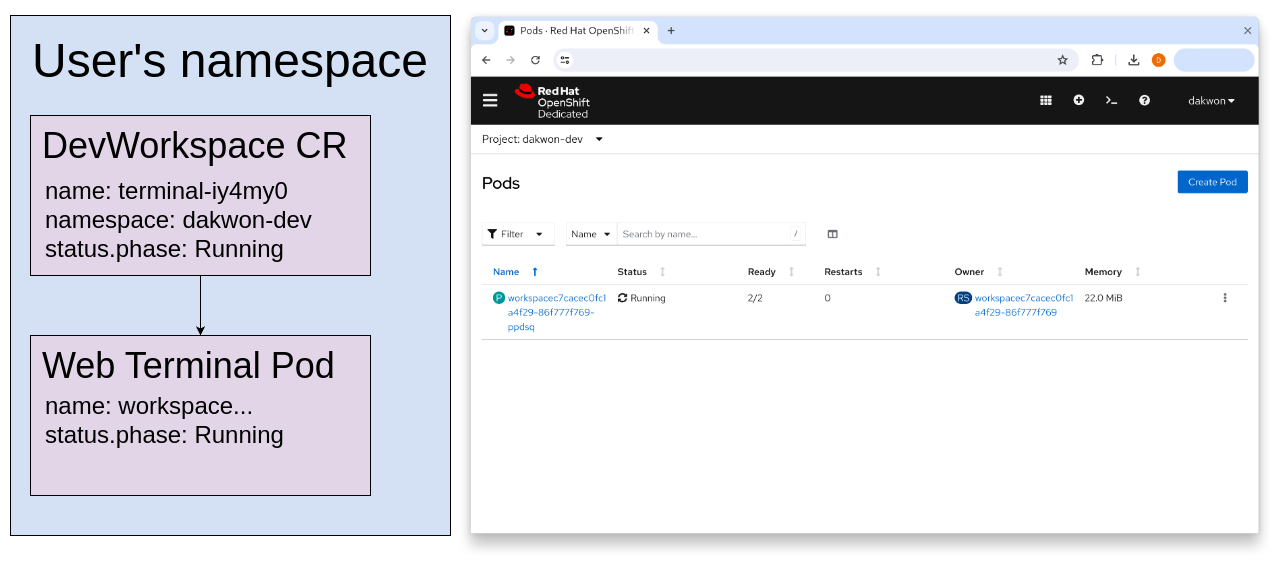
    Diagram that displays the web terminal pod and DevWorkspace CR status right after the web terminal is closed.
    Figure 3. When the user closes the web terminal.
    Figure 3: When the user closes the web terminal.

    The web terminal continues to run until the idle timeout, which is 15 minutes by default. After the idle timeout, the pod terminates (Figure 4).
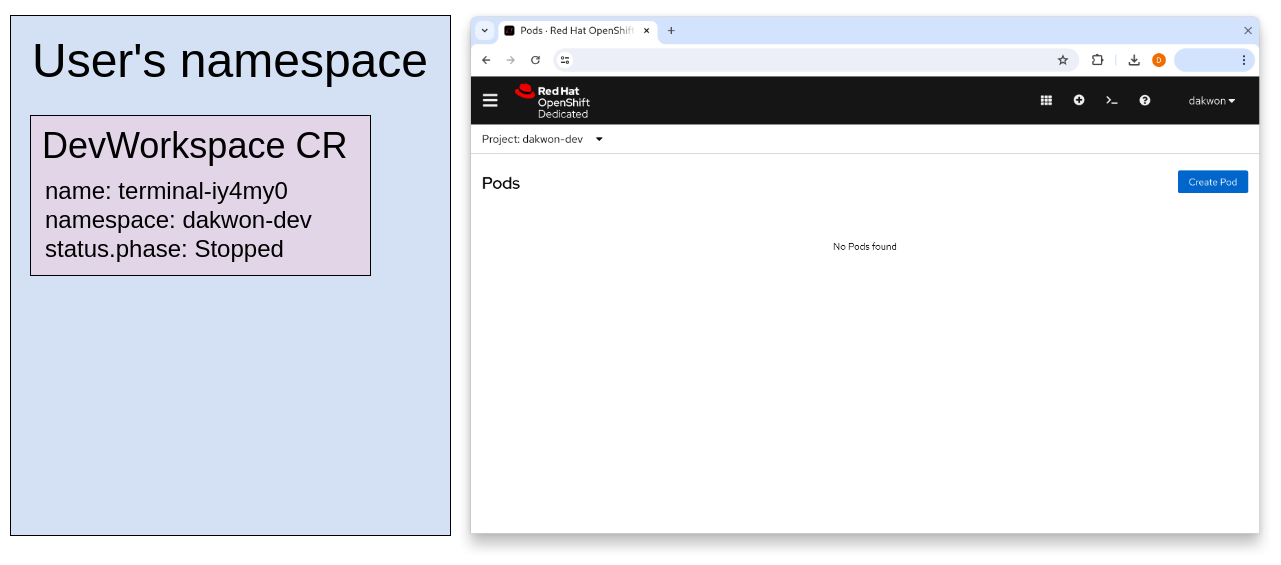
    Diagram that displays the web terminal pod and DevWorkspace CR status when the web terminal is closed and the web terminal pod has terminated.
    Figure 4. When the web terminal pod has idled and terminated.
    Figure 4: WHen the web terminal pod has idled and terminated.

    Note:

    If opening your web terminal is quite slow, this could be because the web terminal pod isn’t running yet, therefore you’re likely waiting for the pod to be up and running.

    To summarize, here are a couple of key takeaways:

    1. Your web terminal is tied to a single DevWorkspace CR in your namespace. This ensures that your web terminal is separate from another user’s web terminal.
    2. Just because your web terminal isn’t open in the console, doesn’t mean that the web terminal isn’t running. The pod itself could still be running in your namespace if it hasn’t idled like in Figure 3.

    Customizing the web terminal with wtoctl

    What if you don't want the web terminal pod to timeout after 15 minutes? wtoctl is a tool installed in the default web terminal tooling image that allows for customizing the web terminal.

    You can run wtoctl --help in your web terminal for more details.

    If you want to revert the customizations performed in this article to the defaults, you can run wtoctl reset <timeout|shell|storage>. Alternatively, if you want to start a new web terminal from scratch, you can simply delete your terminal-* DevWorkspace CR within your namespace. In this case, a new DevWorkspace CR will be created the next time you open the web terminal. 

    Setting a new timeout

    The first change we will make is the idle timeout of our web terminal, which is 15 minutes by default.

    Here are some examples of how to run the command, which accepts the time formatting used by Go’s time package:

    $ wtoctl set timeout 30m
    $ wtoctl set timeout 1h30m
    $ wtoctl set timeout 1.5h

    Changing the shell

    The default configuration for the web terminal provides a bash shell environment. The web terminal also provides the ability to change the shell to zsh:

    $ wtoctl set shell zsh

    After this command is run, the web terminal will restart and will be using the zsh shell for your web terminal from now on. See Figure 5.
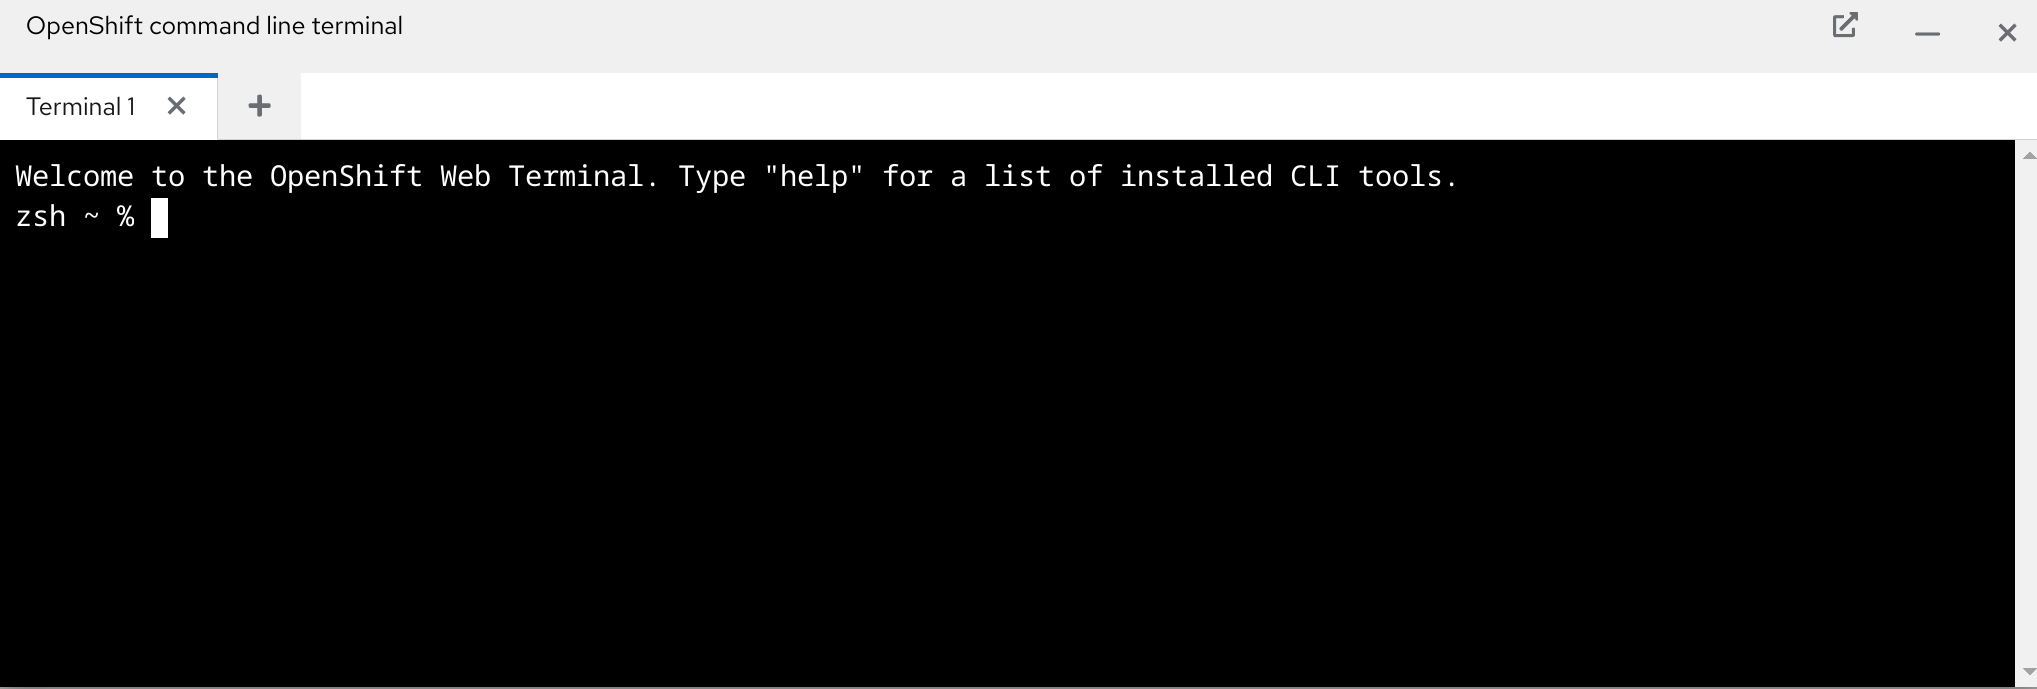
    Screenshot of the web console with a zsh shell.
    Figure 5. A web terminal with the zsh shell.
    Figure 5: A web terminal with the zsh shell.

    Enabling persistent storage

    Creating a persistent volume for your web terminal is a great way to store user data such as git repositories, commonly used OpenShift templates or scripts. Do note that if you delete your web terminal's terminal-* DevWorkspace CR, the PVC used for persistent storage will also be deleted automatically.

    To enable persistent storage in your web terminal, run the following command:

    $ wtoctl set storage
    Enter desired storage size (default: '100Mi'): 
    Enter desired mount path (default: '/home/user/storage'): 
    Adding persistent volume with size 100Mi to /home/user/storage. Is this okay? (y/N): y
    devworkspace.workspace.devfile.io/terminal-vvauwn configured
    Updated Web Terminal storage. Terminal may restart

    The sequence above creates a PVC in your namespace, mounts it to /home/user/storage in your web terminal tooling container, and restarts the web terminal pod to apply the new change.

    Additionally, wtoctl get storage specifies the configured storage for the web terminal if present, and wtoctl reset storage removes the volume from the web terminal and optionally deletes the PVC too:

    $ wtoctl get storage 
    Persistent storage (100Mi) is mounted to /home/user/storage
    $ wtoctl reset storage
    Would you like to also delete the persistent volume claim used for storage (name: storage-workspace939f8f4fc6aa4130)? (y/N): y
    devworkspace.workspace.devfile.io/terminal-vvauwn configured
    persistentvolumeclaim "storage-workspace939f8f4fc6aa4130" deleted
    Deleted persistent volume claim storage-workspace939f8f4fc6aa4130
    Reset Web Terminal storage. Terminal may restart

    Conclusion

    Knowledge of the web terminal lifecycle is useful when working with and debugging web terminals. Within the default web terminal tooling image, the ever-evolving wtoctl tool can be used to further customize your web terminal environment. 

    In the next article, we plan to dive into the wtoctl set image command which replaces your web terminal’s tooling image with a custom image allowing for further shell customizations to tailor your web terminal experience.

    Last updated: September 13, 2024

    Related Posts

    • Install OpenShift's Web Terminal Operator in any namespace

    • Cluster tooling updates and more in Red Hat OpenShift's Web Terminal Operator 1.3

    • Introducing the new Traces UI in the Red Hat OpenShift Web Console

    • How to get Red Hat OpenShift operators' information without oc-mirror plug-in

    Recent Posts

    • Run Red Hat Enterprise Linux CoreOS on NVIDIA BlueField DPUs

    • Agent harness engineering: Separating model capabilities from enforcement

    • What's new for developers in Red Hat Enterprise Linux 10.3 and 9.9

    • Control multicluster costs with right-sizing in Red Hat Advanced Cluster Management 5

    • Lightbits is now certified for Red Hat OpenStack Services on OpenShift

    What’s up next?

    Learn how to set up and use the Developer Sandbox for Red Hat OpenShift. With the Developer Sandbox, you experience hands-on learning resources without setup or configuration, and learn to develop quicker than ever before.

    Start the activity
    Red Hat Developers logo

    Platforms

    • Red Hat AI
    • Red Hat Enterprise Linux
    • Red Hat OpenShift
    • Red Hat Ansible Automation Platform
    • See all products

    Build

    • Developer Sandbox
    • Developer tools
    • Interactive tutorials
    • API catalog

    Quicklinks

    • Learning resources
    • E-books
    • Cheat sheets
    • Blog
    • Events
    • Newsletter

    Communicate

    • About us
    • Contact sales
    • Find a partner
    • Report a website issue
    • Site status dashboard
    • Report a security problem

    Red Hat Developer

    Build here. Go anywhere.

    We serve the builders. The problem solvers who create careers with code.

    Join us if you’re a developer, software engineer, web designer, front-end designer, UX designer, computer scientist, architect, tester, product manager, project manager or team lead.

    Sign me up

    Red Hat legal and privacy links

    • About Red Hat
    • Jobs
    • Events
    • Locations
    • Contact Red Hat
    • Red Hat Blog
    • Inclusion at Red Hat
    • Cool Stuff Store
    • Red Hat Summit
    © 2026 Red Hat

    Red Hat legal and privacy links

    • Privacy statement
    • Terms of use
    • All policies and guidelines
    • Digital accessibility
    Ask AI