Centralized secrets management platforms, like HashiCorp Vault, enable organizations to protect some of their most sensitive values (think passwords, tokens, or any type of content that may be deemed protected). Red Hat Ansible Automation Platform includes integrations for several popular secrets management platforms, including HashiCorp Vault, to enable accessing secure values during automation execution. However, regardless of how secure a secrets management system is along with how it protects the content it stores, one of the biggest challenges that organizations need to contend with is handling how consumers access the secrets management platform—also known as the "secret zero problem". A breach of a long-lived credential that's used to read a range of content from the secrets management system has a potential blast radius to negatively impact the security posture of an organization.
Ansible Automation Platform addresses this challenge firsthand through an integration with HashiCorp Vault that was first made available with the version 2.7 release of Ansible Automation Platform. Instead of authenticating from Ansible to HashiCorp Vault using a set of long lived credentials, short-lived OpenID Connect (OIDC) credentials are dynamically generated at runtime to facilitate the communication between the two systems.
This article provides an overview of the OIDC based integration between Ansible and HashiCorp Vault, the configuration required within both systems, and how content stored in HashiCorp Vault can be used during the execution of automation within Ansible Automation Platform.
Enabling the OIDC feature for HashiCorp Vault
The OIDC integration for HashiCorp Vault which was part of the Red Hat Ansible Automation Platform 2.7 release was made available as a technology preview component. As a result, this capability is not enabled by default within fresh installations or upgrades. Additional steps need to be completed to enable this feature and the specific steps required are dependent on the Ansible deployment method used.
Red Hat Enterprise Linux: Ansible Automation Platform containerized installer
Enable the feature flag by specifying the following in the installation inventory:
feature_flags:
  FEATURE_OIDC_WORKLOAD_IDENTITY_ENABLED: True
Ansible Automation Platform operator installation for Red Hat OpenShift
Specify the following in the Ansible Automation Platform custom resource:
apiVersion: aap.ansible.com/v1alpha1
kind: AnsibleAutomationPlatform
metadata:
  name: aap
  namespace: aap
spec:
 feature_flags:
    FEATURE_OIDC_WORKLOAD_IDENTITY_ENABLED: True
After the OIDC feature has been enabled, confirm the OIDC provider in Ansible Automation Platform is running. First, set an environment variable associated with the URL of the Ansible Automation Platform:
export AAP_URL=<AAP_URL>The OIDC provider is exposed at the /o context path. Query the OIDC discovery endpoint to not only confirm the provider is running, but also to view the exposed set of capabilities:
curl -L https://${AAP_URL}/o/.well-known/openid-configuration/With the OIDC feature enabled in Ansible Automation Platform, the next step is to configure HashiCorp Vault.
Configuring HashiCorp Vault
HashiCorp Vault can operate in a variety of environments including traditional infrastructure (such as bare metal or virtual machines) or within containers on Red Hat OpenShift, or as a SaaS offering on the HashiCorp Cloud Platform. To demonstrate the integration between Ansible Automation Platform and HashiCorp Vault, you need:
- Access to an existing HashiCorp Vault environment with privileges to configure the instance
- CLI tools installed on your local machine
- Vault (HashiCorp Vault) command-line interface
- jq (a lightweight and flexible command-line JSON processor)
If you need to deploy your own instance of HashiCorp Vault on OpenShift, read Run Vault on OpenShift.
After HashiCorp Vault is available in your environment, use the vault CLI to log in to the instance.
Set the VAULT_ADDR environment variable to the location of the HashiCorp Vault instance:
export VAULT_ADDR=<VAULT_ADDRESS>Authenticate to HashiCorp Vault using the appropriate method for your environment. Confirm that you're authenticated by viewing the details of the current authentication token:
vault token lookupStoring Secrets
To demonstrate the integration between Ansible and HashiCorp Vault, you can store a Secret in HashiCorp Vault and then retrieve it using the OIDC-based capability in Ansible Automation Platform.
First, ensure that the default Secrets mount uses the Key/Value v2 plugin:
vault secrets enable -path=secret kv-v2Store a Secret called ansible-oidc-vault-demo with a key titled secretvalue and a value of Ansible Automation Platform integration with HashiCorp Vault using OIDC.
vault kv put secret/ansible-oidc-vault-demo secretvalue="Ansible Automation Platform integration with HashiCorp Vault using OIDC"Configure Ansible access
With the Secret stored in HashiCorp Vault, the next step is to enable how Ansible accesses the content. Because Ansible will be using OIDC-based authentication, and presents a JSON web token (JWT) to Vault, first enable the JWT Auth Method in HashiCorp Vault:
vault auth enable jwtConfigure the JWT auth method by specifying the location of the Ansible OIDC endpoint. Details provided within the endpoint enable Vault to validate the authenticity of the incoming JWT.
vault write auth/jwt/config oidc_discovery_url="${AAP_URL}/o"If your Ansible environment does not expose a publicly signed CA, you must provide the CA certificate using the oidc_discovery_ca_pem parameter.
Next, create a HashiCorp Vault policy called ansible-oidc-vault-demo-policy to enable access to read the Secret you created:
vault policy write ansible-oidc-vault-demo-policy - <<EOF
path "secret/data/ansible-oidc-vault-demo" {
     capabilities = ["read"]
}
EOF
Create a HashiCorp Vault role called ansible-oidc-vault-demo-role to bind the authenticated user (in this case, Ansible Automation Platform) to the policy:
vault write auth/jwt/role/ansible-oidc-vault-demo-role - <<EOF
{
     "role_type": "jwt",
     "bound_audiences": ["${VAULT_ADDR}"],
     "user_claim": "sub",
     "policies": ["ansible-oidc-vault-demo-policy"]
}
EOF
By creating a policy that specifies the Secret that can be read by name, you have restricted access to content in HashiCorp Vault. You can extend this posture by requiring that claims on the JWT provided by Ansible Automation Platform contain specific values to further limit the level of access granted.
For example, to allow a job template in a specific Ansible Automation Platform organization, use the bound_claims property of a role to include the following property:
"bound_claims": {
    "aap_controller_organization_name": ["Vault Demo"],
    "aap_controller_job_template_name": "aap-vault-demo"
},
Red Hat documentation contains a full list of claims included on a JWT by Ansible.
Configuring Ansible Automation Platform
Now that HashiCorp Vault has been configured with a Secret and policies have been defined to enable access by Ansible Automation Platform, let's explore how the OIDC capabilities can be used.
Create a credential for HashiCorp Vault in Ansible Automation Platform
Navigate to the Ansible Automation Web interface and log in. View the available credential type by navigating to Automation Execution > Infrastructure > Credential Types.
Enter "hashicorp" in the search box.
When the OIDC feature is enabled in Ansible, you see the two existing credential types for HashiCorp Vault: HashiCorp Vault Secret Lookup and HashiCorp Vault Signed SSH. You also see a new analogous set aligned with OIDC support: HashiCorp Vault Secret Lookup (OIDC) and HashiCorp Vault Signed SSH (OIDC). Because the assets we are concerned with, in this example, is a Secret stored in HashiCorp Vault, we utilize the HashiCorp Vault Secret Lookup (OIDC) credential type.
Before creating a new credential, segregate this demonstration in a separate organization to avoid potential conflicts with existing automation content. In the Ansible Automation Platform web interface, navigate to Access Management > Organizations, and select Create organization.
Enter "HashiCorp Vault OIDC Demo" in the Name field. Click Next and then Finish to create the new organization.
Creating and utilizing a separate organization is optional. You can use an existing organization (such as Default) if you prefer, but be sure to align the targeted organization in subsequent steps if you are using a different organization.
Now create a new HashiCorp Vault Secret Lookup (OIDC) credential by navigating to Automation Execution > Infrastructure > Credentials.
Click Create credential.
Enter the following basic credential details:
- Name: HashiCorp Vault
- Organization: HashiCorp Vault OIDC Demo
- Credential Type: HashiCorp Vault Secret Lookup (OIDC)
The following list details the fields that are associated with the HashiCorp Vault Secret Lookup (OIDC). Fill out the form with the appropriate values (figure 1).
- Server URL:
$VAULT_ADDR- URL of the HashiCorp Vault server. Aligns to the
$VAULT_ADDRenvironment variable set previously
- URL of the HashiCorp Vault server. Aligns to the
- CA Certificate:
- CA certificate of the HashiCorp Vault server. Can be omitted if the certificate is publicly trusted.
- JWT Path:
jwt- The path where the JWT authentication method is mounted
- Vault Role:
ansible-oidc-vault-demo-role- HashiCorp Vault role to authenticate against
- Namespace:
- The name of the Namespace containing authentication and Secrets content. Only applicable for HashiCorp Vault Enterprise and HCP Vault.
- API Version:
v2- API version for the Key/Value plug-in
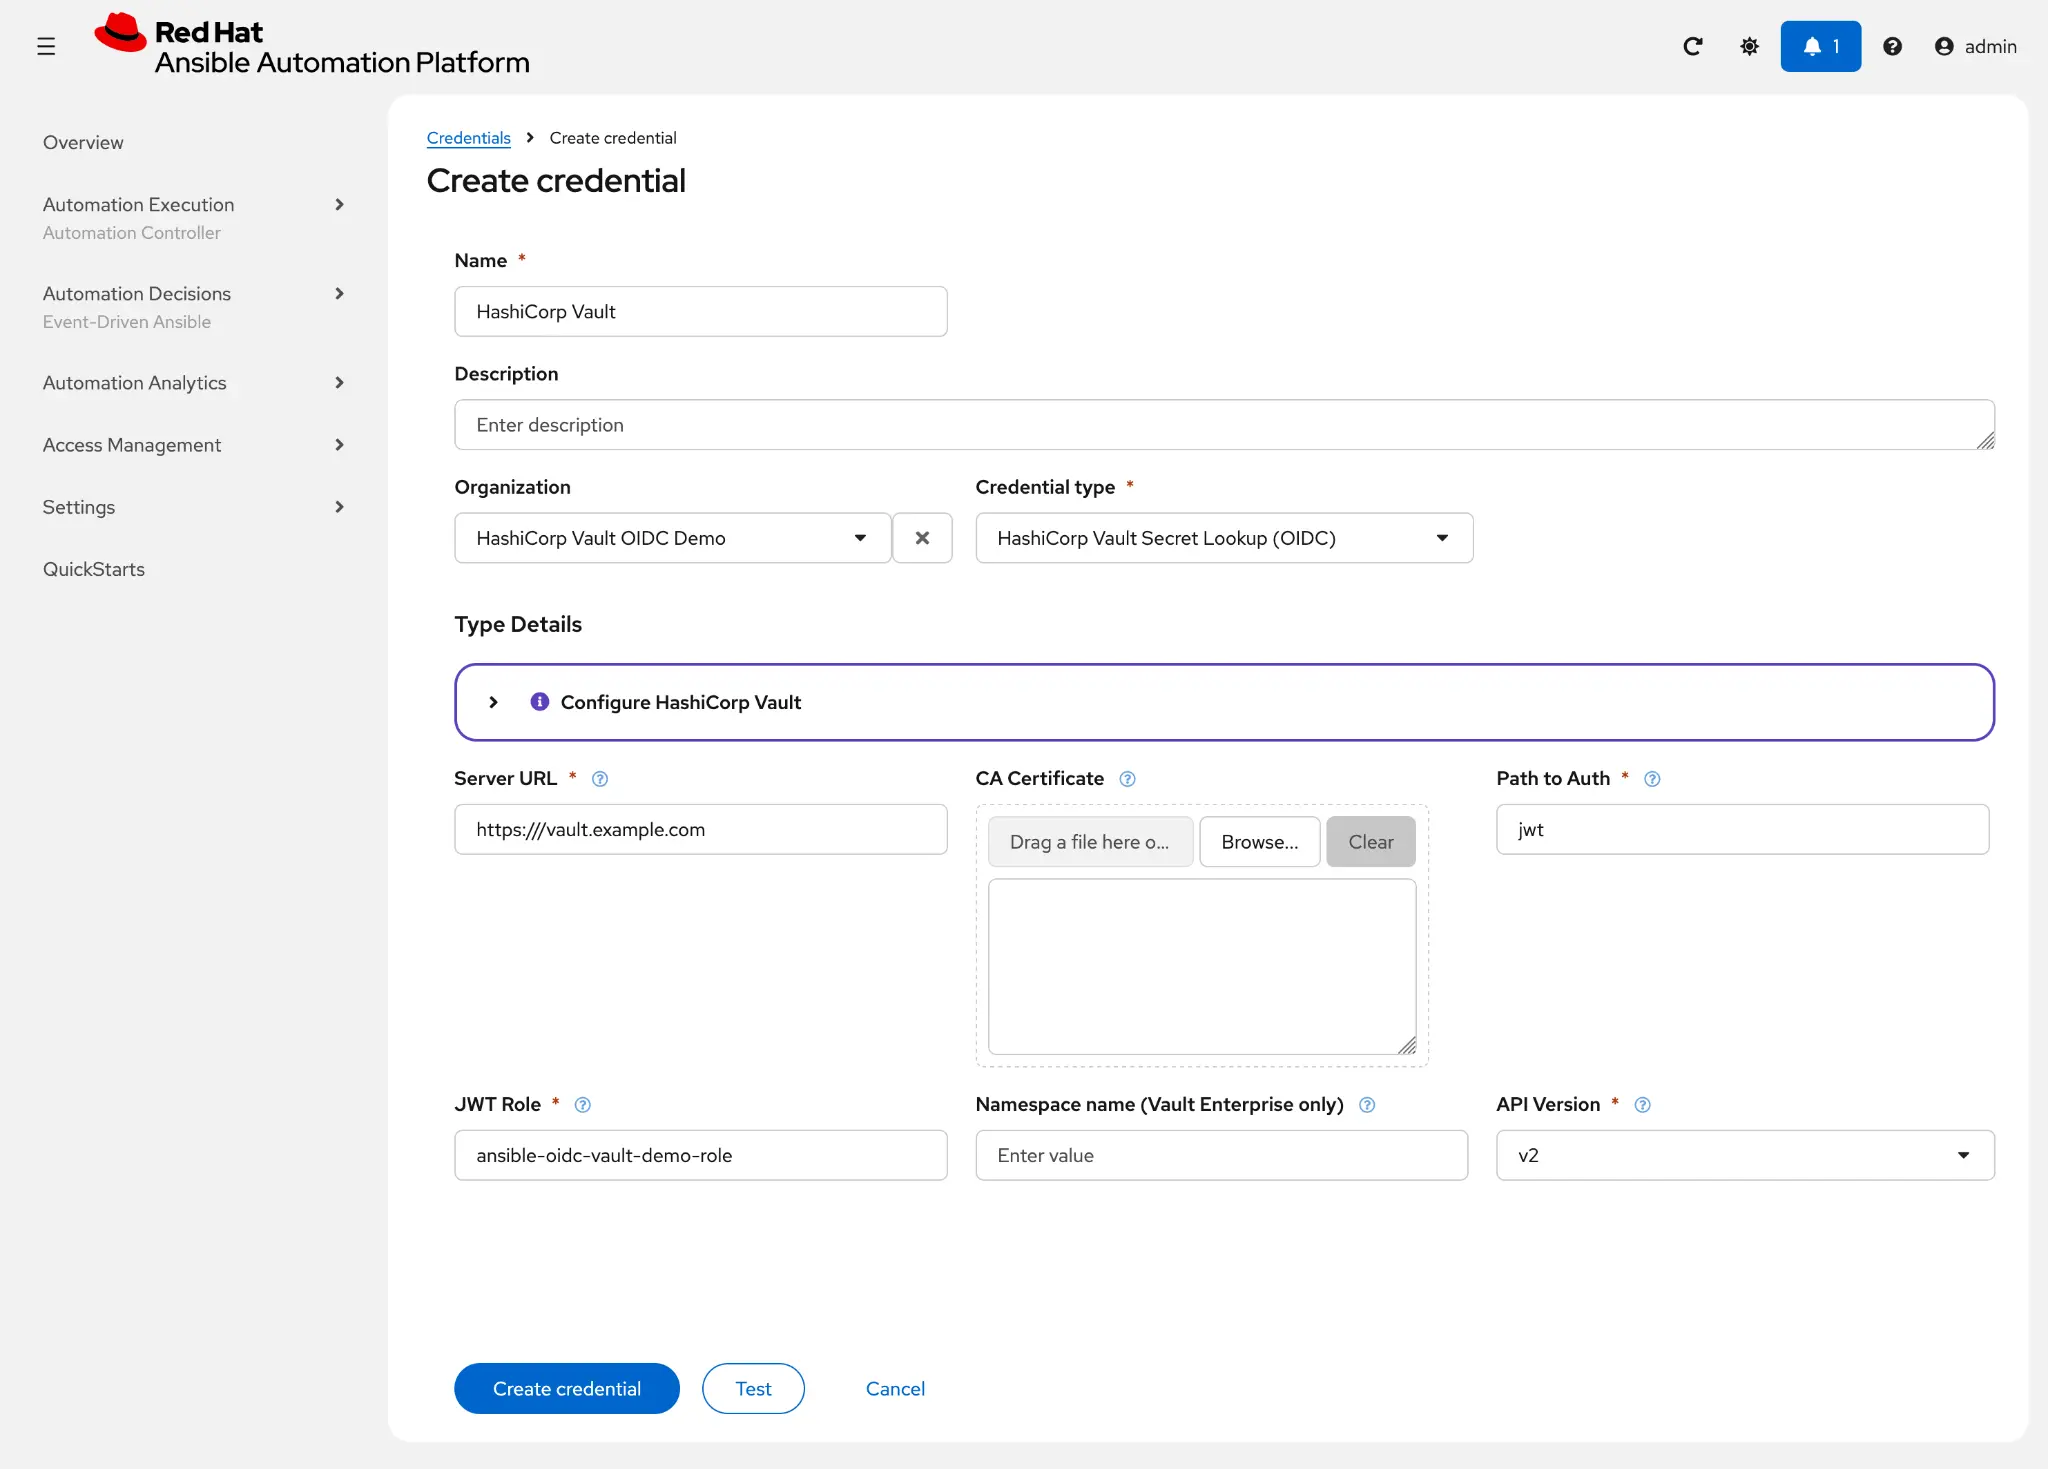
To confirm integration between Ansible Automation Platform and HashiCorp Vault is performing correctly, click the Test button. A dialog box appears, allowing you to retrieve content from HashiCorp Vault.
Enter the following values into the fields in the dialog box:
- Path to Secret:
secret/ansible-oidc-vault-demo - Path to Auth:
jwt - Key Name:
secretvalue - Job Template: Select any available job template. Any existing job template can be used unless the
bound_claimsproperty was defined on the HashiCorp Vault role targeting a specific job template.
Click Run to execute the test. If the test succeeded, a message with the text Test passed appears (figure 2) along with the claims associated with the generated JWT that was sent to HashiCorp Vault.

If the test failed, confirm the configurations in HashiCorp Vault were applied properly, and that the properties in the credential are correct. Click Retry to attempt the verification process again.
To exit the test, click the Close button. Click Create Credential to save the credential and to connect Ansible Automation Platform with HashiCorp Vault.
Custom credential for job template injection
A credential type is available to connect Ansible Automation Platform to access a Secret in HashiCorp Vault using OIDC credentials. However, this lookup credential can't be used directly in a job template because only certain credential types are valid for this purpose. Instead, you can create a custom credential type, and bind it to a value from the HashiCorp Vault credential created previously.
To create a custom credential, navigate to Automation Execution > Infrastructure > Credential Types.Click Create credential type.
Enter the following in the new Credential Type page:
Name:
HashiCorp Vault ValueInput configuration:
fields:
  - id: hashicorp_vault_value
    type: string
    label: HashiCorp Vault Value
required:
  - hashicorp_vault_value
Injector configuration:
extra_vars:
  hashicorp_vault_value: '{{ hashicorp_vault_value }}'
Click Create credential type to create the new custom credential type.
Now create a new credential to bind the Secret stored within HashiCorp Vault. Navigate to Automation Execution > Infrastructure > Credentials. Click Create credential.
Enter the following basic credential details:
- Name:
HashiCorp Vault Secret Value - Organization:
HashiCorp Vault OIDC Demo - Credential Type:
HashiCorp Vault Value
Next to the HashiCorp Vault Value field, there is a key icon (see figure 3). This allows you to populate the field from an external secrets management system (in this case, the OIDC based HashiCorp Vault Secret Lookup Credential we created previously).
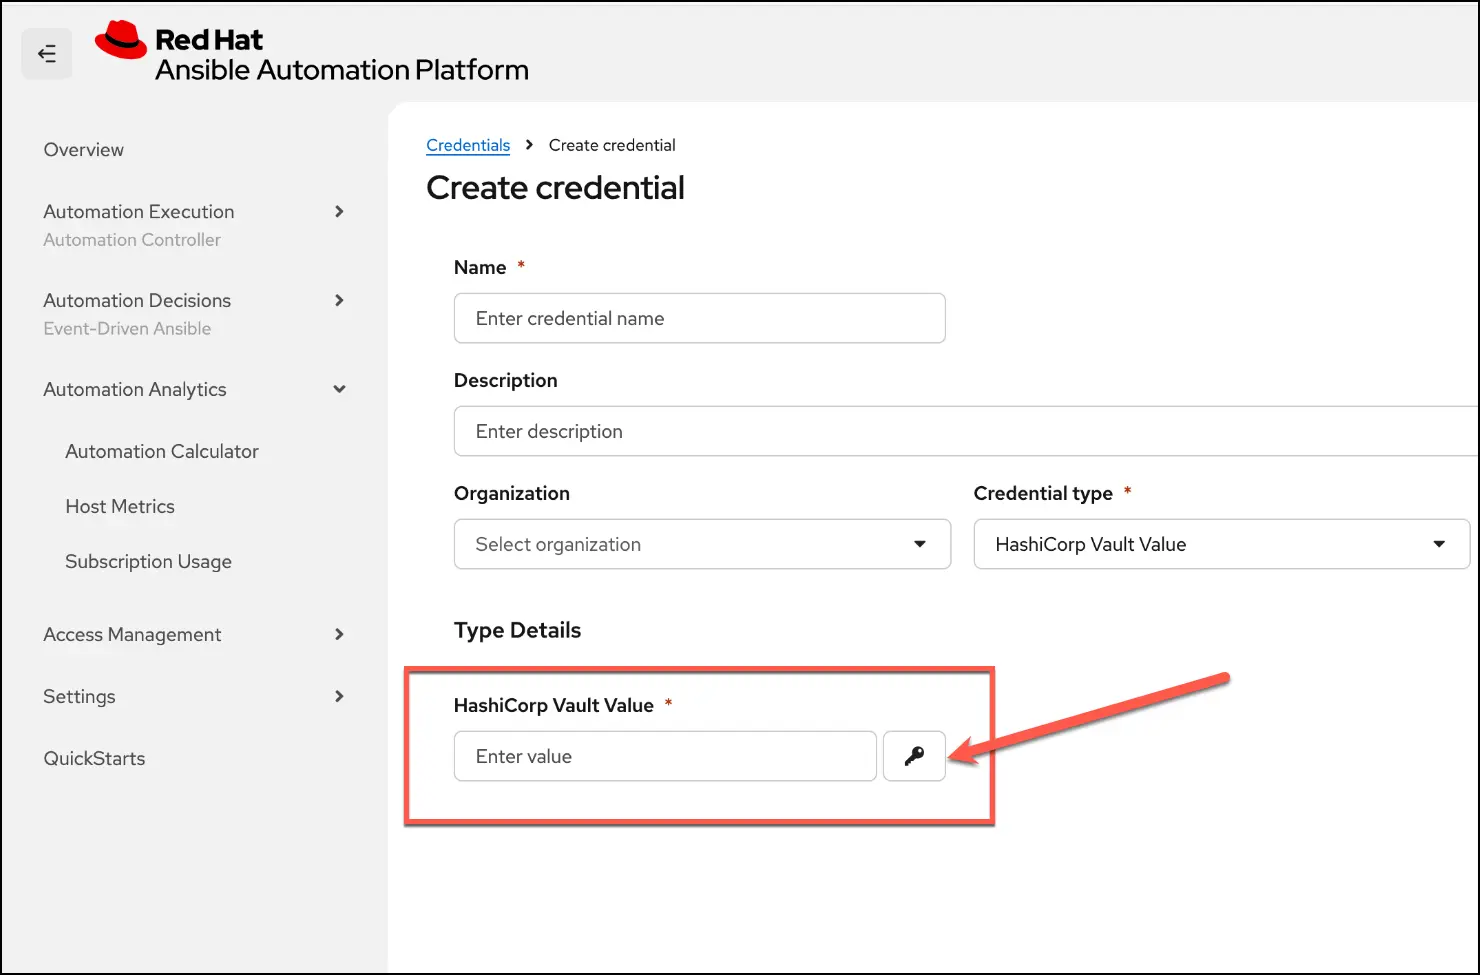
Click the key icon to launch the Secrets Management System integration dialog.
Select HashiCorp Vault as the credential type, and enter the following in the remainder of the dialog.
- Path to Secret:
secret/ansible-oidc-vault-demo - Path to Auth:
jwt - Key Name:
secretvalue - Job Template: Select any available job template.
These parameters may seem familiar. They were the same parameters used previously when testing and validating the connection to HashiCorp Vault.
Usage in Ansible Automation Platform Automation execution
Now that a Credential is available to dynamically source a Secret value from HashiCorp Vault, let's see how it can be used in the execution of a job template in Ansible Automation Platform.
I have a playbook called display_hashicorp_vault_secret.yml in this Git repository:
---

- name: "HashiCorp Vault OIDC Demo"
  hosts: localhost
  tasks:
    - name: Print the Value Obtained from HashiCorp Vault
      ansible.builtin.debug:
        msg: "Value stored in HashiCorp Vault: {{ hashicorp_vault_value }}"
To integrate this playbook with Ansible Automation Platform, we must first create a new Ansible inventory. Navigate to Automation Execution > Infrastructure > Inventories and then click Create inventory > Create inventory.
Enter the following into the Create inventory dialog:
- Name:
HashiCorp Vault OIDC Demo - Organization:
HashiCorp Vault OIDC Demo
Click Create inventory.
Because the playbook executes against a localhost target, you must add a new host. Select the Host tab for the newly created inventory, and select Create host.
Enter localhost for the name of the host and enter the following in the Variables text field:
ansible_connection: local
ansible_python_interpreter: '{{ ansible_playbook_python }}'
Click Create to create the host.
Next, create an Ansible project to bring the playbook from the repository into Ansible Automation Platform. Navigate to Automation Execution > Projects, and then click Create project.
Enter the following into the project creation dialog:
- Name:
ansible-oidc-vault-demo - Organization:
HashiCorp Vault OIDC Demo - Source control type:
Git - Source control URL:
https://github.com/sabre1041/ansible-oidc-vault-demo - Source control branch/tag/commit:
main
Click Create project.
Finally, create a new job template by navigating to Automation Execution > Job Templates. Click Create template > Create job template.
Enter the following into the job template creation dialog (see figure 4):
- Name:
Display HashiCorp Vault Secret Content - Organization:
HashiCorp Vault OIDC Demo - Inventory:
HashiCorp Vault OIDC Demo - Project:
ansible-oidc-vault-demo - Playbook:
playbooks/display_hashicorp_vault_secret.yml - Credentials:
HashiCorp Vault Secret Value | HashiCorp Vault Secret Value
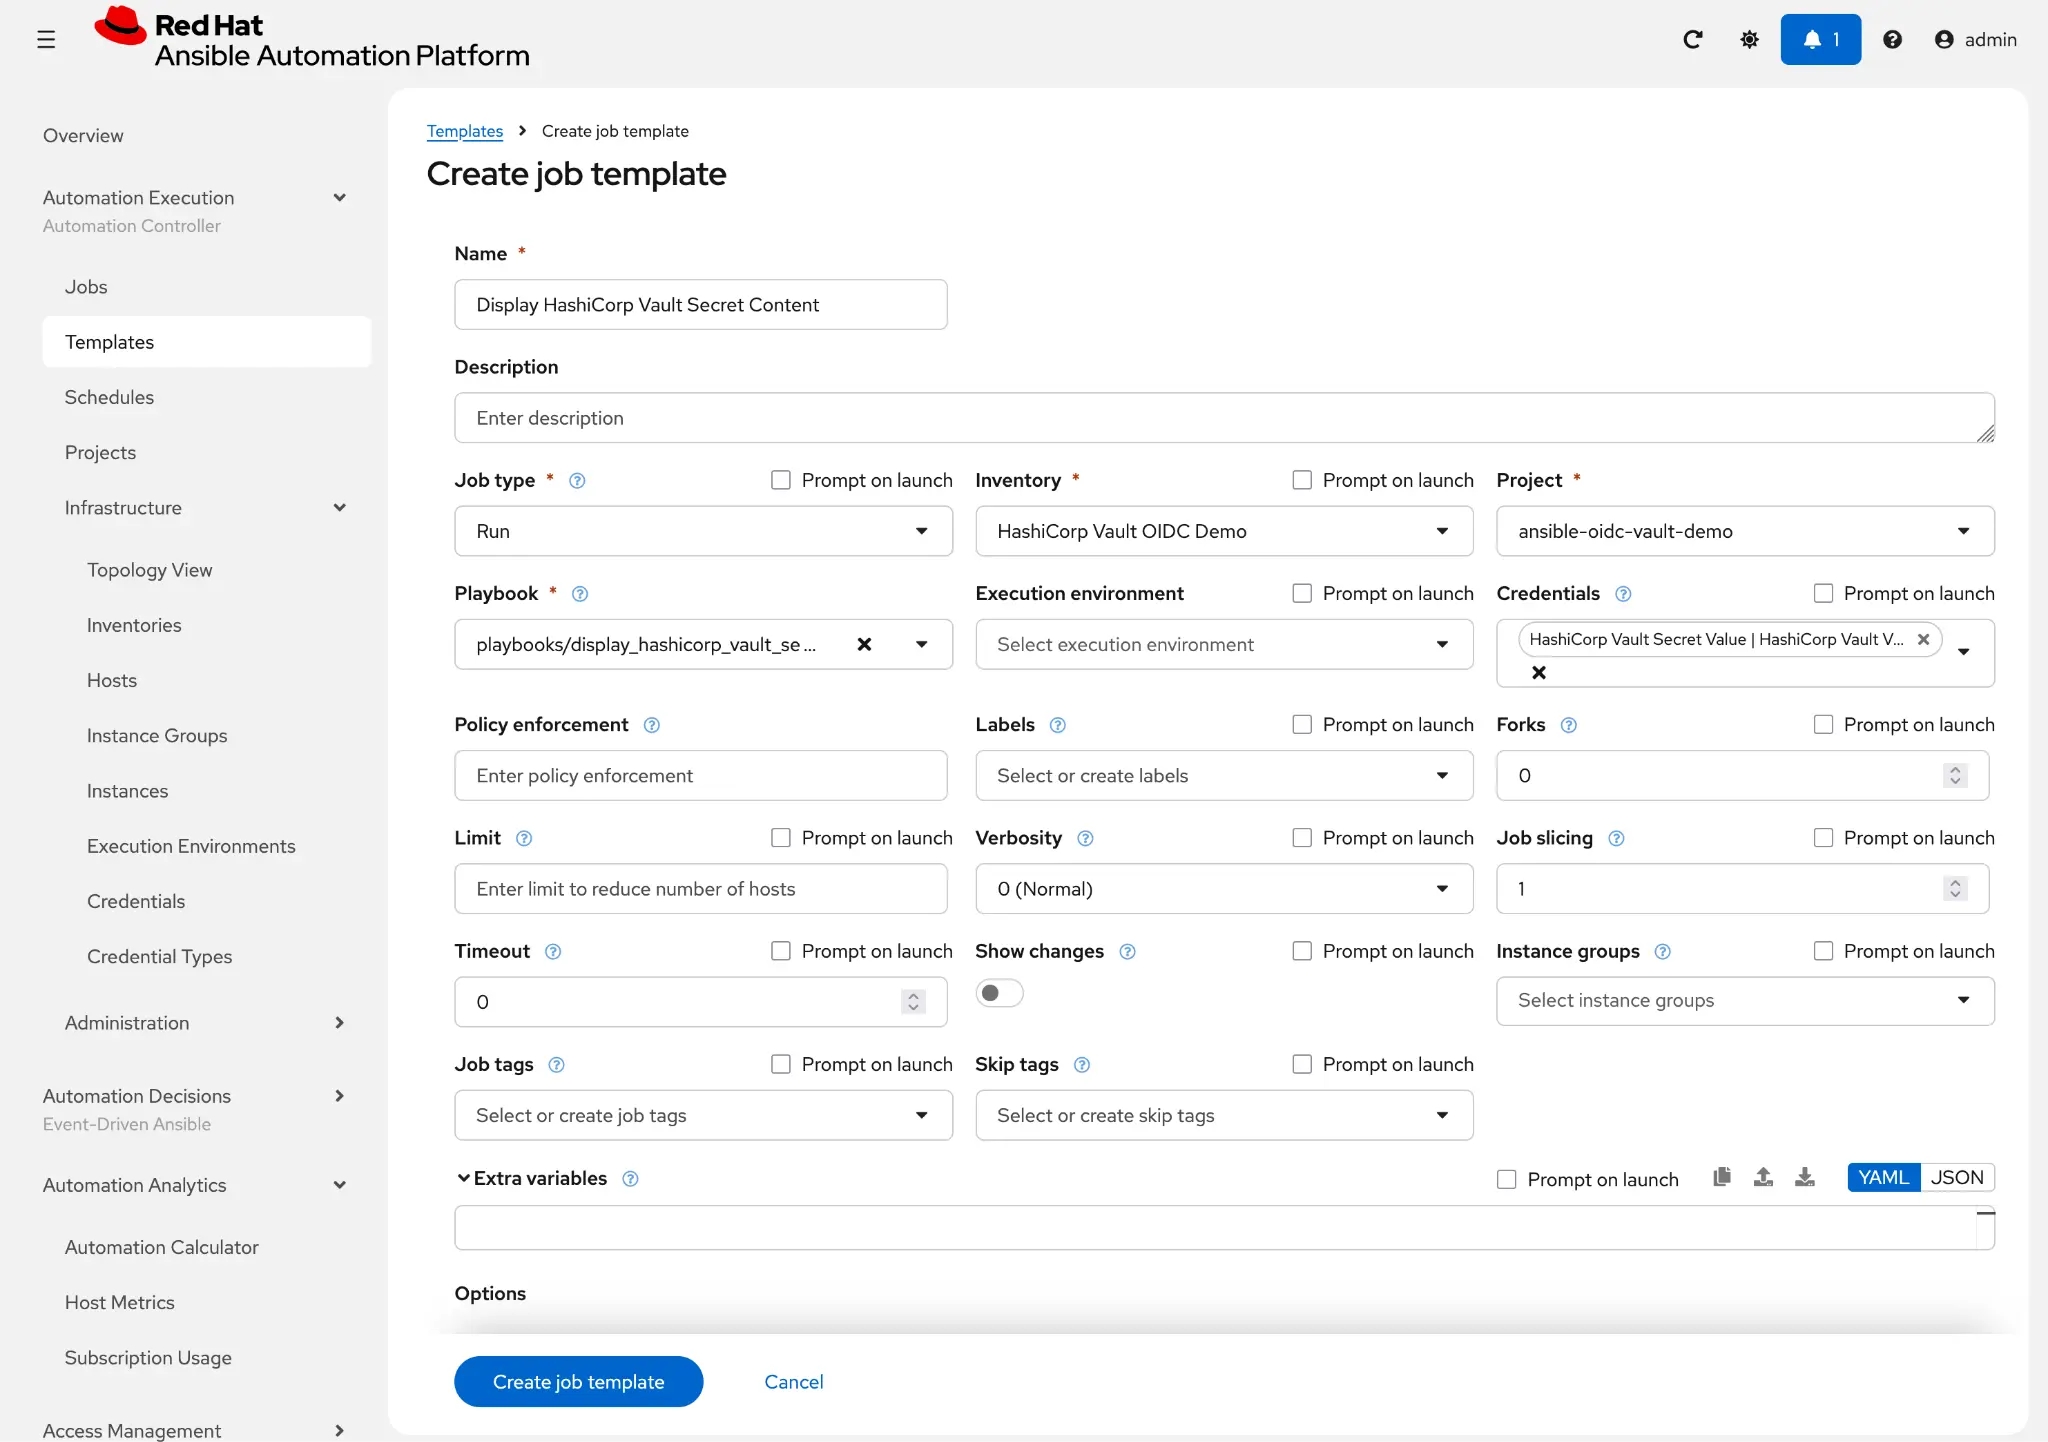
Click Create job template.
Execution and verification
Now that all desired components in Ansible Automation Platform have been configured, click the rocket icon on the Job Templates page to launch the Display HashiCorp Vault Secret Content job template.
Monitor the execution of the Job and confirm that it completes successfully (figure 5).
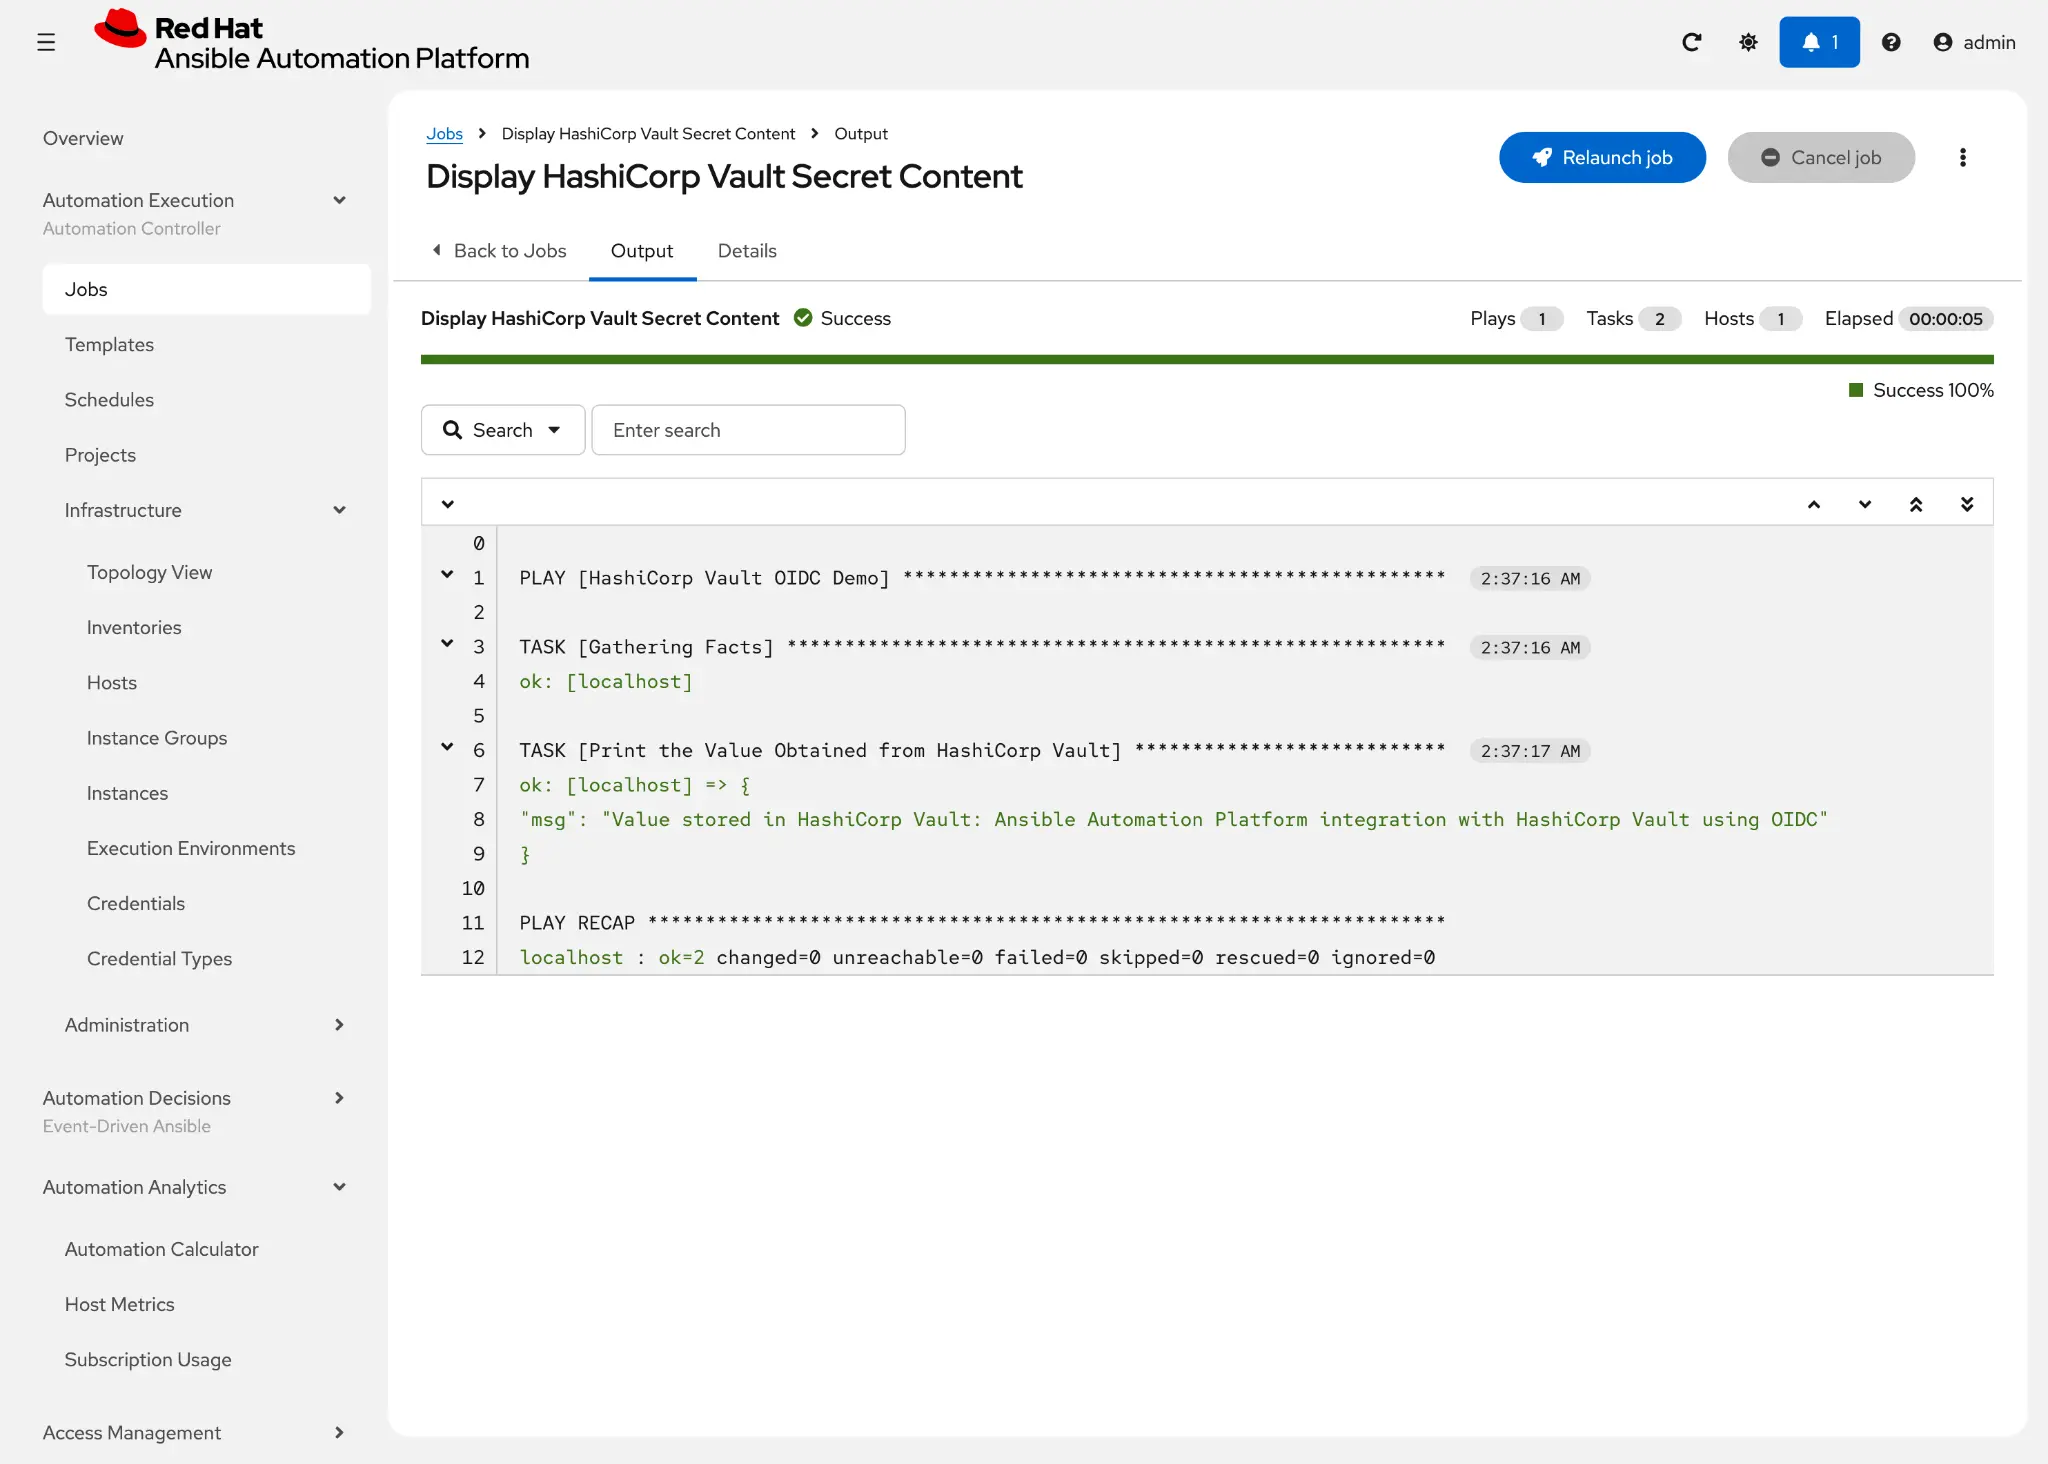
In the job output, confirm that the value stored in HashiCorp Vault was successfully retrieved and is displayed.
Conclusion
As demonstrated in this article, you can access Secrets stored in HashiCorp Vault using OIDC-based authentication in Ansible Automation Platform. This eliminates many of the management concerns that may be present when integrating these two platforms, and it's an important part of improving your security posture. A move towards utilizing just-in-time credentials for accessing external secrets management systems, as demonstrated through the integration with HashiCorp Vault, is just one of the ways that Red Hat Ansible Automation Platform is working toward providing a more secure operating environment.
To learn more, read Streamline secrets management with Red Hat and HashiCorp.
Last updated: August 12, 2026
