In its third decade of widespread use on Linux, logical volume manager (LVM) remains the primary tool for virtualizing storage on servers. Although LVM is regularly used on internal server devices, the LVM capabilities become more interesting when applied at greater scale, using externally attached devices. In this context, the storage area network (SAN) creates special requirements for software like LVM. Recent improvements in LVM make it more useful for applications that want to take advantage of SAN storage.
A SAN environment is characterized by devices shared by multiple hosts, or LUNs attached to multiple initiators using fiber channel or iSCSI connections. Applications often need to dynamically split up this shared storage space, and assign portions of it to different applications. This is a job that LVM can perform using the shared volume groups (VG) feature.
LVM terminology
Here's an overview of important LVM terminology:
Physical volume (PV)
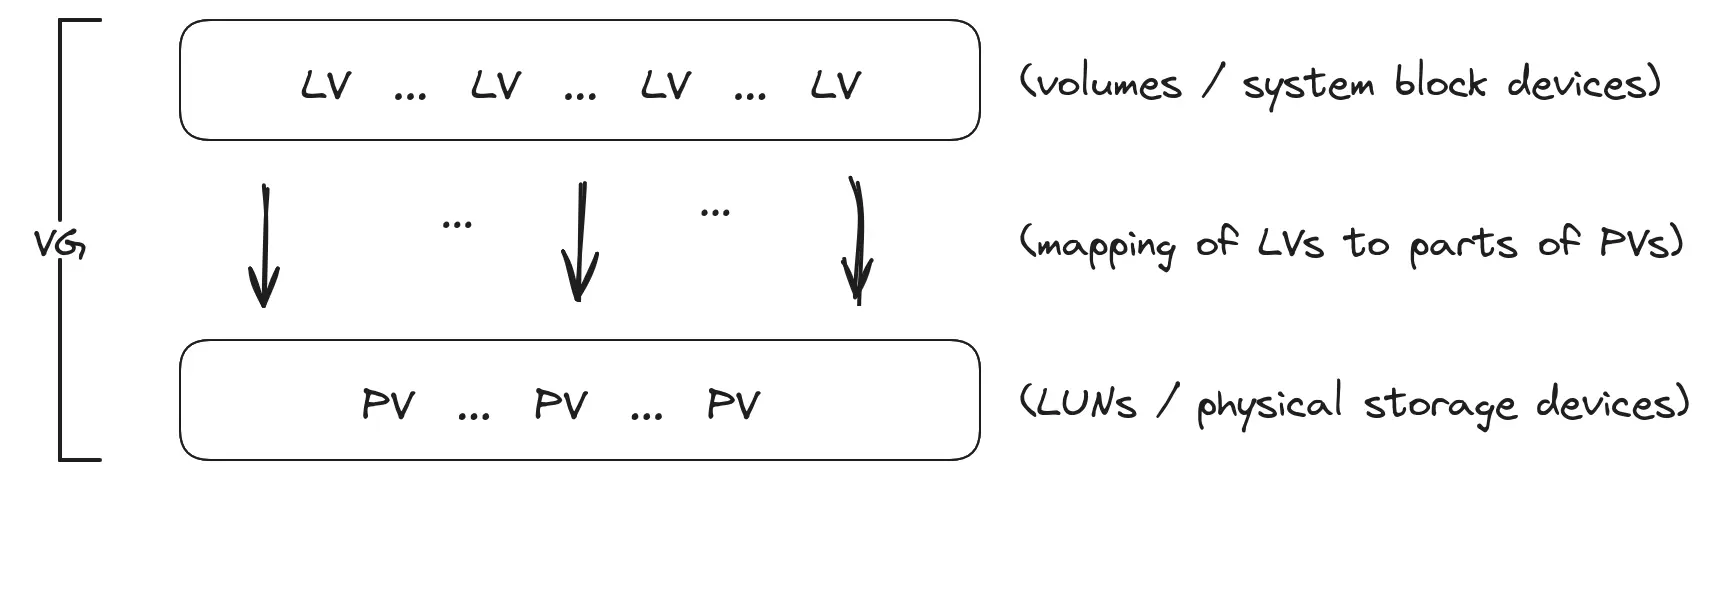
A physical volume (PV) is LVM's name for a device (LUN) that it has initialized. LVM writes a header and metadata at the start of the device (typically the first 1 MB) to make it a PV.
Logical volume (LV)
A logical volume (LV), or sometimes just "volume", is a block device that LVM creates on the Linux host system. An LV takes some physical space from the PV, and presents that storage to the system as its own block device.
The user of LV doesn't have to know, or care, which PV (or PVs) holds the LV data. Alternatively, the user of the LV can specify exactly which PVs to use for a given LV.
Volume group (VG)
A volume group is:
- A collection of one or more PVs (LUNs) you wish to use together for a common purpose or a common set of volumes.
- A collection of one or more LVs (volumes) using those PVs.
The VG provides a named "domain" of storage devices and system volumes, making them easier to manage together.
Important metadata
The "bookkeeping" that LVM does to keep track of PVs and LVs is stored in the space that LVM reserves at the start of each PV. This "VG metadata" includes things like the VG's name, the PVs used by the VG, the list of LVs that exist in the VG, properties of each LV (name, size), and which parts of each PV are used by each LV.
Figure 1 illustrates that within a volume group, there are logical volumes that map to physical volumes.
Local VG
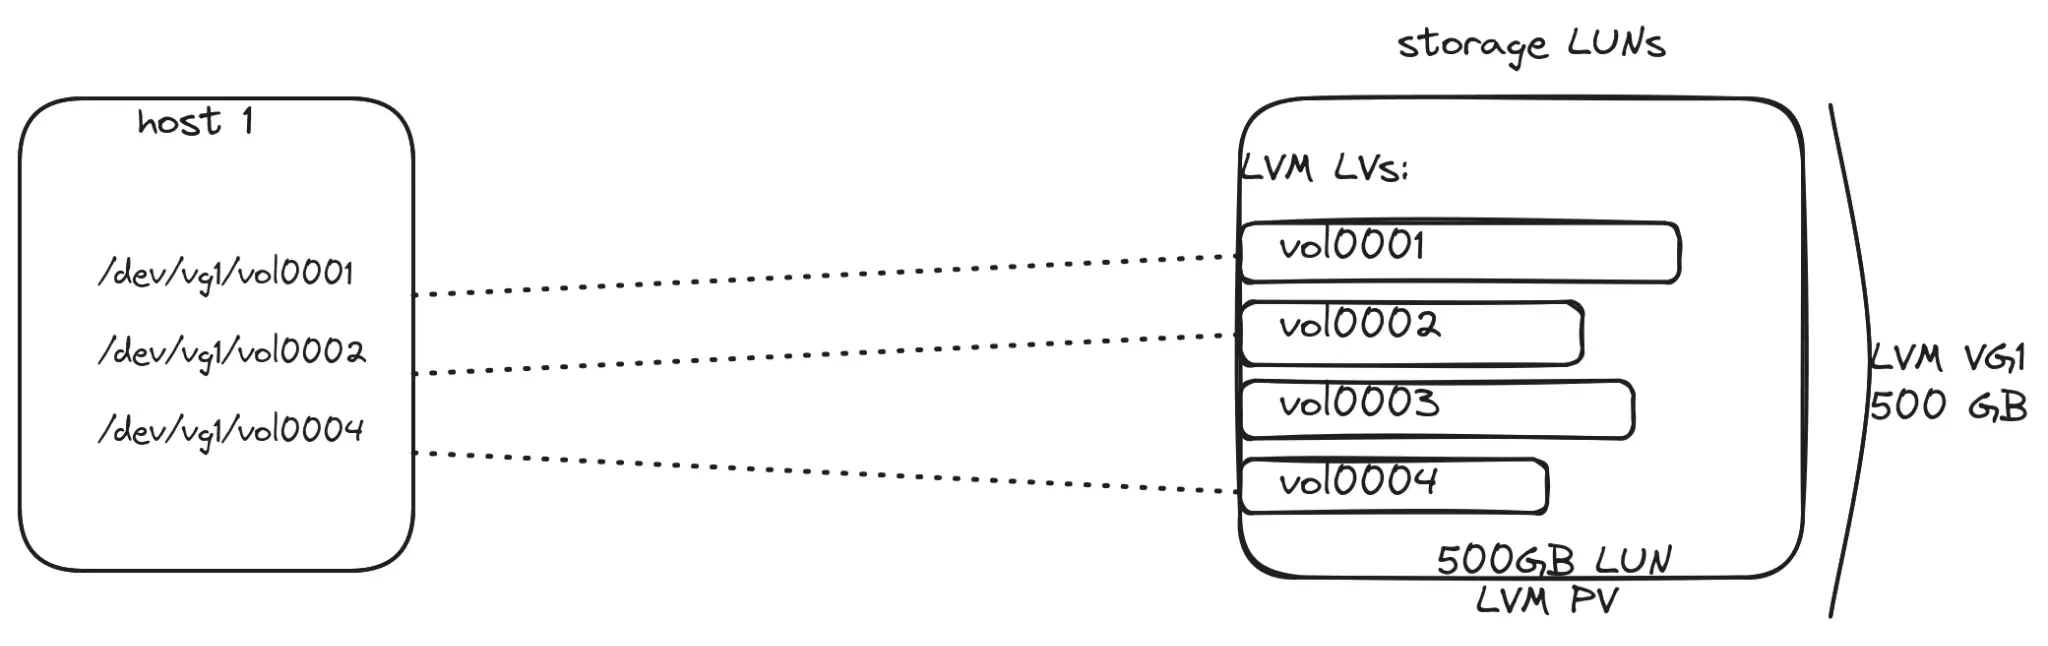
A local VG is used by a single host machine (figure 2). This can be true even when the VG exists on shared devices. In this configuration, one machine is assigned as the VG owner (recorded in the metadata) using the LVM system ID (see lvmsystemid(8) for more information). Other hosts attached to the same devices ignore the VG because of its foreign system ID.
Shared VG
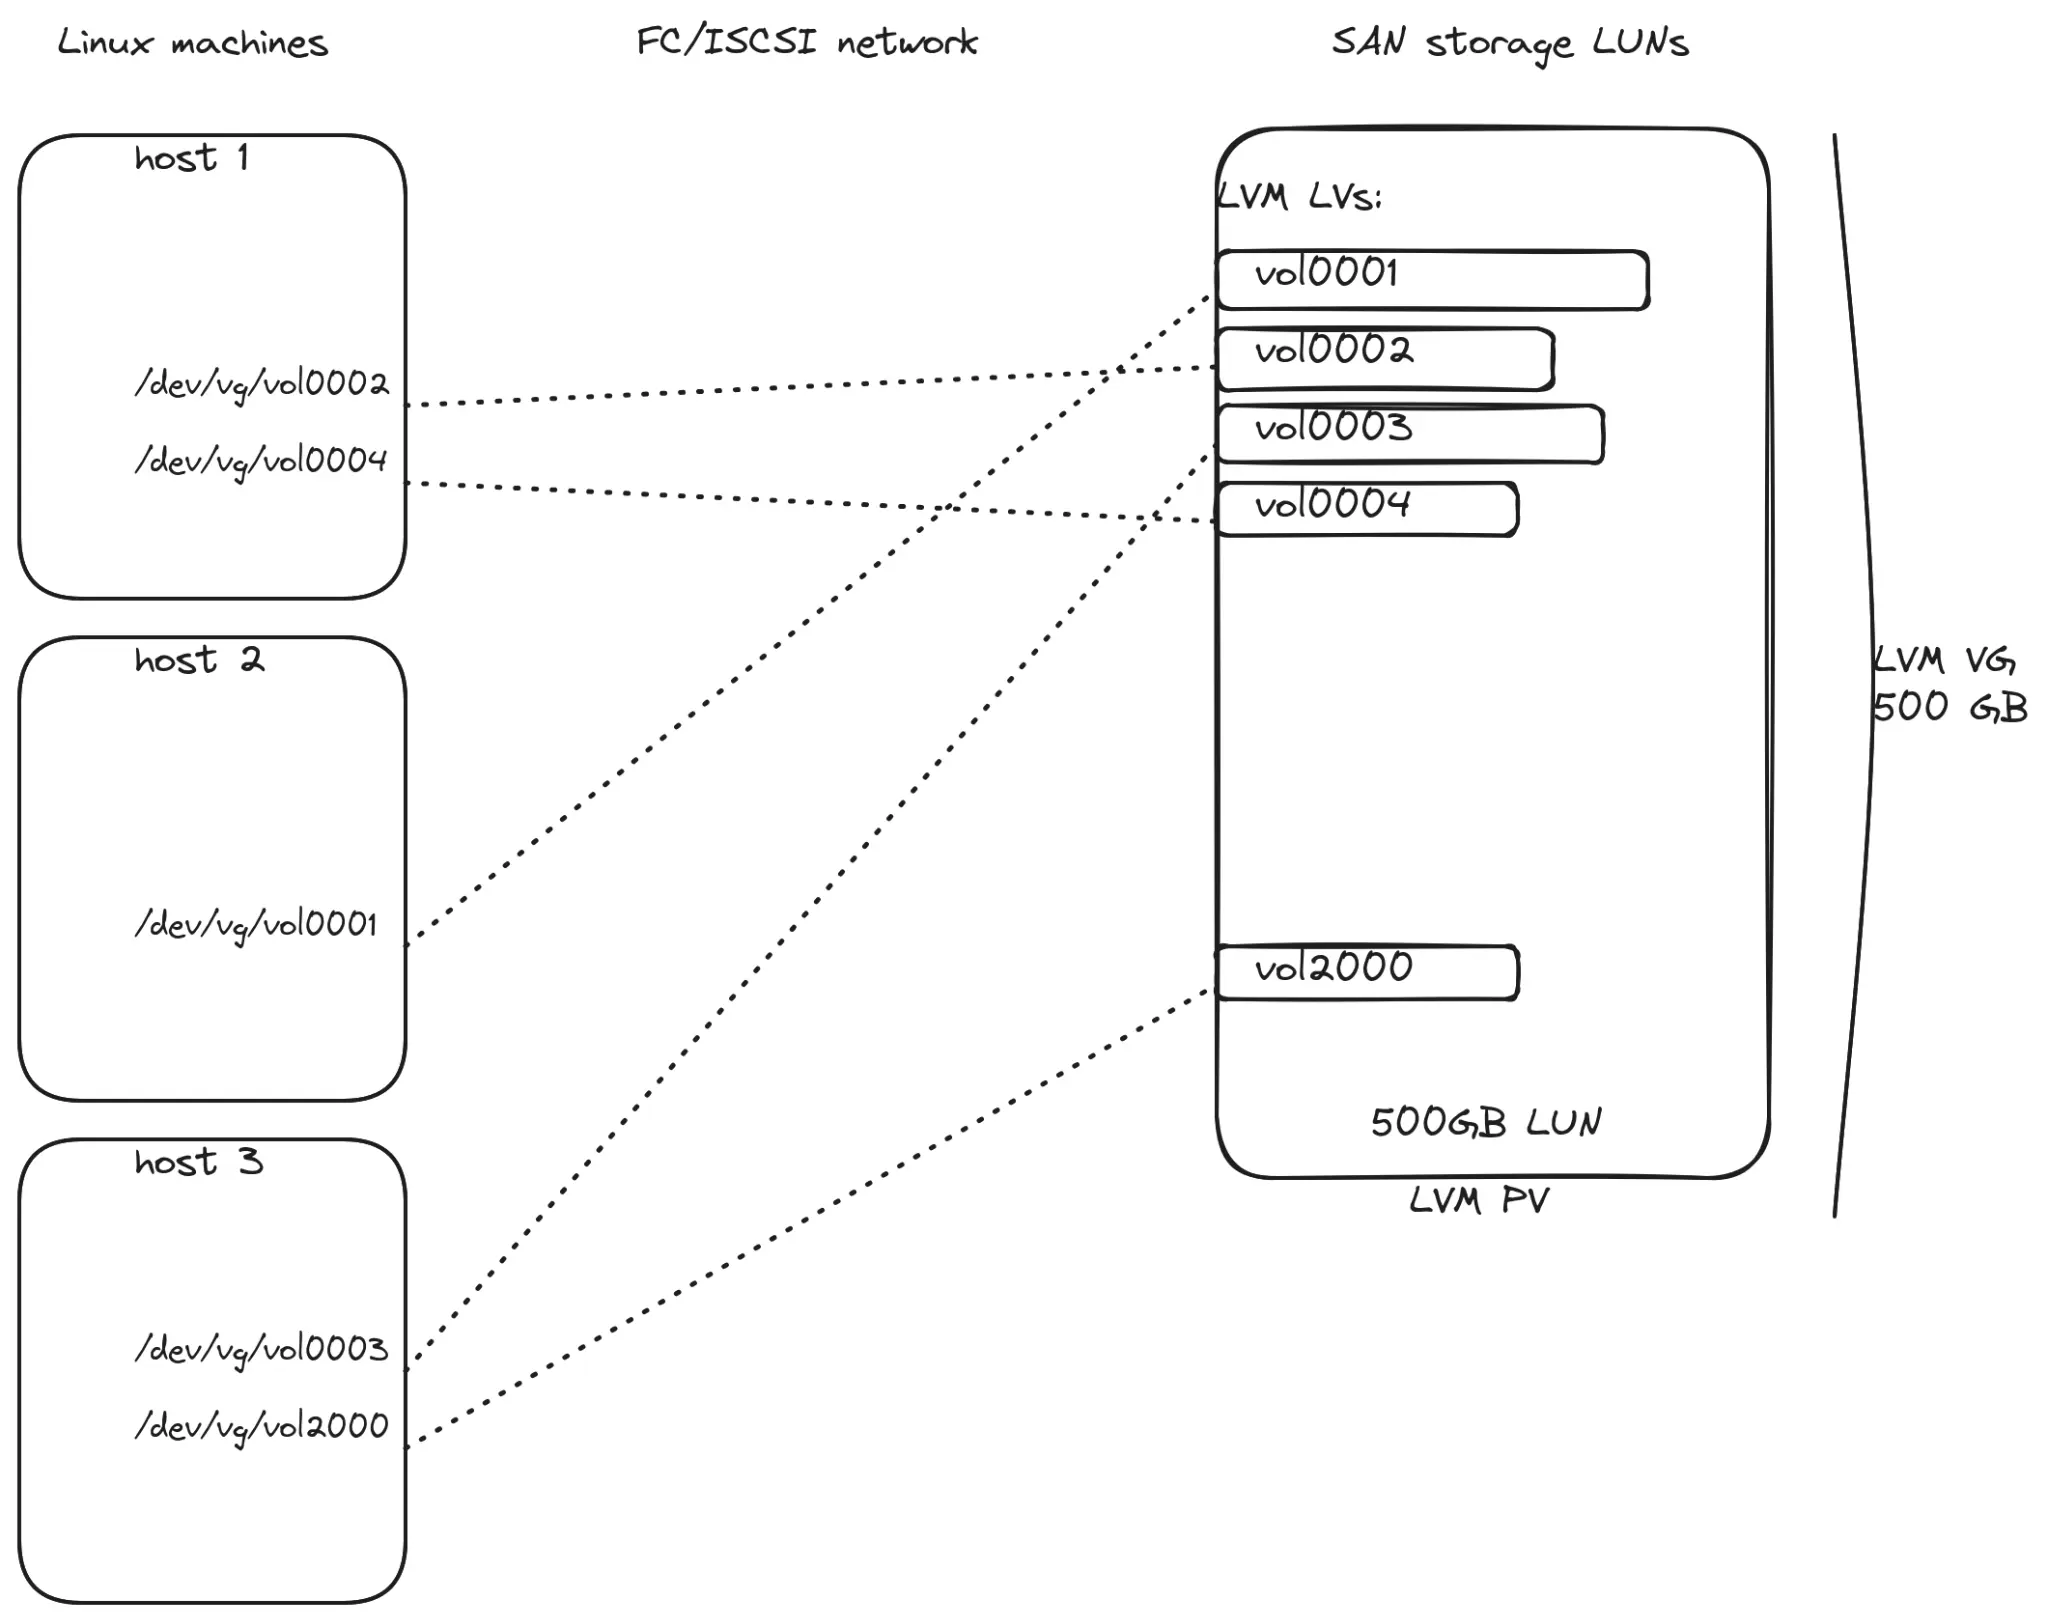
A shared VG on shared devices (for example, SAN LUNs) can be used by multiple host machines at once (figure 3). Each host can use the shared VG largely as if it was its own local VG, but all hosts have equivalent access. Two key practical advantages of this are:
- Any host can use any LV in the VG (if it's not in use by another host.)
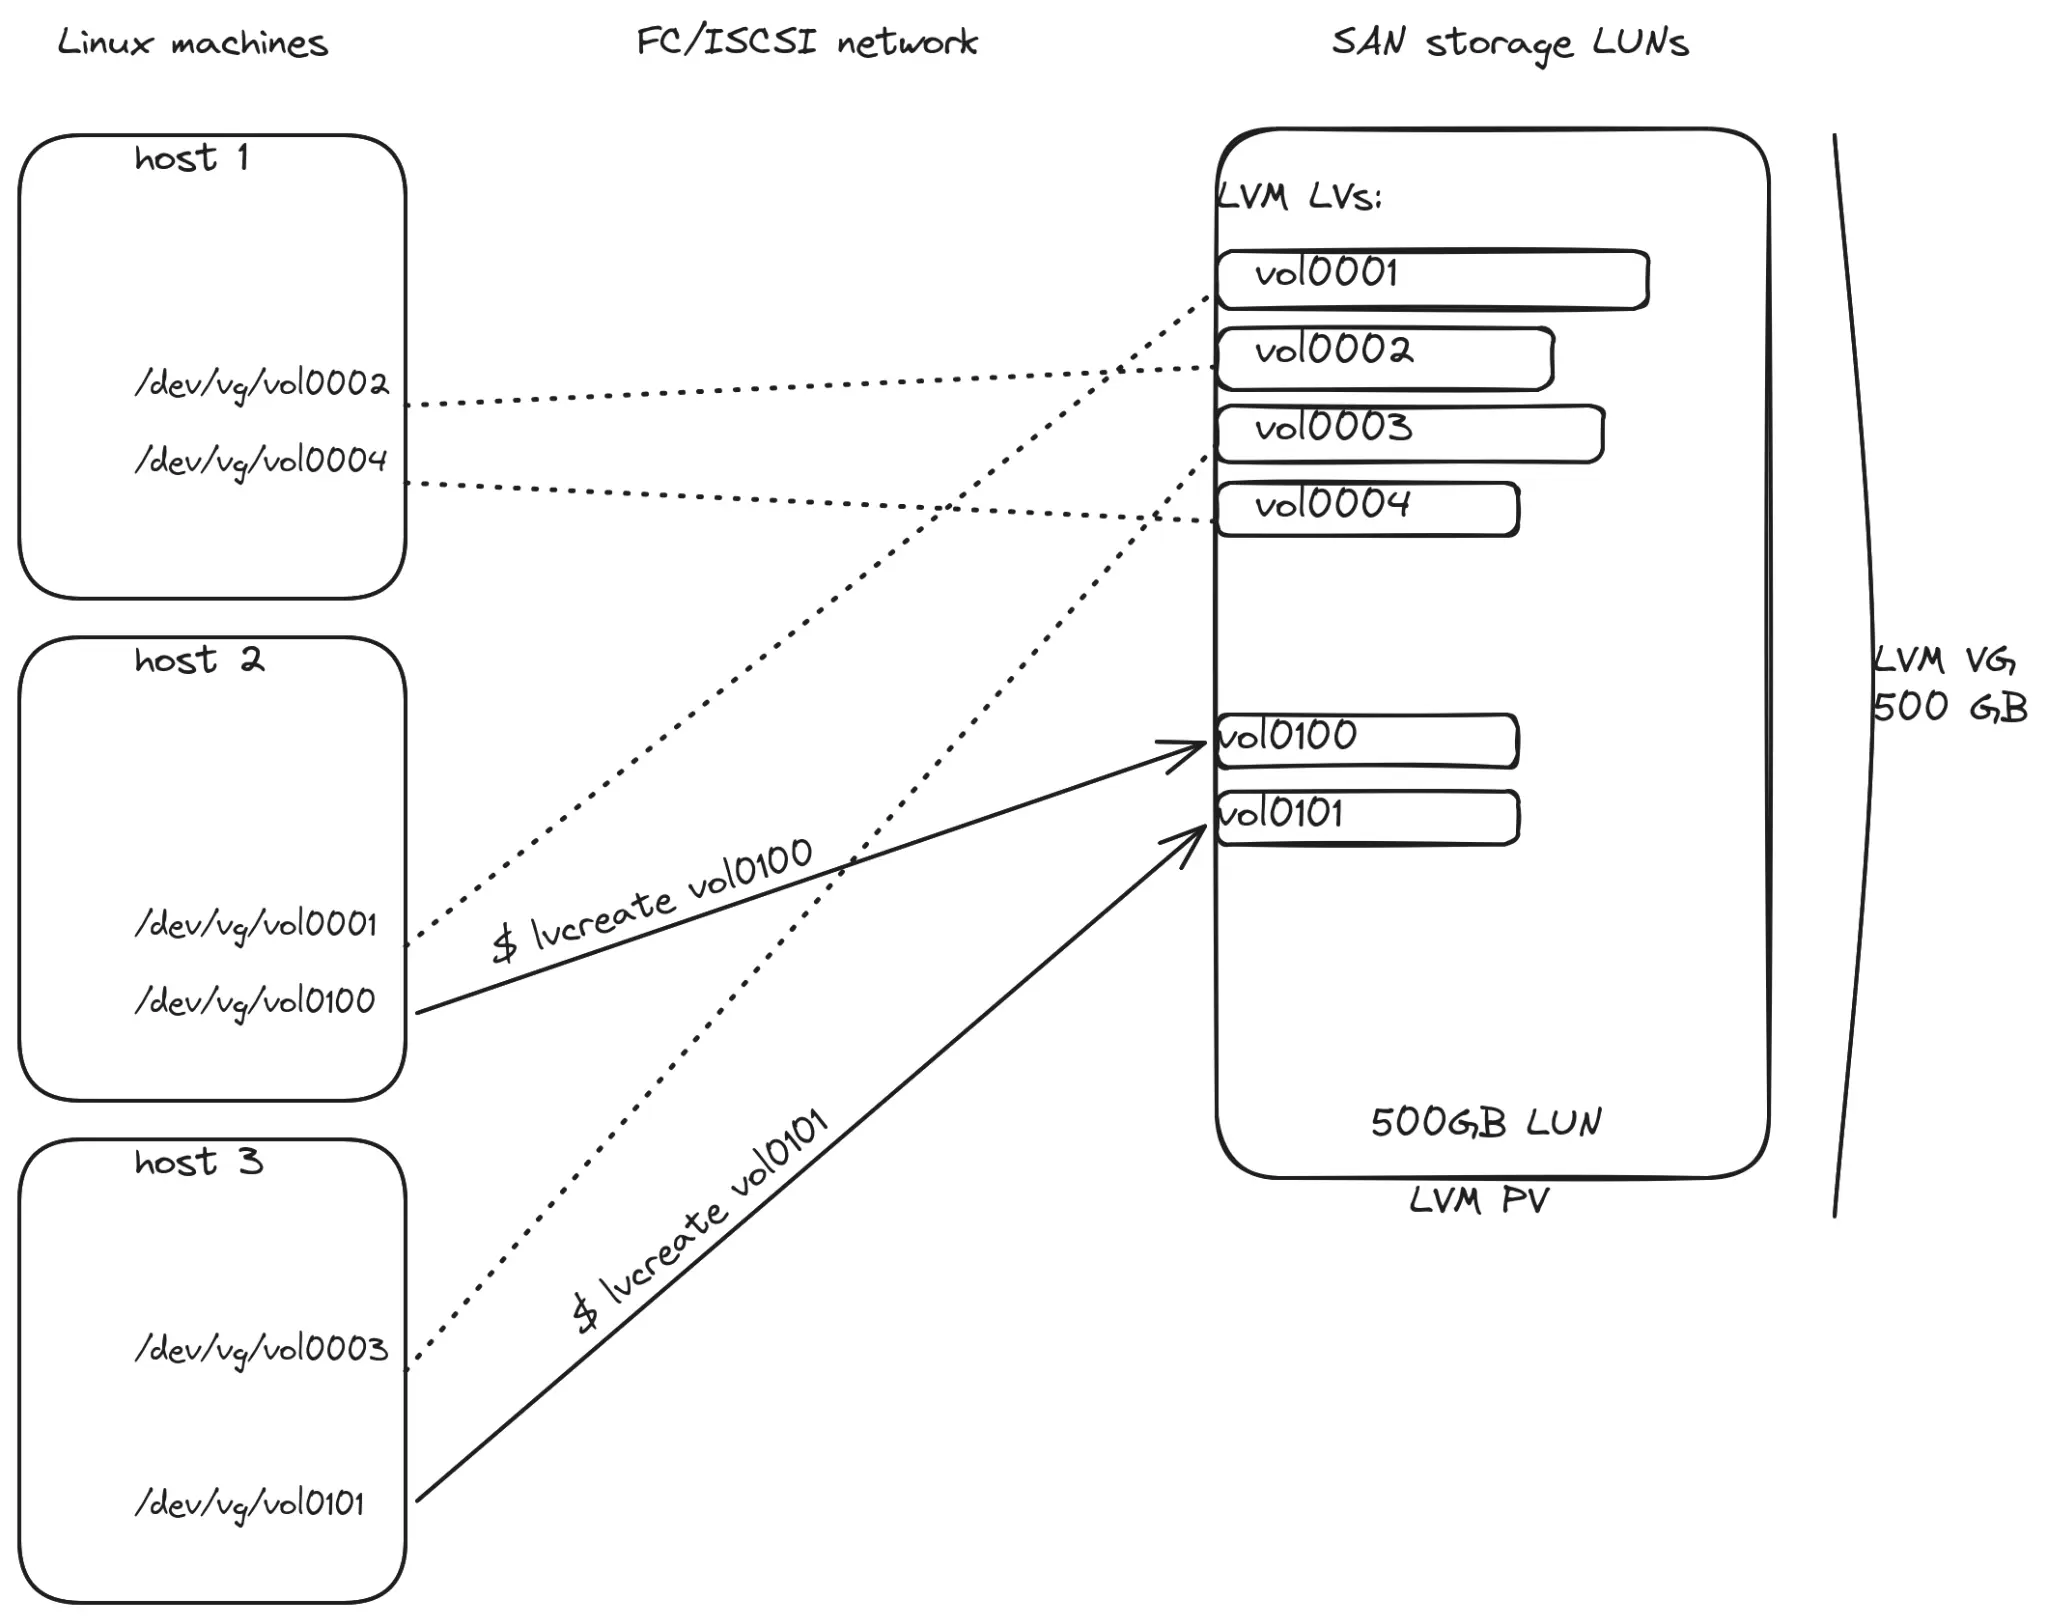
- Any host can create or remove LVs within the shared VG.
The ability to activate volumes on different hosts (figure 4) at different times means that hosts can avoid copying large data sets over the network when data needs to be used on a new host.
Locking
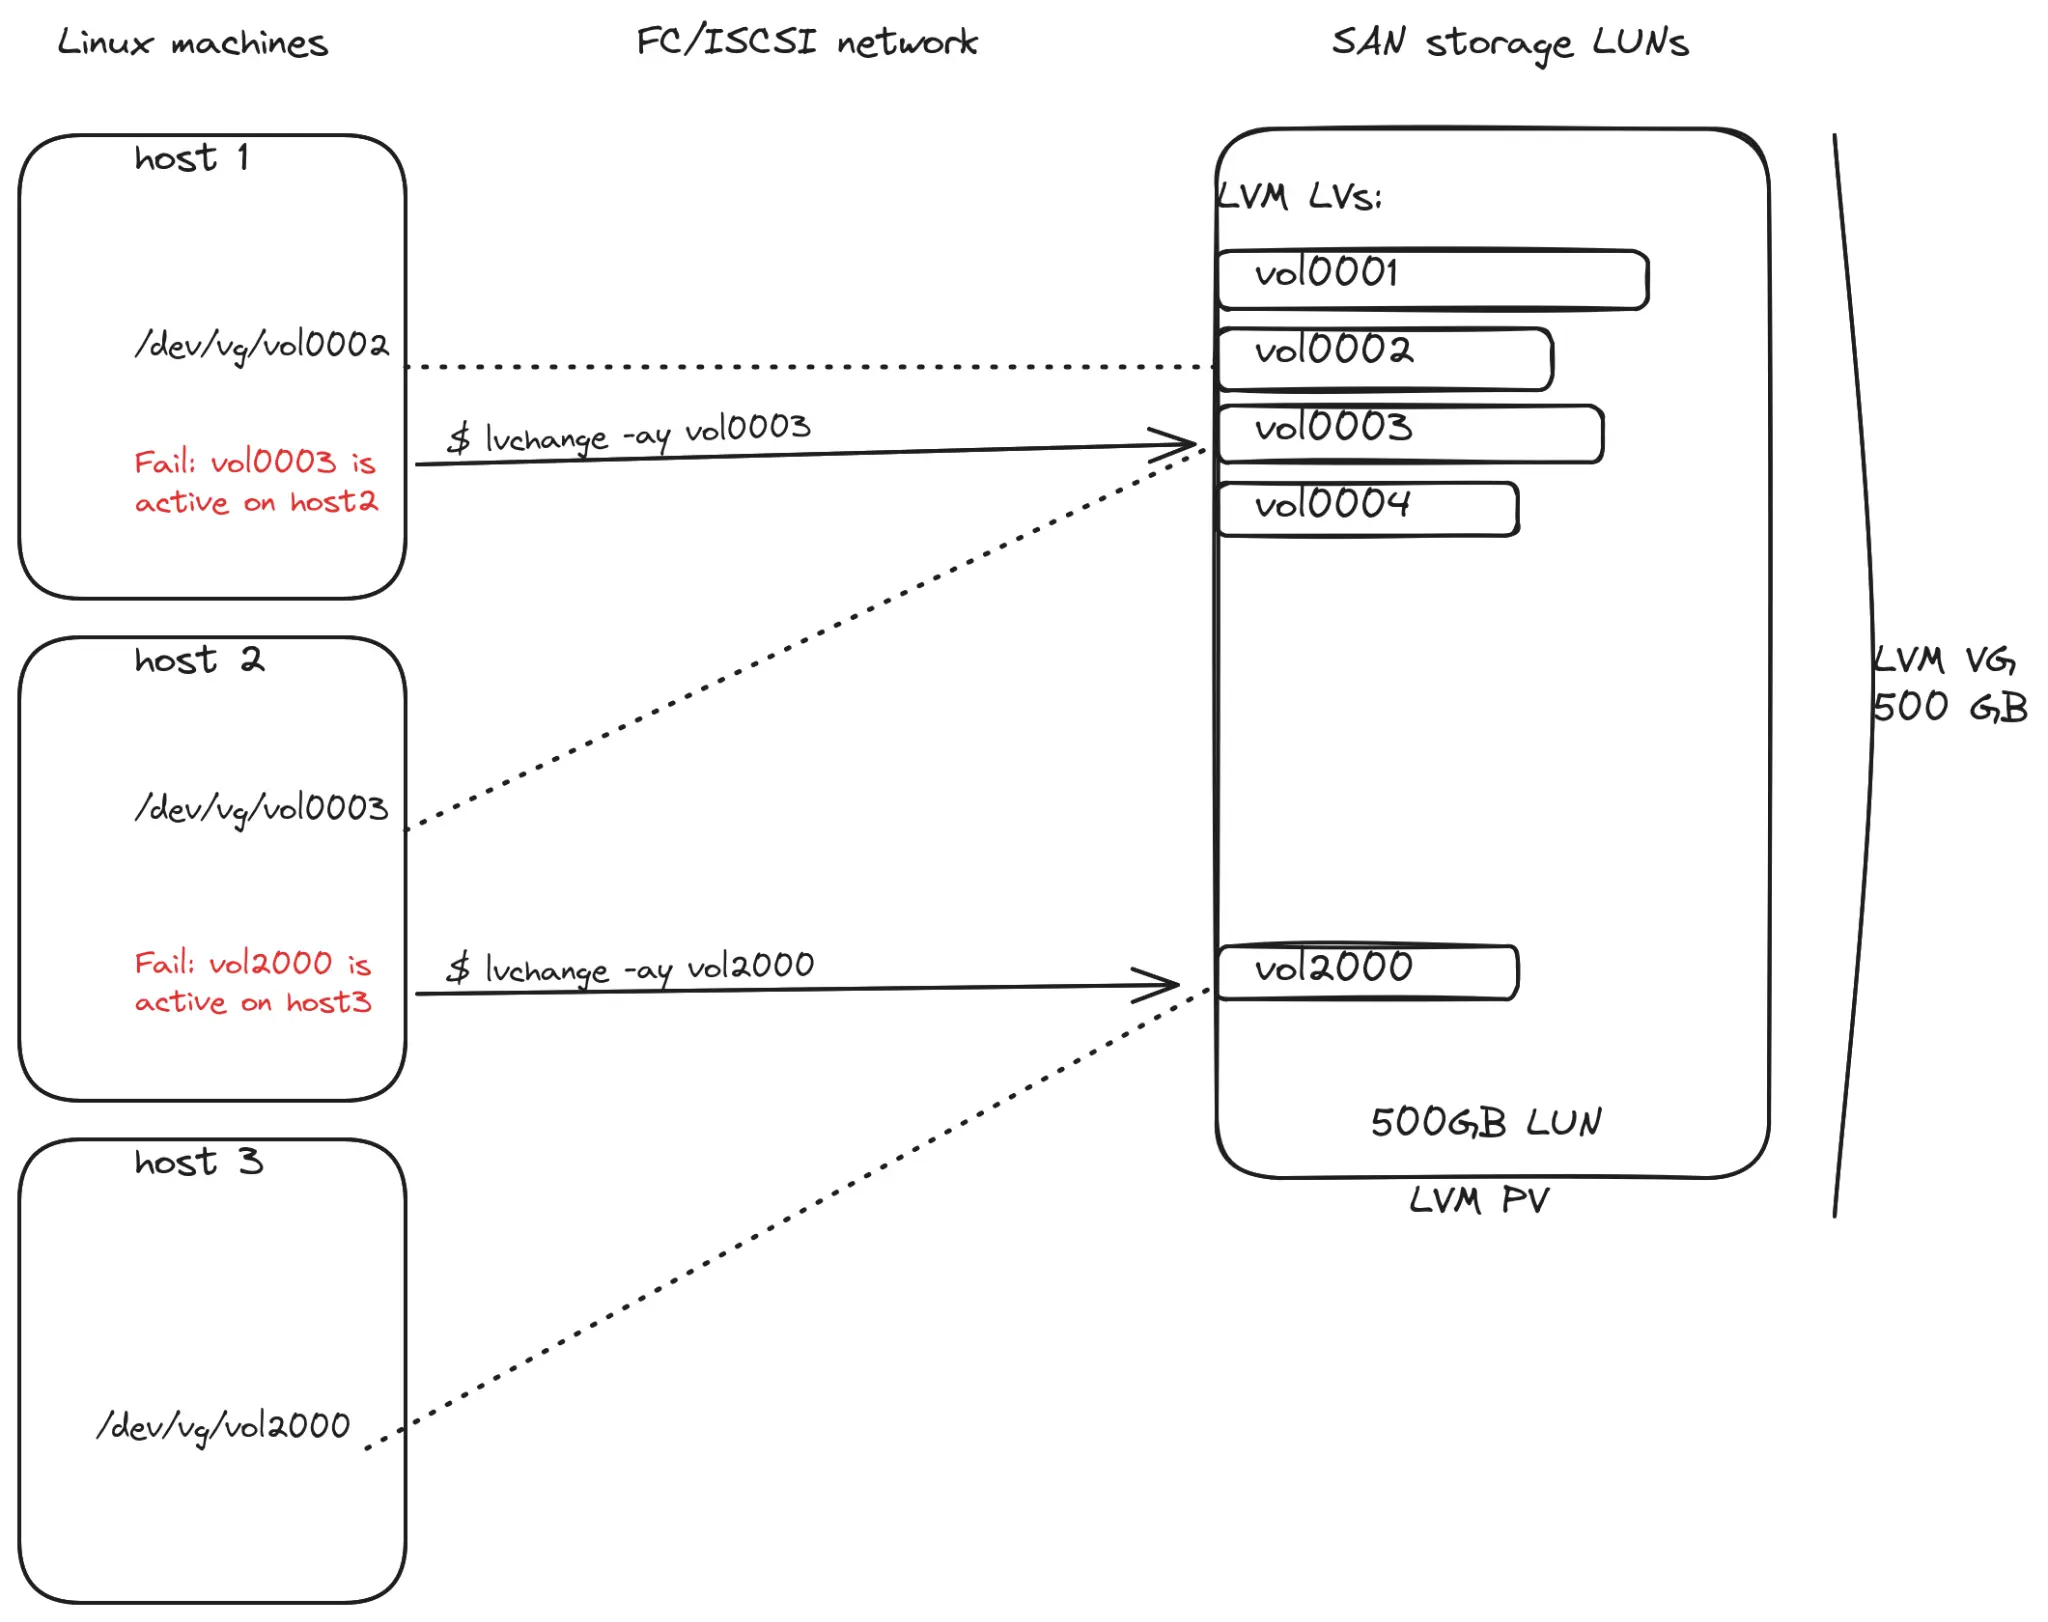
Because each host can change the VG at any time (for example, when creating or removing an LV), the changes must be serialized using a lock on VG metadata. Also, each active LV on a host must be protected by a lock to ensure that only one host has the LV active at a time.
The lvmlockd daemon
LVM can use different lock managers. LVM commands interface with the lvmlockd daemon, which interfaces with specific lock managers. The sanlock lock manager is especially applicable to recent use cases. Using sanlock, no network setup or communication is required among the hosts. All necessary locking and coordination occurs using only the shared LUNs. Locks are written to reserved areas on the shared LUNs (a hidden "lvmlock" LV that LVM creates in the VG to hold lock state.)
Lock mechanisms
When supported by the devices, sanlock uses the efficient SCSI COMPARE AND WRITE command (also referred to as "atomic test and set"). Otherwise, sanlock uses the Disk Paxos algorithm to determine lock ownership among competing hosts. It must renew a single lockspace lease within the VG to maintain ownership of all locks in the VG. By default, a host renews its lockspace lease in the VG once every 20 seconds. If unable to renew its lease for 80 seconds, its persistent reservation (PR) is removed by another host being blocked.
LV locks
Most LVs are active on only one host at a time. After one host deactivates an LV, another host can activate it. In these cases, the LV is protected by an exclusive lock held by the host where the LV is active (figure 5). Modifications to the LV, such as extending it, renaming it, removing it, also require an exclusive lock on the LV.
Some special applications can make use of a single LV active on multiple hosts concurrently. These applications typically perform their own inter-host synchronization to ensure data coherency for the LV's contents. In this case, the LV can be activated on multiple hosts concurrently using a shared LV lock. This also applies to read-only LVs.
Host failures
Should a host using a shared VG fail, a recovery process must be followed by LVM and sanlock before LVs from the failed host can be used by another host. There are two approaches for handling failed hosts: SCSI-3 persistent reservations (PR), and watchdog timers local to each host. One or both methods can be used (PR for host recovery requires RHEL 10.3).
Persistent reservations
Each host registers persistent reservations on the shared VG LUNs before using the VG. This protects the devices from uncoordinated changes when hosts fail, and speeds up recovery of locks held by failed hosts. A failed host's locks are available to other hosts after the failed host's PR has been removed.
Watchdog timer
When not using PR, watchdog timers provide the necessary device protection, but recovery of locks is slower. A host's watchdog renewal is linked to its on-disk lease renewal. This produces predictable timing of host resets that are based on the lease timestamp on disk.
Shared VG commands
Using a shared VG is largely the same as using a local VG, but there are a few options specifically related to shared VGs.
Creating a VG
The vgcreate command syntax when creating a shared VG with PR is:
$ vgcreate --shared --setpersist y \
--setlockargs persist,notimeout <vgname> <devices>- The
--sharedoption tells LVM to create a shared VG. LVM uses the running lock manager. - The
--setpersist yoption tells LVM to use persistent reservations, which is required to modify the VG or activate LVs. Exclude this option if devices do not support PR. The --setlockargs persist,notimeoutoption tells LVM to use persistent reservations for lock recovery (persist), and not to use timeouts for lock recovery (notimeout). Exclude these settings if devices do not support PR.
Starting and stopping a VG
Shared VGs require a special command to start the lock manager for the VG, making locks available to LVM. This "lock start" step must be run prior to using the VG, for example at system startup before activation of LVs. The corresponding "lock stop" step stops the lock manager for the VG.
$ vgchange --lockstart <vgname>
$ vgchange --lockstop <vgname>
Persistent reservations must also be started to use the VG. This is not unique to shared VGs, but must be done prior to starting locking.
Startup:
$ vgchange --persist start <vgname>
$ vgchange --lockstart <vgname>
Shutdown:
$ vgchange --lockstop <vgname>
$ vgchange --persist stop <vgname>
Alternatively, combine locking and PR commands:
$ vgchange --persist start --lockstart <vgname>
$ vgchange --lockstop --persist stop <vgname>
Shared VG example
First, edit configuration files to enable the use of shared VGs with sanlock. This must be done on each host that will use a shared VG.
Edit /etc/lvm/lvm.conf and set use_lvmlockd to 1:
use_lvmlockd = 1Edit /etc/lvm/lvmlocal.conf and set host_id to a unique integer from 1 to 2000 for each host. This is used for PR keys and sanlock. For example:
host_id = 1999Start services
Start system services (daemons) on each host that will use a shared VG:
$ systemctl start wdmd
$ systemctl start sanlock
$ systemctl start lvmlockd
Alternatively, you can start daemons directly:
$ wdmd
$ sanlock daemon
$ lvmlockd
Select devices
Identify the devices (shared LUNs) that will be used by the shared VG, and add these devices to the LVM devices file on each host.
Use lsblk (or a similar tool) to identify the block device paths corresponding to the shared LUNs. The same LUN may have a different block device name on each host, so use the WWN (or serial number) to identify the proper device.
$ lsblk -o+WWN,serial Add the block devices to the LVM devices file, which allows LVM to use the devices:
$ lvmdevices --adddev <device_path>For example:
[hostA]$ lsblk -o name,WWN,serial
NAME    WWN                                   SERIAL
sdc     0x11111111222222223333333330000001    1111

[hostA]$ lvmdevices --adddev /dev/sdc
[hostB]$ lsblk -o name,WWN,serial
NAME WWN SERIAL
sdf 0x11111111222222223333333330000001 1111
[hostB]$ lvmdevices --adddev /dev/sdfAlternatively, update the LVM devices file on the host where vgcreate will be run. After vgcreate, update the LVM devices file on the remaining hosts with the vgimportdevices <vgname> command. This avoids the need to correctly identify the block device separately on each host.
Check persistent reservations
If persistent reservations will be used, verify that the WEAR (write exclusive all registrants) PR type is supported by the selected devices. For example:
[hostA]$ lvmpersist devtest --prtype WEAR --device /dev/sdc
Device /dev/sdc: supports type WEAR
Create shared VG
From one host, create the new shared VG using the selected devices. A VG name must be chosen to identify the VG (such as vg1). For example, when using PR (requires RHEL 10.3 or later):
[hostA]$ vgcreate --shared --setpersist y \
--setlockargs persist,notimeout vg1 /dev/sdc
  Enabling sanlock global lock
  lvmpersist: started vg1 with key 0x1000000000000001.
  Logical volume "lvmlock" created.
  Volume group "vg1" successfully created
  lvmpersist: stopped vg1 with key 0x1000000000000001.
  lvmpersist: started vg1 with key 0x1000000000010001.
  VG vg1 starting sanlock lockspace
  Starting locking.  Waiting until locks are ready...
When not using PR, the syntax is:
$ vgcreate --shared <vgname> <device_path(s)>Start VG on all hosts
Each host must start locking and PR (if applicable) for a shared VG before it can use the VG. When a host is restarted, it must perform this step before the VG can be used. This step registers PR keys for the local host on the VG devices, and registers the VG with the lock manager so that locks can be acquired.
[hostB]$ vgchange --lockstart --persist start vg1
  lvmpersist: started vg1 with key 0x1000000000010002.
  VG vg1 starting sanlock lockspace
  Starting locking.  Waiting for sanlock may take a few seconds to 3 min...
Use LVs
Each host can create, remove, extend, activate, and deactivate LVs in the VG. The following steps illustrate some simple examples.
hostA creates and activates a new LV named vol001:
[hostA]$ lvcreate -n vol001 -L64M vg1
  Logical volume "vol001" created.
hostB creates and activates a new LV named vol002:
[hostB]$ lvcreate -n vol002 -L64M vg1
  Logical volume "vol002" created.
hostA lists LVs, fails to activate vol002 (which is active on hostB), and deactivates vol001:
[hostA]$ lvs vg1
  LV     VG  Attr       LSize
  vol001 vg1 -wi-a----- 64.00m
  vol002 vg1 -wi------- 64.00m

$ lvchange -ay vg1/vol002
  LV locked by other host: vg1/vol002 (host_id 2)
  Failed to lock logical volume vg1/vol002.

$ lvchange -an vg1/vol001
hostB lists LVs, activates vol001 (which is inactive on hostB), and lists LVs again:
[hostB]$ lvs vg1
  LV     VG  Attr       LSize
  vol001 vg1 -wi------- 64.00m
  vol002 vg1 -wi-a----- 64.00m

$ lvchange -ay vg1/vol001

$ lvs vg1
  LV     VG  Attr       LSize
  vol001 vg1 -wi-a----- 64.00m
  vol002 vg1 -wi-a----- 64.00m
Conclusion
By utilizing the shared volume groups feature in LVM, along with the lvmlockd and sanlock daemons, you can manage storage across multiple hosts in a SAN environment. This configuration ensures data integrity through robust locking mechanisms and persistent reservations while simplifying resource allocation. With these capabilities, LVM remains a powerful and flexible solution for modern, scalable storage virtualization.

