AI
  • Get started with AI

    • Red Hat AI

      Accelerate the development and deployment of enterprise AI solutions.

    • AI learning hub

      Explore learning materials and tools, organized by task.

    • AI interactive demos

      Click through scenarios with Red Hat AI, including training LLMs and more.

    • AI/ML learning paths

      Expand your Red Hat OpenShift AI knowledge using these learning resources.

    • AI quickstarts

      Focused AI use cases designed for fast deployment on Red Hat AI platforms.

    • No-cost AI training

      Foundational Red Hat AI training.

  • Featured resources

    • Red Hat OpenShift AI
    • Open source AI for developers
    • AI product application development
    • Open source-powered AI/ML for hybrid cloud
    • AI and Node.js cheat sheet

Red Hat AI Factory with NVIDIA

Red Hat AI Factory with NVIDIA is a co-engineered, enterprise-grade AI solution for building, deploying, and managing AI at scale across hybrid cloud environments.

Learn
  • Self-guided

    • Documentation

      Find answers, get step-by-step guidance, and learn how to use Red Hat products.

    • Learning paths

      Explore curated walkthroughs for common development tasks.

    • Guided learning

      Receive custom learning paths powered by our AI assistant.

    • See all learning
  • Hands-on

    • Developer Sandbox

      Spin up Red Hat's products and technologies without setup or configuration.

    • Interactive labs

      Learn by doing in these hands-on, browser-based experiences.

    • Interactive demos

      Click through product features in these guided tours.

  • Browse by topic

    • AI/ML
    • Automation
    • Java
    • Kubernetes
    • Linux
    • See all topics
  • Training & certifications

    • Courses and exams
    • Certifications
    • Skills assessments
    • Red Hat Academy
    • Learning subscription
    • Explore training
Build
  • Get started

    • Red Hat build of Podman Desktop

      A downloadable, local development hub to experiment with our products and builds.

    • Developer Sandbox

      Spin up Red Hat's products and technologies without setup or configuration.

  • Download products

    • Red Hat Enterprise Linux
    • Red Hat AI
    • Red Hat OpenShift
    • Red Hat Ansible Automation Platform
    • See all products
  • Featured

    • Red Hat build of OpenJDK
    • Red Hat JBoss Enterprise Application Platform
    • Red Hat OpenShift Dev Spaces
    • Red Hat Developer Toolset
  • References

    • E-books
    • Documentation
    • Cheat sheets
    • Architecture center
Community
  • Get involved

    • Events
    • Live AI events
    • Red Hat Summit
    • Red Hat Accelerators
    • Community discussions
  • Follow along

    • Articles & blogs
    • Developer newsletter
    • Videos
    • Github
  • Get help

    • Customer service
    • Customer support
    • Regional contacts
    • Find a partner

Join the Red Hat Developer program

Download Red Hat products and project builds, access support documentation, learning content, and more.

ConsoleDocsSupport Search
New For you

Recommended

We'll recommend resources you may like as you browse. Try these suggestions for now.

  • Product downloads
  • Cheat sheets
  • Red Hat Developer learning portal
  • Developer blog
  • E-books
  • Developer Sandbox
Log in

Get more with a Red Hat Developer account

  • Product downloads
  • Console access
  • Event registration
  • Training & trials
Explore more account benefitsLog in or register

A subscription may be required for some services.

Contact us

CodeReady Workspaces devfile, demystified

<p>&nbsp;</p> <quillbot-extension-portal></quillbot-extension-portal>

December 9, 2019
Don Schenck
Related topics:
ContainersDeveloper tools
Related products:
Developer Toolset

    With the exciting advent of CodeReady Workspaces (CRW) 2.0 comes some important changes. Based on the upstream project Eclipse Che 7, CRW brings even more of the "Infrastructure as Code" idea to fruition. Workspaces mimic the environment of a PC, an operating system, programming language support, the tools needed, and an editor. The real power comes by defining a workspace using a YAML file—a text file that can be stored and versioned in a source control system such as Git. This file, called devfile.yaml, is powerful and complex. This article will attempt to demystify the devfile.

    A Java Maven example

    The following devfile defines a workspace that has Java language support, includes the Maven build tool, and has two custom commands.
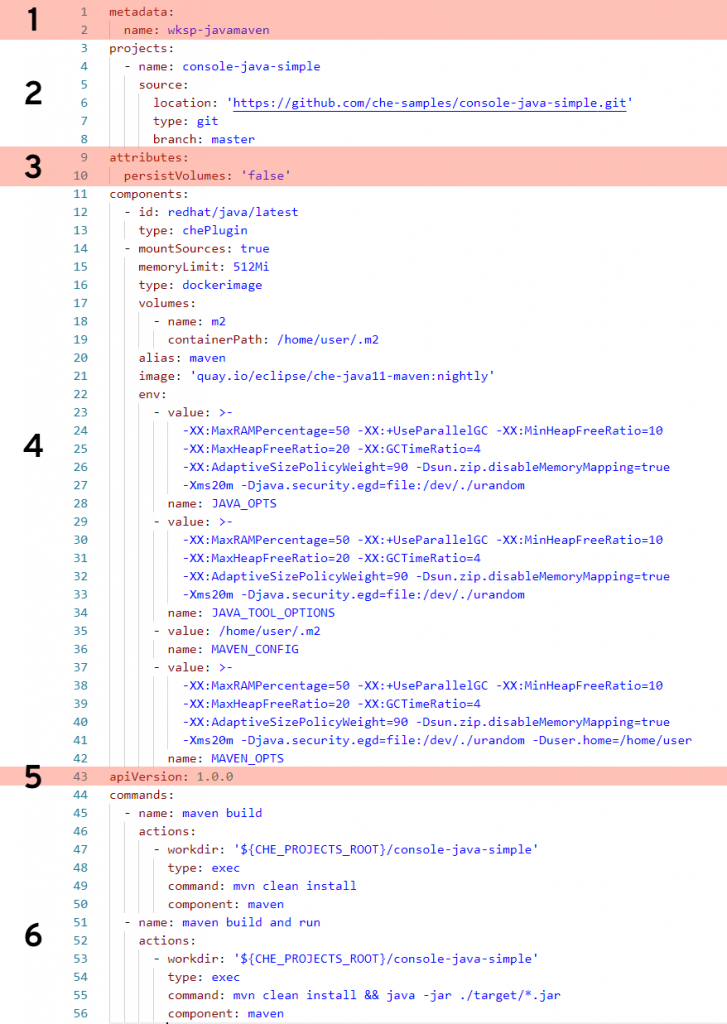
    Let's break this down.

    Section 1: metadata

    This section is required, and in this case name is specified as the name of this workspace (wksp-javamaven). You also have the option of a name prefix, in which case the system will generate the rest of the name (e.g., generateName: javamaven-). Using generateName means a user can have multiple instances of this workspace at the same time. This is an important distinction and one which must be addressed by management.

    Section 2: projects

    This section is optional (but probably a very good idea) and tells the workspace where to find the project that will be included. In this case, we're pointing to the master branch of a Git repository located on GitHub. You can specify multiple projects for a workspace, and the type can be a zip file as well. While the name of the project does not need to match the name of the repo it's, again, probably a very good idea. If you make them different, well ... then that's a create opportunity to add confusion and really mess things up.

    Section 3: attributes

    This part is optional and can pretty much define anything you wish. In this example, it's specifying that any values stored in any specified volumes are not stored. This will likely be the value you'll always want. The idea is that, unless you commit your changes to the Git repo, any work done will be lost. Think of it this way: Whereas on your local PC you perform a File --> Save command to keep your work, you'll instead do git commit. In "devfile-speak," persistVolumes: false makes the data ephemeral. This setting, false, also makes the workspace perform better.

    Section 4: components

    This is the heaviest part of this example, where we specify what bits and pieces make up our workspace.

    The first component is a Che Plugin, identified at redhat/java/latest. You can see the description of this plug on this GitHub page.

    The next component is a type dockerimage that is the maven support for this workspace. Of special note is the setting mountSources: true, which makes the source code available to the container that is running this image. In this particular case, we want our Maven build to have access to the source code—which makes sense.

    The volumes: setting defines a directory within the container that is available to this workspace. This is used, for example, to give the workspace access to a needed directory that would otherwise be outside the container and blocked by lack of permissions. In other words, if you run a command in a workspace and get an error message because you are denied access to a directory, you can get around that by defining that directory here, in your devfile, that will be created inside your container.

    The remaining settings associated with this component are related to memory limits, security, etc.

    Section 5: apiVersion

    This section is required and is how you specify which API version you are using. This is pretty much boilerplate text.

    Section 6: commands

    This is the fun part. In this section, you can define custom commands that are available to the user. Typically, this is where you'll specify command-line commands that can be run from within the IDE rather than dropping to the command line and typing what may be a lengthy command. The properties here will look pretty much self-explanatory. Note that a macro can be used instead of hard-coded value for the project root directory (e.g., ${CHE_PROJECTS_ROOT}).

    Start exploring

    There are many settings and variations of devfiles. If you have the ability, I suggest going into your CRW 2.0 instance and exploring any existing workspaces' devfiles. Take an existing devfile, clone it, then change it and implement it to see what happens. Like any good developer, make changes until you break things, then gain understanding.

    Last updated: November 8, 2023

    Recent Posts

    • A day in the life of an NVIDIA H100 on Red Hat OpenShift 5

    • Migrate BuildConfigs to builds for Red Hat OpenShift with one plug-in install

    • Run Red Hat Enterprise Linux CoreOS on NVIDIA BlueField DPUs

    • Agent harness engineering: Separating model capabilities from enforcement

    • What's new for developers in Red Hat Enterprise Linux 10.3 and 9.9

    Red Hat Developers logo

    Platforms

    • Red Hat AI
    • Red Hat Enterprise Linux
    • Red Hat OpenShift
    • Red Hat Ansible Automation Platform
    • See all products

    Build

    • Developer Sandbox
    • Developer tools
    • Interactive tutorials
    • API catalog

    Quicklinks

    • Learning resources
    • E-books
    • Cheat sheets
    • Blog
    • Events
    • Newsletter

    Communicate

    • About us
    • Contact sales
    • Find a partner
    • Report a website issue
    • Site status dashboard
    • Report a security problem

    Red Hat Developer

    Build here. Go anywhere.

    We serve the builders. The problem solvers who create careers with code.

    Join us if you’re a developer, software engineer, web designer, front-end designer, UX designer, computer scientist, architect, tester, product manager, project manager or team lead.

    Sign me up

    Red Hat legal and privacy links

    • About Red Hat
    • Jobs
    • Events
    • Locations
    • Contact Red Hat
    • Red Hat Blog
    • Inclusion at Red Hat
    • Cool Stuff Store
    • Red Hat Summit
    © 2026 Red Hat

    Red Hat legal and privacy links

    • Privacy statement
    • Terms of use
    • All policies and guidelines
    • Digital accessibility
    Ask AI