Install and configure Red Hat Developer Hub and explore templating basics
Learning path | 6 resources | 2 hrs | Published on January 15, 2024
Development teams today face a huge amount of cognitive overload due to the many frameworks, new technologies, and new approaches that make writing software a lot harder than it used to be.
In this learning path, created by Uth Lawson, you will learn how to install the Red Hat Developer Hub internal developer platform and learn the concepts and skills you need to install your IDP, configure simple GitHub authorization, and explore templating basics.
Now we have a running instance of Red Hat Developer Hub. Out of the box, this instance has all of its plug-ins installed. However, we need to be able to configure it specifically for our end user developers. Every organization is different, and Developer Hub allows you to completely configure it to match your organizational and developmental needs.
In order to get full benefit from taking this lesson, you need to:
Have a GitHub account.
In this lesson, you will:
Create a custom configuration file using ConfigMap in Red Hat OpenShift.
Set up simple GitHub authentication.
Create the ConfigMap
In order to change your configuration to match your needs, you have to create a custom configuration file. OpenShift allows you to do this by using a ConfigMap object, which is injected into the running application as a file at pod creation time.
To add this file using the OpenShift UI:
Switch back to your Developer Sandbox OpenShift session.
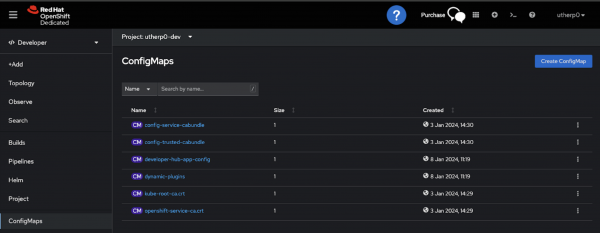
Select the Developer viewpoint if needed, then select ConfigMaps in the left-hand navigation panel to see the existing ConfigMaps used by Developer Hub (Figure 11).
Figure 11: View the ConfigMaps available in Developer Hub via OpenShift.
Select Create ConfigMap.
In the dialog, enter app-config-rhdh as the Name.
Switch to the YAML view by clicking the YAML radio button. The name in the YAML is prepopulated to app-config-rhdh.
Enter the YAML as follows to customize the title bar at the top of the Red Hat Developer Hub login page:
kind: ConfigMap
apiVersion: v1
metadata:
  name: app-config-rhdh
data:
  app-config-rhdh.yaml: |
    app:
      title: My Red Hat Developer Hub
      baseUrl:
https://developer-hub-{your_sandbox_project}.apps.{your_sandbox_url}.openshiftapps.com/
Info alert:Use the route URL you saved from the previous step.
For now, select the Route icon in the top-right of the roundel for the developer-hub application, and the screen in Figure 10 will appear in a separate tab. Make note of your route URL. You will need it later.
Select Create to add the ConfigMap to the project.
Click the ConfigMaps left-hand navigation panel again to see it in the list.
Upgrade the Helm chart
Since you are still in the Developer Sandbox, you can now upgrade the Helm chart to inject this new ConfigMap as the custom configuration:
Click Helm on the left-hand navigation. There is a Helm chart already installed for the Developer Hub application.
Click the three-button icon to the far right of your project and select Upgrade. If necessary, click the Form view radio button.
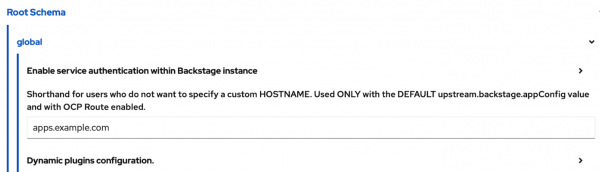
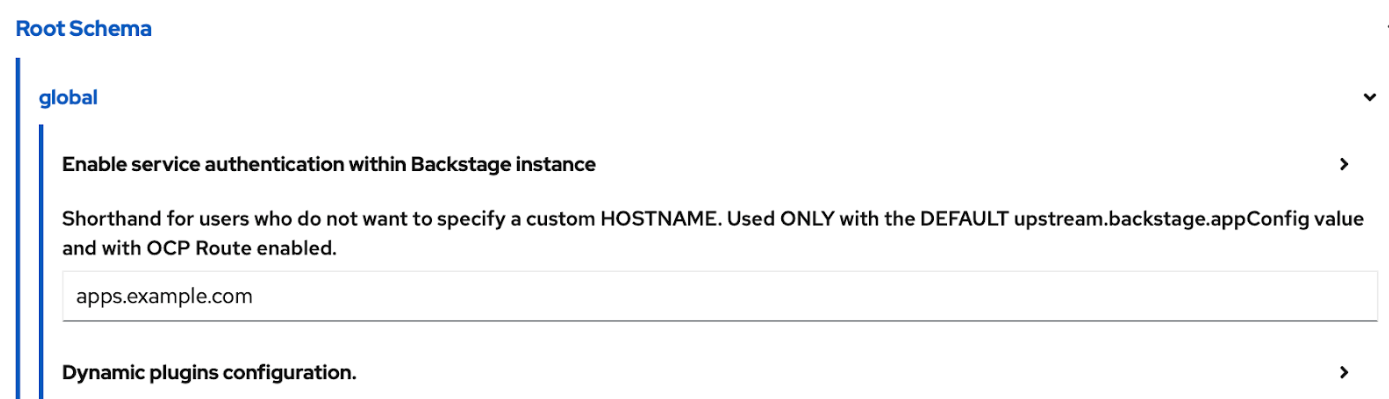
Set the default route to generate URLs to talk to GitHub.
Click Root Schema
Click Global
In the Shorthand for Users that do not want to specify….. text box, enter the last part of the URL used in Step 1, as shown in Figure 12, starting with apps.xxx (i.e. apps.sandbox-m2.ll9k.p1.openshiftapps.com).
Figure 12: The Root schema window that sets the default routes to GitHub.
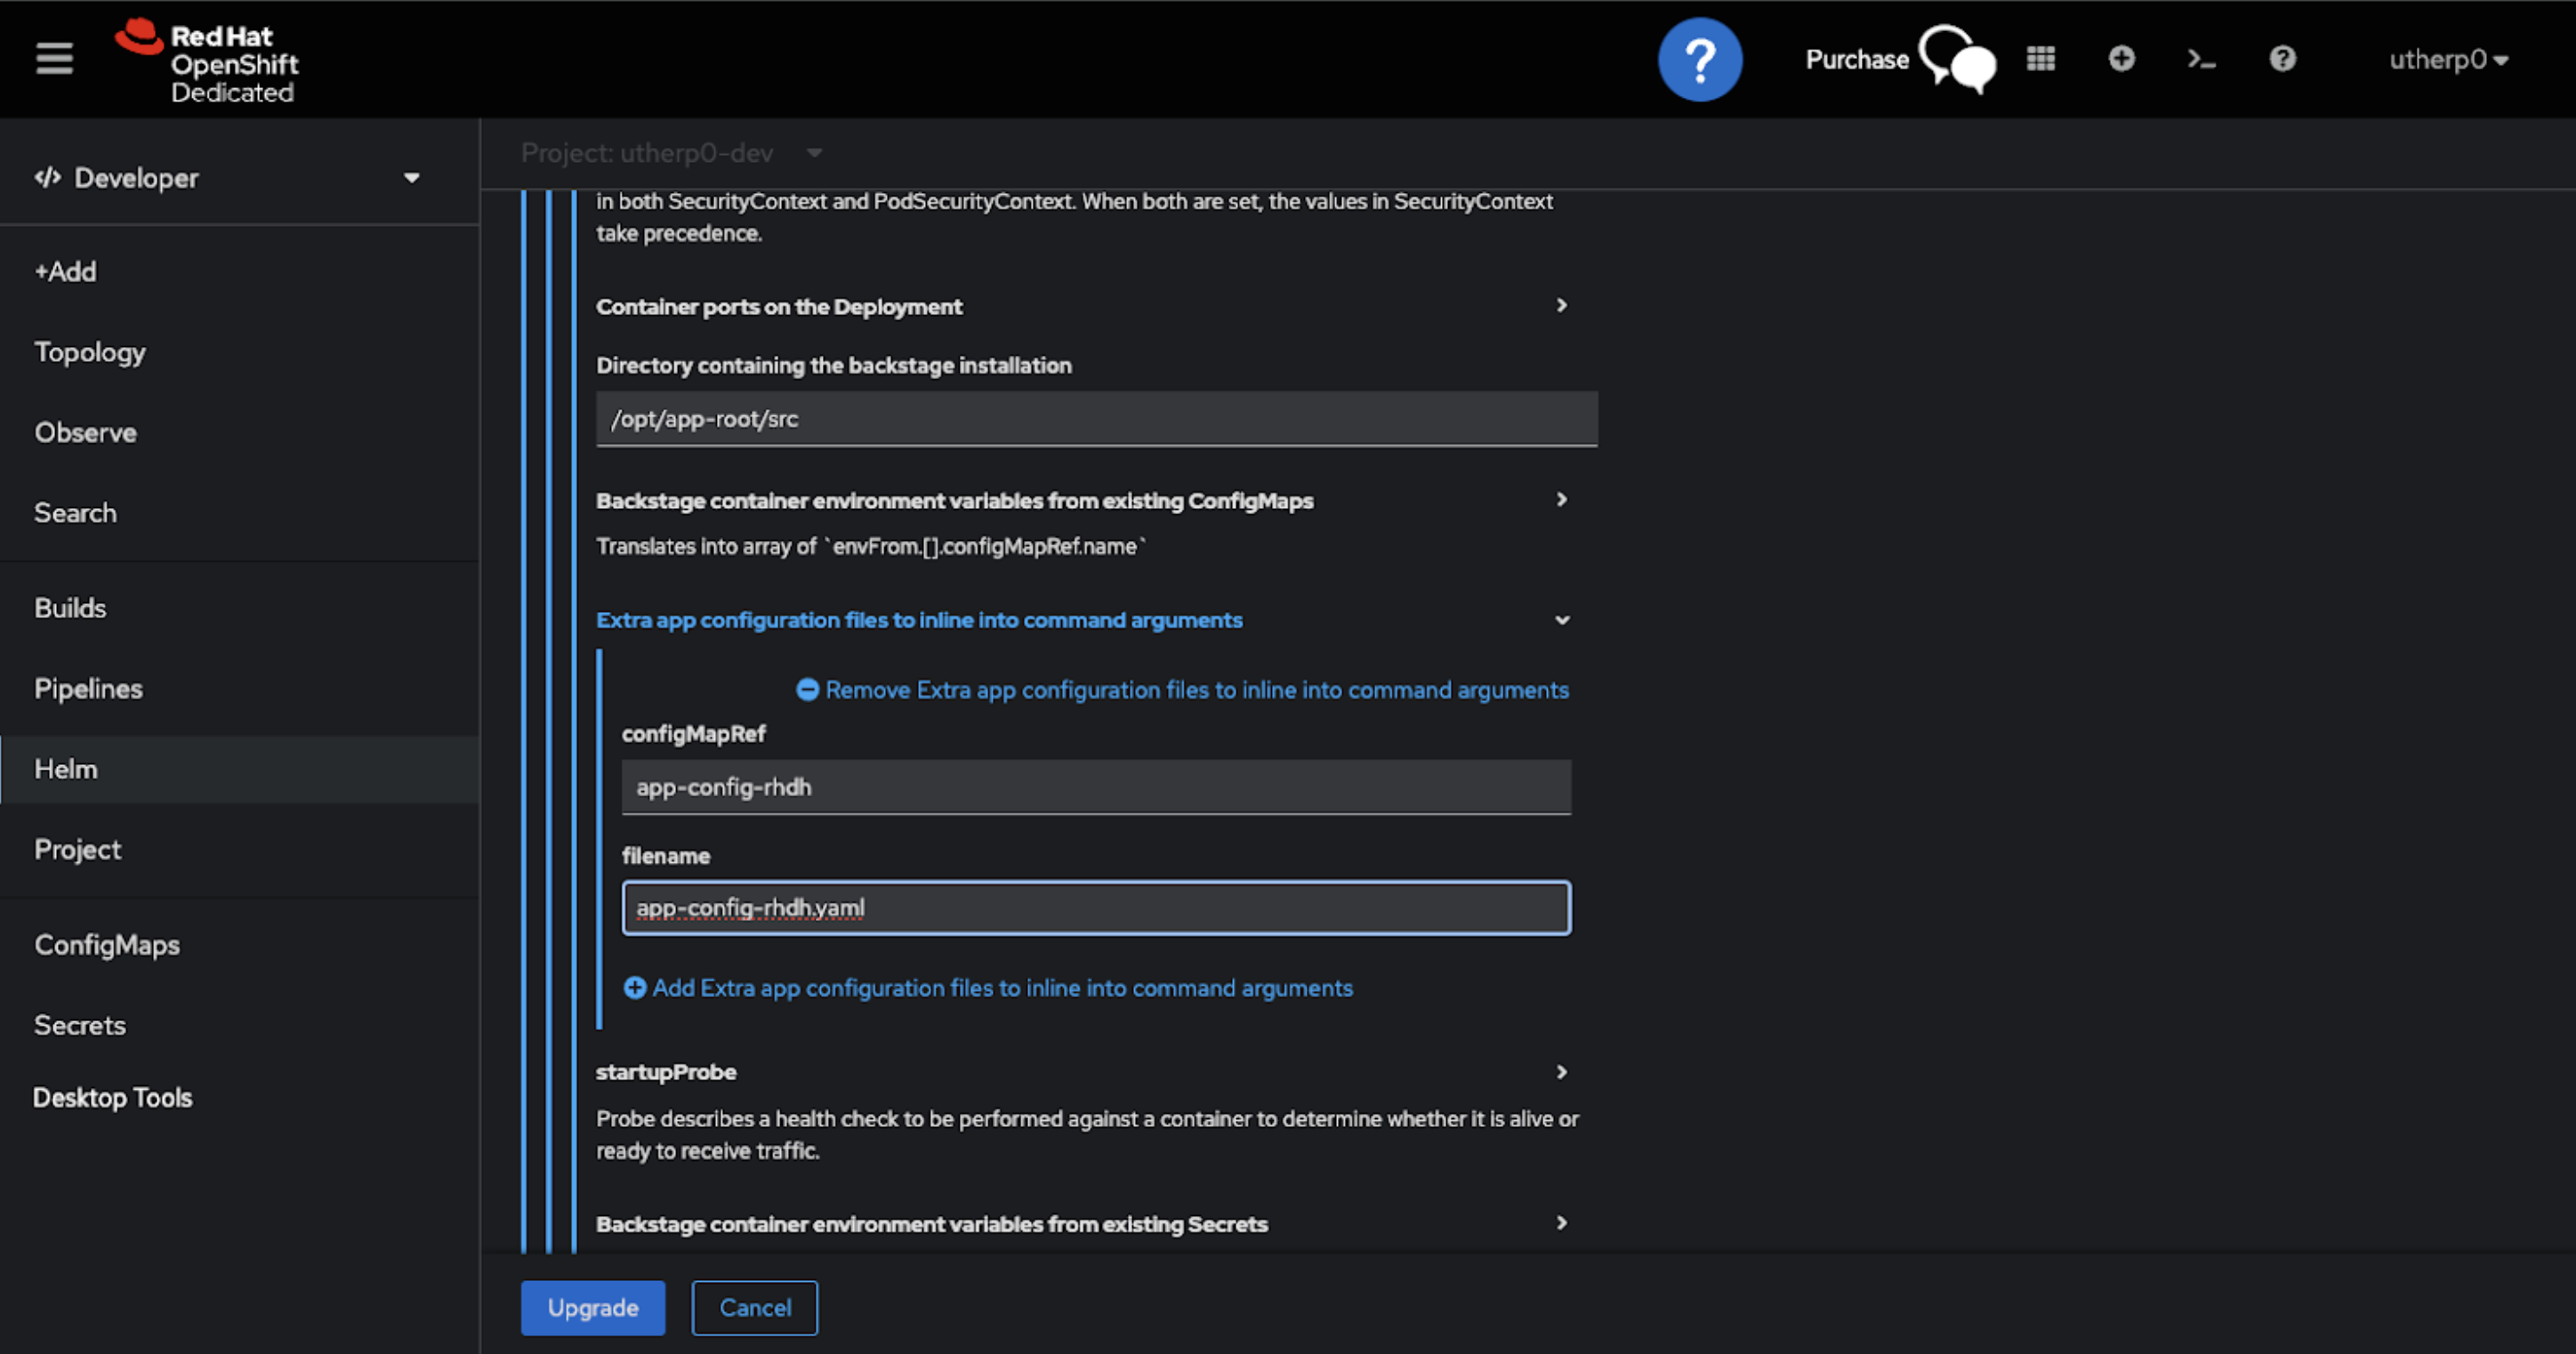
The Helm chart dialog page lists all parameters being consumed by the Helm chart. Add the new ConfigMap into the Backstage parameters by expanding the following elements:
Click Root Schema.
Click Backstage Chart Schema.
Click Backstage Parameters.
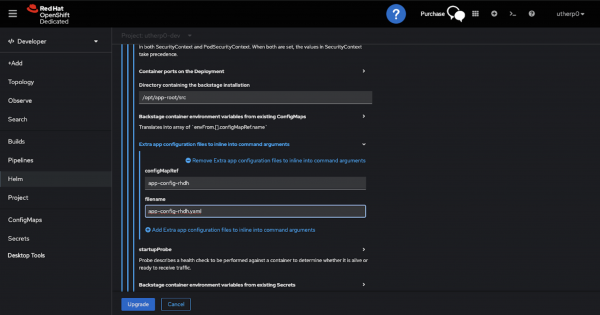
Click Extra App Configuration files to inline into command arguments
Click + Extra App Configuration files to inline into command arguments, which gives you a set of text entry points.
Fill them in as shown in Figure 13:
Under configMapRef, enter app-config-rhdh.
Under filename, enter app-config-rhdh.yaml.Select Upgrade. This will re-execute the Helm chart with the additional configuration.
Figure 13: The OpenShift configuration screen for your Developer Hub configuration via the Helm chart.
Select Upgrade. This will re-execute the Helm chart with the additional configuration.
Info alert:Note: Don’t be put off by the number or complexity of the configuration parameters. Developer Hub pre-configures Backstage with almost everything you need without having to know or change the majority of these parameters, but having them available allows you to have maximal configuration.
If you played with the Developer Hub UI earlier, you probably noticed that the catalog and APIs were completely empty. This is because in order to populate the catalog and add templates, you must enable a source control, such as GitHub, GitLab or Bitbucket.
To enable source control, we will add an integration to the configuration that ties connectivity and authentication to an external source. Doing this allows Developer Hub to authenticate and interact with code repositories.
Set up simple GitHub authentication
For the sake of this learning path, let’s set up simple authentication to GitHub. To do this, you need a GitHub account with some options set up on GitHub itself.
For the next part of the lesson, there are two ways you can approach setting up GitHub authentication. The simplest way (which is not recommended for production because you would not normally put tokens and secrets directly into the config) is quick and easy, but doesn’t show you how to set up a GitHub organization, which will be needed for groups of people accessing Developer Hub. To use this method, do the following:
Info alert:Make sure you have created an OAuth App, not a Github App.
Enter your developer hub application route URL in the Homepage URL input. This value is the default URL you are taken to when you enter Red Hat Developer Hub, which we suggested you note in the installation phase. You can confirm this URL by going to the roundel and clicking the Route icon.
In the OAuth App creation page, enter a memorable name.
Ensure that the Callback URL in your GitHub application is configured as follows:
https://developer-hub-<NAMESPACE_NAME\>.<OPENSHIFT_ROUTE_HOST\>/api/auth/github/handler/frame
Under Webhook, uncheck the Active box.
Click Create GitHub App to create the app. This will take you to the About screen.
Under Client Secrets, click Generate a new client secret.
Copy and save both CLIENT_ID and Client Secrets.
For the next part of the setup, you can leave the GitHub website and return to the Developer Sandbox. Haveyour ACCESS_TOKEN, CLIENT_ID, and Client Secrets information ready.
At this point, let's change the configuration of our installed Developer Hub to use the information we just generated for the GitHub authentication:
In the OpenShift Developer viewpoint, select ConfigMaps, then app-config-rhdh.
Click the YAML tab to view the YAML code.
In the data: component, add the following additional code. Make sure that it is at the same indentation level as the app: entry in the YAML from the "Create the ConfigMap" section:
Replace all of the values within curly braces ({ }) with the data you generated, and make sure you delete the curly braces when you are finished.
Save the ConfigMap. You will get a message like this: app-config-rhdh has been updated to version 1759846577
By adding GitHub in as an authentication agent, you allow a user to log in and use their credentials/access to complete actions via GitHub from within the Developer Hub templates. Once you have followed the instructions above, restart the application.
To restart the application:
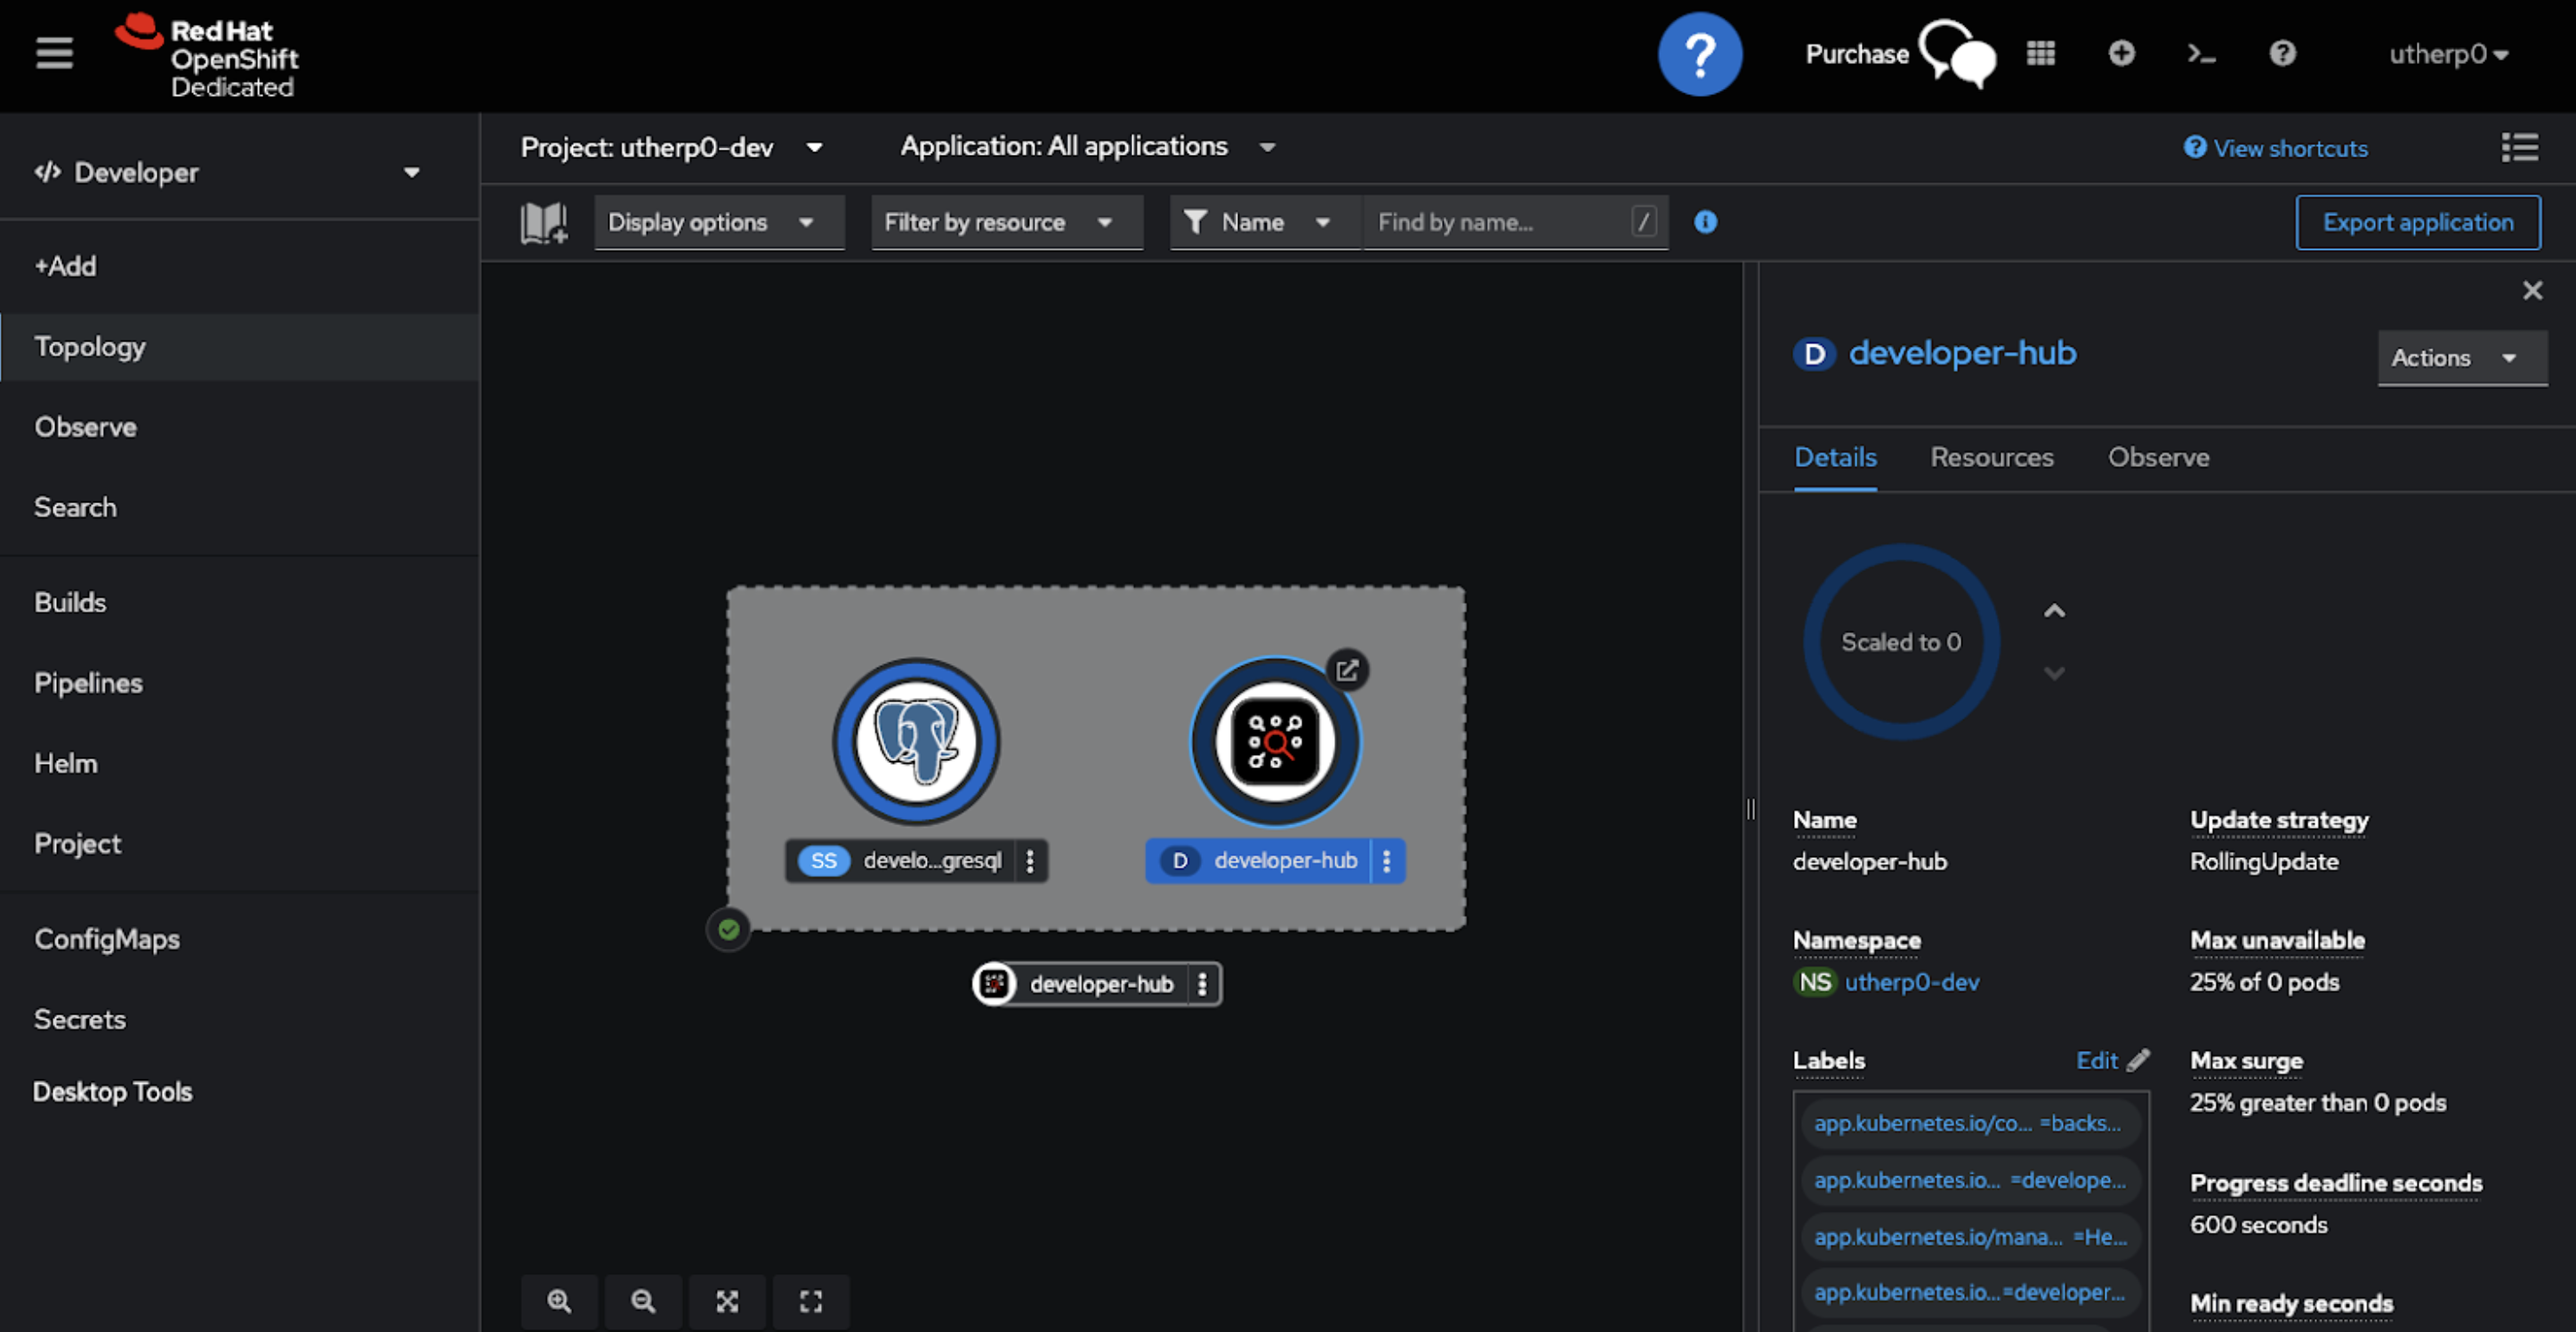
Go to the Developer viewpoint in the Developer Sandbox.
Select Topology.
Click on the developer-hub application (not the Postgres stateful set) and use the scaling controls to reduce the replica count to 0 (Figure 14).
Figure 14: Use the scaling controls to spin up and down your pods.
Info alert:The nature of adding information through the ConfigMap means that your changes are not propagated automatically, unlike when you add something to the Helm chart and re-publish.
Once the application has shut down, use the scaling controls again to set the replicas to 1. The application will restart and the new contents of the ConfigMap will be injected.
Go back and refresh the web page with the Developer Hub portal.
Go to the Settings gear (bottom left).
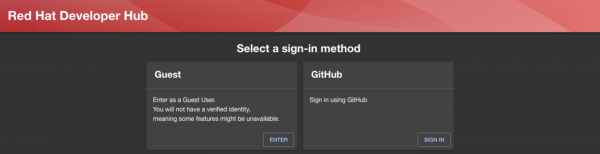
Under Profile (which should say Guest), click the three-button icon, then select Sign Out. This will take you to a login page that has two options (Figure 15).
Figure 15: Click SIGN IN under GitHub to authenticate with Red Hat Developer Hub.
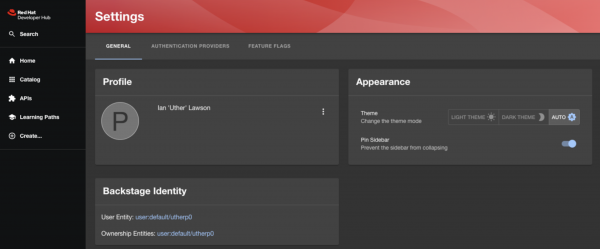
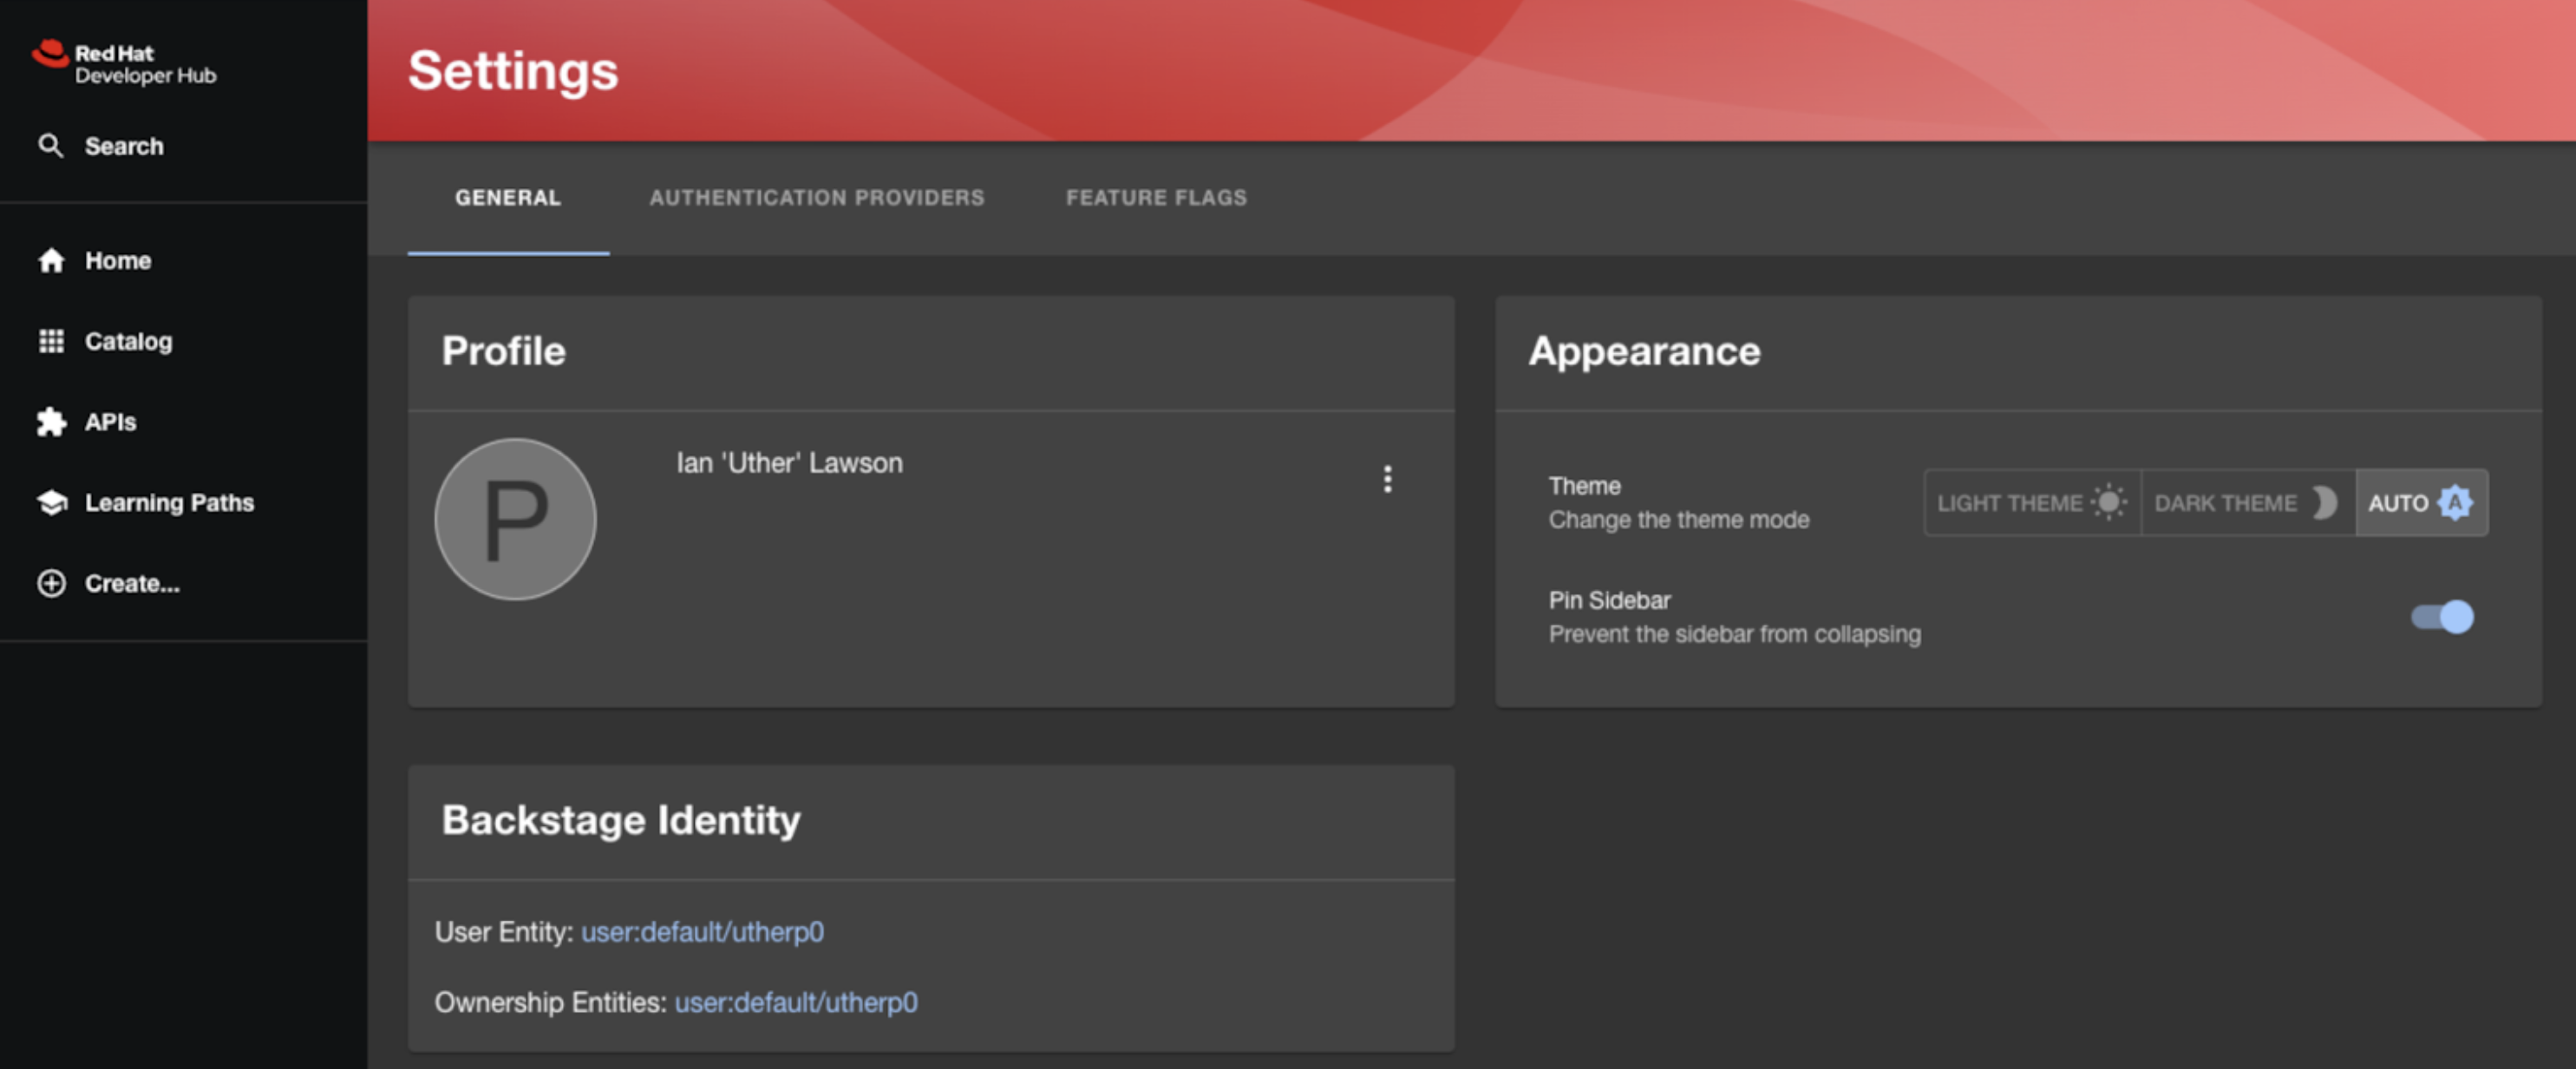
Now choose GitHub to log in and follow the prompts. If your configuration is correct, you will be logged back onto the homepage. Select Settings in the bottom left. The screen should now look similar to the one in Figure 16.
Figure 16: The Developer Hub Settings screen.
We are now ready to show the capabilities of Red Hat Developer Hub.