


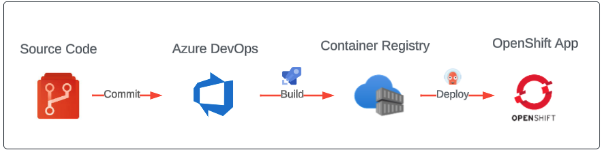
The advent of cloud technologies brings many benefits to the enterprise, such as provisioning at scale and a cloud-native DevOps approach. However, it also brings new challenges for developers and infrastructure engineers who wish to migrate from their datacenter to the public cloud. Among those challenges are integrating existing development methodologies with tool sets provided by the cloud provider as on-premise and cloud environments can each differ greatly. In this article, we explore a real-world implementation of a complete CI/CD pipeline using Source-to-Image builds deployed in Microsoft Azure Red Hat OpenShift with Azure tooling (see Figure 1).
The tools that will be leveraged in this article are:
- Azure Red Hat OpenShift
- Azure DevOps (ADO) with Azure Repos and Azure Pipelines
- Azure Container Registry (ACR)
- Red Hat OpenShift GitOps (Argo CD)
- Argo CD Image Updater
- OpenShift Source-to-Image (S2I)
Disclaimer: The information contained in this article represents the views and opinions of its authors and does not necessarily represent recommended practices or guidance from Red Hat.
Prerequisites
This article assumes that you have already provisioned a Red Hat OpenShift cluster. To showcase the Azure stack, we have opted to deploy Azure Red Hat OpenShift, but any OpenShift cluster that can access Azure public cloud endpoints can be used. Enterprises typically deploy Azure Red Hat OpenShift as a private cluster with access to their corporate network. The Azure Pipelines agent needs network connectivity to the cluster to facilitate an Azure Pipelines build. The default Azure Pipelines agent can be used, but if you are attempting this tutorial in a private cluster, you should follow these instructions to create an Azure build agent instead.
Next, instantiate a container registry in ACR. While other container registries can be used, we have opted to showcase ACR configured for an Azure Red Hat OpenShift private cluster as part of the Azure solution stack. Once that is set up, continue to Azure DevOps and set up an organization, create a project, and link the project to the ACR repository by setting up a service connection.
Staging the builder image in ACR
Red Hat’s builder images consist of three fundamental elements: source code, source-to-image (S2I) scripts, and builder images. In our example, we will use the Red Hat JBoss Web Server builder image.
We will start by pushing the builder image to Azure Container Registry. Be sure to replace the <acr-registry-name> with the registry name you created earlier.
To push the image to the registry, run the following commands to use a token and authenticate into the registry:
$ ACR_REGISTRY=<acr-registry-name>.azurecr.io
$ az login
$ ACR_TOKEN=$(az acr login --name $ACR_REGISTRY --expose-token --query 'accessToken' | jq -r )
After running this command, you will receive a temporary login token. Utilize the token to login, as follows:
$ podman login $ACR_REGISTRY -u 00000000-0000-0000-0000-000000000000 -p $ACR_TOKEN
Then, pull the builder image from upstream, and tag and push to your ACR:
$ podman login registry.redhat.io
$ podman pull --arch=amd64 registry.redhat.io/jboss-webserver-6/jws60-openjdk17-openshift-rhel8:latest
$ podman tag registry.redhat.io/jboss-webserver-6/jws60-openjdk17-openshift-rhel8 $ACR_REGISTRY/jboss-webserver-6/jws60-openjdk17-openshift-rhel8
$ podman push $ACR_REGISTRY/jboss-webserver-6/jws60-openjdk17-openshift-rhel8 --remove-signatures
Staging the manifests and setting up the pipeline
Now that you have staged your image in ACR, it is time to stage the application and pipeline manifests in Azure Repos. For our Source-to-Image build, we have decided to wrap the assemble and run S2I scripts within a Dockerfile as it provides the necessary integration with Azure Pipelines tasks. Within the Dockerfile, we uploaded the source code for the build to the pod's /tmp/src directory. We also set the .s2i/bin directory permissions to match the running user of the base image, in this case UID 185.
ADD --chown=1001:0 test-app-service/src /tmp/src
ADD --chown=185:0 ./.s2i/bin/ ${S2I_HOME}/.s2i/bin
Let’s start by importing our example Git repository into Azure Repos. Our repository uses source code from the helloworld-ws example from jboss-eap-quickstarts. This example utilizes a custom-made Azure Pipelines YAML file, a Dockerfile containing the S2I scripts, an OpenShift deployment, service, and route deployed with Kustomize, and an .s2i folder which contains the necessary assemble and run files.
Note: You will need to replace the <acr-registry-name> with your registry name in the following files:
test-app-service/app/base/deployment.yamltest-app-service/Dockerfiletest-app-service/azure-pipelines.yml
You also need to replace <cluster-name> and <region> in the following file:
test-app-service/app/base/deployment.yaml
Lastly, you need to replace <docker-connection-name> and <agent-pool> in the following file:
test-app-service/azure-pipelines.yml
Once you have imported the repository, click on Pipelines, and select New pipeline. It will prompt you to select your repository; select the repository that you have just created and press next. In the Configure section, select Existing Azure Pipelines YAML file, select your branch, and select the path of the .yml file—in this case, it is /test-app-service/azure-pipelines.yml. Then press continue.
You will then be asked to review your pipeline YAML. Here, make any necessary changes to any naming conventions you may have on your side. Now, you have a working pipeline ready to go.
Running the pipeline
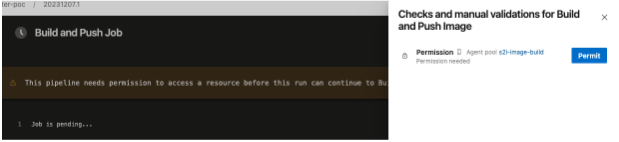
Now is the time to run your pipeline. On the initial run, you will likely be presented with a message to give permissions needed to run the build and push job (see Figure 2).
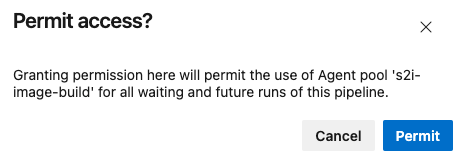
Click Permit, and then when you receive the confirmation message, select Permit again (see Figure 3):
Follow the build logs if you choose. If there are no errors, navigate to your ACR instance and ensure your image is present. The name of the image produced will be: .azurecr.io/my-dev/helloworld-ws.
Deploying the image and utilizing Image Updater
Now that we have our image staged, it is time to get OpenShift GitOps (upstream is Argo CD) and Argo CD Image Updater up and running. Argo CD is a declarative GitOps engine to deploy Kubernetes-based infrastructure and applications. Argo CD Image Updater uses annotations on Argo CD application image tags to regularly query the corresponding container registry and optionally update the application with the new image. Follow the documentation on how to install OpenShift GitOps and Argo CD Image Updater.
The easiest way to install Argo CD Image Updater is to run the following command. Note that this command should be run in the same project in which your OpenShift GitOps or Argo CD instance is installed, in our case, openshift-gitops project. Refer to the documentation for additional configuration of Argo CD Image Updater.
$ oc apply -n openshift-gitops -f https://raw.githubusercontent.com/argoproj-labs/argocd-image-updater/stable/manifests/install.yaml
Note that it is important to set up your pull secret in the project in which you are deploying your application. In this case, the namespace is called helloworld-s2i. To create one, ensure that the Admin user is enabled in your ACR instance, and then enter the following commands in your command prompt:
$ oc new-project helloworld-s2i
$ ACR_PW=$(az acr credential show -n $ACR_REGISTRY --query 'passwords[0].value' | jq -r)
$ ACR_USER=$(az acr credential show -n $ACR_REGISTRY --query 'username' | jq -r)
$ oc create secret -n helloworld-s2i docker-registry \
    --docker-server=$ACR_REGISTRY \
    --docker-username=$ACR_USER \
    --docker-password=$ACR_PW \
    --docker-email=unused \
    acr
$ oc secrets link default acr --for=pull -n helloworld-s2i
Argo CD Image Updater requires a pull secret, as it will need to access the metadata in the ACR registry. Therefore, you will need to repeat these commands in your Argo CD namespace:
$ oc create secret -n openshift-gitops docker-registry \
    --docker-server=$ACR_REGISTRY \
    --docker-username=$ACR_USER \
    --docker-password=$ACR_PW \
    --docker-email=unused \
    acr
$ oc secrets link default acr --for=pull -n openshift-gitops
Now you can create a new OpenShift application. An example GitOps application YAML file is included in the example Git repository. You will need to replace <gitops-argo-namespace>, <acr-registry-name>, and <git-repo-url> in the following file:
application.yaml
Navigate to your Azure Pipeline, and initiate a new pipeline run. You will find that your pipeline now produces a new image, and that image will be pushed to your ACR registry. Argo CD Image Updater will continue to poll the registry for updates on the image you have defined, by default, every 2 minutes. When Argo CD Image Updater has detected a change to your image, it will make the update, prompting Argo CD to deploy a new pod matching your new image.
Next, check your application:
$ oc get pods -n helloworld-s2i
You will find that a new pod has been created, using the newly implemented image.
Conclusion
In this tutorial, we have successfully used Source-to-Image builds leveraging Azure DevOps tools, specifically, Azure Repos and Azure Pipelines, for continuous integration. Then, we leveraged OpenShift GitOps (Argo CD) for continuous deployment. In addition to creating a CI/CD pipeline, the CD process was further automated with Argo CD Image Updater to allow for the most seamless transition between container images, allowing for the least possible amount of downtime for your applications.
