A recent blog post, 10 things to avoid in docker containers, describes ten scenarios you should avoid when dealing with docker containers. However, recommendation #3 - Don’t create large images and the sentence "Don’t install unnecessary packages or run “updates” (yum update) that download files to a new image layer" has generated quite a few questions. Some of you are wondering how a simple yum update can create a large image. In an attempt to clarify the point, this post explains how docker images work, some solutions to maintain a small docker image, yet still keep it up to date.
To better illustrate the problem, let's start with a fresh Fedora 23 (or RHEL) image. (Use docker pull fedora:23).
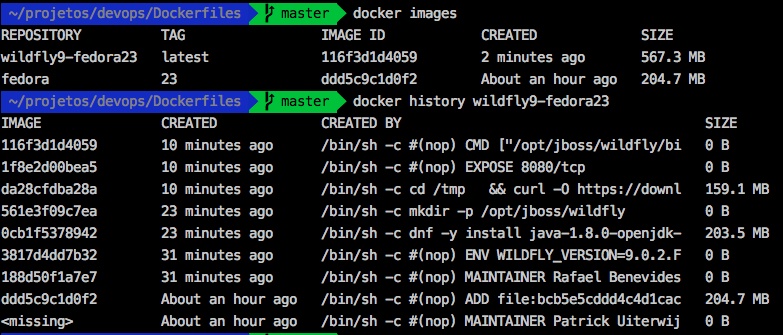
Once complete, running The docker images, command reveals an image size of 204.7 MB. We'll now create a custom image that contains JDK 1.8 and WildFly 9.0.2.Final, using the following Dockerfile (downloads from GitHub).
Building this image results in a final size of 567.3 MB, and we can perform a docker history <image name> to see the size of its layers. Doing so demonstrates that JDK 1.8 has added 203.5 MB, and WildFly has added 159.1 MB to the total image size - that's already a lot of space!
Further still, you'll eventually need to create a WildFly 10.0.0.Final image. If you don't want to install JDK 1.8 again, you might feel tempted to reuse the existing image by replacing WildFly 9.0.2.Final with 10.0.0.Final. In doing so, you'd likely expect that this new image will have almost the same size of 567 MB, but the resulting image size will actually increase to 728.1 MB. The image will have grown by 160 MB even if you remove WildFly 9.0.2.Final before adding WildFly 10.0.0.Final in the docker image. The difference in size is not due to the differences between WildFly versions.
Copy on Write
In order to understand this behavior, we need to understand that the Docker container file-system uses a Copy-on-Write technique technique that improves container startup time (incredibly fast!) when we compare containers to ordinary Virtual Machines. Though this technique contributes in several ways to make docker containers efficient, it can result in extra disk usage; thus, docker image authors need to consider several things to avoid creating large images.
To explain: Every RUN instruction in the Dockerfile writes a new layer in the image. Every layer requires extra space on disk; therefore, when we "uprgade" WildFly, we are in fact creating a new layer. In order to keep the number layers to a minimum, any file manipulation like moving, extracting, removing, etc, should ideally be made under a single RUN instruction.
The following line, for example, installs WildFly 10.0.0.Final in the container, and the download, extraction, move, and cleanup commands are made on a single line. This results in a final size of 569.1 MB:
    "cd /tmp && \
        curl -O https://download.jboss.org/wildfly/$WILDFLY_VERSION/wildfly-$WILDFLY_VERSION.tar.gz && \
        tar xf wildfly-$WILDFLY_VERSION.tar.gz && \
        mv /tmp/wildfly-$WILDFLY_VERSION /opt/jboss/wildfly && \
        rm /tmp/wildfly-$WILDFLY_VERSION.tar.gz"
Note the use of backslashes for line continuation. This gives readability, yet everything is on the same logical line.
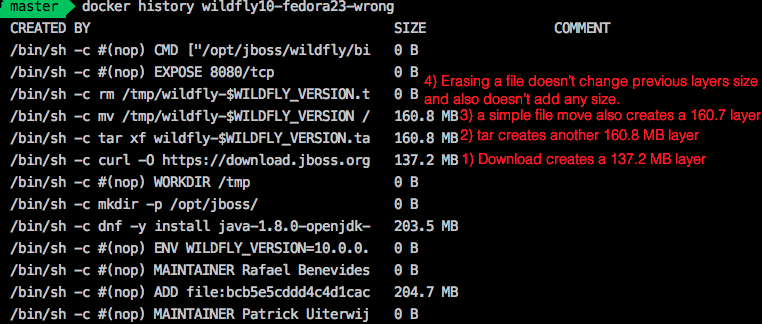
In comparison, if each one of these commands were executed in a separate RUN instruction, the image will have 4 more layers, and have a final size of 867.1 MB. The command docker history allows you to easily visualize the layers and its size according to the following image:
Yum Update
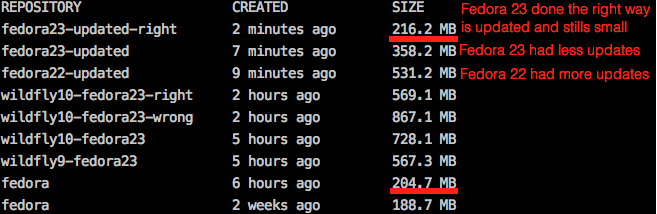
But what about the use of yum update? To better illustrate the answer to this question I prepared two images: fedora:22, and fedora:23. These two customized images have the same RUN dnf -y update instruction in their respective Dockerfiles, yet the result is that that fedora:22 has a size of 531.2 MB, while the newer fedora:23 has a size of 358.2 MB.
Fedora:22 is larger because it had to download many more files to become "up to date" with Fedora:23. Thus, this example demonstrates that running latest versions of existing platforms (e.g. Fedora 23 instead of 22) can not only speed up image creation, but also save space by preventing additional files to be written to an intermediate layer.
We should NOT forget that "updates" trigger many file changes as it downloads new rpm packages and installs them. As explained before, we can't change the previous image layers, but we can at least get rid of the rpm cache in a single RUN command. With a small modification to RUN dnf -y update && dnf clean all, the image is reduced from 358.2 MB to 216.2 MB (just 11.5 MB larger than the original fedora:23 image). So if you need to do an update, keep in mind that you should also clean up afterwards to free as much space as possible.
Conclusion
In conclusion, the problem is not running "yum/dnf update" in your image, and a basic understanding of docker's layered file-system can make a big difference in the size of your image. Large images become an issue when thousands of containers need to be deployed across a cluster, but avoiding "updates" in your linux containers can lead to bugs and security vulnerabilities.
The solution is perform updates and cleanups in a single RUN instruction, which both updates the image, and frees space (resulting in a smaller image) at the same time.
Related articles
- 10 things to avoid in docker containers
- Java inside docker: What you must know to not FAIL
- A practical introduction to container terminology
For more information about containers, visit and register at http://developers.redhat.com/
Last updated: February 24, 2025