As of Red Hat build of Keycloak 22, creating a highly available Keycloak solution can introduce operational complexity, as well as performance issues.
For example, to have multiple instances of Keycloak that share the same session information, a common cache that is available to all Keycloak instances is a must (in this case, Red Hat Data Grid common to two Red Hat OpenShift clusters) as well a common database (that is highly available and/or fault tolerant).
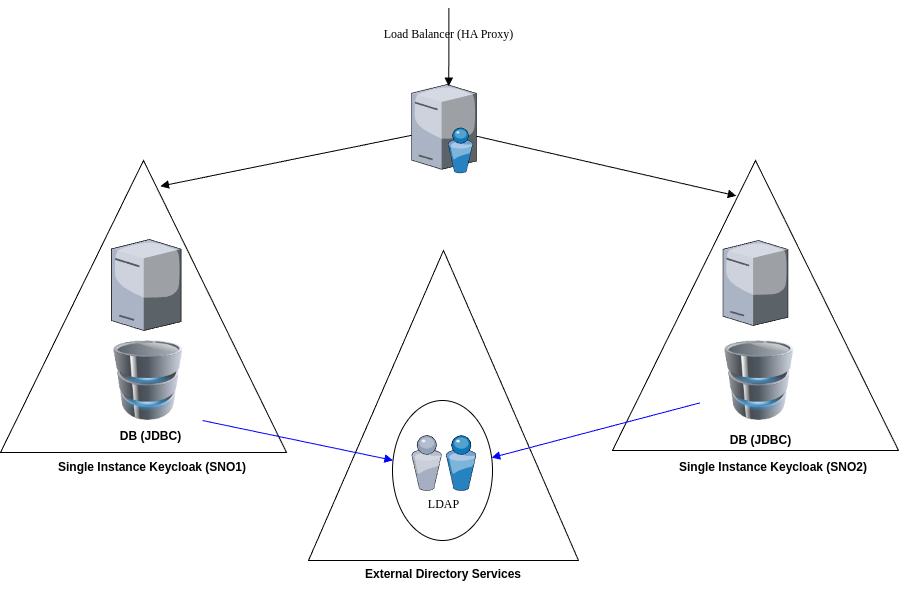
Instead, this solution avoids a common cache or database and utilizes multiple single instances that all use the same source for user authentication (Active Directory as LDAP). To maintain session information, the load balancer will only point to the first server in the list. Should there be a failover, all sessions get terminated, and a re-authentication is required.
Figure 1 shows a simple illustration of the proof of concept demonstrated in this article.
What this guide is
- A proof of concept, built in a home lab with simple failure testing, and without any QA or load testing.
- Based on OpenShift 4.14.
- Demonstrates a possible high availability or fault tolerant solution.
What this guide is not
- A production ready or final solution.
- A solution that is thoroughly tested for functionality and/or performance.
- An implementation of Keycloak with LDAPS (feature not available in Red Hat build of Keycloak 22, potentially available in Red Hat build of Keycloak 24). Refer to the Red Hat build of Keycloak documentation for up-to-date product information.
Systems used to demonstrate this proof of concept
- A Homelab based on a simple network
192.168.1.0/24and subdomainlocal.mylab.io - An Active Directory instance running at
ad.local.mylab.io - Two Keycloak instances installed on single node OpenShift clusters, identified by SNO1 and SNO2, both accessing the same Active Directory. The OpenShift version is 4.14.1
- A virtual machine with Red Hat Enterprise Linux 9 installed, as the load balancer with hostname
keycloak.local.mylab.iothat uses the Keycloak instances as backend servers (primary/backup) - OpenID Connect (OIDC) authentication configured on the two single node OpenShift clusters that rely on this setup of Keycloak
Implementation steps
HAProxy configuration
For a successful implementation, it must be ensured that 1) the end user with an account in Keycloak, and 2) all the single sign-on systems accessed by the user all point to the same backend Keycloak server. This is primarily because session information is not shared across Keycloak instances, and will cause sign-in problems when the Keycloak server, used to authenticate a user, is not the same Keycloak server referenced by the systems this user is attempting to access.
To achieve this, avoid load balancing between multiple servers. To ensure this doesn't happen, only one server should be used for all systems, which is achieved by configuring HAProxy to use one server at any given time. When failing to a backup, to terminate all sessions, and similarly, when returning from backup to primary, to terminate all sessions.
This is achieved using the following configuration lines (full configuration provided at a later section):
backend keycloakbackend
    mode http
    balance first
    option httpchk GET /health
    http-check expect string UP # /health will display json text containing the word UP
    option redispatch
    option httplog
    option log-health-checks
    default-server ssl check verify none on-marked-down shutdown-sessions on-marked-up shutdown-backup-sessions
    server sno1 keycloak-rhbk.apps.sno1.local.mylab.io:443 sni str('keycloak-rhbk.apps.sno1.local.mylab.io') check-sni 'keycloak-rhbk.apps.sno1.local.mylab.io' verifyhost 'keycloak-rhbk.apps.sno1.local.mylab.io' ca-file /etc/ssl/certs/ocp_ca.pem
    server sno2 keycloak-rhbk.apps.sno2.local.mylab.io:443 sni str('keycloak-rhbk.apps.sno2.local.mylab.io') check-sni 'keycloak-rhbk.apps.sno2.local.mylab.io' verifyhost 'keycloak-rhbk.apps.sno2.local.mylab.io' ca-file /etc/ssl/certs/ocp_ca.pem backup
TLS configuration
TLS configuration requires a certificate that includes all the subject alternate names for the Keycloak server. This could also be achieved by a wildcard SSL certificate *.local.mylab.io.
The steps below include a self signed configuration that will be used throughout this implementation:
cat > ./keycloak.ext << EOF
keyUsage = critical, digitalSignature, keyEncipherment
extendedKeyUsage = serverAuth
subjectAltName = @alt_names

[ alt_names ]
DNS.1 = keycloak.local.mylab.io
DNS.2 = keycloak-rhbk.apps.sno1.local.mylab.io
DNS.3 = keycloak-rhbk.apps.sno2.local.mylab.io
EOF

openssl req -x509 \
-sha384 -days 9999 \
-nodes \
-newkey rsa:3072 \
-subj "/CN=KeyCloak Cert Authority" \
-keyout ./ocp_ca.key -out ./ocp_ca.pem

openssl req -new \
-nodes \
-newkey rsa:3072 \
-subj "/CN=Keycloak Transparent Proxy" \
-keyout ./keycloak.key -out ./keycloak.csr

openssl x509 -req \
-in keycloak.csr \
-CA ocp_ca.pem -CAkey ocp_ca.key \
-CAcreateserial -out ./keycloak.pem \
-days 9999 \
-sha384 -extfile ./keycloak.ext

cat ./keycloak.pem  > ./certificate.pem
cat ./ocp_ca.pem  >> ./certificate.pem
cat ./keycloak.key > ./key.pem

cp ./ocp_ca.pem /etc/pki/ca-trust/source/anchors/
update-ca-trust
Keycloak setup and configuration
The steps below show how Keycloak is installed and setup in each cluster. Keycloak depends on Postgres database, which will be installed before hand. Both Keycloak and Postgres are installed by Red Hat build of Keycloak 22 and Crunchy Postgres Operators, respectively.
Install Crunchy Postgres Operator subscription
cat > ./01_crunchy-postgres-operator-subscription.yaml << EOF
apiVersion: operators.coreos.com/v1alpha1
kind: Subscription
metadata:
  name: crunchy-postgres-operator
  namespace: openshift-operators
spec:
  channel: v5
  installPlanApproval: Automatic
  name: crunchy-postgres-operator
  source: certified-operators
  sourceNamespace: openshift-marketplace
  startingCSV: postgresoperator.v5.5.0
EOF

$ oc apply -f ./01_crunchy-postgres-operator-subscription.yaml

Wait until you see the operator running:

$ oc get pods -n openshift-operators
NAME                     READY    STATUS     RESTARTS   AGE
pgo-695dff4d84-mbnpz    1/1       Running    0           1m
Create RHBK namespace
Since each Keycloak will be running in a dedicated namespace, create the namespace RHBK in each cluster:
cat > ./02_rhbk_namespace.yaml << EOF
apiVersion: project.openshift.io/v1
description: "Red Hat Build of Keycloak"
displayName: RHBK
kind: ProjectRequest
metadata:
    name: rhbk
EOF

$ oc apply -f ./02_rhbk_namespace.yaml
Create Postgres database instance in RHBK namespace
This creates a Postgres database instance in the RHBK namespace:
cat > ./03_postgressdb.yaml << EOF
# From https://github.com/CrunchyData/postgres-operator-examples/blob/main/kustomize/postgres/postgres.yaml
apiVersion: postgres-operator.crunchydata.com/v1beta1
kind: PostgresCluster
metadata:
  name: postgresdb
  namespace: rhbk
spec:
  image: registry.developers.crunchydata.com/crunchydata/crunchy-postgres:ubi8-16.2-0
  openshift: true
  postgresVersion: 16
  instances:
    - name: rhbkdb
      dataVolumeClaimSpec:
        accessModes:
        - "ReadWriteOnce"
        resources:
          requests:
            storage: 1Gi
  users:
    - name: keycloak
      options: "SUPERUSER"
      databases:
        - keycloak
  patroni:
    dynamicConfiguration:
      postgresql:
        pg_hba:
          - "host all all 0.0.0.0/0 md5" # This is too open, only used in this demo, never for production
          - "local all all trust" # This is too open, only used in this demo, never for production
  backups:
    pgbackrest:
      image: registry.developers.crunchydata.com/crunchydata/crunchy-pgbackrest:ubi8-2.49-0
      repos:
      - name: repo1
        volume:
          volumeClaimSpec:
            accessModes:
            - "ReadWriteOnce"
            resources:
              requests:
                storage: 1Gi
EOF

$ oc apply -f ./03_postgressdb.yaml
Ensure you see this before proceeding to the next step:
$ oc get pods -n rhbk |grep postgres
postgresdb-backup-g4gz-xz4bn      0/1     Completed    0          1m
postgresdb-repo-host-0            2/2     Running      0          1m
postgresdb-rhbkdb-5rqd-0          4/4     Running      0          1m
Install Keycloak operator and instance in RHBK namespace
Install Keycloak secrets prior to installation
Prior to installing your Keycloak instance, we need to tell Keycloak how to connect to Postgres, and which secrets to use:
cat > ./04_create_keycloak_secrets.sh << EOF
# Remove old secrets (if they exist)
oc delete secrets keycloak-db-secret keycloak-tls-secret keycloak-truststore-secret

# Create secrets from secrets created by the postgresdb installation
oc create secret generic keycloak-db-secret \
--from-literal=username="$(oc get secret postgresdb-pguser-keycloak -o go-template='{{.data.user | base64decode }}')" \
--from-literal=password="$(oc get secret postgresdb-pguser-keycloak -o go-template='{{.data.password | base64decode }}')"
oc create secret tls keycloak-tls-secret --cert ./certificate.pem --key ./key.pem
oc create secret generic keycloak-truststore-secret --from-file=./truststore.jks # This is still not available to be used in RHBK22, but likely in RHBK24+
EOF

bash ./04_create_keycloak_secrets.sh
Install Keycloak operator group
The Keycloak operator is installed in a single namespace, therefore, we are creating an operator group and a subscription afterwards:
cat > ./05_create_keycloak_operatorgroup.yaml << EOF
apiVersion: operators.coreos.com/v1
kind: OperatorGroup
metadata:
  annotations:
    olm.providedAPIs: Keycloak.v2alpha1.k8s.keycloak.org,KeycloakRealmImport.v2alpha1.k8s.keycloak.org
  generateName: rhbk-
  generation: 1
  name: rhbk-l2mcp
  namespace: rhbk
spec:
  targetNamespaces:
  - rhbk
  upgradeStrategy: Default
EOF

$ oc apply -f ./05_create_keycloak_operatorgroup.yaml
Install RHBK22 operator subscription
cat > ./06_create_rhbk22-operator-subscription.yaml << EOF
apiVersion: operators.coreos.com/v1alpha1
kind: Subscription
metadata:
  name: rhbk-operator
  namespace: rhbk
spec:
  channel: stable-v22
  installPlanApproval: Automatic
  name: rhbk-operator
  source: redhat-operators
  sourceNamespace: openshift-marketplace
  startingCSV: rhbk-operator.v22.0.9-opr.1 # This value can change based on OCP version
EOF

oc apply -f ./06_create_rhbk22-operator-subscription.yaml

Wait until you see:
$ oc get pods -n rhbk |grep rhbk-operator
rhbk-operator-547478b86c-c8rxp   1/1     Running     0          1m
Install Keycloak instance
cat > ./07_create_keycloak_instance.yaml << EOF
apiVersion: k8s.keycloak.org/v2alpha1
kind: Keycloak
metadata:
  name: keycloak-instance
spec:
  instances: 1
  db:
    vendor: postgres
    host: postgresdb-primary.rhbk.svc
    usernameSecret:
      name: keycloak-db-secret
      key: username
    passwordSecret:
      name: keycloak-db-secret
      key: password
  http:
    tlsSecret: keycloak-tls-secret
  hostname:
    # We don't mention the hostname or the admin hostname here, we manage it with OpenShift routes, and HAProxy restriction to admin url
    strict: false
  truststores: # https://github.com/keycloak/keycloak/blob/main/docs/documentation/release_notes/topics/24_0_0.adoc#keycloak-cr-truststores
    mystore:
      secret:
        name: keycloak-truststore-secret
EOF

$ oc apply -f ./07_create_keycloak_instance.yaml

Wait until you see:
$ oc get pods -n rhbk | grep keycloak
keycloak-instance-0              1/1     Running     0          22h
Install Keycloak admin and hostname routes
Keycloak allows an admin hostname/URL separate from an instance hostname/URL. One is used by users and systems, while the other is used to perform administrative tasks on the instance. I have avoided specifying these hostnames in the instance configuration above, and will rely on OpenShift routes to access both the Keycloak instance hostname (keycloak.local.mylab.io) and the OpenShift application routes (to be designated as admin hostname keycloak-rhbk.apps.sno{1,2}.local.mylab.io). Admin routes should be hidden from Keycloak users.
cat > ./08_create_route_sno1.yaml << EOF
---
apiVersion: route.openshift.io/v1
kind: Route
metadata:
  name: keycloak-hostname-route
spec:
  host: keycloak.local.mylab.io
  port:
    targetPort: https
  tls:
    termination: passthrough
    insecureEdgeTerminationPolicy: Redirect
  to:
    kind: Service
    name: keycloak-instance-service
---
apiVersion: route.openshift.io/v1
kind: Route
metadata:
  name: keycloak-admin-route
spec:
  host: keycloak-rhbk.apps.sno1.local.mylab.io # Used to configure keycloak via ansible
  port:
    targetPort: https
  tls:
    termination: passthrough
    insecureEdgeTerminationPolicy: Redirect
  to:
    kind: Service
    name: keycloak-instance-service
EOF
cat > ./08_create_route_sno2.yaml << EOF
---
apiVersion: route.openshift.io/v1
kind: Route
metadata:
  name: keycloak-hostname-route
spec:
  host: keycloak.local.mylab.io
  port:
    targetPort: https
  tls:
    termination: passthrough
    insecureEdgeTerminationPolicy: Redirect
  to:
    kind: Service
    name: keycloak-instance-service
---
apiVersion: route.openshift.io/v1
kind: Route
metadata:
  name: keycloak-admin-route
spec:
  host: keycloak-rhbk.apps.sno2.local.mylab.io # Used to configure keycloak via ansible
  port:
    targetPort: https
  tls:
    termination: passthrough
    insecureEdgeTerminationPolicy: Redirect
  to:
    kind: Service
    name: keycloak-instance-service
EOF
$ oc apply -f ./08_create_route_sno1.yaml # <-- on SNO1
$ oc apply -f ./08_create_route_sno2.yaml # <-- on SNO2
You should see (based on your cluster), the following:

$ oc get routes

NAME                      HOST/PORT                                       PATH                        SERVICES PORT                  TERMINATION            WILDCARD
keycloak-admin-route      keycloak-rhbk.apps.sno1.local.mylab.io          keycloak-instance-service   https   passthrough/Redirect   None
keycloak-hostname-route   keycloak.local.mylab.io                         keycloak-instance-service   https   passthrough/Redirect   None
Configure Keycloak instances
The steps below automate the configuration of Keycloak. The script ensures the playbook is called with the correct credentials.
cat > ./09_configure_keycloak_cmd.sh << EOF
#!/bin/bash
ansible-galaxy collection install community.general
ansible-playbook ./09_configure_keycloak.yaml \
-e my_auth_keycloak_url="https://$(oc get route |grep keycloak-admin-route | awk '{print $2}')" \
-e my_auth_password="$(oc get secret keycloak-instance-initial-admin -o jsonpath='{.data.password}' | base64 --decode)"
EOF

cat > ./09_configure_keycloak.yaml << EOF
---
# Tested and working, it needs to be run from a command line that is already logged into the OpenShift cluster
# Run with ansible-playbook ./09_configure_keycloak.yaml \
# -e my_auth_keycloak_url="https://$(oc get route |grep keycloak-admin-route | awk '{print $2}')" \
# -e my_auth_password="$(oc get secret keycloak-initial-admin -o jsonpath='{.data.password}' | base64 --decode)"

- name: Playbook to configure keycloak
  hosts: localhost
  vars:
    my_auth_keycloak_url: ""
    my_auth_password: ""
  tasks:
  - name: Create or update Keycloak realm (minimal example)
    community.general.keycloak_realm:
      auth_client_id: admin-cli
      auth_keycloak_url: "{{ my_auth_keycloak_url }}"
      auth_realm: master
      auth_username: admin
      auth_password: "{{ my_auth_password }}"
      id: mylab
      realm: mylab
      state: present
      enabled: true

  - name: Create LDAP user federation
    community.general.keycloak_user_federation:
      auth_keycloak_url: "{{ my_auth_keycloak_url }}"
      auth_realm: master
      auth_username: admin
      auth_password: "{{ my_auth_password }}"
      realm: mylab
      name: ldap
      state: present
      provider_id: ldap
      provider_type: org.keycloak.storage.UserStorageProvider
      config:
        priority: 0
        enabled: true
        cachePolicy: DEFAULT
        batchSizeForSync: 1000
        editMode: READ_ONLY
        importEnabled: true
        syncRegistrations: false
        vendor: "Active Directory"
        usernameLDAPAttribute: cn
        rdnLDAPAttribute: cn
        uuidLDAPAttribute: objectGUID
        userObjectClasses: person, organizationalPerson, user
        connectionUrl: ldap://ad.local.mylab.io:389
        usersDn: "cn=users,dc=local,dc=mylab,dc=io"
        authType: simple
        bindDn: "cn=Administrator,cn=users,dc=local,dc=mylab,dc=io"
        bindCredential: "MYSECRETPASSWORD"
        searchScope: 2 # Subtree
        validatePasswordPolicy: false
        trustEmail: false
        useTruststoreSpi: always #ldapsOnly
        connectionPooling: true
        pagination: true
        allowKerberosAuthentication: false
        debug: false
        useKerberosForPasswordAuthentication: false
      mappers:
        - name: "full name"
          providerId: "full-name-ldap-mapper"
          providerType: "org.keycloak.storage.ldap.mappers.LDAPStorageMapper"
          config:
            ldap.full.name.attribute: cn
            read.only: true
            write.only: false

  - name: Create or update a Keycloak client (with all the bells and whistles)
    community.general.keycloak_client:
      auth_client_id: admin-cli
      auth_keycloak_url: "{{ my_auth_keycloak_url }}"
      auth_realm: master
      auth_username: admin
      auth_password: "{{ my_auth_password }}"
      state: present
      realm: mylab
      client_id: openshift
      name: OpenShift Authentication
      description: This is a client that allows OpenShift to Authenticate with Keycloak via OIDC
      enabled: true
      client_authenticator_type: client-secret
      secret: MYREALLYWELLKEPTSECRET
      redirect_uris:
        - https://oauth-openshift.apps.sno1.local.mylab.io/*
        - https://oauth-openshift.apps.sno2.local.mylab.io/*
EOF

bash ./09_configure_keycloak_cmd.sh
OIDC OpenShift authentication to Keycloak setup and configuration
The purpose of this step is to demonstrate the final working solution by configuring the two OpenShift clusters to use OIDC authentication to keycloak.local.mylab.io.
Create OIDC secrets
cat > ./10_create_keycloak_oidc_secrets.sh << EOF
#!/bin/bash
oc create secret generic idp-secret --from-literal=clientSecret="MYREALLYWELLKEPTSECRET" -n openshift-config
oc create configmap ca-config-map --from-file=ca.crt=./ocp_ca.pem -n openshift-config
EOF
Add OIDC using keycloak.local.mylab.io as an identity provider
cat > ./11_configure_keycloak_oidc_oauth.yaml << EOF
# If you only have kubeadmin, then simply `oc apply -f 11_configure_keycloak_oidc_oauth.yaml`
# If you have other auth providers, then `oc edit oauth cluster` and add from `- name: oidckeycloak`
# till the end as suitable within the existing yaml.
apiVersion: config.openshift.io/v1
kind: OAuth
metadata:
  name: cluster
spec:
  identityProviders:
  - name: oidckeycloak
    mappingMethod: add
    type: OpenID
    issuer: https://keycloak.local.mylab.io/realms/mylab
    openID:
      clientID: "openshift"
      clientSecret:
        name: idp-secret
      ca:
        name: ca-config-map
      extraScopes:
      - email
      - profile
      extraAuthorizeParameters:
        include_granted_scopes: "true"
      claims:
        preferredUsername:
        - preferred_username
        - email
        name:
        - nickname
        - given_name
        - name
        email:
        - custom_email_claim
        - email
        groups:
        - groups
EOF

bash  ./10_create_keycloak_oidc_secrets.sh

oc apply -f ./11_configure_keycloak_oidc_oauth.yaml
Eventually you will see a screen similar to Figure 2 (in my case, I have an extra htpasswd provider).

HAProxy setup and configuration
Install and enable HAProxy
# dnf install -y haproxy
# systemctl enable --now haproxy
HAProxy configuration
The HAProxy configuration used for this proof of concept:
$ cat /etc/haproxy/haproxy.cfg
global
    log         127.0.0.1 local2 debug
    ssl-default-bind-options ssl-min-ver TLSv1.2
    chroot      /var/lib/haproxy
    pidfile     /var/run/haproxy.pid
    maxconn     4000
    user        haproxy
    group       haproxy
    daemon
    ca-base     /etc/ssl/certs
    crt-base  /etc/ssl/private
    # turn on stats unix socket
    stats socket /var/lib/haproxy/stats
    tune.maxrewrite  16384
    tune.bufsize     32768

defaults
    mode                    http # http mode is used throughout with re-encrypt
    log                     global
    option                  httplog
    option                  dontlognull
    option                  redispatch
    retries                 3
    timeout http-request    20s
    timeout queue           1m
    timeout connect         10s
    timeout client          1m
    timeout server          1m
    timeout http-keep-alive 10s
    timeout check           10s
    maxconn                 3000
    hash-type consistent
    balance source

listen haproxy-stats # Only if you wish to access stats
    bind :8080
    mode http
    option forwardfor
    option httpclose
    stats enable
    stats show-legends
    stats refresh 10s
    stats uri /stats
    stats realm Haproxy\ Statistics
    stats auth admin:MYSPECIALPASSWORD
    stats admin if TRUE

frontend keycloakfrontend
    mode http
    bind *:80
    bind *:443 name keycloak.local.mylab.io:443 ssl crt /etc/ssl/certs/keycloak-bundle.pem
    http-request redirect scheme https unless { ssl_fc }
    use_backend keycloakbackend if { path /realms/mylab } || { path_beg /realms/mylab } # This protects the backends Administrative uris (/admin/master or /realm/master)

backend keycloakbackend
    mode http
    balance first
    option httpchk GET /health # This uri will show “status”: “UP” as part of its outout
    http-check expect string UP
    option redispatch
    option httplog
    option log-health-checks
    default-server ssl check verify none on-marked-down shutdown-sessions on-marked-up shutdown-backup-sessions # This is important, to shutdown all sessions when transitioning from one backend to the other
    server sno1 keycloak-rhbk.apps.sno1.local.mylab.io:443 sni str('keycloak-rhbk.apps.sno1.local.mylab.io') check-sni 'keycloak-rhbk.apps.sno1.local.mylab.io' verifyhost 'keycloak-rhbk.apps.sno1.local.mylab.io' ca-file /etc/ssl/certs/ocp_ca.pem
    server sno2 keycloak-rhbk.apps.sno2.local.mylab.io:443 sni str('keycloak-rhbk.apps.sno2.local.mylab.io') check-sni 'keycloak-rhbk.apps.sno2.local.mylab.io' verifyhost 'keycloak-rhbk.apps.sno2.local.mylab.io' ca-file /etc/ssl/certs/ocp_ca.pem backup # This will be designated as backup
DNS (named) configuration
The DNS settings used for this proof of concept is:
$ cat /var/named/local.mylab.io.db |egrep 'sno1|sno2|keycloak'
sno1         IN A       192.168.1.231
*.apps.sno1       CNAME      sno1
api.sno1       CNAME      sno1
api-int.sno1       CNAME      sno1
sno2         IN A       192.168.1.232
*.apps.sno2       CNAME      sno2
api.sno2       CNAME      sno2
api-int.sno2       CNAME      sno2
; keycloak reverse proxy
keycloak IN A  192.168.1.215

$ cat /var/named/192.168.1.db |egrep 'sno1|sno2|keycloak'
231      IN  PTR     sno1.local.mylab.io.
232      IN  PTR     sno2.local.mylab.io.
215      IN  PTR     keycloak.local.mylab.io.
Conclusion
Creating a Keycloak solution that is resilient to instance failures is possible by ensuring all Keycloak instances use the exact same configuration (realm, user federation source, client configuration) and are running behind a load balancer (HAProxy, in this instance).
To ensure session information is consistent between systems, ensuring only one Keycloak instance is used at all times is a must. This can be achieved by using the first available Keycloak instance for all systems, and when the first instance fails, terminate all sessions, and point to the backup Keycloak instance (or next in list of backend servers). Should the failed instance be restored, terminate all sessions to backup, and point back to the original Keycloak instance.
Even though this solution hasn't been tested in an operational environment for reliability and functionality, initial tests (by failing the first instance) demonstrate that users are able to continue using this setup by re-authenticating to the backup instance should the first instance fail. Although future versions of Keycloak may provide a highly available configuration that shares session information and a database, depending on an organization's needs, it may be sufficient to rely on the solution demonstrated in this article.
Last updated: September 13, 2024