

Apache Kafka is a publish-subscribe messaging system that is commonly used to build loosely coupled applications. These types of applications are often referred to as reactive applications.
Our team maintains a reactive example that shows the use of Kafka in a simple application. If you've looked at these types of applications, you know that although the components are decoupled, they need access to a shared Kafka instance. Access to this shared instance must be protected. This means that each component needs a set of security credentials that it can use to connect to the Kafka instance.
As a Node.js developer, how can you safely share and use those credentials without a lot of work? Read on to find out.
Note: You can learn more about using Node.js in reactive applications in the article Building reactive systems with Node.js.
Connect to a Kafka instance
The information you need to connect to a Kafka instance generally includes the following:
- One or more URLs for the Kafka cluster.
- Information about the connection/authentication mechanism.
- A user ID.
- A user secret.
You definitely need to be careful about who has access to the last two, and ideally, you don’t want the first one to be public. The result is that you need to provide something like the following to connect to the Kafka instance:
KAFKA_BOOTSTRAP_SERVER=michael--wmc-utegzxlxds-fhyltiy-j-j.bf2.kafka.cloud.com:443
KAFKA_CLIENT_ID=srvc-acct-123456789-1234-1234-1234-24bda5a97b89
KAFKA_CLIENT_SECRET=abcdef12-1234-1234-1234-da90b53e893e
KAFKA_SASL_MECHANISM=plain
Additionally, you should not expose the connection information beyond the application itself.
The other thing to note is that there are a number of different Kafka clients for Node.js, and the way you pass this information for each client is different. If you need help choosing which client to use, check out the Kafka section in the Node.js reference architecture.
As a simple example, to pass the information when using the KafkaJS client, you could use code like this:
  kafkaConnectionBindings = {
    brokers: [process.env.KAFKA_BOOTSTRAP_SERVER ]
  };

  if (process.env.KAFKA_SASL_MECHANISM === 'plain') {
    kafkaConnectionBindings.sasl = {
      mechanism: process.env.KAFKA_SASL_MECHANISM,
      username: process.env.KAFKA_CLIENT_ID,
      password: process.env.KAFKA_CLIENT_SECRET
    };
    kafkaConnectionBindings.ssl = true;
  }
  const kfk = new Kafka(kafkaConnectionBindings);
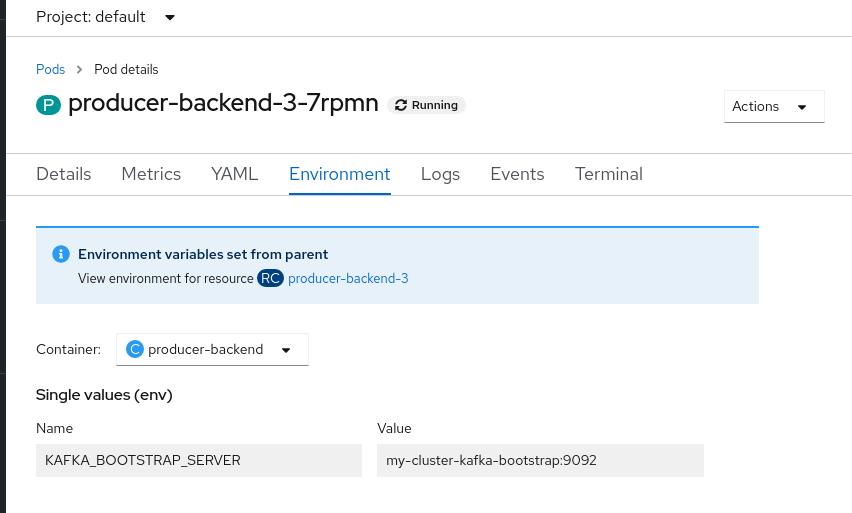
Using environment variables is the easiest way to configure a connection, but it is not necessarily secure. If you set the environment variables from the command line, then anybody with access to the environment will be able to access them. Tools and frameworks will also often make it easy to access environment variables for debugging purposes. For example, in Red Hat OpenShift, you can view the environment variables from the console, as shown in Figure 1.
In production environments, make sure that even if you trust those with access to the environments, only those who have a "need to know" have access to information like credentials.
Passing the credentials securely
Now that you understand what information you need to pass, how do you safely get the credentials to the running application?
Instead of setting the credentials in the environment directly, a safer way is to use a package like dotenv to get the credentials from a file and provide them to the Node.js application environment. The benefit of using dotenv is that the credentials will not show up in the environment outside of the Node.js process.
While this approach is better, the credentials still might be exposed if you dump the Node.js environment for debugging through a Node.js diagnostic report. You are also left with the question of how to get the dotenv file securely to the application. If you are deploying to Kubernetes, you can map a file into deployed containers, but that will take some planning and coordination for developments.
By this point, you are probably thinking that this seems like a lot of work and are wondering whether you'd need to resolve this for each type of service and set of credentials that are needed by an application. The good news is that for Kubernetes environments, this problem has already been solved.
Service binding in Kubernetes
Service binding is a standard approach to map a set of files into containers in order to provide credentials in a safe and scalable way. You can read more about the Service Binding specification for Kubernetes on GitHub.
The specification does not define what files are mapped in for a given service type. But in OpenShift, for example, binding to a Red Hat OpenShift Streams for Apache Kafka instance results in the following files being mapped into the application container:
$SERVICE_BINDING_ROOT/<kafka-instance-name>
├── bootstrapServers
├── password
├── provider
├── saslMechanism
├── securityProtocol
├── type
└── user
In this case, SERVICE_BINDING_ROOT is passed to the application through the environment.
Consume service bindings easily with kube-service-bindings
Now that you have the credentials available to the application running in the container, the remaining work is to read the credentials from those files and then provide them to the Kafka client used within your Node.js application. Hmm—that still sounds like a lot of work, and it's also tied to the client you are using.
More good news! We’ve put together the npm package kube-service-bindings, which makes it easy for Node.js applications to consume these secrets without requiring developers to be familiar with service bindings.
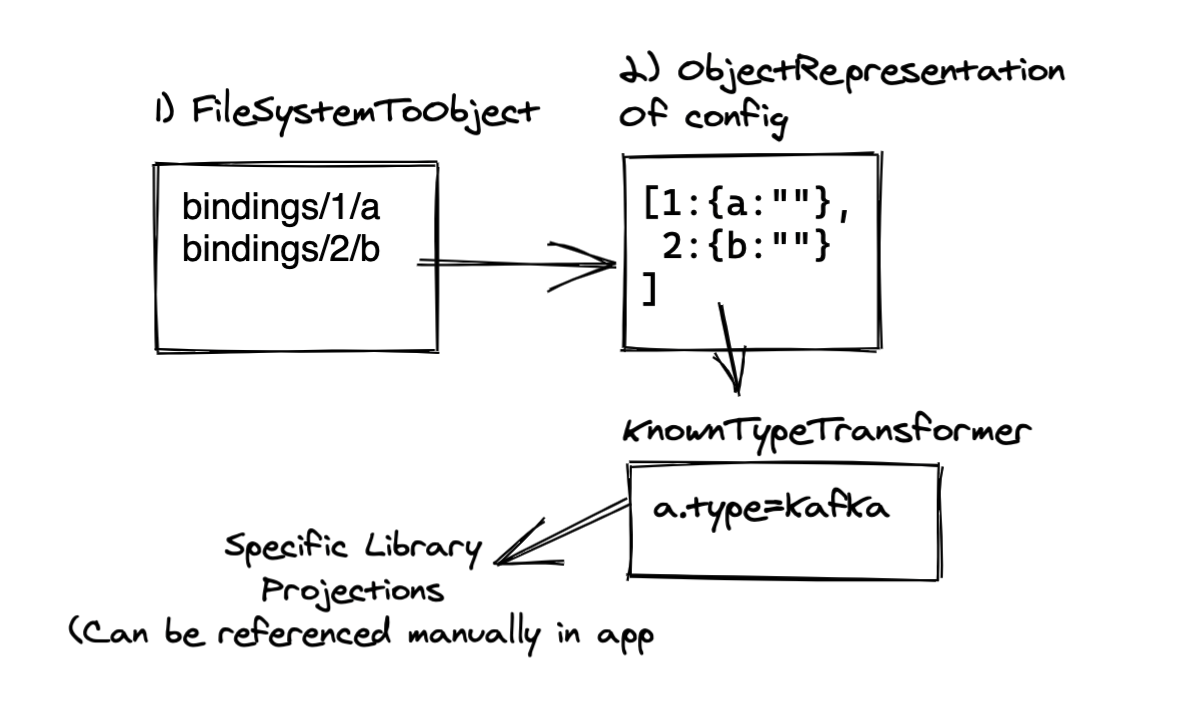
The package provides the getBinding() method, which does roughly the following:
- Looks for the
$SERVICE_BINDING_ROOTvariable in order to determine if bindings are available. - Reads the info from the files.
- Maps the names of the files to the option names needed by the Node.js clients that will connect to the service.
Figure 2 is a nice picture of that flow.
All the developer needs to do is call the getBinding() method, tell it which client it is using, and then pass the returned object to their Kafka client. Minus error checking, the code is as simple as this:
const serviceBindings = require('kube-service-bindings');
try {
kafkaConnectionBindings =
serviceBindings.getBinding('KAFKA', 'kafkajs');
} catch (err) { // proper error handling here
};
const kfk = new Kafka(kafkaConnectionBindings);
The first parameter is KAFKA because we are talking about connecting to a Kafka service. But in the future, kube-service-bindings should help bind to other types of services as well.
The reactive-example is coded so that it can get the credentials from the environment, a dotenv file, or automatically when the credentials are available through service bindings. There are two branches in the repository: kafkajs and node-rdkafka. These branches let you see what the code looks like for your preferred client and how kube-service-bindings gives you the credentials in the format needed by that client.
Set up service bindings in OpenShift
So far, you've seen that with kube-service-bindings, it's easy for Node.js developers to use credentials available through service bindings.
The second part is to set up the service bindings themselves. The article Connect Node.js applications to Red Hat OpenShift Streams for Apache Kafka with Service Binding takes you through the steps of setting up service bindings to connect a Node.js application with an instance of Red Hat OpenShift Streams for Apache Kafka. As you might expect in a Kubernetes environment, you first install some Operators. Then, you apply some YAML to tell one of these Operators to bind the OpenShift Streams for Apache Kafka instance to your application.
What's even better is that with the release of OpenShift 4.8, you can use the OpenShift UI to do this binding! This gets us to the point where the administrator/operators of the cluster can easily set up the Kafka instance for an organization. Developers can then connect their applications without needing to know the credentials. The UI can be used for ease of use during initial development, and then YAML can be used for more automated/production deployments.
To see for yourself just how easy this is, follow these steps to connect an application to a configured Kafka instance:
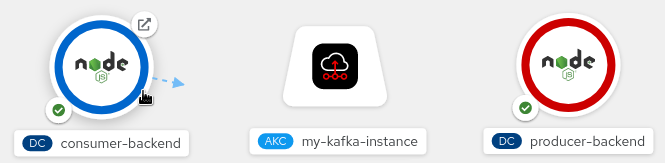
- Hover the mouse pointer over the icon for the application (consumer-backend, which is one of the components in the reactive-example), as shown in Figure 3.

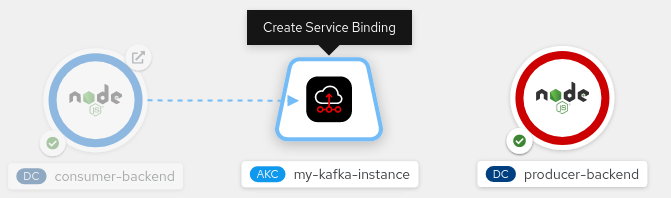
Figure 3. The consumer-backend application icon in the OpenShift UI. - Left-click and drag the head of the arrow until it's directly over the icon for the
KafkaConnectionobject (Figure 4).
Figure 4. The KafkaConnection object in the OpenShift UI. - Release the left mouse button to create the service binding.
That’s it! If your code uses kube-service-bindings, it will automatically find the credentials through the binding and connect to the server for your Kafka instance.
Node.js and Apache Kafka: Further resources
In this article, we introduced the credentials needed to connect to a Kafka server and showed you how they can be safely provided to your Node.js applications. If you want to dive deeper, try the following:
- Install and experiment with the reactive-example to explore the code and
kube-service-bindings. (If you are really adventurous, you could create your own files and setSERVICE_BINDING_ROOTto point to them.) - Work through setting up service bindings for a Kafka instance in Connect Node.js applications to Red Hat OpenShift Streams for Apache Kafka with Service Binding.
- Work through the quick start of manually connecting Node.js to Kafka published on the Red Hat customer portal.
- Work through the tutorial for automatically binding Node.js to Kafka published on the Red Hat customer portal.
- If you have installed the RHOAS operator, work through the quick start for automatically binding Node.js.
To stay up to date with what Red Hat is up to on the Node.js front, check out our Node.js landing page.
Last updated: December 27, 2023