
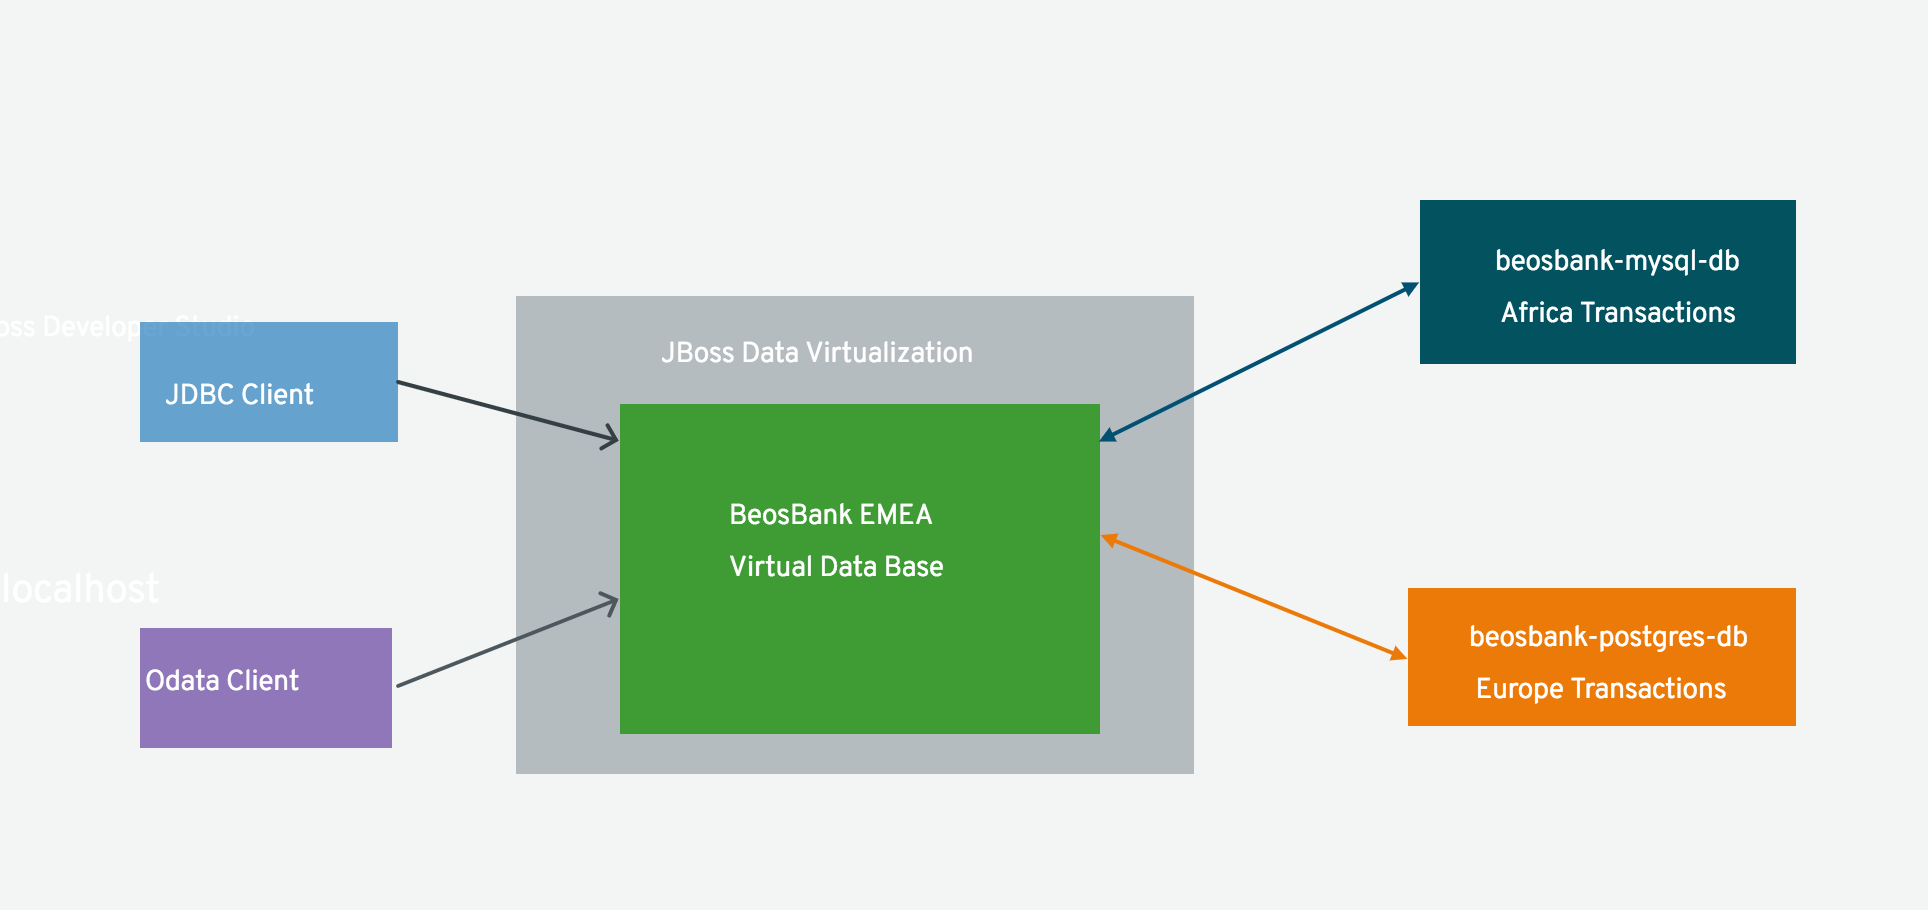
In the following blog post, we will learn how to create and access federated views from a various data source using JBoss Data Virtualization.
This lab is from the JBoss Developer Guidebook/ch5 Exposing Data as service book (40% with discount code JBDG40 offered from October 1-31).
Use Case Description
Let's consider a Money transfer institution operating in EMEA region. For business purposes, the institution has two relational databases:
- one MySQL DB holding transactions for African Market
- a Postgres DB holding transactions sent from Europe
The two databases are shipped as images on Docker Hub. In the following section, we will create an EMEA federated live view containing customer's data from the two databases.
Sources: https://github.com/nelvadas/rhte2017
Setup Data Sources
Run docker container to start local databases.
docker run -d -p 6406:3306 jbossdevguidebook/beosbank_mysql_db_africa

docker run -d -p 6432:5432 jbossdevguidebook/beosbank_posgres_db_europa
After starting docker containers, you should be able to check:
$ docker ps

CONTAINER ID    IMAGE                                          COMMAND                  CREATED             STATUS              PORTS                    NAMES

26e67af717fa    jbossdevguidebook/beosbank_posgres_db_europa   "docker-entrypoint..."   4 seconds ago       Up 3 seconds       0.0.0.0:6432->5432/tcp   trusting_turing

dac6332bc813    jbossdevguidebook/beosbank-mysql-db-africa     "docker-entrypoint..."   46 seconds ago      Up 46 seconds      0.0.0.0:6406->3306/tcp   cranky_thompson
Use dedicated clients to check the DB Content. (optional step).
           $ mysql -h 127.0.0.1 -P 6406 -D beosbank-africa -u root --password=Africa01#

           $ psql -h 127.0.0.1 -p 6432 -d beosbank-europa -U root

When prompted to give the db password for the beosbank-europa db enter Europa01#.
Create a Teiid Model project
To start building Federated view, we need a Teiid Model project, the final project associated with this lab is hosted on GitHub. https://github.com/nelvadas/rhte2017
Use the File>New > Teiid Model Project Menu from JBoss Developer Studio to create a new project in the workspace.

Enter the project name beosbank-rhte or a custom name of your choice.
Click on next button twice, do not select any reference project when asked.
At the end, create the following folder structure.
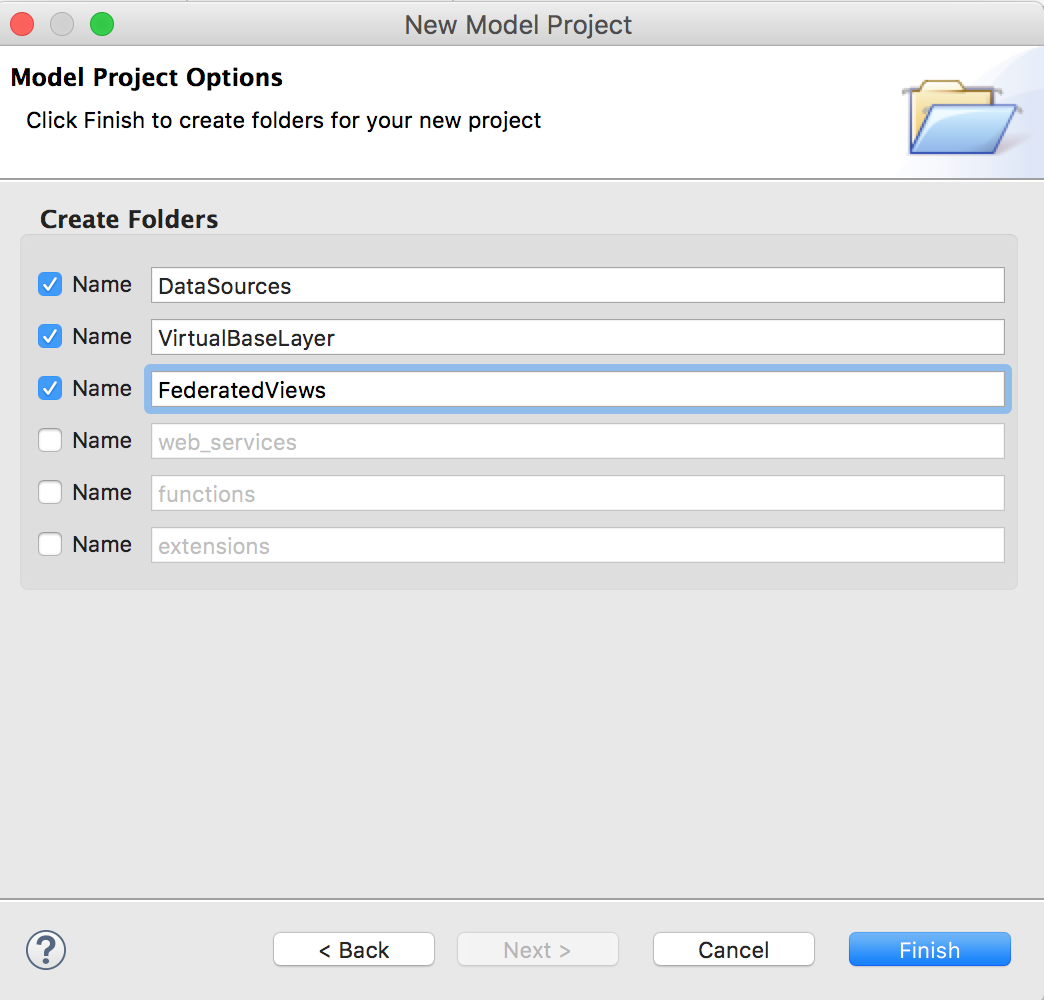
- DataSources: This folder will contain the data source physical model.
- VirtualBaseLayer: Virtual layers created from the source model.
- FederatedViews: Federated views to be exposed in the Virtual Database.
You can also create a new Teiid Model project from the Teiid Designer Perspective using the first action in the Guides view.
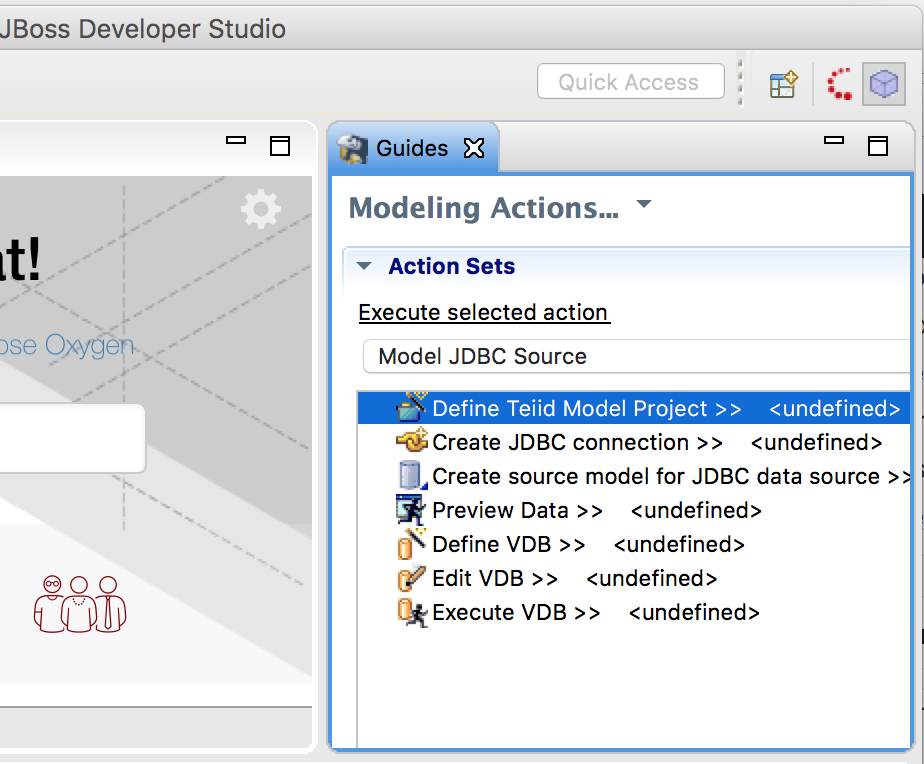
Once the project is created, we need to reference existing data source and connect them and create various views.
There are four major steps to complete the goal of exposing a live view to end users with JBoss Data Virtualization.
- Create source models for the existing legacy databases.
- Create Virtual Base Layers models to isolate physical model from higher level views.
- Interconnect, Transform and map VBL Models to build business views (Federated views).
- Expose the Federated views as a Virtual Database.
- Consume VDB content.
Create source Model for Docker Databases
Source model establishes a link with the physical database we want to work with. Follow the following steps to create a source model for the MySQL database containing transactions for African segment.
- Click on Create source model for JDBC data source in the guide panel of your Teiid Designer perspective.
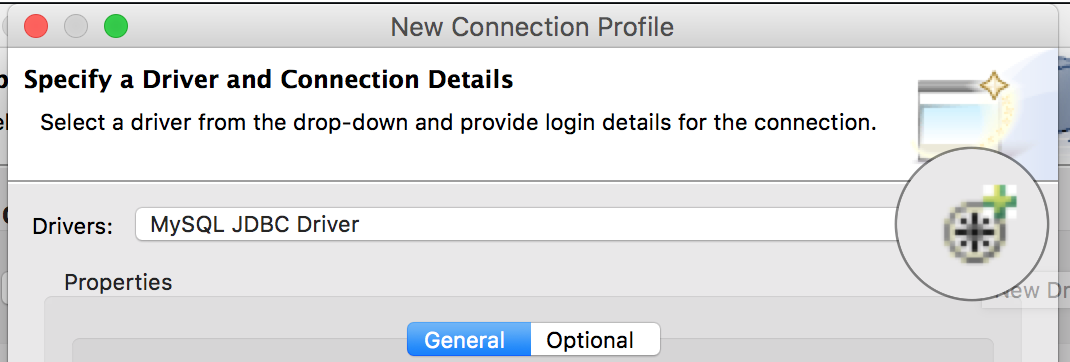
- Create a new MySQL Connection profile, enter a name for this profile and click on next button.
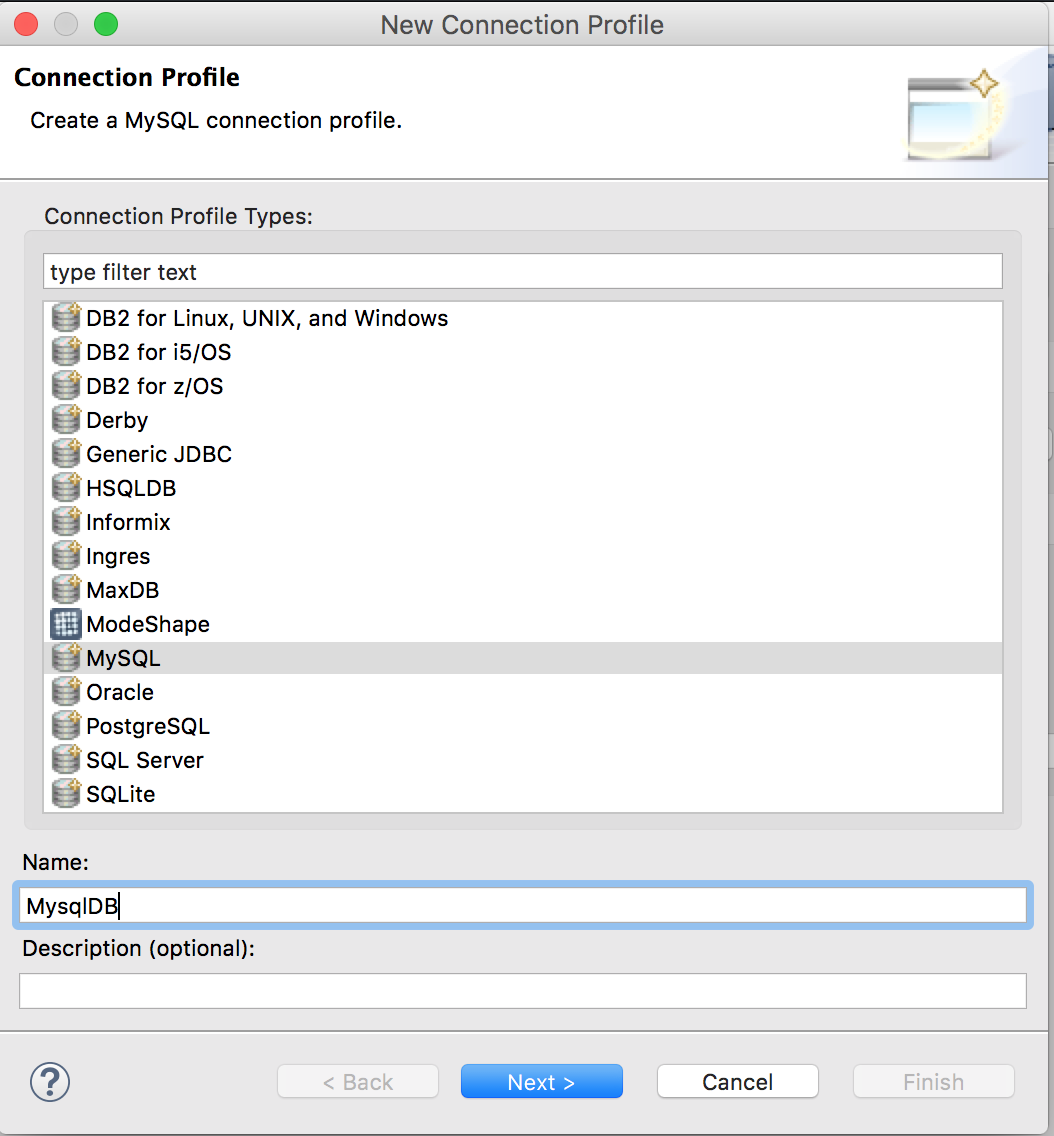
- Add a driver, JAR Driver.
Click on the rounded cross button to add a Driver JAR. a new dialog with three tabs is open to let you select the appropriate JAR file; first, select the Name/Type tab and select MySQL 5.1 item as shown in the below screenshot.
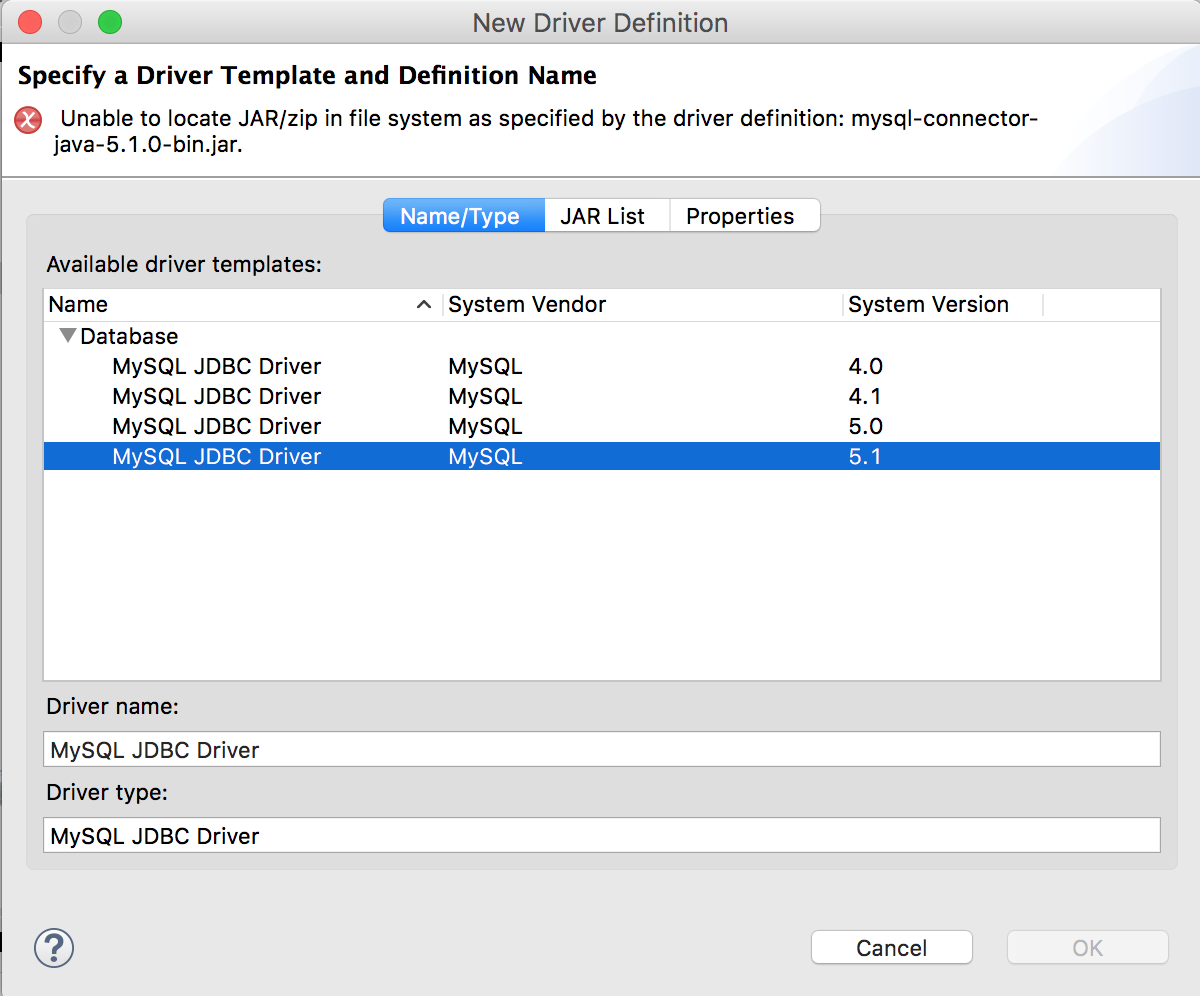
An error is displayed on top of your dialog box saying t-the specified mysql-connector-java Jar is not available on your system.
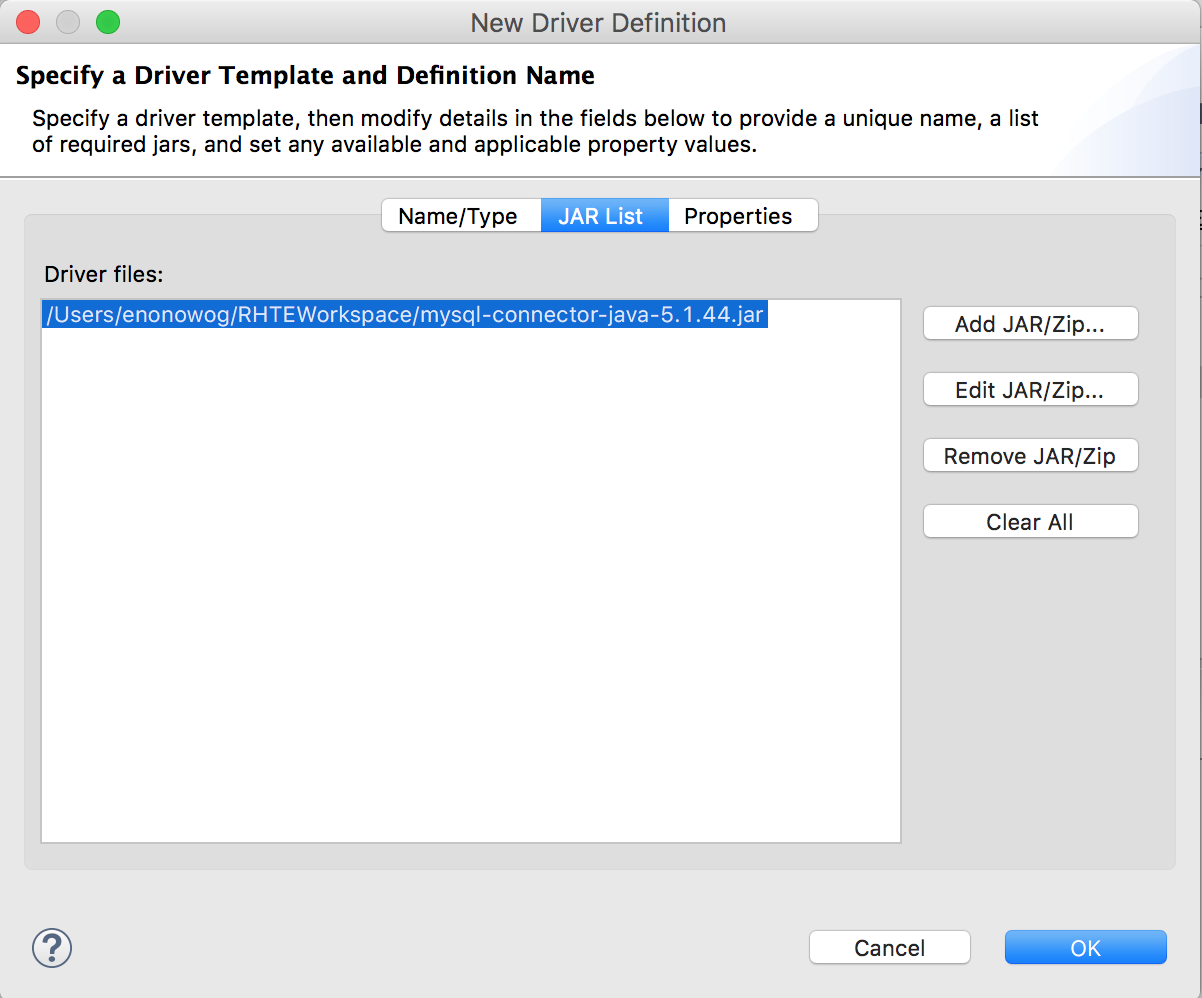
Download mysql-connector-java v 5.1.44 from Maven repository and upload it on the JAR List tab.
Remove other jars present if any, after uploading the driver jar, click on OK to close the dialog box.
Fill the database properties and check the connectivity.
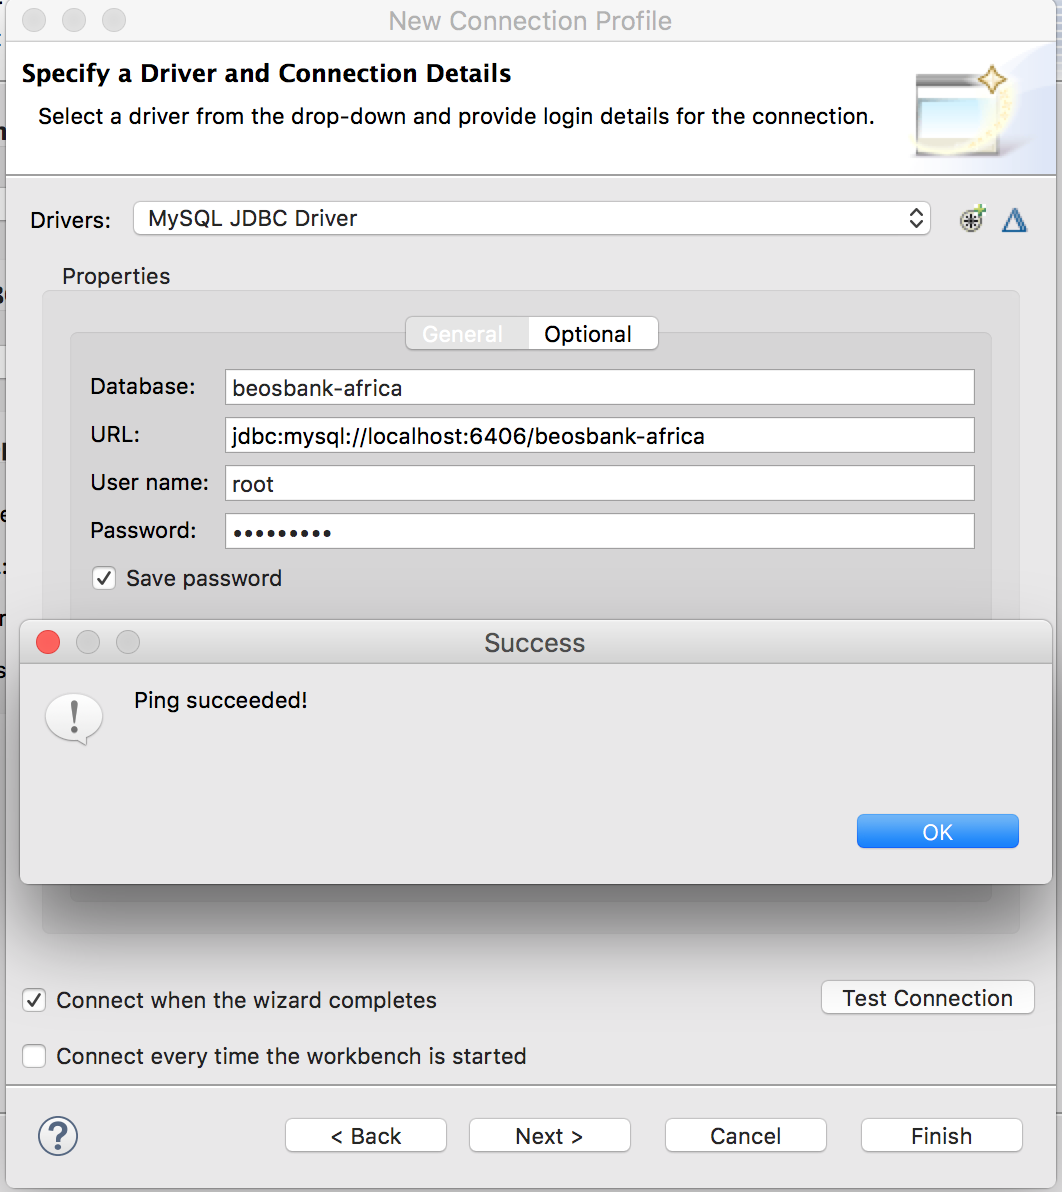
The following details should be entered according to the port mapping done while starting the docker container.
Database: beosbank-africa
URL: jdbc:mysql://localhost:6406/beosbank-africa
User: root
Password: Africa01#
Then Select database metadata to import and pick only the beobank database.
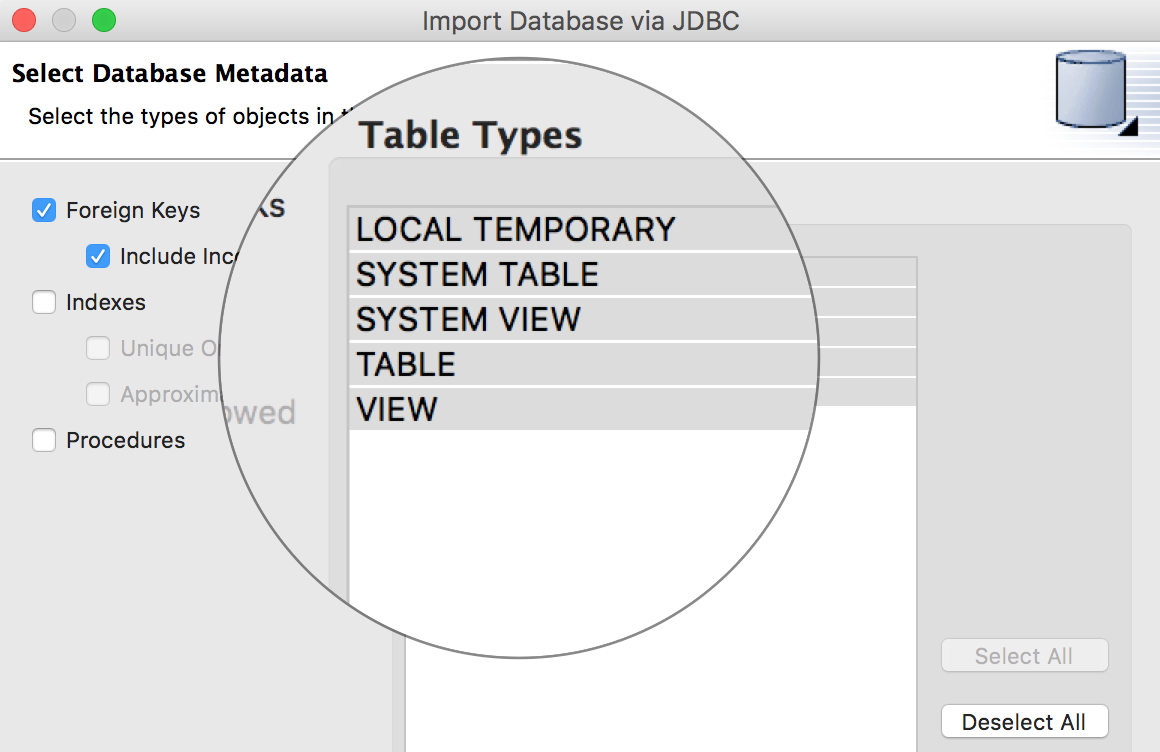

Make sure all tables from this database are selected.
Click on the next button to finish.
Save the imported model as AF_Transactions.xmi in the Datasources Folder.
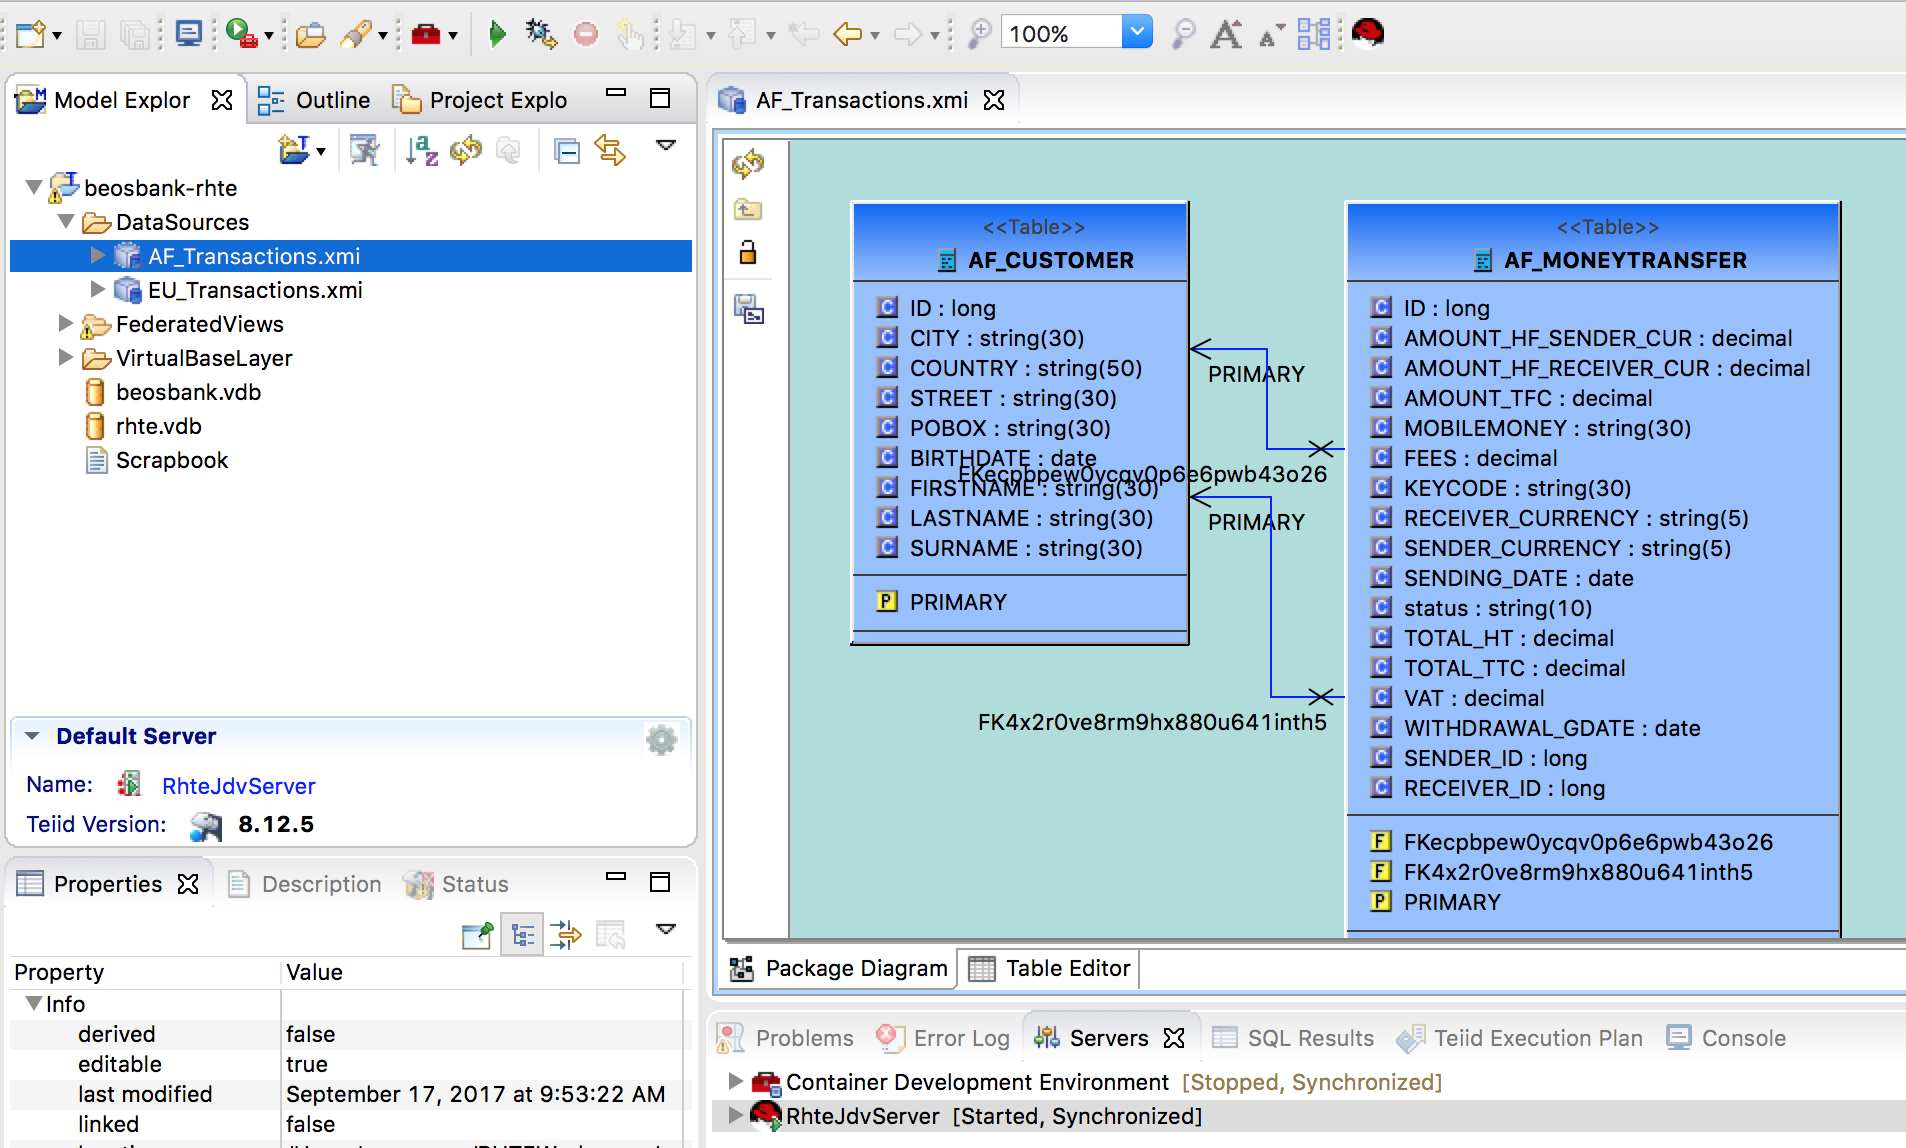
The model is created and its table structure is displayed in the main view.
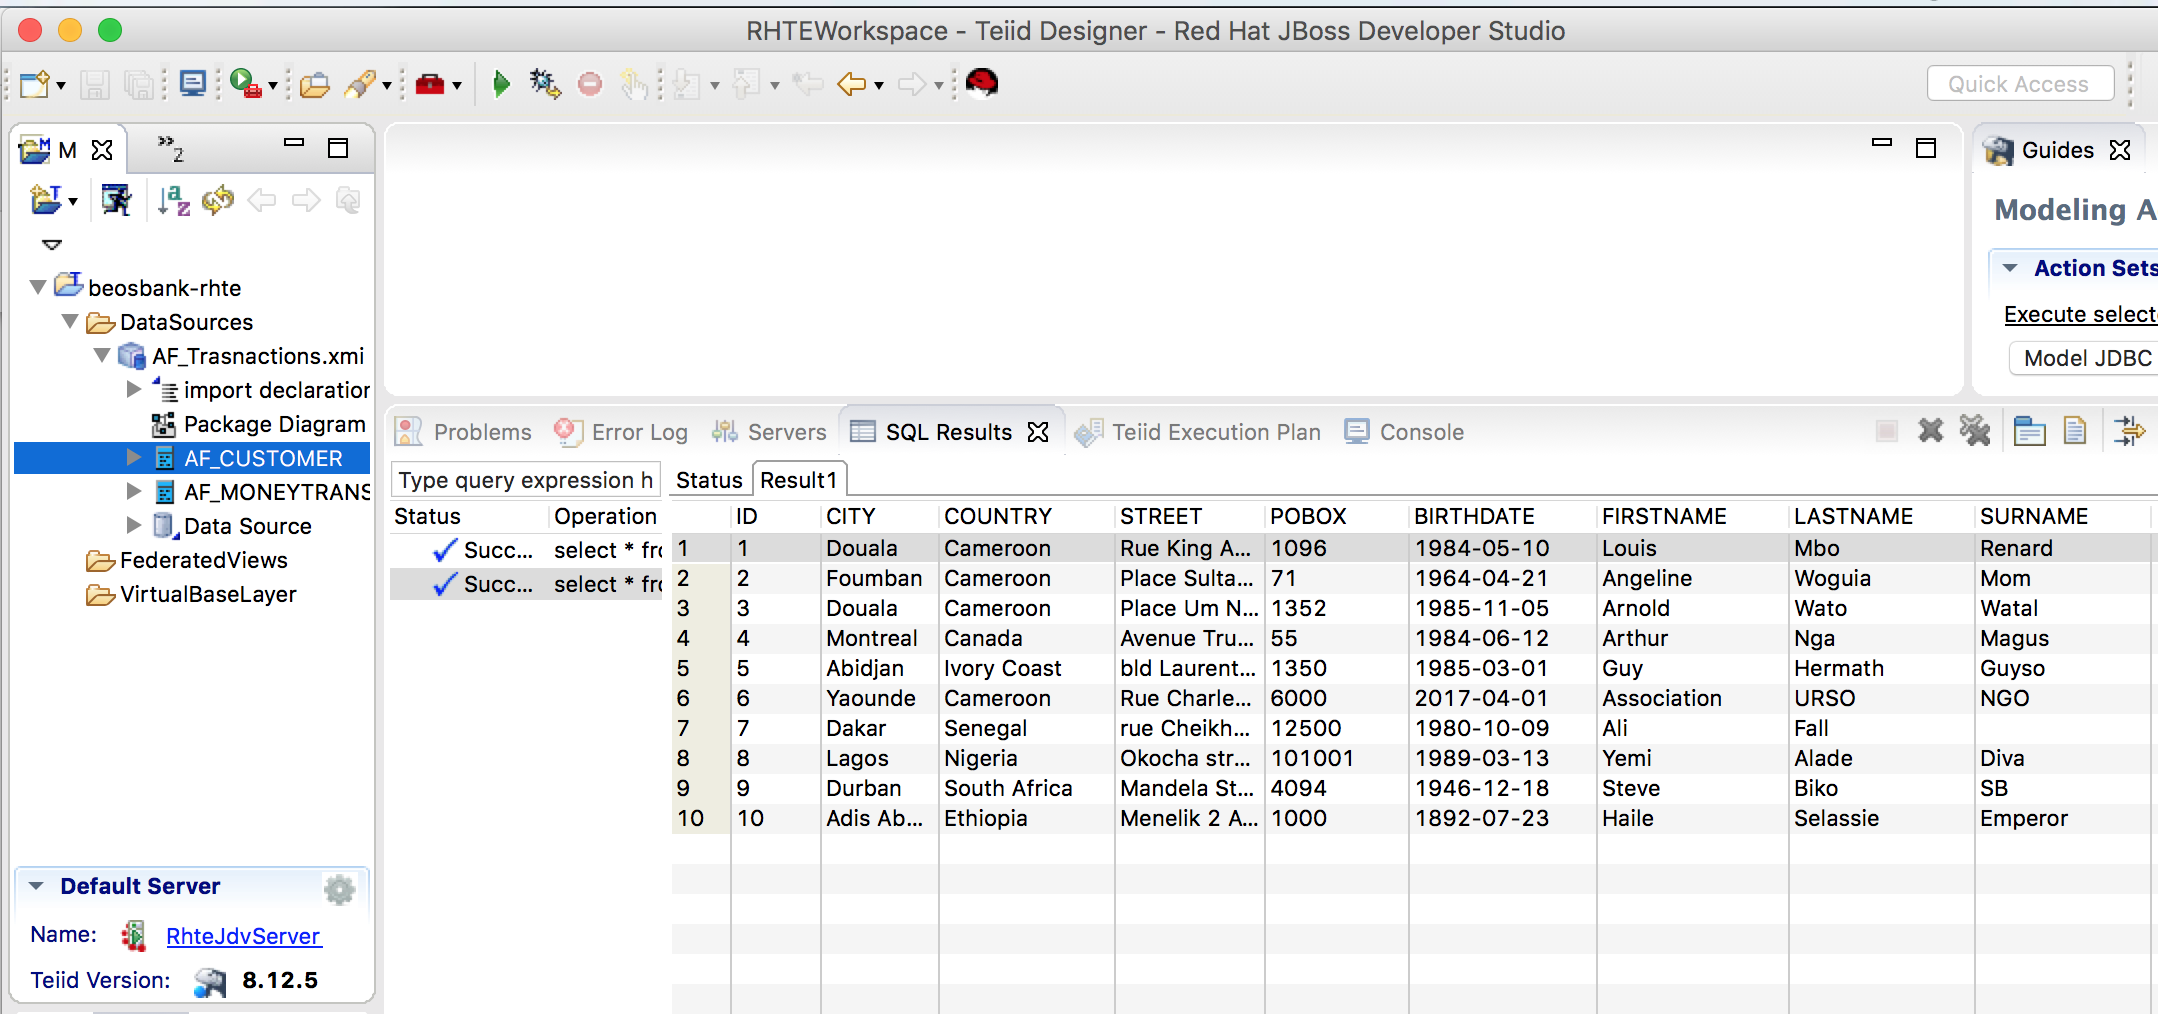
You can preview the AF_CUSTOMER table content by right-clicking on it > Modeling > Preview Data. (you need the JDV server to be up and running)
At this stage, we have one Database referenced: The MySQL Database. What about the postgres db?
The process to reference the Europa Database is very similar to what has been done with the beosbank-mysql-africa database:
Create a connection profile for Postgres with the Driver dependency postgresql-42.1.4.jar.
Fill the driver connection properties:
- Database= beosbank-europa
- URL=jdbc:postgresql://localhost:6432/beosbank-europa
- Username=root
- Password=Europa01#
Select the Public tables: eu_customer and eu_moneytransfer.
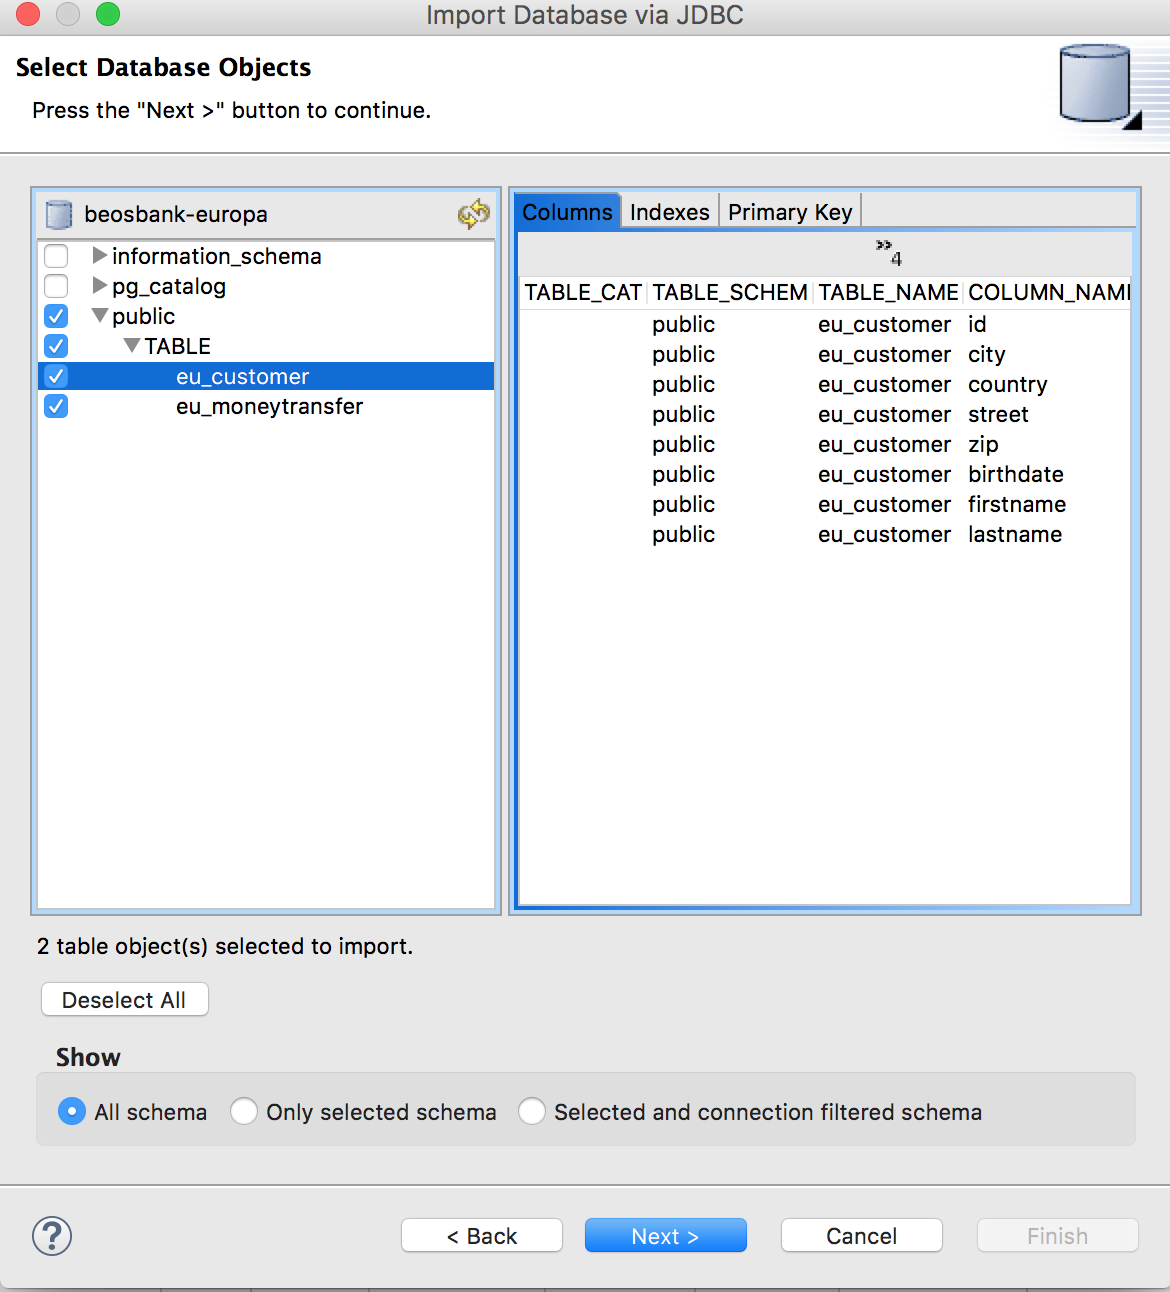
Associate these two tables to a source model with the following configuration:
- Model name: EU_Transactions.xmi
- Destination Folder: beosbank-datavirt/DataSources
- Uncheck the included catalog for fully qualified Names box.
- JNDI Name: beosbank_POSGRES_DS
You should now be able to preview Posgres Data using the Modeling>Preview Data Menu Action on the eu_customers table.
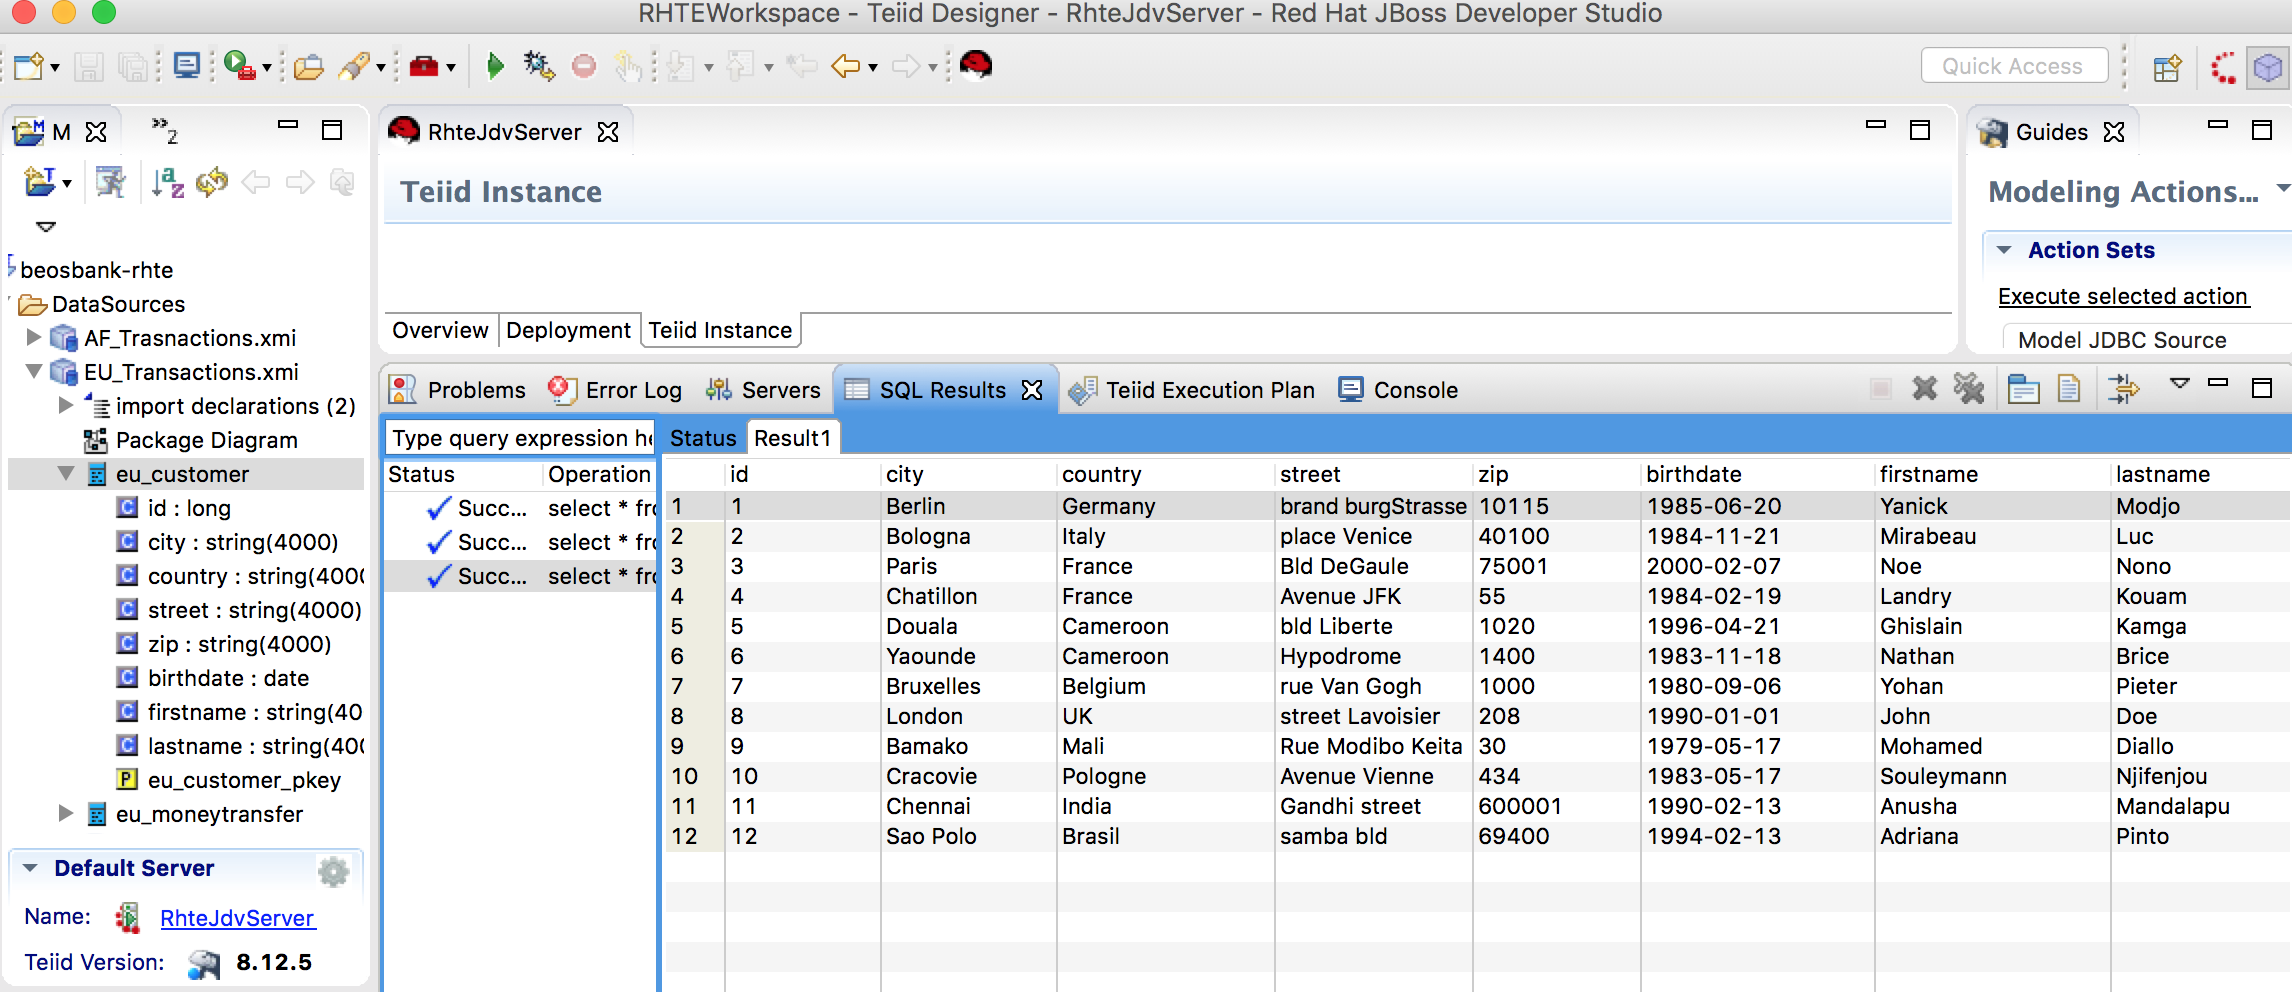
Remember customer table store both senders and receivers details.
Create Virtual Base Layer (VBL) from Source Model
The virtual base model sits between the source model and high-level views; the main purpose is to isolate high-level views or layers from modifications that can happen on physical /source models.
Virtual models can be created from scratch or by transforming or copying existing models.
In the following section, we will create two VBL Models, AF_Transactions_VBL.xmi and EU_Transactions_VBL.xmi in the VirtualBaseLayer project's folder.
The databases have two tables: AF_Customer and AF_MoneyTransfer, AF_Customer hold data on senders and receivers while AF_MoneyTransfer hold details on money transaction. in the VBL layer, we will add a singe MoneyTransfer (note there is no prefix -:)!!!) table that will be populated with data from both AF_MoneyTransfer and AF_Customer.
Steps to create the AF_Transations_VBL.xmi are described below.
To make it simple we will not duplicate AF_Transactions source Model; this introduces a supplemental mapping operation to map source model table to VBL model table. We will create a VBL model from scratch and rely on AF_Transactions model tables to fill them.
1- Create a Relational View Model
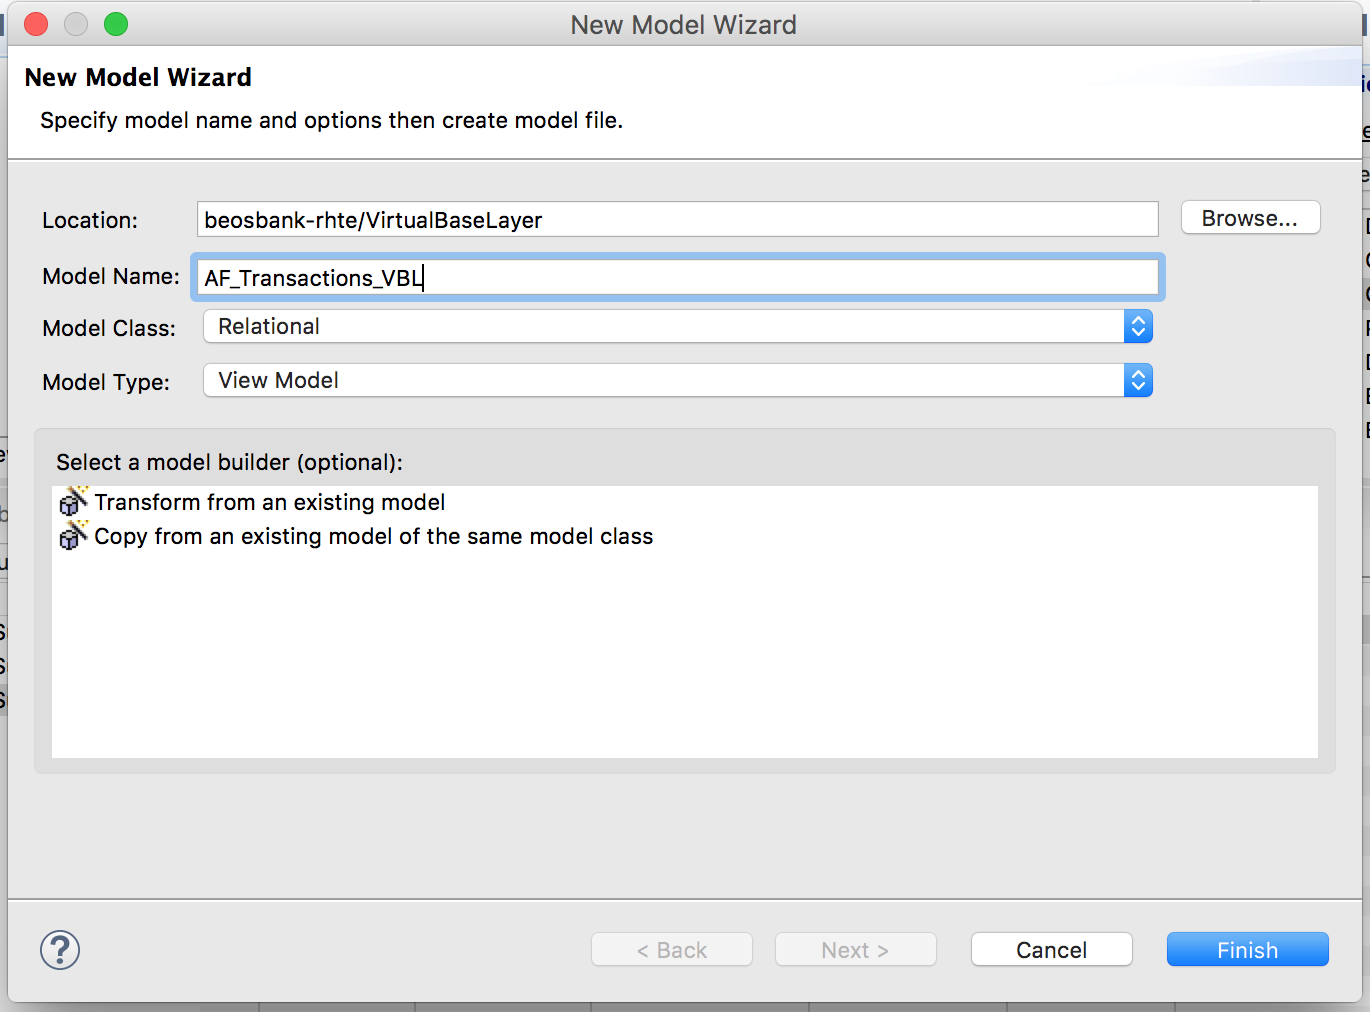
Click on the finish button.
2- Add a table to the VBL
In this section, we will create a single MoneyTransfer Table to collect in a single row all the data related to a money transfer operation including the code, the sender_name, receiver_name, sender country, receiver country and financial details.
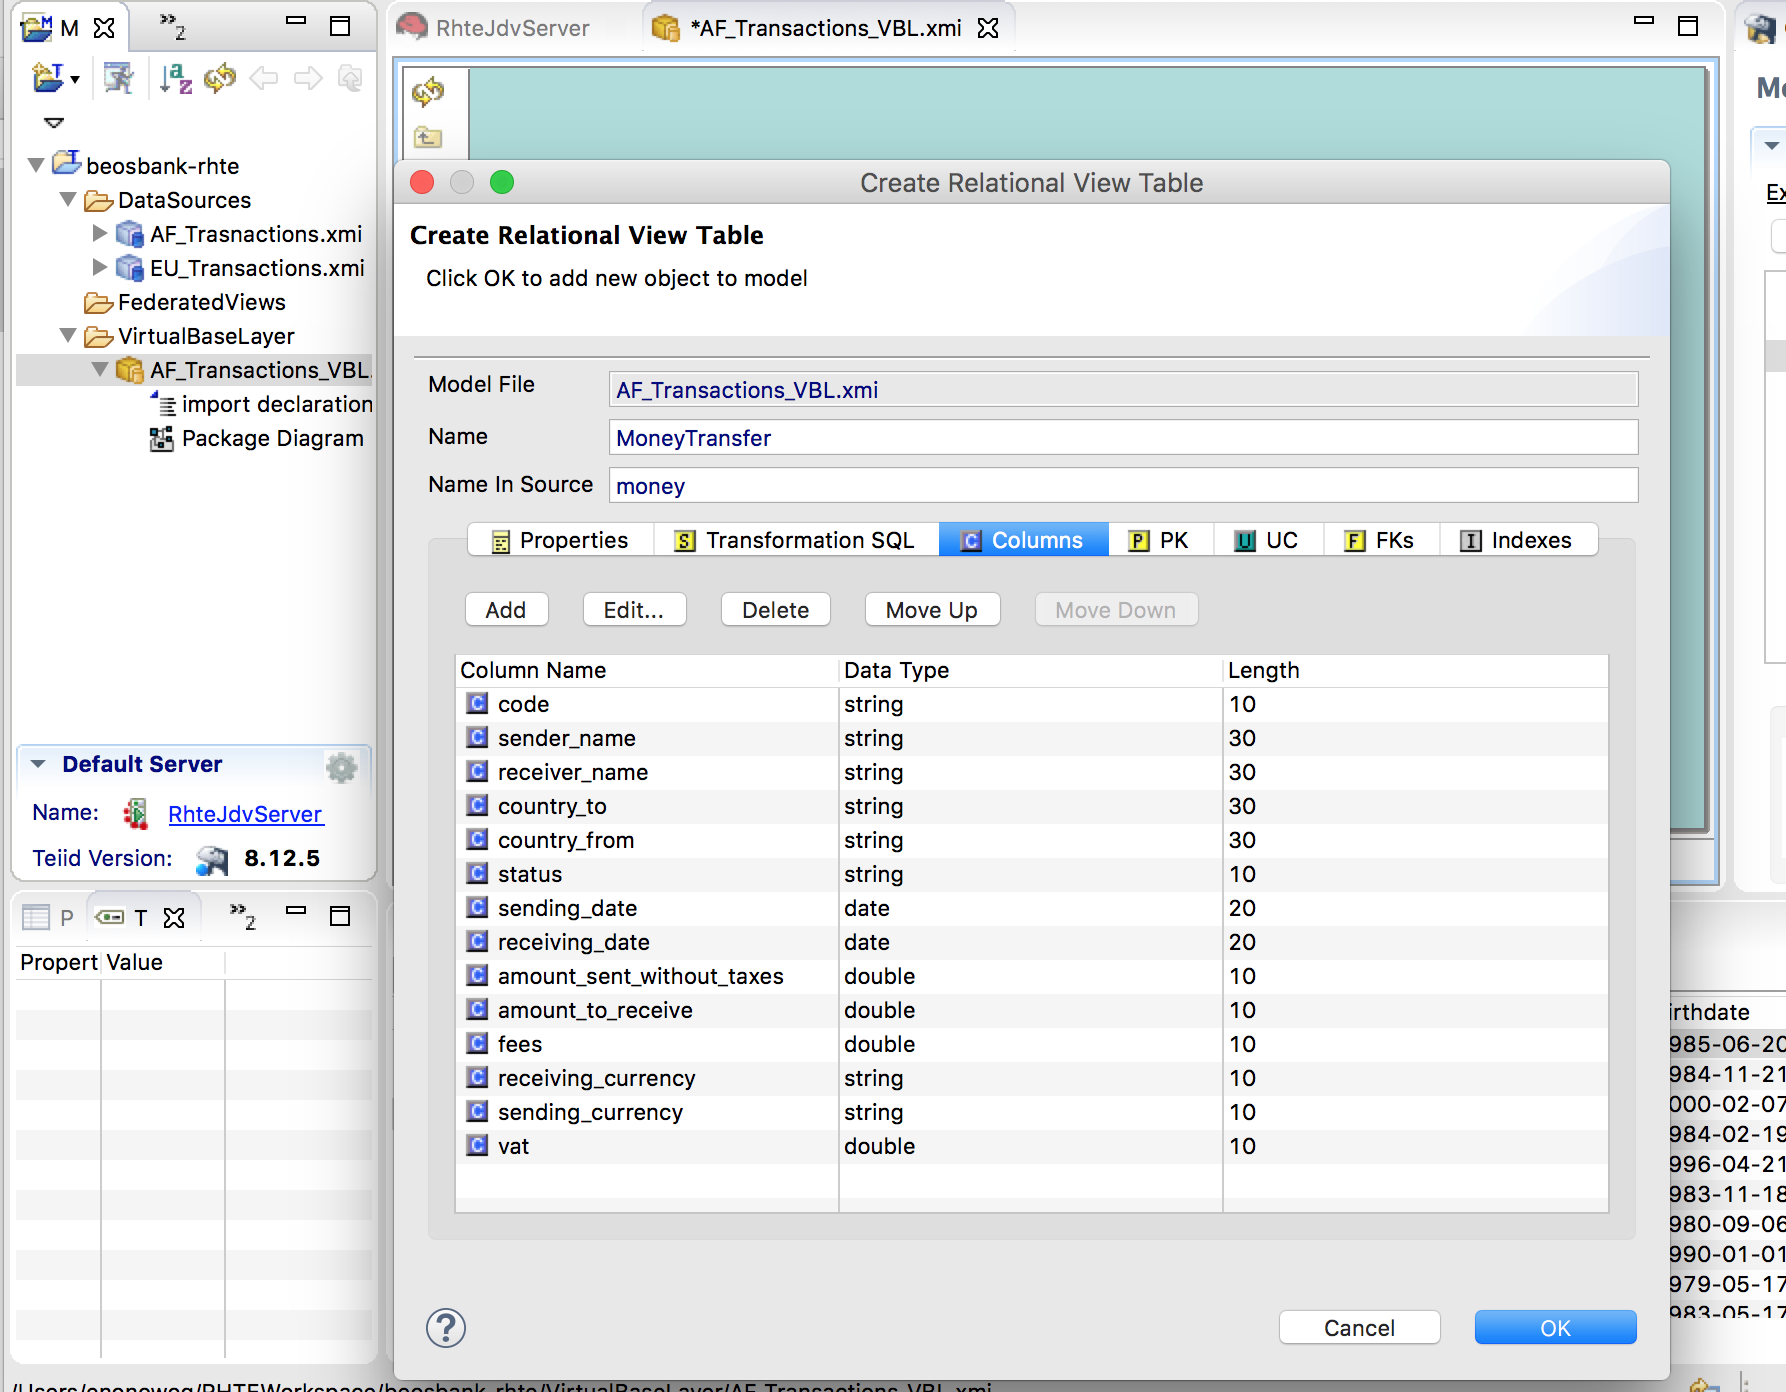
Once table attributes are created, we will update model source's view to automatically produce a money transfer row from input tables. (Use bigdecimal instead of double for amounts fields)
Follow the following steps to create complete the VBL Creation.
Double Click on the MoneyTransfer Table:
Drag and drop the AF_CUSTOMER table to the Sources panel, this is the receiver side of the relation between af_moneytransfer and af_customer.
Drag and drop the AF_MONEYTRANSFER table to the Sources Panel
Drag and drop the AF_CUSTOMER table to the Sources panel; as this table was previously added to the sources diagram, the editor requests you to enter an alias for the table; this is the sender side of the relation between af_moneytransfer and af_customer; enter the alias sender.
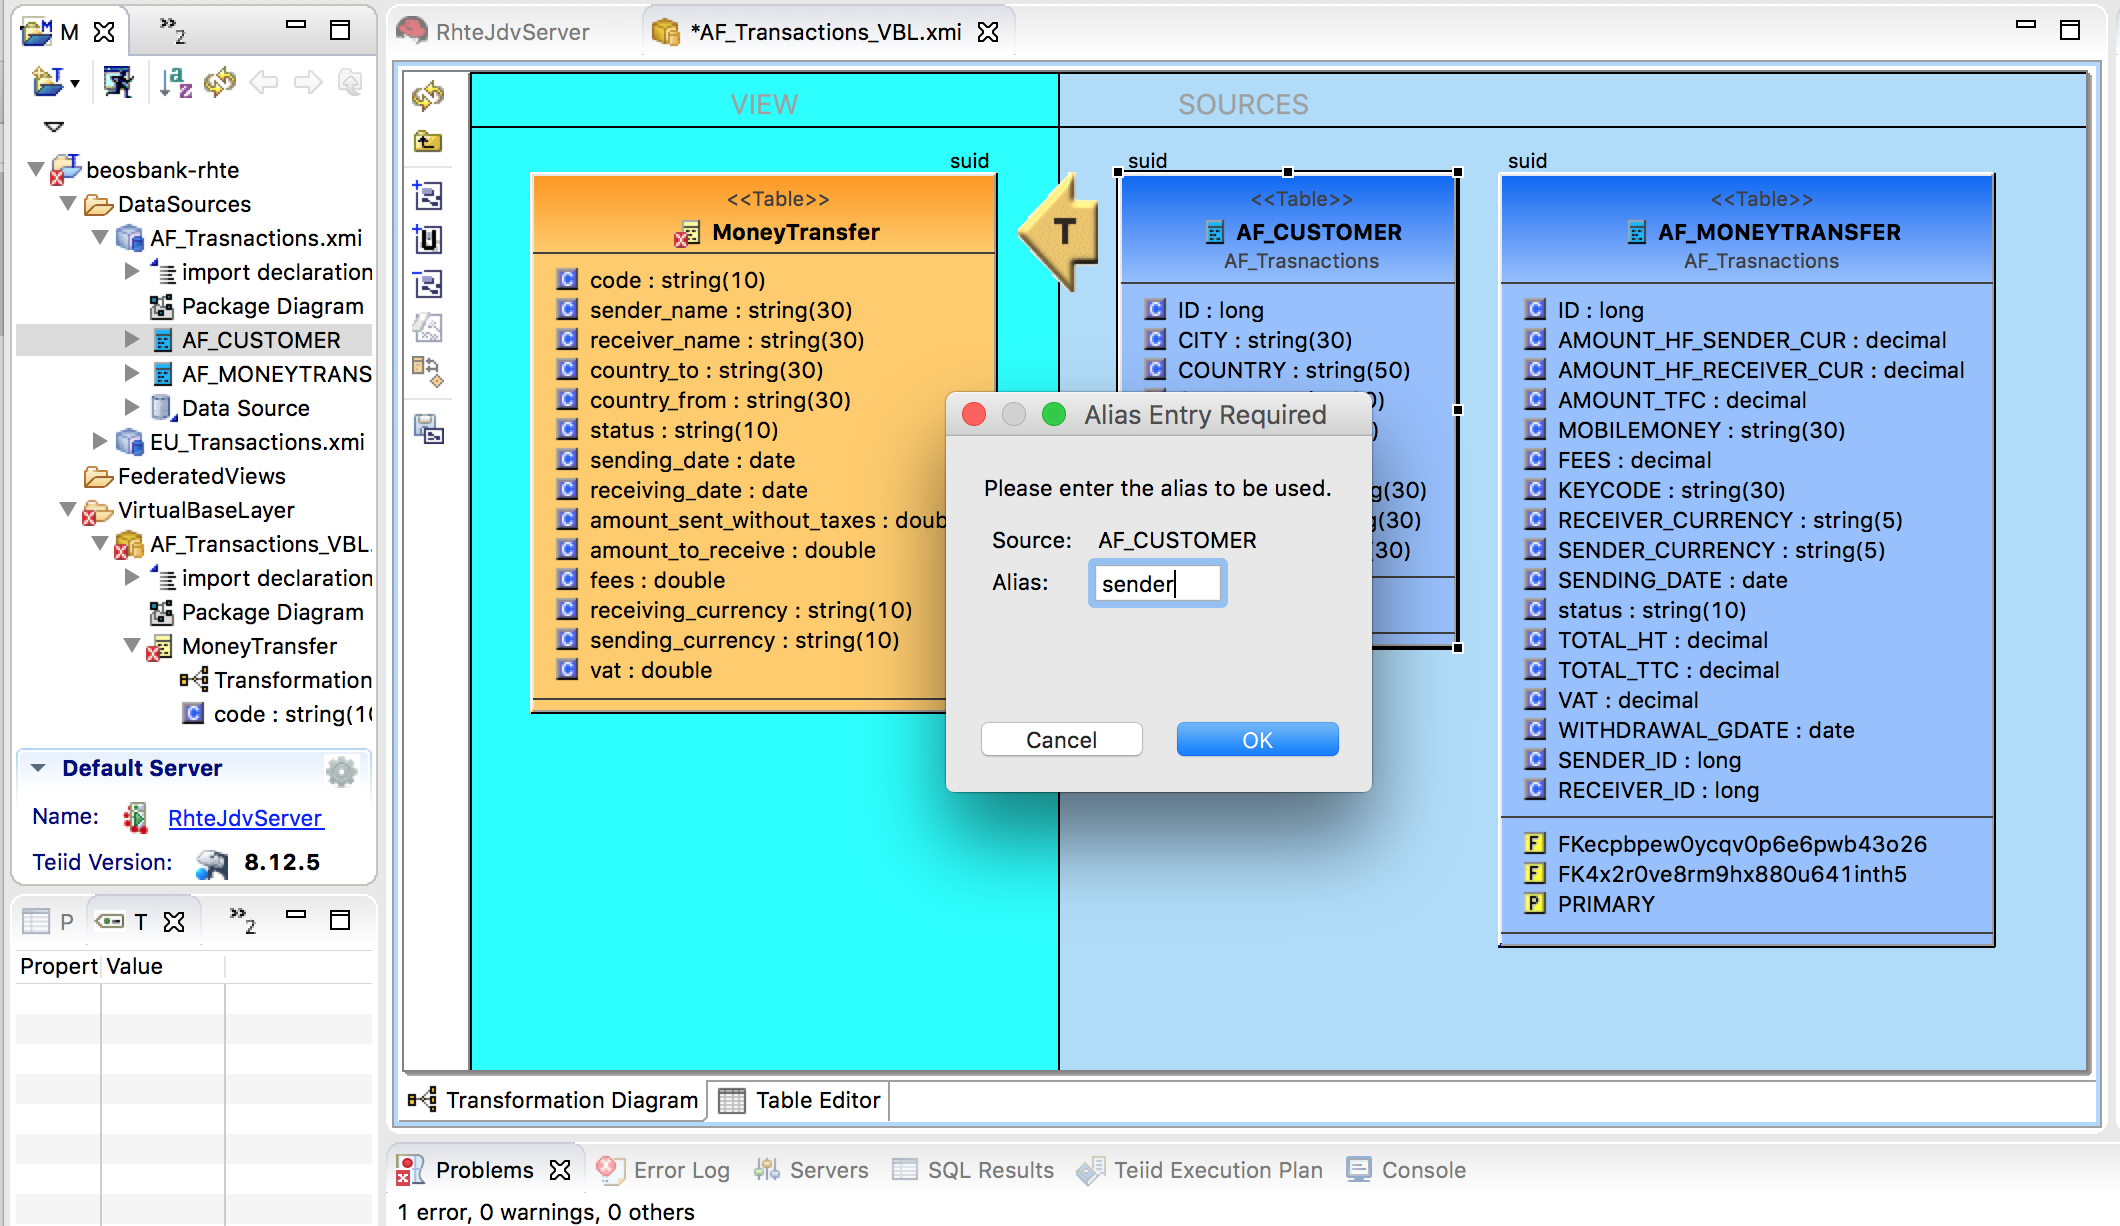
Double Click on the Transformation Button (left yellow arrow) to adjust the mapping SQL Query.
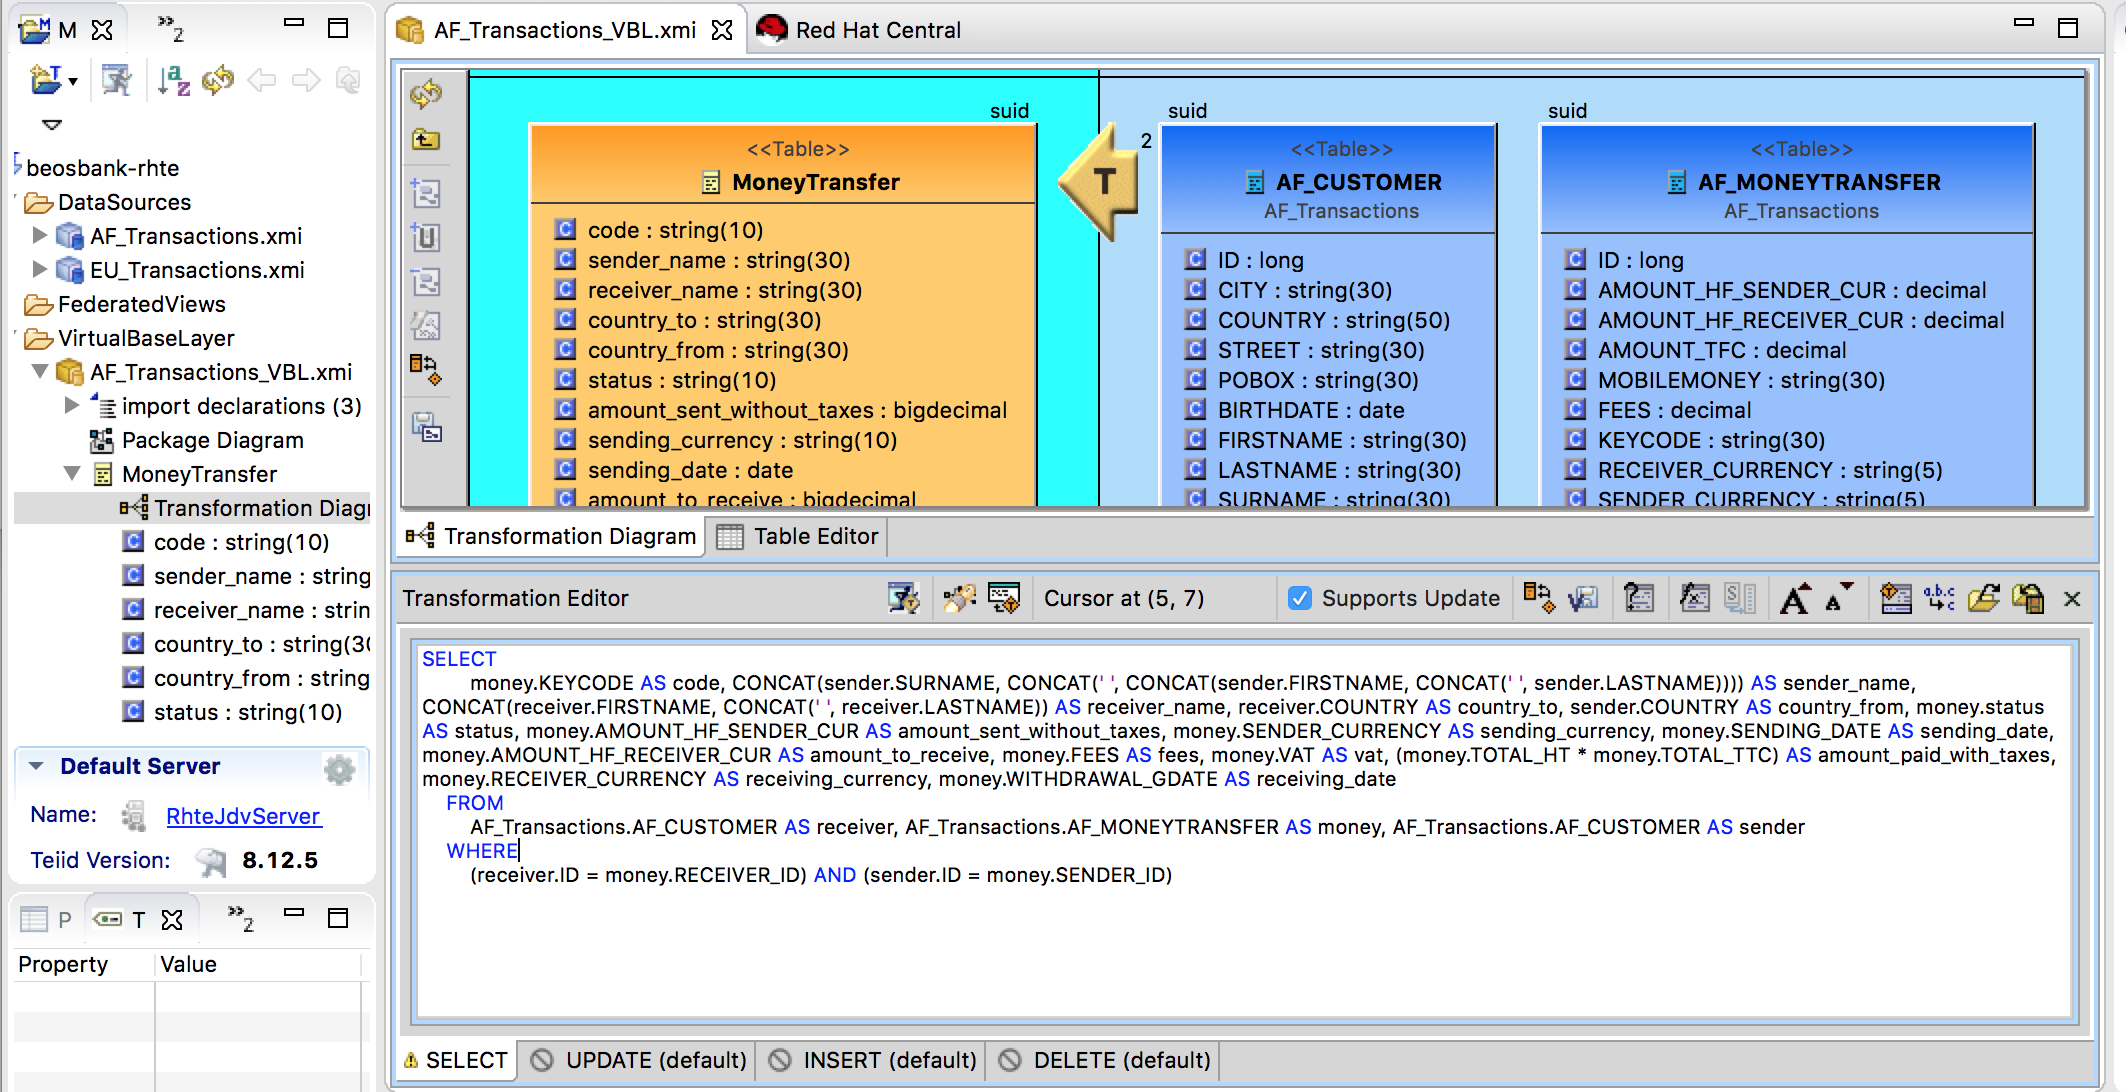
The final query looks like.
SELECT

money.KEYCODE AS code, CONCAT(sender.SURNAME, CONCAT(' ', CONCAT(sender.FIRSTNAME, CONCAT(' ', sender.LASTNAME)))) AS sender_name,
CONCAT(receiver.FIRSTNAME, CONCAT(' ', receiver.LASTNAME)) AS receiver_name, receiver.COUNTRY AS country_to, sender.COUNTRY AS country_from,
money.status AS status, money.AMOUNT_HF_SENDER_CUR AS amount_sent_without_taxes, money.SENDER_CURRENCY AS sending_currency,
 money.SENDING_DATE AS sending_date, money.AMOUNT_HF_RECEIVER_CUR AS amount_to_receive, money.FEES AS fees, money.VAT AS vat,
money.TOTAL_HT  AS amount_paid_with_taxes, money.RECEIVER_CURRENCY AS receiving_currency, money.WITHDRAWAL_GDATE AS receiving_date

FROM

 AF_Transactions.AF_CUSTOMER AS receiver,
 AF_Transactions.AF_MONEYTRANSFER AS money,
 AF_Transactions.AF_CUSTOMER AS sender

WHERE

(receiver.ID = money.RECEIVER_ID) AND (sender.ID = money.SENDER_ID)
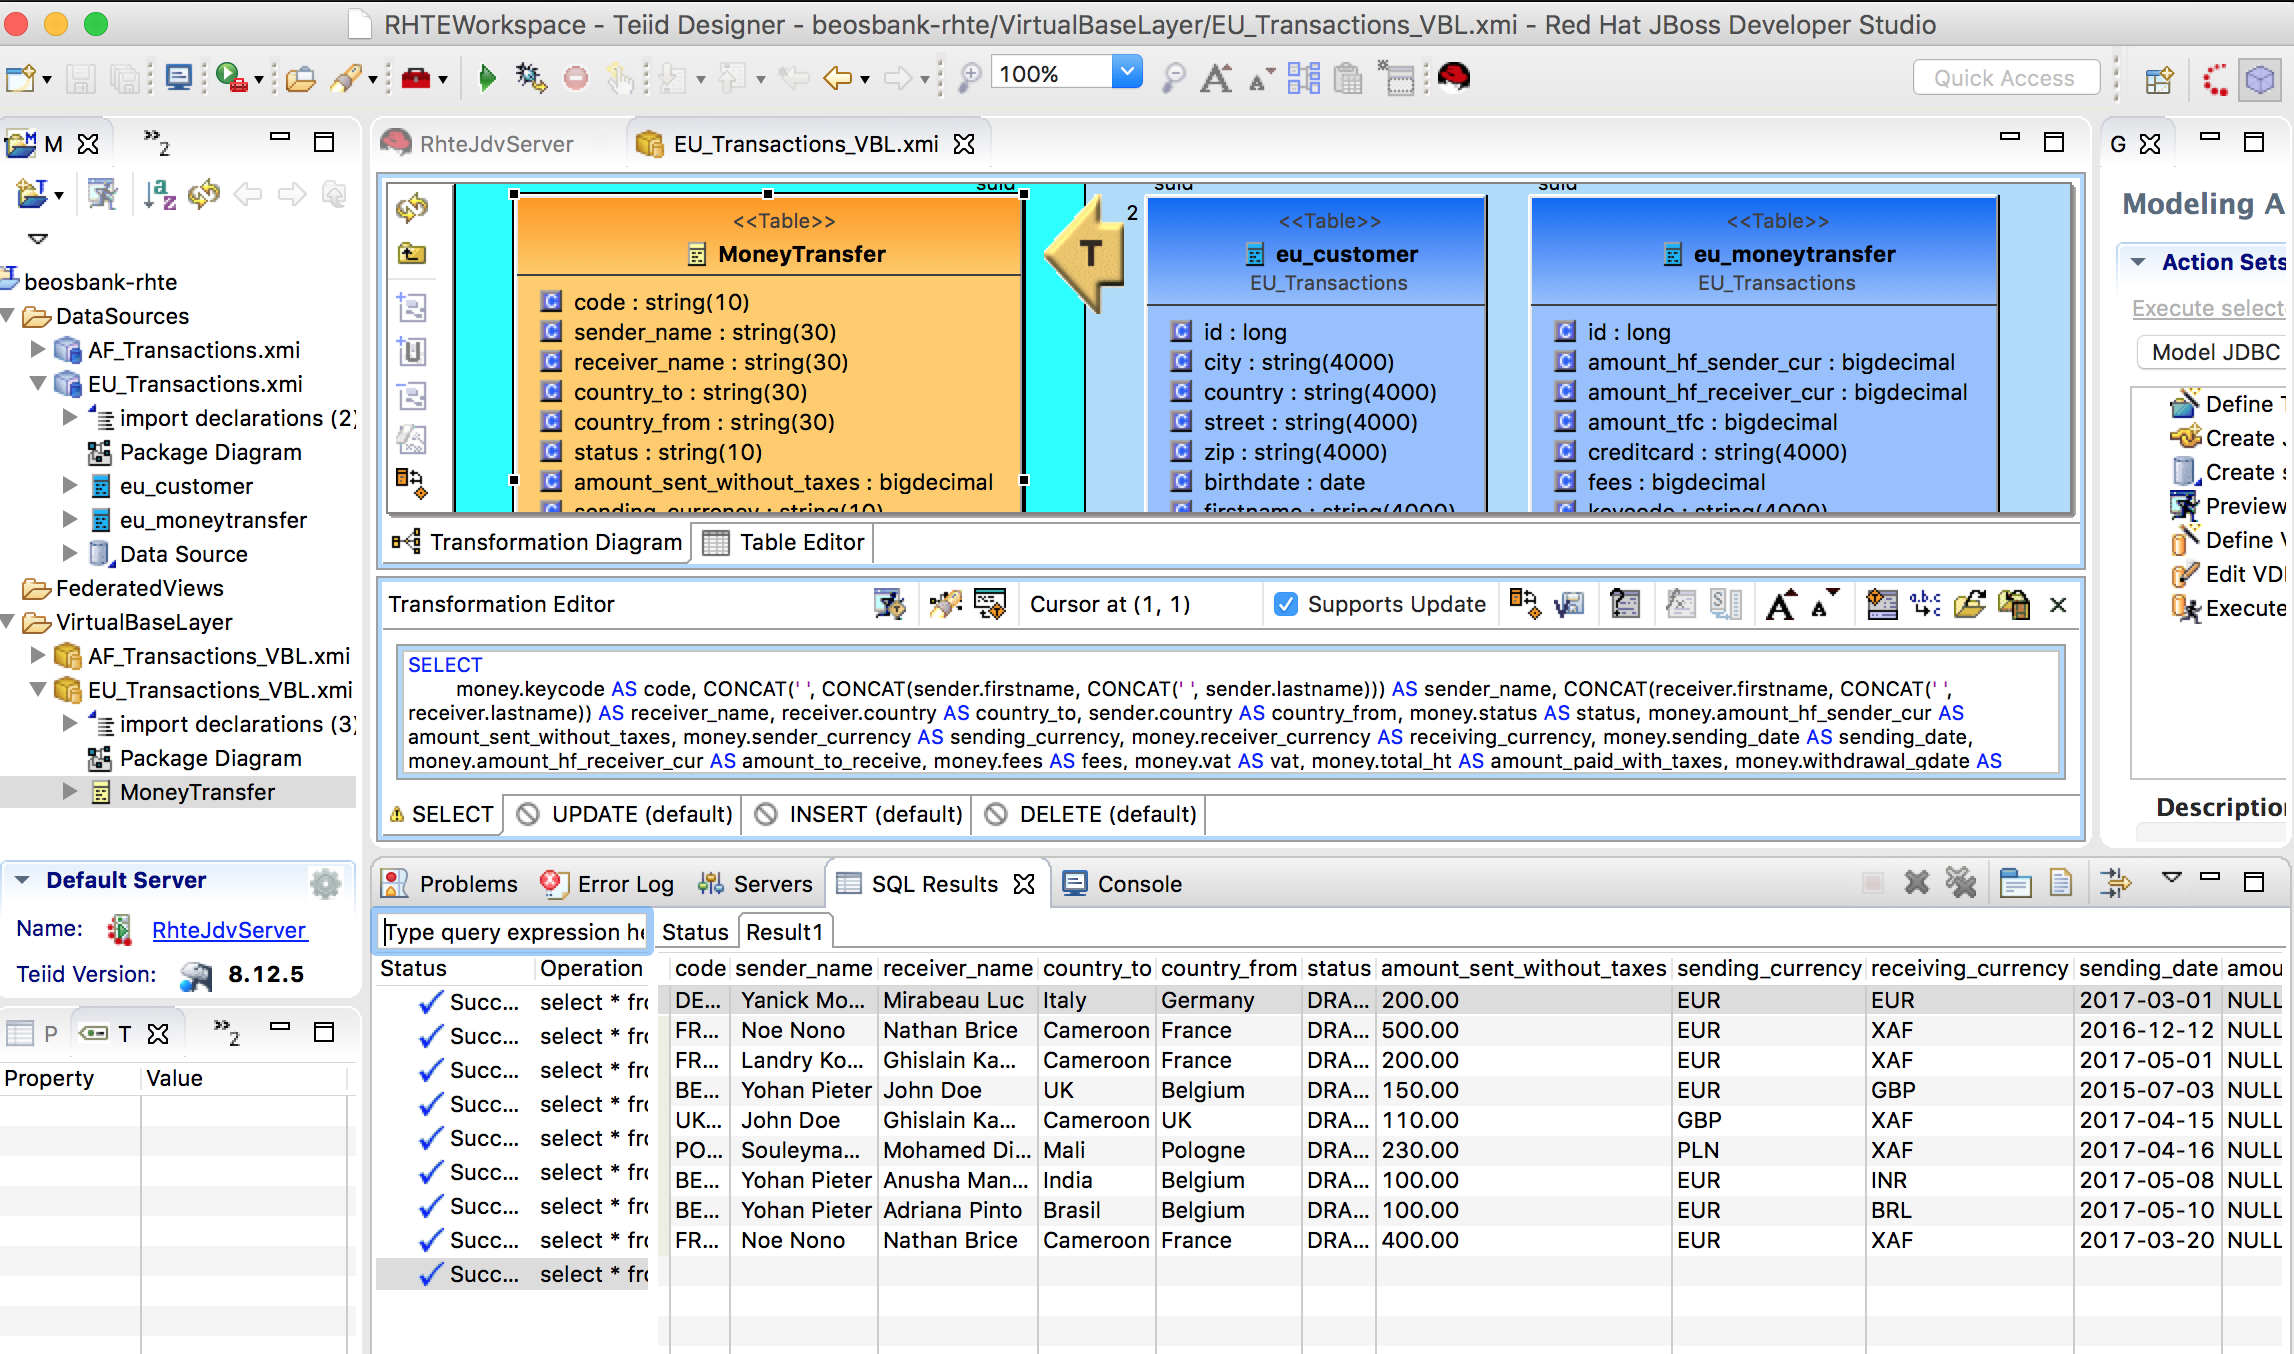
Exercise: Use the same steps described below to create EU_Transactions_VBL.xmi model.
Remember there is no SURNAME field in the EU_CUSTOMER table, the query should be similar. Adjust your select clause to not include SURNAME.
CONCAT(' ', CONCAT(sender.firstname, CONCAT(' ', sender.lastname))) AS sender_name
Once created, you should be able to preview the EU MoneyTransfer table.
Create Federated Layer from VBL
JBoss DataVirtualization enables users to efficiently combine the data their need locally without having to move any data like ETL processes do. Depending on your business case, you can create views model as you want. By using the data federation principles, we can build a custom federated view that provides a union of African and European customers in a single data view. This data can be added later to what we call a virtual database.
To create a federated view with the list of both customers from mysql and postgres database, we have to create a new relational view model by transforming either the AF_Customer_VBL or EU_AF_Customer_VBL Virtual base model.
This operation creates a new model in the FederatedViews Folder that is initialized with the target VBL Source model.
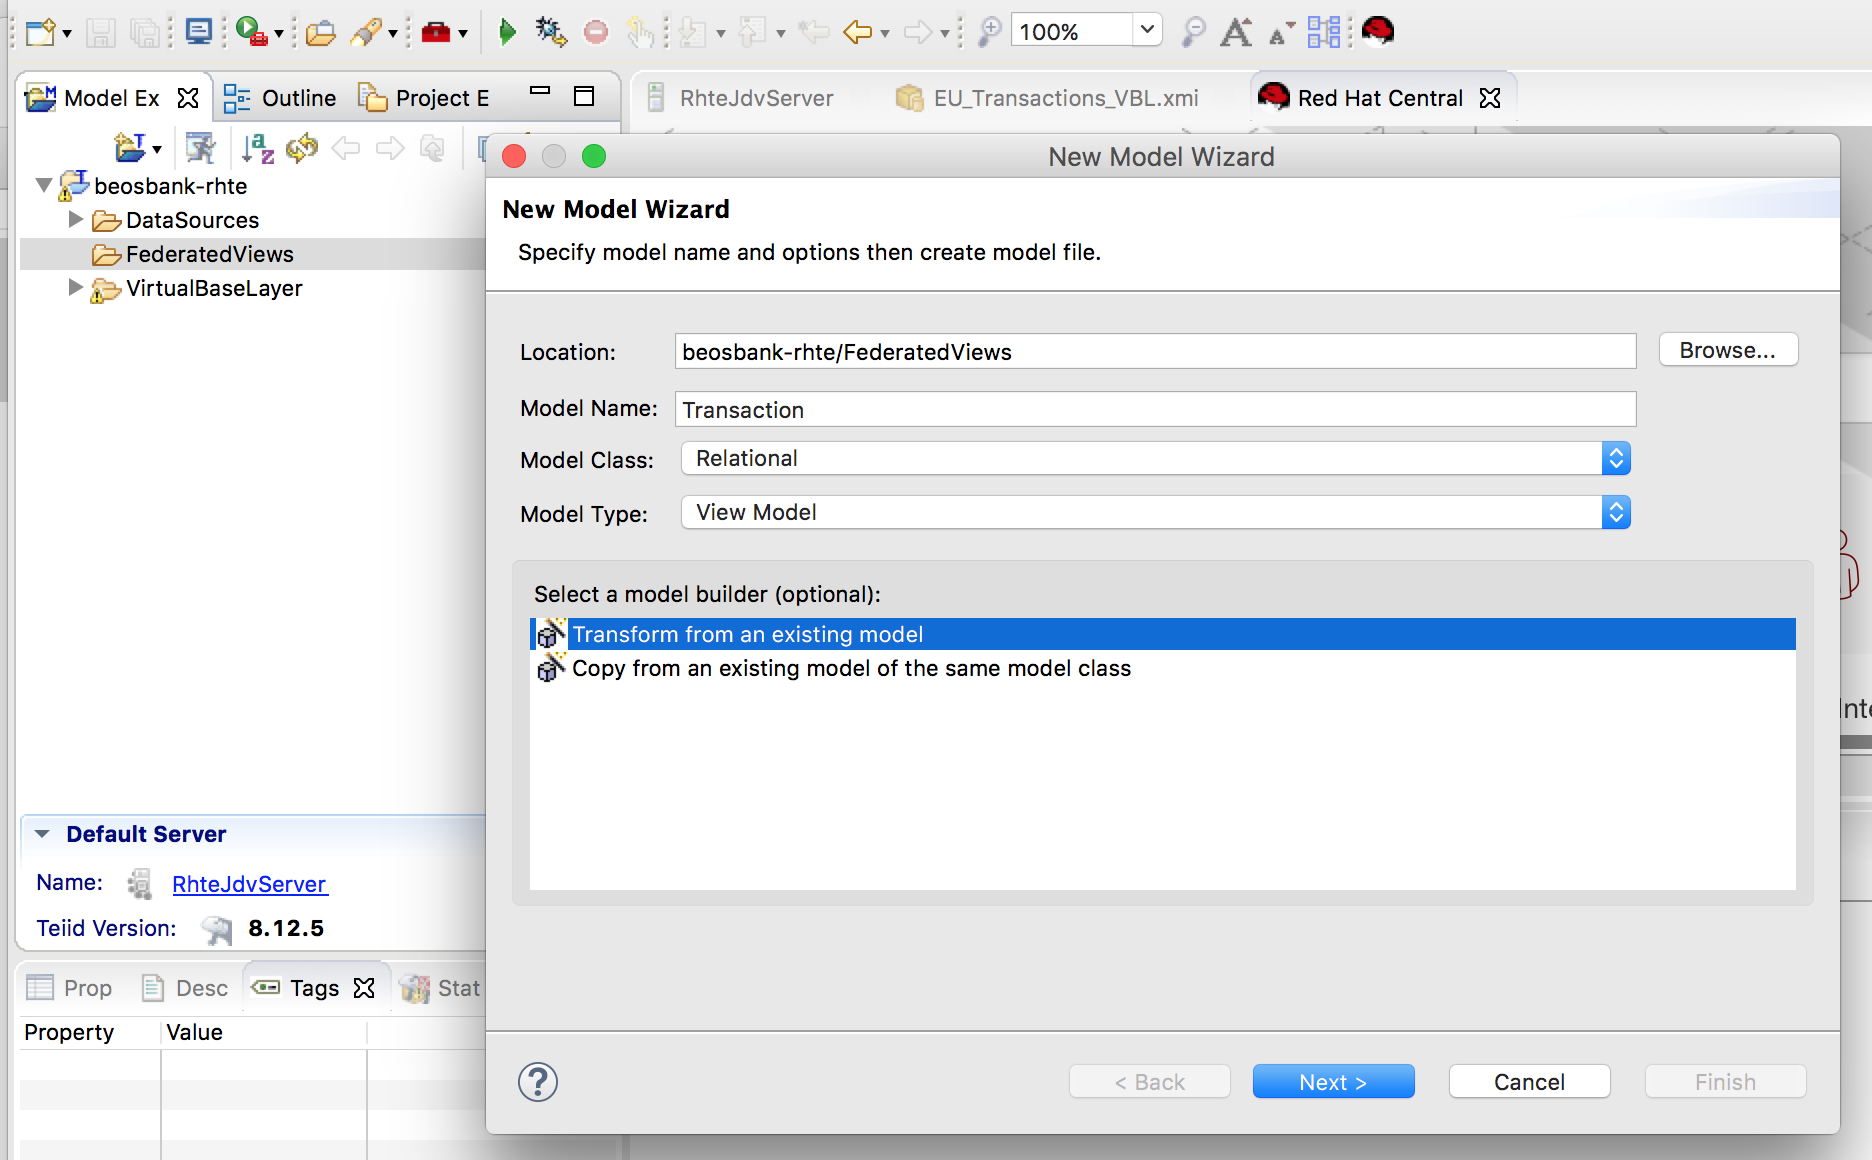
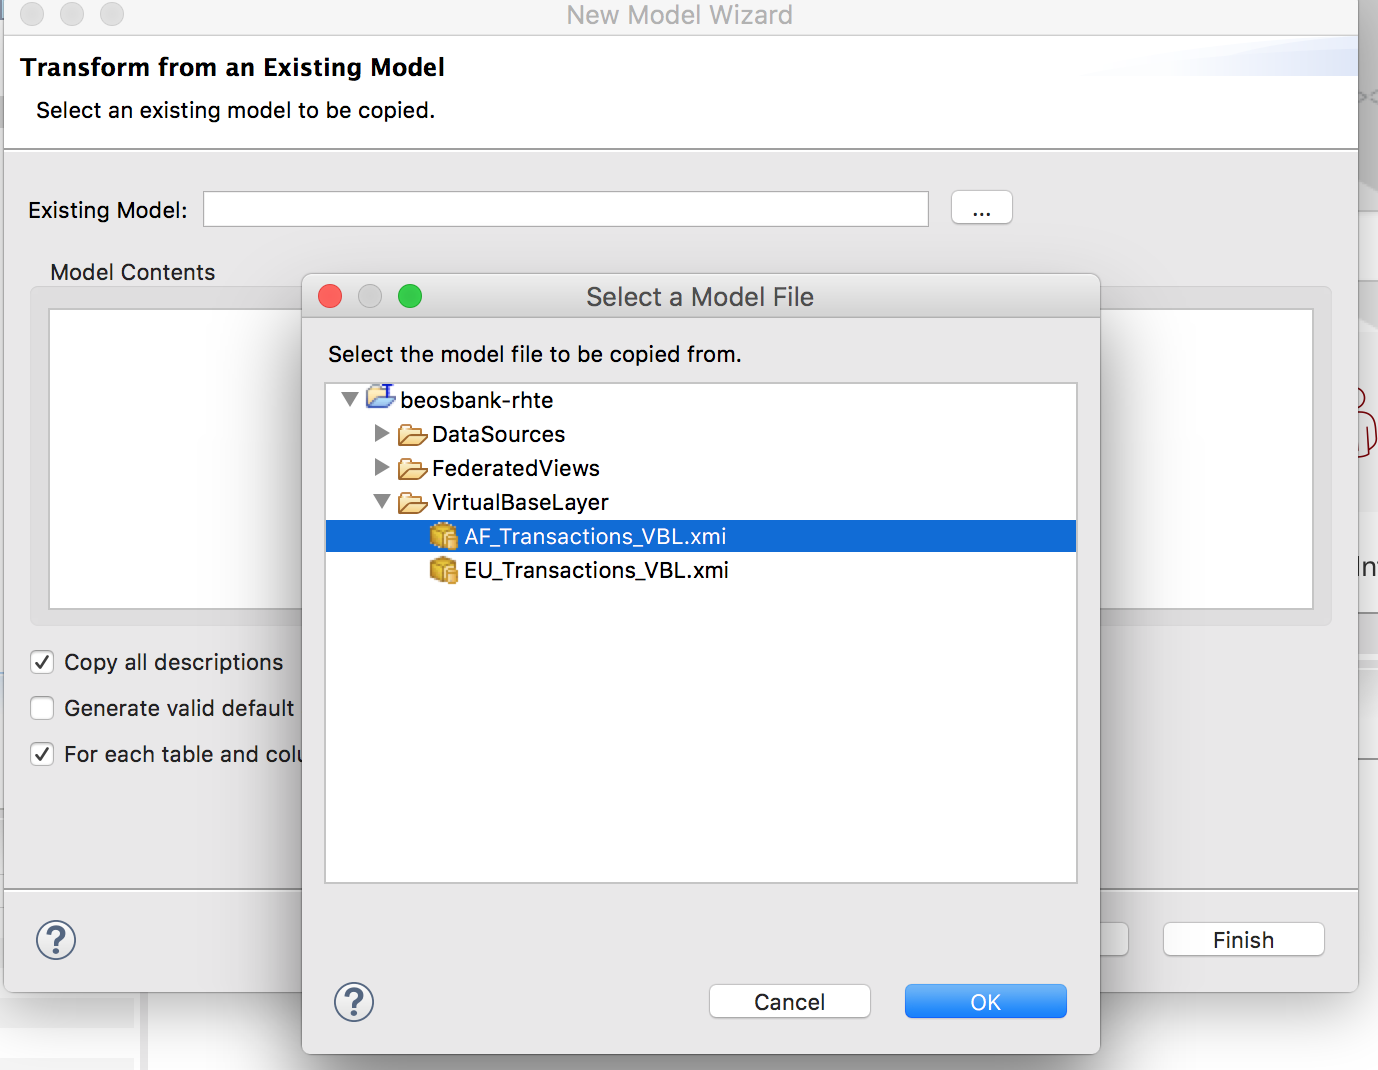
Select the AF_Transaction_VBL.xmi model as the mode to be transformed.
Once the federated FederatedViews/Transaction.xmi model is created, open its transformation diagram.
Right-click on the AF_Tranacation_VBL MoneyTransfer source model and create a transformation union like this.
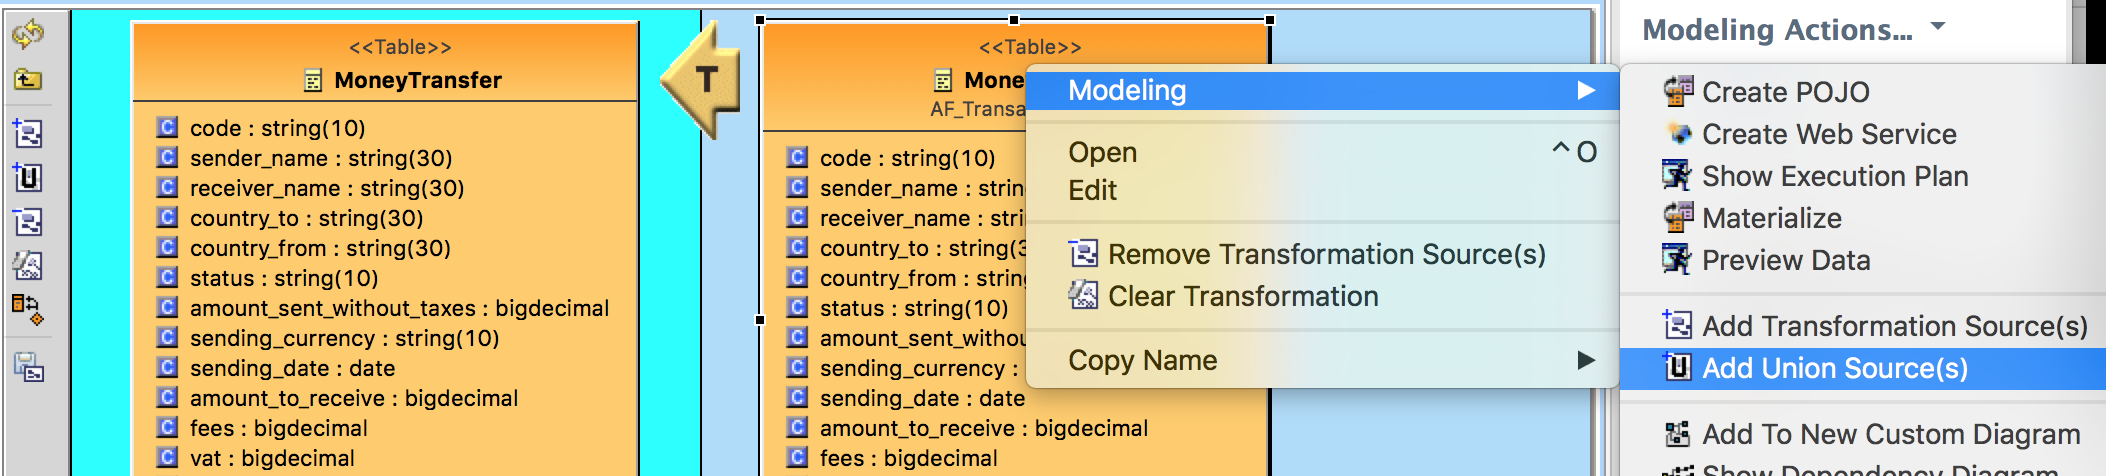
A union SQL is generated, update it to reference the EU_Transactions.MoneyTransfer table.
The final transformation diagram should be similar to the following structure.
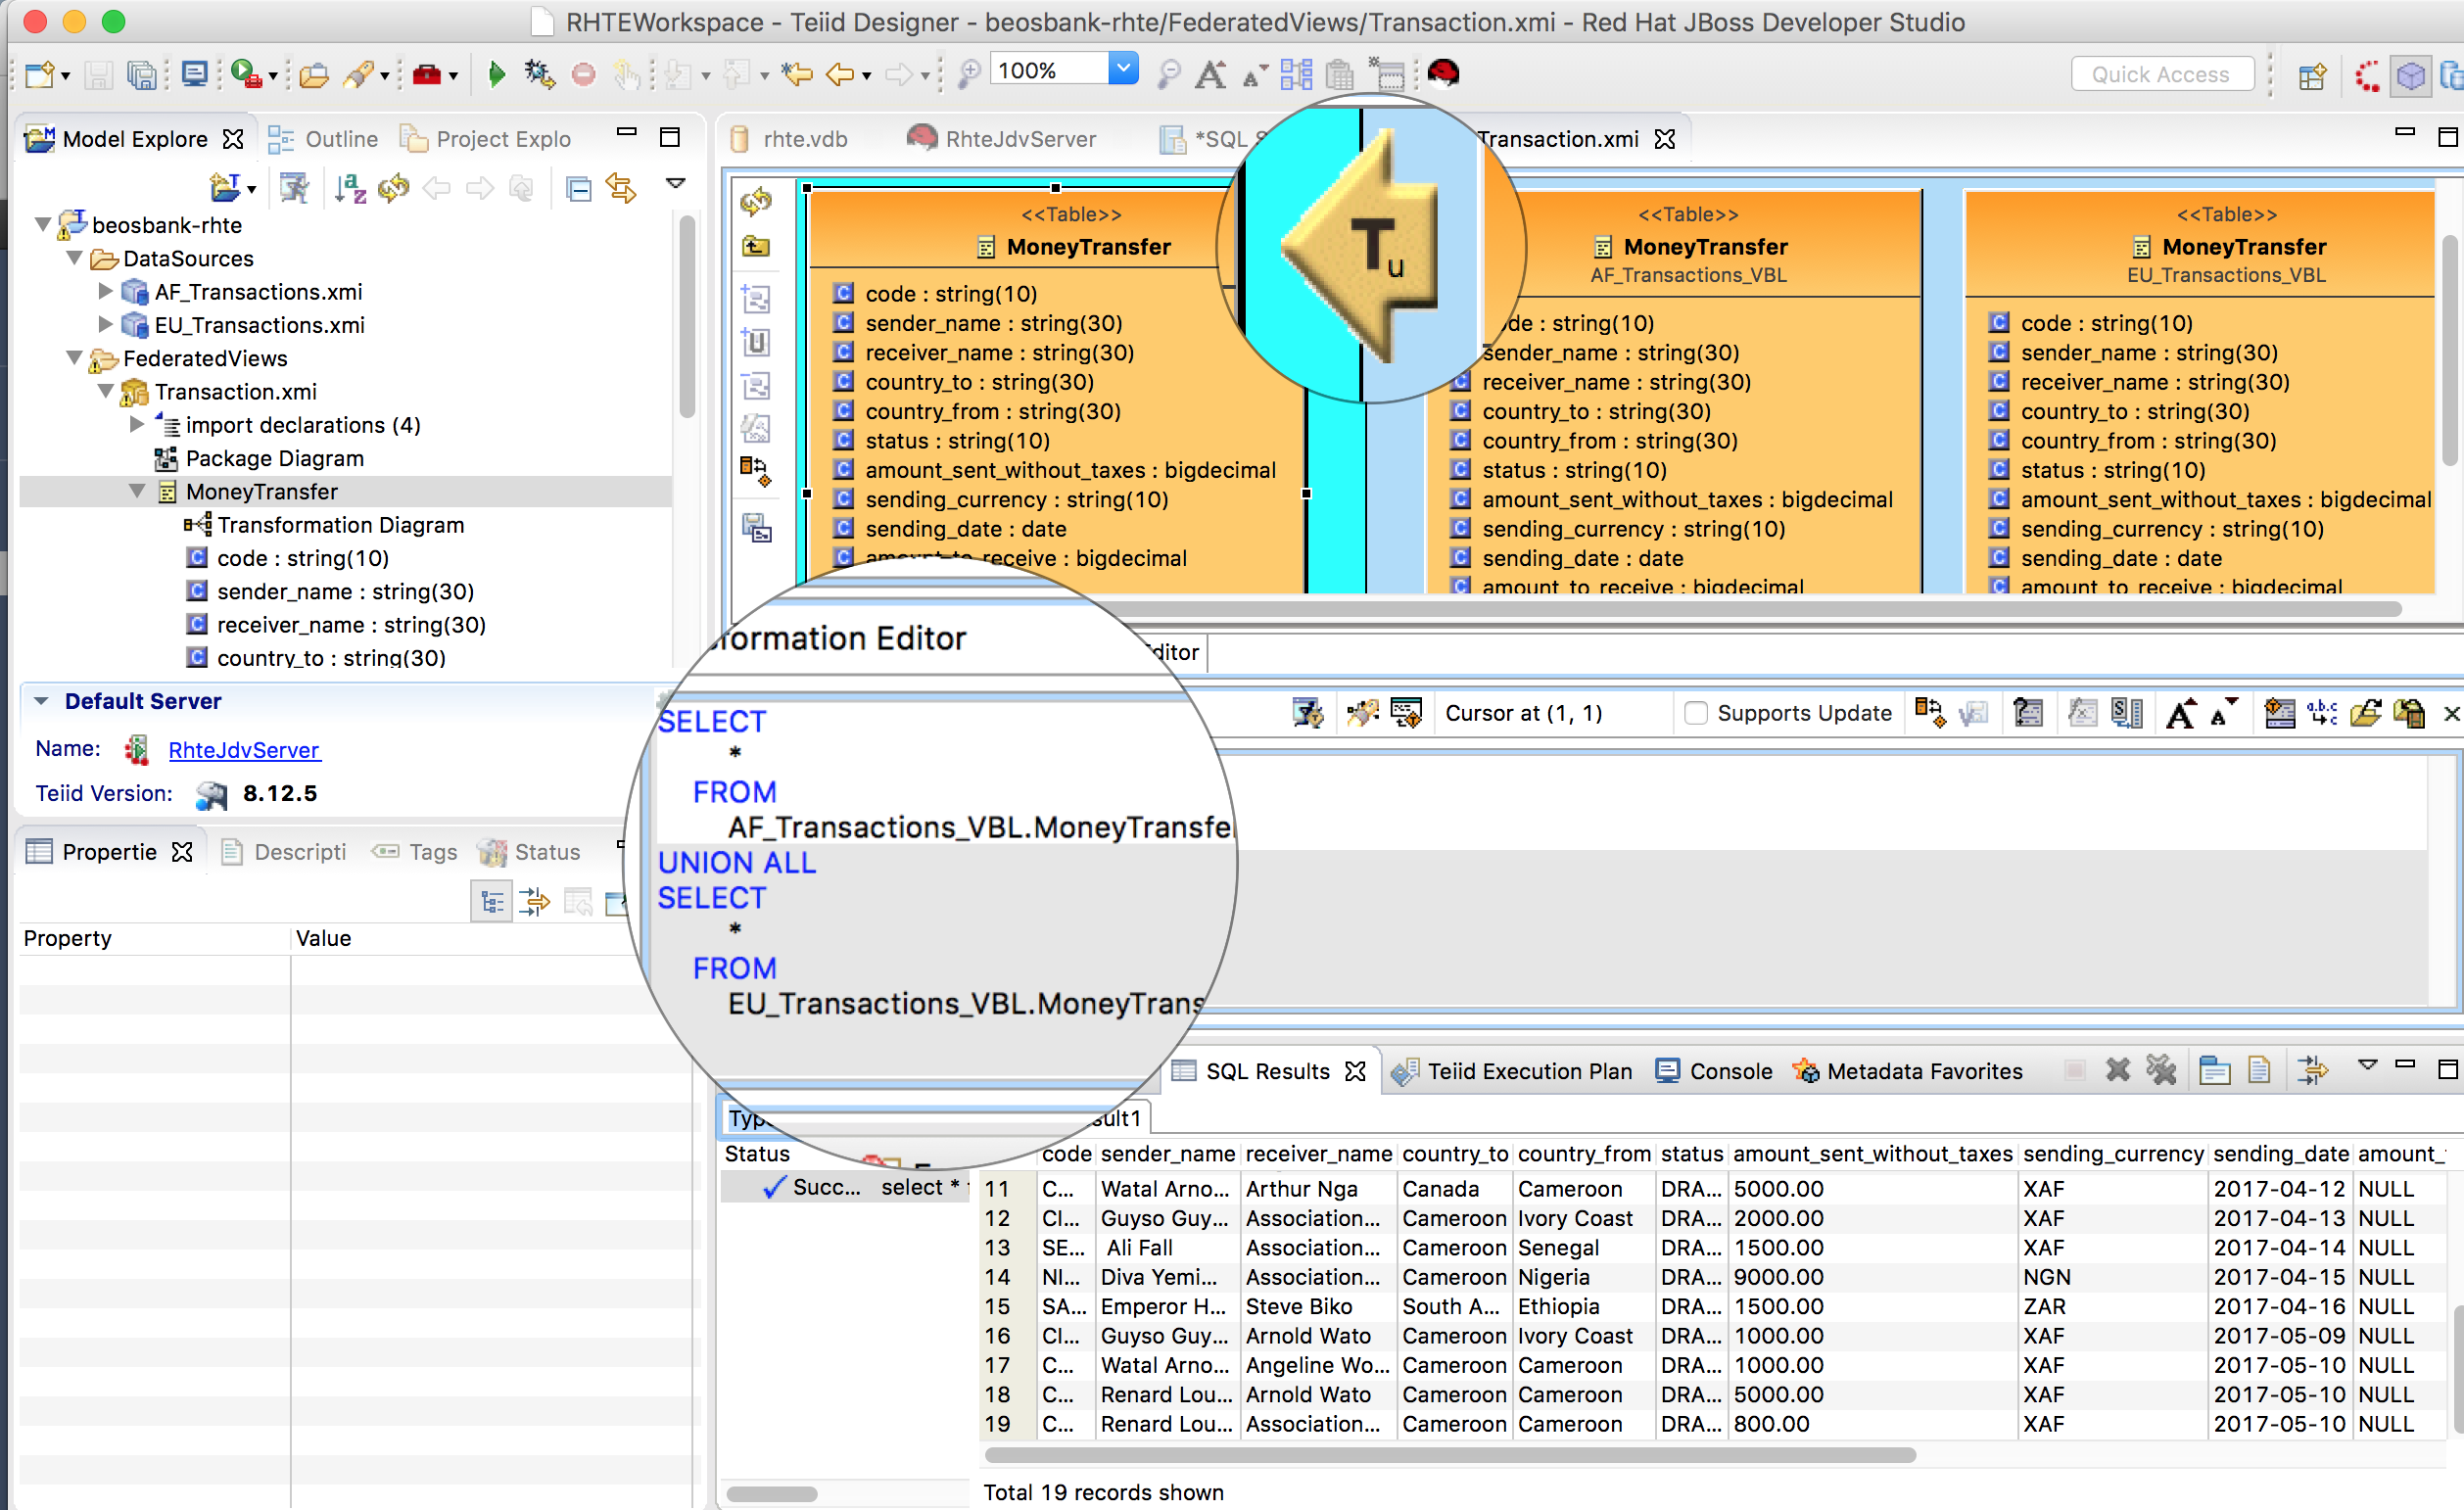
Once previewing the FederatedViews/Transaction.MoneyTransfer table content, you should be able to see both transactions form the MySQL and Postgres DB.
Deploying and Accessing Virtual Data Base
Deploying the VDB
At the end of the day, to expose data to final customers, we have to add models we want to expose to a Virtual Database (VDB) and deploy it.
Let's create a virtual db with name beosbank with the following steps.
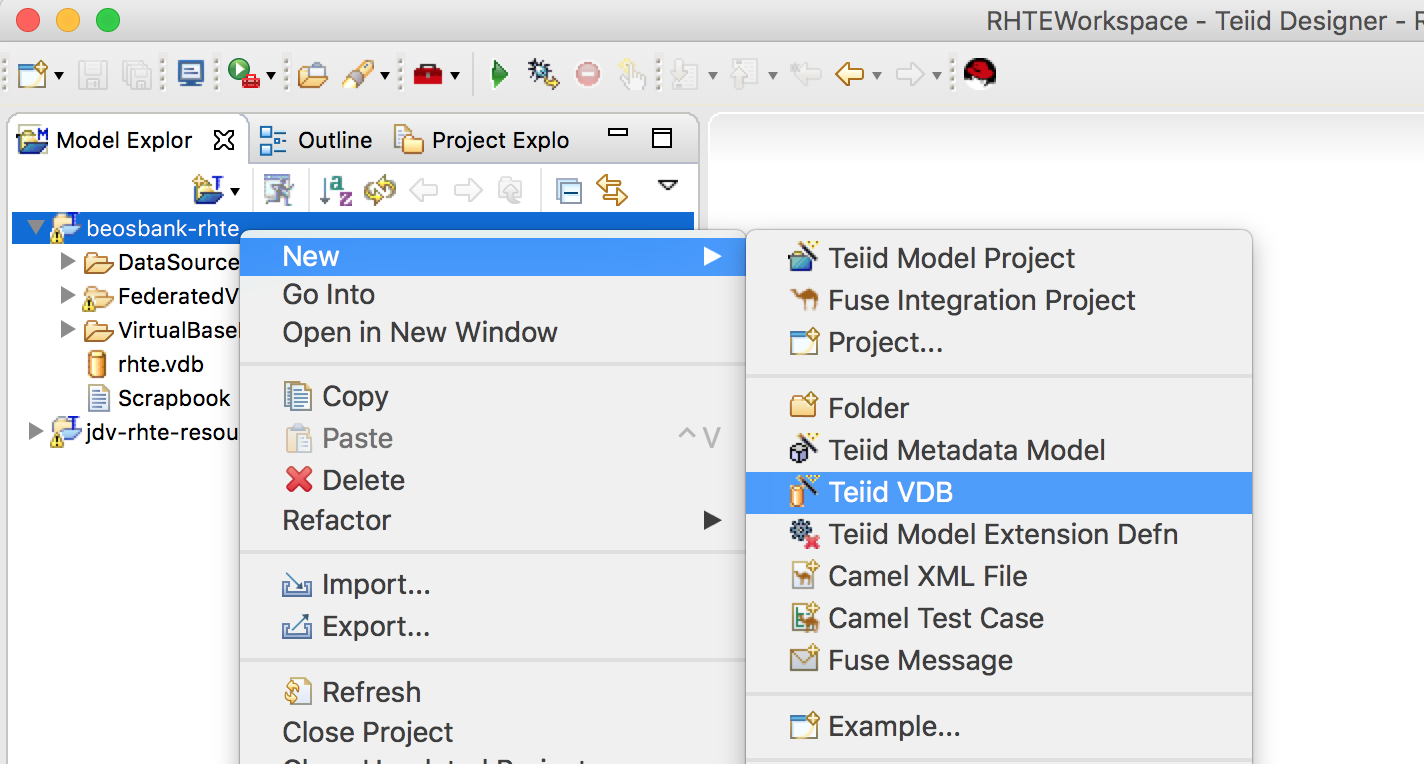
Right-click on the Teiid project and select the New > Teiid VDB Menu item.
Enter the VDB details as follow:
name: beosbank
description: Beosbank Virtual Database Demo
Select the model to be exposed: FederatedViews/Transaction.xmi
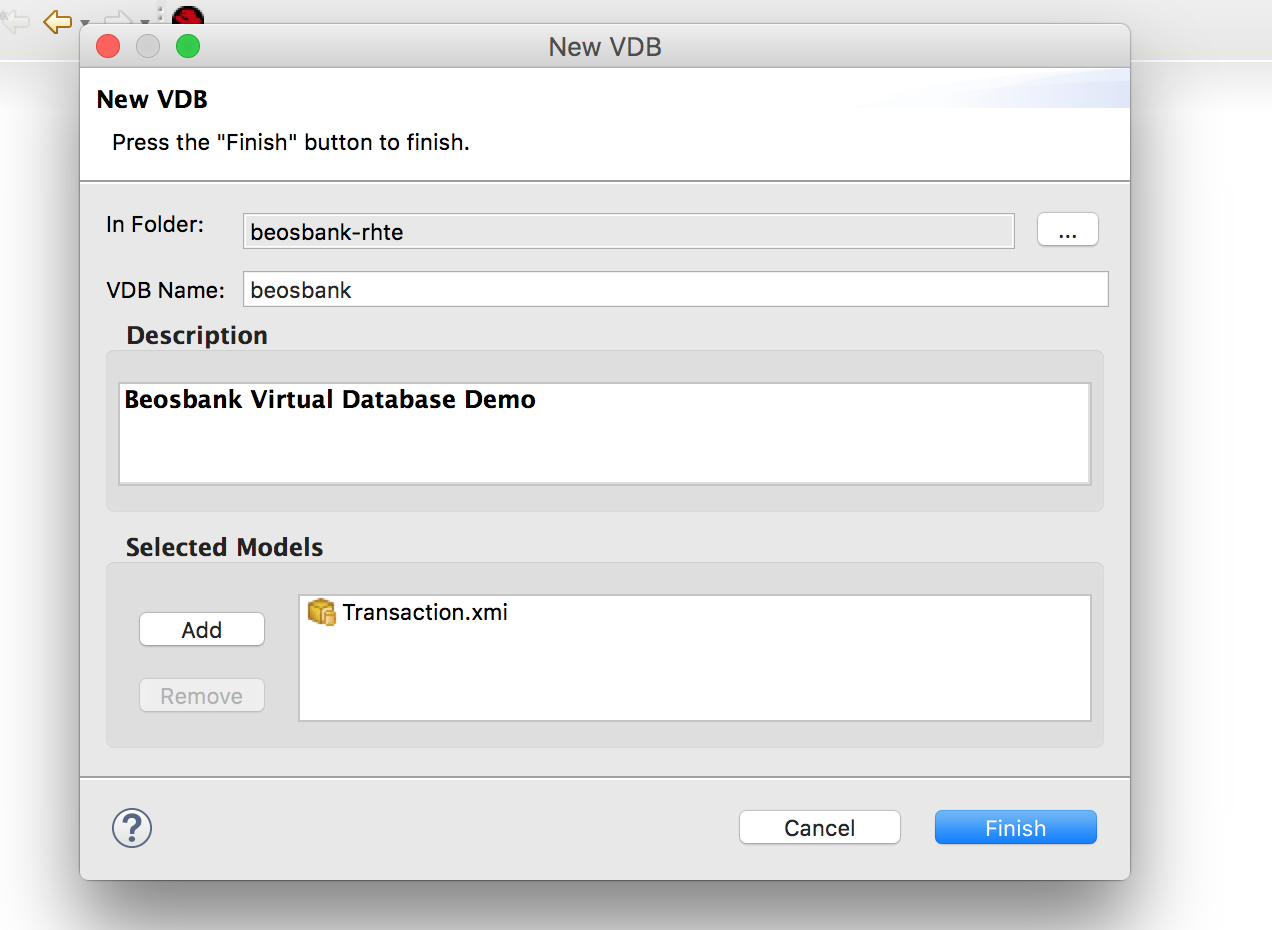
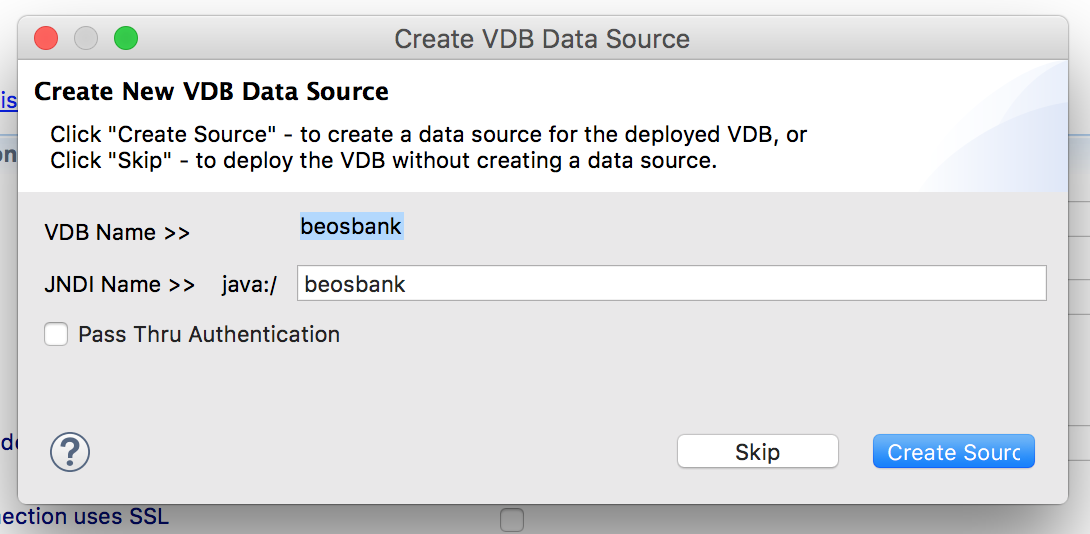
Click on finish. The VDB is created and can now be deployed on the started JDV server; to do so, right click on the vdb file itself and follow the deploy action.
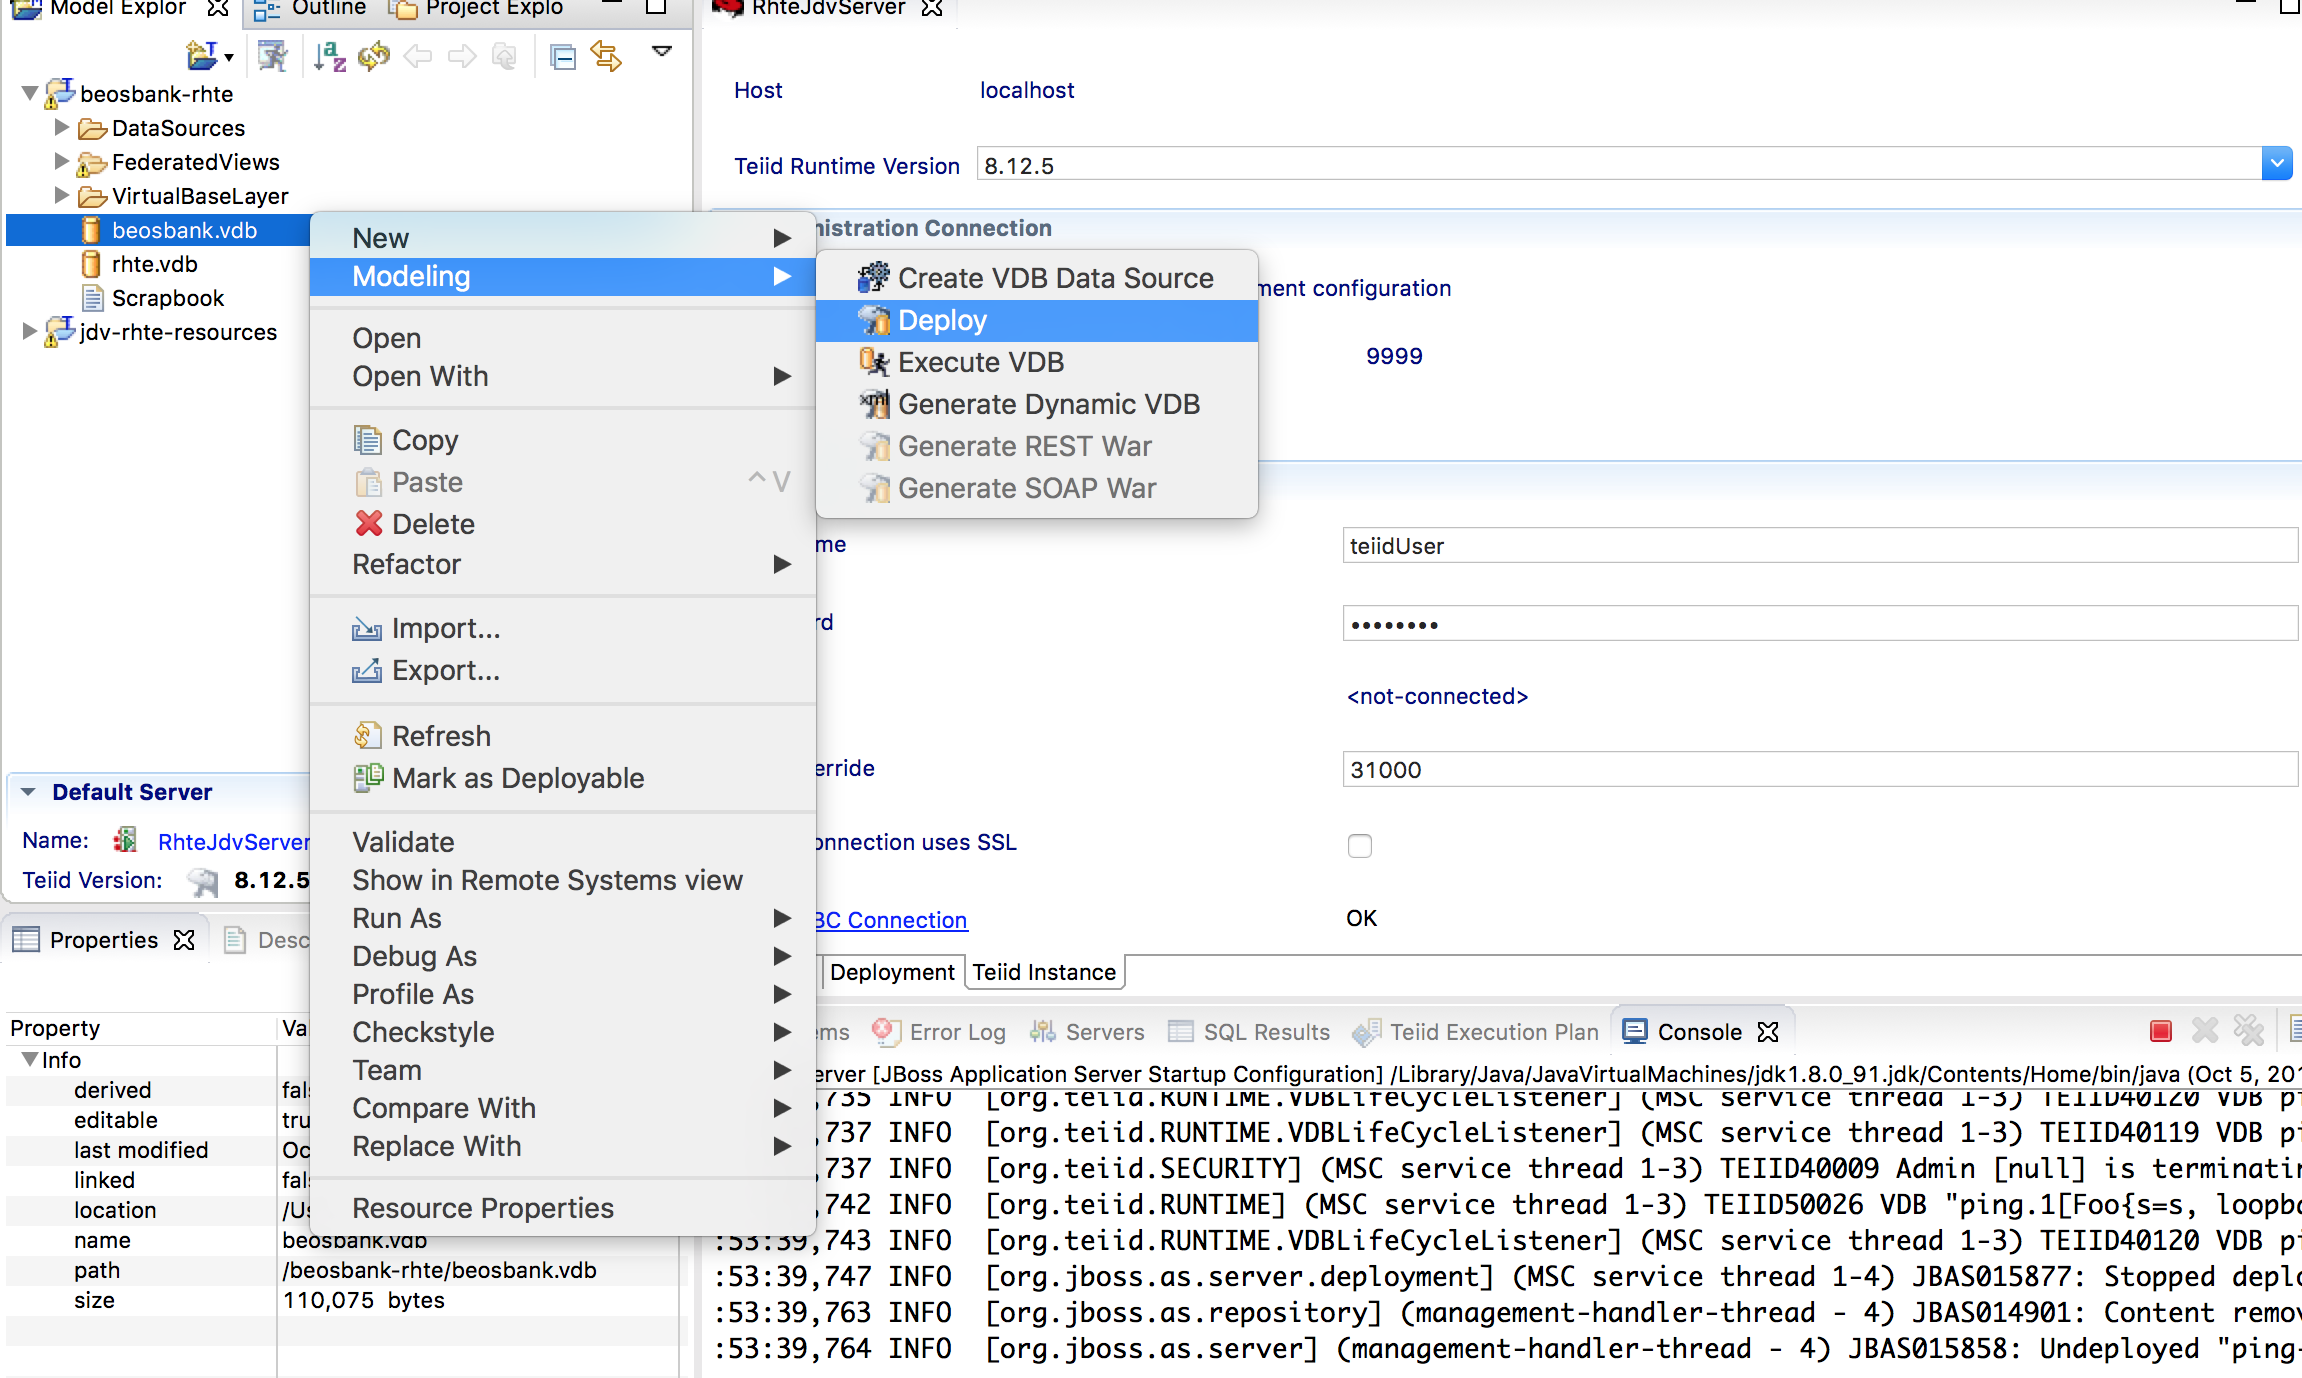
The first time you completed this action, you will be prompt to create the VDB datasource.
The VDB first version is deployed and the logs explicitly display the exposed models.
21:56:43,622 INFO  [org.teiid.RUNTIME] (teiid-async-threads - 2) TEIID50030 VDB beosbank.1 model "Transaction" metadata loaded. End Time: 10/5/17 9:56 PM

21:56:43,622 INFO  [org.teiid.RUNTIME] (teiid-async-threads - 3) TEIID50030 VDB beosbank.1 model "EU_Transactions_VBL" metadata loaded. End Time: 10/5/17 9:56 PM

21:56:43,636 INFO  [org.teiid.RUNTIME] (teiid-async-threads - 1) TEIID50030 VDB beosbank.1 model "AF_Transactions_VBL" metadata loaded. End Time: 10/5/17 9:56 PM

21:56:43,655 INFO  [org.teiid.RUNTIME.VDBLifeCycleListener] (teiid-async-threads - 1) TEIID40003 VDB beosbank.1 is set to ACTIVE

21:56:57,993 INFO  [org.jboss.as.connector.subsystems.datasources] (MSC service thread 1-7) JBAS010400: Bound data source [java:/beosbank]
Accessing the VDB
Once the VDB is deployed, you can access it through various interfaces including Rest OData or Teiid JDBC.
Accessing the VDB through OData
OData provides a simple REST API to access the exposed VDB and their model use.
curl -u teiidUser:Admin01# http://localhost:8080/odata/beosbank.1/Transaction.MoneyTransfer
http --auth teiidUser:Admin01# http://localhost:8080/odata/beosbank.1/Transaction.MoneyTransfer
To get access to the whole content of the Transaction.MoneyTransfer table the VDB model can be specified in the URL just after the vdb name. (vdbname.version)
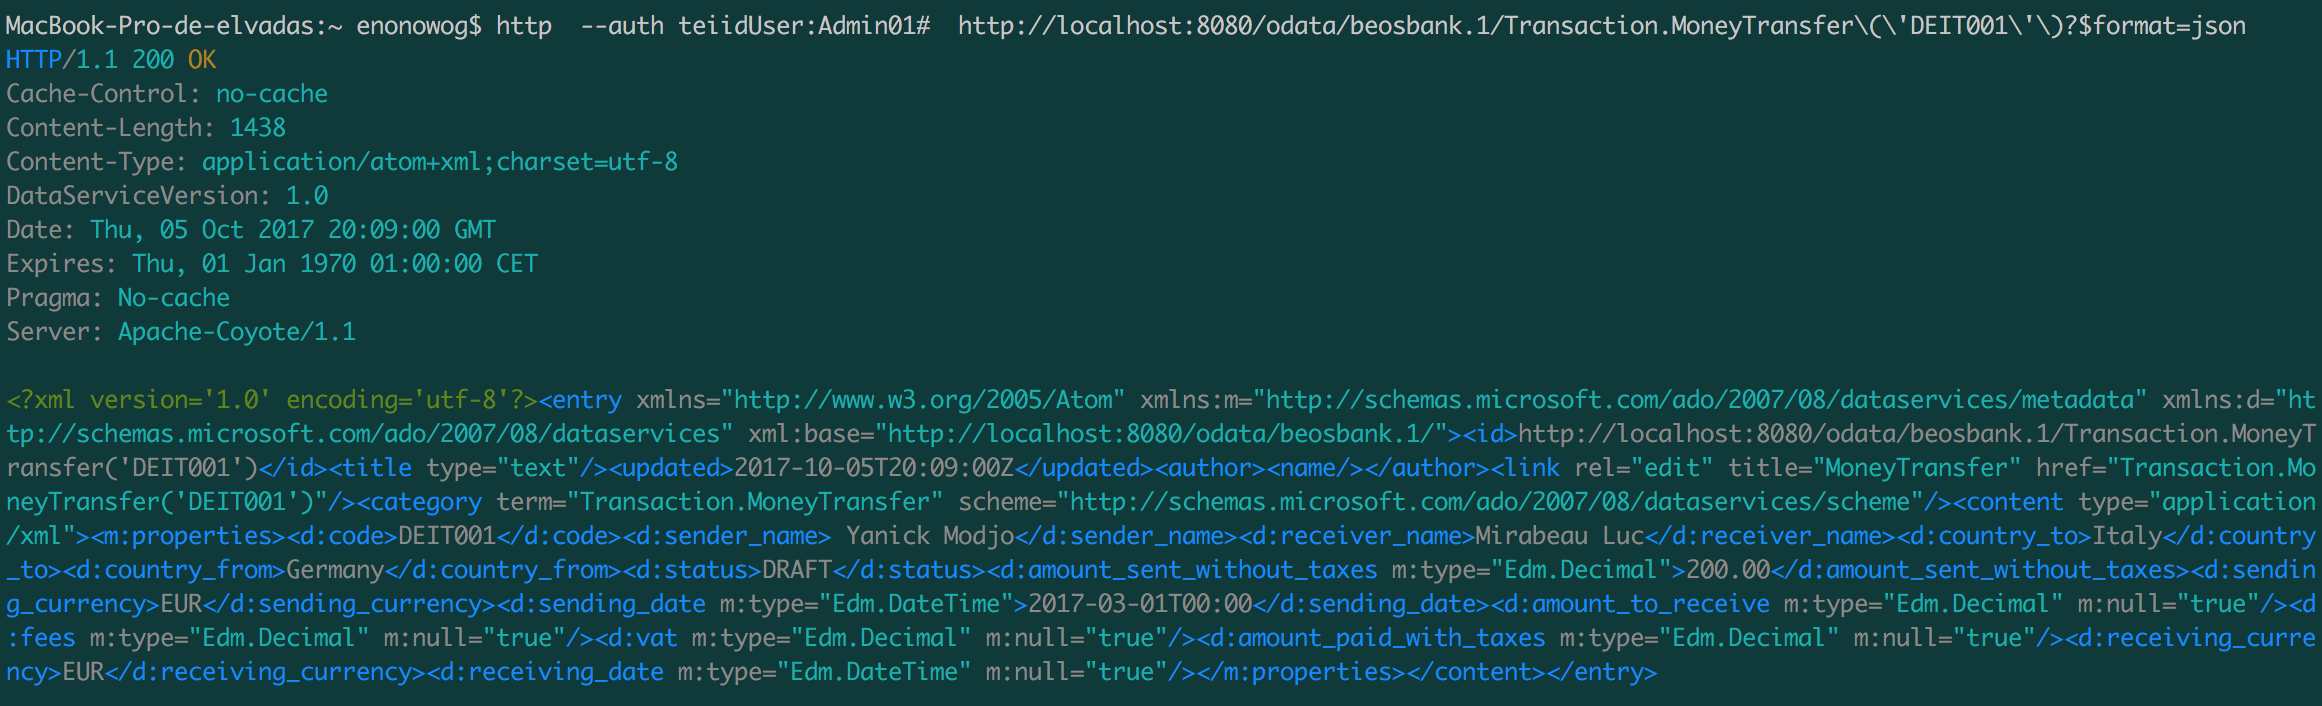
To get the details of the transaction with reference (table key) DEIT001, call the following URLs;
curl -u teiidUser:Admin01# http://localhost:8080/odata/beosbank.1/Transaction.MoneyTransfer\(\'DEIT001\'\)
http --auth teiidUser:Admin01# http://localhost:8080/odata/beosbank.1/Transaction.MoneyTransfer\(\'DEIT001\'\)
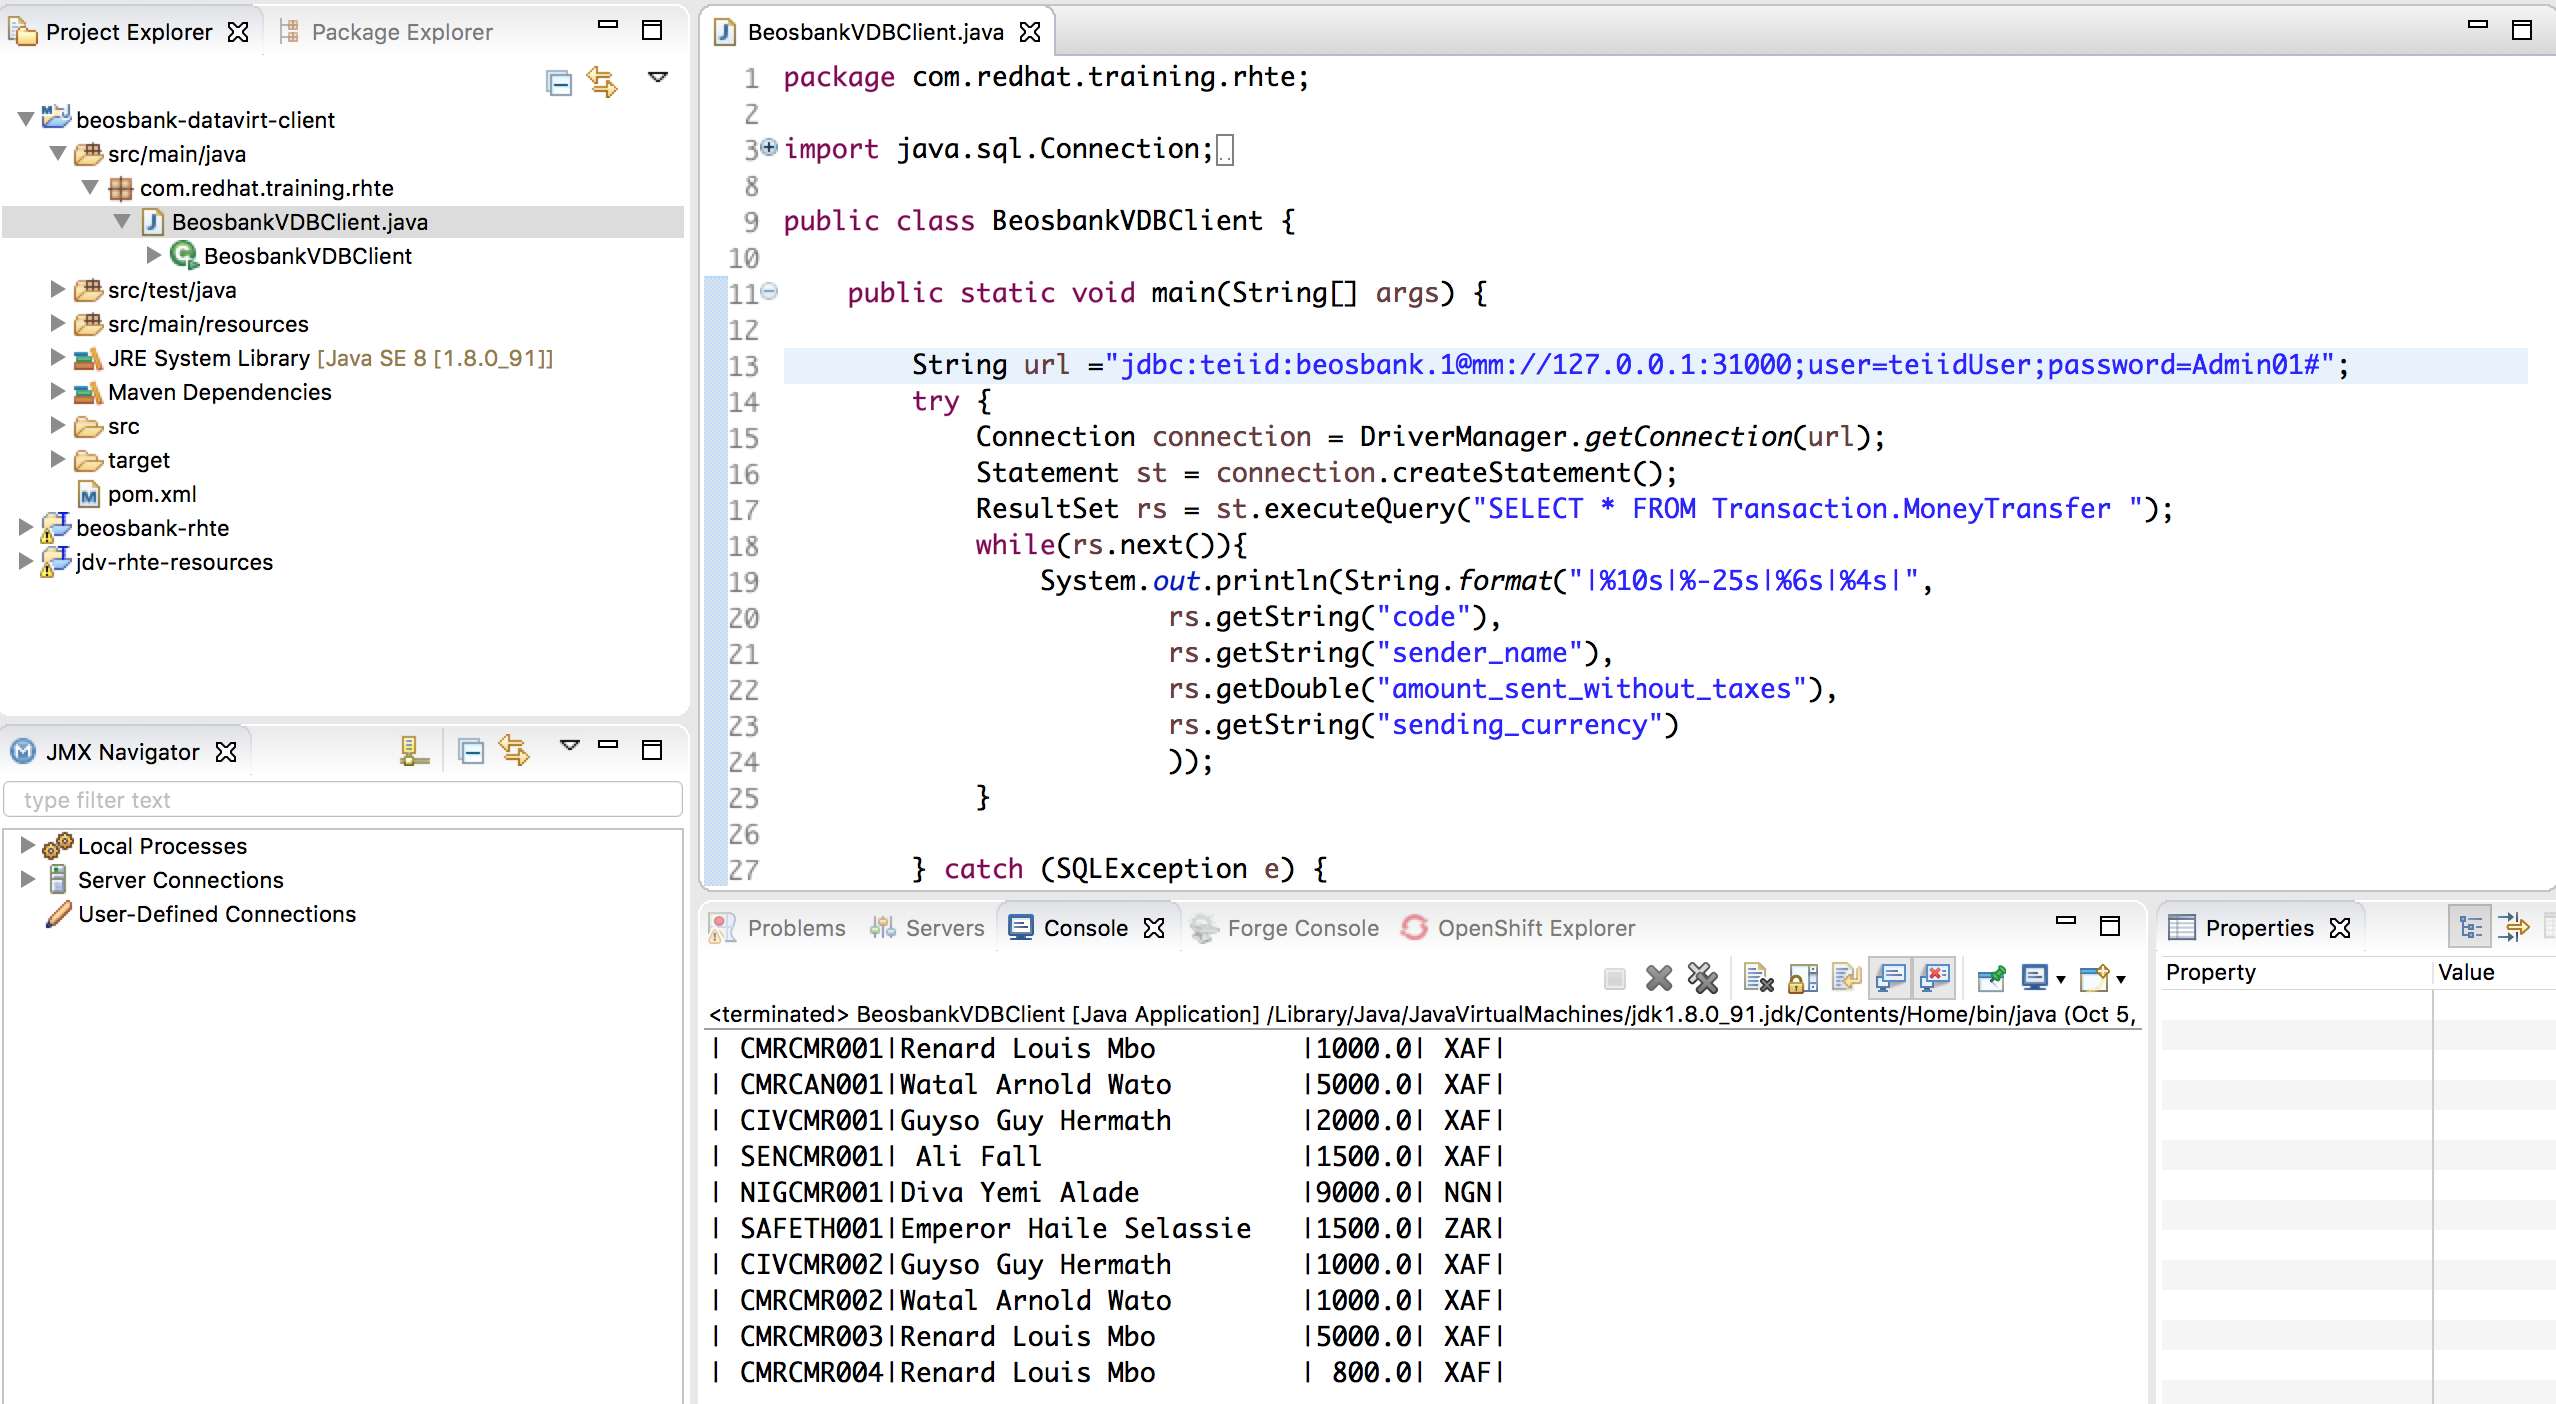
Accessing the VDB through Teiid JDBC Client
To access the VDB with JDBC, include the mvn:org.jboss.teiid/teiid-jdbc/8.12.5.redhat-8
String url ="jdbc:teiid:beosbank.1@mm://127.0.0.1:31000;user=teiidUser;password=Admin0 1#";
 Connection connection = DriverManager.getConnection(url);
 Statement st = connection.createStatement();

ResultSet rs = st.executeQuery("SELECT * FROM Transaction.MoneyTransfer"); while(rs.next()){

System.out.println(String.format("|%10s|%-25s|%6s|", rs.getString("code"),rs.getString("sender_name"),rs.getDouble("amount_sent_ without_taxes")));}
Summary
In this post, we walked through the different steps needed to design a virtual database using JBoss DataVirtualization. We establish a connection to two relational DB, created a Virtual base layer to isolate high-level layers from Physical model changes. At the end, we implemented a federated union table from both models and exposed it as a VDB; we consumed VDB data using OData and Teiid JBDC.
For a development environment with superior support for your entire development lifecycle click here to download Red Hat JBoss Developer Studio.
Last updated: October 26, 2023