
When you want to do automated tasks for builds and deployments with Red Hat OpenShift, you might want to take advantage of the OpenShift REST API. In scripts you can use oc CLI command which talks to the REST APIs. However there are times when it is more convenient to do this directly from your C# code without having to invoke an external program. This is the value of having an infrastructure platform that is exposed as services with an open API.
If you want to call the API from your C# code, you have to create a request object, call the API, and parse the response object. The upstream project, OpenShift Origin, provides a Swagger 2.0 specification and you can generate a client library for each programming language. Of course, C# is supported. This isn't a new approach, Kubernetes has a repository that is generated by Swagger Codegen.
For C#, we can use Microsoft Visual Studio to generate a C# client library for a REST API. In this article, I'll walk you through the process of generating the library from the definition.
Visual Studio can accept the Swagger 2.0 definition directly, but the OpenShift Swagger 2.0 API definition has some issues generating a C# library. However, with Kubernetes, some conversions are defined ussing JSONPath, see the GitHub repo.
Following these conversions, I wrote some C# code to apply the required conversions to the original definition. If you want to generate code for your own project, please feel free to use my project to convert a definition file. Then you can generate C# code from the generated definition file.
Now, prepare the placeholder project in Visual Studio. The project framework should be .NET Framework instead of .NET Core. It seems this is just a limit of the tooling. You can create a .NET Core (netstandard or netcoreapp) client library later. After creating a .NET Framework project, right-click the REST API Client context menu in the project and select Add.
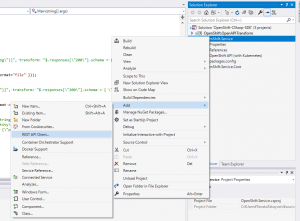
Then specify the file path for the generated definition file.

If you want to use the client library with .NET Core, please create a placeholder project. I'm using a .NET Core class library project. Then, modify the csproj file, as follows, to add a package reference for Microsoft.Rest.ClientRuntime.
<Project Sdk="Microsoft.NET.Sdk">

   <PropertyGroup>
     <TargetFrameworks>netstandard2.0</TargetFrameworks>
   </PropertyGroup>

   <ItemGroup>
     <PackageReference Include="Microsoft.Rest.ClientRuntime" Version="2.3.11" />
   </ItemGroup>

</Project>
Then just simply copy and paste the folder including the generated code.
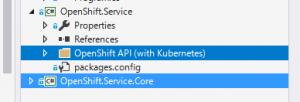
I publish the NuGet package for this generated project. Since the project is not listed in the search results, please specify the full name OpenShift.Service.Core to add the package reference into your own C# project. You also have to add the Microsoft.Rest.ClientRuntime package reference.
Now you can write C# code to call the OpenShift REST API. Here is a simple example to call a GET pod REST API.
//if your master URL has an invalid SSL, please add a custom validation callback.
var handler = new HttpClientHandler
{
    ServerCertificateCustomValidationCallback = HttpClientHandler.DangerousAcceptAnyServerCertificateValidator
};
//replace the acutual OpenShift master host name and your token to log in.
var client = new OpenShiftAPIwithKubernetes(new Uri("https://:8443/"), new TokenCredentials(""), handler);
var pods = await client.ListCoreV1NamespacedPodAsync("");
foreach (var pod in pods.Items)
{
    Console.WriteLine(pod.Metadata.Name + "=" + pod.Status.Phase);
}
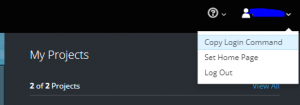
To get a token for test purposes, log in to the OpenShift web console and select Copy Login Command from the context menu in the upper right corner (to the right of the user icon).
The pasted command has the following format. Use the master_host value and token value. Note that this token will expire. We recommend using service accounts for production purposes.
oc login https://<master_host>:8443 --token=<token>
Enjoy writing code to work with the OpenShift REST API. If you find any issues, please send feedback to my repository.
Last updated: February 25, 2022