Note: This post is from 2016. For current instructions, reference the documentation.
https://docs.ansible.com/ansible/latest/index.html
https://docs.ansible.com/ansible-tower/
With DevOps taking hold in businesses ranging from small design agencies to large enterprises, there has been a real push to automate deployments and make them consistent. As part of this, maintaining configuration as code and utilizing a version control system such as Git or Subversion to house it is becoming more prominent. Tools like Puppet and Chef have been around for a number of years, but many find these difficult or cumbersome to configure. Then Ansible came along. This article is going to show you how to get started with Ansible and demonstrate how it has become a viable alternative to Puppet or Chef.
Our Objectives
- Establish Prerequisites
- Install Ansible
- Discuss Ansible layout
- Create a basic configuration
Establish Prerequisites
For the purposes of this article, we’re working on a Red Hat Enterprise Linux 7.2 server which has been registered to the Red Hat Network for updates using subscription-manager register --auto-attach. The easiest way to install Ansible is by adding a third-party repository named EPEL (Extra Packages for Enterprise Linux), which is maintained over at https://docs.fedoraproject.org/en-US/epel/. You can easily add the repo by running the following command:
rpm -Uvh https://dl.fedoraproject.org/pub/epel/epel-release-latest-7.noarch.rpm
No other software is required as Ansible utilizes SSH to interact with remote servers.
Installing Ansible
Now that we’ve added the EPEL repository, we’re ready to install Ansible! This can be done by running yum -y install ansible on the command line. This will install a bunch of python dependencies during the process, but will only take around 30 seconds to complete.
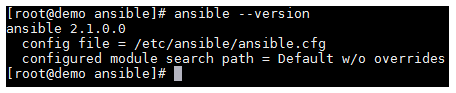
Once the above has completed, you can confirm that Ansible is installed and ready to go by running ansible --version.
Ansible Layout
Before we create a basic configuration, I want to take a moment to explain the Ansible file/folder structure. You’ll note that if you list the files/folders in /etc/ansible that you’re presented with the following. Alongside, I have included an explanation for each file or folder.
/etc/ansible— The main configuration folder which encompasses all Ansible config/etc/ansible/hosts— This file holds information for the hosts/and host groups you will configure/etc/ansible/ansible.cfg— The main configuration file for Ansible/etc/ansible/roles— This folder allows you to create folders for each server role, web/app/db, etc.
It is advisable to use a proper role structure in Ansible, as this makes it easier to manage your playbooks.
What are playbooks, you ask? Well, these are what Ansible uses to describe a policy you would like managed systems to enforce, whether it be installing a piece of software or setting DNS servers in resolv.conf. A playbook will generally consist of the following elements:
- Tasks — This can be used to include smaller files or provide further instructions.
- Handlers — This can be used to do things like restart a service or carry out other tasks.
- Templates — You can vary certain things in this to produce dynamic configuration files.
- Files — This one is simple. It’s a static file which probably doesn’t need to be different across servers.
Create a basic configuration
So, let’s get down to the fun stuff! Ansible is a really powerful orchestration tool, and as such, the list of things you can achieve by using it is endless. Before creating an example playbook, I’d like to demonstrate some things you can do with Ansible on one line. You can do cool things like run a command remotely using ansible <host> -m command -a “command_to_run”.

You could easily scale this out to run this command against an entire group of hosts and return their kernel version in just a few seconds or minutes (depending on your infrastructure, of course!).
Now let’s create a basic playbook to deploy Apache to our local Ansible server. Obviously, you’d be looking at running Ansible against remote hosts such as web servers and database servers, etc., but this will show us how Ansible works. It’s worth mentioning at this point that if you’re following this guide, but planning to run Ansible against another server, then it’s recommended that you configure a keypair on your Ansible server by running ssh-keygen -t rsa and then exporting the public key (id_rsa.pub) to the authorized_keys file for the user (usually root) on the server you’re wanting to run commands against. This will allow you to seamlessly execute playbooks against your environment without requiring a password to be entered each time.
Let’s create a new file with the .yml extension. In my case, I’m creating ‘test-playbook.yml’ to house our instructions. In it, I’ve put the following:
- hosts: localhost
  tasks:
    - name: install httpd
      yum: name=httpd update_cache=yes state=latest
You need to make sure that you follow standard YAML syntax guidelines when manipulating Ansible configuration files, otherwise you are likely to experience syntax errors. A link to YAML Syntax on Ansible’s website is included in the resources section of this article.
Now that we have a playbook to use, we simply use ansible-playbook test-playbook.yml to run the playbook against our server. If everything goes according to plan, you should see the following:
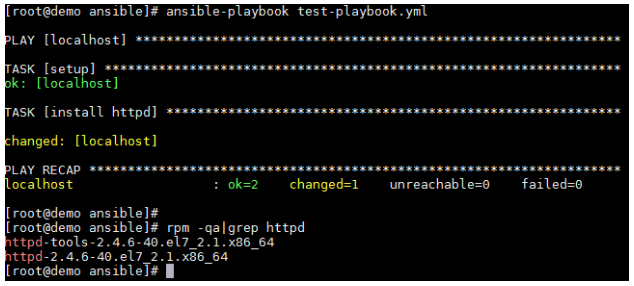
Excellent! We’ve run our first playbook and installed Apache on our demo server.
Closing Thoughts
Although we’ve only touched the surface of what Ansible is capable of, it’s clear to me that it’s a strong competitor with the likes of Puppet and Chef. Due to the rich documentation available on Ansible’s site (see resource section below), along with the regular updates Ansible receives, it can only go from strength to strength.
Further Resources
- You can find further information on the YAML syntax used for Ansible configuration here: http://docs.ansible.com/ansible/YAMLSyntax.html
- More detailed information and configuration examples of Playbooks can be found here: http://docs.ansible.com/ansible/playbooks.html
- Information on Ansible Tower (a front-end GUI for Ansible) can be found here: https://www.ansible.com/tower
- Red Hat explains how Ansible fits into its management strategy: https://www.Red Hat.com/en/about/blog/why-red-hat-acquired-ansible
Keith Rogers
 Keith Rogers is an IT professional with over 10 years’ experience who currently works for a large broadcasting company out of the UK. His long standing passion in computing has led to him taking up multiple extra-curricular activities to further his knowledge and fuel his interest.
Keith has spent years working with Linux by utilising Apache, MySQL and PHP to build full web stacks along with creating more complex load balanced and redundant solutions suitable for high availability. In the last 2 to 3 years he has found himself using new cloud based infrastructures such as those provided by AWS and Azure to assist in achieving these goals.
Currently, he’s working in the DevOps space with a focus on utilising new automation tools such as Terraform/Ansible/Cloud-Init to efficiently and consistently deploy infrastructure. Along with this he has been focusing on improving the bridge between operations and development by deploying new tools like Graylog to make it easier to parse log data and visualise any patterns within these logs.
In his spare time he likes to spend time furthering his tech knowledge by utilising new technologies at home.
