In today's fast paced world of business, delivering quickly is a top priority. Doing so is difficult, however, if you lack confidence in your codebase or rely on error prone deployment processes. Continuous integration enables development teams to automatically run test cases prior to merging code into a stable branch, while continuous deployment leverages automation to provide more reliable, faster deployments of that code.
Red Hat Mobile Application Platform supports an agile approach to developing, integrating, and deploying enterprise mobile applications—whether native, hybrid, or on the web. The platform supports collaborative development across multiple teams and projects, and a wide variety of leading tool kits and frameworks. You gain central control over security and policy management, the ease of Mobile Backend-as-a-Service (MBaaS) integration with enterprise systems, and a variety of cloud deployment options.
In this article we’ll demonstrate how a Red Hat Mobile Application Cloud Application or mBaaS Service can be configured for continuous integration (CI) via CircleCI, and for continuous deployment (CD) to the Red Hat Mobile Application Platform.
Prerequisites
You’ll need these items to follow the steps outlined in this tutorial:
- Node.js v0.10 installed (other versions will most likely be fine also, but are not tested)
- npm installed (installed automatically with Node.js)
- Git installed and a basic knowledge of Git
- GitHub account (sign up here https://github.com/join)
- An RHMAP instance. You an instance for free here.
Git remotes
When developing a Project on RHMAP, each Application you create will be initialized in its own unique Git repository. This provides an easy to use, non-proprietary, and thoroughly documented approach for getting your code in and out of the platform - Git. It also means you can rely on the distributed nature of the Git platform to host your code wherever you like, using multiple git remotes. If you’re not sure what this means, this screenshot of output from a git remote -v (show all remotes) command might help clear things up.
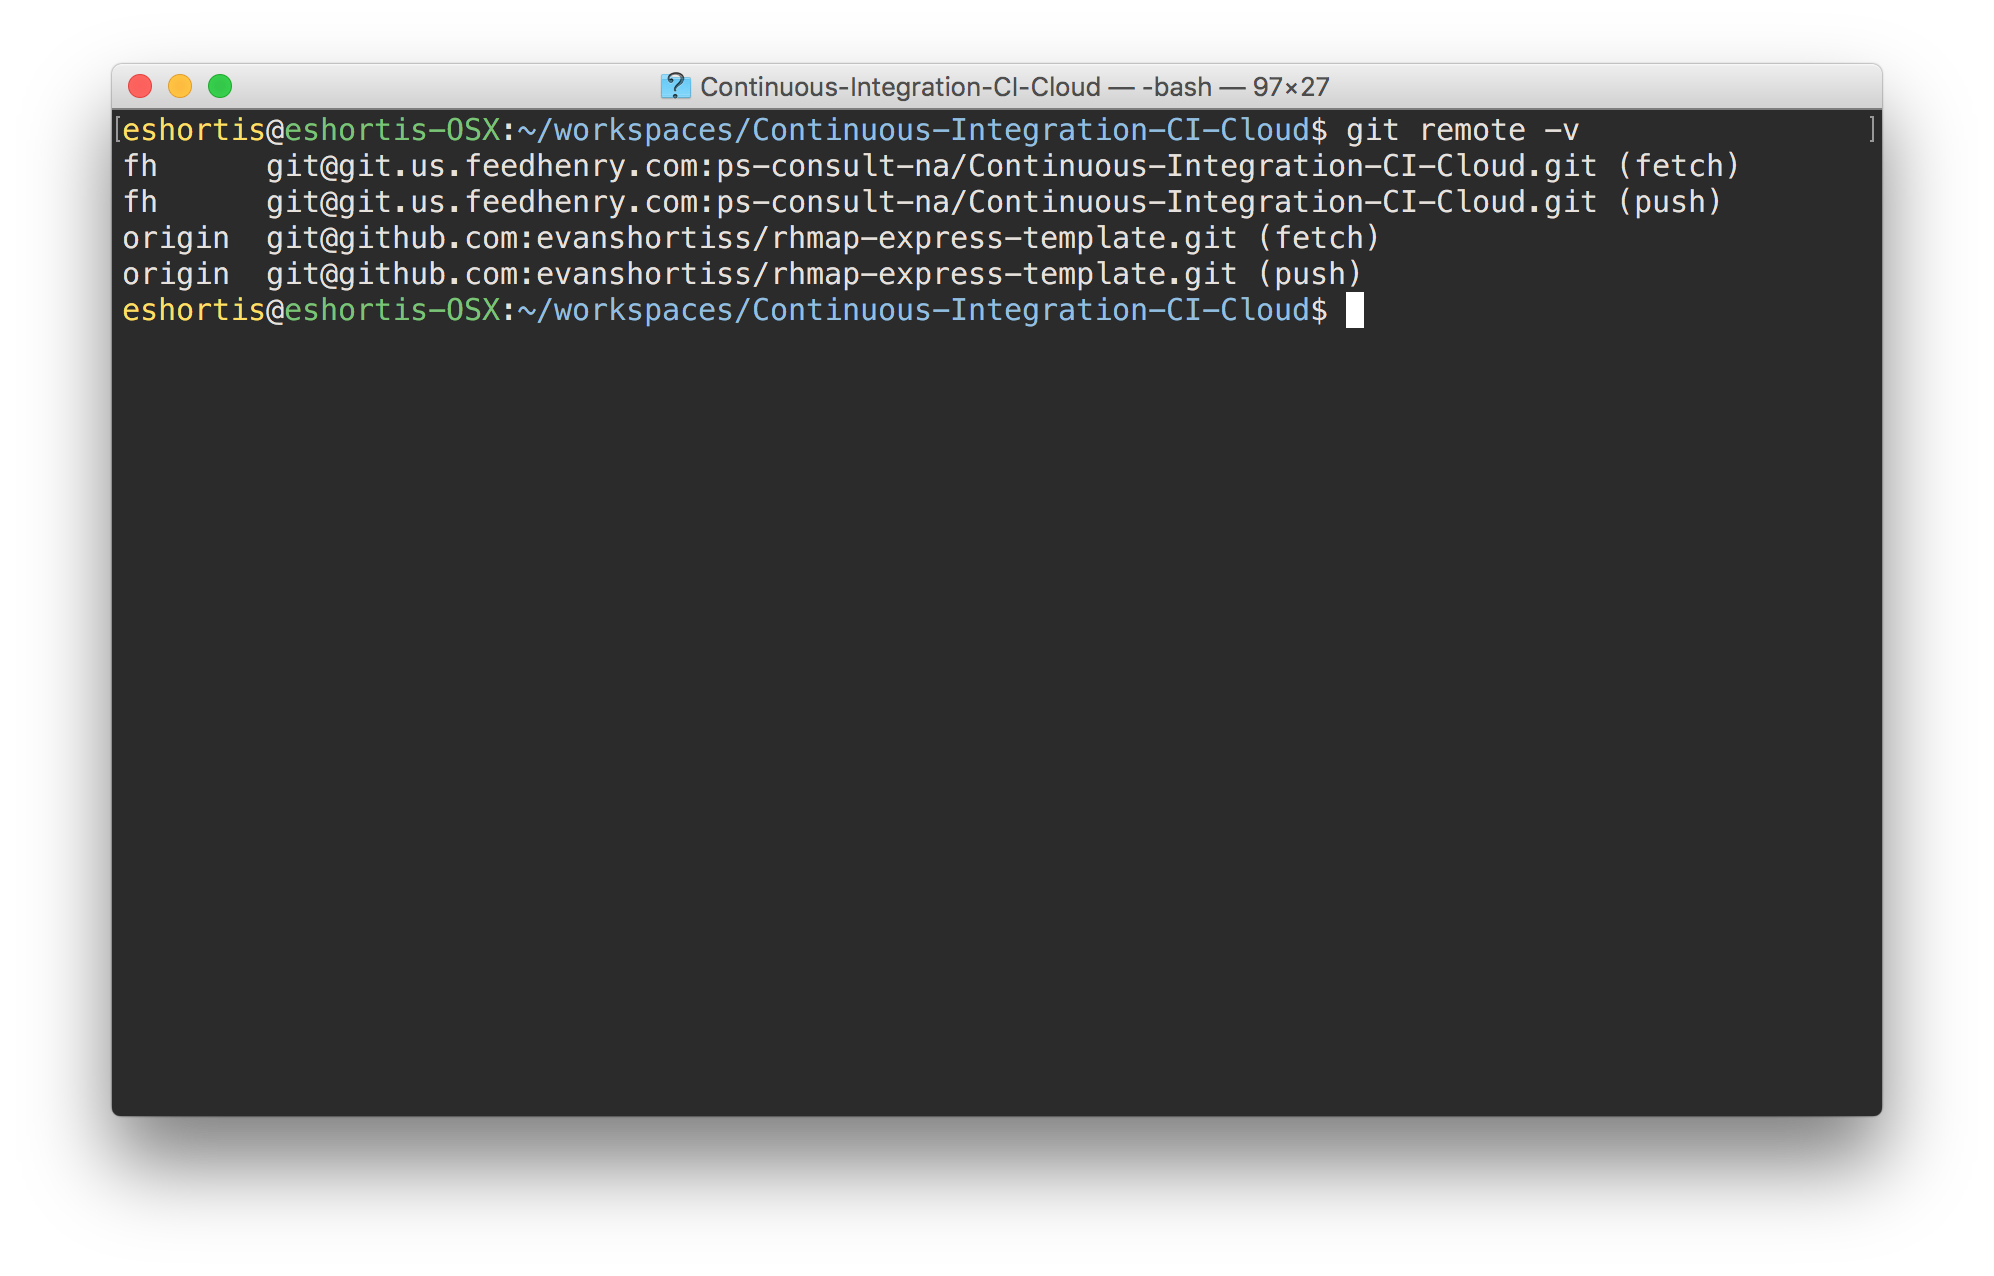
The screenshot above lists all remotes that my application's local Git repository has configured. In this case the remotes are github.com and git.us.feedhenry.com. This means I can push/pull my code to/from origin or fh when I choose to perform a Git command. Put simply, I can easily store the code in multiple locations without any overhead, and I could easily add or remove new Git remotes as desired.
So what bearing does this have on continuous integration? Using Git allows us to use GitHub as the primary remote store (often referred to as origin) and use the RHMAP remote repository only for deployment of code.
By storing our code in GitHub, we can utilize all the great issue tracking, plugins, pull requests, and other features that GitHub has developed to make collaboration a breeze. More importantly for us, it also makes integration with continuous integration providers a breeze - we can use CircleCI, or even the Jenkins plugin for GitHub.
Git repository & project setup
Fork the template application on GitHub
For the purpose of this tutorial we’re going to use a template express application that has some tests ready to run. You can find the template at https://github.com/evanshortiss/rhmap-express-template.
Fork this template to your GitHub account using the "Fork" button in the upper righthand corner of the project page. If you can’t see a Fork button then you probably aren’t logged into GitHub. (You'll need to create an account if you don't already have one.)
Once you’ve got the project forked you can view it at https://github.com/{YOUR_GITHUB_USERNAME}/rhmap-express-template. This will be your primary working repository from this point forward.
Create a new project on Red Hat Mobile
Now that we’ve got a template application, we’ll want to deploy it somewhere. That’s where the Red Hat Mobile Application Platform (RHMAP) comes in! Since we’re using GitHub, we can easily import our project into RHMAP.
Start by signing into your RHMAP domain and creating a new Project. (You can create a new Project by visiting the Projects page of your domain and clicking the “New Project” button.)
When the New Project screen loads, find the “Bare Project” template by checking the “Blank” checkbox on the left. You should see the following:

Click “Choose” and enter a name when prompted. Finally, click “Create” and (after a short wait) you should be able to click the “Finish” button. Once you’ve finished up you’ll be placed on the Project “Apps, Cloud Apps & Services” screen shown below:
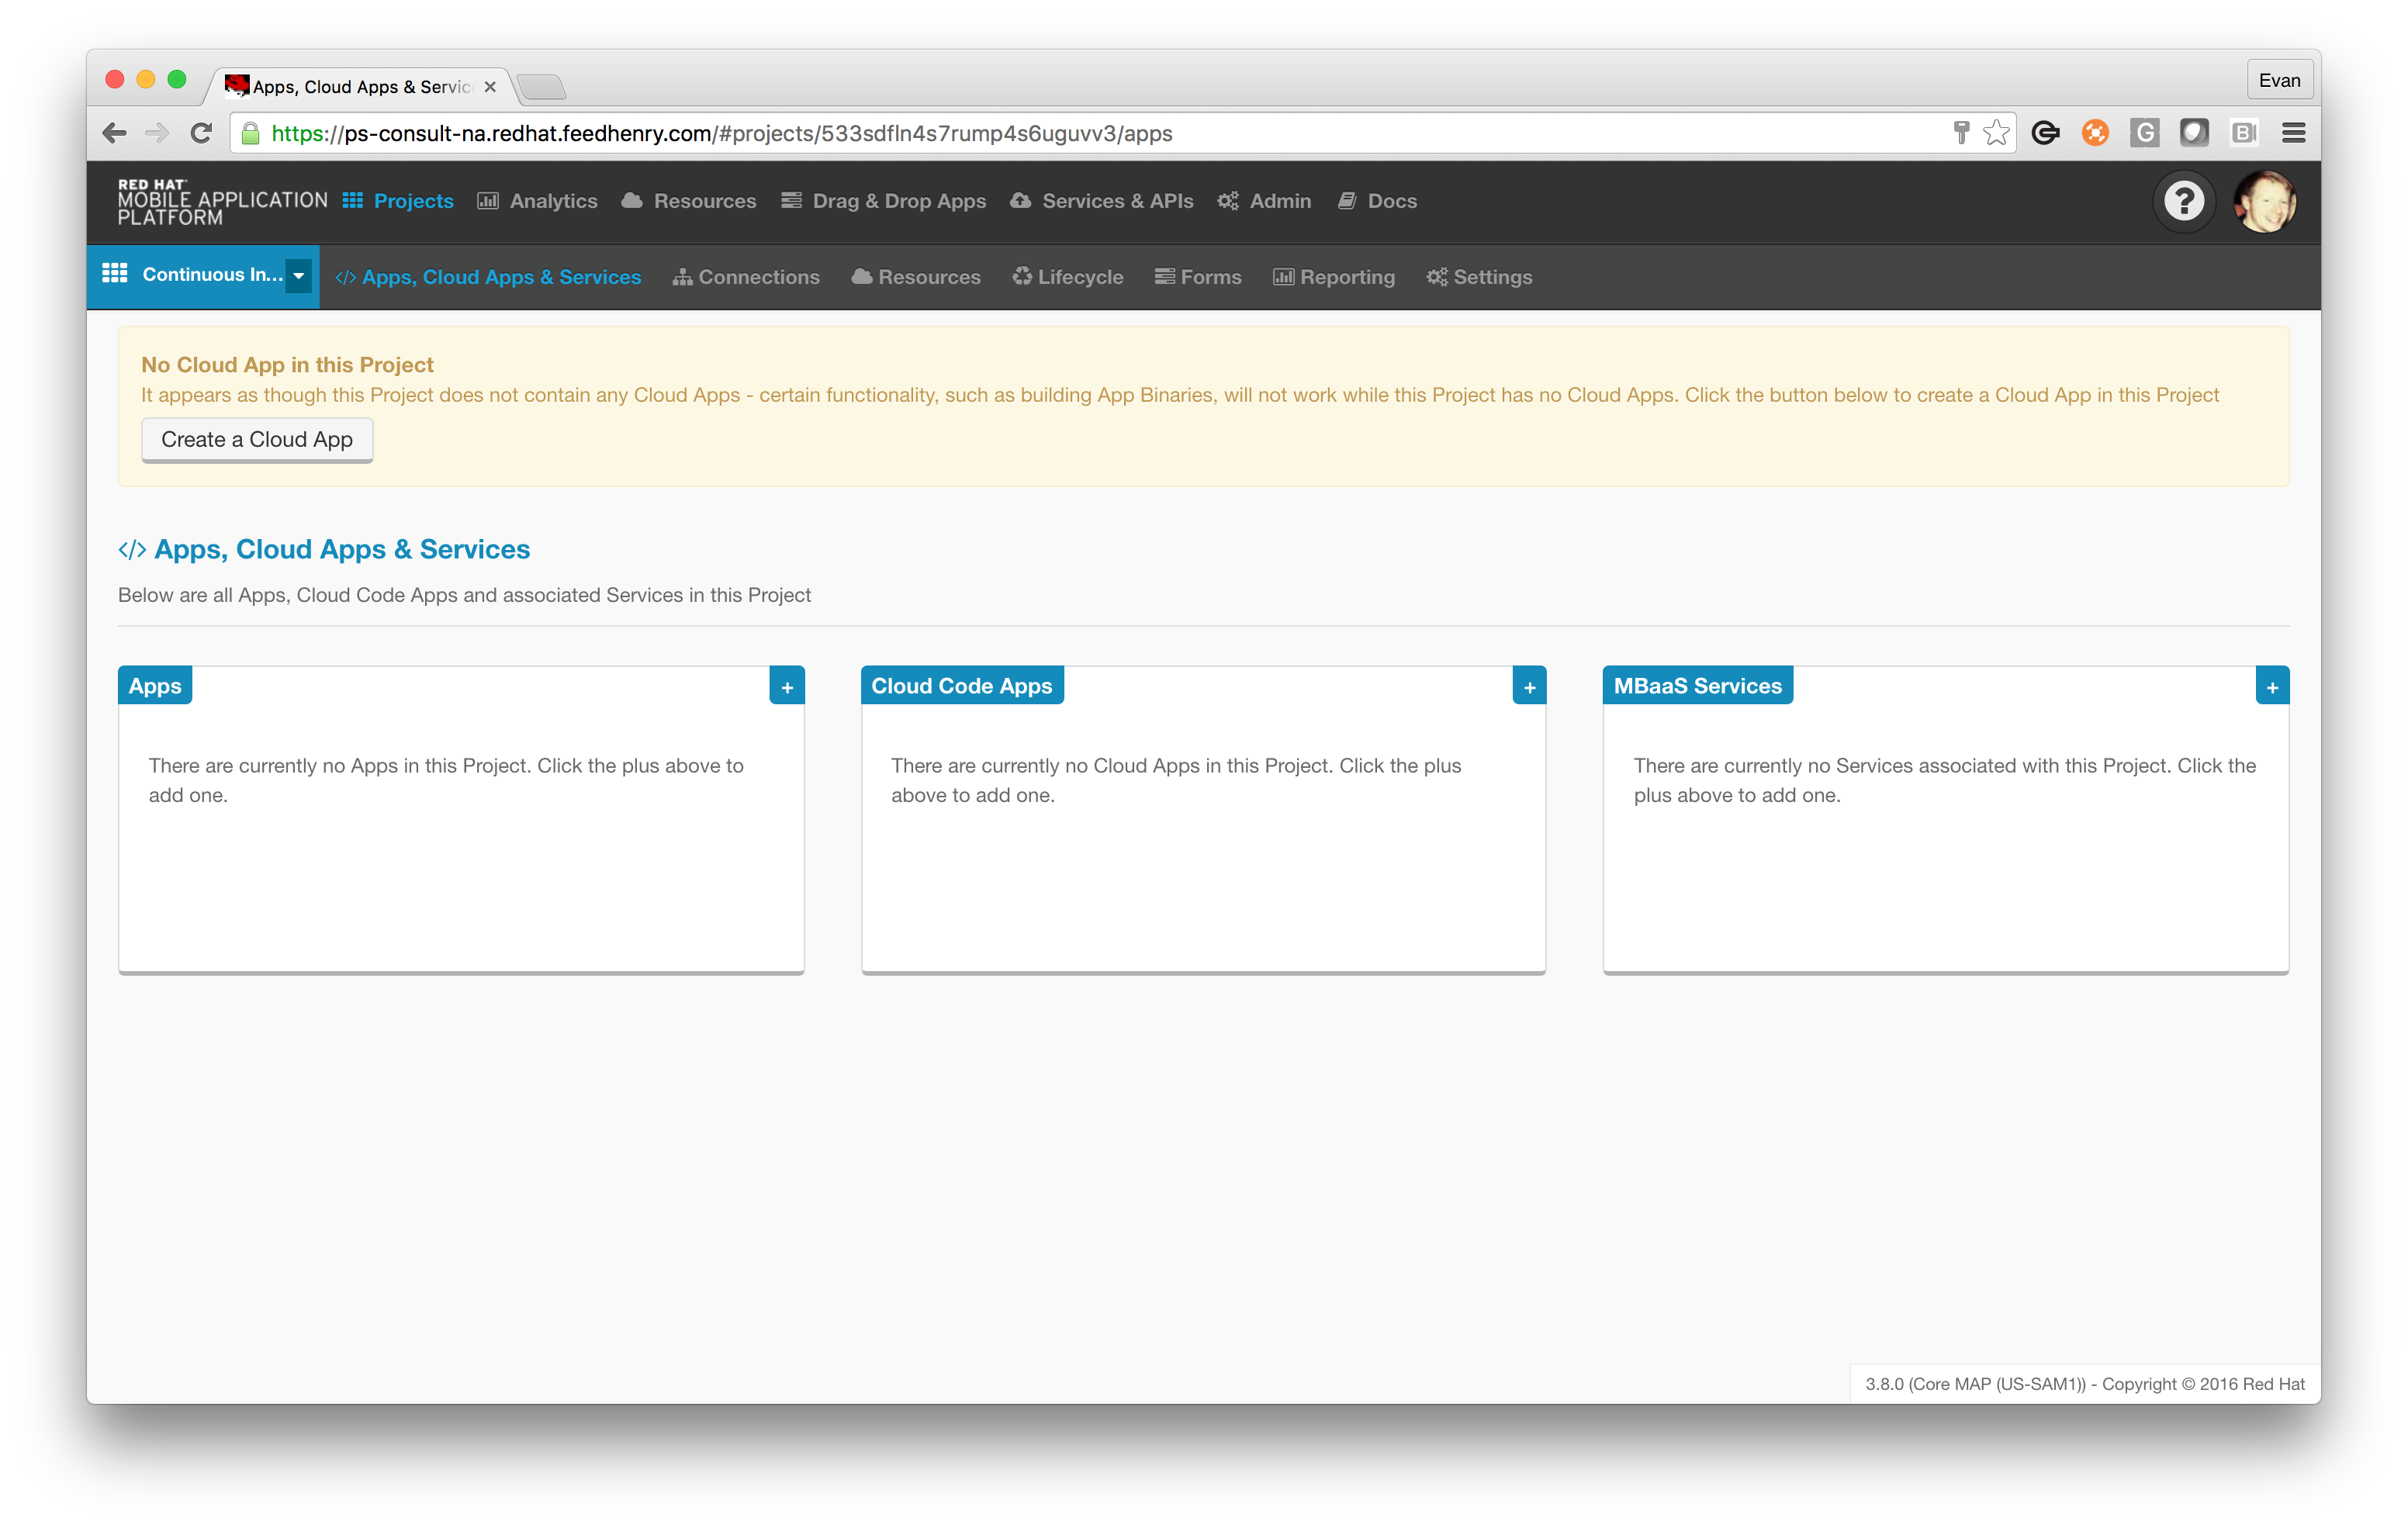
From here we’re going to choose “Create a Cloud App”, then do the following on the subsequent screen:
- Choose “Import Existing Application”
- Click “Next”
- Enter a name
- Select “Development” as the environment
- Click “Next”
- Choose “Public Git Repository”
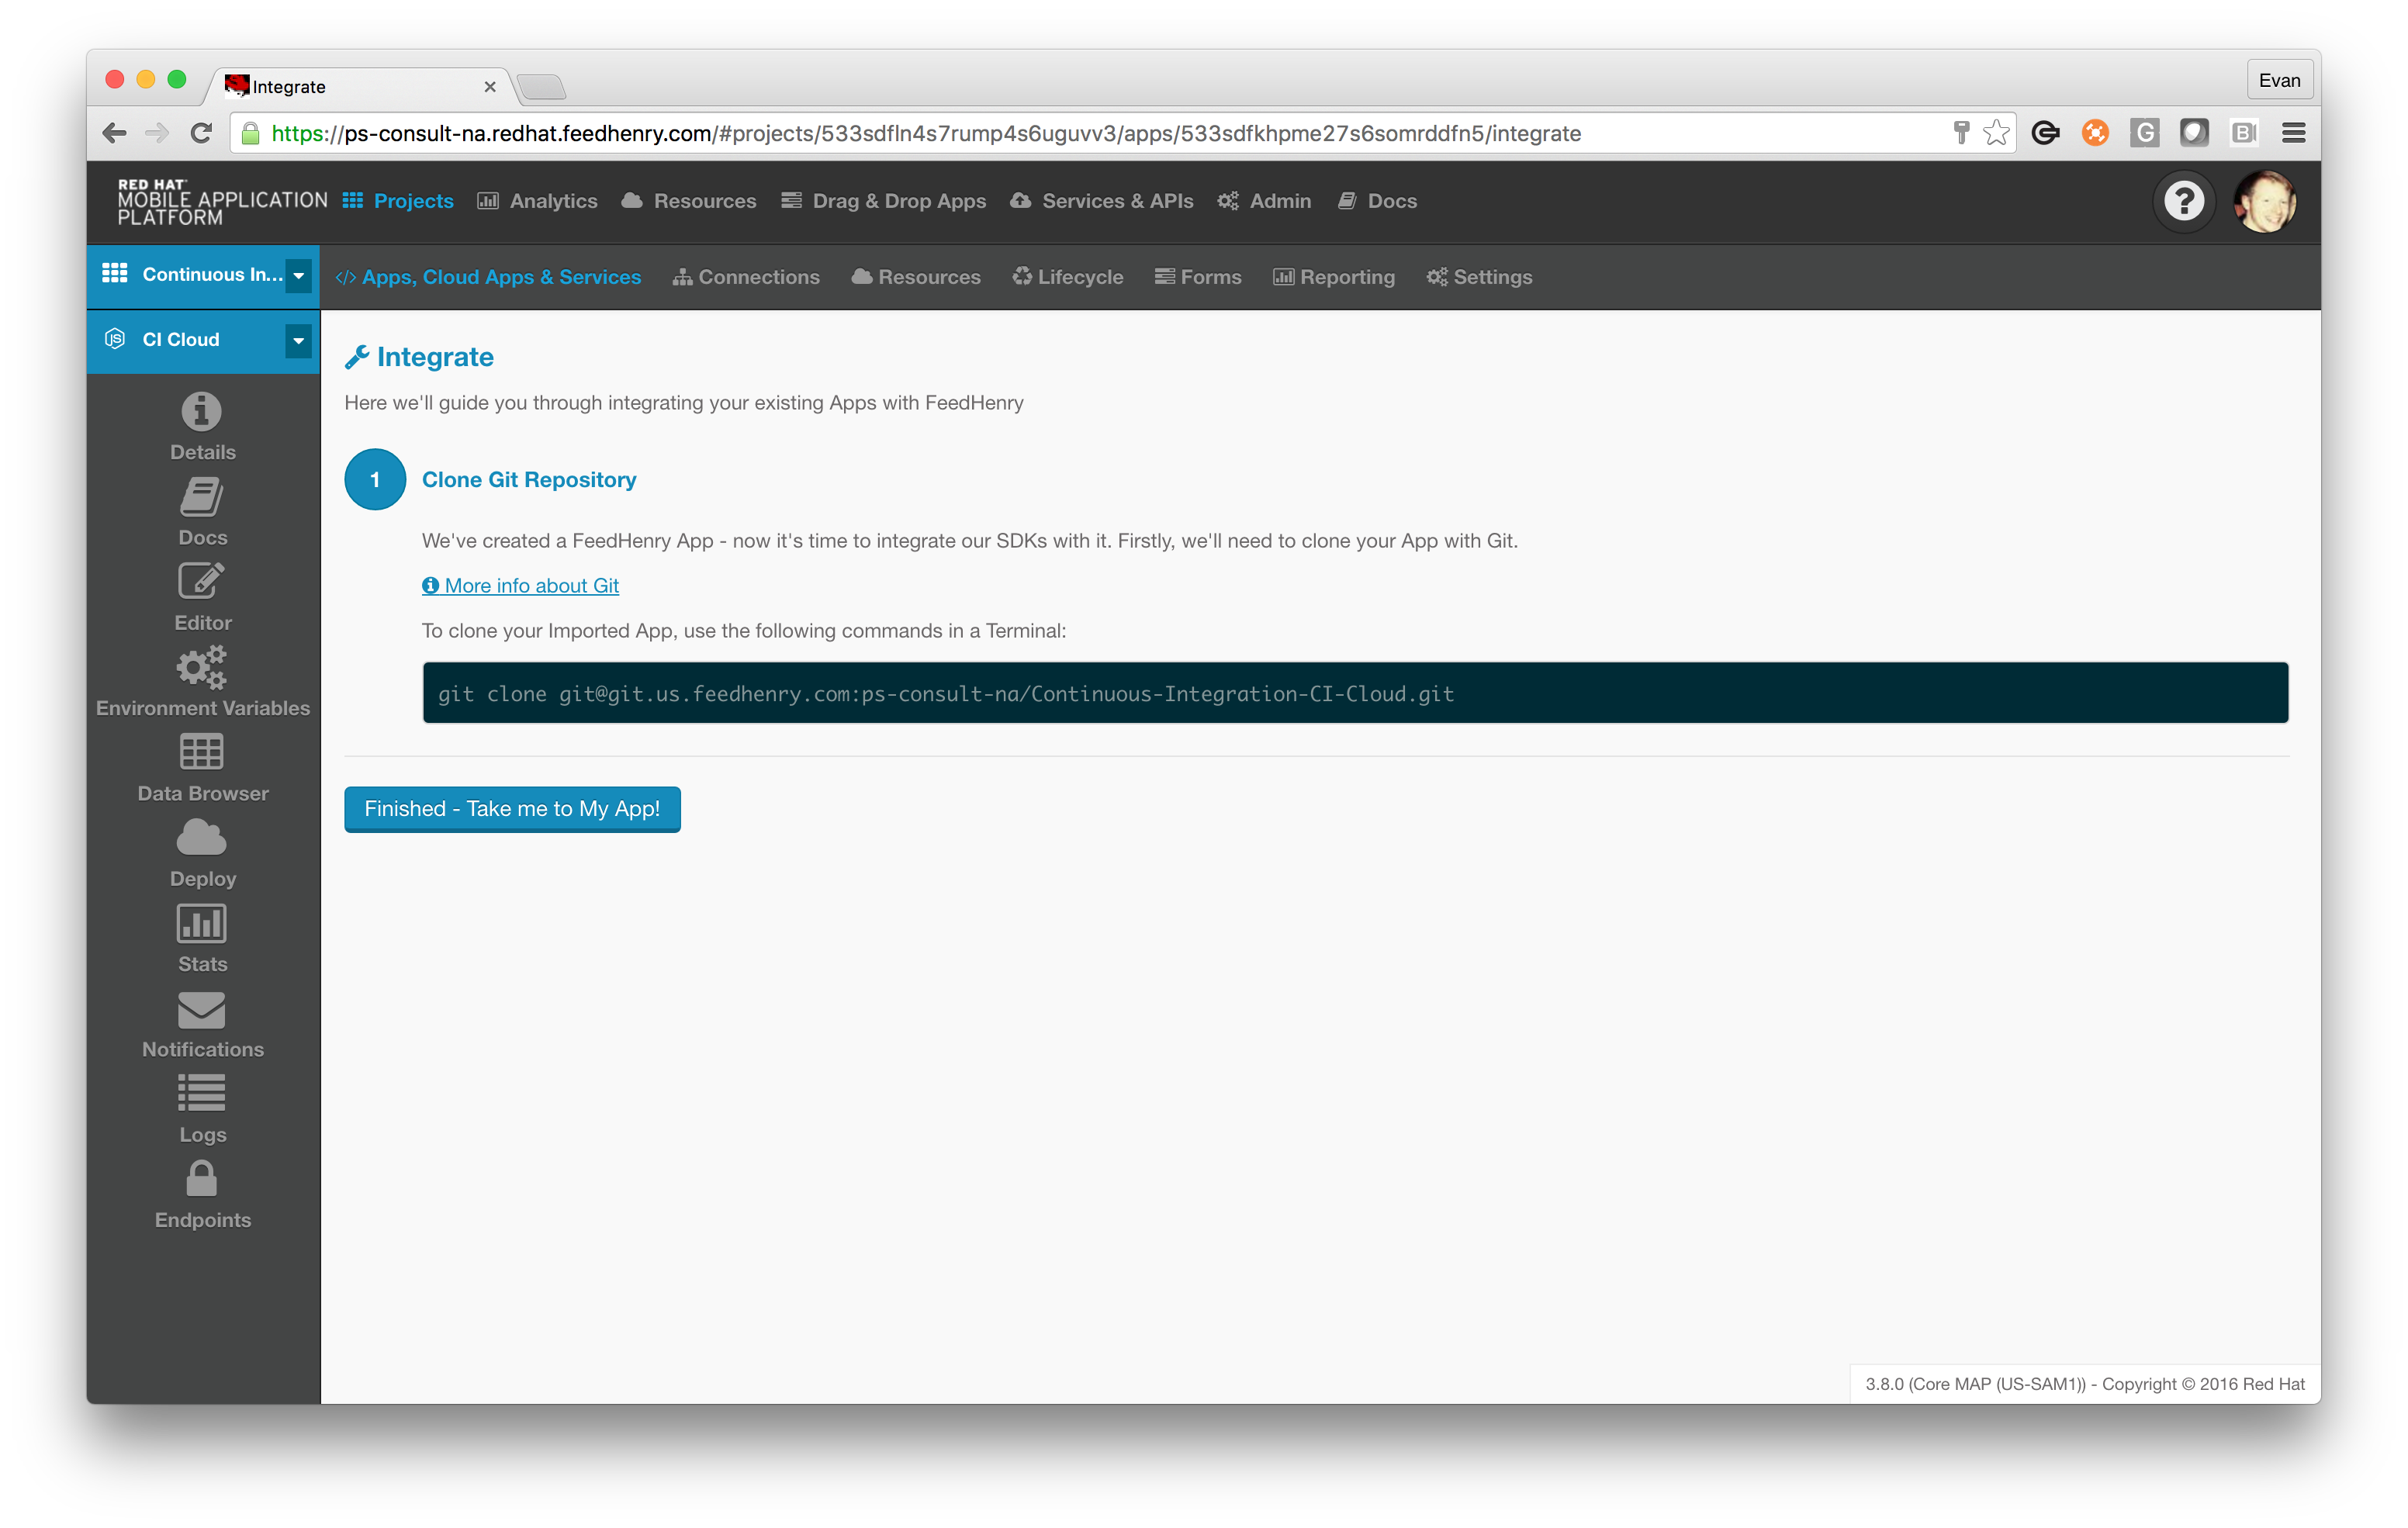
Once prompted, enter the Git URL of the fork we created earlier, for example I entered https://github.com/evanshortiss/rhmap-express-template. Enter “master” as the Git Branch value. Finally click “Import & Move on to Integration”. After a short wait you should see the following screen which indicates we’re finished this step.
Create a continuous deployment user
This step can only be performed for enterprise deployments of the Red Hat Mobile Application Platform. You can skip this section if you’re using the community edition (e.g yourname.openshift.feedhenry.com).
Security is a top priority for RHMAP. We want to enable you to use the tools you love to build great applications, and we also want to ensure you can do so securely. In this section we’ll demonstrate how you can create a user with restricted permissions that can be used to deploy your application from CircleCI.
Create a deployment user account
Navigate to the Admin section of the Studio and select the Users pane to get started.From the users screen you can use the “Create” button to add our new user. In the example below we create a dev.deploys@redhat.com user. Create a username and password and skip the “Invite Email” if desired. Do not add any Teams for the user just yet.
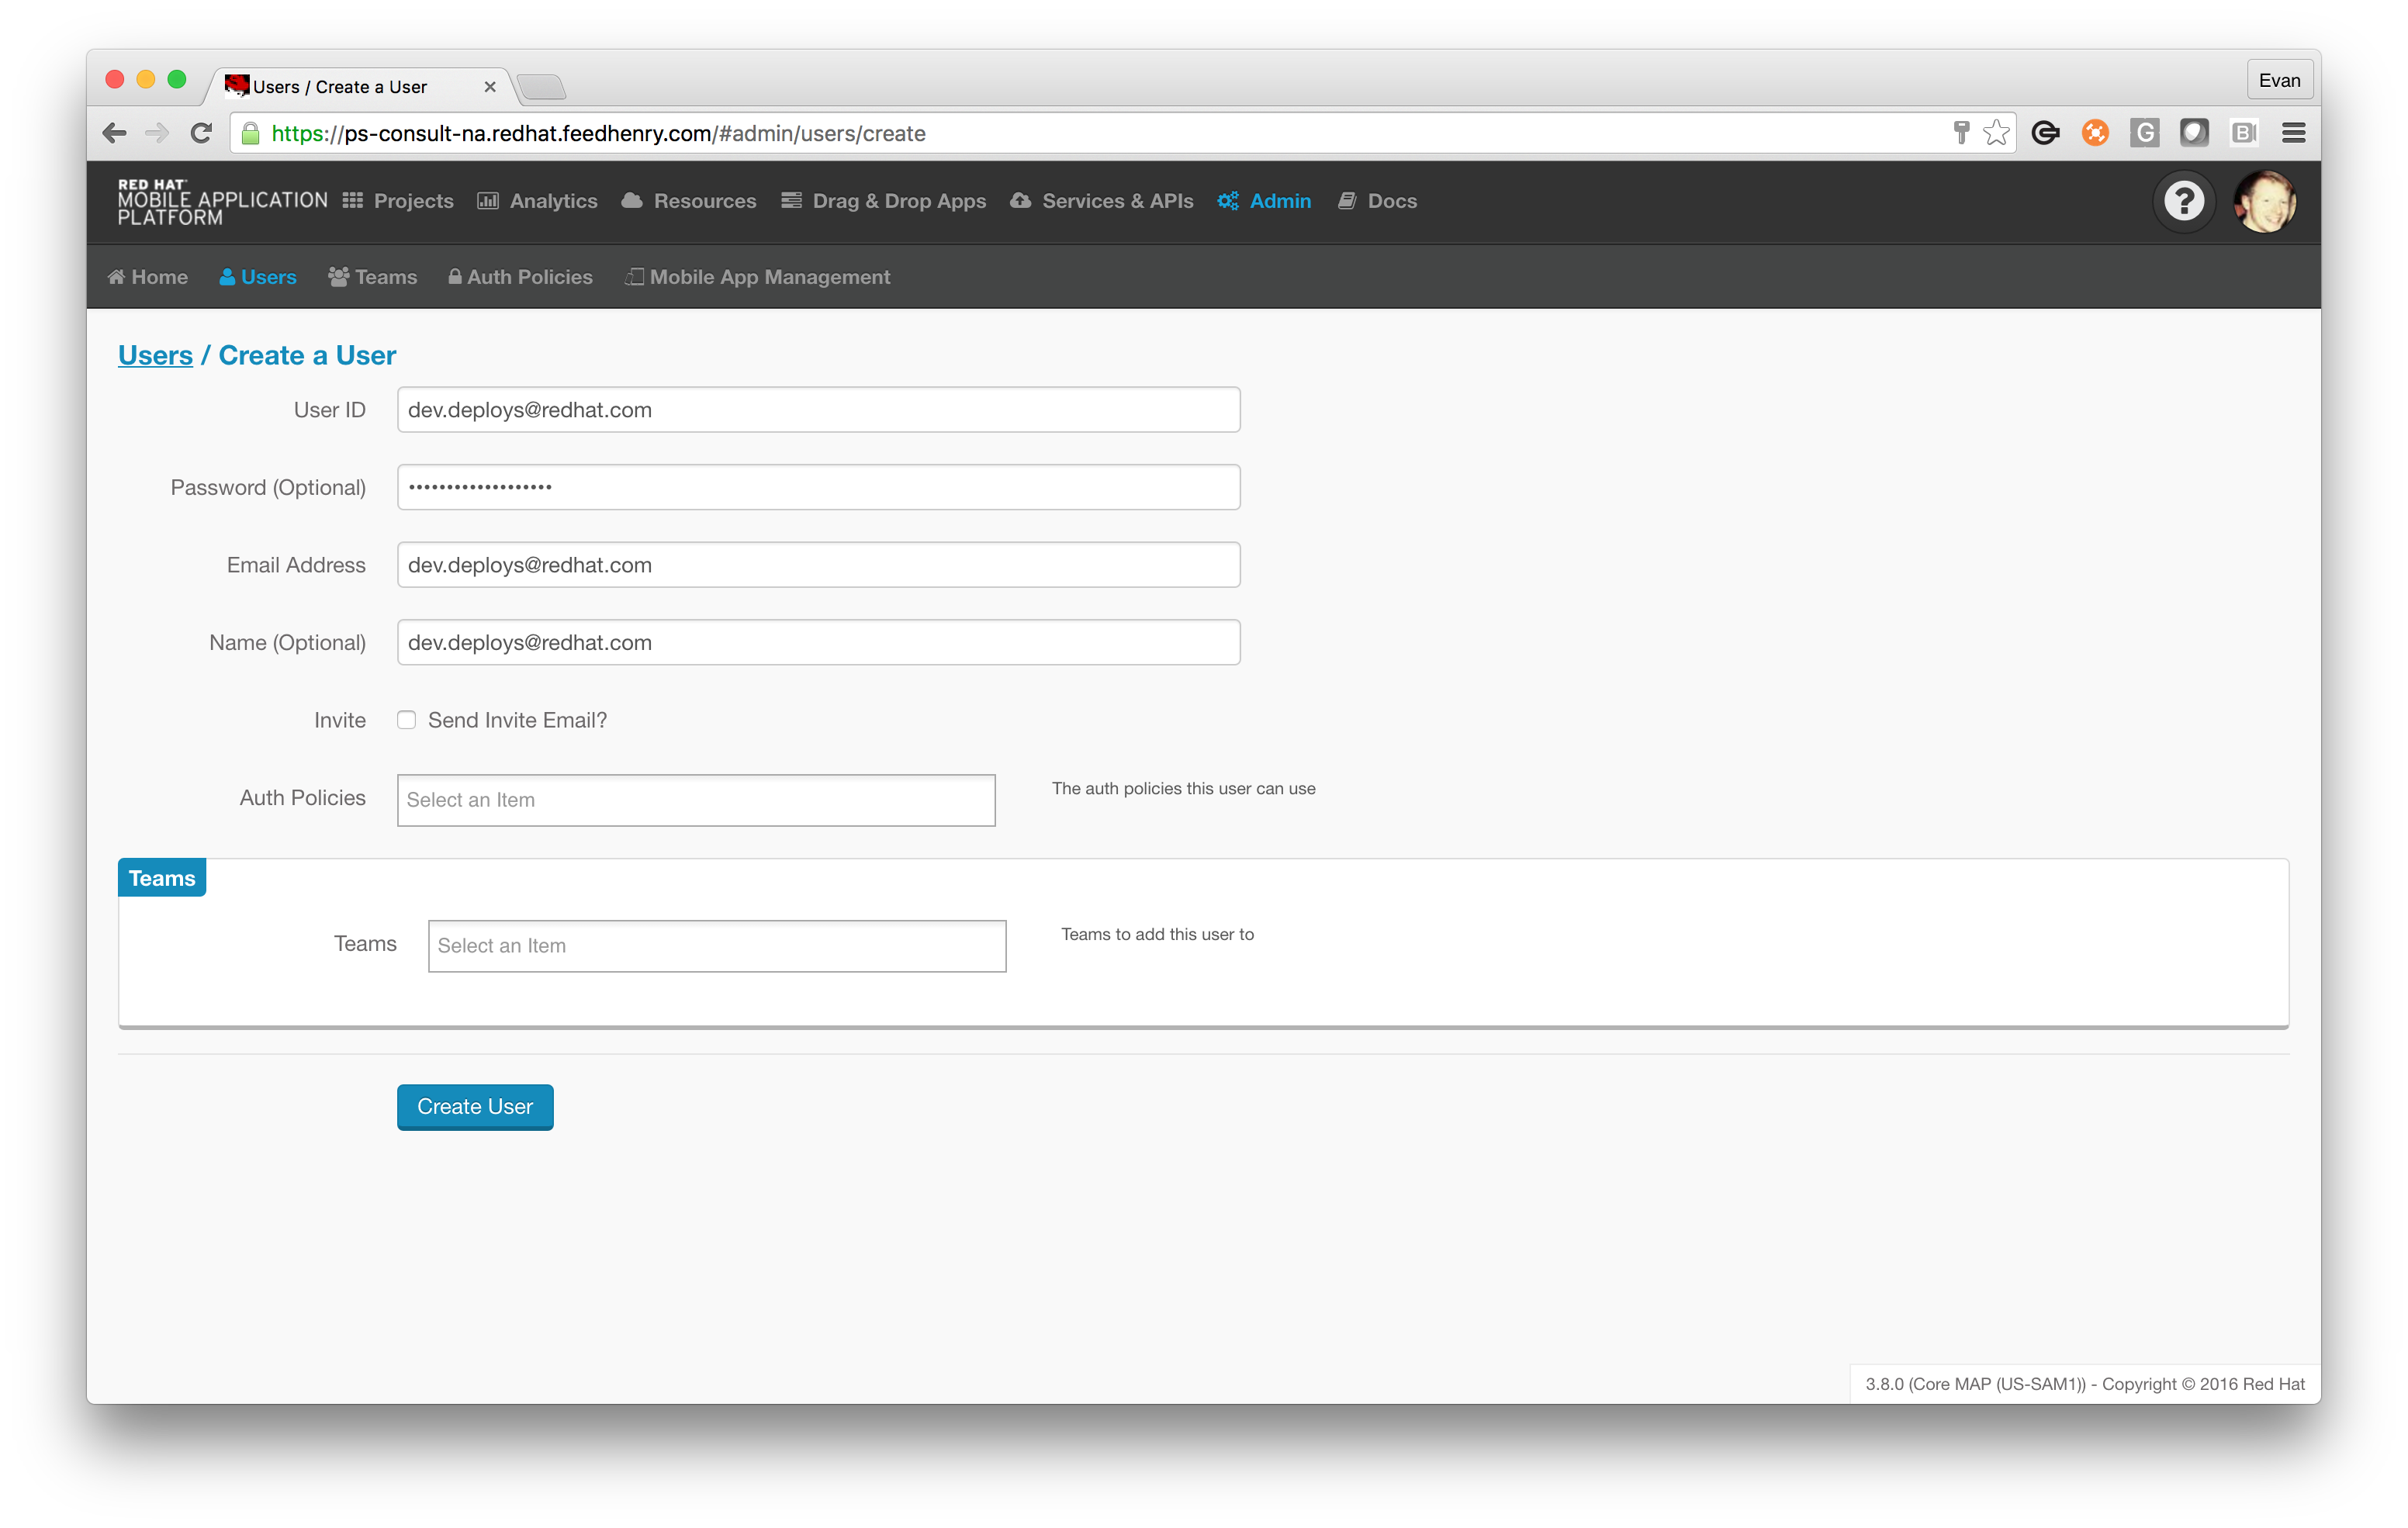
It’s worth noting we added added dev to our username since you might want to have a user defined for each environment you plan to deploy to. Once you’re happy with your settings entered click create and head on to the next section.
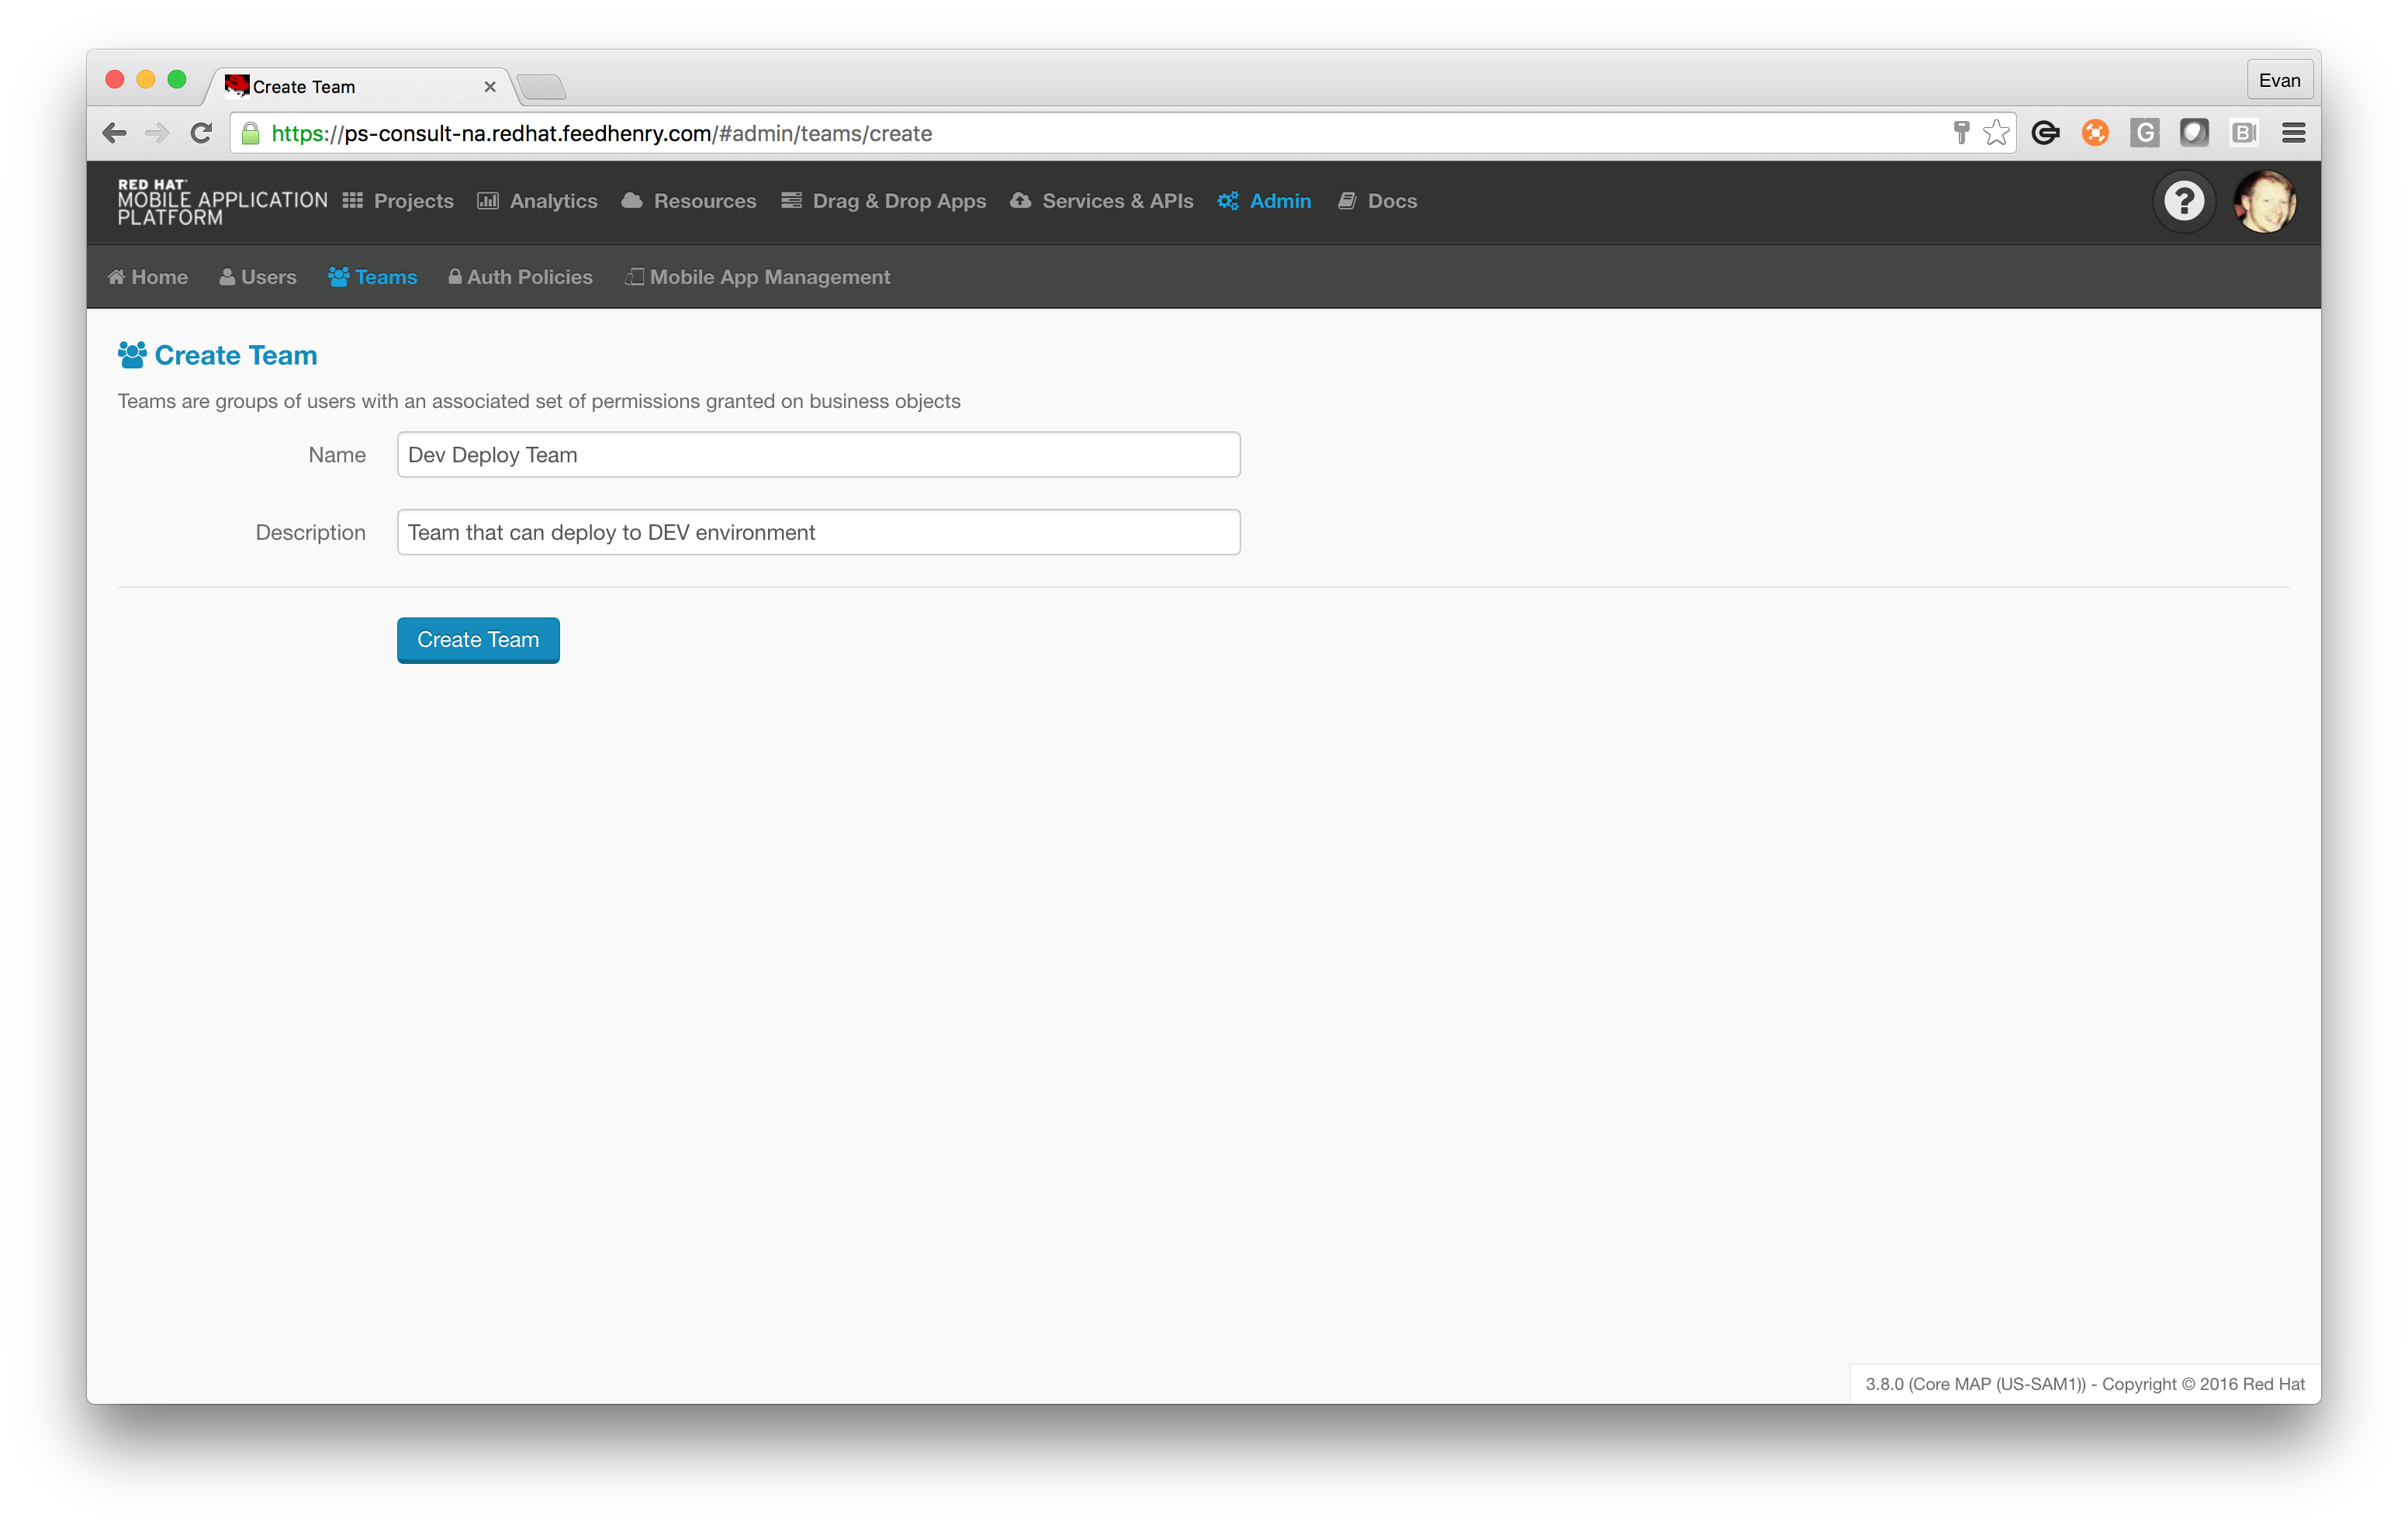
Create a deploy user team/role
Now that we have a user we need to give that user some permissions so they can deploy our Cloud Application. Start out by navigating to the "Admin" screen again and selecting the "Teams" tab. On the next screen choose “Create Team” and when prompted, enter a name and description similar to the example in the screenshot below and click “Create Team”:
After creating the Team you’ll be brought to the "Team Dashboard" screen. On this screen you’ll see a number of items in the "Permissions Tree" that can be configured for our new Team. We’re interested in modifying the "Domain > Project" settings so that our new Team can Edit the project. We also set “Access All” to “Off” and add the Project we created earlier to the Business Objects list.
The screenshot below shows this configuration.This will allow our CI Server to update our Git repository for the project. Take a moment to ensure your settings are configured like the screenshot below:

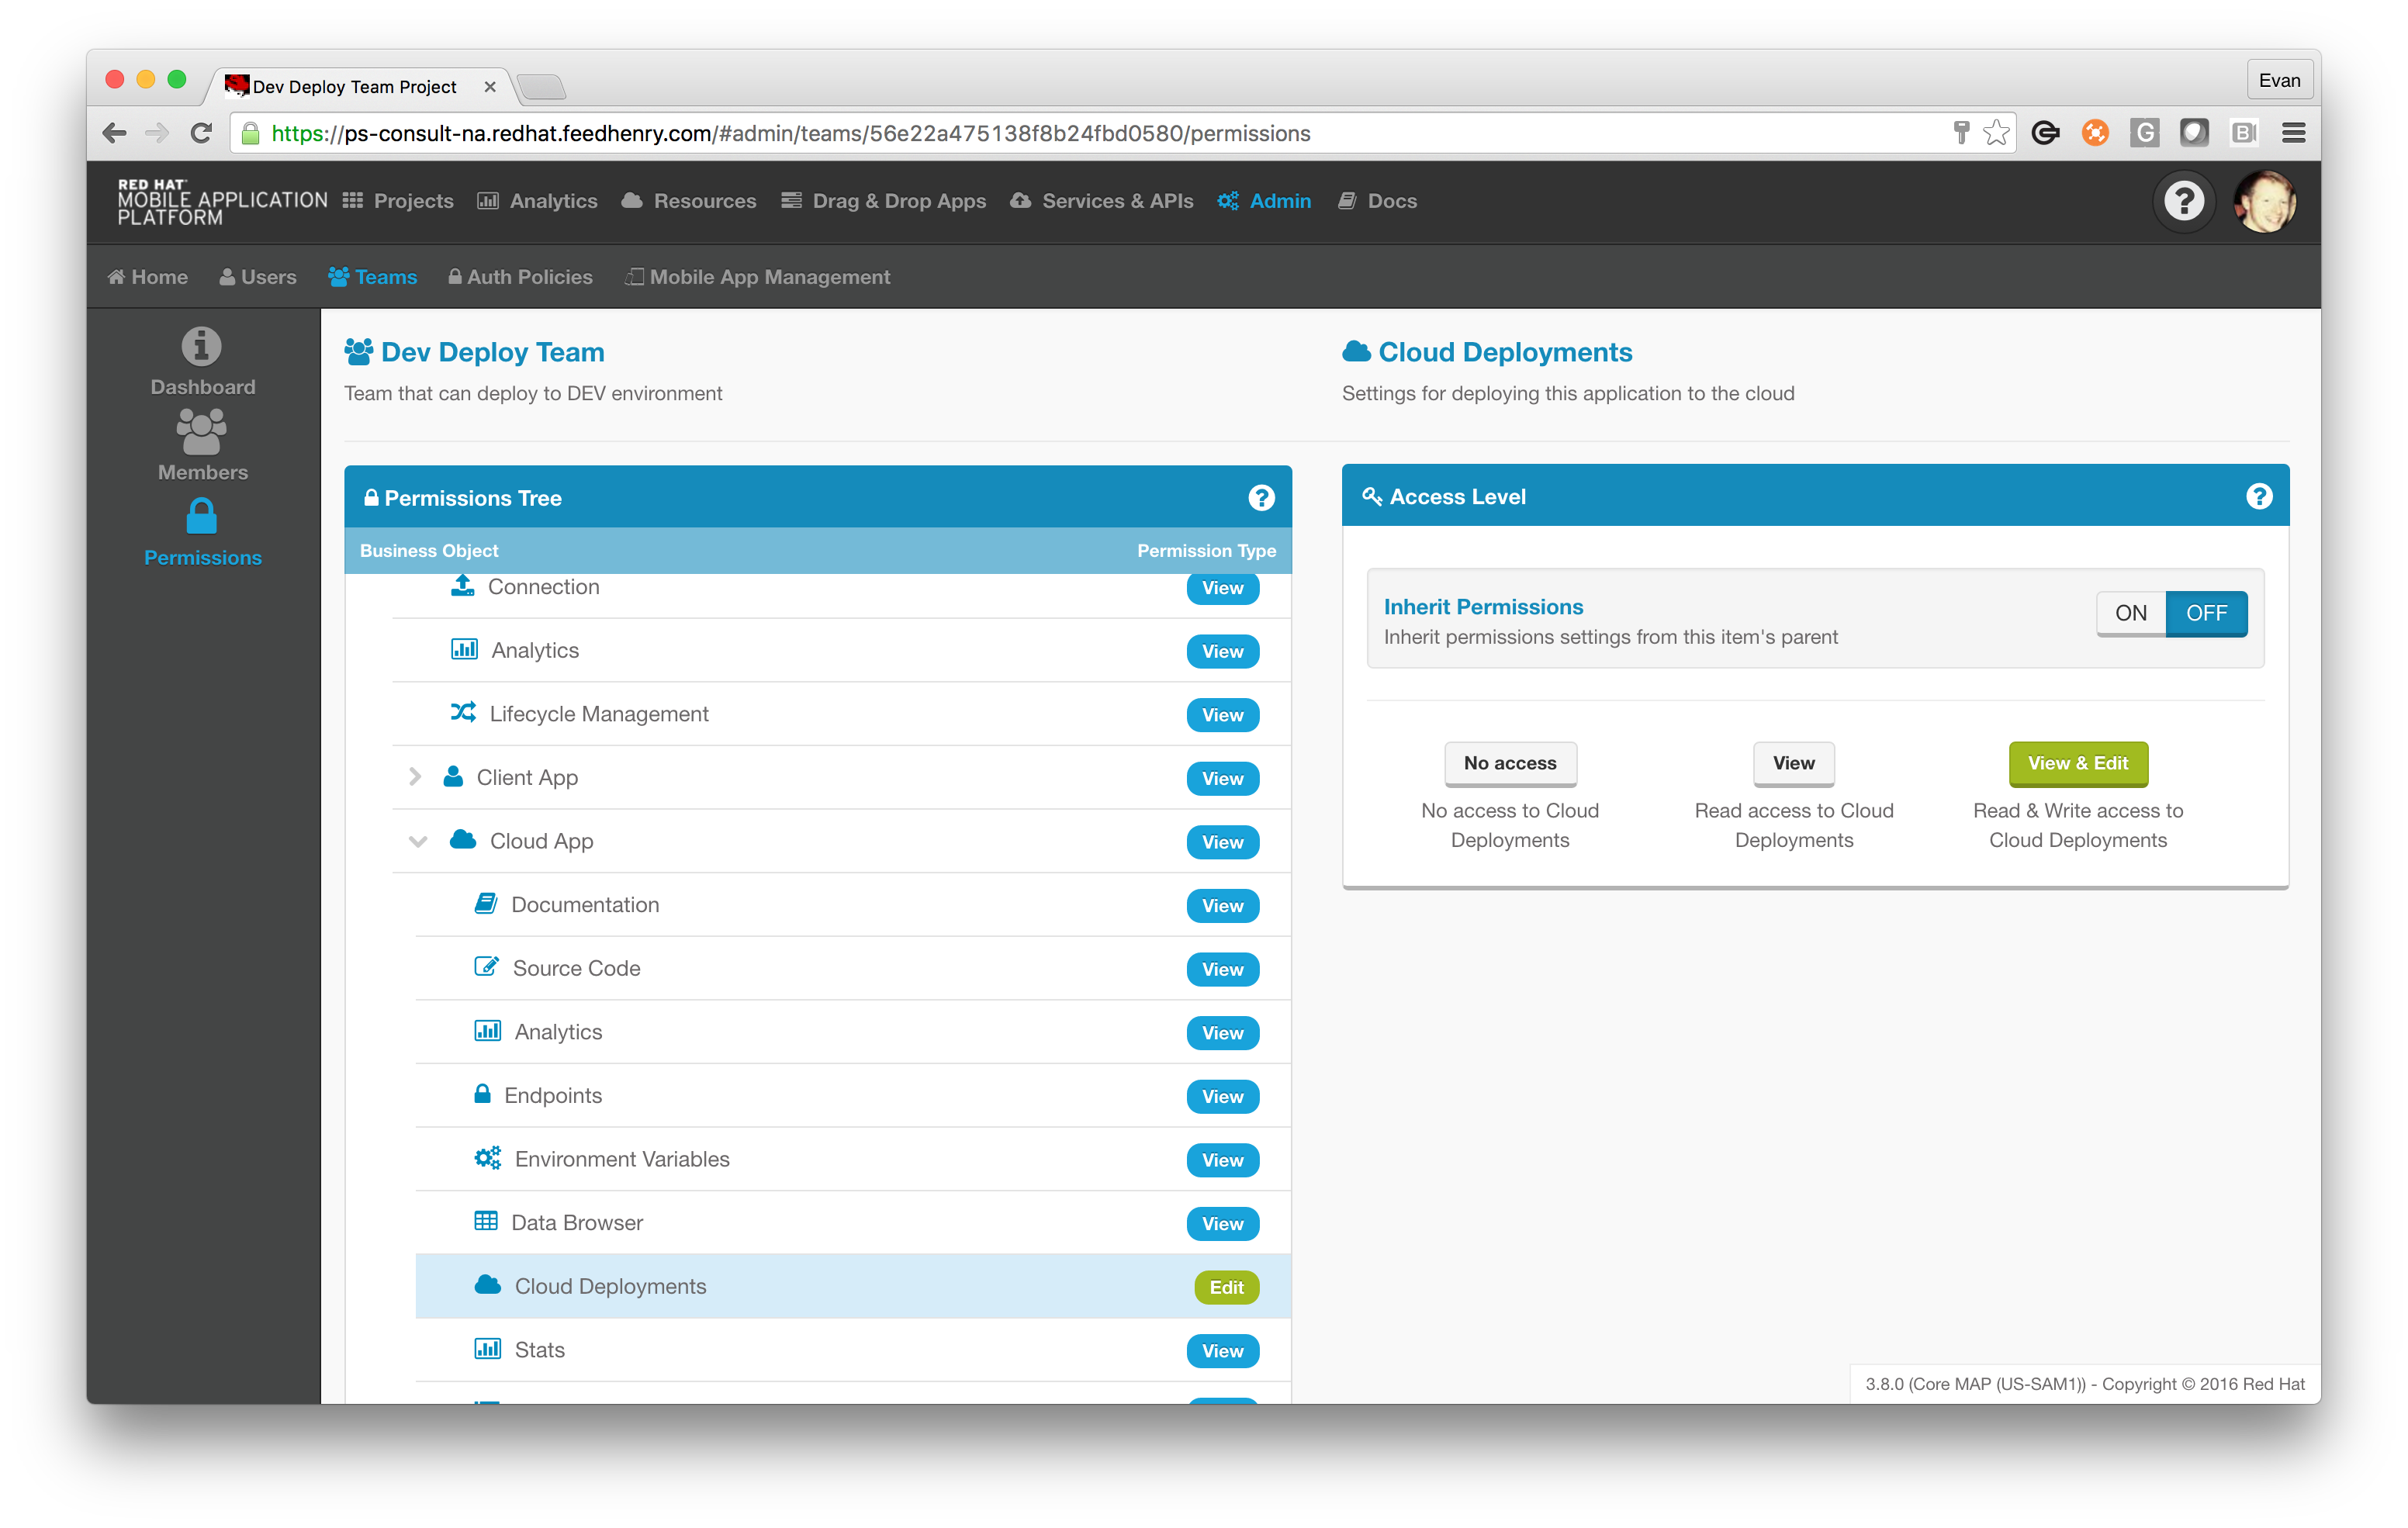
Next we need to modify "Domain > Project > Cloud App > Cloud Deployment" to have “View & Edit” permissions as shown below:
Then we need to update the Team to have view permission for our Environments by changing "Domain > Admin > Environment" to "View".

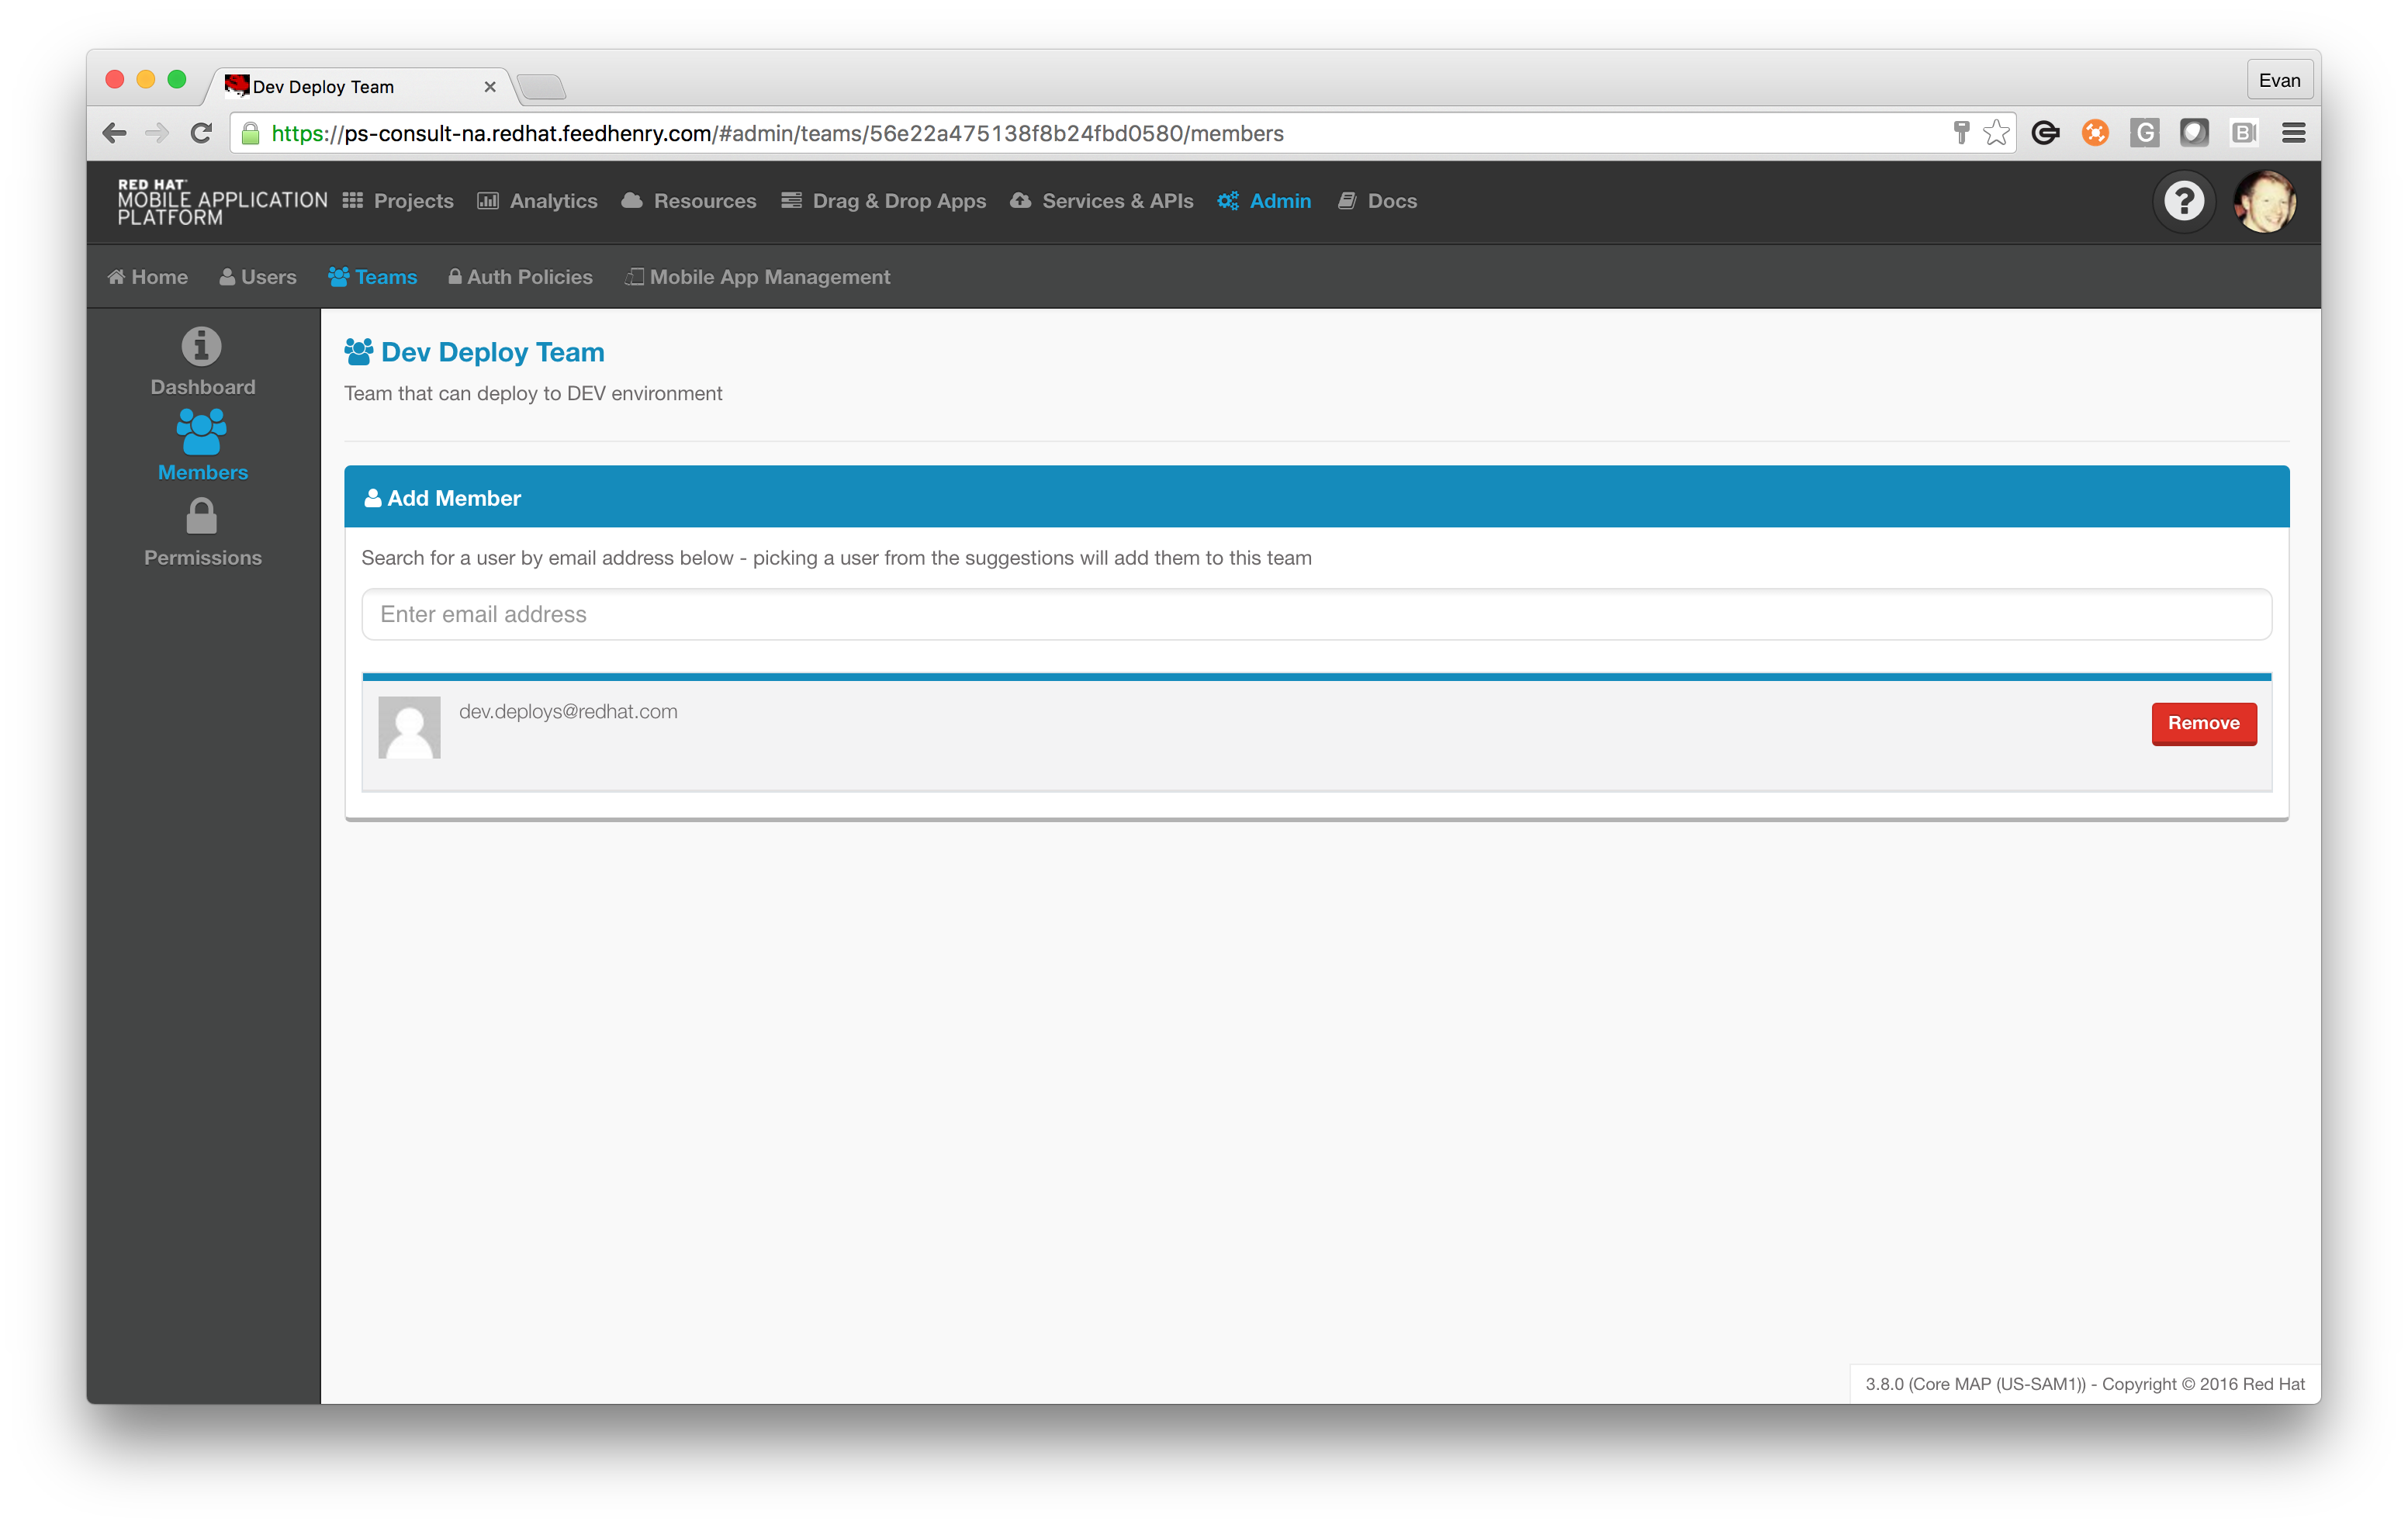
Lastly, we need to assign a role in this Team to a the user we created to allow CircleCI access to the application. Switch to the “Members” screen using the icon on the left and use the “Add Member” section to add the user:
Install & use FHC
FHC is a Command Line Interface (CLI) that enables users to perform administrative actions for their RHMAP instance and applications. For continuous deployment, we’ll need to use FHC on our chosen CI service, but we’ll experiment with it on our local machine first. Install FHC on your machine by typing npm install -g fh-fhc in a terminal. Ensure you install version 2.4.0-206 or higher, eg. npm i -g fh-fhc@2.4.0-206
Target your domain and login
Now that FHC is installed, you can type fhc in a terminal to view available commands, but first let’s configure FHC by using the target and login commands. Use your own username and password to login (not the account we created for CircleCI), since we require full user permissions in order to use most commands.
fhc target YOUR_DOMAIN.feedhenry.com
fhc login <username> <password>
List projects and cloud applications
Listing projects can be done by using the command fhc projects - go ahead and issue this command now. Once the command completes, you can copy the ID of the project we’re working with to the clipboard and use it in the next command.
Using fhc apps we can view applications contained within a project. Issue the command fhc apps {PROJECT_ID}, using the previously copied project ID. Once this completes, copy the "ID" column for your cloud application, we’ll need it for the next step.
Deploy an application using FHC
FHC provides us with a stage command that we can use to deploy a cloud application - type fhc app stage to see the help output. When viewing this help, you should observe that it supports the same options as the deploy screen in RHMAP (no coincidence there.)
Issue the following command to deploy your application in the Development environment for your domain. (Be sure to replace {APP_ID} with the application ID we copied in the last step). We also want to use the latest code in the master branch:
fhc app stage --app={APP_ID} --env=dev --runtime=node010 --clean=true --gitRef.type=branch --gitRef.hash=HEAD --gitRef.value=master
The command should provide periodic status updates, and it should complete with a success message after a short period of time.
Configure CircleCI to test our cloud application
Configuring a project that’s hosted on GitHub to integrate with CircleCI is a one time task that CircleCI makes straightforward and intuitive.
Visit https://circleci.com and select “Log In”. When prompted, before finalizing the authorization, ensure you’re happy with the level of access CircleCI is requesting to your GitHub. Once you're satisfied, accept the agreement.
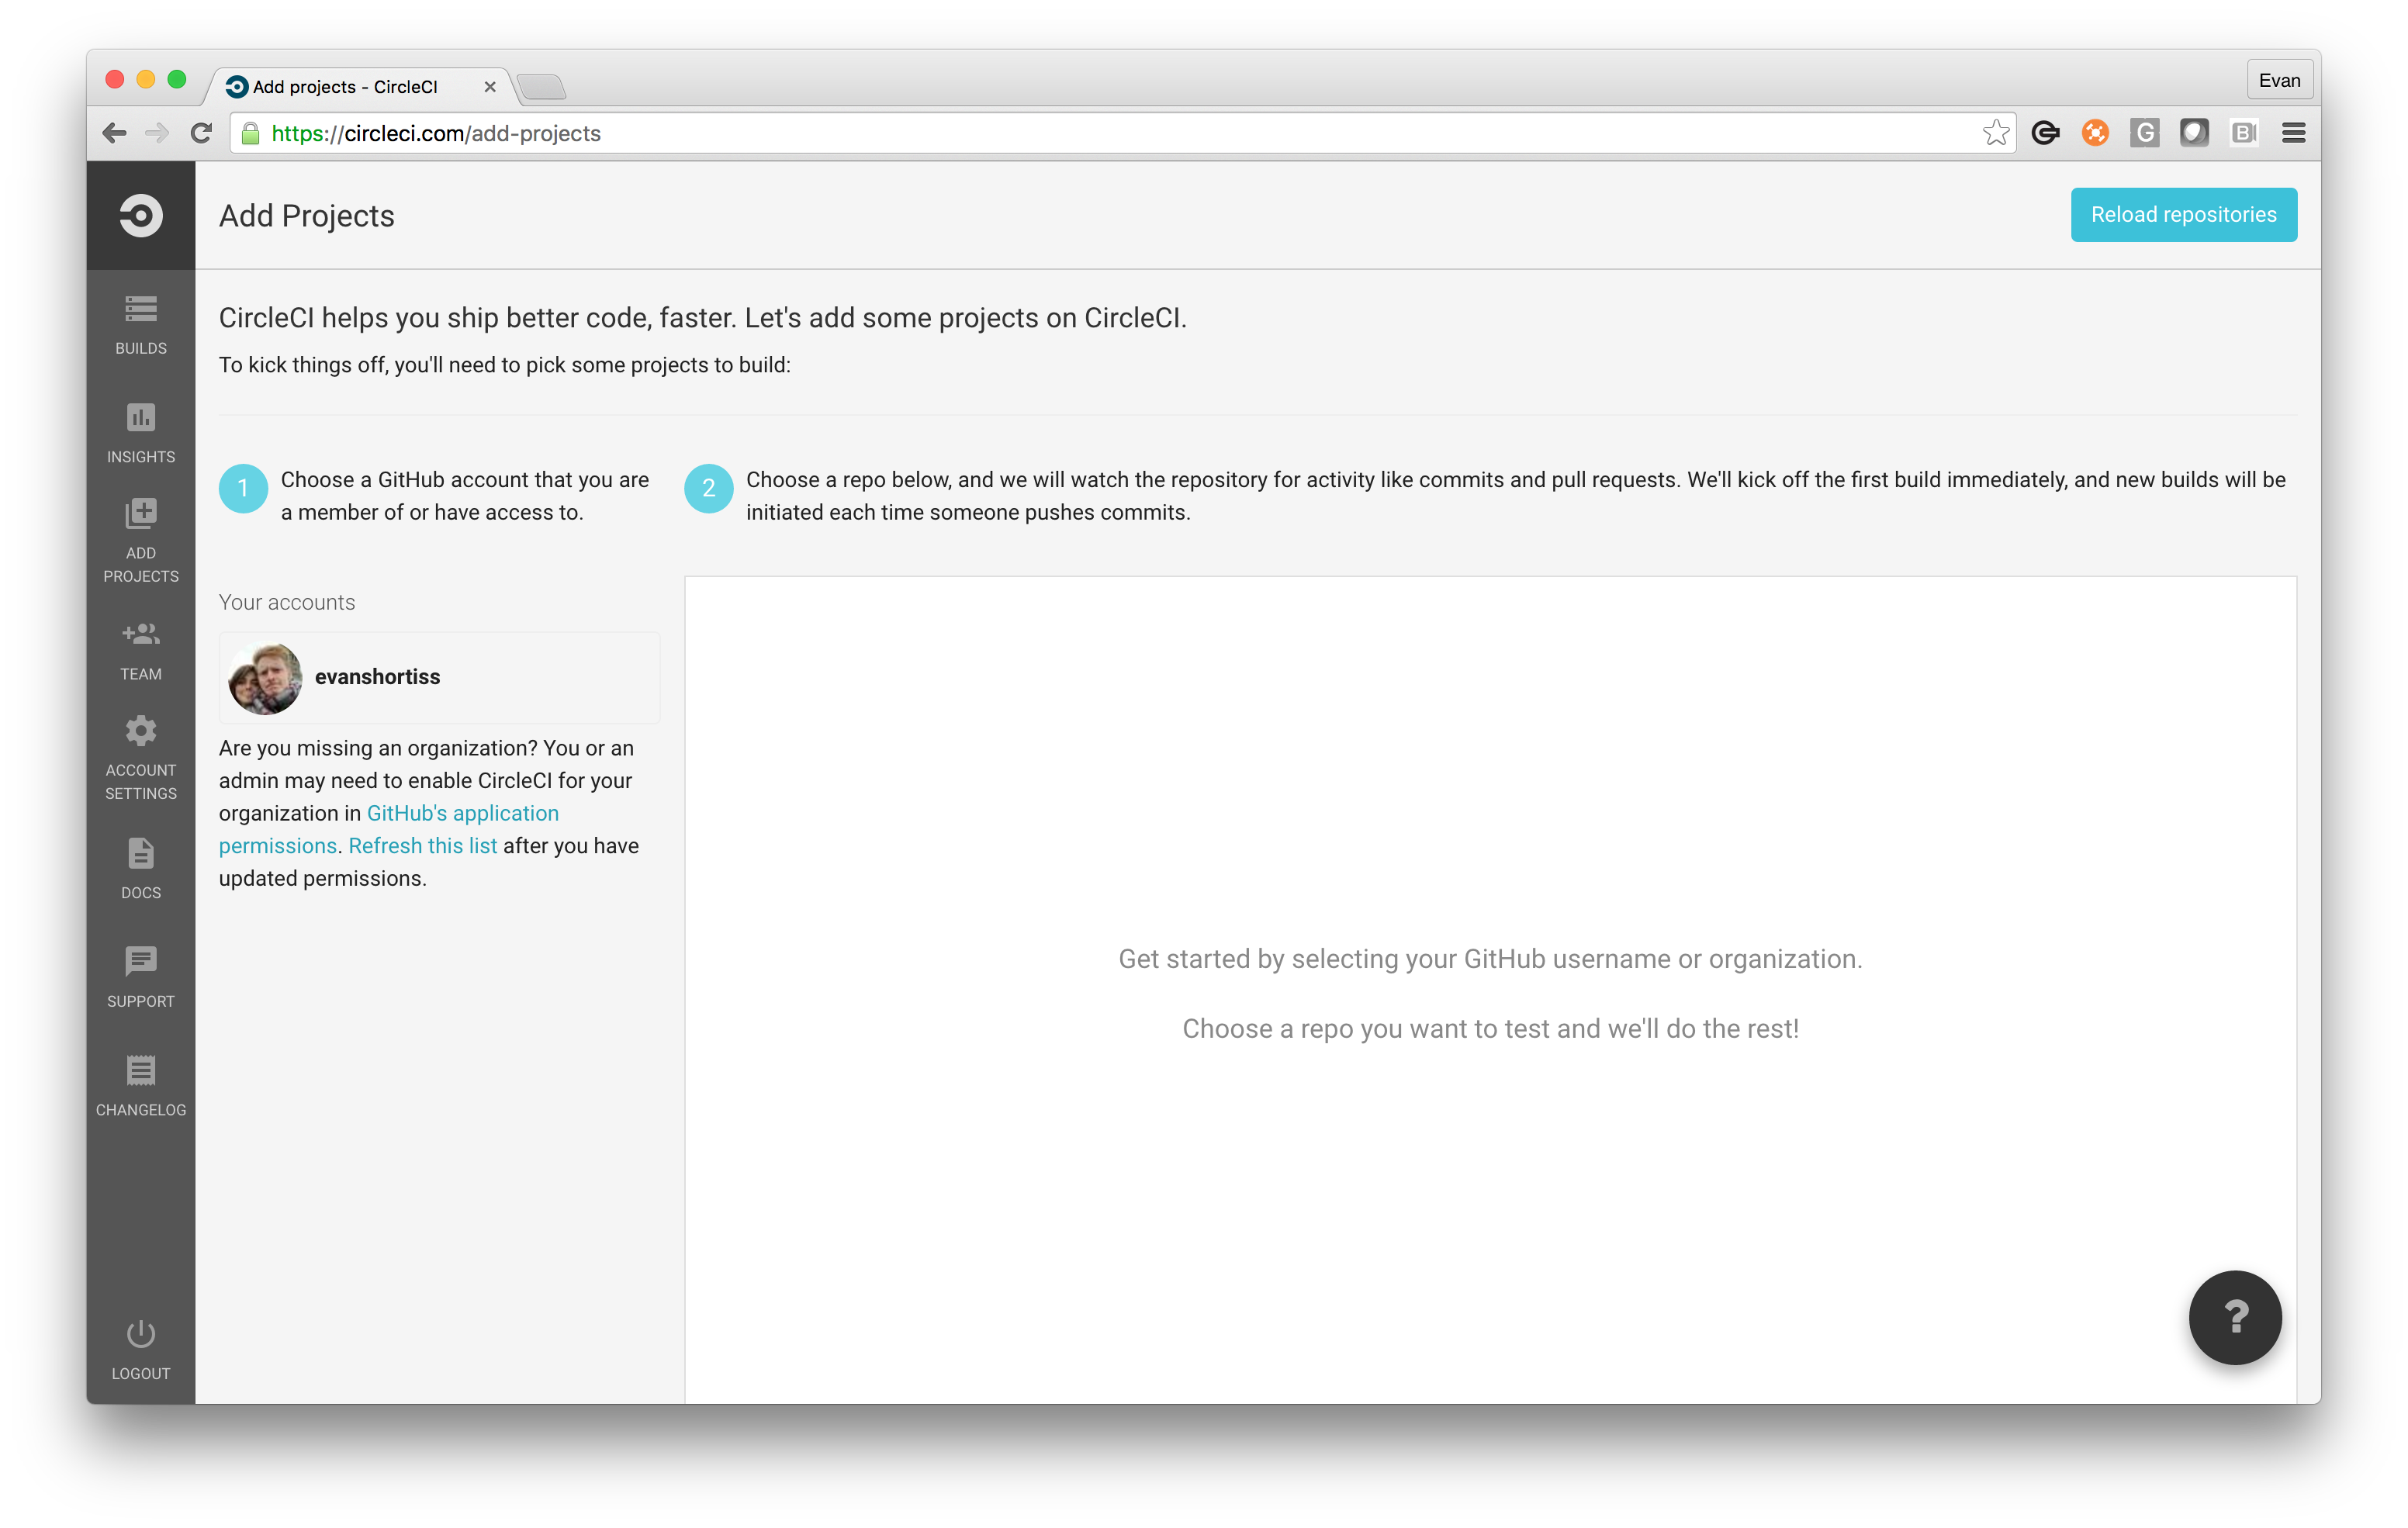
After you finished granting CircleCI access, you should have been brought to the CircleCI Dashboard similar to that shown below. Your Dashboard might be empty, but that’s ok, it will fill up soon enough!

Next we need to tell CircleCI that we want it to build our project when we push to it.
From the Dashboard, select “Add Project” from the dark navigation bar on the left, and once prompted, select the account/organization your project is within, then select the repository and click “Build Project” as shown below:
This should kick off a build, which will take some time, but eventually should pass since our template has passing test cases. Once the build is complete, the build icon will turn either red meaning it failed, or green indicating a pass.
That’s it! Your project will now build anytime a Pull Request is opened, and every time a commit is pushed to master. This will make it easier to verify that submitted code meets quality standards (as enforced by your tests). Configuring the settings in more detail can be achieved using a circle.yml file; we’ll cover that next so our project can be automatically deployed on RHMAP.
Git SSH access for CircleCI & RHMAP
The final configuration step will be to create an SSH key to enable CircleCI to run Git commands against our RHMAP instance.
Generate an SSH key
Use the following command to create a key, but replace the email address with either the one you chose for deployment use, or your OpenShift user email:
ssh-keygen -t rsa -b 4096 -C "your.email@example.com"
When prompted, use the default values and don’t enter a password. If you have an existing SSH key, be sure to choose a new destination file.
You should now have two files, by default these will be in ~/.ssh, but if you chose a custom location they’ll be placed there. We’ll upload the file with a .pub extension to RHMAP, and the other file will be uploaded to CircleCI.
Upload an SSH key to RHMAP
Navigate to your account settings on RHMAP by clicking your account image in the top left of the screen, choosing “SSH Key Management” from the subsequent screen, and “Add New Key” on the final page.
Open the ssh_key.pub file that you generated (or the .pub file, specifically, if you chose a different name/location) and paste it’s entire contents into the “Public Key” field.

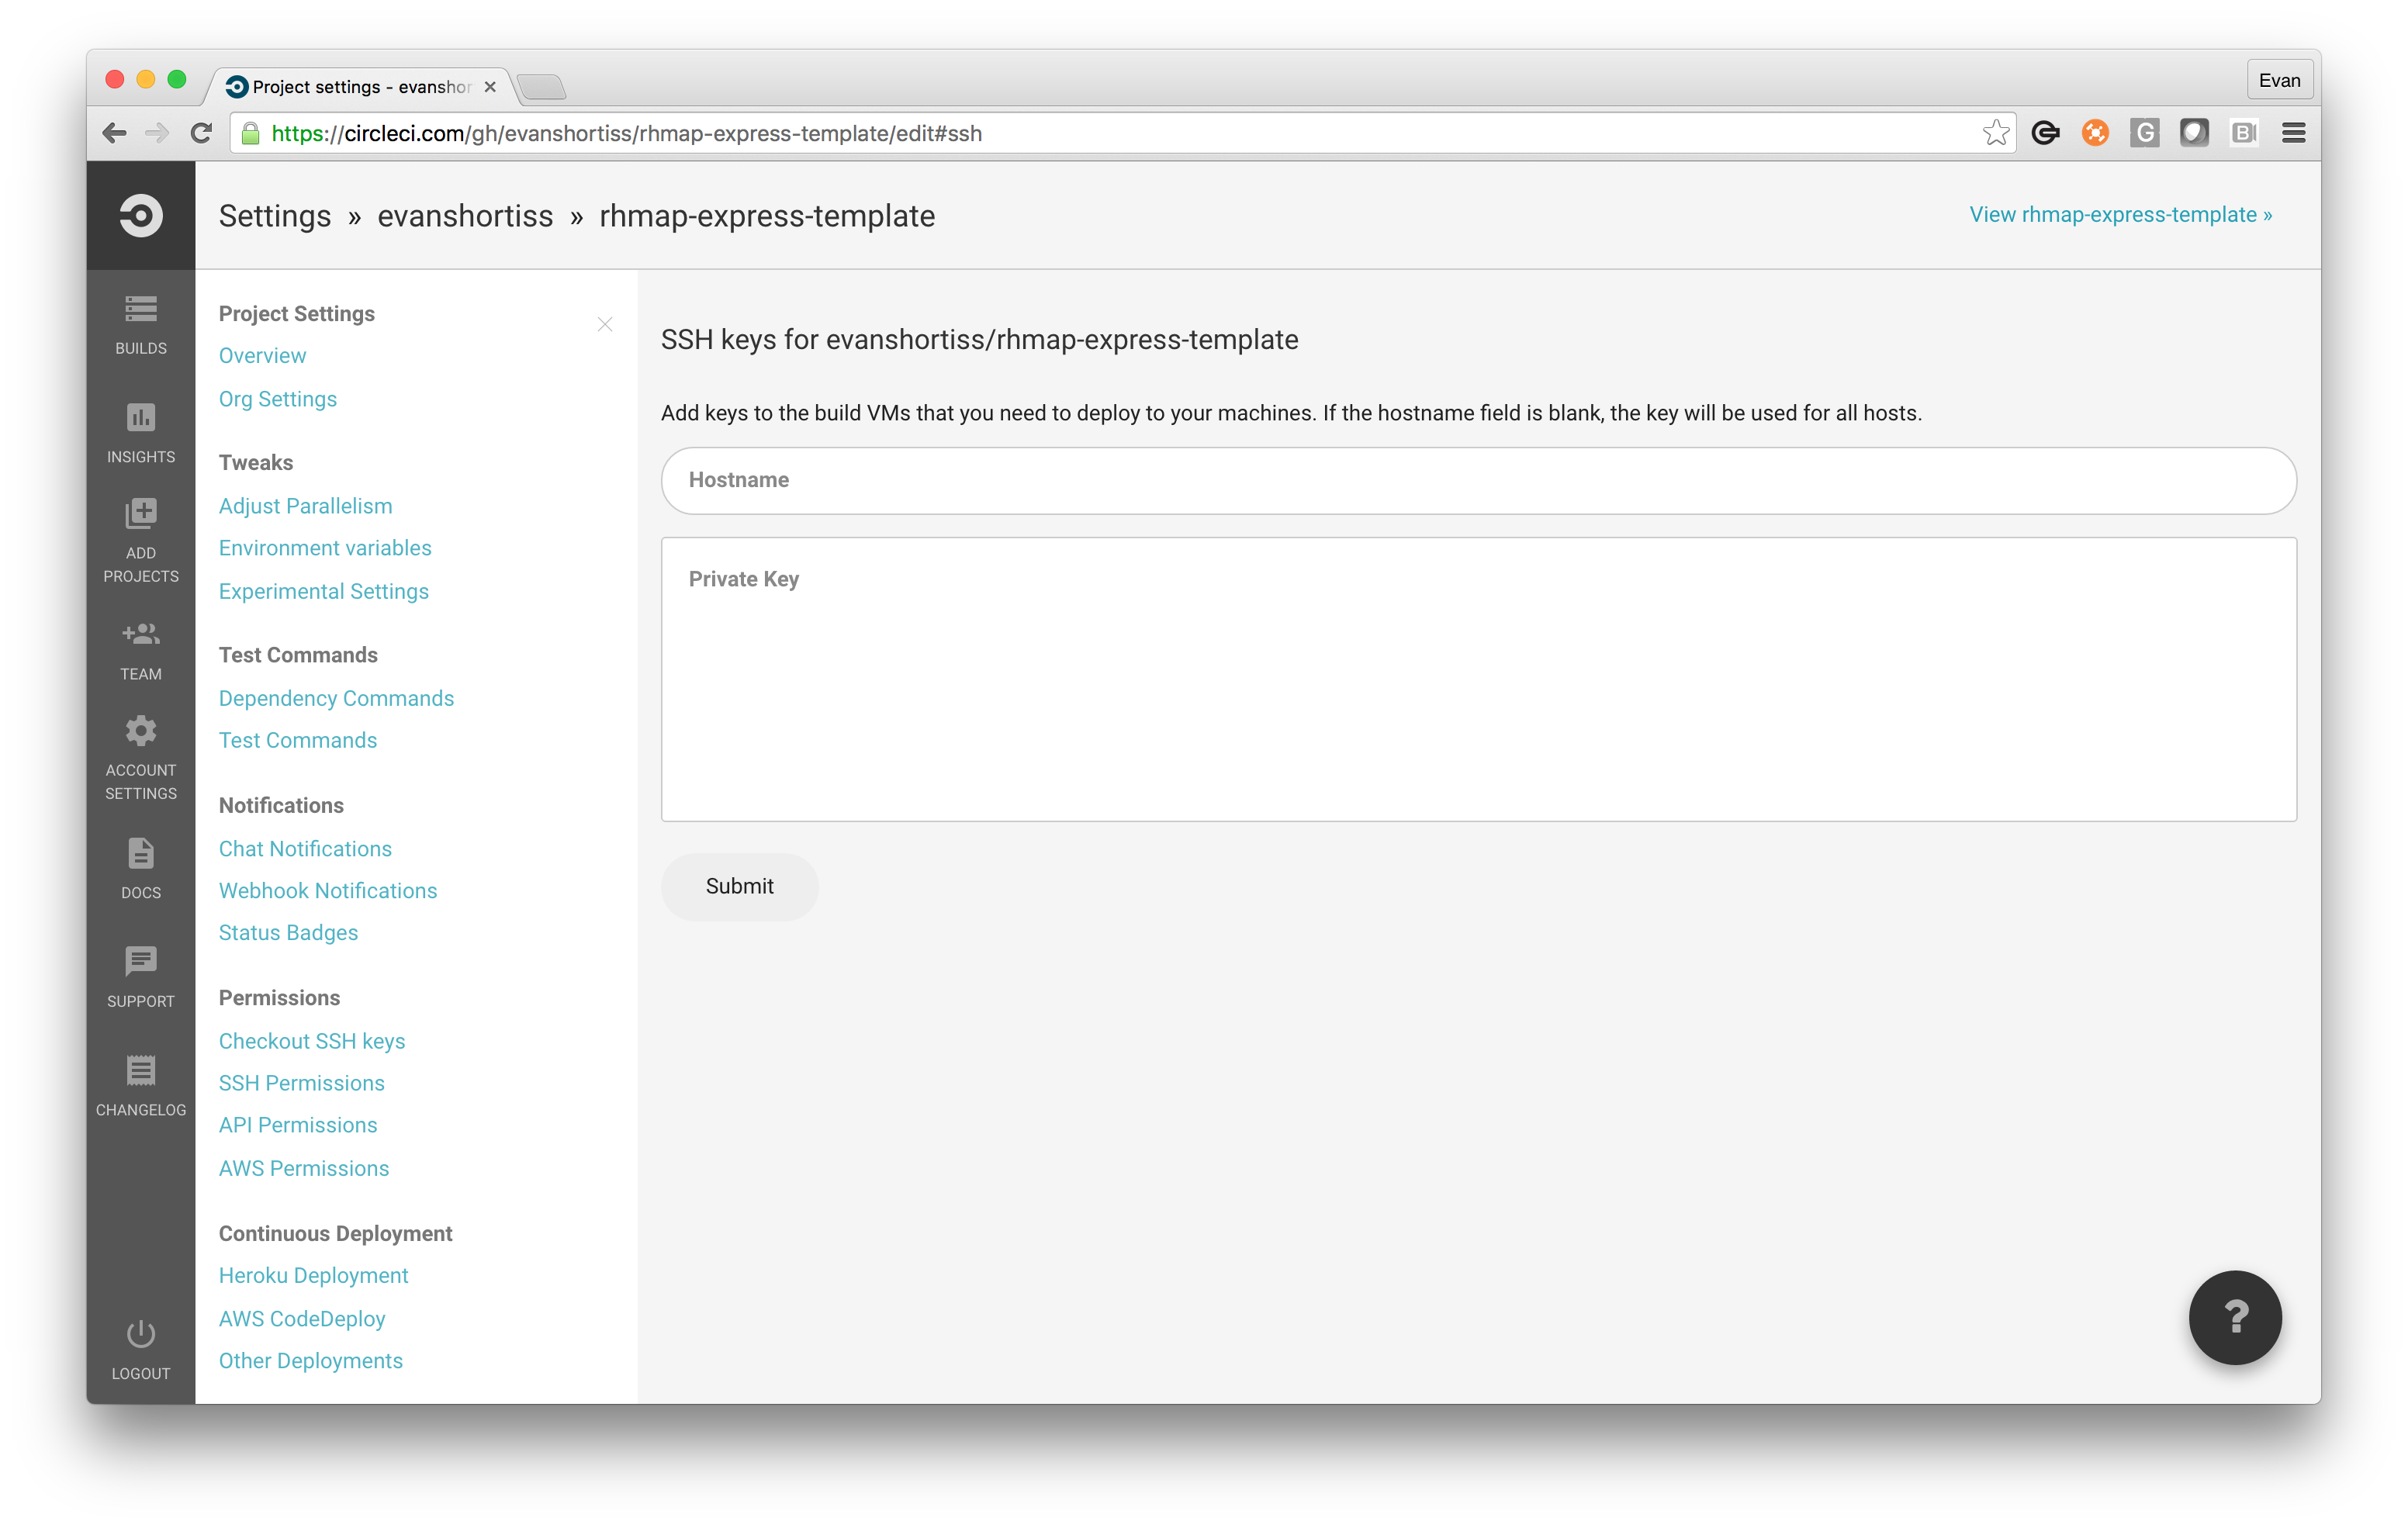
Upload an SSH key to CircleCI
Navigate to the “Project Settings” on CircleCI and choose “SSH Permissions”. From this screen you can upload the private key you just generated. You’ll need to choose the key that does not have the .pub file extension (ssh_key for example).
Configure CircleCI to deploy our cloud application
Lastly, we need to configure CircleCI to deploy our application. We’ll guide you through the steps required to set this up, and also provide a brief FHC tutorial along the way!
Using FHC on CircleCI
To deploy our application on CircleCI, we can have CircleCI execute the appropriate FHC commands each time it performs a successful build. We can do this by adding a circle.yml file to the root directory of our project. Pasting the following content into this new file:
deployment:
 development:
   branch: dev
   commands:
     npm i -g fh-fhc@2.4.0-206
     git push $FH_GIT_URL $CIRCLE_SHA1:refs/heads/dev
     fhc target $FH_DOMAIN
     fhc login $FH_USER $FH_PASS
     fhc app stage --app=$FH_CLOUD_APP_ID --env=$FH_CLOUD_ENV --runtime=node010 --clean=true --gitRef.type=branch --gitRef.hash=HEAD --gitRef.value=dev
The configuration above tells CircleCI to run the specified commands whenever it successfully builds the “dev” branch for us. As you can see, we reference a number of environment variables referenced with the “FH_” prefix in this new file, we need to add them to CircleCI before committing our changes.
Setting CircleCI Environment Variables
CircleCI makes setting environment variables easy, just navigate to your CircleCI Dashboard and select your project on the left - it will be highlighted white once selected. After selecting the project, use the “Project Settings” link in the top right to get to the settings screen. Once the settings screen has loaded, select "Tweaks > Environment variables" from the menu on the left. Enter the variable name and value in the provided inputs and then click “Save Variables”. Do this for each variable in the list below:
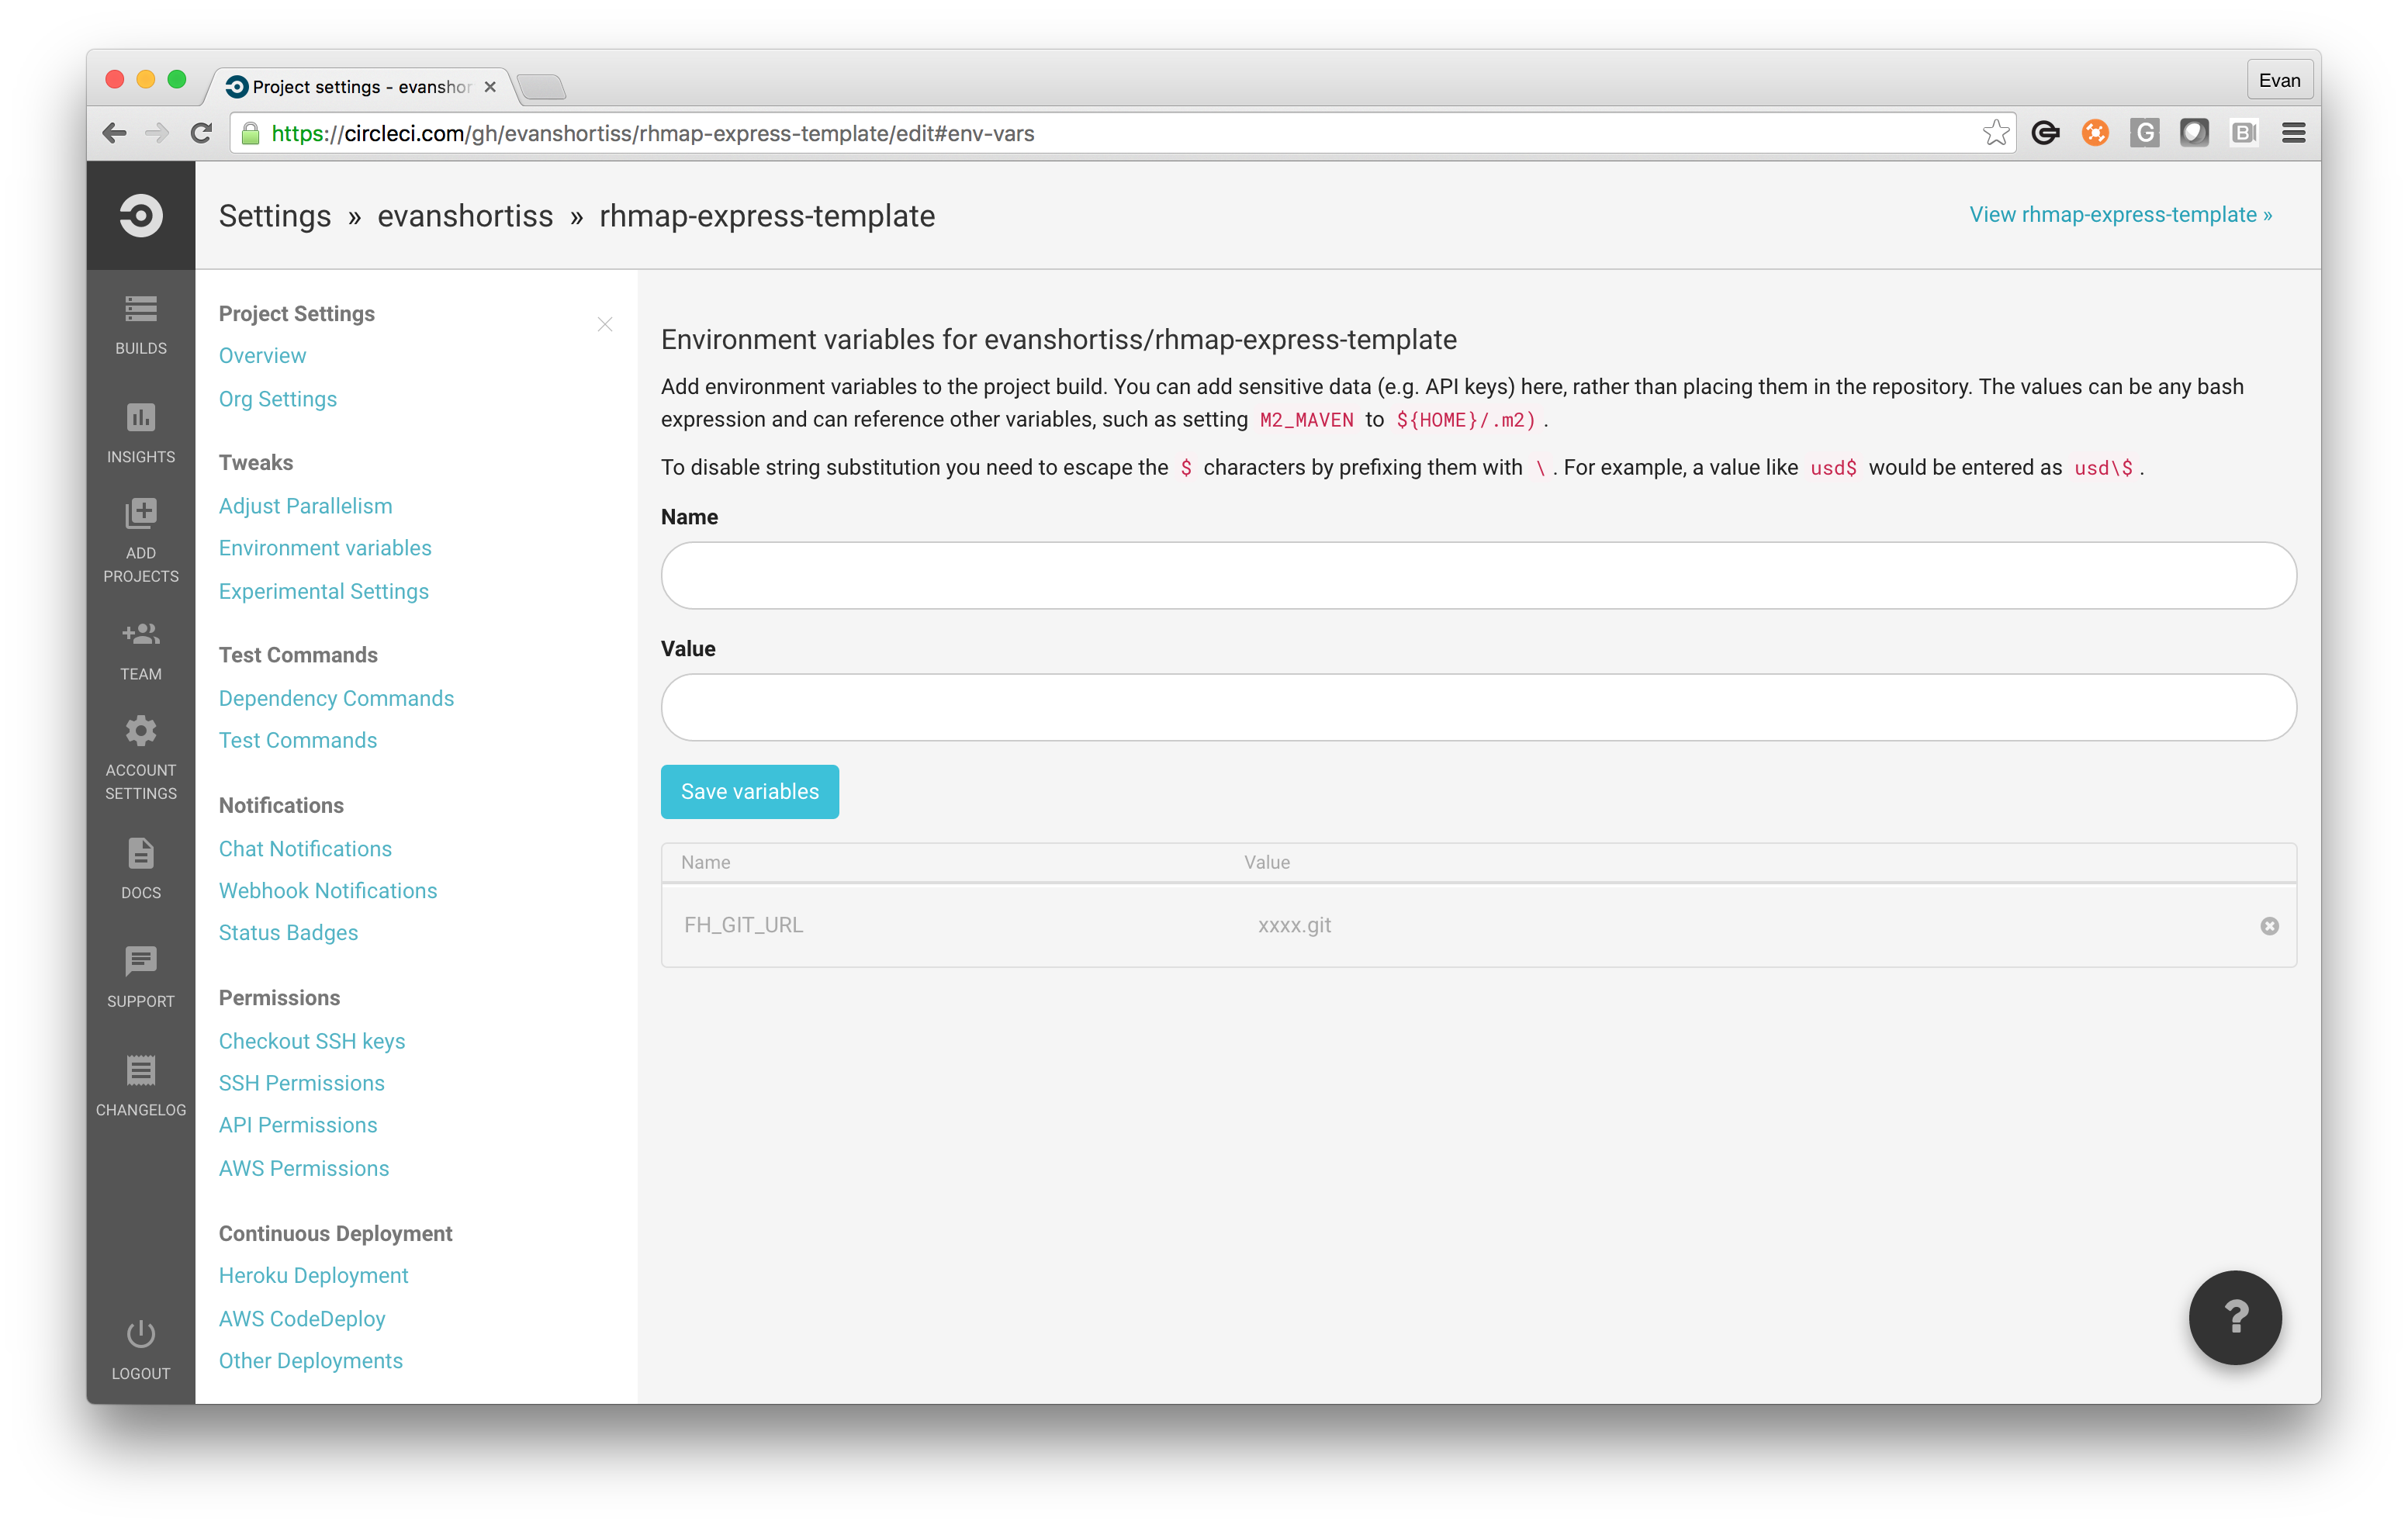
Here are the names and required values of each environment variable:
- FH_GIT_URL - The Git URL for your Cloud Application. Can be gotten from the Details screen of your Cloud Application in the RHMAP Studio
- FH_CLOUD_ENV - This will correspond to the env you’d like to deploy to. You can use the FHC command TODO to list the environments and their names to find this.
- FH_USER - The user account we created, dev.deploys@redhat.com.
- FH_PASS - The password for the user we created.
- FH_CLOUD_APP_ID - The AppID for your Cloud Application. We got this using FHC, but it’s also present on the Details screen for your Cloud Application in the RHMAP Studio.
Run a Build - Conclusion
Now that you’ve added the circle.yml file to your project and set the required environment variables, you can get back to developing. When you merge a pull request into the “dev” branch (of the GitHub repository that we forked initially) or push a change directly, it will be deployed to your Development environment on RHMAP immediately. That is of course, if the CircleCI build passes.
The image below shows a sample of the CircleCI output for a successful build:

Last updated: June 28, 2023
