
As part of the microservices adoption journey, there will come a time when an organization starts to implement more and more rules services as part of the total application solution landscape. There could be hundreds of rules services to be managed and deployed at one time, making the job of the application team more challenging and eventually causing delays to the entire production rollout.
Red Hat Decision Manager (RHDM) is a solution that enables developers and application teams to implement decision services or business rules for their application needs. I will be covering how we can fully utilize the capabilities brought by Red Hat Decision Manager and Red Hat OpenShift to enable a smooth CI/CD process, in order to have rapid decision services deployment. (This tutorial assumes you already have a good understanding of RHDM and OpenShift.)
All the steps outlined here can be found in the demo that I have created in GitHub. The demo is based on simple travel insurance business rules. If you do not wish to follow the steps here, you can proceed to GitHub to use the scripts to deploy the demo. Please be aware that the GitHub content may change over time as I continue to enhance the demo.
Overview of architecture
Let's take a quick look at the architecture that we'll cover in this article. Bear in mind that this is one of the many possibilities of how you can deploy the RHDM on OpenShift. As you can see from the diagram, Decision Central and Decision Manager are deployed into the DEV environment, while only Decision Manager is deployed into SIT, UAT, and PROD. Decision Central is not needed in those environments because we can easily deploy the changes of decision services in those environments using the CI/CD process.

RHDM CI/CD Architecture">
Rules Designers or Rules Developers access Decision Central in the DEV environment to develop or make changes to the business rules. Changes can be deployed and tested in the kie-server in the DEV environment. When it is decided that the changes are good to go from DEV into the SIT, Jenkins pipelines are used to build the kjar and deploy it into the Decision Server in the SIT environment. A Nexus repository is also configured as maven repo for the kjar and container build.
In this article, to keep the demonstration simple, the changes from Decision Central are pushed directly into the Gogs server. A configured Git Hook will do a curl POST to invoke Jenkins job to build the kjar using pipelines, deploy kjar into Nexus, and then deploy the kjar from Nexus into OpenShift SIT Environment. I believe this is enough to provide a good start for anyone who'd like to set up a similar environment, even extended to UAT and PROD environments.
In a real-life environment, you may also consider having a separate container repository to store the ready-built golden copy of the container image. That way, you can always refer to this golden container image for deployment to multiple environments including the production environment. One of such container image repository is Red Hat Quay.
Preparing our environments on OpenShift
Before deploying the RHDM, be ensure the RHDM image stream is available on OpenShift. Log in as cluster-admin and validate the imagestreams by running the following commands. If the image streams are not available on OpenShift, please follow these instructions on how to configure it. You may have a different image streams version tag in your environment; please take note to make the necessary changes in the steps outlined here.
oc get imagestreamtag -n openshift | grep rhdm73-decisioncentral-openshift
oc get imagestreamtag -n openshift | grep rhdm73-kieserver-openshift
We are creating three OpenShift projects to represent the different environments. In this example, we will create a project called Tools to group the Jenkins, Nexus, and Gogs containers—a separate project each for DM DEV and DM SIT.
oc new-project rhdm-tools --display-name="Tools"
oc new-project rhdm-sit --display-name="DM SIT"
oc new-project rhdm-dev --display-name="DM DEV"
At the later part, when we are using the Jenkins pipelines to deploy the kjar using the kie-server template into SIT environment, this kie-server template will create necessary rolebindings on top of many other OpenShift components. In order for Jenkins to be able to provision kie-server in the SIT environment, we need to ensure the Jenkins has the proper permissions. Run the following commands to create the necessary permissions for Jenkins. You may receive this notification: "Warning: ServiceAccount 'jenkins' not found," which can be ignored at the moment.
oc create role RoleBindingRbacCreate --verb=create --resource=rolebindings.rbac.authorization.k8s.io -n rhdm-sit
oc create role RoleBindingCreate --verb=create --resource=rolebindings.authorization.openshift.io -n rhdm-sit
oc policy add-role-to-user edit system:serviceaccount:rhdm-tools:jenkins -n rhdm-sit
oc policy add-role-to-user edit system:serviceaccount:rhdm-tools:jenkins -n rhdm-sit
oc adm policy add-role-to-user RoleBindingRbacCreate system:serviceaccountrhdm-tools:jenkins --role-namespace=rhdm-sit -n rhdm-sit
oc adm policy add-role-to-user RoleBindingCreate system:serviceaccount:rhdm-tools:jenkins --role-namespace=rhdm-sit -n rhdm-sit
Deploying Gogs container and preparing the demo data
Next, we are creating the Gogs container in the Tools project.
oc new-app -f https://raw.githubusercontent.com/chengkuangan/templates/master/gogs-persistent-template.yaml -p SKIP_TLS_VERIFY=true -n rhdm-tools
Wait for the Gogs container to be ready. Navigate to the Gogs console, create a new user, and perform the next few commands.
We will use the sample project from the GitHub.
git clone --bare https://github.com/chengkuangan/travel-insurance-rules.git
cd travel-insurance-rules.git
Create a token so that you can use the token to create the Gogs repo using the command line. Please change the ${GOGUSER}, ${GOGSPASSWORD}, ${GOGD_HOSTNAME} accordingly.
curl -X POST -H "content-type: application/json" -d '{"name":"sample-token","sha1":"8a4fc41b4868aecdd623b10cb1b64a36c6ee51f3"}' 'http://${GOGSUSER}:${GOGSPASSWORD}@${GOGS_HOSTNAME}/api/v1/users/${GOGSUSER}/tokens'
Use the token created in the previous step to create the necessary repository. Please change the ${GOGUSER}, ${GOGSPASSWORD}, ${GOGD_HOSTNAME} accordingly.
curl -H "Content-Type: application/json" -d '{"name": "travel-insurance-rules", "description": "Travel Insurance Rules Demo", "private": false}' -X POST 'http://${GOGSUSER}:${GOGSPASSWORD}@${GOGS_HOSTNAME}/api/v1/user/repos?token=8a4fc41b4868aecdd623b10cb1b64a36c6ee51f3'
Make sure you are in the local travel-insurance-rules.git directory. Push the sample codes into the Gogs repository. Please change the ${GOGUSER}, ${GOGSPASSWORD}, ${GOGD_HOSTNAME} accordingly.
git push --mirror 'http://${GOGSUSER}:${GOGSPASSWORD}@${GOGS_HOSTNAME}/${GOGSUSER}/travel-insurance-rules.git'
Remove the git directory.
cd ..
rm -rf travel-insurance-rules.git
Now, we'll clone the repository from Gogs repository that we just created, because we need to make some changes for the demo to work. You can just head directly to the Gogs console to do this; however, I find using commands is better. Please change the ${GOGUSER}, ${GOGSPASSWORD}, ${GOGD_HOSTNAME}, ${PROJECTNAME} accordingly. Here, ${PROJECTNAME} refers to the project where the Nexus is deployed, e.g., rhdm-tools.
git clone http://${GOGS_HOSTNAME}/${GOGSUSER}/travel-insurance-rules.git
cd travel-insurance-rules
sed -i -e "s/http:\/\/nexus3.demo1-tools.svc.cluster.local/http:\/\/nexus3.${PROJECTNAME}.svc.cluster.local/g" ./Jenkinsfile
sed -i -e "s/http:\/\/nexus3.demo1-tools.svc.cluster.local/http:\/\/nexus3.${PROJECTNAME}.svc.cluster.local/g" ./openshift-nexus-settings.xml
git add .
git commit -m "Updated Jenkinsfile"
git push 'http://${GOGSUSER}:${GOGSPASSWORD}@${GOGS_HOSTNAME}/${GOGSUSER}/travel-insurance-rules.git'
cd ..
rm -rf travel-insurance-rules
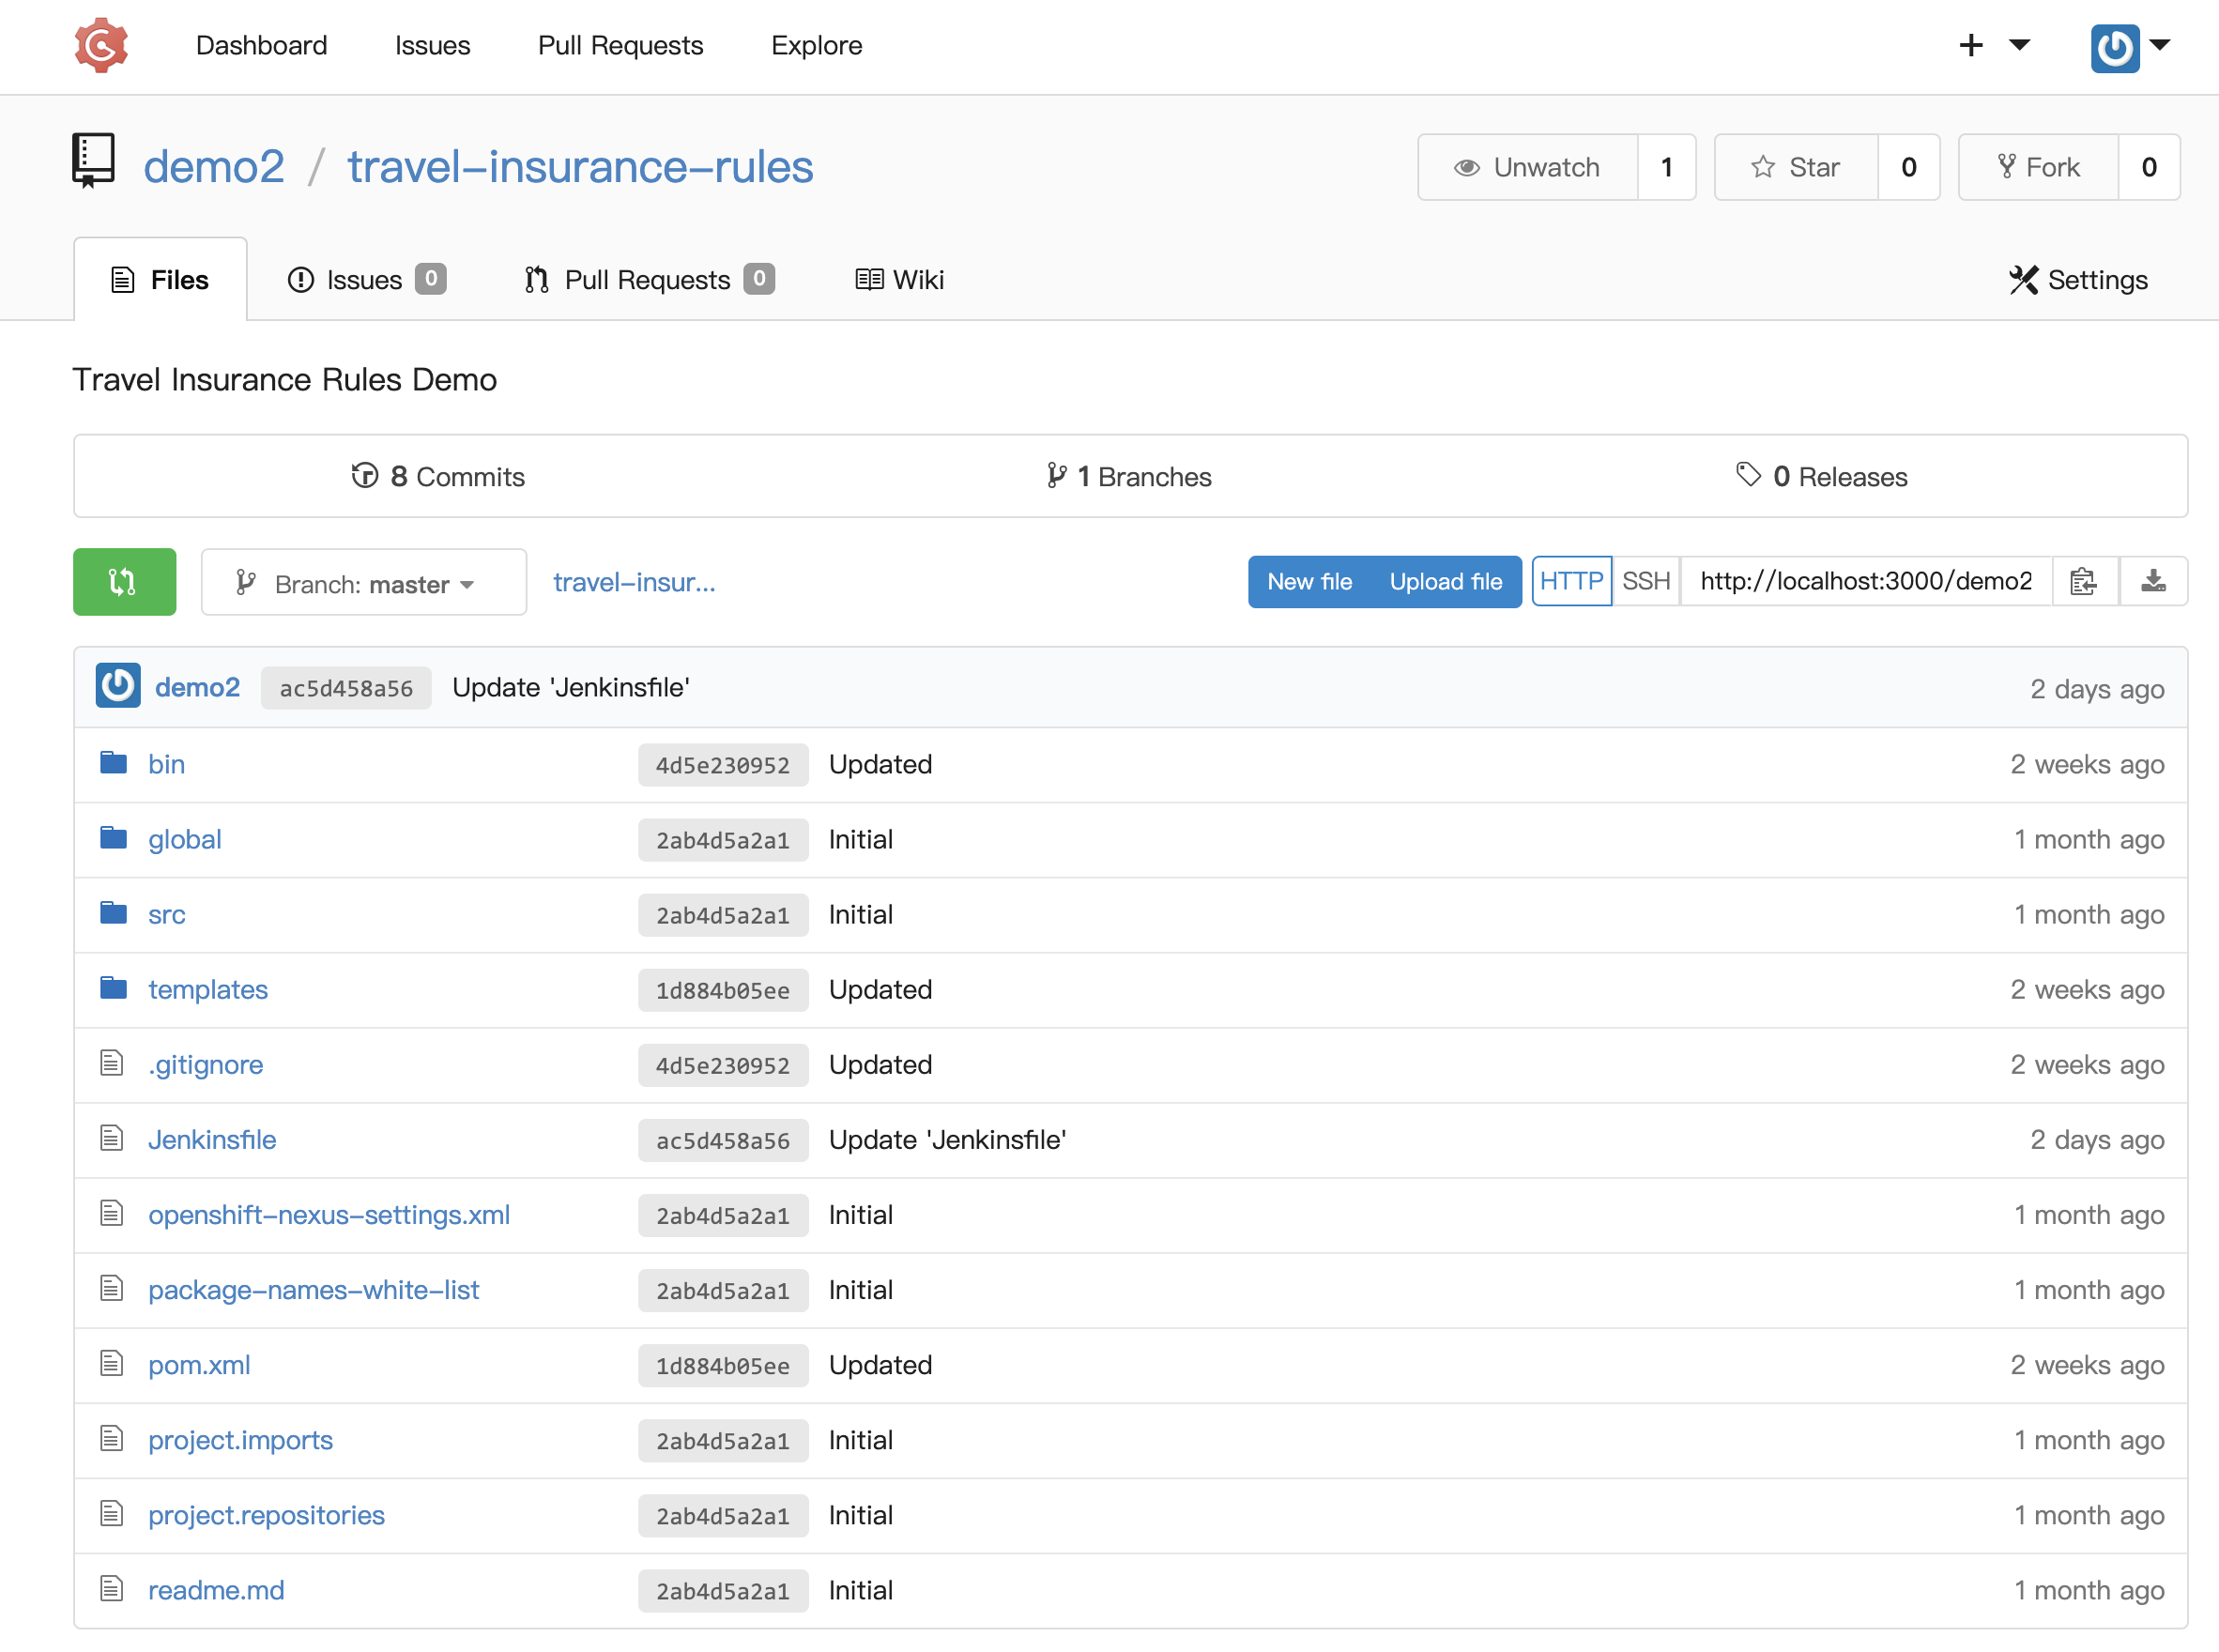
Gogs Repository">
Provisioning Nexus 3
The next step is to deploy the Nexus container.
oc new-app -f https://raw.githubusercontent.com/chengkuangan/templates/master/nexus3-persistent-templates.yaml -n rhdm-tools
Wait for the Nexus container to be ready, which will take some time. Run the following command to create the necessary repo in the Nexus. Please replace the ${NEXUS_HOSTNAME} accordingly, e.g., http://nexus3-rhdm-tools.apps.ocp.demo.com.
curl -o /tmp/nexus-functions -s https://raw.githubusercontent.com/chengkuangan/scripts/master/configure_nexus3_repo.sh; source /tmp/nexus-functions admin admin123 http://${NEXUS_HOSTNAME}

Nexus Repos">
Provision Jenkins
Next, deploy the Jenkins container.
oc new-app jenkins-persistent -n rhdm-tools
Wait for the container to be ready. Then, log in to Jenkins with OpenShift user and accept the default permission prompt. Once you are in, create a new token and take note of this token; we will be using it in the next command to create the Jenkins job. Keep this token safe as you will not be able to retrieve it from Jenkins again.
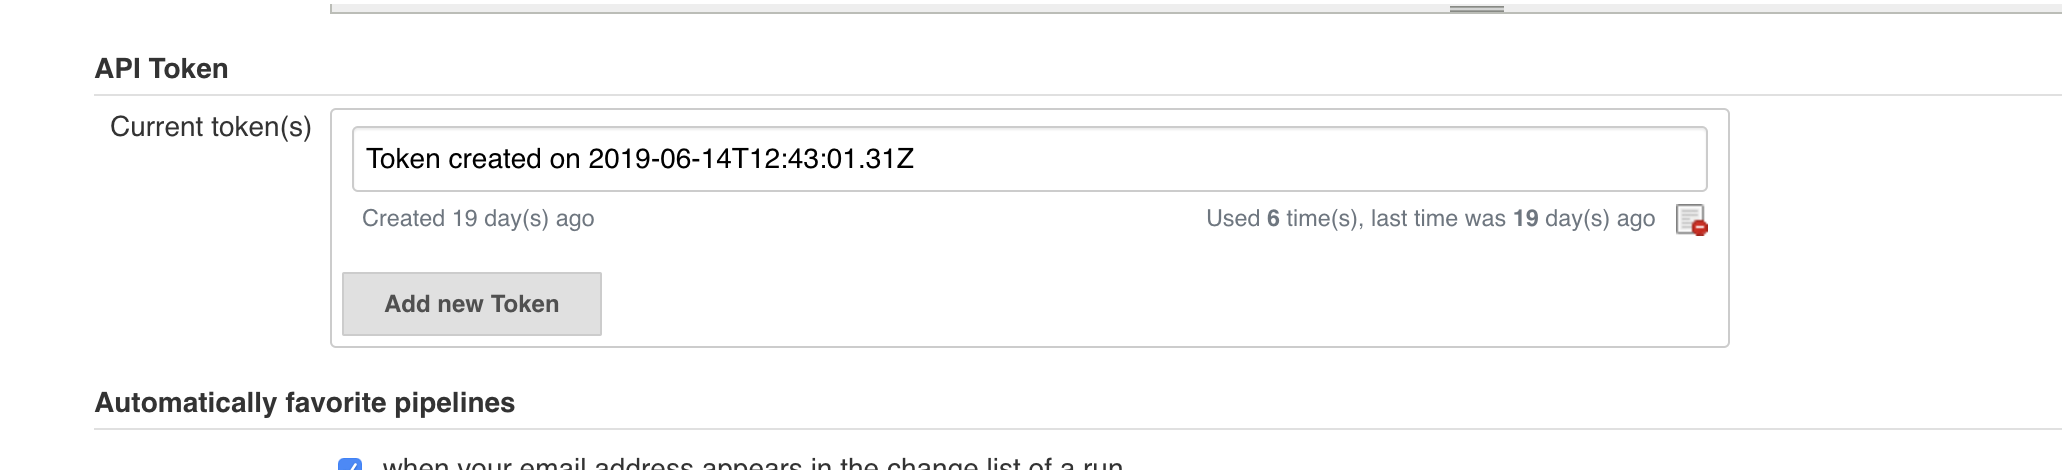
Create Jenkins Token">
Run the following commands to create a Jenkins job and populate the correct settings. Remember to use the correct values according to your environment for ${PROJECTNAME}, ${DOMAIN_NAME}, ${GOGUSER}, ${JENKINS_USERNAME}, ${JENKINS_TOKEN}.
curl -k https://jenkins-${PROJECTNAME}.${DOMAIN_NAME}/jnlpJars/jenkins-cli.jar --output /tmp/jenkins-cli.jar
curl -k https://raw.githubusercontent.com/chengkuangan/travel-insurance-rules/master/templates/jenkins-job.xml --output /tmp/jenkins-job-work.xml
sed -i -e "s/https:\/\/github.com\/chengkuangan\/travel-insurance-rules.git/http:\/\/gogs:3000\/${GOGSUSER}\/travel-insurance-rules.git/g" /tmp/jenkins-job-work.xml
java -jar /tmp/jenkins-cli.jar -s https://jenkins-${PROJECTNAME}.${DOMAIN_NAME}/ -noCertificateCheck -auth ${JENKINS_USERNAME}:${JENKINS_TOKEN}  create-job travel-insurance-rules < /tmp/jenkins-job-work.xml
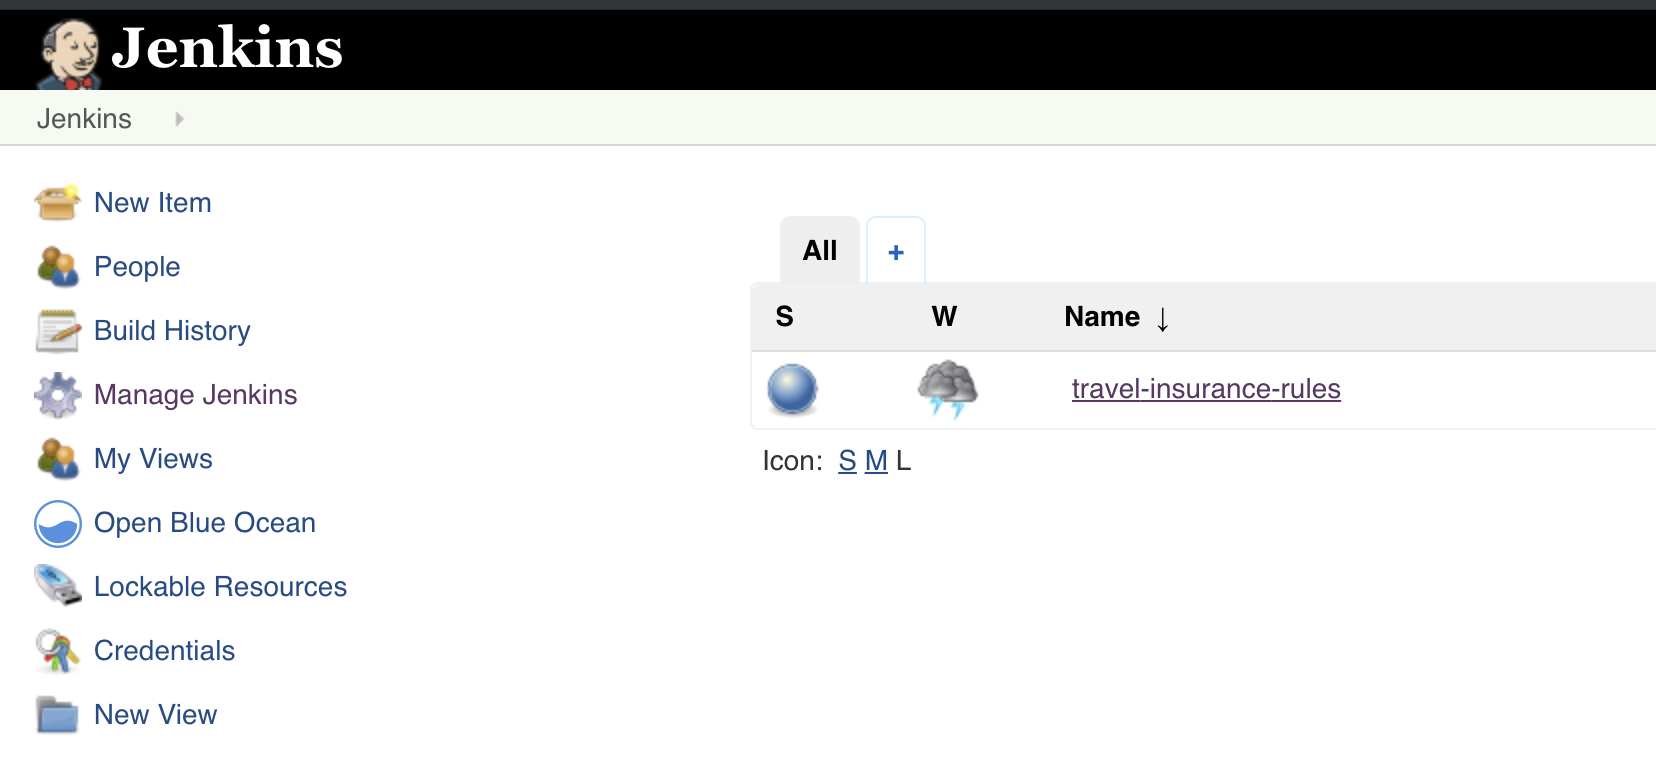
Jenkins Job">
Deploying kie-server and Decision Central in DEV environment
Create the keystore required to deploy the kie-server and Decision Central. To make this tutorial simple, I am using one keystore for both kie-server and Decision Central. For production, it is recommended to use a separate keystore and more secure password.
keytool -genkeypair -alias jboss -keyalg RSA -keystore ./keystore.jks -storepass mykeystorepass --dname 'CN=demo1,OU=Demo,O=ocp.demo.com,L=KL,S=KL,C=MY'
Create the secrets for kie-server and Decision Central.
oc create secret generic kieserver-app-secret --from-file=./keystore.jks -n rhdm-dev
oc create secret generic decisioncentral-app-secret --from-file=./keystore.jks -n rhdm-dev
Deploy the kie-server and Decision Central using the authoring templates. You can obtain the template from the Red Hat Product download site.
Note that I also pass in the GIT_HOOKS_DIR parameter at the oc new-app command. This denotes the directory for the Git hook that we are going to create later to make sure whenever changes made to Decision Central project files will be pushed automatically to Gogs repo. Remember to replace the value for $KIESERVER_KEYSTORE_PASSWORD and $PROJ_DM_DEV_NAME at the command-line parameter.
oc new-app -f https://raw.githubusercontent.com/chengkuangan/travel-insurance-rules/master/templates/rhdm73-authoring.yaml -p DECISION_CENTRAL_HTTPS_SECRET=decisioncentral-app-secret -p KIE_SERVER_HTTPS_SECRET=kieserver-app-secret -p DECISION_CENTRAL_HTTPS_PASSWORD=$KIESERVER_KEYSTORE_PASSWORD -p KIE_SERVER_HTTPS_PASSWORD=$KIESERVER_KEYSTORE_PASSWORD -p APPLICATION_NAME=dmanager -p IMAGE_STREAM_TAG=1.1 -p GIT_HOOKS_DIR=/opt/eap/standalone/data/kie/hooks -n $PROJ_DM_DEV_NAME

KIE Server and Decision Central in DEV Environment">
You may noticed that I have a persistent volume created using the template. This is not default in the RHDM authoring template that is downloaded from the Red Hat website. This is required and useful when we import and create ssh keys, ssh config, and ssh known_hosts files into the Decision Central POD later.
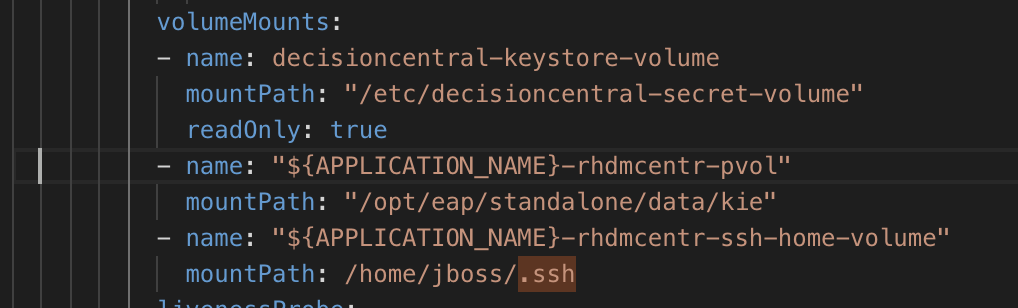
Decision Central DC Modification for .ssh PV">
Complete the CI/CD process
Configure Gogs
For demonstration purposes, I will just configure the post-receive Git hook at Gogs repo settings. It is just a simple curl POST to the Jenkins job to start the Jenkins build whenever there is a code change in the Gogs repository, submitted by Decision Central. In real-life environment, you may want to do a more complete script to call the Jenkins job build based on different situation, or you may want to just use the built-in Webhooks.
The following is the curl command used in post-receive Git hook. Notice that this is the same Jenkins user that we used earlier with the created token. Replace the Jenkins hostname as needed for your actual environment. Change the user and token according to your environment.
#!/bin/bash
curl -k -X POST --user demo1-admin-edit-view:<token> https://jenkins-demo1-tools.apps.3.1.190.191.nip.io/job/travel-insurance-rules/build
Next, oc rsh into the Decision Central container to create file /home/jboss/.ssh/config with the following content (with 644 file permission). Make sure the host and hostname match the svc for the NodePort that we created earlier. Replace the other values to match your own environment. You can create this file outside the POD and use the oc cp command to copy it into the POD.
Host gogs-ssh.demo1-tools.svc.cluster.local
    Hostname gogs-ssh.demo1-tools.svc.cluster.local
    User demo1
    Port 1025
    IdentityFile ~/.ssh/id_rsa
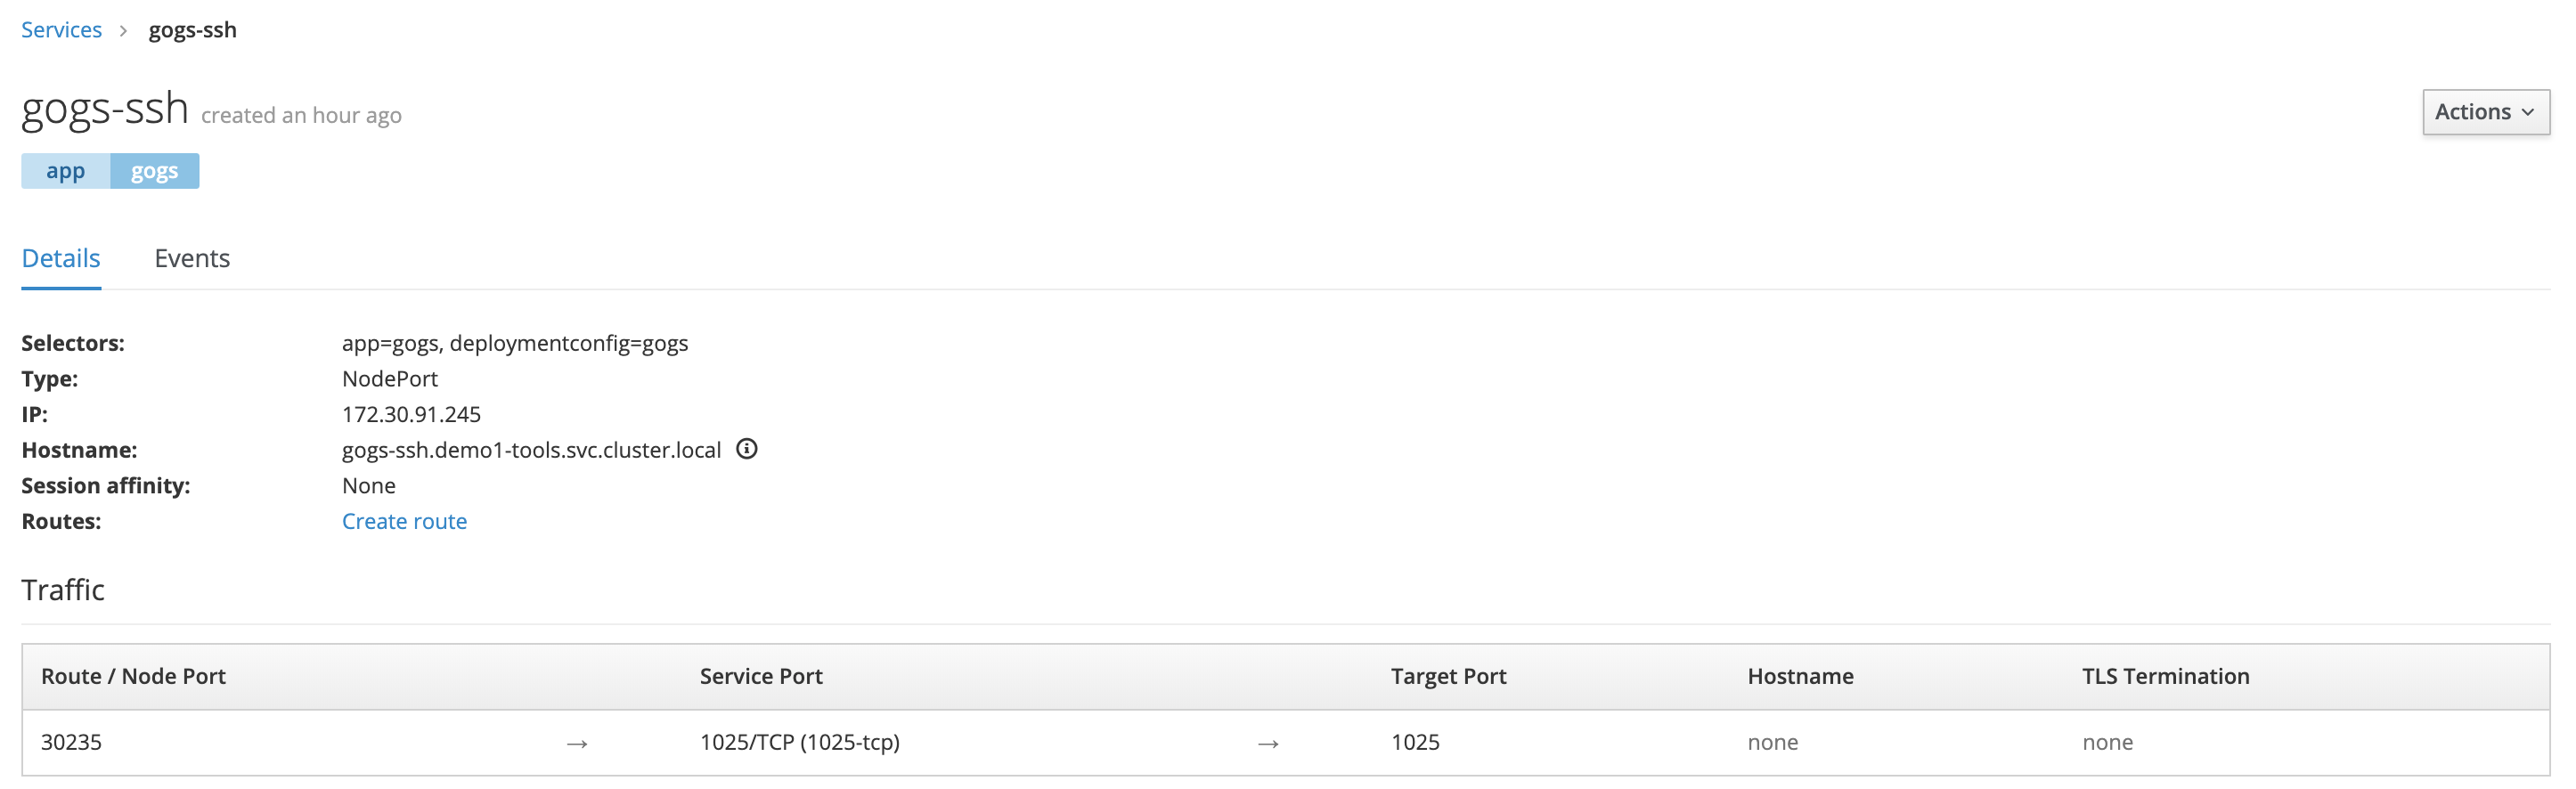
Gogs NodePort for SSH">
Copy the ssh private key (id_rsa) file into /home/jboss/.ssh, make sure it has file permission 600. You can use oc cp command to do this.
Create an empty known_hosts by running the following command in the POD. You can also use the oc exec command to do this.
touch /home/jboss/.ssh/known_hosts
Next, oc rsh into the Decision Central POD and test the ssh connection to Gogs with the following command. You will be prompted to accept and trust the hostname. It is important to do this; otherwise, when you modified the project files on Decision Central console, the attempt to save the changes will fail at the backend with the error message "Host key verification failed" thrown at Decision Central server logs.
ssh -vT gogs-ssh.rhdm-tools.svc.cluster.local
Navigate into /opt/eap/standalone/data/kie/hooks. Create a file named post-commit with 755 file permission. The post-commit file contains only one line as per the following. The location of this file is the parameter that we used for GIT_HOOKS_DIR when we created the containers using the RHDM authoring templates.
git push
Because we did not change the default adminUser and password in the templates, we need to navigate to the Decision Manager deployment config to retrieve the generated adminUser and password.
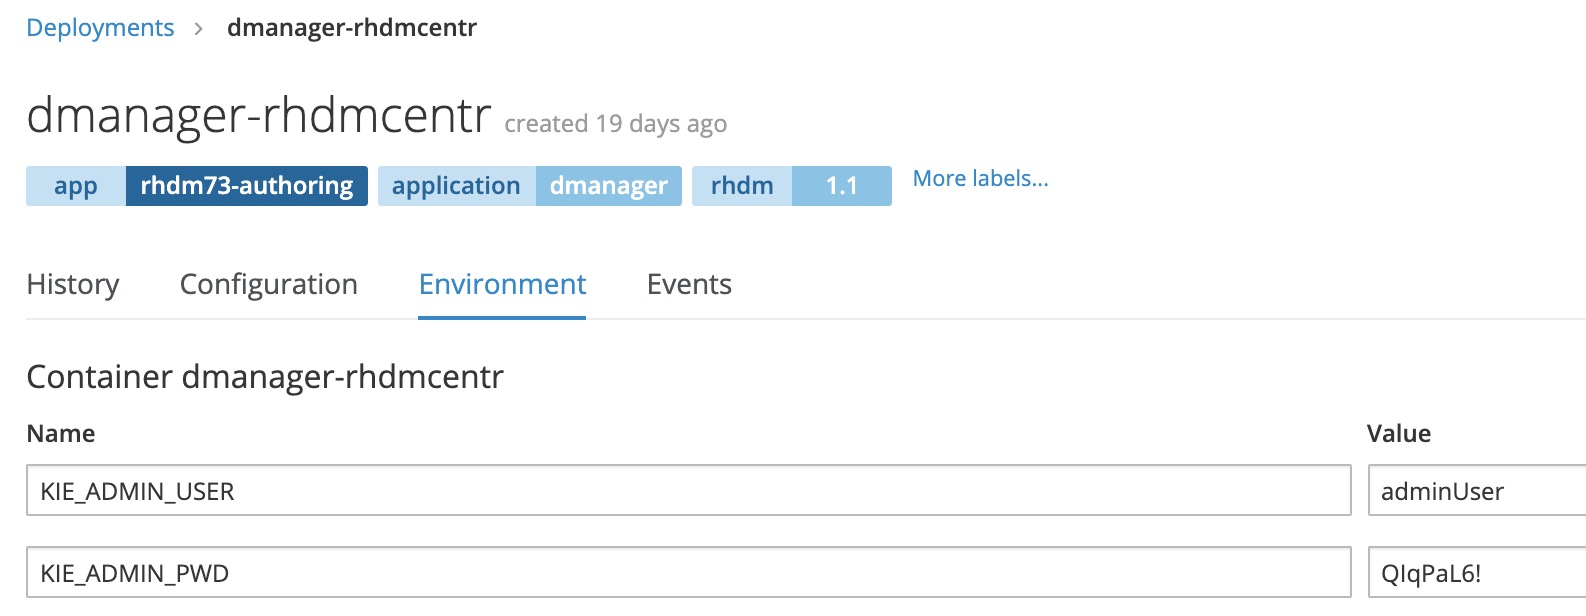
Decision Central adminUser and Password">
Log in into the Decision Central using the adminUser and import the project source code from the Gogs repository into Decision Central. Make sure it is the correct Gogs ssh URL, and note that we are using the internal svc hostname with port 1025.
Import Project from Gogs">
Now, try to make changes on one of the project files. If the integration works, you will see the changes being pushed into Gogs, and the Jenkins job will be started right after. Do note that the first Jenkins build will take longer.
Imported Decision Service Project Contents">
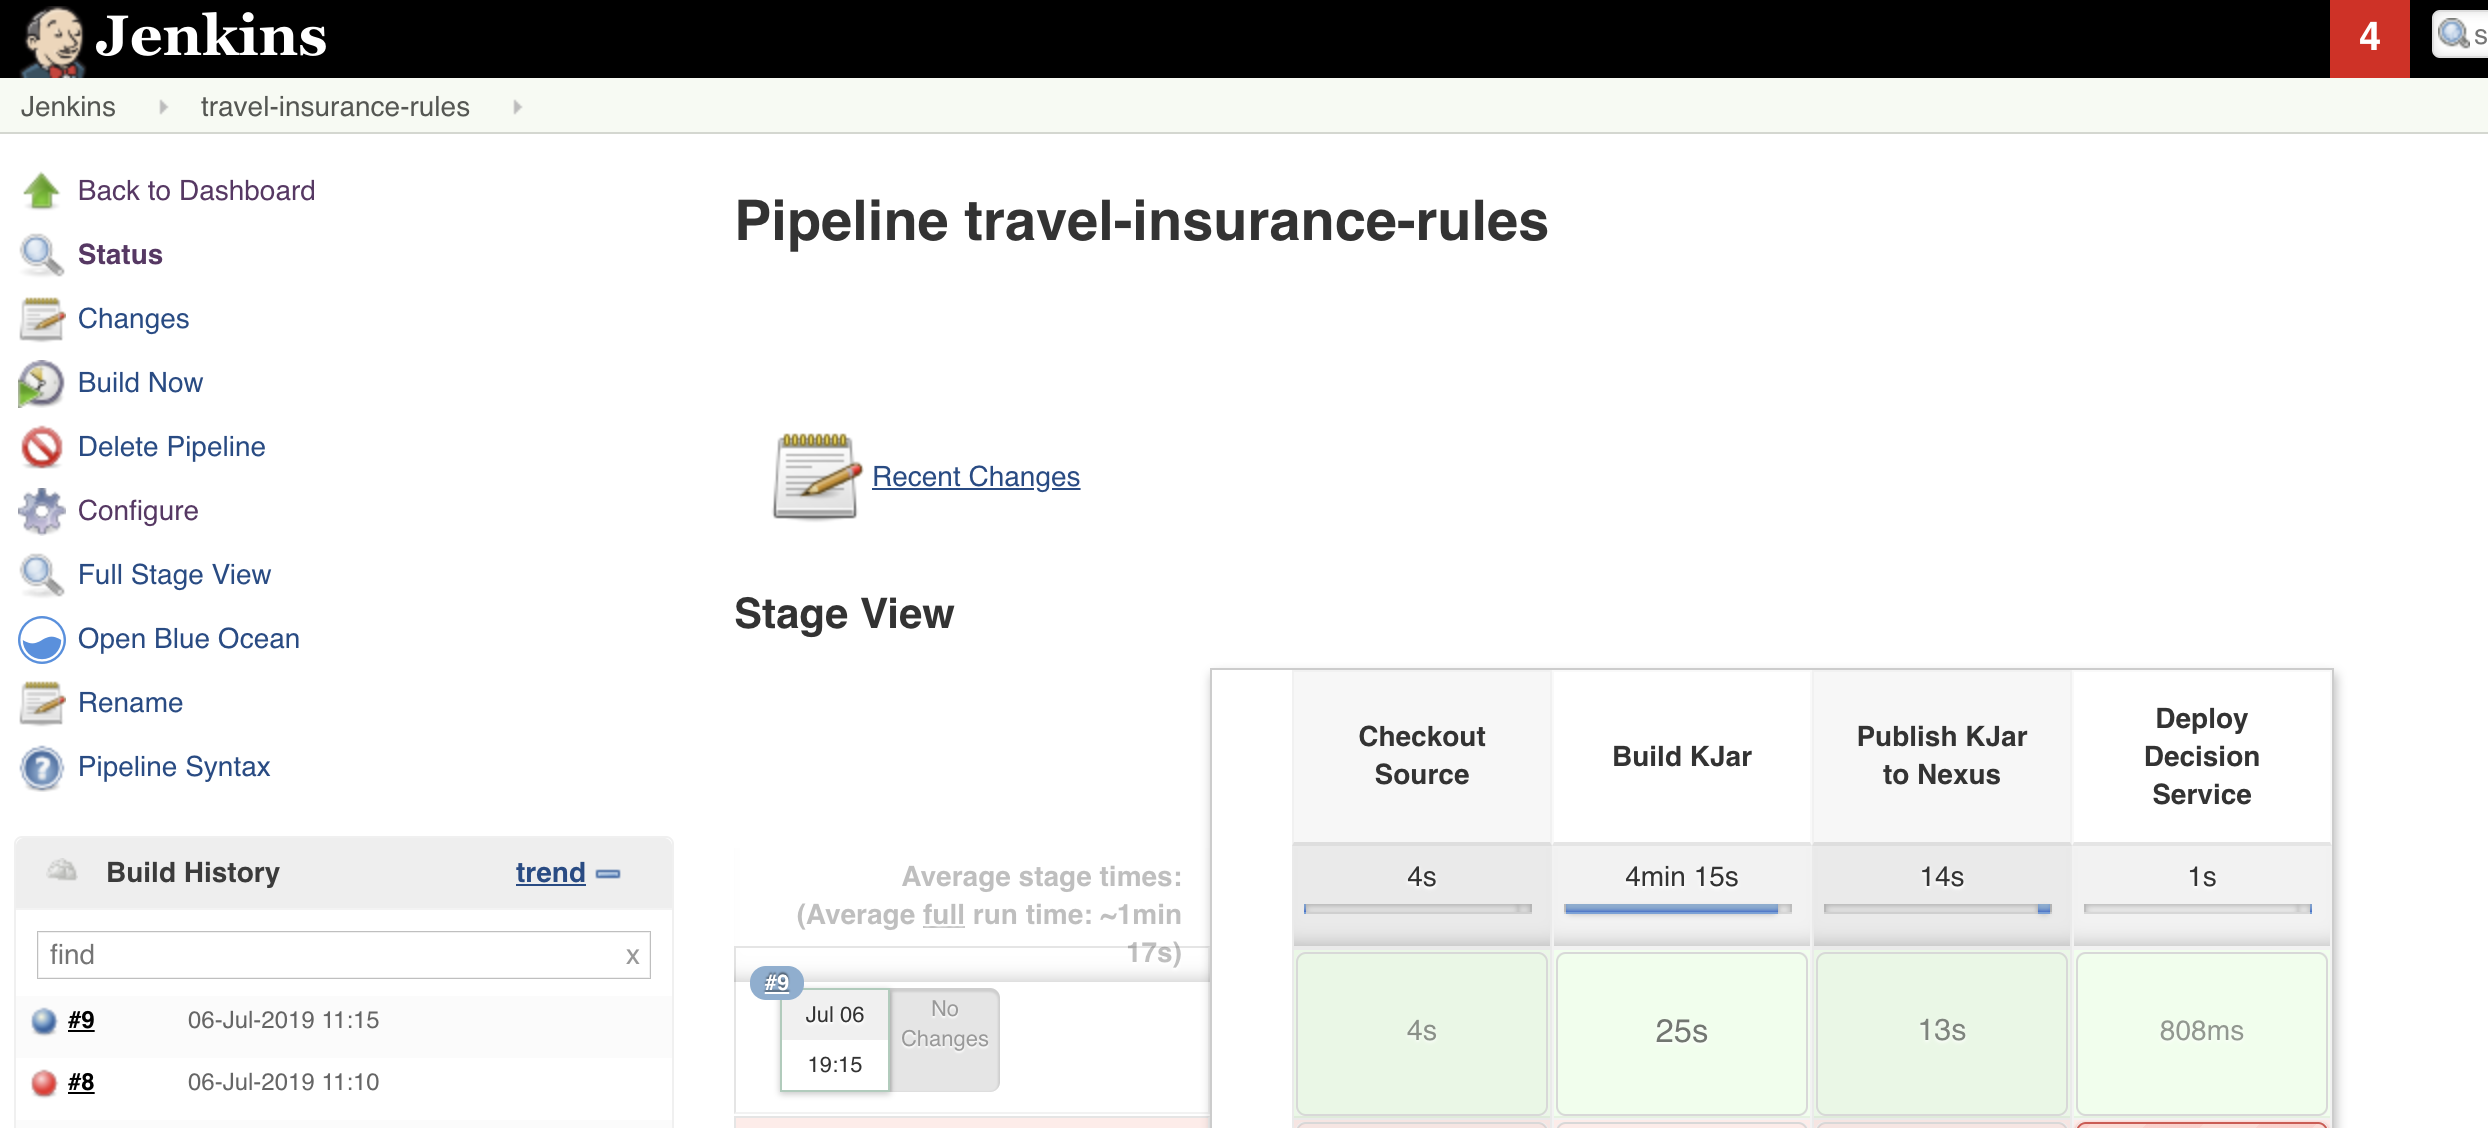
A Success Triggered Jenkins Build">
As you have noticed, there is a kie-server deployed in the DEV environment. In your actual environment, you may want to deploy your decision services into the kie-server in DEV first. Ensure it is working before you deploy into SIT environment. With the know-how from this article, you can change the process when and where to suit your environment.
What can you do next?
- Apply the same approach for your UAT environment.
- Introduce a container image repository into your environment to minimize the need for frequent decision service build when you need to deploy the same decision services into multiple environments. You may consider Red Hat Quay or other equivalent repositories such as Nexus for this.
- Introduce blue-green deployment to minimize the decision service deployment downtime.
- Introduce a governance process as part of your DevOps journey.
References
- How to enable the require image streams on OpenShift
- A complete guide on deploying RHDM on OpenShift
