
As I tried to create queues/topics installed within OpenShift 3.2 and accessible to external clients, I found that there were more things assumed about the process than not. So I decided to share my steps with others.
The only supported template for this scenario is via ssl transport with persistence
Big Assumptions:
- That OpenShift is installed and working
- Persistent volumes have been created in OpenShift to use
- You must have a persistent store (i.e. a PV must be set up) based upon the template we are using.
- The volume claim is made during the build. It must be smaller than the size of the PV
Let's Get Started:
You must create a set of keys to run A-MQ inside of Openshift. If you do not have an enterprise one, you can follow the steps below to create a set of SSL Keys:
- Create a keystore for the broker SERVER
$ keytool -genkey -alias amq-server -keyalg RSA keystore amq-server.ks ## - Export the broker SERVER certificate from the keystore
$ keytool -export -alias amq-server -keystore amq-server.ks -file amq-server_cert - Create the CLIENT keystore
$ keytool -genkey -alias amq-client -keyalg RSA -keystore amq-client.ks - Import the previous exported broker's certificate into a CLIENT truststore
keytool -import -alias amq-server -keystore amq-client.ts -file amq-server_cert - If you want to make trusted also the client, you must export the client's certificate from the keystore
keytool -export -alias amq-client -keystore amq-client.ks -file amq-client_cert - Import the client's exported certificate into a broker SERVER truststore
$ keytool -import -alias amq-client -keystore amq-server.ts -file amq-client_cert
A good tool to know to list the contents of the key : $ keytool -list -keystore amq-server.ks
MOVING ON TO OPENSHIFT
- Create a new project:
- $ oc new-project <projectName>
- Create a service account to be used for the A-MQ deployment:
- $ echo '{"kind": "ServiceAccount", "apiVersion": "v1", "metadata": {"name": "amq-service-account"}}' | oc create -f –
- Use the broker keyStore file to create the A-MQ secret:
- $ oc secrets new amq-app-secret broker.ks
- Add the secret to the service account created earlier:
- $ oc secrets add sa/amq-service-account secret/amq-app-secret
- Add the view role to the service account. This enables the service account to view all the resources in the amq-demo namespace, which is necessary for managing the cluster when using the Kubernetes REST API agent for discovering the mesh endpoints.
- $ oc policy add-role-to-user view system:serviceaccount:amq-demo:amq-service-account
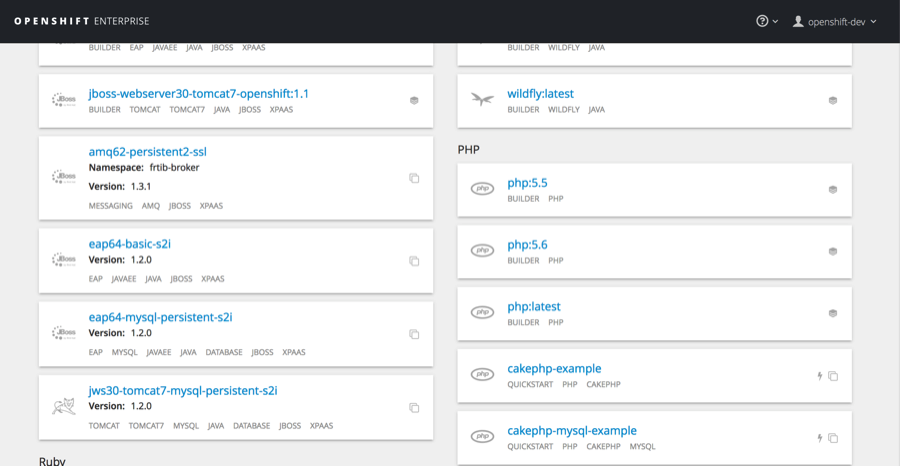
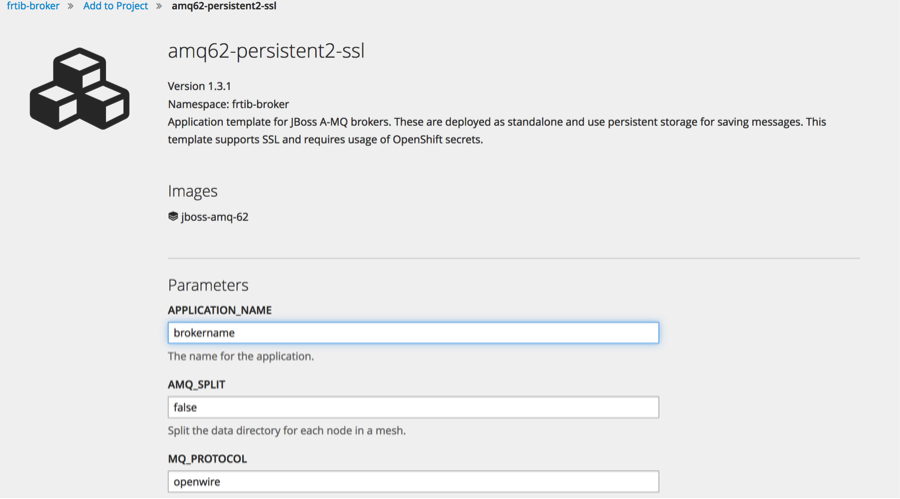
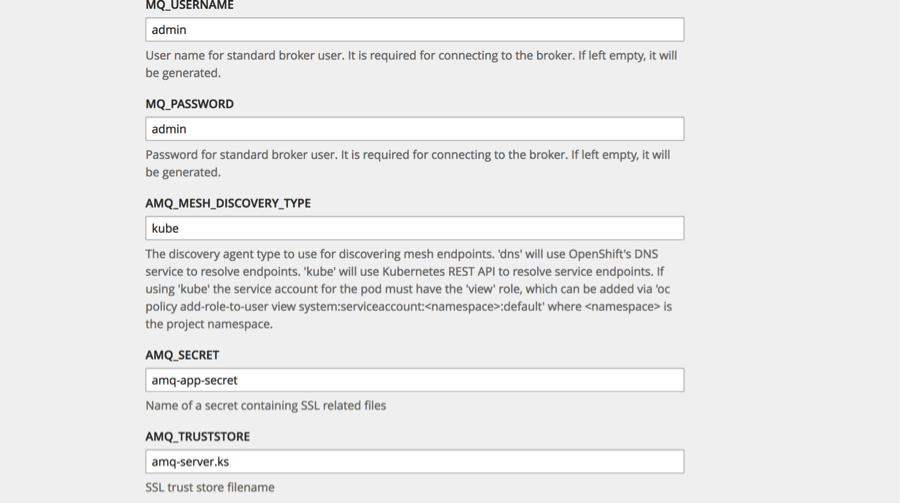
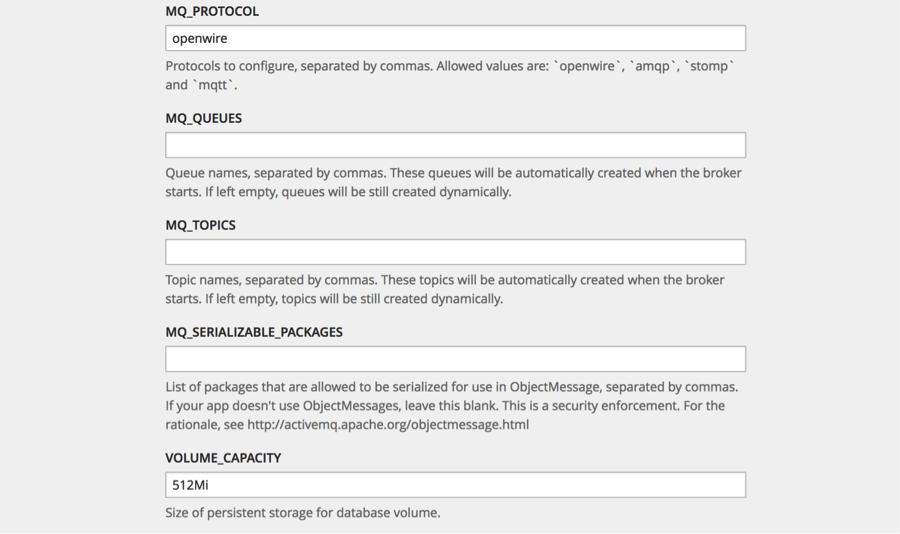
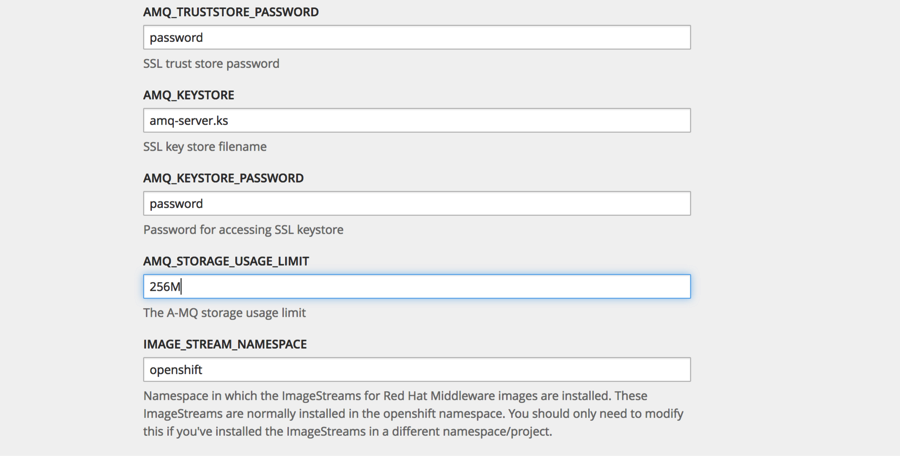
Now lets add the broker to the project. Click on add to project: Use the amq62-persistent-ssl template
Then fill out the template with the corresponding information:
(click on the images for enlarged view)
Then hit <create>. Feel free to add labels prior to creating broker.
In the pods log you want to see:
Loading message broker from: xbean:activemq.xml
INFO | Refreshing org.apache.activemq.xbean.XBeanBrokerFactory$1@39c0f4a: startup date [Tue Sep 20 18:37:20 EDT 2016]; root of context hierarchy
INFO | Creating Kubernetes discovery agent for kube://frtib-amq-tcp:61616/?transportType=tcp.
INFO | Using Persistence Adapter: KahaDBPersistenceAdapter[/opt/amq/data/split-1/serverData/kahadb]INFO | KahaDB is version 5
INFO | Recovering from the journal @1:1042226INFO | Recovery replayed 23 operations from the journal in 0.121 seconds.
INFO | Apache ActiveMQ 5.11.0.redhat-621084 (frtib-amq-1-7dnaa, ID:frtib-amq-1-7dnaa-48421-1474411042948-0:1) is starting
INFO | Listening for connections at: tcp://frtib-amq-1-7dnaa:61616?maximumConnections=1000&wireFormat.maxFrameSize=104857600
INFO | Connector openwire startedINFO | Listening for connections at: ssl://frtib-amq-1-7dnaa:61617?maximumConnections=1000&wireFormat.maxFrameSize=104857600
INFO | Connector ssl started
INFO | Starting OpenShift discovery agent for service frtib-amq-tcp transport type tcp
INFO | Network Connector DiscoveryNetworkConnector:NC:BrokerService[frtib-amq-1-7dnaa] started
INFO | Apache ActiveMQ 5.11.0.redhat-621084 (frtib-amq-1-7dnaa, ID:frtib-amq-1-7dnaa-48421-1474411042948-0:1) started
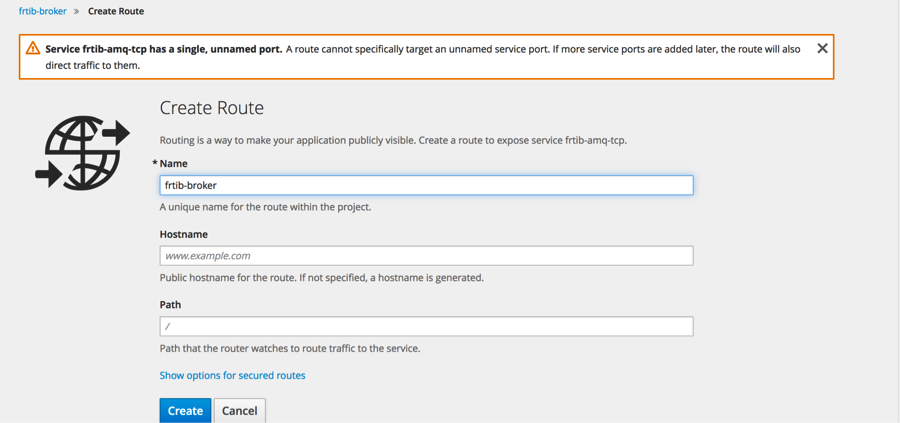
Now we must create a route that will expose this service to the outside world. Click on create route next to <applicationName>-amq-tcp-ssl Service.

This will start the create route dialog. Give the route a name and then select show options for secure routes.
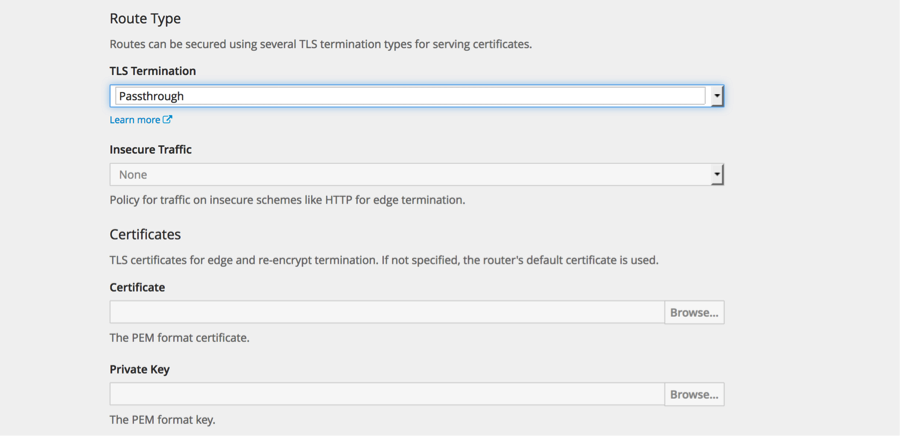
Select passthrough for the TLS Termination. From documentation: With passthrough termination, encrypted traffic is sent straight to the destination without the router providing TLS termination. Therefore no key or certificate is required.
Hit create.
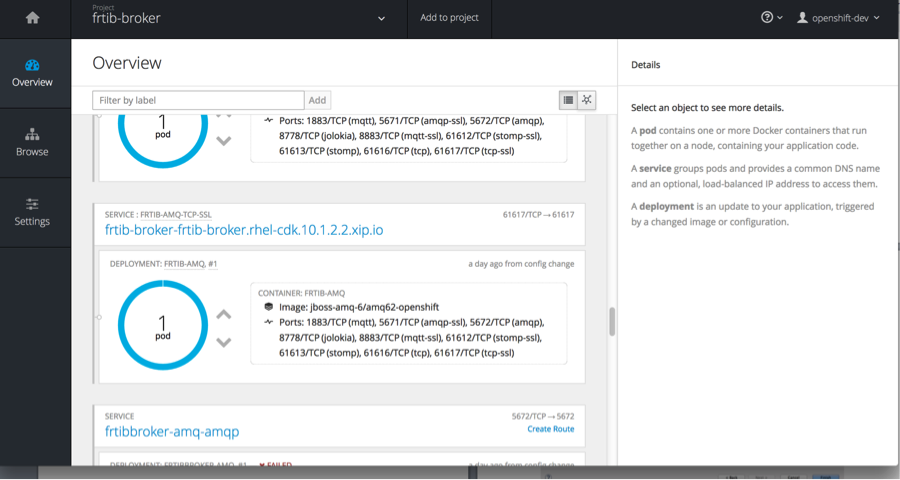
You should then see a route above the service as in below:
Now that the broker is ready to go in OpenShift, you can access it externally by some client. My example, will demonstrate Camel connectivity.
In Camel you want to setup a route that includes the ActiveMQ component. The configuration for accessing A-MQ broker in OpenShift should look similar to below:
<bean id="activemq" class="org.apache.activemq.ActiveMQSslConnectionFactory">
<property name="brokerURL" value="failover://ssl://frtib-broker-frtib-broker.rhel-cdk.10.1.2.2.xip.io:443" />
<property name="userName" value="admin" />
<property name="password" value="admin" />
<property name="trustStore" value="file:/Users/michelledavis/CDK21/cdk-2.1.0/cdk/components/rhel/rhel-ose/amq-client.ts" />
<property name="trustStorePassword" value="password" />
</bean>
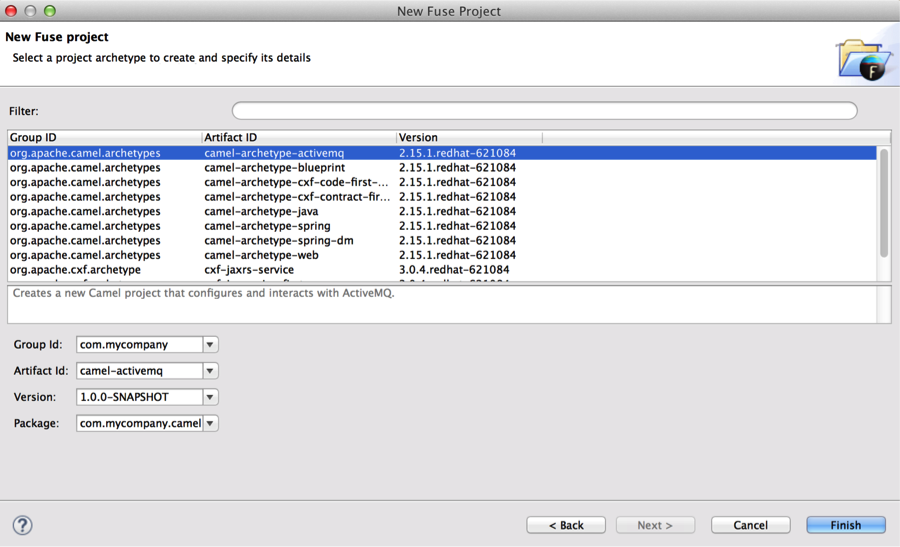
To try this out. We can use the Camel-archetype-activemq archetype to rapidly create an activemq camel Spring project.
Edit the camel context and replace the following:
<!-- This creates an embedded ActiveMQ Broker -->
<broker xmlns="http://activemq.apache.org/schema/core" useJmx="true" persistent="false">
<transportConnectors>
<transportConnector uri="tcp://localhost:61616" />
</transportConnectors>
</broker>
<!-- Lets connect the Camel ActiveMQ component to the embedded broker.
See http://camel.apache.org/activemq.html for more information.
-->
<bean id="activemq" class="org.apache.activemq.camel.component.ActiveMQComponent">
<property name="brokerURL" value="failover:tcp://localhost:61616"/>
</bean>
With this:
<bean id="activemq" class="org.apache.activemq.ActiveMQSslConnectionFactory">
<property name="brokerURL" value="failover://ssl://<openshift-service>:443" />
<property name="userName" value="<username>" />
<property name="password" value=<password>" />
<property name="trustStore" value="file<directory of store> " />
<property name="trustStorePassword" value="<password>" />
</bean>
In the eclipse console window, you want to see:
[INFO] Starting Camel ...
[apache.camel.spring.Main.main()] MainSupport INFO Apache Camel 2.15.1.redhat-621084 starting
[apache.camel.spring.Main.main()] SpringCamelContext INFO Apache Camel 2.15.1.redhat-621084 (CamelContext: camel-1) is starting
[apache.camel.spring.Main.main()] ManagedManagementStrategy INFO JMX is enabled
[intosh.local:1099/jmxrmi/camel] DefaultManagementAgent INFO JMX Connector thread started and listening at: service:jmx:rmi:///jndi/rmi://Macintosh.local:1099/jmxrmi/camel
[apache.camel.spring.Main.main()] DefaultTypeConverter INFO Loaded 186 type converters
[apache.camel.spring.Main.main()] SpringCamelContext INFO AllowUseOriginalMessage is enabled. If access to the original message is not needed, then its recommended to turn this option off as it may improve performance.
[apache.camel.spring.Main.main()] SpringCamelContext INFO StreamCaching is not in use. If using streams then its recommended to enable stream caching. See more details at http://camel.apache.org/stream-caching.html
[apache.camel.spring.Main.main()] FileEndpoint INFO Endpoint is configured with noop=true so forcing endpoint to be idempotent as well
[apache.camel.spring.Main.main()] FileEndpoint INFO Using default memory based idempotent repository with cache max size: 1000
[apache.camel.spring.Main.main()] XPathBuilder INFO Created default XPathFactory com.sun.org.apache.xpath.internal.jaxp.XPathFactoryImpl@5667f8ea
[apache.camel.spring.Main.main()] SpringCamelContext INFO Route: route1 started and consuming from: Endpoint[file://src/data?noop=true]
[ ActiveMQ Task-1] FailoverTransport INFO Successfully connected to ssl://frtib-broker-frtib-broker.rhel-cdk.10.1.2.2.xip.io:443
[pache.camel.spring.Main.main()] SpringCamelContext INFO Route: route2 started and consuming from: Endpoint[activemq://personnel.records]
[pache.camel.spring.Main.main()] SpringCamelContext INFO Total 2 routes, of which 2 is started.
[pache.camel.spring.Main.main()] SpringCamelContext INFO Apache Camel 2.15.1.redhat-621084 (CamelContext: camel-1) started in 1.397 seconds
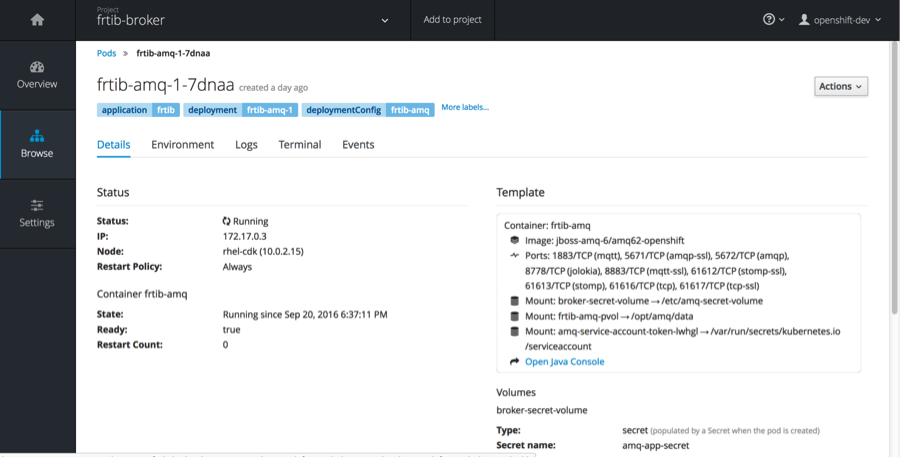
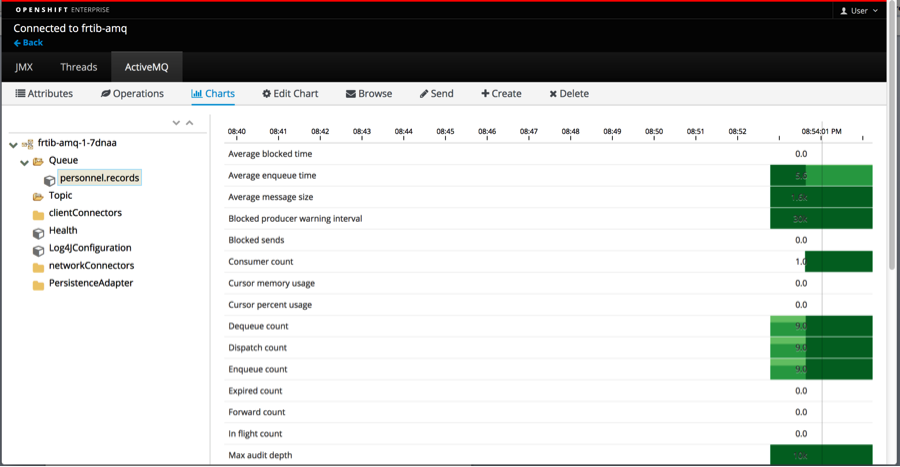
In the Pods detail window you can start the activemq console by selecting Open Java Console
Here you will find statistics about the broker.

Now scale up to 2 or 3 pods. You will find that when you start the camel route again, it will go to the newly created pod (#2). Now kill that pod, oc delete pod <podName>. You will see in the eclipse console:
[k.10.1.2.2.xip.io/10.1.2.2:443] FailoverTransport WARN Transport (ssl://frtib-broker-frtib-broker.rhel-cdk.10.1.2.2.xip.io/10.1.2.2:443) failed, attempting to automatically reconnect
java.io.EOFException
at java.io.DataInputStream.readInt(DataInputStream.java:392)
at org.apache.activemq.openwire.OpenWireFormat.unmarshal(OpenWireFormat.java:258)
at org.apache.activemq.transport.tcp.TcpTransport.readCommand(TcpTransport.java:221)
at org.apache.activemq.transport.tcp.TcpTransport.doRun(TcpTransport.java:213)
at org.apache.activemq.transport.tcp.TcpTransport.run(TcpTransport.java:196)
at java.lang.Thread.run(Thread.java:745)
[1) thread #2 - file://src/data] route1 INFO received file and putting on queue
[ ActiveMQ Task-3] FailoverTransport WARN Failed to connect to [ssl://frtib-broker-frtib-broker.rhel-cdk.10.1.2.2.xip.io:443] after: 10 attempt(s) continuing to retry.
[ ActiveMQ Task-1] FailoverTransport WARN Failed to connect to [ssl://frtib-broker-frtib-broker.rhel-cdk.10.1.2.2.xip.io:443] after: 10 attempt(s) continuing to retry.
[ ActiveMQ Task-1] FailoverTransport INFO Successfully connected to ssl://frtib-broker-frtib-broker.rhel-cdk.10.1.2.2.xip.io:443
[ ActiveMQ Task-3] FailoverTransport INFO Successfully reconnected to ssl://frtib-broker-frtib-broker.rhel-cdk.10.1.2.2.xip.io:443
Hope this helps....
